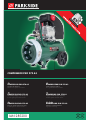
Parkside PKO 270 A3 Operation and Safety Notes
- Kategorie
- Luftkompressoren
- Typ
- Operation and Safety Notes
Dieses Handbuch eignet sich auch für

IAN 285200
COMPRESSOR PKO 270 A3
HU SI
CZ SK
COMPRESSOR PKO 270 A3
Operation and Safety Notes
Translation of original operation manual
GB
KOMPRESSZOR PKO 270 A3
Kezelési és biztonsági utalások
Az originál használati utasítás fordítása
HU
KOMPRESOR PKO 270 A3
Navodila za upravljanje in varnostna opozorila
Prevod originalnega navodila za uporabo
SI
KOMPRESOR PKO 270 A3
Pokyny pro obsluhu a bezpečnostní pokyny
Překlad originálního provozního návodu
CZ
KOMPRESOR PKO 270 A3
Pokyny pre obsluhu a bezpečnostné pokyny
Preklad originálneho návodu na obsluhu
SK AT
KOMPRESSOR PKO 270 A3
Bedienungs- und Sicherheitshinweise
Originalbetriebsanleitung
DE
CH

GB Operation and Safety Notes Page 07
HU Kezelési és biztonsági utalások Oldal 15
SI Navodila za upravljanje in varnostna opozorila Stran 24
CZ Pokyny pro obsluhu a bezpečnostní pokyny Strana 32
SK Pokyny pre obsluhu a bezpečnostné pokyny Strana 40
DE / AT / CH Bedienungs- und Sicherheitshinweise Seite 48
Before reading, unfold the page containing the illustrations and familiarise yourself with all functions of the device.
GB
Olvasás előtt kattintson az ábrát tartalmazó oldalra és végezetül ismerje meg a készülék mindegyik funkcióját.
HU
Pred branjem odprite stran s slikami in se nato seznanite z vsemi funkcijami naprave.
SI
Před čtením si otevřete stranu s obrázky a potom se seznamte se všemi funkcemi přístroje.
CZ
Pred čítaním si odklopte stranu s obrázkami a potom sa oboznámte so všetkými funkciami prístroja.
SK
Klappen Sie vor dem Lesen die Seite mit den Abbildungen aus und machen Sie sich anschließend mit allen Funktionen des Gerätes vertraut.
DE AT CH

1
2 3
4 5
1
2
8
10
13
11
16 17
14
I
H
9
15
3
7
19
18
11
2321
9
15
24
11
34 5 67
4
3
3
5
6
7
7
21
21
23
23
24
24
24
22
25
ON
OFF
12

10 11
6 7
12 13
8 9
9
B
A
D
E
C
C
D
F
15
G
max
min
18
16
20
24
22
25

GB
Read and follow the operating and safety instructions before you start working with this power
tool.
HU
Üzembe helyezés előtt olvassa el a kezelési útmutatót és a biztonsági előírásokat, és mindig tartsa
be azokat!.
SI
Pred zagonom preberite navodila za uporabo in varnostne napotke ter jih upoštevajte!
CZ
Před uvedením do provozu si přečtěte a dodržujte návod k obsluze a bezpečnostní pokyny.
SK
Pred uvedením do prevádzky si prečítajte návod na obsluhu a bezpečnostné upozornenia a
dodržiavajte ich.
DE AT CH
Vor Inbetriebnahme Bedienungsanleitung und Sicherheitshinweise lesen und beachten!
GB
Beware of electrical voltage!
HU
Figyelmeztetés az elektromos feszültség elöl!
SI
Opozorilo pred električno napetostjo!
CZ
Varování před elektrickým napětím!
SK
Výstraha pred elektrickým napätím!
DE AT CH
Warnung vor elektrischer Spannung!
GB
Warning! The equipment is remote-controlled and may start-up without warning.
HU
Figyelmeztetés! Az egység távirányított és figyelmeztetés nélkül megindulhat.
SI
Opozorilo! Enota se upravlja na daljavo in se lahko zažene brez opozorila.
CZ
Varování! Jednotka je řízena dálkově a může se spustit bez varování.
SK
Výstraha! Jednotka je riadená diaľkovo a môže sa rozbehnúť bez predchádzajúceho varovania.
DE AT CH
Warnung! Die Einheit ist ferngesteuert und darf ohne Warnung anlaufen
GB
Caution! Before using for the first time, check the oil level and replace the oil sealing plug!
HU
Figyelem! Az első beüzemeltetés előtt leellenőrizni az olajállást és kicserélni az olajlezáró
dugót!
SI
Pozor! Pred prvim zagonom preverite stanje olja in zamenjajte zamašek za olje!
CZ
Pozor! Před prvním uvedením do provozu zkontrolovat stav oleje a vyměnit uzavírací zátku oleje!
SK
Pozor! Pred uvedením do prevádzky skontrolovať stav oleja a vymeniť olejovú zátku!
DE AT CH
Achtung! Vor Erstinbetriebnahme Ölstand überprüfen und Ölverschlussstopfen austauschen!
GB
Wear ear-muffs. The impact of noise can cause damage to hearing.
HU
Hordjon egy zajcsökkentő fülvédőt. A zaj behatása hallásvesztéshez vezethet.
SI
Uporabljajte zaščito za ušesa. Učinkovanje hrupa lahko povzroči izgubo sluha.
CZ
Noste ochranu sluchu. Působení hluku může způsobit ztrátu sluchu.
SK
Používajte ochranu sluchu. Pôsobenie hluku môže spôsobiť poškodenie sluchu.
DE AT CH
Tragen Sie einen Gehörschutz. Die Einwirkung von Lärm kann Gehörverlust bewirken.
GB
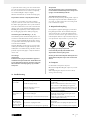
Beware of hot parts!
(G Fig.12)
HU
Figyelmeztetés a forró részek elöl!
SI
Opozorilo pred vročimi deli!
CZ
Varování před horkými díly!
SK
Výstraha pred horúcimi dielmi!
DE AT CH
Warnung vor heißen Teilen!

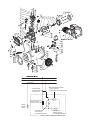
Blau, blue, bleu
Grün/Gelb, green/yellow,
verdure/jaune
L
N
Druckschalter
Pressure Switch
Manocontact
Motorbetriebskondensator,
running capacitor,
condensateur de fonctionnement
Hauptwicklung,
main winding,
enroulement principal
Hilfswicklung,
auxiliary winding,
enroulement auxiliaire
Thermoschutzschalter,
thermal protector,
protection thermique
Masse,
ground,
masse

7
GB
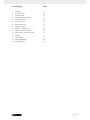
Table of contents: Page:
1. Introduction 8
2. Device description 8
3. Scope of delivery 8
4. Intended use 9
5. Safety information 9
6. Technical data 11
7. Before starting the equipment 11
8. Attachment and operation 11
9. Electrical connection 12
10. Cleaning, maintenance and storage 12
11. Disposal and recycling 13
12. Transport 13
13. Troubleshooting 13
14. Warranty certificate 14
15. Declaration of conformity 57

8
GB
1. Introduction
MANUFACTURER:
scheppach
Fabrikation von Holzbearbeitungsmaschine GmbH
Günzburger Straße 69
D-89335 Ichenhausen
DEAR CUSTOMER,
we hope your new tool brings you much enjoyment and
success.
NOTE:
According to the applicable product liability laws, the
manufacturer of the device does not assume liability for
damages to the product or damages caused by the product
that occurs due to:
• Improper handling,
• Non-compliance of the operating instructions,
• Repairs by third parties, not by authorized service tech-
nicians,
• Installation and replacement of non-original spare
parts,
• Application other than specified,
• A breakdown of the electrical system that occurs due to
the non-compliance of the electric regulations and local
regulations.
We recommend:
Read through the complete text in the operating instruc-
tions before installing and commissioning the device. The
operating instructions are intended to help the user to
become familiar with the machine and take advantage of
its application possibilities in accordance with the recom-
mendations. The operating instructions contain important
information on how to operate the machine safely, profes-
sionally and economically, how to avoid danger, costly
repairs, reduce downtimes and how to increase reliability
and service life of the machine.
In addition to the safety regulations in the operating instruc-
tions, you have to meet the applicable regulations that ap-
ply for the operation of the machine in your country. Keep
the operating instructions package with the machine at all
times and store it in a plastic cover to protect it from dirt
and moisture. Read the instruction manual each time before
operating the machine and carefully follow its information.
The machine can only be operated by persons who were in-
structed concerning the operation of the machine and who
are informed about the associated dangers. The minimum
age requirement must be complied with.
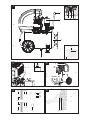
2. Device description (Fig. 1-13)
1. Transport handle
2. Pressure switch
3. Quick-lock coupling (regulated compressed air)
4. Pressure gauge (for reading the preset vessel pressure)
5. Pressure regulator
6. Pressure gauge (for reading the vessel pressure)
7. Quick-lock coupling (unregulated compressed air)
8. Pressure vessel
9. Supporting foot
10. Drain plug for condensation water
11. Wheel
12. Oil drain plug
13. Compressor pump
14. Compressed air hose
15. Air filter
16. Oil sealing plug
17. ON/OFF switch
18. Oil – level window
19. Safety valve
20. Oil filler opening
21. Flange screw
22. Washer
23. Nut
24. Flange nut
25. Screw
3. Scope of delivery
1x Air filter
2x Supporting foot
2x Wheel
1x Mounting material
1x Oil sealing plug
1x Compressed air hose
1x Translation of Original Operating Manual
• Open the packaging and remove the device carefully.
• Remove the packaging material as well as the packag-
ing and transport bracing (if available).
• Check that the delivery is complete.
• Check the device and accessory parts for transport
damage.
• If possible, store the packaging until the warranty pe-
riod has expired.
ATTENTION
The device and packaging materials are not toys! Chil-
dren must not be allowed to play with plastic bags,
film and small parts! There is a risk of swallowing and
suffocation!

9
GB
4. Intended use
The compressor is designed to generate compressed air for
compressed-air driven tools which can be driven with an air
volume of up to approx. 260 l/min (e.g. tire inflator, blow-
out pistol and paint spray gun). Due to the limited air output
it is not possible to use the compressor to drive tools with
very high air consumption (for example orbital sanders, die
grinders and hammer screwdrivers).
The equipment is to be used only for its prescribed purpose.
Any other use is deemed to be a case of misuse. The user
/ operator and not the manufacturer will be liable for any
damage or injuries of any kind caused as a result of this.
Please note that our equipment has not been designed for
use in commercial, trade or industrial applications. Our
warranty will be voided if the equipment is used in com-
mercial, trade or industrial businesses or for equivalent
purposes.
5. Safety information
m Attention! The following basic safety measures must be
observed when using electric tools for protection against
electric shock, and the risk of injury and fire. Read all these
notices before using the electric tool and keep the safety
instructions for later reference.
m Attention! The following basic safety actions must be
taken when using this compressor in order to protect the us-
er from electric shocks and the risk of injury and fi re. Read
and follow these instructions before using the equipment.
Safe work
1 Keep the work area orderly
– Disorder in the work area can lead to accidents.
2 Take environmental influences into account
– Do not expose electric tools to rain.
– Do not use electric tools in a damp or wet environ-
ment. There is a risk of electric shock!
– Make sure that the work area is well-illuminated.
– Do not use electric tools where there is a risk of
fire or explosion.
3 Protect yourself from electric shock
– Avoid physical contact with earthed parts (e.g.
pipes, radiators, electric ranges, cooling units).
4 Keep children away
– Do not allow other persons to touch the equipment
or cable, keep them away from your work area.
5 Securely store unused electric tools
– Unused electric tools should be stored in a dry,
elevated or closed location out of the reach of
children.
6 Do not overload your electric tool
– They work better and more safely in the specified
output range.
7 Wear suitable clothing
– Do not wear wide clothing or jewellery, which can
become entangled in moving parts.
– Rubber gloves and non-slip shoes are recom-
mended when working outdoors.
– Tie long hair back in a hair net.
8 Do not use the cable for purposes for which it is not
intended
– Do not use the cable to pull the plug out of the
outlet. Protect the cable from heat, oil and sharp
edges.
9 Take care of your tools
– Keep your compressor clean in order to work well
and safely.
– Follow the maintenance instructions.
– Check the connection cable of the electric tool
regularly and have it replaced by a recognised
specialist when damaged.
– Check extension cables regularly and replace
them when damaged.
10 Pull the plug out of the outlet
– During non-use of the electric tool or prior to
maintenance and when replacing tools such as
saw blades, bits, milling heads.
11 Avoid inadvertent starting
– Make sure that the switch is switched off when
plugging the plug into an outlet.
12 Use extension cables for outdoors
– Only use approved and appropriately identified
extension cables for use outdoors.
– Only use cable reels in the unrolled state.
13 Remain attentive
– Pay attention to what you are doing. Remain
sensible when working. Do not use the electric tool
when you are distracted.
14 Check the electric tool for potential damage
– Protective devices and other parts must be care-
fully inspected to ensure that they are fault-free
and function as intended prior to continued use of
the electric tool.
– Check whether the moving parts function fault-
lessly and do not jam or whether parts are dam-
aged. All parts must be correctly mounted and
all conditions must be fulfilled to ensure fault-free
operation of the electric tool.
– Damaged protective devices and parts must be
properly repaired or replaced by a recognised
workshop, insofar as nothing different is specified
in the operating manual.
– Damaged switches must be replaced at a cus-
tomer service workshop.
– Do not use any faulty or damaged connection
cables.
– Do not use any electric tool on which the switch
cannot be switched on and off.
15 Have your electric tool repaired by a qualified
electrician
– This electric tool conforms to the applicable safety
regulations. Repairs may only be performed by an
electrician using original spare parts. Otherwise
accidents can occur.

10
GB
16 Important!
– For your own safety you must only use the acces-
sories and additional units listed in the operating
instructions or recommended or specified by the
manufacturer. The use of mounted tools or ac-
cessories other than those recommended in the
operating instructions or catalogue may place
your personal safety at risk.
17 Noise
– Wear ear muffs when you use the compressor.
18 Replacing the power cable
– To prevent hazards, leave the replacement of
damaged power cables strictly to the manufac-
turer or a qualified electrician. There is a risk of
electric shock!
19 Inflating tires
– Directly after inflating tires, check the pressure
with a suitable pressure gauge, for example at
your filling station.
20 Roadworthy compressors for building site operations
– Make sure that all lines and fittings are suitable for
the maximum permissible operating pressure of
the compressor.
21 Place of installation
– Set up the compressor on an even surface.
22 Supply hoses at pressures above 7 bar should be
equipped with a safety cable (e.g. a wire rope).
ADDITIONAL SAFETY INSTRUCTIONS
Safety instructions for working with compressed air
and blasting guns
• The compressor pump and lines can become very hot
during operation. Touching these parts will burn you.
• The air which is sucked in by the compressor must be
kept free of impurities that could cause fires or explo-
sions in the compressor pump.
• When releasing the hose coupling, hold the hose cou-
pling piece with your hand. This way, you can protect
yourself against injury from the rebounding hose.
• Wear safety goggles when working with the blow-out
pistol. Foreign bodies or blown off parts can easily
cause injuries.
• Do not blow at people with the blow-out pistol and do
not clean clothes while being worn. Risk of injury!
Safety information for paint spraying
• Do not process any paints or solvents with a flash point
below 55° C. There is a risk of explosion!
• Do not heat up paints or solvents. There is a risk of ex-
plosion!
• If hazardous liquids are processed, wear protective fil-
ter units (face guards). Also, adhere to the safety infor-
mation provided by the manufacturers of such liquids.
• The details and designations of the Ordinance on Haz-
ardous Substances, which are displayed on the outer
packaging of the processed material, must be ob-
served.
• Additional protective measures are to be undertaken if
necessary, particularly the wearing of suitable clothing
and masks.
• Do not smoke during the spraying process and/or in the
work area. There is a risk of explosion! Paint vapors are
easily combustible.
• Never set up or operate the equipment in the vicinity of
a fire place, open lights or sparking machines.
• Do not store or eat food and drink in the work area.
Paint vapors are harmful to your health.
• The work area must exceed 30 m
3
and sufficient ven-
tilation must be ensured during spraying and drying.
Do not spray against the wind. Always adhere to the
regulations of the local police authority when spraying
combustible or hazardous materials.
• Do not process media such as white spirit, butyl alcohol
and methylene chloride with the PVC pressure hose.
These media will destroy the pressure hose.
Operating pressure vessels
• You must keep your pressure vessel in good working
order, operate the vessel correctly, monitor the vessel,
carry out necessary maintenance and repair work im-
mediately and meet the relevant safety precautions.
• The supervisory authority may enforce essential control
measures in individual cases.
• A pressure vessel is not allowed to be used if it has
faults or deficiencies that can endanger workers or third
parties.
• Check the pressure vessel for signs of rust and dam-
age each time before using. Do not use the compressor
with a damaged or rusty pressure vessel. If you discover
any damage, then please contact the customer service
workshop.
Do not lose these safety instructions
Residual risk
Observe the specified maintenance and safety instructions
in the instruction manual.
Always be attentive at work and keep third persons at a safe
distance from your workplace.
Even with proper use of the device, a certain residual risk
remains, which can not be excluded. The following poten-
tial hazards can be derived from the type and design of
the device:
unintentional commissioning of the product.
Hearing loss if no suitable hearing protection is worn.
Wear safety glasses to prevent your eyes and face from
dust and dirt particles.
Inhalation of whirled-up dust and dirt particles.

11
GB
6. Technical data
Mains connection 220 - 240 V ~ 50Hz
Motor rating W
1800
Operating mode
S1
Compressor speed
2850 min
-1
Pressure vessel capacity (in liters)
approx. 24
Operating pressure
approx. 10 bar
Theoretical intake capacity (l/min)
approx. 260
sound power level L
WA
97 dB(A)
uncertainty K
WA
3 dB
Protection type
IP20
Weight of the unit in kg
approx. 27
Oil (15W 40) l
approx. 0,6
Max. altitude
(above mean sea level)
1000 m
The noise emission values were measured in accordance
with EN ISO 3744:1995.
Wear hearing protection.
The effects of noise can cause a loss of hearing.
7. Before starting the equipment
Before you connect the equipment to the mains supply
make sure that the data on the rating plate are identical to
the mains data.
• Check the equipment for damage which may have oc-
curred in transit. Report any damage immediately to
the transport company which was used to deliver the
compressor.
• Install the compressor near the point of consumption.
• Avoid long air lines and supply lines (extension cables).
• Make sure that the intake air is dry and dustfree.
• Do not install the compressor in a damp or wet room.
• The compressor may only be used in suitable rooms
(with good ventilation and an ambient temperature from
+5 °C to 40 °C). There must be no dust, acids, vapors,
explosive gases or inflammable gases in the room.
• The compressor is designed to be used in dry rooms. It
is prohibited to use the compressor in areas where work
is conducted with sprayed water.
• The oil level in the compressor pump has to be checked
before putting the equipment into operation.
8. Attachment and operation
m Important!
You must fully assemble the appliance before using it
for the first time!
You will require the following tools for assembly and instal-
lation: Open-ended wrench size 12, 13 and 14 mm (not
included)
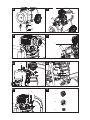
8.1 Fitting the wheels (Fig. 4,5)
• Fit the supplied wheels as shown.
8.2 Fitting the supporting feet (Fig. 4,6)
• Fit the supplied supporting foot as shown.
8.3 Fitting the air filter (Fig. 7,8)
• Remove the transportation stop (B) and screw the air fil-
ter (15) to the equipment.
8.4 Changing the transportation cover (A) (Fig. 9,10)
• Remove the transportation cover from the oil filter open-
ing (20) and insert the supplied oil sealing plug (16)
into the oil filler opening.
8.5 Mains connection
• The compressor is equipped with a mains cable with
shock-proof plug. This can be connected to any 220 -
240 V~ 50 Hz shock-proof socket.
• Before you use the machine, make sure that the mains
voltage is the same as the operating voltage (see the
rating plate).
• Long supply cables, extensions, cable reels etc. cause a
drop in voltage and can impede motor start-up.
• At low temperatures below +5°C, sluggishness may
make starting difficult or impossible.
8.6 ON/OFF switch (Fig. 2)
• Pull the ON/OFF switch (17) upwards to switch on the
compressor. To switch off the compressor, press the
ON/OFF switch down.
8.7 Setting the pressure (Fig. 1,3)
• Use the pressure regulator (5) to set the pressure on the
pressure gauge (4).
• The set pressure can be drawn from the quick lock cou-
pling (3).
• The vessel pressure can be read off the pressure gauge
(6).
• The vessel pressure is drawn from the quick lock cou-
pling (7).
8.8 Setting the pressure switch (Fig. 1)
• The pressure switch (2) is set at the factory.
Cut-in pressure approx. 8 bar
Cut-out pressure approx. 10 bar.
8.9 Fitting the compressed air hose (Fig. 1, 3)
• Use the compressed air hose (14) if you intend to carry
out work at a greater distance from the compressor. To
do so, connect the nipple (H) on the compressed air
hose to one of the quick release couplings (3, 7). Then
attach the compressed air tool to the quick-release cou-
pling (I) on the compressed air hose.

12
GB
9. Electrical connection
The electrical motor installed is connected and ready
for operation. The connection complies with the appli-
cable VDE and DIN provisions.
The customer‘s mains connection as well as the exten-
sion cable used must also comply with these regula-
tions.
Important information
In the event of an overloading the motor will switch itself off.
After a cool-down period (time varies) the motor can be
switched back on again.
Damaged electrical connection cable
The insulation on electrical connection cables is often dam-
aged.
This may have the following causes:
• Passage points, where connection cables are passed
through windows or doors.
• Kinks where the connection cable has been improperly
fastened or routed.
• Places where the connection cables have been cut due
to being driven over.
• Insulation damage due to being ripped out of the wall
outlet.
• Cracks due to the insulation ageing.
Such damaged electrical connection cables must not be
used and are life-threatening due to the insulation damage.
Check the electrical connection cables for damage regu-
larly. Make sure that the connection cable does not hang on
the power network during the inspection.
Electrical connection cables must comply with the applica-
ble VDE and DIN provisions. Only use connection cables
with the marking „H05VV-F“.
The printing of the type designation on the connection
cable is mandatory.
AC motor
• The mains voltage must be 220 - 240 V~ 50 Hz.
• Extension cables up to 25 m long must have a cross-
section of 1.5 mm
2
.
Connections and repairs of electrical equipment may only
be carried out by an electrician.
Please provide the following information in the event of any
enquiries:
• Type of current for the motor
• Machine data - type plate
• Machine data - type plate
10. Cleaning, maintenance, and storage
m Important!
Pull out the power plug before doing any cleaning and
maintenance work on the equipment. Risk of injury from
electric shock!
m Important!
Wait until the equipment has cooled down completely! Risk
of burns!
m Important!
Always depressurize the equipment before carrying out any
cleaning and maintenance work! Risk of injury!
10.1 Cleaning
• Keep the equipment free of dirt and dust as far as pos-
sible. Wipe the equipment with a clean cloth or blow it
down with compressed air at low pressure.
• We recommend that you clean the equipment immedi-
ately after you use it.
• Clean the equipment regularly with a damp cloth and
some soft soap. Do not use cleaningagents or solvents;
these may be aggressive to the plastic parts in the
equipment. Ensure that no water can get into the interior
of the equipment.
• You must disconnect the hose and any spraying tools
from the compressor before cleaning. Do not clean the
compressor with water, solvents or the like.
10.2 Maintenance work on the pressure vessel (Fig. 1)
m Important! To ensure a long service life of the pressure
vessel (8), drain off the condensed water by opening the
drain valve (10) each time after using. Release the vessel
pressure first (see 10.7.1). Open the drain screw by turning
counter-clockwise (looking at the screw from the bottom
of the compressor) so that all the condensed water can run
out of the pressure vessel. Then close the drain screw again
(turn it clockwise). Check the pressure vessel for signs of
rust and damage each time before using. Do not use the
compressor with a damaged or rusty pressure vessel. If you
discover any damage, then please contact the customer
service workshop.
m Important!
The condensed water from the pressure vessel will
contain residual oil. Dispose of the condensed water
in an environmentally compatible manner at a suita-
ble collection point.
10.3 Safety valve (Fig. 3)
The safety valve (19) has been set for the highest permitted
pressure of the pressure vessel. It is prohibited to adjust the
safety valve or remove its seal. Actuate the safety valve
from time to time to ensure that it works when required. Pull
the ring with sufficient force until you can hear the com-
pressed air being released. Then release the ring again.
10.4 Checking the oil level at regular intervals (Fig. 11)
Place the compressor on a level and straight surface. The oil
level must be between the MAX and MIN marks on the oil
level window (Fig. 18).
Oil change: we recommend SAE 15W 40 or equivalent.
The original oil filling must be changed after 100 hours in
operation; thereafter the oil must be drained and replaced
with new oil after every 500 hours in operation.
10.5 Changing the oil (Fig. 1,10,11)
Switch off the engine and pull the mains plug out of the
socket. Remove the oil sealing plug (16). After releasing any
air pressure you can unscrew the oil drain plug (12) from the
compressor pump (13).

13
GB
To prevent the oil from running out in an uncontrolled man-
ner, hold a small metal chute under the opening and collect
the oil in a vessel. If the oil does not drain out completely,
we recommend tilting the compressor slightly.
When the oil has drained out, re-fit the oil drain plug (12).
Dispose of the old oil at a drop-off point for old oil.
To fill in the correct quantity of oil, make sure that the
compressor stands on an even surface. Fill new oil through
the oil filler opening (20) until it comes up to the maximum
level. This is marked with a red dot on the oil level window
(18) (Fig. 11). Do not exceed the maximum filling quantity.
Overfilling the equipment may result in damage. Reinsert
the oil sealing plug (16) into the oil filler opening (20).
10.6 Cleaning the intake filter (Fig. 3, 12, 13)
The intake filter prevents dust and dirt being drawn in. It is
essential to clean this filter after at least every 300 hours in
service. A clogged intake filter will decrease the compres-
sor’s performance dramatically. Open the thumb screw (E)
to the remove the intake filter.
Then pull off the filter cover (C). Now you can remove the
air filter (F) and the filter housing (D). Carefully tap out the
air filter, filter cover and filter housing. Then blow out these
parts with compressed air (approx. 3 bar) and reinstall in
reverse order.
10.7 Storage
m Important!
Pull out the mains plug and ventilate the equipment
and all connected pneumatic tools. Switch off the com-
pressor and make sure that it is secured in such a way
that it cannot be started up again by any unauthor-
ized person.
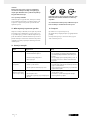
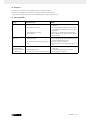
13. Troubleshooting
Fault Possible cause Remedy
The compressor
does not start.
• No supply voltage.
• Insufficient supply voltage.
• Outside temperature is too low.
• Motor is overheated.
• Check the supply voltage, the power plug and the
socket-outlet.
• Make sure that the extension cable is not too long.
Use an extension cable with large enough wires.
• Never operate with an outside temperature of below +5° C.
• Allow the motor to cool down. If necessary, remedy
the cause of the overheating.
The compressor
starts but there is no
pressure.
• The non-return valve (19) leaks.
• The seals are damaged.
• The drain plug for condensation water (10) leaks.
• Have a service center replace the non-return valve (19).
• Check the seals and have any damaged seals re-
placed by a service center.
• Tighten the screw by hand. Check the seal on the
screw and replace if necessary.
The compressor
starts, pressure is
shown on the pres-
sure gauge, but the
tools do not start.
• The hose connections have a leak.
• A quick-lock coupling has a leak.
• Insufficient pressure set on the pressure regulator (5).
• Check the compressed air hose and tools and replace
if necessary.
• Check the quick-lock coupling and replace if neces-
sary.
• Increase the set pressure with the pressure regulator.
m Important!
Store the compressor only in a dry location which is
not accessible to unauthorized persons. Always store
upright, never tilted! Oil may leak out!
10.7.1 Releasing excess pressure
Release the excess pressure by switching off the compressor
and using the compressed air which is still left in the pres-
sure vessel, e.g. with a compressed air tool running in idle
mode or with a blow-out pistol.
11. Disposal and recycling
The equipment is supplied in packaging to prevent it from
being damaged in transit. The raw materials in this pack-
aging can be reused or recycled. The equipment and its
accessories are made of various types of material, such as
metal and plastic. Defective components must be disposed
of as special waste. Ask your dealer or your local council.
The packaging is wholly composed of
environmentally-friendly materials that can be
disposed of at a local recycling centre.
Contact your local refuse disposal authority for more
details of how to dispose of your worn out electrical
devices.
12. Transport
Use the handle to transport the compressor.
Observe the weight when lifting the compressor (see Tech-
nical Data).
When transporting the compressor in a motor vehicle,
ensure good load securing.

14
GB
14. Warranty certificate
Dear Customer,
All of our products undergo strict quality checks to ensure that they reach you in perfect condition. In the unlikely event that your device
develops a fault, please contact our service department at the address shown on this guarantee card. Of course, if you would prefer
to call us then we are also happy to offer our assistance under the service number printed below. Please note the following terms under
which guarantee claims can be made:
• These guarantee terms cover additional guarantee rights and do not affect your statutory warranty rights. We do not charge you for
this guarantee.
• Our guarantee only covers problems caused by material or manufacturing defects, and it is restricted to the rectification of these
defects or replacement of the device. Please note that our devices have not been designed for use in commercial, trade or industrial
applications. Consequently, the guarantee is invalidated if the equipment is used in commercial, trade or industrial applications or for
other equivalent activities. The following are also excluded from our guarantee: compensation for transport damage, damage caused
by failure to comply with the installation/assembly instructions or damage caused by unprofessional installation, failure to comply
with the operating instructions (e.g. connection to the wrong mains voltage or current type), misuse or inappropriate use (such as over-
loading of the device or use of non-approved tools or accessories), failure to comply with the maintenance and safety regulations,
ingress of foreign bodies into the device (e.g. sand, stones or dust), effects of force or external influences (e.g. damage caused by the
device being dropped) and normal wear resulting from proper operation of the device.
The guarantee is rendered null and void if any attempt is made to tamper with the device.
• The guarantee is valid for a period of 3 years starting from the purchase date of the device. Guarantee claims should be submitted
before the end of the guarantee period within two weeks of the defect being noticed. No guarantee claims will be accepted after the
end of the guarantee period. The original guarantee period remains applicable to the device even if repairs are carried out or parts
are replaced. In such cases, the work performed or parts fitted will not result in an extension of the guarantee period, and no new
guarantee will become active for the work performed or parts fitted. This also applies when an on-site service is used.
• In order to assert your guarantee claim, please send your defective device postage-free to the address shown below. Please enclose
either the original or a copy of your sales receipt or another dated proof of purchase. Please keep your sales receipt in a safe place,
as it is your proof of purchase. It would help us if you could describe the nature of the problem in as much detail as possible. If the
defect is covered by our guarantee then your device will either be repaired immediately and returned to you, or we will send you a
new device.
Of course, we are also happy offer a chargeable repair service for any defects which are not covered by the scope of this guarantee or
for units which are no longer covered. To take advantage of this service, please send the device to our service address.

15
HU
Tartalomjegyzék: Oldal:
1. Bevezetés 16
2. A készülék leírása 16
3. Szállított elemek 16
4. Rendeltetésszerűi használat 17
5. Biztonsági utasítások 17
6. Technikai adatok 19
7. Beüzemeltetés előtt 19
8. Felépítés és kezelés 19
9. Elektromos csatlakoztatás 20
10. Tisztítás, karbantartás és tárolás 20
11. Megsemmisítés és újrahasznosítás 21
12. Szállítás 21
13. Hibaelhárítás 21
14. Jótállási Tájékoztató 22
15. Konformkijelentés 57

16
HU
1. Bevezetés
GYÁRTÓ:
scheppach
Fabrikation von Holzbearbeitungsmaschine GmbH
Günzburger Straße 69
D-89335 Ichenhausen
TISZTELT VÁSÁRLÓ!
Sok örömet és sikert kívánunk Önnek, amikor az új készülé-
két használja.
KEDVES VÁSÁRLÓ!
A hatályban lévő termékfelelősségi törvény értelmében a
berendezés gyártója nem vonható felelősségre a beren-
dezésen vagy vele kapcsolatban keletkező károkért a
következő esetekben:
• szakszerűtlen kezelés,
• a használati utasítások be nem tartása,
• harmadik személy által végzett, szakképzetlen javítá-
sok,
• nem eredeti alkatrészek beszerelése és cseréje,
• szakszerűtlen használat,
• az elektromos rendszer kiesése az elektromos előírá-
sok, illetve a VDE 0100, DIN 57113 / VDE 0113 sza-
bályozások be nem tartása miatt.
Javaslatok:
Mielőtt a berendezést összeszerelné, és üzembe helyezné
olvassa el a használati útmutató teljes szövegét.
Az üzemelési utasítások célja a készülékkel való ismerke-
désének megkönnyítése és a használati lehetőségeinek
megismertetése.
Az üzemelési utasítások fontos megjegyzéseket tartalmaz a
készülék biztonságos, szakszerű és gazdaságos haszná-
latával kapcsolatosan, a veszélyek elkerülésére, a javítási
költségek megspórolására, a kiesési idő csökkentésére,
és a készülék megbízhatóságának és élettartamának
növelésére.
A használati útmutatóba foglalt biztonsági utasításokon kí-
vül mindenképpen be kell tartani a nemzeti érvényben lévő
szabályozásokat a készülék üzemelésével kapcsolatosan.
Az üzemelési utasításokat helyezze egy tiszta, műanyag
mappába, hogy megóvja a szennyeződéstől és a nedves-
ségtől, és tárolja a készülék közelében. A munka elkezdése
előtt minden gépkezelőnek el kell olvasnia az utasításokat
és gondosan be kell tartania őket. Csak olyan személyek
használhatják a készüléket, akiket kiképeztek a gép hasz-
nálatáról, és a lehetséges veszélyekről, illetve kockázatok-
ról. Be kell tartani az előírt minimális kort.
A jelen üzemelési utasításokba foglalt biztonsági előírások
és a helyi országos különleges előírások kiegészítéseként
be kell tartani az általánosan elismert műszaki előírásokat a
fafeldolgozó szerszámgépek üzemelésekor.
Az útmutató, valamint a biztonsági előírások figyelmen
kívül hagyásából származó balesetekért és károkért nem
vállalunk felelősséget.
2. A készülék leírása (ábra 1-13)
1. Szállítófogantyú
2. Nyomáskapcsoló
3. Gyorskuplung (szabályozott préslég)
4. Manométer (le lehet olvasni a beállított nyomást)
5. Nyomásszabályozó
6. Manométer (le lehet olvasni a kazánnyomást)
7. Gyorskuplung (szabályozatlan préslég)
8. Nyomástartály
9. Állóláb
10. Leengedő-csavar a kondenzvízhez
11. Kerék
12. Olaj-leeresztőcsavar
13. Sűrítőszivattyú
14. Préslégtömlő
15. Légszűrő
16. Olaj tömítő dugó
17. Be-/ki- kapcsoló
18. Olaj-figyelőablak
19. Biztonsági szelep
20. Olaj - betöltőnyílás
21. Karima csavarok
22. Mosó
23. Dió
24. Szorítóanya
25. Csavar
3. Szállított elemek
1x Légszűrő
2x Leeresztőcsavar a kondenzvízhez
2x Kerék
1x Szerelési anyagok
1x Olaj - elzáródugó
1x Préslégtömlő
1x Használati utasítás
• Nyissa ki a csomagolást és óvatosan vegye ki a készü-
léket.
• Távolítsa el a csomagolóanyagot, valamint a csomago-
lási / szállítási biztosításokat (ha vannak ilyenek).
• Ellenőrizze, hogy teljes-e a szállítmány.
• Ellenőrizze a készülék és a kiegészítő alkatrészek szál-
lítás során keletkezett sérüléseit.
• Lehetősége szerint a garancia érvényességének letelté-
ig őrizze meg a csomagolást.
m FIGYELEM!
A készülék és a csomagolóanyag nem gyerekjáték!
A gyerekek ne játsszanak a műanyag zacskókkal,
fóliákkal és apró alkatrészekkel! Fennáll a lenyelés
és fulladás veszélye!

17
HU
4. Rendeltetésszerűi használat
A kompresszor préslég előállítására szolgál, a préslég
által üzemeltetett szerszámokhoz, amelyek cca. 260 l/
perc-i légmennyiséggel lehetnek üzemeltetve (mint például
abroncstöltők, kifúvópisztolyok és lakkozó pisztolyok). A
korlátolt levegőszállítási mennyiség miatt nem lehetséges
olyan szerszámoknak az üzemeltetése, amelyek egy na-
gyon magas légfogyasztást mutatnak fel (mint például rez-
gőcsiszolók, oszlopos csiszológépek és ütvecsavarozók).
A gépet csak rendeltetése szerint szabad használni. Ezt
túlhaladó bármilyen használat, nem számít rendeltetéssze-
rűnek. Ebből adódó bármilyen kárért vagy bármilyen fajta
sérülésért a használó ill. a kezelő felelős és nem a gyártó.
Kerjuk vegye figyelembe, hogy a keszulekeink rendelte-
tesuk szerint nem az ipari, kezműipari vagy gyari haszna-
latra lettek konstrualva. Nem vallalunk szavatossagot, ha a
keszulek ipari, kezműipari vagy gyari uzemek teruleten va-
lamint egyenertekű tevekenysegek teruleten van hasznalva.
5. Biztonsági utasítások
m Figyelem! Az elektromos kéziszerszámok használata
során az áramütés, illetve sérülés- és tűzveszély megelőzé-
se érdekében az alábbi alapvető biztonsági utasításokat
kell betartani. Az elektromos kéziszerszám használata előtt
minden utasítást olvasson el, és mindig gondosan tartsa be
a biztonsági előírásokat.
m Figyelem! Ennek a kompresszornak a használatánál,
áram ütés, sérülések és tűzveszély elleni védelem szem-
pontjából, fi gyelembe kell venni a következő alapvető
biztonsági intézkedéseket. Olvassa és vegye fi gyelembe
ezeket az utasításokat, mielőtt használná a készüléket.
Biztonságos munkavégzés
1 Tartsa a munkakörét rendben
– Rendetlenség a munkakörben baleset veszélyét
idézi elő.
2 Vegye a környezeti befolyásokat figyelembe
– Ne tegyen ki az elektromos szerszámokat esőnek.
– Ne használjon elektromos szerszámokat nedves
vagy vizes környezetben. Veszély az áramcsapás
által!
– Gondoskodjon jó megvilágításról.
– Ne használjon elektromos eszközöket ott, ahol
tűz- és robbanásveszély keletkezhet.
3 Óvja magát az áramütés elől
– Kerülje el a földelt részekkel való testi érintkezést,
mint például csövekkel, fűtőtestekkel, tűzhelyek-
kel,hűtőszekrényekkel.
4 Tartsa a gyerekeket távol!
– Ne engedje meg más személynek, hogy meg-
érintsék a szerszámot vagy a kábelt, tartsa őket a
munkakörétől távol.
5 Tárolja a szerszámait biztonságosan
– Nem használt szerszámokat egy száraz, zárt
teremben és a gyerekek számára nem elérhetően
kell tárolni.
6 Ne terhelje túl a szerszámait
– Jobban és biztonságosabban dolgozik a mega-
dott teljesítményi körben.
7 Viseljen megfelelő munkaruhát
– Ne viseljen bő ruhát vagy ékszert. Ezeket elkap-
hatják a mozgó részek.
– Hosszú hajnál viseljen hajhálót.
– A szabadban történö munkálatoknál gumikesztyű
és tapadós lábbeli ajánlatos.
8 Ne használja fel a kábelt más célokra
– Ne hordja a szerszámot a kábelnál fogva, és
ne használja fel a kábelt a csatlakozó dugó
kihúzására a dugaszoló aljzatból. Óvja a kábelt
hőségtől, olajtól és éles szélektől.
9 Ápolja gondosan a szerszámait
– Tartsa a kompresszort tisztán azért, hogy jól és
biztosan tudjon dolgozni.
– Tartsa be a karbantartási előírásokat..
– Ellenőrizze le rendszeresen a csatlakozási veze-
téket és a kábelját, és sérülés esetén cseréltesse ki
azt egy elismert szakember által.
– Ellenőrizze le rendszeresen a hosszabbító kábelt
és sérülés esetén cserélje ki.
10 Húzza ki a csatlakozódugót az aljzatból
– Ha nem használja az elektromos kéziszerszámot,
javítás előtt és a szerszámok, pl. fűrészlap, fúró és
marógép cseréjénél.
11 Ügyeljen arra, hogy a gép ne indulhasson el akarat-
lanul
– Mielőtt a csatlakozót bedugja az aljzatba,
győződjön meg arról, hogy a gép kapcsolója
kikapcsolt állapotban van.
12 Kültéren használjon hosszabbító kábelt
– A szabadban csak szabadtéri használatra alkal-
mas, ennek megfelelő jelöléssel ellátott hosszab-
bító kábelt alkalmazzon.
– A kábeldobot csak letekert állapotban használja.
13 Legyen figyelmes
– Figyeljen arra, amit csinál. Munkája során kellő
körültekintéssel járjon el. Ne használja az elektro-
mos kéziszerszámot, ha nem tud rá figyelni.
14 Ellenőrizze le a készülékét sérülésekre
– A szerszám további használata előtt a védő be-
rendezéseket vagy enyhén sérült részeket gondo-
san megvizsgálni, hibátlan és meghatározásuknak
megfelelő működésükre.
– Vizsgálja meg, hogy a mozgó részek működé-
se rendben van, és hogy nem szorulnak vagy
nincsennek károsulva részeik. Ahhoz, hogy a
készülék biztonsága biztosítva legyen minden
résznek helyesen fel kell szerelve lennie.
– Amennyiben a használati utasításban nincs más
megadva, a károsult biztonsági berendezéseket
és részeket szakszerüen egy elismert szakműhely
által kell megjavíttatni vagy kicseréltetni.
– A károsult kapcsolókat egy vevőszolgálati műhely
által muszáj kicseréltetni.
– Ne használjon hibás vagy sérült csatlakozó
vezetékeket.
– Ne használjon olyan elektromos szerszámokat
ahol a kapcsolót nem lehet be- és kikapcsolni.

18
HU
15 Az elektromos kéziszerszám javítását villanyszerelő-
vel végeztesse
– Ez az elektromos szerszám megfelel a rávonat-
kozó biztonsági határozatoknak. Javításokat
csak egy villamossági szakember végezheti el,
különben balesetek érhetik a használót.
16 Figyelem!
– Saját biztonságáért, csak a használati utasítás-
ban megadott vagy a gyártó által ajánlott vagy
megadott kellékeket és pótkészülékeket használni.
A használati utasításban vagy a katalógusban
ajánlott bevetési szerszámoktól vagy kellékektől
eltérőek használata egy személysérülési veszélyt
jelenthet az Ön számára.
17 Zaj
– A kompresszor használatánál zajcsökkentő fülvé-
dőt hordani.
18 A csatlakozási vezeték kicserélése
– Ha megrongálódik a csatlakozási vezeték, akkor
a veszélyeztetések elkerülése érdekében azt ki
kell cseréltetni a gyártó vagy egy villamossági
szakember által. Veszély az áramcsapás által!
19 Abroncsok feltöltése
– Közvetlenül a feltöltés után leellenőrizni, például
egy benzinkútnál egy megfelelő manométerrel a
töltést.
20 Útonhajtaható kompresszorok építési helyszínüzem-
ben
– Ügyeljen arra, hogy minden tömlő és armatúra
megfelelő legyen a kompresszor maximálisan
engedélyezett munkanyomásának.
21 Felállítás helye
– A kompresszort csak egy sík felületre állítani fel.
22 Az bevezető tömlőknek 7 bar felett egy biztonsági
kábellel (mint például egy drótkötéllel) kell felszerel-
ve lenniük.
TOVÁBBI BIZTONSÁGI UTASÍTÁSOK
Biztonsági utasítások a présléggel és a kifúvó piszto-
lyokkal történő dolgozáshoz
• Az üzem alat a kompresszorszivattyú és a vezetékek
magas hőmérsékleteket érnek el. A megérintésük megé-
getéshez vezet.
• A kompresszor által beszívott levegőt olyan hozzákeve-
résektől mentesen kell tartani, amelyek a kompresszor-
szivattyúban tűzhöz vagy robbanáshoz vezethetne.
• A tömlőkuplung kioldásánál tartsa kézzel feszesen a
tömlő kuplungrészét. Így elkerüli a visszacsapódó tömlő
általi sérüléseket.
• A kifúvópisztollyal történő dolgozásnál védőszem-
üveget hordani. Az idegen testek vagy az elfújt részek
könnyen sérüléseket okozhatnak.
• Ne fújjon a kifúvópisztollyal személyekre vagy tisztítson
ruhát a testen. Sérülés veszélye!
Biztonsági utasítások a színszórásnál
• Ne dolgozzon fel olyan lakkokat vagy oldószereket
amelyeknek a gyulladási pontja 55°C alatt van. Rob-
banásveszély!
• Ne melegítse meg a lakkokat vagy az oldószereket.
Robbanásveszély!
• Ha az egészségre káros folyadékokat dolgozna meg, ak-
kor védelemként szűrőkészülékekre (arcmaszkokra) van
szükség. Vegye figyelembe az ilyen anyagokat gyártó
cégnek, az óvintézkedésekkel kapcsolatos közléseit is.
• Figyelembe kell venni a megmunkálandó anyagok
átcsomagolására feltett veszélyanyagrendelettel kap-
csolatos adatokat és megjelöléseket. Adott esetben ki-
egészítő védőintézkedéseket kell elvégezni, különösen
szükséges a megfelelő ruhák és maszkok hordása.
• Tilos a dohányzás a szórási folyamat ideje alatt, vala-
mint a munkateremben. Robbanásveszély! Színpárák is
könnyen gyullékonyak.
• Nem szabad tűzhelyeknek, nyílt fénynek vagy szikra-
képző gépeknek felállítva illetve üzemeltetve lenniük.
• Ne tároljon vagy fogyasztjon ételeket vagy italokat a
munkateremben. A festékpárák károssak az egészségre.
• A munkateremnek 30 m
3
-nél nagyobbnak kell lennie és
a szórásnál és szárításnál biztosítani kell egy elegendő
levegőcserét.
• Ne szórjon szél ellen. Gyullékony illetve veszélyes szó-
rójavak szórásánál már alapjába véve figyelembe kell
venni a helyi rendőrség határozatait.
• Ne dolgozzon fel a PVC-nyomótömlővel összeköttetés-
ben olyan mediumokat mint tesztbenzínt, butylalkoholt
és methylenchloridot. Ezek a mediumok tönkreteszik a
nyomótömlőt.
Nyomástartály üzemeltetése
• Aki egy nyomástartályt üzemeltet, annak azt egy ren-
deltetésszerűi állapotban kell tartania, rendeltetéssze-
rűen kell üzemeltetnie, felügyelnie, azonnal minden
szükséges gondozási és rendbehozási munkát elvégez-
nie valamint a körülmények szerint szükséges biztonsá-
gi intézkedéseket megtennie.
• A felügyelő hivatal egyes esetben egy szükséges fel-
ügyelési intézkedést rendelhet el.
• Egy nyomástartályt nem szabad üzemeltetni, ha olyan
hibákat mutat ki, amelyek által az alkalmazott vagy egy
harmadik személy veszélyeztetve lehet.
• Minden üzem előtt a nyomástartályt rozsdára és sérülé-
sekre leellenőrizni. Nem szabad a kompresszort sérült
vagy rozsdás nyomástartállyal üzemeltetni. Ha sérülé-
seket állapítana meg, akkor kérjük forduljon a vevőszol-
gálati szakműhelyhez.
Ne veszítse el ezeket a biztonsági utasításokat.
Reziduális kockázat
Figyeljük meg a meghatározott karbantartási és biztonsági
utasításokat a használati utasítás.
Mindig legyen figyelmes a munka, és tartsa harmadik sze-
mélyek biztonságos távolságra a munkahelyén.
Még a megfelelő használata a készülék egy bizonyos ma-
radék kockázat továbbra is fennáll, amelyet nem lehet ki-
zárni. A következő potenciális veszélyeket is származhat a
típus és design a készülék:
akaratlan üzembe a terméket.

19
HU
Hallásvesztés, ha nincs megfelelő hallásvédő viselése.
Viseljen védőszemüveget, hogy megakadályozzák a sze-
mét, és arcát a portól és a szennyeződéstől részecskéket.
Belégzése megpördült-por és piszok részecskéket.
6. Technikai adatok
Hálózati csatlakozás 220 - 240 V ~ 50Hz
Motorteljesítmény W
1800
Üzemmód
S1
Kompresszor-fordulatszám
2850 perc
-1
Nyomástartó edény kapacitása
(liter)
cca. 24
Üzemi nyomás
cca. 10 bar
Teo. Beszívási teljesítmény l/perc
cca. 260
Hangteljesítmény L
WA
97 dB(A)
Bizonytalanság K
WA
3 dB
Védelmi rendszer
IP20
A készülék súlya kg-ban
cca. 27
Olaj (15W 40) l
cca. 0,6
Max. felállításmagasság (NN felett) 1000 m
A zajkibocsátási értékek az EN ISO 3744:1995 szerint
lettek meghatározva.
Viseljen hallásvédőt.
A zaj halláskárosodást okozhat.
7. Beüzemeltetés előtt
Győződjön meg rákapcsolás előtt arról, hogy a típustáblán
megadott adatok megegyeznek a hálózati adatokkal.
• Ellenőrizze le a kézüléket szállítási károkra. Esetleges
sérüléseket azonnal a szállítmányozó vállalatnál, ame-
lyik a kompresszort szállította jelenteni.
• A kompresszort a fogyasztó közelében kell felállítani.
• El kell kerülni a hosszú légvezetékek és a hosszú csatla-
kozók (hosszabbítókábel) használatát.
• Ügyelni egy száraz és pormentes légbeszívásra.
• Ne állítsa fel nedves vagy vizes teremben a kompresszort.
• A kompresszort csak megfelelő termekben (jól szellőz-
tetett, környezeti hőmérséklet +5°C-tól 40°C-ig) sza-
bad üzemeltetni. A teremben nem szabad poroknak,
savaknak, páráknak, robbanékony vagy gyullékony
gázoknak lennie.
• A kompresszor száraz termekben levő használatra al-
kalmas. Tilos olyan részlegekben használni, ahol fröcs-
csenővízzel dolgoznak.
• A beüzemeltetés előtt le kell ellenőrizni a kompresszor-
szivattyúban az olajállást.
8. Felépítés és kezelés
m Figyelem!
A beüzemeltetés előtt a készüléket okvetlenül komp-
lett összeszerelni!
Az összeszereléshez szüksége van: 1 x villáskulcs 12 mm,
13 mm, 14 mm (nincs a szállítás terjedelmében)
8.1 A kerekek felszerelése (ábra 4,5)
• Az 5-ös képen mutatottak szerint felszerelni a mellékelt
kerekeket.
8.2 Az állóláb felszerelése (ábra 4,6)
• A 6-os képen mutatottak szerint felszerelni a mellékelt
állólábat.
8.3 A légszűrő összeszerelése (ábra 7,8)
• Távolítsa el a szállítási dugót (B) és csavarja a készülé-
ken feszesre a légszűrőt (15).
8.4 A szállítófedél kicserélése (A) (ábra 9,10)
• Távolítsa el az olajbetöltőnyílás (20) szállítási fedelét
és tegye be a mellékelt olaj-elzáródugót (16) az olaj
betöltőnyílásba.
8.5 Hálózati csatlakozás
• A kompresszor egy védőérintkezős dugós hálózati
vezetékkel van felszerelve. Ezt minden védőérintkezős
220 - 240 V~ 50 Hz dugaszoló aljzatra rá lehet kap-
csolni, amely 16A-al le van biztosítva.
• Üzembe helyezés előtt ügyeljen arra, hogy a hálóza-
ti feszültség megegyezzen a gép teljesítményi táblája
szerinti üzemi feszültségnek.
• Hosszú betáplálási vezetékek, valamint meghosszab-
bítások, kábeldobok stb. Feszültségesést okoznak és
megakadályozhatják a motorindítást.
• Alacsony hőmérsékleteknél, +5°C alatt nehéz járatúság
által veszélyeztetve van a motorindítás.
8.6 Be-/ kikapcsoló (ábra 2)
• A kompresszor bekapcsolásához felfelé kell húzni a
be/kikapcsolót (17). A lekpacsoláshoz lefelé kell nyom-
ni a be-/kikapcsolót.
8.7 Nyomásbeállítás: (ábra 1,3)
• A nyomásszabályozóval (5) lesz a manométeren (4)
beállítva a nyomás.
• A beállított nyomást a gyorskuplungon (3) lehet levenni.
• A kazánnyomás a manóméteren (6) less leolvasva.
• A kazánnyomás a gyorskuplungon (7) less leszedve.
8.8 Nyomáskapcsoló beállítás (ábra 1)
• A nyomáskapcsoló (2) gyárilag be van állítva.
Bekapcsolási nyomás cca. 8 bar
Kikapcsolási nyomás cca. 10 bar
8.9 A préslégtömlő összeszerelése (ábra 1,3)
• A kompresszortól nagyobb távolságban történő dolgo-
záshoz lehet a préslégtömlőt (14) használni. Csatla-
koztasa ahhoz az egyik gyorskuplungba (3, 7) be a
préslégtömlő tűző menetes csatlakozóját (H). Csatla-
koztassa azután a préslégszerszámot a préslégtömlő
gyorskuplungjára (I) rá.

20
HU
9. Elektromos csatlakoztatás
A telepített elektromos motor üzemkészen csatlako-
zik. A csatlakozás megfelel a vonatkozó VDE és DIN
rendelkezéseknek.
A vásárló által használt hálózati csatlakozó, valamint
az általa használt hosszabbító vezeték is feleljen meg
ezeknek az előírásoknak.
Fontos utasítások
A motor túlterhelés esetén magától kikapcsol. Az (eltérő
hosszúságú) hűtési idő után visszakapcsolhatja a motort.
Sérült elektromos csatlakozóvezetékek
Az elektromos csatlakozóvezetékek szigetelése gyakran
megsérül.
Ennek oka lehet:
• Nyomási helyek, ha a csatlakozóvezetéket ablak- vagy
ajtóréseken keresztül vezeti.
• Törési helyek a csatlakozóvezetékek szakszerűtlen rög-
zítése vagy vezetése miatt.
• Vágási helyek a csatlakozóvezetéken való áthajtás miatt.
• Szigetelés sérülése a fali csatlakozóaljzatból való ki-
szakítás miatt.
• Repedések a szigetelés öregedése miatt.
Ne használjon ilyen sérült elektromos csatlakozóvezetéke-
ket, mivel használatuk a szigetelés sérülése miatt életveszé-
lyes.
Rendszeresen ellenőrizze, hogy nem sérültek-e az elektro-
mos csatlakozóvezetékek. Ügyeljen arra, hogy ellenőrzés-
kor a vezeték ne csatlakozzon a hálózatra.
Az elektromos csatlakozóvezetékek feleljenek meg a vo-
natkozó VDE és DIN rendelkezéseknek. Csak „H05VV-F“
jelölésű csatlakozóvezetékeket használjon.
A csatlakozóvezeték típusának megnevezését a vezetéken
fel kell tüntetni.
Váltóáramú motor
• A hálózati feszültség 220 - 240 V~ 50 Hz legyen
• A 25 méternél rövidebb hosszabbító vezetékek kereszt-
metszete 1,5 négyzetmilliméter legyen.
Az elektromos berendezések csatlakoztatását és javítását
csak villamossági szakember végezheti.
Kérdései esetén az alábbi adatokat kell megadni:
• Motor áramtípusa
• Gép típuscímkéjének adatai
• Motor típuscímkéjének adatai
10. Tisztítás, karbantartás és tárolás
m Figyelem!
Minden tisztítási és karbantartási munka előtt kihúzni a há-
lózati csatlakozót! Sérülési veszély az áramcsapások által!
m Figyelem!
Várja meg amig a készülék teljesen le nem hült! Megégetés
veszélye!
m Figyelem!
Minden tisztítási és karbantartási munka előtt a készüléket
nyomásnélkülire kell tenni! Sérülés veszélye!
10.1 Tisztítás
• Tartsa a készüléket annyira por- és szennyeződés men-
tesen, amennyire csak lehet. Dörzsölje le a készüléket
egy tiszta posztóval vagy pedig fújja ki alacsony nyo-
más alatt sűrített levegővel.
• Azt ajánljuk, hogy minden használat után azonnal ki-
tisztítsa a készüléket.
• A készüléket rendszeresen egy nedves posztóval és
egy kevés kenőszappannal megtisztítani. Ne használ-
jon tisztító vagy oldó szereket; ezek megtámadhatják a
készülék műanyagrészeit. Ügyeljen arra, hogy ne kerül-
hessen víz a készülék belsejébe.
• Tisztítás előtt leválasztani a tömlőt és a permetező szer-
számokat a kompresszorról. Nem szabad a kompresz-
szort vízzel, oldószerekkel vagy hasonlóakkal tisztítani.
10.2 A nyomástartály karbantartása (ábra 1)
Figyelem! A nyomástartály (8) tartós tartósságához
minden üzem után a leeresztőcsavar (10) megnyitása által
le kell engedni a kondenzvízet. Eressze előtte le a kazány-
nyomást (lásd a 10.7.1-et). A leeresztőcsavar az óramutató
járásával ellenkező irányba történő csavarás által lesz
megnyitva (a kompresszor alulsó oldala felöl nézve a csa-
varra), azért hogy a kondenzvíz teljesen le tudjon folyni a
nyomástartályból. Zárja azután ismét be a leeresztőcsavart
(az óramutató forgási irányába csavarni). Minden üzem
előtt a nyomástartályt rozsdára és sérülésekre leellenőrizni.
Nem szabad a kompresszort sérült vagy rozsdás nyomás-
tartállyal üzemeltetni. Ha sérüléseket állapítana meg, akkor
kérjük forduljon a vevőszolgálati szakműhelyhez.
m Figyelem!
A nyomástartályból levő kondenzvíz olajmaradéko-
kat tartalmaz. A kondenzvízet a megfelelő gyüjtőhe-
lyen környezetbarát módon megsemmisíteni.
10.3 Biztonsági szelep (ábra 3)
A biztonsági szelep (19) a nyomástartály legmagasabb
engedélyezett nyomására van beállítva. Tiltott a biztonsági
szelepnek az elállítása vagy az ólomzárjának az eltávo-
lítása. Ahhoz hogy a biztonsági szelep szükség esetén
rendesen működjön, időröl időre üzemeltetni kell. Húzzon
olyan erősen a gyűrűn, amig a préslég halhatóan le nem
enged. Azután engedje ismét el a gyűrűt.
10.4 Az olajállást rendszeresen leellenőrizni (ábra 11)
Állítsa a kompresszort egy síma, egyenes felületre. Az
olajállásnak az olaj-figyelőüveg (18) MAX és MIN jelzése
között kell lennie.
Olajcsere: Ajánlott olaj: SAE 15W 40 vagy egyenértékű.
Az első töltést cca. 100 üzemóra után ki kell cserélni, azu-
tán minden 500 üzemóra után le kell ereszteni az olajat és
frisset utántölteni.
10.5 Olajcsere (ábra 1,10,11)
Kapcsolja le a motort és húzza ki a hálózati csatlakozót a
dugaszoló aljzatból. Távolítsuk el az olaj tömítő dugó (16).
Miután leeresztette az esetleg meglevő légnyomást, ki tudja
csavarni az olaj-leeresztőcsavart (12) a kompresszorszi-
vattyúból (13). Ahhoz hogy ne folyon ki az olaj ellenőrzés
nélkül, tartson egy kis pléhcsatornát alá és fogja fel egy
Seite wird geladen ...
Seite wird geladen ...
Seite wird geladen ...
Seite wird geladen ...
Seite wird geladen ...
Seite wird geladen ...
Seite wird geladen ...
Seite wird geladen ...
Seite wird geladen ...
Seite wird geladen ...
Seite wird geladen ...
Seite wird geladen ...
Seite wird geladen ...
Seite wird geladen ...
Seite wird geladen ...
Seite wird geladen ...
Seite wird geladen ...
Seite wird geladen ...
Seite wird geladen ...
Seite wird geladen ...
Seite wird geladen ...
Seite wird geladen ...
Seite wird geladen ...
Seite wird geladen ...
Seite wird geladen ...
Seite wird geladen ...
Seite wird geladen ...
Seite wird geladen ...
Seite wird geladen ...
Seite wird geladen ...
Seite wird geladen ...
Seite wird geladen ...
Seite wird geladen ...
Seite wird geladen ...
Seite wird geladen ...
Seite wird geladen ...
Seite wird geladen ...
Seite wird geladen ...
Seite wird geladen ...
Seite wird geladen ...
-
 1
1
-
 2
2
-
 3
3
-
 4
4
-
 5
5
-
 6
6
-
 7
7
-
 8
8
-
 9
9
-
 10
10
-
 11
11
-
 12
12
-
 13
13
-
 14
14
-
 15
15
-
 16
16
-
 17
17
-
 18
18
-
 19
19
-
 20
20
-
 21
21
-
 22
22
-
 23
23
-
 24
24
-
 25
25
-
 26
26
-
 27
27
-
 28
28
-
 29
29
-
 30
30
-
 31
31
-
 32
32
-
 33
33
-
 34
34
-
 35
35
-
 36
36
-
 37
37
-
 38
38
-
 39
39
-
 40
40
-
 41
41
-
 42
42
-
 43
43
-
 44
44
-
 45
45
-
 46
46
-
 47
47
-
 48
48
-
 49
49
-
 50
50
-
 51
51
-
 52
52
-
 53
53
-
 54
54
-
 55
55
-
 56
56
-
 57
57
-
 58
58
-
 59
59
-
 60
60


Parkside PKO 270 A3 Operation and Safety Notes
- Kategorie
- Luftkompressoren
- Typ
- Operation and Safety Notes
- Dieses Handbuch eignet sich auch für
in anderen Sprachen
- slovenčina: Parkside PKO 270 A3
Verwandte Artikel
-
Parkside PKO 270 A4 Operating And Safety Instructions Manual
-
Parkside PKO 270 A1 Operation And Safety Notes Original Operating Instructions
-
-
Parkside PKO 270 B2 Operation and Safety Notes
-
Parkside PKO 270 A3 Operation and Safety Notes
-
Parkside PKO 500 A1 Operation and Safety Notes
-
Parkside PKO 400 B2 Original Operating Instructions
-
-
-
Andere Dokumente
-
Scheppach HC 53dc Operating And Safety Instructions Manual
-
Scheppach HC550TC Benutzerhandbuch
-
-
Scheppach HC550TC-400V Benutzerhandbuch
-
-
ULTIMATE SPEED 12 V UOP 12 C1 Operation and Safety Notes
-
Schneider Airsystems Universal 170-25 W Original Operating Manual
-
 EKOM DK50 2V/110 Installation, Operation And Mantenance Manual
