
multimedia
producer
™
For Pentium
®
Based PCs Running Windows
®
95
Für Pentium
®
-PCs mit Windows
®
95
Pour PC équipés d’un processeur Pentium
®
et fonctionnant sous Windows
®
95
Installation and
User’s Guide
Installations- und
Benutzerhandbuch
Guide d’installation
et de l’utilisateur

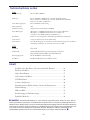
TABLE OF CONTENTS
Installation and User’s Guide 1
Installations- und Benutzerhandbuch 19
Guide d’installation et de l’utilisateur 39

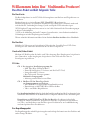
Welcome to Buz
™
Multimedia Producer!
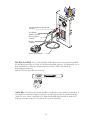
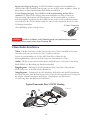
The Buz package includes:
The Buz Card:
The Buz Adapter card is a PCI video capture card to input and digitize video.
It is also an intelligent, high-performance PCI* Ultra-SCSI** host adapter designed for
Pentium-based PCs using Windows
®
95, ideally suited for connection to Iomega’s Jaz
®
and
Zip
®
SCSI drives.
*PCI–Peripheral Component Interconnect–is a local bus interface that enables high speed data
transfer.
**SCSI (pronounced SKUH-zee) is an acronym for the Small Computer System Interface - an
industry standard for connecting peripherals to personal computers.
Check the Buz box Connections section of this guide for additional technical information.
The Buz Box:
Connect video devices such as a VCR, laserdisk, DVD, television or a Camcorder to your
computer through the Buz box.
The Audio/Video Cable:
The A/V cable connects audio and video from your input devices, such as a Camcorder, to the
output devices, such as a VCR or television.
The CD Jewel Case:
CD #1: The integrated installer for:
• MGI video Wave SE Plus Software for Buz™
• PictureWorks Hotshots™ Software (With NetCard™ Trial)
• Iomega RecordIt™ Software
• Buz drivers and utilities
Multimedia Tutorial
• Guide to Making Better Movies
CD #2: HotShots CD for Photo Page printing
Tutorials and other Stuff
• MGI VIdeoWave Tutorial (retail version)
• MGI Video Wave SE Plus Software for Buz™ EasyGuide
• Sample video and audio files
The Installation Guide will lead you through the installation process including how to
connect your Buz box to the back of your computer and to video and audio devices.
MGI Video Wave SE Plus Software for Buz™ EasyGuide steps you through the software
basic functions such as capturing video and audio, producing, still capturing and saving your
productions.
The Welcome Packet:
The Welcome Packet contains registration information and important information about
accessories and other Iomega products.

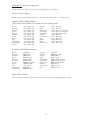
Buz Performance Characteristics
Video Specifications
Compression Hardware Motion JPEG (MJPEG)
Resolution Up to 720x480 at 30 frames per second (60 fields) NTSC
Up to 768x576 at 25 frames per second (50 fields) PAL/SECAM
Up to 24 bit (16 million) colors
Video Data Rate Up to 6MB/sec sustained
Capture Format AVI
Production Format AVI, MOV, MPEG output format
Video Playback Playback of MJPEG AVIs via onboard hardware
Playback of MJPEG AVIs via software on non-Buz equipped computers (uses BuzPlay.exe)
Still Images Capture up to 720x480 at 24 bit color from video
Video In/Out Composite (RCA) and S-Video (Mini DIN)
Audio In/Out Stereo RCA pass-through to existing industry standard sound card Audio synchronization
and
capture at up to 16 bit stereo, 44.1 kHz
SCSI Specifications
Technology Ultra SCSI
Interface 32 bit PCI bus mastering, PCI 2.1 compliant, Plug and Play onboard BIOS for bootable
operation
Transfer Rates Up to 20MB/sec sustained
Connectors HD50 external and 50 pin internal ribbon
Index
Buz Card Installation (see note below) .................................................................. 3
Buz Box Connections ........................................................................................... 6
Audio Settings ...................................................................................................... 8
Video/Audio Connections .................................................................................. 10
SCSI Guidelines ................................................................................................. 11
Software Features ................................................................................................ 11
Software Electronic Documentation Information ............................................... 12
Troubleshooting ................................................................................................. 13
How To Get Help .............................................................................................. 16
Regulatory Agency Statements ............................................................................ 18
Legal Basics ......................................................................................................... 18
왎 NOTE: Buz Multimedia Producer
TM
is a technologically sophisticated package. Ensure your system
has the latest video and audio drivers installed. It is recommended that you optimize your hard drive
using Windows 95 system tools such as Scan Disk and Disk Defragmenter and, before installation,
disable all system crash recovery, anti-virus software, or other background-running software. For more
troubleshooting information see Iomega’s web site: www.iomega.com.
왎
2

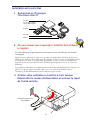
Buz Card Installation
1. Locate the software CD marked
‘Start Here Disk #1’
Buz Box
Buz Card
A/V-Cable
Buz CDs
Buz Installation Guide
and the MGI EasyGuide
2. Don’t get Stung! Install your software first.
Buz will not function correctly if you do not load your software first.
Start your computer. When your system has completely booted into the Windows 95 Desktop,
put the CD marked Start Here (Disk 1) into your CD-ROM drive and follow the instructions
on the screen. If the install program does not automatically start, double-click on the CD-
ROM drive icon then double click on the Start icon.
The default install settings will automatically install the software and drivers. When the software
is installed and you have watched the Buz Multimedia Producer Installation Tutorial, proceed
to the next step.
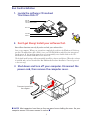
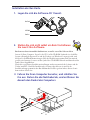
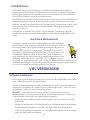
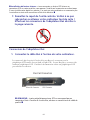
3. Shut down and turn off your computer. Disconnect the
power cord, then remove the computer cover.
Disconnect power from
the computer
왎 NOTE: Most computers have three or four rear-panel screws holding the cover. See your
computer manual if the cover removal is unclear. 왎
3

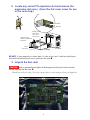
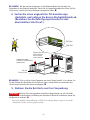
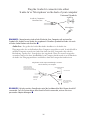
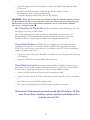
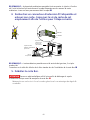
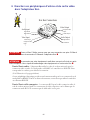
4. Locate any vacant PCI expansion slot and remove the
expansion slot cover. (Save the slot cover screw for use
in the next step.)
Computers have either
VERTICAL or HORIZONTAL
expansion slots.
Use any PCI slot
Expansion slot cover
(remove and save)
Slot cover screw
(remove and save)
ISA slots
Tower
Desktop
PCI Slot
ISA Slot
왎 NOTE: If your computer is a tower type, it is safer to lay it on it’s side for installing the
Buz card to avoid pushing it over as you insert the card. 왎
5. Unpack the Buz card.
CAUTION Touch a grounded metal object to discharge any build-up of static electricity
before handling the Buz card. 왎
Handle the card by its edges. If you lay it down, place it on the static-proof bag it is shipped in.
4

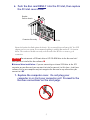
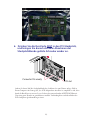
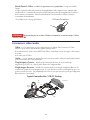
6. Push the Buz card FIRMLY into the PCI slot, then replace
the PCI slot cover screw.
Bracket
flush to chassis
Connector fits evenly
PCI slot
Ensure the bracket fits flush against the chassis. If you currently have an Iomega Jaz
®
Jet
®
SCSI
adapter card on your system, we recommend replacing it with the Buz card now. See caution
below. The connector should seat evenly on both ends of the PCI slot to ensure a good
connection.
CAUTION Do not connect a SCSI boot drive or SCSI CD-ROM drive to the Buz card until
after you have installed the Buz software. 왎
왎 Internal drive installation: If you are connecting an internal SCSI drive to the SCSI
connector on your Buz card, you may want to install or connect it at this time. Install your
software first or your computer may not recognize the Buz card or any other drives you
connect to it. 왎
7. Replace the computer cover. Do not plug your
computer in or start your computer yet! Proceed to the
Buz box connections on the next page.
5

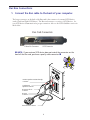
Buz Box Connections
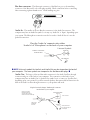
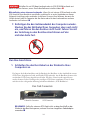
1. Connect the Buz cable to the back of your computer.
The longer connector on the back of the Buz card is the connector for external SCSI devices
(such as Jaz® and Zip® SCSI drives). The Buz card connects to a variety of SCSI devices. See
your SCSI device documentation for proper connection. Also see the SCSI Guidelines section in
this booklet.
SCSI Connector
Fifteen-Pin Connector
Buz Card Connectors
왎 NOTE: If your external SCSI device does not match the connector on the
back of the Buz card, purchase a quality cable converter. 왎
Buz Box
Connector
External SCSI Connector
Buz Box Speaker Out (Pass-through)
Connector
Your Existing
Speaker's Connector
Buz Box Audio In
Connector
6

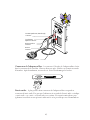
Buz box connector: The fifteen-pin connector of the Buz box goes to the matching
connector of the Buz card. Look at this plug carefully. Check orientation before connecting.
After connecting, tighten thumb screws. Avoid bending any pins.
Audio In: The smaller of the two Buz box connectors is the Audio In connector. The
computer may have an Audio In symbol, or it may say ‘Audio In’ or ‘Input’, depending upon
your system. The Microphone connection can also be used as ‘Audio In’ but it is not the
prefered connection.
Audio In
Microphone
Plug the 'Audio In' connector into either
'Audio In' or 'Microphone' on the back of your computer
'Audio in' Connector
from Buz Box
Universal Symbols
왎 NOTE: Universal symbols for Audio In and Audio Out may be stamped on the back of
your computer. The same symbols are stamped on the Buz box audio plugs. 왎
Audio Out: The larger of the two Buz audio connectors is the Audio Out Pass-through
connector and goes on the back of your computer. The connection on the back of your
computer may have an Audio Out or Speaker Out symbol on it or it may say ‘Speaker Out’,
depending upon your system. If you have external speakers, disconnect and reconnect into the
back of the audio out Pass-through connector so your speakers will work.
Plug the Buz Audio Output "Passthrough" connector
into the back of your computer
Audio Out
Audio Output
'Passthrough'
Connector
Unplug your existing
External 'Speaker Out'
connector and reconnect it
into the back of the 'Passthrough'
Speaker Out
(Some systems Have
this connection only for
sound output)
Headphones
Best connection
Universal Symbols
7

왎 NOTE: Most sound cards will use the standard ‘mini’ stereo jack. If your system does not
have a ‘mini’ jack, purchase an adapter. 왎
2. After the Buz box has been connected, reconnect the
power to the back of your computer and start your
system.
a. After you start your computer, Windows 95 will display the message: ‘Found New Hardware:
PCI SCSI adapter’, and then will identify it as Iomega Buz: PCI Ultra SCSI Host Adapter and will
automatically load the drivers.
b. It will then identify a PCI Multimedia Video Device and identify it as Iomega Buz Multimedia
Producer and will automatically load drivers for this also. You will then be prompted to restart
the computer. Click Yes.
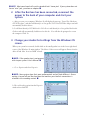
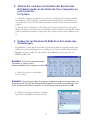
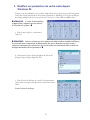
3. Change your Audio Out settings from the Windows 95
screen.
When your system has restarted, double-click on the small speaker icon in the lower right-hand
corner of the Windows 95 main window. The Master Volume screen will appear. Ensure that the
Mute All and Mute boxes are NOT selected.
왎 NOTE: If the speaker icon is not present,
refer to your system’s User’s Manual. 왎
a. Go to Options and select Properties.
왎 NOTE: Some systems have their own audio controls and will look different. Ensure
muting is turned off and the check box that matches your Audio In connections is
selected in the recording control. 왎
b. Choose Recording option from the Properties
window then click OK.
8

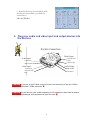
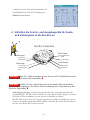
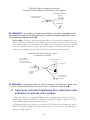
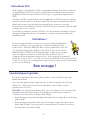
4. Plug your audio and video input and output devices into
the Buz box.
S-Video Output
Composite Video
Output
Left Channel
Right Channel
Right Channel
Buz Box Connections
Audio input
S-Video Input
Composite Video
Input
Video Input
Video Output
Audio Output
Left Channel
CAUTION If you are using S-Video, ensure that your are connecting a four-pin S-Video
plug into the Buz box S-Video connector. 왎
CAUTION Do not connect your audio equipment to the composite video input or output
jack. You could damage your equipment or your Buz card. 왎
c. From the Recording Control window check
the select box that matches your Audio In
connections(s).
Close the Window
9

Audio Input/Output: The Buz box uses universal color codes for video and audio
connectors. The left-channel is WHITE and the right-channel is RED. Simply match the
colors for proper connection.
(See illustration on previous page)
If your electronic device has a single audio connector for sound, connect it to the Left or WHITE
channel. If it is a single connector, you will not use the right channel, or RED connector.
Composite Video Input/Output: The RCA connector for composite video uses the
universal yellow color code. Composite video connectors are the same type as the RCA audio
connectors; do not connect audio to this jack.
S-Video Input/Output: This cable is not included in the Buz package. The four-pin S-
Video input is used with some video equipment such as VCRs, video cameras or televisions.
This plug has a small ‘key’ on the connector that directs you to plug it in correctly. Look closely
at your S-Video connector and plug for correct orientation.
(See the illustration on the previous page)
CAUTION Do not connect Composite and S-Video inputs at the same time. Use one or
the other. 왎
Video/Audio Connections
Video: If your Camcorder or VCR has an S-Video connector, use it for better video quality.
To select S-Video, launch MGI VideoWave. Go to the Capture Screen, set Video Format and
choose S-Video.
Audio: If your system has only one audio connector, use the left (white) channel for the single
sound connection.
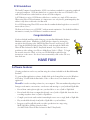
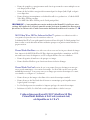
Input Devices: Connect the ‘OUT’ connectors of your camcorder, VCR, DVD, etc., into
the ‘IN’ side of the Buz box.
Output Devices: Connect the ‘OUT’ connectors from the Buz box to the ‘IN’ connectors
on your VCR. If your television is hooked to your VCR you’ll be able to monitor output.
(Output devices are not necessary for Buz to function properly.)
"OUT"
Side
"IN"
Side
VCR or TV
Typical Camcorder, Buz, VCR/TV Hookup
Input
Audio
Output
Video
Output
10
S-Video Connector
Key

SCSI Guidelines
The Small Computer System Interface (SCSI) is an industry standard for connecting peripherals
to personal computers. SCSI rules define how to connect more than one SCSI device to the
same SCSI connection (either built-in or from a SCSI host adapter).
A SCSI chain is a series of SCSI devices cabled one to another on a single SCSI connection.
When using Ultra SCSI performance, it is important to use only shorter, premium quality data
cables for any drives connected to the Buz card.
For a SCSI chain using Ultra SCSI, ensure that the combined chain length does not exceed l.5
meters (about 5 feet.)
The Buz card is factory set at SCSI ID 7 with automatic termination. For detailed installation
information, consult your SCSI device’s installation manual.
Congratulations!
You have finished installing and hooking up your new Buz Multimedia Producer
Hardware and Sofware. Familiarize yourself with the software by viewing the
tutorials in the following order: ‘MGI VideoWaveTutorial’ (retail version) (CD
#2). Using the MGI EasyGuide for Buz (CD#2), work through the ‘MGI video
Wave SE Plus Software for Buz™ EasyGuide‘ manual. As you become more
proficient at video editing, view ‘How to Make Better Videos’ (CD#1). To begin
the tutorials, insert the CD#1 or #2 in your CD-ROM drive and follow the
instructions on the screen. If it doesn’t start automatically, click on the CD icon,
then click start.
HAVE FUN!
Software Features
Creating productions can be easy and fun using the software included in the Buz Multimedia
Producer.
To open any Buz application software, double-click on the Iomega Buz icon on the Windows
95 Desktop. Double-click the Buz Audio, Video or Photo icons, now launch the desired
application.
RecordIt
TM
is audio recording software for your computer! This new multimedia package from
Iomega records music, conversations, even lectures and meetings to your Jaz® and Zip® disks.
• Record from a microphone right onto your hard drive or onto a Jaz® or Zip® disk.
• Record audio files from a compact disc directly onto a Jaz® or Zip® disk, then take those
recordings anywhere there is a Jaz® or Zip® drive.
• Compile your favorite audio tracks from multiple sources onto a single Jaz® or Zip® disk.
• Play recorded files directly from Jaz® or Zip® disks or your hard drive.
• Integrate your RecordIt files with your video productions in a snap, using
MGI VideoWave SE Plus Software for Buz.
(See MGI Video Wave SE Plus Software for Buz™ EasyGuide.)
11

12
왎 NOTE: If you have a previous version of RecordIt™ installed on your system, uninstall it
and use the new version that comes with Buz. Buz cannot use files created by a version of
RecordIt lower than1.1. 왎
MGI VideoWave SE Plus Software for Buz™ spices up your home movies by adding
text, transitions and sound.
The tutorial on CD #2 guides you through the basic functions of the software. The EasyGuide
inside the CD jewel case will lead you through a brief production to get you started creating
your own productions.
PictureWorks HotShots
gives you everything you need to get still images imported from
MGI VideoWave SE Plus, your digital camera, DVD, scanner, network, disks, CD or the
Internet onto your computer.
• Organize, enhance and share your pictures
• Use HotShots to put great looking images into your work
PictureWorks NetCard
(trial version) can send your pictures as “digital postcards” via e-
mail. NetCards are interactive multimedia postcards. Now you can E-mail pictures to friends,
family, colleagues, etc., over the Internet.
• Send pictures and movies via standard e-mail
• Send self-playing NetCards, no special software required to view
• NetCards attach to any e-mail
• At less than 350KB, NetCards are small and easy to send
Electronic Documentation for RecordIt, MGI VideoWave SE Plus, and
PictureWorks HotShots software and NetCard (Trial version)
are available on CD #2

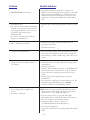
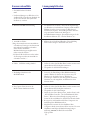
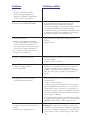
Possible SolutionsResource Conflicts
1. During install Windows 95 device
manager appears on the screen and says
there is a system resource conflict.
Other resource conflicts:
• Buz does not function but shows no error
message.
• SCSI device not detected.
• Video capture does not work.
• Sound card not functioning.
• Other devices not functioning.
2. Buz is not functioning properly.
Either the ‘Iomega: Buz PCI Ultra SCSI
Host Adapter’ or the ‘Iomega Buz
Multimedia Producer’ portion of the Buz
card is NOT seen in Device Manager.
3. System does not support multifunction
card.
• Drive letter not assigned to SCSI devices
connected to Buz. During reboot, blue
and yellow Iomega Jaz® Jet PCI BIOS
screen does not appear.
and
• MGI software locks up.
and
• Windows 95 Device Manager SCSI
controllers section displays the Buz SCSI
controller with the problem icon (!).
• If a red “X” is present, continue with install.
• See Windows 95 System Information for resolving
conflicts, or see Iomega’s web site for more information.
(See Help/If you have a Hardware Conflict/Start the
Hardware Conflict Troubleshooter.)
• See other solutions below.
• Check all cable connections.
• Ensure the Buz card is correctly installed and seated
properly in the PCI slot.
• Look for system conflicts by double-clicking on My
Computer icon, then the Control Panel icon, then the
System icon, then the Device Manager. In the Device
Manager tab, scroll down and check for devices with yellow
exclamation markers. See Windows 95 System Information
for resolving conflicts.
• Move the Buz card to another PCI slot.
• Remove conflicting drivers.
• Try turning off System ‘Plug and Play’ options in system
BIOS.
• Check all cable connections.
• Ensure the board is correctly installed and seated properly
in the PCI slot.
• Try moving the Buz card to a different PCI slot.
• Your system may not support multifunction adapters.
Specifically, PCI to PCI bridge chips and specification for
PCI 2.1. Contact your computer system manufacturer for
possible upgrades and/or support information.
13
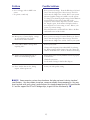
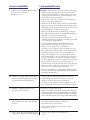
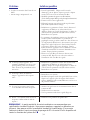
Troubleshooting
왎 NOTE: Buz Multimedia Producer is a technologically sophisticated package. Ensure your
system has the latest video and audio drivers installed. It is recommended that you optimize
your hard drive using Windows 95 system tools such as Scan Disk and Disk Defragmenter and
before installation, disable all system crash recovery, anti-virus software, or other background-
running software. For more troubleshooting information see Iomega’s web site:
www.iomega.com. 왎

Problem Possible Solutions
• The Audio Compression and Video Compression of
Windows 95 are not installed on the computer. Select Add/
Remove Programs from Windows 95 Control Panel, select
Windows Setup tab, select Multimedia. Follow the screen
instructions. (You may need Windows 95 install disks or
CD.)
• Click the ‘Don’t ask this question again’, check box. Click
No.
• Ensure the Buz card is correctly installed and seated
properly in the PCI slot.
• Check all connections.
• Reset your screen settings: From the Windows 95 Control
Panel, select the Display icon. Select Settings. Change the
font from large to small or small to large, then reboot your
system.
• Ensure the board is correctly installed and seated properly
in the PCI slot.
• Check all connections.
• Check for “PCI SCSI Bus Controller” or “PCI Multimedia
Video Device” under “Other Devices” in Device Manager.
If one of the above is showing, remove and reboot your
system.
• Obtain a display driver upgrade from your system
manufacturer.
• You may want to upgrade your system’s display card. The
minimum suggested specifications are: 800x600
resolution, 16 bit color and 2MB video memory.
NOTE: Even if you have tried all of the following solutions
and the preview is still choppy, the display on an output
device, such as a TV or VCR, will look good.
• If you are using S-Video, see page 10 of this guide.
• In the MGI software: Click the Start button, then Options,
then General Options, then click Buz Overlay.
• Change the Capture setting to a lower rate.
(See MGI EasyGuide for more information.)
• Close all other applications.
• Capture to a faster drive such as Iomega Jaz® 1GB or Jaz®
2GB.
4. MMSYSTEM:006 error message.
5. ActiveMovie error:
“Some of the file types usually associated with
ActiveMovie are currently associated with
other programs. Because of this, you may
be unable to play certain types of
multimedia files.”
“Do you want to fix this (by restoring the
file types to ActiveMovie) ?”
6. Error: “PCI board not found”.
7. Corrupt fonts in MGI Library.
8. Capture View Screen in MGI software is
not working.
9. Poor or choppy video in MGI’s view
screen.
• No picture, sound only
14

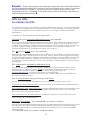
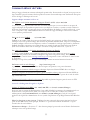
Possible SolutionsProblem
• Reset your screen settings: From the Windows 95 Control
Panel, select the Display icon. Select Settings. The Color
Palette must be: High Color (16 bit). Reboot your system.
• Advanced graphic settings are available on some systems.
To change your advanced graphic settings: In the Windows
95 Control Panel, select System, then click on the
Performance tab. From the Performance window, click on
the Graphics option. In the Advanced Graphics window,
move the slider to a lower setting or ‘none’. Reboot your
system. Try various settings.
• Move the Buz card to another PCI slot. Refer to the Buz
card install section of this booklet.
• Reset your screen settings: From the Windows 95 Control
Panel, select the Display icon. Select Settings. The Color
Palette must be High Color (16 bit). Reboot your system.
• Reboot your system.
• Change audio frequency from within MGI by selecting
the Options window, click Capture Driver tab, change the
audio to 22.05 kHz stereo, 16 bit or another lower setting.
• Ensure the board is correctly installed and seated properly
in the PCI slot.
• Check all connections.
• See the Audio Settings in this Booklet (Page 8).
• Lower your video quality setting.
9. Poor or choppy video in MGI’s view
screen.
• No picture, sound only
10. Message says: ‘Current display settings
are not suitable for video overlay.
Preview mode will be enabled.’
11. “Out of Wave Buffer” message when
capturing video.
12. Audio is not captured with video or
audio is not heard during capture.
13. Error: “Audio data was lost during
capture, reduce capture rate”.
15
왎 NOTE: Some computer systems have hardware that does not meet industry standard
specifications. You may choose to replace, remove or disable those components. You may
want to check with your system’s manufacturer for standard compliance to PCI specification
2.1 and for support for PCI to PCI bridge chips, to gain full Buz functionality. 왎

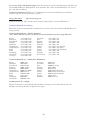
How to Get Help
Iomega is committed to providing a first class technical support service. To meet this goal, we offer a variety of
support options designed to meet the needs of a wide range of users including a 24-hour Technical Support Service.
Automated Technical Support 24 hours a day
By
phone via the Automated Customer Support System (ACSS) +353-1-8075-050
This interactive troubleshooting system works just like a “live” technical support agent. By answering a series of
questions via the keypad of your touch tone telephone, this system will help you perform a diagnosis of the
problem and provide you with a solution over the phone or by fax 24 hours a day, 7 days a week. Dial +353-1-
8075-050 directly or call Technical Support and choose to transfer to this system from the menu.
By
fax via the FaxBack service +353-1-8075-060
FaxBack is a simple to use automated fax help system that contains a wealth of technical information on all
Iomega products. To solve your problem immediately, simply dial the above number with your touch tone
telephone and order a catalogue listing the FaxBack documents available for your Iomega product e.g. the Zip®
or Jaz® catalogue or a document listed in these catalogues. This service is available 24 hours a day, 7 days a
week.
By e-mail via the Automated E-mail Response System
Like the FaxBack, our 24 hour automated e-mail response system will
e-mail you our wealth of technical
documentation on all Iomega products. Just send an e-mail to
[email protected] with the word
“introduction” in the subject header.
Note: This is an automated reply, there is no human interaction.
By
internet via the Iomega Website http://www.iomega.com
From our new localised European Websites you can now:
Download Technical Support documents from our HTML document library in your language
View and print Iomega manuals and installation guides from our PDF library. All you need to view and print
these files is the Acrobat Reader which is availabe from Adobe’s Website : http://www.adobe.com.
Download latest drivers and software in various languages from our FTP site.
Drivers/Software Download Services
Bulletin Board System +353-1-8075-080 (IRL) or +49-2957-792990 (D)
To dial into the Iomega BBS simply set your modems’ communication parameters to 8 bits, no parity, and one
stop bit and dial either of our 2 Bulletin Board numbers +353-1-8075-080 (Ireland) or +49-02957-792990
(Germany) with your modem software or your operating systems’ communication software such as
HyperTerminal in Windows 95.
Latest drivers and upgrades - download the latest software upgrades and drivers from our BBS. At the Main
Menu choose “F” for file menu and then “L” for list all files.
Technical Information – choose “T” at the Main Menu to go to our library of technical information on all
Iomega products.
16

Iomega Website http://www.iomega.com
Download the latest drivers and software in your language from our Website
European Technical Support
When contacting Iomega Technical Support, please have the serial number of your drive ready.
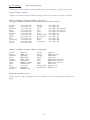
Turboline Technical Support Numbers
(These calls do incur a toll but receive priority in our call queuing system)
Austria +353-1-8075-132 Portugal +353-1-8075-142
Belgium +353-1-8075-137 Spain +353-1-8075-141
Denmark +353-1-8075-145 Switzerland +353-1-8075-131 (German)
France +353-1-8075-136 Switzerland +353-1-8075-138 (French)
Finland +353-1-8075-148 Switzerland +353-1-8075-144 (Italian)
Germany +353-1-8075-130 Sweden +353-1-8075-147
Greece +353-1-8075-149 South Africa +353-1-8075-134
Ireland +353-1-8075-135 UK +353-1-8075-133
Italy +353-1-8075-143 Poland +353-1-8075-182
Luxembourg +353-1-8075-139 Russia +353-1-8075-190
Netherlands +353-1-8075-140 International +353-1-8075-170
Norway +353-1-8075-146
Freephone Technical Support Numbers
Austria 0660-5541 Norway 800-11677
Belgium 08007-1219 Poland 00800-353-1201
Denmark 8001-8860 Portugal 05055-3003
France 0800-916051 Spain 900-99-3538
Finland 08001-13501 Switzerland 0800-558091 (German)
Germany 0130-829446 Switzerland 0800-552447 (French)
Greece 00800-353-12001 Switzerland 0800-552446 (Italian)
Ireland 1800-688-500 Sweden 020-793128
Italy 1678-77476 South Africa 0800-99-42-18
Luxembourg 0800-2009 U.K. 0800-973194
Netherlands 0800-022-2861
Product Repair or Return
Please call Iomega Technical Support for information on returning your Iomega product for repair.
17

Regulatory Agency Statements
United States FCC Information
The computer equipment described in this installation guide generates and uses radio frequency (RF)
energy. If the equipment is not installed and operated in strict accordance with the manufacturer’s
instructions, interference to radio and television reception may result.
왎 Interferene This equipment complies with Part 15 of the FCC Rules and its operation is subject to the
following conditions: (1) the equipment may not cause harmful interference, and (2) the equipment must
accept any interference received, including interference that may cause undesired operation. 왎
Part 15, Class B, of the FCC Rules, is designed to provide reasonable protection against radio and
television interference in a residential installation. Although the equipment has been tested and found to
comply with allowed RF emission limits, as specified in the above cited Rules, there is no guarantee that
interference will not occur in a particular situation. Interference can be determined by turning the
equipment off and on while monitoring radio or television reception. The user may be able to eliminate
any interference by implementing one or more of the following measures:
• Reorient the affected device and/or its receiving antenna.
• Increase the distance between the affected device and the computer equipment.
• Plug the computer and its peripherals into a different branch circuit from that used by the
affected device.
WARNING Only the manufacturer’s cable or an equivalent double shielded, host interface cable should be
used with external subsystems. Other types of cables may violate FCC rules and regulations. Also, changes or
modifications to the electronics or enclosure of this product must be expressly approved by Iomega; otherwise,
the user’s authority to operate the equipment may be voided by the FCC.
왎
FCC Declaration of Conformity
The Buz Multimedia Producer PCI card has been tested and found to comply with the limits for a Class B
digital device, pursuant to part 15 of the FCC rules. Model: Buz. Manufacturer’s Name: Iomega
Corporation. Manufacturer’s Address: 1821 West Iomega Way, Roy, Utah, USA 84067. Manufacturer’s
Telephone Number: (801) 778-1000. Responsible Party: John Glavin.
Canadian DOC Information
This digital apparatus does not exceed the Class B limits for radio noise emissions from digital devices as set
out in the Radio Interference Regulations of the Canadian Department of Communications.
Declaration of Conformity
The Buz Multimedia Producer is CE certified and conforms to the following Directive(s) and Standard(s):
Application of Council Directive(s): 89/336/EEC. Standard(s) to which Conformity is Declared: EN
55022, EN 50082-1. Manufacturer’s Name: Iomega Corporation. Manufacturer’s Address: 1821 West
Iomega Way, Roy, Utah, USA 84067. Importer’s Name: Iomega Netherlands branch of Iomega
International S.A. Type of Equipment: Multimedia Producer. Model No.: BUZ. Netherlands branch of
Iomega International S.A
Legal Basics
Photographs, artwork, recordings and videos created by others, including material from the Internet,
television/radio broadcasts, and any other media, are generally covered by copyright and other laws.
Whenever you use content which you did not create, or any recording of a person other than yourself, get
permission from the copyright owner of the material or the person you have recorded. Failure to get
permission could put you at risk of copyright infringement or other liability.
18
Seite wird geladen ...
Seite wird geladen ...
Seite wird geladen ...
Seite wird geladen ...
Seite wird geladen ...
Seite wird geladen ...
Seite wird geladen ...
Seite wird geladen ...
Seite wird geladen ...
Seite wird geladen ...
Seite wird geladen ...
Seite wird geladen ...
Seite wird geladen ...
Seite wird geladen ...
Seite wird geladen ...
Seite wird geladen ...
Seite wird geladen ...
Seite wird geladen ...
Seite wird geladen ...
Seite wird geladen ...
Seite wird geladen ...
Seite wird geladen ...
Seite wird geladen ...
Seite wird geladen ...
Seite wird geladen ...
Seite wird geladen ...
Seite wird geladen ...
Seite wird geladen ...
Seite wird geladen ...
Seite wird geladen ...
Seite wird geladen ...
Seite wird geladen ...
Seite wird geladen ...
Seite wird geladen ...
Seite wird geladen ...
Seite wird geladen ...
Seite wird geladen ...
Seite wird geladen ...
Seite wird geladen ...
Seite wird geladen ...
-
 1
1
-
 2
2
-
 3
3
-
 4
4
-
 5
5
-
 6
6
-
 7
7
-
 8
8
-
 9
9
-
 10
10
-
 11
11
-
 12
12
-
 13
13
-
 14
14
-
 15
15
-
 16
16
-
 17
17
-
 18
18
-
 19
19
-
 20
20
-
 21
21
-
 22
22
-
 23
23
-
 24
24
-
 25
25
-
 26
26
-
 27
27
-
 28
28
-
 29
29
-
 30
30
-
 31
31
-
 32
32
-
 33
33
-
 34
34
-
 35
35
-
 36
36
-
 37
37
-
 38
38
-
 39
39
-
 40
40
-
 41
41
-
 42
42
-
 43
43
-
 44
44
-
 45
45
-
 46
46
-
 47
47
-
 48
48
-
 49
49
-
 50
50
-
 51
51
-
 52
52
-
 53
53
-
 54
54
-
 55
55
-
 56
56
-
 57
57
-
 58
58
-
 59
59
-
 60
60


in anderen Sprachen
- English: Iomega Buz
- français: Iomega Buz
Verwandte Artikel
Andere Dokumente
-
JVC MC-R433U Benutzerhandbuch
-
Lindy 32870 Benutzerhandbuch
-
MSI MS-7900 1.0 Bedienungsanleitung
-
MSI KA780V Series Benutzerhandbuch
-
-
-
MSI MS-7793v2.2 Bedienungsanleitung
-
-
MSI 970 GAMING Bedienungsanleitung
-