Makita DUM604 Benutzerhandbuch
- Kategorie
- Power Heckenscheren
- Typ
- Benutzerhandbuch

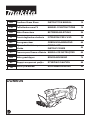
DUM604
EN Cordless Grass Shear INSTRUCTION MANUAL 10
FR Taille-Herbes sans Fil MANUEL D’INSTRUCTIONS 19
DE Akku-Grasschere BETRIEBSANLEITUNG 29
IT Cesoie tagliaerba a batteria ISTRUZIONI PER L’USO 39
NL Accugrasschaar GEBRUIKSAANWIJZING 49
ES Tijeras Inalámbricas para
Hierba
MANUAL DE
INSTRUCCIONES 59
PT Tesoura para Grama a Bateria MANUAL DE INSTRUÇÕES 69
DA Akku græsklipper BRUGSANVISNING 79
EL Φορητό κουρευτικό γκαζόν ΕΓΧΕΙΡΙΔΙΟ ΟΔΗΓΙΩΝ 88
TR Akülü Çim Makası KULLANMA KILAVUZU 99

12
3
Fig.1
1
2
Fig.2
1
2
Fig.3
1
Fig.4
1
Fig.5
Fig.6
Fig.7
2

1
Fig.8
2
1
Fig.9
Fig.10
Fig.11
Fig.12
3
2
1
Fig.13
1 2 3
Fig.14
Fig.15
3

1
Fig.16
1
Fig.17
Fig.18
Fig.19
Fig.20
Fig.21
1
Fig.22
Fig.23
4

Fig.24
Fig.25
1
Fig.26
1
Fig.27
1 2
3
Fig.28
Fig.29
1
Fig.30
5

1
Fig.31
Fig.32
1
Fig.33
1
Fig.34
Fig.35
Fig.36
1
Fig.37
1
2
Fig.38
6

1
Fig.39
Fig.40
Fig.41
Fig.42
Fig.43
Fig.44
Fig.45
Fig.46
7

Fig.47
Fig.48
Fig.49
Fig.50
Fig.51
Fig.52
Fig.53
1
Fig.54
8

1
Fig.55
9

10 ENGLISH
ENGLISH (Original instructions)
SPECIFICATIONS
Model: DUM604
Cutting width 160 mm
Strokes per minute 2,500 min-1
Dimensions
(L x W x H)
353 mm x 177 mm x 131 mm
Rated voltage D.C. 18 V
Battery cartridge BL1815 / BL1815N / BL1820 / BL1820B / BL1830 / BL1830B /
BL1840 / BL1840B / BL1850 / BL1850B / BL1860B
Net weight 1.4 - 1.8 kg
• Duetoourcontinuingprogramofresearchanddevelopment,thespecicationshereinaresubjecttochange
without notice.
• Specicationsandbatterycartridgemaydifferfromcountrytocountry.
• Weight,withbatterycartridge,accordingtoEPTA-Procedure01/2003
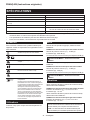
Symbols
Thefollowingshowthesymbolsusedfortheequip-
ment.Besurethatyouunderstandtheirmeaningbefore
use.
Takeparticularcareandattention.
Read instruction manual.
Danger;beawareofthrownobjects.
Keepbystandersaway.
Cuttingmeanscontinuestorunafterthe
motorisswitchedoff.
Do not expose to moisture.
Cd
Ni-MH
Li-ion
OnlyforEUcountries
Donotdisposeofelectricequipmentor
batterypacktogetherwithhouseholdwaste
material!
InobservanceoftheEuropeanDirectives,
onWasteElectricandElectronic
EquipmentandBatteriesandAccumulators
andWasteBatteriesandAccumulators
and their implementation in accordance
withnationallaws,electricequipmentand
batteriesandbatterypack(s)thathave
reachedtheendoftheirlifemustbecol-
lected separately and returned to an envi-
ronmentallycompatiblerecyclingfacility.
Intended use
Thetoolisintendedforcuttinglawnedgesorsprouts.
Noise
ThetypicalA-weightednoiseleveldeterminedaccord-
ingtoEN50636:
DUM604 with shear blade for grass shear installed
Sound pressure level (LpA):76dB(A)
Uncertainty(K):0.98dB(A)
Thenoiselevelunderworkingmayexceed80dB(A).
WARNING: Wear ear protection.
ThetypicalA-weightednoiseleveldeterminedaccord-
ingtoEN60745:
DUM604 with shear blade for hedge trimmer
installed
Sound pressure level (LpA):74dB(A)
Uncertainty(K):3dB(A)
Thenoiselevelunderworkingmayexceed80dB(A).
WARNING: Wear ear protection.
Vibration
Thevibrationtotalvalue(tri-axialvectorsum)deter-
minedaccordingtoEN50636:
DUM604 with shear blade for grass shear installed
Vibrationemission(ah):2.5m/s2 or less
Uncertainty(K):1.5m/s2
Thevibrationtotalvalue(tri-axialvectorsum)deter-
minedaccordingtoEN60745:
DUM604 with shear blade for hedge trimmer
installed
Vibrationemission(ah):2.5m/s2 or less
Uncertainty(K):1.5m/s2

11 ENGLISH
NOTE:Thedeclaredvibrationemissionvaluehas
beenmeasuredinaccordancewiththestandardtest
methodandmaybeusedforcomparingonetoolwith
another.
NOTE:Thedeclaredvibrationemissionvalue
mayalsobeusedinapreliminaryassessmentof
exposure.
WARNING:Thevibrationemissionduringactual
useofthepowertoolcandifferfromthedeclared
emission value depending on the ways in which the
tool is used.
WARNING:Besuretoidentifysafetymeasures
toprotecttheoperatorthatarebasedonanestima-
tionofexposureintheactualconditionsofuse(taking
accountofallpartsoftheoperatingcyclesuchas
thetimeswhenthetoolisswitchedoffandwhenitis
running idle in addition to the trigger time).
EC Declaration of Conformity
For European countries only
TheECdeclarationofconformityisincludedasAnnexA
to this instruction manual.
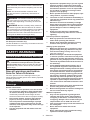
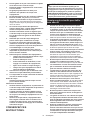
SAFETY WARNINGS
General power tool safety warnings
WARNING: Read all safety warnings, instruc-
tions, illustrations and specications provided
with this power tool.Failuretofollowallinstructions
listedbelowmayresultinelectricshock,reand/or
seriousinjury.
Save all warnings and instruc-
tions for future reference.
Theterm"powertool"inthewarningsreferstoyour
mains-operated(corded)powertoolorbattery-operated
(cordless) power tool.
Cordless Grass Shear Safety
Warnings
General instructions
1. To ensure correct operation, user has to read
this instruction manual to make himself famil-
iar with the handling of the equipment.Users
insufcientlyinformedwillriskdangertothem-
selves as well as others due to improper handling.
2. Never allow children, persons with reduced
physical, sensory or mental capabilities or
lack of experience and knowledge or people
unfamiliar with these instructions to use the
machine, local regulations may restrict the age
of the operator.
3. Use the equipment with the utmost care and
attention.
4. Operate the equipment only if you are in good
physical condition. Perform all work calmly
and carefully. Use common sense and keep in
mind that the operator or user is responsible
for accidents or hazards occurring to other
people or their property.
5. Never operate the machine while people, espe-
cially children, or pets are nearby.
6. The motor is to be switched off immediately in
case that the equipment shows any problem or
abnormal sign.
7. Switch off and remove the battery cartridge
when resting and when leaving the equipment
unattended, and place it in a safe location to
prevent danger to others or damage to the
equipment.
8. Avoid using the machine in bad weather
conditions especially when there is a risk of
lightning.
Personal protective equipment
1. Wear eye protection and stout shoes at all
times while operating the machine.
2. Always wear substantial footwear and long
trousers while operating the machine.
Starting up the equipment
1. Make sure that there are no children or other
people nearby, also pay attention to any ani-
mals in the working vicinity. Otherwise stop
usingtheequipment.
2. Before use always check that the equipment
is safe for operation. Check the security of the
cutting tool and the guard and the switch trig-
ger/lever for easy and proper action. Check for
clean and dry handles and test the function of
the start/stop.
3. Check damaged parts before further use of
the equipment. A guard or other part that is
damaged should be carefully checked to deter-
mine that it will operate properly and perform
its intended function. Check for alignment of
moving parts, binding of moving parts, break-
age of parts, mounting, and any other condi-
tion that may affect its operation. A guard or
other part that is damaged should be properly
repaired or replaced by our authorized ser-
vice center unless indicated elsewhere in this
manual.
4. Switch on the motor only when the hands and
feet are away from the cutting tool.
5. Before starting make sure that the cutting tool
has no contact with any objects.
Method of operation
1. Only use the equipment in good light and
visibility. During the winter season beware
of slippery or wet areas, ice and snow (risk
of slipping). Always ensure a safe footing on
slopes and be sure to walk and never run.
2. Take care against injury to feet and hands from
the cutting tool.
3. Never stand on a ladder and run the
equipment.
4. Never climb up into trees to perform cutting
operation with the equipment.

12 ENGLISH
5. Never work on unstable surfaces.
6. Remove sand, stones, nails etc. found within
the working range. Foreign particles may dam-
age the cutting tool and can cause dangerous
kick-backs.
7. Should the cutting tool hit stones or other hard
objects, immediately switch off the motor and
inspect the cutting tool.
8. Inspect the cutting tool at short regular inter-
vals for damage (detection of hairline cracks
by means of tapping-noise test).
9. Before commencing cutting, the cutting tool
must have reached full working speed.
10. The cutting tool has to be equipped with the
appropriate guard. Never run the equipment
with damaged guards or without guards in
place!
11. All protective installations and guards sup-
plied with the equipment must be used during
operation.
12. Always remove the battery cartridge from the
equipment:
— whenever leaving the equipment
unattended;
— before clearing a blockage;
— before checking, cleaning or working on
the equipment;
— after striking a foreign object;
— whenever the equipment starts vibrating
abnormally.
13. Always ensure that the ventilation openings
are kept clear of debris.
14. Cutting means continues to run after the motor
is switched off.
Cutting Tools
Employ only the correct cutting tool for the job
in hand.
Maintenance instructions
1. The condition of the equipment, in particular of
the cutting tool of the protective devices must
be checked before commencing work.
2. Turn off the motor and remove the battery
cartridge before carrying out maintenance,
replacing cutting tools or cleaning the equip-
ment or cutting tool.
3. When not in use, store the equipment indoors
in dry and high or locked-up place - out of the
reach of children. Clean and maintain before
storage.
SAVE THESE INSTRUCTIONS.
WARNING: DO NOT let comfort or familiarity
with product (gained from repeated use) replace
strict adherence to safety rules for the subject
product. MISUSE or failure to follow the safety
rules stated in this instruction manual may cause
serious personal injury.
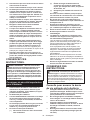
Cordless Hedge Trimmer Safety
Warnings
1. Keep all parts of the body away from the cut-
ter blade. Do not remove cut material or hold
material to be cut when blades are moving.
Make sure the switch is off when clearing
jammed material.Amomentofinattentionwhile
operating the hedge trimmer may result in serious
personalinjury.
2. Carry the hedge trimmer by the handle with
the cutter blade stopped. When transporting or
storing the hedge trimmer always t the cut-
ting device cover.Properhandlingofthehedge
trimmerwillreducepossiblepersonalinjuryfrom
thecutterblades.
3. Hold the power tool by insulated gripping
surfaces only, because the cutter blade may
contact hidden wiring.Cutterbladescontacting
a"live"wiremaymakeexposedmetalpartsofthe
powertool"live"andcouldgivetheoperatoran
electric shock.
4. Do not use the hedge trimmer in the rain or in
wet or very damp conditions.Theelectricmotor
isnotwaterproof.
5. First-time users should have an experienced
hedge trimmer user show them how to use the
trimmer.
6. The hedge trimmer must not be used by
children or young persons under 18 years of
age.Youngpersonsover16yearsofagemaybe
exemptedfromthisrestrictioniftheyareundergo-
ingtrainingunderthesupervisionofanexpert.
7. Use the hedge trimmer only if you are in good
physical condition.Ifyouaretired,yourattention
willbereduced.Beespeciallycarefulattheendof
aworkingday.Performallworkcalmlyandcare-
fully.Theuserisresponsibleforalldamagesto
third parties.
8. Never use the trimmer when under the inu-
ence of alcohol, drugs or medication.
9. Work gloves of stout leather are part of the
basic equipment of the hedge trimmer and
must always be worn when working with it.
Also wear sturdy shoes with anti-skid soles.
10. Before starting work check to make sure
that the trimmer is in good and safe working
order. Ensure guards are tted properly. The
hedge trimmer must not be used unless fully
assembled.
11. Make sure you have a secure footing before
starting operation.
12. Hold the tool rmly when using the tool.
13. Do not operate the tool at no-load
unnecessarily.
14. Immediately switch off the motor and remove
the battery cartridge if the cutter should come
into contact with a fence or other hard object.
Check the cutter for damage, and if damaged
repair immediately.
15. Before checking the cutter, taking care of
faults, or removing material caught in the cut-
ter, always switch off the trimmer and remove
the battery cartridge.

13 ENGLISH
16. Switch off the trimmer and remove the battery
cartridge before doing any maintenance work.
17. When moving the hedge trimmer to another
location, including during work, always
remove the battery cartridge and put the blade
cover on the cutter blades. Never carry or
transport the trimmer with the cutter running.
Never grasp the cutter with your hands.
18. Clean the hedge trimmer and especially the
cutter after use, and before putting the trimmer
into storage for extended periods. Lightly oil
the cutter and put on the cover.Thecoversup-
pliedwiththeunitcanbehungonthewall,pro-
vidingasafeandpracticalwaytostorethehedge
trimmer.
19. Store the hedge trimmer with the cover on, in
a dry room. Keep it out of reach of children.
Never store the trimmer outdoors.
SAVE THESE INSTRUCTIONS.
WARNING: DO NOT let comfort or familiarity
with product (gained from repeated use) replace
strict adherence to safety rules for the subject
product. MISUSE or failure to follow the safety
rules stated in this instruction manual may cause
serious personal injury.
Important safety instructions for
battery cartridge
1. Before using battery cartridge, read all instruc-
tions and cautionary markings on (1) battery
charger, (2) battery, and (3) product using
battery.
2. Do not disassemble battery cartridge.
3. If operating time has become excessively
shorter, stop operating immediately. It may
result in a risk of overheating, possible burns
and even an explosion.
4. If electrolyte gets into your eyes, rinse them
out with clear water and seek medical atten-
tion right away. It may result in loss of your
eyesight.
5. Do not short the battery cartridge:
(1) Do not touch the terminals with any con-
ductive material.
(2) Avoid storing battery cartridge in a con-
tainer with other metal objects such as
nails, coins, etc.
(3) Do not expose battery cartridge to water
or rain.
A battery short can cause a large current
ow, overheating, possible burns and even a
breakdown.
6. Do not store the tool and battery cartridge in
locations where the temperature may reach or
exceed 50 °C (122 °F).
7. Do not incinerate the battery cartridge even if
it is severely damaged or is completely worn
out. The battery cartridge can explode in a re.
8. Be careful not to drop or strike battery.
9. Do not use a damaged battery.
10. The contained lithium-ion batteries are subject
to the Dangerous Goods Legislation require-
ments.
Forcommercialtransportse.g.bythirdparties,
forwardingagents,specialrequirementonpack-
agingandlabelingmustbeobserved.
Forpreparationoftheitembeingshipped,consult-
inganexpertforhazardousmaterialisrequired.
Pleasealsoobservepossiblymoredetailed
national regulations.
Tapeormaskoffopencontactsandpackupthe
batteryinsuchamannerthatitcannotmove
around in the packaging.
11. Follow your local regulations relating to dis-
posal of battery.
SAVE THESE INSTRUCTIONS.
CAUTION: Only use genuine Makita batteries.
Useofnon-genuineMakitabatteries,orbatteriesthat
havebeenaltered,mayresultinthebatterybursting
causingres,personalinjuryanddamage.Itwill
alsovoidtheMakitawarrantyfortheMakitatooland
charger.
Tips for maintaining maximum
battery life
1. Charge the battery cartridge before completely
discharged. Always stop tool operation and
charge the battery cartridge when you notice
less tool power.
2. Never recharge a fully charged battery car-
tridge. Overcharging shortens the battery
service life.
3. Charge the battery cartridge with room tem-
perature at 10 °C - 40 °C (50 °F - 104 °F). Let
a hot battery cartridge cool down before
charging it.
4. Charge the battery cartridge if you do not use
it for a long period (more than six months).

14 ENGLISH
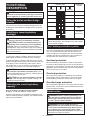
FUNCTIONAL
DESCRIPTION
CAUTION: Always be sure that the tool is
switched off and the battery cartridge is removed
before adjusting or checking function on the tool.
Using the tool as cordless hedge
trimmer
Thistoolcanbeusedasacordlesshedgetrimmerby
installingtheshearbladesforhedgetrimmer(optional
accessory).
Installing or removing battery
cartridge
CAUTION: Always switch off the tool before
installing or removing of the battery cartridge.
CAUTION: Hold the tool and the battery car-
tridge rmly when installing or removing battery
cartridge.Failuretoholdthetoolandthebattery
cartridgermlymaycausethemtoslipoffyourhands
andresultindamagetothetoolandbatterycartridge
andapersonalinjury.
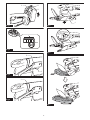
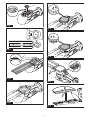
►Fig.1: 1. Red indicator 2. Button 3. Battery cartridge
Toremovethebatterycartridge,slideitfromthetool
whileslidingthebuttononthefrontofthecartridge.
Toinstallthebatterycartridge,alignthetongueonthe
batterycartridgewiththegrooveinthehousingandslip
it into place. Insert it all the way until it locks in place
withalittleclick.Ifyoucanseetheredindicatoronthe
uppersideofthebutton,itisnotlockedcompletely.
CAUTION: Always install the battery cartridge
fully until the red indicator cannot be seen.Ifnot,
itmayaccidentallyfalloutofthetool,causinginjuryto
you or someone around you.
CAUTION: Do not install the battery cartridge
forcibly.Ifthecartridgedoesnotslideineasily,itis
notbeinginsertedcorrectly.
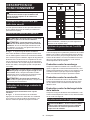
Indicating the remaining battery
capacity
Only for battery cartridges with the indicator
►Fig.2: 1. Indicator lamps 2.Checkbutton
Pressthecheckbuttononthebatterycartridgetoindi-
catetheremainingbatterycapacity.Theindicatorlamps
lightupforfewseconds.
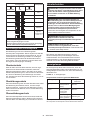
Indicator lamps Remaining
capacity
Lighted Off Blinking
75% to 100%
50% to 75%
25% to 50%
0% to 25%
Charge the
battery.
Thebattery
may have
malfunctioned.
NOTE:Dependingontheconditionsofuseandthe
ambienttemperature,theindicationmaydifferslightly
fromtheactualcapacity.
Tool / battery protection system
Thetoolisequippedwithatool/batteryprotectionsys-
tem.Thissystemautomaticallycutsoffpowertothe
motortoextendtoolandbatterylife.Thetoolwillauto-
maticallystopduringoperationifthetoolorbatteryis
placedunderoneofthefollowingconditions:
Overload protection
Whenthebatteryisoperatedinamannerthatcauses
ittodrawanabnormallyhighcurrent,thetoolautomati-
callystops.Inthissituation,turnthetooloffandstopthe
applicationthatcausedthetooltobecomeoverloaded.
Thenturnthetoolontorestart.
Overheat protection
Whenthetoolorbatteryisoverheated,thetoolstops
automaticallyandthelampblinks.Inthiscase,letthe
toolandbatterycoolbeforeturningthetoolonagain.
Overdischarge protection
Whenthebatterycapacityisnotenough,thetoolstops
automatically.Inthiscase,removethebatteryfromthe
toolandchargethebattery.
Switch action
WARNING: Before installing the battery car-
tridge into the tool, always check to see that the
switch trigger actuates properly and returns to
the "OFF" position when released.
WARNING: For your safety, this tool is
equipped with the lock-off button which prevents
the tool from unintended starting. Never use the
tool if it starts when you pull the switch trigger
without pressing the lock-off button.Askyourlocal
MakitaServiceCenterforrepairs.

15 ENGLISH
WARNING: Never disable the lock function or
tape down the lock-off button.
NOTICE: Do not pull the switch trigger forcibly
without pressing the lock-off button.Theswitch
maybreak.
►Fig.3: 1. Switch trigger 2.Lock-offbutton
Tostartthetool,depressthelock-offbuttonandpullthe
switchtrigger.Releasetheswitchtriggertostop.The
lock-offbuttoncanbepressedfromeithertherightor
leftside.
Indicator lamp
Theindicatorlampblinksorlightsupwhentheremain-
ingbatterycapacityisloworempty.Theindicatorlamp
alsolightsupwhenthetoolbecomesoverloaded.
►Fig.4: 1. Indicator lamp
Lamp status and action to be taken
Indicator lamp Status Actiontobetaken
Thelampblinks
red.
Theremaining
batterycapacity
is low.
Chargethebattery.
Thelamplightsup
red. *
Thetoolhas
stoppedbecause
the remaining
batterycapacityis
empty.
Chargethebattery.
Thetoolhas
stopped due to
overload.
Turnoffthetool.
*Thetimeatwhichtheindicatorlamplightsupvariesdepending
onthetemperaturearoundtheworkareaandthebatterycar-
tridge conditions.
Adjusting the shearing height (for
grass shear)
CAUTION: When changing the shearing
height, be sure to attach the blade cover and be
careful not to trap ngers between the tool and
grass receiver.
Theshearingheightcanbesettothreelevels(15mm,
20mm,and25mm)bychangingthexedpositionof
thegrassreceiver.Theshearingheightwithoutthe
grassreceiverisabout10mm.
1. Slidethegrassreceivertowardthefrontofthe
tool.
►Fig.5: 1. Grass receiver
2. Changethexedpositionofthegrassreceiverby
movingitinthedirectionofthearrow.
►Fig.6
NOTE:Theshearingheightvalueisaguideline.The
actual shearing height may vary depending on the
conditionofthelawnortheground.
NOTE:Tryatestshearinginalessconspicuous
place to get your desired height.
ASSEMBLY
CAUTION: Always be sure that the tool is
switched off and the battery cartridge is removed
before carrying out any work on the tool.
CAUTION: When replacing the shear blades,
always wear gloves and attach the blade cover so
that your hands and face do not directly contact
the blades.
NOTICE: When replacing the shear blades, do
not wipe off grease from the gear and crank.
Installing or removing the blade
cover
CAUTION: Be careful not to touch the blades
when installing or removing the blade cover.
Toremovethebladecover,pullitslightly,andthenslide
itsideways.Toinstallthebladecover,performthesteps
in reverse.
►Fig.7
Installing or removing the grass
receiver
CAUTION: When installing or removing the
grass receiver, be sure to attach the blade cover
and be careful not to trap your ngers between
the tool and grass receiver.
Removing the grass receiver
1. Release the protrusions on the grass receiver
fromthegroovesonthetoolwhileslidingthegrass
receivertowardthefrontofthetool.
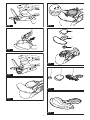
►Fig.8: 1. Grass receiver
2. Releasethehingeofthegrassreceiverfromthe
tool.
Installing the grass receiver
1. Hookthehingeofthegrassreceiveronthegroove
ofthetool.
►Fig.9: 1. Hinge 2. Grass receiver
2. Aligntheprotrusionsonthegrassreceiverwith
thegroovesonthetoolbyslidingthegrassreceiver
towardthefrontofthetoolandmovingitinthedirection
ofthearrow.
►Fig.10
NOTICE: Do not attach the hinge of the grass
receiver to the tool forcibly after aligning the pro-
trusions on the grass receiver with the grooves
on the tool.

16 ENGLISH
Installing or removing the shear
blades for grass shear
Removing the shear blades
1. Remove the grass receiver and place the tool
upside down.
►Fig.11
2. While pressing the lock lever, turn the undercover
counterclockwise until on the undercover is aligned
with on the lock lever.
►Fig.12
3. Removetheundercover,shearblades,andcrank.
►Fig.13: 1.Undercover2.Shearblades3. Crank
Installing the shear blades
1. Preparethecrank,undercover,andnewshear
blades.
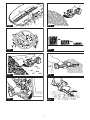
►Fig.14: 1. Crank 2.Undercover3.Shearblades
2. Removethebladecoverfromtheoldshear
blades,andthenattachittothenewones.
►Fig.15
3. Adjustthethreepinssothattheyarelinedupon
the alignment line.
►Fig.16: 1.Alignmentline
4. Applyasmallamountofgreasetotheperiphery
ofthecrank.Attachthecranktothepinswiththesmall
andlargeroundsfacingup.
►Fig.17: 1. Crank
5. Adjustthebladesandbaseplatesothatthehole
inthebaseplateandthetwoprotrusionsontheblades
are lined up.
►Fig.18
6. Turntheshearbladesupsidedownandinstall
themsothatthepinsonthetooltintheholeonthe
baseplate.Makesurethattheshearbladesarexed
securely in place.
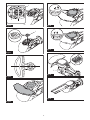
►Fig.19
7. Placetheundercoversothat on the under-
cover is aligned with on the lock lever.
►Fig.20
8. While pressing the undercover, turn the under-
cover clockwise until on the undercover is aligned
with on the lock lever.
►Fig.21
9. Makesurethatthelocklevertsinthegrooveon
the undercover.
►Fig.22: 1. Lock lever
CAUTION: Never use the tool without install-
ing the undercover.
10. Removethebladecover,andthenturnonthetool
to check that it works properly.
NOTICE: If the shear blades do not operate prop-
erly, the blades are not engaging the crank prop-
erly. Remove the blades and install them again.
Installing or removing shear blades
for hedge trimmer
Optional accessory
CAUTION: Attach the blade cover before
removing or installing the shear blades.
Removing shear blades
1. Placethetoolupsidedown.
►Fig.23
2. While pressing the lock lever, turn the undercover
counterclockwise until on the undercover is aligned
with on the lock lever.
►Fig.24
3. Remove the undercover.
►Fig.25
4. Loosen two screws with a screwdriver and remove
theshearblades.
►Fig.26: 1. Screws
NOTE:Theshearbladescanberemovedwithout
removing the screws.
5. Removethecrankfromtheshearblades.
►Fig.27: 1. Crank
NOTE:Thecrankmayremaininthetool.
NOTE:Attachthebladecoverandthestoragecase
totheremovedshearblades,andthenstorethe
blades.
Installing shear blades
1. Preparethecrank,undercover,andnewshear
blades.
►Fig.28: 1. Crank 2.Undercover3.Shearblades
2. Attachthebladecovertotheshearblades.
►Fig.29
3. Adjustthethreepinssothattheyarelinedupon
the alignment line.
►Fig.30: 1.Alignmentline
4. Applyasmallamountofgreasetotheperipheryof
thecrank.Attachthecranktothepinswithitssmalland
largeroundsfacingdown.
►Fig.31: 1. Crank
5. Slidetheshearbladessothattheholeonthe
baseplateispositionedatthecenteroftheringsof
blades.
►Fig.32
6. Turntheshearbladesupsidedownandinstall
themsothatthepinonthetooltsintheholeonthe
shearblades.Inserttheclawofthebaseplateintothe
grooveonthetool.Makesurethattheshearbladesare
xedsecurelyinplace.

17 ENGLISH
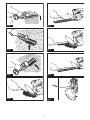
►Fig.33: 1. Claw
7. Tightenthetwoscrewsrmlywithascrewdriver.
►Fig.34: 1. Screws
8. Placetheundercoversothat on the under-
cover is aligned with on the lock lever.
►Fig.35
9. While pressing the undercover, turn the under-
cover clockwise until on the undercover is aligned
with on the lock lever.
►Fig.36
10. Makesurethatthelocklevertsinthegrooveon
the undercover.
►Fig.37: 1. Lock lever
CAUTION: Never use the tool without install-
ing the undercover.
11. Removethebladecover,andthenturnonthetool
tocheckifthetoolworksproperly.
NOTICE: If the shear blades do not operate prop-
erly, the blades are not engaging the crank prop-
erly. Remove the blades and install them again.
Installing or removing the chip
receiver
Optional accessory
CAUTION: When installing or removing the
chip receiver, always wear gloves and attach the
blade cover so that your hands and face do not
directly contact the blade.
Thechipreceivergathersdiscardedleavesandmakes
clean-upafterwardmucheasier.Itcanbeinstalledon
eithersideofthetool.
Toinstallthechipreceiver,pressitagainsttheshear
bladessothatthehookstintotheholesoftheshear
blades.
►Fig.38: 1. Hooks 2. Holes
Toremovethechipreceiver,presstheleversonboth
sides to release the hooks.
►Fig.39: 1. Levers
NOTICE: Never try to remove the chip receiver
by an excessive force with its hooks locked in the
holes of the blades.
OPERATION
WARNING: Before shearing, clear away sticks
and stones from the shearing area. Furthermore,
clear away any weeds from the shearing area in
advance.
►Fig.40
WARNING: Keep hands away from blades.
CAUTION: Avoid operating the tool in very
hot weather as much as practicable. When operat-
ing the tool, be careful of your physical condition.
Shearing (for grass shear)
Turnthetoolonafteradjustingtheshearingheightand
holditsothatthebottomofthetoolrestsontheground.
Gentlymovethetoolforward.
►Fig.41
Whentrimmingaroundcurbs,fencesortrees,movethe
toolalongthem.Becarefulthatthebladesdonotcome
into contact with them.
►Fig.42
Whentrimmingsproutsorfoliageofasmalltree,trim
littlebylittle.
►Fig.43
Trimlargebranchestothedesiredheightusingbranch
cuttersbeforeusingthistool.
NOTICE: Do not use the tool in a way that causes
the motor to stop or to rotate extremely slowly.
NOTICE: Do not attempt to cut thick branches.
NOTICE: Do not allow the shear blades to con-
tact the ground during operation. The blades will
be dulled, causing poor performance.
NOTICE: Do not trim the wet grass or foliage of
small trees.
Cutting long lawn
Do not try to cut long grass all at once. Instead, cut the
lawninsteps.Leaveadayortwobetweencutsuntilthe
lawnbecomesevenlyshort.
►Fig.44
NOTE: Cutting long grass to a short length all at once
may cause the grass to die.
Trimming (for hedge trimmer)
CAUTION: Be careful not to accidentally
contact a metal fence or other hard objects while
trimming.Thebladesmaybreakandcauseaninjury.
CAUTION: Be careful not to allow the shear
blades to contact the ground.Thetoolmayrecoil
andcauseaninjury.
CAUTION: Overreaching with a hedge trim-
mer, particularly from a ladder, is extremely
dangerous. Do not work while standing on anything
wobblyorinrm.
NOTICE: Do not attempt to cut branches thicker
than 10 mm in diameter with the tool.Cutbranches
tothedesiredheightusingbranchcuttersbefore
using the tool.

18 ENGLISH
NOTICE: Do not cut down dead trees or similar
hard objects. Doing so may damage the tool.
NOTICE: Do not trim the grass or weeds while
using the shear blades.Thebladesmaybecome
tangled in the grass or weeds.
Hold the tool with one hand, pull the switch trigger while
pressingthelock-offbutton,andthenmoveitforward.
►Fig.45
Forbasicoperation,tiltthebladestowardthetrimming
direction and move it calmly and slowly at the speed
rateof3to4secondspermeter.
►Fig.46
Totieastringatthedesiredheightandtotrimalongit
help you to cut a hedge top evenly.
►Fig.47
Ifthechipreceiverisattachedtotheblades,itgathers
discardedleavesandmakesclean-upafterwardmuch
easier.
Tocutahedgesideevenly,cutfromthebottomtotop.
►Fig.48
Whentrimmingtomakearoundshape(trimmingbox-
woodorrhododendron,etc.),trimfromtheroottothe
topforabeautifulnish.
►Fig.49
MAINTENANCE
CAUTION: Always be sure that the tool is
switched off and the battery cartridge is removed
before attempting to perform inspection or
maintenance.
TomaintainproductSAFETYandRELIABILITY,
repairs,anyothermaintenanceoradjustmentshould
beperformedbyMakitaAuthorizedorFactoryService
Centers,alwaysusingMakitareplacementparts.
Cleaning the tool
Cleanthetoolbywipingoffdustwithadryclothorone
dipped in soapy water and wrung out.
NOTICE: Never use gasoline, benzine, thinner,
alcohol or the like. Discoloration, deformation or
cracks may result.
Blade maintenance
Beforetheoperationoronceperhourduringoperation,
applylow-viscosityoil(machineoil,orspray-typelubri-
catingoil)totheblades.
►Fig.50
►Fig.51
Afteroperation,removedustfrombothsidesofthe
bladeswithawiredbrush,wipeitoffwithaclothand
then apply low-viscosity oil (machine oil, or spray-type
lubricatingoil)totheblades.
►Fig.52
►Fig.53
NOTICE: Do not wash the blades in water. Doing
so may cause rust or damage to the tool.
NOTICE: Dirt and corrosion cause excessive
blade friction and shorten the operating time per
battery charge.
Storage
Thehookholeinthetoolbottomisconvenientforhang-
ingthetoolfromanailorscrewonthewall.
Attachthebladecovertotheshearbladessothatthe
bladesarenotexposed.Storethetooloutofthereach
ofchildren.Storethetoolinaplacenotexposedto
moisture or rain.
►Fig.54: 1. Hole
►Fig.55: 1. Hole
OPTIONAL
ACCESSORIES
CAUTION: These accessories or attachments
are recommended for use with your Makita tool
specied in this manual.Theuseofanyother
accessoriesorattachmentsmightpresentariskof
injurytopersons.Onlyuseaccessoryorattachment
foritsstatedpurpose.
Ifyouneedanyassistanceformoredetailsregard-
ingtheseaccessories,askyourlocalMakitaService
Center.
• Shearbladeassembly(forgrassshearuse)
• Shearbladecover(forgrassshearuse)
• Grassreceiver(forgrassshearuse)
• Longhandleattachment(forgrassshearuse)
• Shearbladeassembly(forhedgetrimmeruse)
• Shearbladecover(forhedgetrimmeruse)
• Chipreceiver(forhedgetrimmeruse)
• Storagecase
• Makitagenuinebatteryandcharger
NOTE:Someitemsinthelistmaybeincludedinthe
toolpackageasstandardaccessories.Theymay
differfromcountrytocountry.

19 FRANÇAIS
FRANÇAIS (Instructions originales)
SPÉCIFICATIONS
Modèle : DUM604
Largeur de coupe 160 mm
Nombredecoursesparminute 2 500 min-1
Dimensions
(L x l x H)
353 mm x 177 mm x 131 mm
Tensionnominale 18 V CC
Batterie BL1815 / BL1815N / BL1820 / BL1820B / BL1830 / BL1830B /
BL1840 / BL1840B / BL1850 / BL1850B / BL1860B
Poidsnet 1,4 à 1,8 kg
• Étantdonnél’évolutionconstantedenotreprogrammederechercheetdedéveloppement,lesspécications
contenuesdanscemanuelsontsujettesàmodicationsanspréavis.
• Lesspécicationsetlabatteriepeuventêtredifférentessuivantlespays.
• Poids,aveclabatterie,conformémentàlaprocédureEPTA-01/2003
Symboles
Voustrouverezci-dessouslessymbolesutiliséspour
l’appareil.Veillezàcomprendreleursignicationavant
toute utilisation.
Veuillezêtreprudentetresterattentif.
Lirelemoded’emploi.
Danger;prendregardeauxprojections
d’objets.
Tenezlespersonnesàl’écart.
Lesdispositifsdecoupecontinuentde
tournerunefoislemoteurcoupé.
Nepasexposeràl’eau.
Cd
Ni-MH
Li-ion
Pourlespaysdel’Unioneuropéenne
uniquement
Nejetezpaslesappareilsélectriquesou
lesbatteriesavecvosorduresménagères!
Conformémentauxdirectiveseuropéennes
relativesauxdéchetsd’équipements
électriquesetélectroniquesetauxpiles
etaccumulateursainsiqu’auxdéchetsde
pilesetd’accumulateursetleurmiseen
œuvreconformémentauxloisnationales,
leséquipementsélectriques,lespilesetles
batteriesenndeviedoiventfairel’objet
d’unecollectesélectiveetêtreconésà
une usine de recyclage respectueuse de
l’environnement.
Utilisations
L’outilestconçupourcouperlesbordsdepelouseou
les pousses.
Bruit
NiveaudebruitpondéréAtypique,déterminéselon
EN50636:
DUM604 avec lame de cisaille pour taille-herbes installée
Niveau de pression sonore (LpA):76dB(A)
Incertitude(K):0,98dB(A)
Leniveaudebruitenfonctionnementpeutdépasser80dB(A).
AVERTISSEMENT : Portez un serre-tête
antibruit.
NiveaudebruitpondéréAtypique,déterminéselon
EN60745:
DUM604 avec lame de cisaille pour taille-haie installée
Niveau de pression sonore (LpA):74dB(A)
Incertitude(K):3dB(A)
Leniveaudebruitenfonctionnementpeutdépasser80dB(A).
AVERTISSEMENT : Portez un serre-tête
antibruit.
Vibrations
Valeurtotaledevibrations(sommedevecteurtriaxial)
déterminéeselonEN50636:
DUM604 avec lame de cisaille pour taille-herbes installée
Émissiondevibrations(ah):2,5m/s2 ou moins
Incertitude(K):1,5m/s2
Valeurtotaledevibrations(sommedevecteurtriaxial)
déterminéeselonEN60745:
DUM604 avec lame de cisaille pour taille-haie installée
Émissiondevibrations(ah):2,5m/s2 ou moins
Incertitude(K):1,5m/s2
NOTE :
Lavaleurd’émissiondevibrationsdéclaréeaété
mesuréeconformémentàlaméthodedeteststandardet
peutêtreutiliséepourcomparerlesoutilsentreeux.
NOTE :
Lavaleurd’émissiondevibrationsdéclaréepeut
aussiêtreutiliséepourl’évaluationpréliminairedel’exposition.

20 FRANÇAIS
AVERTISSEMENT :L’émissiondevibrations
lorsdel’usageréeldel’outilélectriquepeutêtre
différentedelavaleurd’émissiondéclarée,suivantla
façondontl’outilestutilisé.
AVERTISSEMENT :Lesmesuresdesécuritéà
prendrepourprotégerl’utilisateurdoiventêtrebasées
suruneestimationdel’expositiondansdescondi-
tionsréellesd’utilisation(entenantcomptedetoutes
lescomposantesducycled’utilisation,commepar
exemplelemomentdesamisehorstension,lorsqu’il
tourneàvideetlemomentdesondéclenchement).
Déclaration de conformité CE
Pour les pays européens uniquement
LadéclarationdeconformitéCEestfournieenAnnexe
Aàcemoded’emploi.
CONSIGNES DE
SÉCURITÉ
Consignes de sécurité générales
pour outils électriques
AVERTISSEMENT : Veuillez lire les
consignes de sécurité, instructions, illustrations
et spécications qui accompagnent cet outil
électrique. Le non-respect de toutes les instructions
indiquéesci-dessouspeutentraîneruneélectrocu-
tion,unincendieet/oudegravesblessures.
Conservez toutes les mises en
garde et instructions pour réfé-
rence ultérieure.
Leterme«outilélectrique»danslesavertissements
faitréférenceàl’outilélectriquealimentéparlesecteur
(aveccordond’alimentation)ouàl’outilélectriquefonc-
tionnantsurbatterie(sanscordond’alimentation).
Consignes de sécurité pour taille-
herbes sans l
Généralités
1. Pour garantir un fonctionnement correct,
vous devez lire ce manuel d’instructions en
vue de vous familiariser avec la manipulation
de l’équipement.Lesutilisateursmalinformés
risquent,pardesmanipulationsinappropriées,de
seblesseroudeblesserleurentourage.
2. Ne laissez en aucun cas les enfants, les per-
sonnes aux facultés physiques, sensorielles
ou mentales diminuées ou sans expérience
ni expertise ou les personnes qui ne sont pas
familiarisées avec ces instructions utiliser la
machine. Les réglementations locales peuvent
limiter l’âge de l’utilisateur.
3. Soyez toujours très prudent et attentif lorsque
vous utilisez l’équipement.
4.
N’utilisez l’équipement que si vous êtes en bonne
condition physique. Travaillez toujours en faisant
preuve de calme et de prudence. Faites preuve de
bons sens et gardez à l’esprit que l’opérateur ou l’uti-
lisateur est responsable des accidents ou risques
encourus par les personnes ou leur propriété.
5.
N’utilisez jamais la machine alors que des per-
sonnes — et tout particulièrement des enfants — ou
des animaux domestiques se trouvent à proximité.
6.
Vous devez immédiatement couper le moteur si
l’équipement présente un problème ou une anomalie.
7.
Éteignez et retirez la batterie lorsque vous faites
une pause et lorsque vous laissez l’équipement
sans surveillance, et rangez-le dans un endroit
où il ne représentera un danger pour personne
et ne risquera pas d’être endommagé.
8. Évitez d’utiliser la machine par mauvais temps,
particulièrement en cas d’orage.
Équipement de protection individuelle
1. Portez toujours une protection oculaire et des
chaussures solides pendant que vous utilisez
la machine.
2. Portez toujours des chaussures adaptées et
un pantalon long pendant l’utilisation de la
machine.
Démarrage de l’équipement
1. Assurez-vous qu’il n’y a pas d’enfants ou
d’autres personnes à proximité. Faites éga-
lement attention aux animaux aux alentours.
Autrement,arrêtezd’utiliserl’équipement.
2. Avant de l’utiliser, vériez toujours la sécu-
rité de l’équipement. Vériez la sécurité de
l’outil de coupe, du carter de protection et de
la gâchette ou du levier pour un fonctionne-
ment facile et correct. Assurez-vous que les
poignées sont propres et sèches et vériez le
fonctionnement de marche/arrêt.
3. Vériez qu’aucune pièce n’est endommagée
avant de continuer à utiliser l’équipement.
Vériez soigneusement le carter de protection
ou toute autre pièce endommagés pour vous
assurer qu’ils fonctionnent bien et remplissent
leurs fonctions respectives. Assurez-vous
que les pièces en mouvement ne sont pas
désalignées ou coincées, qu’aucune pièce ou
xation n’est cassée ou la présence de toute
autre condition pouvant affecter le bon fonc-
tionnement. Si le carter de protection ou toute
autre pièce sont endommagés, ils doivent être
réparés ou remplacés de manière adéquate par
notre centre de service après-vente agréé sauf
indication contraire dans ce manuel.
4.
Démarrez le moteur uniquement lorsque les mains
et les pieds sont éloignés de l’outil de coupe.
5. Avant le démarrage, vériez que l’outil de
coupe n’entre en contact avec aucun objet.
Utilisation
1. N’utilisez l’équipement qu’avec une bonne
visibilité et un bon éclairage. En hiver, faites
attention aux sols glissants ou aux zones
humides, à la glace et à la neige (risque de
glissade). Gardez toujours un bon appui au sol
sur les terrains en pente et veillez toujours à
marcher et à ne jamais courir.
Seite wird geladen ...
Seite wird geladen ...
Seite wird geladen ...
Seite wird geladen ...
Seite wird geladen ...
Seite wird geladen ...
Seite wird geladen ...
Seite wird geladen ...
Seite wird geladen ...
Seite wird geladen ...
Seite wird geladen ...
Seite wird geladen ...
Seite wird geladen ...
Seite wird geladen ...
Seite wird geladen ...
Seite wird geladen ...
Seite wird geladen ...
Seite wird geladen ...
Seite wird geladen ...
-
 1
1
-
 2
2
-
 3
3
-
 4
4
-
 5
5
-
 6
6
-
 7
7
-
 8
8
-
 9
9
-
 10
10
-
 11
11
-
 12
12
-
 13
13
-
 14
14
-
 15
15
-
 16
16
-
 17
17
-
 18
18
-
 19
19
-
 20
20
-
 21
21
-
 22
22
-
 23
23
-
 24
24
-
 25
25
-
 26
26
-
 27
27
-
 28
28
-
 29
29
-
 30
30
-
 31
31
-
 32
32
-
 33
33
-
 34
34
-
 35
35
-
 36
36
-
 37
37
-
 38
38
-
 39
39


Makita DUM604 Benutzerhandbuch
- Kategorie
- Power Heckenscheren
- Typ
- Benutzerhandbuch
in anderen Sprachen
- English: Makita DUM604 User manual
- français: Makita DUM604 Manuel utilisateur
Verwandte Artikel
-
Makita DUH507 Benutzerhandbuch
-
-
-
Makita UM600D Benutzerhandbuch
-
Makita UP100D Benutzerhandbuch
-
-
-
Makita VR001G Benutzerhandbuch
-
-
Makita DHW080 Benutzerhandbuch
Andere Dokumente
-
Dolmar DUM604 Bedienungsanleitung
-
-
-
 alza Tools AT-CBBC40V Cordless Brush Cutter-Sting Trimmer Benutzerhandbuch
-
Parkside PGSA 4 A2 Bedienungsanleitung
-
-
-
Batavia BT-CHT003 Benutzerhandbuch
-
Kerbl 18155 Benutzerhandbuch
