Seite wird geladen ...

Anleitungen und Hinweise zu Installation und Einsatz
Instructions and warnings for installation and use
Instructions et avertissements pour l’installation et l’usage
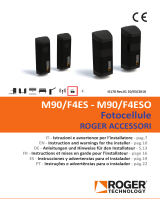
batteriebetriebene Infrarot-Lichtschranken
battery-powered photocells
Photocellules à piles
FT42B

-5°
+5 °
0 °
1
8
0
patentiert
breveté
patented
TX
RX
Stromversorgung des
Empfängers / power supply of the
receiver/ alimentation du recepteur
Vac/dc 12 / 24
Stromversorgung des Senders /
power supply of the trasmitter /
alimentation de l’emetteur
2 x AAA 1,5V 3,0 V
Bereich Versorgungsspannung / limit
power supply / limites d’alimentation
18-35Vdc 15-
28Vac
max. Reichweite / max. range up / portée
m 10 / 20
max. TX-Leistungsaufnahme / max. TX
power absorption / consommation TX
mA 0,04 / 0,12
max. RX-Leistungsaufnahme / max. RX
power absorption / consommation RX
mA 35
Ausgangsrelaiskontakt / output
relay contact / type de relais
max 500mA e
48Vac/dc
Schutzgrad / protection / protection
IP 55 EN 60529
JUMPER
1 2
3
4
NC
13.5Vdc / 24Vac
13.5Vdc / 24Vac
JUMPER
3
4
N A
Default
1
2
3
verbindung herstellen
oder NC:
make a link or NC:
faire un pontet or NC:
Batterie
Battery
Batterie
ACHTUNG!! Wenn mehrere Lichtschranken ohne Synchronisation
installiert werden, wird die Qualität des Signals immer ineffizient sein.
Um die Qualität des Signals zu überprüfen, decken Sie alle Sender ab
(mit Ausnahme des zu prüfenden).
ATTENTION!! If several photocells are being installed
without synchronization, the quality of the signal will always be
inefficient. In order to check the quality of the signal, cover all the
transmitters (apart from the one that is being checked).
ATTENTION!! Dans le cas où plusieurs paires de photocellules
sont installées sans synchronisation, la qualité du signal pourrait
être incorrecte. Dans ce cas, pour effectuer la vérification, il faut
obscurcir tous les emetteurs à l’exception de l’émetteur intéressé.
Leistungssignal
Power signal
Puissance signal
LED-B Signalqualität
LED-B signal quality
LED-B qualité signal
LED-C Ausrichtung OK=ON
LED-C alignment OK=ON
LED-C alignement OK=ON
1 2
*1 CODE
ON !!
*2 RESET
ON+OFF !!
*1 CODE ON !!
DIP 1 muss in Zustand ON
bleiben
*2 RESET ON+OFF !!
Nach dem Wechsel der Batterien stecken Sie den DIP2 einmal auf
ON und wieder auf OFF, um die Lichtschranke zurück zu setzen.
*1 CODE ON !!
DIP 1 should be positioned in ON
*2 RESET ON+OFF !!
When you change the battery put the DIP2 in ON and THEN in
OFF to reset the photocell.
*1 CODE ON !!
DIP 1 doit être positioné en ON
*2 RESET ON+OFF !!
Au changement de la pile il faut mettre le DIP2 en ON et APRES
en OFF pour effacer la photocellule.
LED-B signal quality
1 = NEIN! Kein gutes Signal / NO! No good signal
2 = NEIN! Wenig gutes Signal / NO! Little good signal
3 = JA! Gutes Signal / YES! Good signal
4 = JA! Sehr gutes Signal / YES! Very good signal
pause
pause pause...
pause pause...
pause pause..
pause...
LED ON
MIN
MAX

1
8
0
°
B
F
A
D
E
B
H
G
-5°
+5°
0°
C
B
BAT-3PLUS
2 x AAA
1,5V
Montage
assembly
assemblage
TX
RX
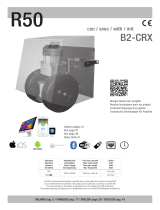
Die Grafik zeigt die Standardnutzung der batteriebetriebenen
Lichtschranke. Der NC Kontakt der Lichtschranke unterbricht bei Druck
auf die mechanische SKS den Infrarotstrahl. Der Öffnerkontakt des
Empfängers ist an den Eingang der Lichtschranke oder den Stopp-
Eingang der Steuerung angeschlossen.
In this photo it is shown the standard use of the photocell with battery.
The N.C. contact of the mechanical edge contact in the photocell. In
this way, every pression of the mechanical edge interrupt the infrared
ray. The N.C. contact of the receiver is connected to the photocell input
or to stop input of a control board.
Dans la photo il est montré l’ utilisation classique de la photocellule
avec pile. Le contact N.F. de la barre palpeuse est branché au contact
de la barre palpeuse de l’émetteur. A chaque pression de la barre
palpause correspond une interruption du faisceau infrarouge.
Le contact N.F. du récepteur de la photocellule peut être branché à une
entrée de la photocellule ou à une entrée STOP n’importe quelle armoire.
Die batteriebetriebene Lichtschranke ist für den Einsatz bei Schiebetoren oder zur Lösung des Problems der Übertragung der SKS vorgesehen. Sie
kann als Standard-Lichtschranke verwendet werden, wenn der Sender nicht mit Strom versorgt werden kann. SEHR WICHTIG!!!! Der Empfänger
muss so installiert werden, dass er nicht von anderen Fotozellen gestört werden kann.
The photocell with battery is designed to be used with sliding gates or to solve the problem of mechanical edge. It can be used as standard
photocell in case the transmitter cannot be power supplied. VERY IMPORTANT!!! The receiver has to be installed in a way which cannot be
disturbed from other photocells.
La photocellule avec pile est réalisée pour être utilisée avec la barre palpeuse. Elle peut être utilisée comme une photocellule standard dans le
cas l’émetteur ne peut pas être alimenté. TRES IMPORTANT!!! Il faut installer le recepteur dans la manière qu’il faut des interférences par
des autres photocellules.
NC
A Rückseite backside fond
B
Schrauben für die Wandmontage
wallmount xing screws vis de xation murale
C
Kabelöffnungen vorgestanzt
holes passage spin connection trous pour le branchement
D Relaisplatine
circuit circuit imprimé
E Platinenhalter sphere support Support
F Drehgelenk rotating block blocage rotation
G Schrauben Drehgelenk xing screws rotating block vis de xation pour le blocage rotation
H Abdeckung mit Streuscheibe cover couvercle
Öffnen Sie die Lichtschranke mit einem
Schraubendreher zwischen dem Boden und dem
Deckel.
Open the photocell with a screwdriver between
the botton and the wall.
Ouvrir la photocellule avec un tournevis entre le
couvercle et le mur.
Anschluss SKS oder NC:
make a link or NC:
faire un pontet or NC:
1 2

Key Automation S.r.l.
Via A. Volta 30 - 30020 Noventa di Piave (VE)
T. +39 0421.307.456 - F. +39 0421.656.98
info@keyautomation.it - www.keyautomation.it
Instruction version
580ISFT42B rev.00
'azienda
The undersigned Nicola Michelin, General Manager of the company:
declares that the product type:
Infrared photocells with RX-TX module
Models:
, 900FT42B
Is in conformity with the following community (EC) regulations:
In accordance with the following harmonized standards regulations:
General Manager
1/4