Lenco Classic Phono TT-33 Blue Bedienungsanleitung
- Kategorie
- Audio-Plattenspieler
- Typ
- Bedienungsanleitung

Model TT-33
User manual Retro Suit Case Turntable
Gebruiksaanwijzing Platenspeler in Retro Behuizing
Benutzerhandbuch Koffer-Plattenspieler im Retro-Stil
Mode d’emploi Tourne-Disque Valise Rétro
Manual del usuario Maleta Retro Para Tocadisco

Version: 1.0
Index
English ............................................................................................................................................... 3
Nederlands ...................................................................................................................................... 12
Deutsch ........................................................................................................................................... 21
Français ........................................................................................................................................... 31
Español ........................................................................................................................................... 41

3
English
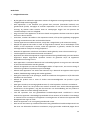
1. Safety instructions
• When using electrical equipment basic safety precautions should always be followed.
• This equipment is not intended to be used by persons (including children) with reduced
physical, sensory or mental capabilities or lack of experience or knowledge. They should be
given appropriate supervision and instructions to use the equipment by a person responsible
for their safety.
• Ensure the equipment is not too close to heat emitting appliances or placed in direct sunlight.
• Check that the voltage indicated on the data plate corresponds with that of the local network
before connecting the equipment to the mains power supply.
• Do not leave the equipment unattended while connected to the power supply.
• Do not immerse the equipment in water or any other liquids. It is imperative to unplug the
power cord after the equipment has been used, before it is cleaned and while being repaired.
• Close supervision is required when using this equipment near children.
• Never leave the equipment within the reach of children.
• Repairs to electrical appliances should only be performed by qualified personnel. Improper
repairs may place the user and/or equipment at serious risk.
• This equipment’s intended for household use only and should not be used for industrial or
commercial purposes.
• Do not operate this appliance with a damaged plug or cord, after a mal- function or after being
dropped or damaged in any way.
• Do not use this equipment for anything other than its intended use. This equipment must be
placed on a stable, heat resistant surface.
• Do not push objects into any openings as damage to the equipment and/or electric shock may
occur.
• Do not use this product in wet or bad weather conditions. This product is not a toy.
• Do not play music at excessive levels especially near children.
• The normal function of the product may be disturbed by Strong Electro Magnetic Interference.
If so, simply reset the product to resume normal operation by following the instruction manual.
• Refer all service to qualified service personnel. Servicing is required when the apparatus has
been damaged in any way, such as power supply cord or plug is damaged, liquid has been
spilled or objects have fallen into the apparatus, or when the apparatus has been exposed to
rain or moisture.
• Please keep the unit in a well-ventilated environment.
• These servicing instructions are for use by qualified service personnel only. To reduce the risk of
electric shock, do not perform any servicing other than that contained in the operating
instructions unless you are qualified to do so.
• The main plug is used as disconnect device, the disconnect device shall remain readily operable.
• This equipment is a class II or double insulated electrical appliance. It is designed in such a way
that it does not require a safety connection to electrical earth.
• The lighting with the triangle symbols shows that the unit contains non- insulated dangerous
voltage.
• The batteries in remote shall not be exposed to excessive heat such as sunshine and fire.

4
• The apparatus shall not be exposed to liquid, and objects filled with liquids, such as vases, shall
not be placed on the apparatus.
We strongly recommend retaining the packaging for future transport of the product.
WARNING:
• Never remove the casing of this apparatus.
• Never place this apparatus on other electrical equipment.
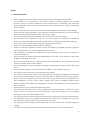
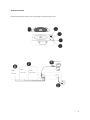
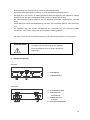
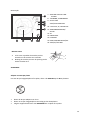
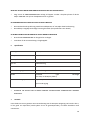
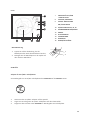
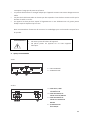
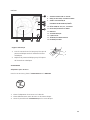
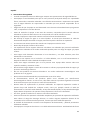
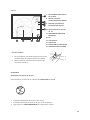
2. Outlook and controls
Front
1. SPEAKER
2. LOCK
Back
3. AUX INPUT 3.5MM
JACK
4. LEFT/RIGHT LINE
OUT JACK
5. SUBWOOFER LINE
OUTPUT JACK
6. POWER SUPPLY
1
2
3
4
5
6
230V ~50Hz

5
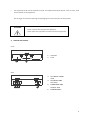
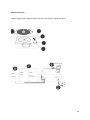
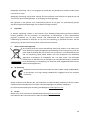
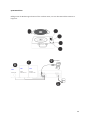
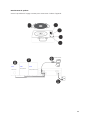
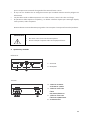
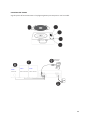
Inside
7. ADAPTOR FOR 45 RPM RECORDS
8. TONE ARM, ARM LIFT
9. AUTO STOP
ON/OFF SWITCH
10. R.P.M 33⅓, 45, 78 SELECTION
11. ARM LOCK/REST
12. SPINDLE
13. TURNTABLE
14. CARTRIDGE
15. POWER INDICATOR
16. POWER/VOLUME
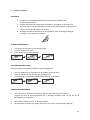
Metal support
1. Tap up the cover until the Metal spike touches
the end of the metal arm.
2. Move the metal spike to the gap of the other
metal arm.
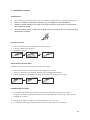
ACCESSORY
Adaptor for 45 rpm record
To play the 45 rpm record, place the ADAPTOR on the SPINDLE.
1. Place the 45 rpm adaptor over the spindle.
2. Gently place your 45 rpm record onto the turntable.
3. Follow the step of OPERATION to play your record.
1
2
7
8
9
10
11
16
15
14
13
12

6
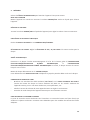
3. Cartridge installation
UNPACKING
1. Remove all packing materials from the unit. (Save all packing materials.)
2. Carefully remove the unit from its Styrofoam and take it out of the plastic bag.
3. Although records can be played with the lid closed as well as opened, it is recommended that
the lid is opened.
4. Remove the white protective needle cover by gently pulling towards the front of the unit.
REMOVING THE NEEDLE
1. Gently pull down the tip of the cartridge.
2. Pull the cartridge forward.
3. Pull out and remove.
INSTALLING THE CARTRIDGE
Position the red cartridge with the sapphire stylus facing down.
1. Line up the tab on the back of the needle with the tone arm.
2. Insert the cartridge with its front end at a downward angle.
3. Lift the front end of the needle upward until it snaps into place.
ADDITIONAL INFORMATION
1. The red cartridge has a very small sapphire stylus that is barely visible.
Notice that the replacement needle you are receiving should be the same as the one already on
the tone arm.
2. This Needle is safe for 33 ⅓, 45 & 78 speed records.
3. Replacing the needle depends on how often you use the turn table.

7
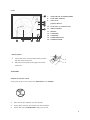
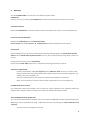
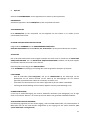
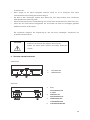
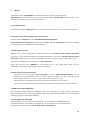
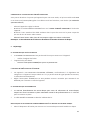
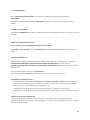
System connection
Follow the operation steps on the next page to start using the unit.
3
5
4
3
2
6
9
7
8
1
Music device
Active
Right speaker
Active
Left speaker
Active
Subwoofer
230V ~50Hz

8
4. Operation
Use the POWER CABLE to connect the unit with the power outlet.
POWER ON
Turn the unit on by rotating the POWER/VOL located on the front panel to power on the unit.
VOLUME CONTROL
Rotate the POWER/VOL on the front panel of the unit to adjust the volume to a comfortable level.
STEPS OF PLAYING RECORDS
Release the TONE ARM from the ARM LOCK/REST.
SELECT SPEED: Set the R.P.M 33⅓, 45, 78 SELECTION to the desired speed of the records.
AUTO STOP
Choose whether the records stop automatically when finished playing by the AUTO STOP ON/OFF
SWITCH. If the AUTO STOP ON/OFF SWITCH turns on, the record will stop turning when it comes to
its end.
Gently place the record on the TURNTABLE.
Gently lift the TONE ARM and move it to the desired starting point on the records.
LINE OUT CONNECTION
- Connect the Auxiliary cable (not supplied) to the LINE OUT JACK on the rear of the record
player and the other end of the cable to the auxiliary inputs of the external component, e.g.
another Hi-Fi unit, Amplifier, etc.
- Check the volume level of your external component and adjust it if necessary.
- Refer to the instruction manual of the external component for its correct operation.
SUBWOOFER OUTPUT JACK
The subwoofer output jack enables you to attach an active subwoofer (not supplied) which will
enhance bass response. Please contact your retailer for suitable subwoofer models.
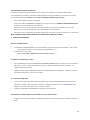
AUX IN CONNECTION & OPERATION
Any component with an Audio Output, such as for instance a DAB Radio module, CD/Cassette Player,
MP3 Player can be connected by using a cable with a 3.5mm dia. jack plug (a 3.5mm AUX IN cord is
supplied).
- Turn the unit on and adjust the volume.

9
- Plug the supplied AUX IN cord into the AUX IN JACK on the rear of the unit.
- Insert the plug at the other end of the Auxiliary cable into the output jack or 3.5mm dia.
headphone jack of the external audio player.
- Switch the other Audio Player on, play the music and adjust its volume if required.
Note: Inserting the Aux plug will disable the record play function.
5. Trouble shooting
THERE IS NO POWER
* The POWER CORD is not connected to either a power outlet or the unit.
- Check the plugs and whether they are not damaged.
* The unit is not turned on.
- Rotate the POWER/VOL switch from the OFF position.
THE UNIT KEEPS SHUTTING ITSELF DOWN
* This unit has a POWER SAVING FUNCTION, to comply with ERP Stage II regulations. If the unit is
not operated or there is no signal output for 15 minutes, it will automatically turn itself off.
* Turn the POWER/VOL switch off for approximately 5 seconds and then switch it ON again to re-
activate the unit.
THE TURNTABLE IS NOT ROTATING
* The turn table drive belt may have come off the turn table mechanism and needs to be refitted.
Please contact professionals for advice on how to re-fit it.
* The AUX IN cable is plugged in. Disconnect it.
MY 45RPM RECORDS DO NOT FIT ON THE TURNTABLE SPINDLE
* Ensure you have placed the 45rpm spindle adaptor on the turn table before installing the
record.
MY RECORD DOES NOT PLAY AT THE CORRECT SPEED
* Switch the speed control switch to the correct one for 33⅓, 45 or 78 rpm records.
MY 33⅓ RECORD WOBBLES WHEN PLACED ON THE TURN TABLE PLATTER
* Make sure you have folded down the ARM LOCK before placing the record on it, or that the
45rpm SPINDLE ADAPTOR has not been left on the turntable platter.

10
THE TONE ARM SLIDES ACROSS THE RECORD AND DOES NOT PLAY IT
* The white protective cover is still covering the needle cartridge. Remove it.
* The stylus tip may be damaged. Replace the stylus. (See specifications for details)
NO SOUND IS HEARD WHEN THE RECORD IS PLAYING
* Adjust the VOLUME CONTROL knob to turn the sound up.
* Check if the Aux connection is removed.
6. Specifications
Power source
AC 230V/50Hz
Speakers
4Ohm X 2
3-Speed Turn table
33⅓, 45, 78 rpm
Line-Out
RCA connection
Aux In
3.5mm dia.
Subwoofer Output Jack
RCA jack for Active Subwoofer
Stylus
Universal type fitted (for 33⅓, 45 & 78 rpm records*)
Accessories supplied
45rpm Spindle Adaptor
3.5mm Aux in connection
* DESIGN AND SPECIFICATIONS ARE SUBJECT TO CHANGE WITHOUT NOTICE.
7. Guarantee
Lenco offers service and warranty in accordance with the European law, which means that in case of
repairs (both during and after the warranty period) you should contact your local dealer.
Important note: It is not possible to send products that need repairs to Lenco directly.
Important note: If this unit is opened or accessed by a non-official service center in any way, the
warranty expires.
This device is not suitable for professional use. In case of professional use, all warranty obligations of
the manufacturer will be voided.

11
8. Disclaimer
Updates to Firmware and/or hardware components are made regularly. Therefore some of the
instruction, specifications and pictures in this documentation may differ slightly from your particular
situation. All items described in this guide for illustration purposes only and may not apply to
particular situation. No legal right or entitlements may be obtained from the description made in
this manual.
9. Disposal of the Old Device
This symbol indicates that the relevant electrical product or battery should not be
disposed of as general household waste in Europe. To ensure the correct waste
treatment of the product and battery, please dispose them in accordance to any
applicable local laws of requirement for disposal of electrical equipment or
batteries. In so doing, you will help to conserve natural resources and improve
standards of environmental protection in treatment and disposal of electrical
waste (Waste Electrical and Electronic Equipment Directive).
10. CE Marking
Products with the CE marking comply with the EMC Directive (2004/108/EC) and
the Low Voltage Directive (2006/95/EC) issued by the Commission of the European
Community.
Hereby, Lenco Benelux BV, Thermiekstraat 1a, 6361 HB Nuth, The Netherlands, declares that this
product is in compliance with the essential requirements and other relevant provisions of Directive
1999/5/EC.
The declaration of conformity may be consulted at techdoc@lenco.com
11. Service
For more information and helpdesk support, please visit www.lenco.com
Lenco Benelux BV, Thermiekstraat 1a, 6361 HB, The Netherlands.

12
Nederlands
1. Veiligheidsinstructies
• Bij het gebruik van elektrische apparatuur moeten de algemene voorzorgsmaatregelen voor de
veiligheid altijd worden opgevolgd.
• Deze apparatuur is niet bestemd voor gebruik door personen (waaronder kinderen) met
gereduceerde fysieke, zintuiglijke of mentale capaciteiten of met een tekort aan kennis of
ervaring. Zij moeten onder toezicht staan en aanwijzingen krijgen van een persoon die
verantwoordelijk is voor hun veiligheid.
• Zorg ervoor dat u de apparatuur uit de buurt houdt van apparaten die hitte uitstralen en plaats
hem niet in direct zonlicht.
• Controleer, voordat u de stekker in het stopcontact steekt, of de op het typeplaatje aangegeven
spanning overeenkomt met die van het lokale lichtnet.
• Laat het apparaat niet onbeheerd achter, terwijl het is aangesloten op de stroomvoorziening.
• Dompel het apparaat niet onder in water of enige andere vloeistof. Het is noodzakelijk om de
stekker uit het stopcontact te halen, nadat de apparatuur is gebruikt, voordat het wordt
schoongemaakt en terwijl het wordt gerepareerd.
• Wanneer de apparatuur in de buurt van kinderen wordt gebruikt, moet er direct toezicht zijn.
• Laat de apparatuur nooit binnen het bereik van kinderen.
• Reparaties aan elektrische apparatuur mogen uitsluitend door gekwalificeerd personeel worden
uitgevoerd. Onjuist uitgevoerde reparaties kunnen de gebruiker en/of de apparatuur
blootstellen aan ernstige risico's.
• Deze apparatuur is uitsluitend bestemd voor huishoudelijk gebruik en mag niet voor industriële
of commerciële doeleinden worden gebruikt.
• Gebruik dit apparaat niet met een beschadigde stekker of kapot snoer, niet na een storing of
nadat het is gevallen of op andere wijze is beschadigd.
• Gebruik deze apparatuur niet anders dan waarvoor hij is bestemd. Dit apparaat moet op een
stabiele, hittebestendige ondergrond worden geplaatst.
• Duw geen voorwerpen in de openingen, omdat dit schade aan de apparatuur en/of elektrische
schokken kan veroorzaken.
• Gebruik dit product niet in natte of slechte weersomstandigheden. Dit product is geen
speelgoed.
• Speel geen muziek op overmatige geluidsniveaus af, in het bijzonder in de buurt van kinderen.
• De normale functie van het product kan worden verstoord door sterke elektromagnetische
interferentie. Als dat gebeurt, volg dan de instructies van de handleiding om het product te
resetten, zodat de normale werking wordt hervat.
• Laat alle reparaties over aan gekwalificeerd onderhoudspersoneel. Onderhoud is vereist
wanneer het apparaat is beschadigd, bijvoorbeeld als het netsnoer of de stekker is beschadigd,
er vloeistof of een voorwerp in het apparaat is terechtgekomen of wanneer het apparaat werd
blootgesteld aan regen of vocht.
• Plaats het apparaat a.u.b. in een goed geventileerde ruimte.
• Deze service-instructies zijn uitsluitend bestemd voor gekwalificeerd onderhoudspersoneel. Om
het risico van elektrische schokken te voorkomen, mag u geen ander onderhoud plegen dan in

13
de handleiding staat vermeld, tenzij u hiervoor gekwalificeerd bent.
• De stekker wordt gebruikt als schakelaar en moet gemakkelijk bereikbaar blijven.
• Dit apparaat is een klasse II of dubbel geïsoleerd elektrisch apparaat. Het apparaat is zodanig
ontworpen dat deze geen veiligheidaansluiting vereist op elektrische aarding.
• Het bliksemschichtsymbool betekent dat het apparaat gevaarlijke, ongeïsoleerde spanning
bevat.
• Stel de batterijen van de afstandsbediening niet bloot aan overmatige warmte, zoals zonlicht en
vuur.
• Het apparaat mag niet worden blootgesteld aan vloeistoffen en met vloeistof gevulde
voorwerpen, zoals vazen, mogen niet op het apparaat worden geplaatst.
Wij raden u sterk aan de verpakking te bewaren voor toekomstig transport van het product.
WAARSCHUWING:
• Verwijder nooit de behuizing van dit apparaat.
• Plaats dit apparaat nooit op andere elektrische
apparatuur.
2. Uiterlijk en bediening
Voorkant
1. LUIDSPREKER
2. VERGRENDELING
Achterkant
3. AUX-INGANG 3,5MM
4. LLINKS/RECHTS
LIJNUITGANG
5. SUBWOOFER LIJN
UITGANG
6. STROOMVOORZIENING
1
2
3
4
5
6
230V ~ 50Hz

14
Binnenzijde
7. ADAPTER VOOR 45 TPM
PLATEN
8. TOONARM, TOONARMLIFT
9. AUTO-STOP
AAN/UITSCHAKELAAR
10. T.P.M 33⅓, 45, 78 SELECTIE
11. ARMVERGRENDELING/
STEUN
12. AS
13. DRAAITAFEL
14. PATROON
15. INDICATIELAMPJE AAN/UIT
16. AAN/UIT/VOLUME
Metalen steun
1. Til de cover op totdat de metalen pin het
uiteinde van de metalen arm aanraakt.
2. Beweeg de metalen pin naar de opening van de
andere metalen arm.
ACCESSOIRE
Adapter voor 45 tpm platen
Om een 45 tpm langspeelplaat af te spelen, dient u de ADAPTER op de AS te plaatsen.
1. Plaats de 45 tpm adapter over de as.
2. Plaats uw 45 tpm langspeelplaat voorzichtig op het draaiplateau.
3. Volg de stappen beschreven over BEDIENING om uw plaat af te spelen.
1
2
7
8
9
10
11
16
15
14
13
12

15
3. Patroon installeren
UITPAKKEN
1. Verwijder alle verpakkingsmaterialen van het apparaat. (Bewaar alle
verpakkingsmaterialen.)
2. Haal het apparaat voorzichtig uit de Styrofoam en vervolgens uit de plastic zak.
3. Al kunnen platen worden afgespeeld met het deksel beide gesloten en geopend, wij
raden u aan het deksel geopend te houden.
4. Verwijder de witte beschermkap van de naald door deze voorzichtig richting de
voorzijde van het apparaat te trekken.
DE NAALD VERWIJDEREN
1. Trek de tip van het patroon voorzichtig omlaag.
2. Trek het patroon naar voren.
3. Trek het patroon er uit en verwijder.
HET PATROON INSTALLEREN
Plaats het rode patroon met de saffieren naald omlaag gericht.
1. Stem het palletje op de achterzijde van de naald af op de toonarm.
2. Steek het patroon in met zijn voorzijde omlaag gericht.
3. Til de voorzijde van de naald omhoog totdat deze op zijn plek klikt.
AANVULLENDE INFORMATIE
1. Het rode patroon heeft een uiterst kleine saffieren naald die vrijwel niet te zien is.
Vergeet niet dat de vervangingsnaald die u ontvangt hetzelfde dient te zijn als die al
geïnstalleerd op de toonarm.
2. Deze naald is veilig voor 33 ⅓, 45 & 78 tpm platen.
3. De naald dient te worden vervangen op basis van hoe vaak u de platenspeler gebruikt.

16
Systeemaansluiting
Volg de stappen op de volgende pagina voordat u het apparaat in gebruik neemt.
5
4
3
2
6
9
7
8
1
Muziekapparaat
Actief
Rechter
luidspreker
Actief
Linker
luidspreker
Actief
Subwoofer
230V ~ 50Hz

17
4. Operatie
Gebruik de VOEDINGSKABEL om het apparaat aan te sluiten op het stopcontact.
INSCHAKELEN
Schakel het apparaat in door POWER/VOL op het voorpaneel te draaien.
VOLUMEREGELING
Draai POWER/VOL op het voorpaneel van het apparaat om het volume in te stellen op een
comfortabel luisterniveau.
STAPPEN VOOR HET AFSPELEN VAN PLATEN
Ontgrendel de TOONARM van de ARMVERGRENDELING/STEUN.
SNELHEID SELECTEREN: Stel de T.P.M 33⅓, 45, 78 SELECTIE in op de juiste snelheid voor uw plaat.
AUTO-STOP
Kies of de plaat automatisch moet stoppen wanneer het einde ervan is bereikt via de AUTO-STOP
AAN/UITSCHAKELAAR. Als u de AUTO-STOP AAN/UITSCHAKELAAR inschakelt, zal de plaat stoppen
met draaien wanneer het einde ervan is bereikt.
Plaats de plaat voorzichtig op het DRAAIPLATEAU.
Til de TOONARM voorzichtig op en beweeg deze naar het gewenste startpunt op de plaat.
LIJNUITGANG
- Sluit de AUX-kabel (niet inbegrepen) aan op de LIJNUITGANG op de achterzijde van de
platenspeler en het andere uiteinde van de kabel op de AUX-ingangen van het externe
apparaat, bijvoorbeeld een andere Hi-Fi eenheid, versterker, enz.
- Controleer het volumeniveau van uw externe apparaat en pas aan indien noodzakelijk.
- Lees de gebruikshandleiding van het externe apparaat voor de juiste bediening ervan.
SUBWOOFERUITGANG
U kunt op de subwooferuitgang een actieve subwoofer aansluiten (niet inbegrepen) om de lage
tonen te versterken. Neem a.u.b. contact op met uw dealer voor geschikte subwoofermodellen.
AUX-IN AANSLUITING & BEDIENING
Elk willekeurig apparaat met een audio-uitgang, zoals een DAB-radiomodule, CD-/cassettespeler of
MP3-speler kan via een kabel worden aangesloten op een ingang met een 3,5mm diameter (een
3,5mm AUX-kabel is meegeleverd).

18
- Schakel het apparaat in en pas het volume aan.
- Steek de meegeleverde AUX-kabel in de AUX-INGANG op de achterzijde van het apparaat.
- Steek de stekker aan het andere uiteinde van de AUX-kabel in de uitgang of 3,5mm
hoofdtelefoonuitgang van de externe audiobron.
- Schakel de andere audiospeler in, speel de muziek af en pas het volume naar wens aan.
Opmerking: Zodra de AUX-kabel wordt aangesloten, wordt de afspeelfunctie voor langspeelplaten
gedeactiveerd.
5. Probleemoplossing
GEEN VOEDING
* De VOEDINGSKABEL is niet aangesloten op het stopcontact of op het apparaat.
- Controleer de stekkers op beschadigingen.
* Het apparaat is niet ingeschakeld.
- Draai de schakelaar POWER/VOL uit de stand OFF.
HET APPARAAT BLIJFT ZICHZELF UITSCHAKELEN
* Dit apparaat is voorzien van een ENERGIEBESPARINGFUNCTIE in overeenstemming met ERP
Fase II richtlijnen. Als het apparaat voor 15 minuten niet wordt gebruikt of er is voor 15
minuten geen signaaluitvoer, schakelt het apparaat zichzelf automatisch uit.
* Draai de schakelaar POWER/VOL voor ongeveer 5 seconden uit en weer aan om het apparaat
opnieuw te activeren.
HET DRAAIPLATEAU DRAAIT NIET
* De aandrijfriem van het draaiplateau is mogelijk los geraakt van het draaimechanisme en moet
opnieuw worden bevestigd. Neem a.u.b. contact op met professionelen voor advies over hoe u
de riem opnieuw kunt bevestigen.
* De AUX-kabel is aangesloten, koppel deze los.
MIJN 45TPM PLATEN PASSEN NIET OP DE AS VAN HET DRAAIPLATEAU
* Zorg ervoor de 45tpm adapter op de as van het draaiplateau te installeren voordat u de
langspeelplaat plaatst.
MIJN PLAAT SPEELT NIET AF OP DE JUISTE SNELHEID
* Schakel de snelheidsregeling op de juiste snelheid voor 33⅓, 45 of 78 tpm platen.

19
MIJN 33⅓ PLATEN WIEBELEN WANNEER GEPLAATST OP HET DRAAIPLATEAU
* Zorg ervoor de ARMVERGRENDELING omlaag te klappen voordat u de plaat plaatst of dat de
45tpm ADAPTER niet op het draaiplateau achter is gelaten.
DE TOONARM SCHUIFT OVER DE PLAAT EN SPEELT NIETS AF
* De witte beschermkap dekt nog steeds het naaldpatroon af. Verwijder deze bescherming.
* De naaldtip is mogelijk beschadigd. Vervang de naald. (Zie specificaties voor details)
ER KLINKT GEEN GELUID WANNEER DE PLAAT WORDT AFGESPEELD
* Draai de VOLUMEREGELING om het geluid te verhogen.
* Controleer of de AUX-aansluiting is losgekoppeld.
6. Specificaties
Voedingsbron
AC 230V/50Hz
Luidsprekers
4Ohm X 2
Platenspeler met 3 snelheden
33⅓, 45, 78 tpm
Lijn-uit
RCA-aansluiting
Aux In
3,5mm dia.
Subwooferuitgang
RCA-aansluiting voor actieve subwoofer
Naald
Universeel type bevestigd
(voor 33⅓, 45 & 78 tpm platen*)
Accessoires inbegrepen
45tpm adapter
3,5mm AUX-ingang
* ONTWERP EN SPECIFICATIES KUNNEN ZONDER VOORAFGAANDE KENNISGEVING WORDEN
GEWIJZIGD.
7. Garantie
Lenco biedt service en garantie aan overeenkomstig met de Europese wetgeving. Dit houdt in dat u,
in het geval van reparaties (zowel tijdens als na de garantieperiode), uw lokale handelaar moet
contacteren.

20
Belangrijke opmerking: Het is niet mogelijk om producten die gerepareerd moeten worden direct
naar Lenco te sturen.
Belangrijke opmerking: De garantie verloopt als een onofficieel servicecenter het apparaat op wat
voor manier dan ook heeft geopend, of er toegang toe heeft gekregen.
Het apparaat is niet geschikt voor professioneel gebruik. In het geval van professioneel gebruik
worden alle garantieverplichtingen van de fabrikant nietig verklaard.
8. Disclaimer
Er worden regelmatig updates in de firmware en/of hardwarecomponenten gemaakt. Daardoor
kunnen gedeelten van de instructies, de specificaties en afbeeldingen in deze documentatie
enigszins verschillen van uw eigen situatie. Alle onderwerpen die staan beschreven in deze
handleiding zijn bedoeld als illustratie en zijn niet van toepassing op specifieke situaties. Aan de
beschrijving in dit document kunnen geen rechten worden ontleend.
9. Afvoer van het oude apparaat
Dit symbool geeft aan dat het betreffende elektrische product of de batterij niet
moet worden verwijderd als algemeen huishoudelijk afval in Europa. Zorg voor een
juiste afvalverwerking door het product en de batterij in overeenstemming met
alle van toepassing zijnde lokale wetten voor het verwijderen van elektrische
apparatuur of batterijen te verwijderen. Als u dit doet, helpt u de natuurlijke
hulpbronnen te behouden en de standaard van milieubescherming te verbeteren
bij de behandeling en verwijdering van elektrisch afval (Afgedankte Elektrische en
Elektronische Apparatuur).
10. CE-markering
Producten met een CE keurmerk houden zich aan de EMC richtlijn (2004/108/EC)
en de Richtlijn voor Lage Voltage (2006/95/EC) uitgegeven door de Europese
Commissie.
Hierbij verklaart Lenco Benelux BV, Thermiekstraat 1a, 6361 HB Nuth, Nederland, dat dit product
voldoet aan de essentiële eisen en andere relevante bepalingen van Richtlijn 1999/5/EU.
De conformiteitsverklaring kan worden geraadpleegd op techdoc@lenco.com
11. Service
Bezoek voor meer informatie en helpdeskondersteuning www.lenco.com
Lenco Benelux BV, Thermiekstraat 1a, 6361 HB, Nederland.
Seite wird geladen ...
Seite wird geladen ...
Seite wird geladen ...
Seite wird geladen ...
Seite wird geladen ...
Seite wird geladen ...
Seite wird geladen ...
Seite wird geladen ...
Seite wird geladen ...
Seite wird geladen ...
Seite wird geladen ...
Seite wird geladen ...
Seite wird geladen ...
Seite wird geladen ...
Seite wird geladen ...
Seite wird geladen ...
Seite wird geladen ...
Seite wird geladen ...
Seite wird geladen ...
Seite wird geladen ...
Seite wird geladen ...
Seite wird geladen ...
Seite wird geladen ...
Seite wird geladen ...
Seite wird geladen ...
Seite wird geladen ...
Seite wird geladen ...
Seite wird geladen ...
Seite wird geladen ...
Seite wird geladen ...
-
 1
1
-
 2
2
-
 3
3
-
 4
4
-
 5
5
-
 6
6
-
 7
7
-
 8
8
-
 9
9
-
 10
10
-
 11
11
-
 12
12
-
 13
13
-
 14
14
-
 15
15
-
 16
16
-
 17
17
-
 18
18
-
 19
19
-
 20
20
-
 21
21
-
 22
22
-
 23
23
-
 24
24
-
 25
25
-
 26
26
-
 27
27
-
 28
28
-
 29
29
-
 30
30
-
 31
31
-
 32
32
-
 33
33
-
 34
34
-
 35
35
-
 36
36
-
 37
37
-
 38
38
-
 39
39
-
 40
40
-
 41
41
-
 42
42
-
 43
43
-
 44
44
-
 45
45
-
 46
46
-
 47
47
-
 48
48
-
 49
49
-
 50
50


Lenco Classic Phono TT-33 Blue Bedienungsanleitung
- Kategorie
- Audio-Plattenspieler
- Typ
- Bedienungsanleitung
in anderen Sprachen
Verwandte Artikel
-
Lenco Classic Phono TT-10BN Bedienungsanleitung
-
Lenco L-85 Benutzerhandbuch
-
-
-
Lenco L-3808 Benutzerhandbuch
-
-
-
Lenco LBT-188 Bedienungsanleitung
-
Lenco LS-10 Benutzerhandbuch
-
Lenco Turntable Benutzerhandbuch