Lenco Classic Benutzerhandbuch
- Kategorie
- CD-Spieler
- Typ
- Benutzerhandbuch
Dieses Handbuch eignet sich auch für

Model: TCD-2500
User Manual Wooden turntable with USB encoding, CD-player and FM radio
Manual del usuario Tocadiscos de madera con codificación USB, reproductor de CD y FM
Mode d’emploi Platine tourne-disque avec encodage USB, lectur CD et radio FM
Benutzerhandbuch Holzplattenspieler mit USB-Codierung, CD-Player und FM radio
Gebruiksaanwijzing Houten platenspeler met USB-codering, CD-speler en FM radio


English.............................................................................................................................. 3
Nederlands............................................................................................................................17
Deutsch..................................................................................................................................31
Français.................................................................................................................................46
Español..................................................................................................................................60
Index
2

ENVIRONMENTAL PROTECTION
Do not dispose of this product with the normal household waste at th
e
end of its life cycle. Return it to a collection point for the recycling o
f
electrical and electronic devices. This is indicated by the symbol o
n
the product, user manual or packaging.
The materials are reusable according to their markings. By reusing, recycling or other forms of
utilization of old devices you make an important contribution to the protection of our
environment.
Please contact your local authorities for details about collection points.
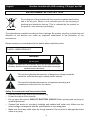
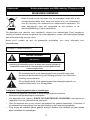
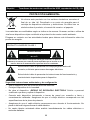
CLASS 1 LASER PRODUCT
WARNING
Risk of electric shock
Do not open!
Caution: To reduce the risk of electric shock, do not remove the cover
(or back). There are no user serviceable parts inside. Refer servicing to
qualified service personnel.
This symbol indicates the presence of dangerous voltage inside the
enclosure, sufficient enough to cause electric shocks.
This symbol indicates the presence of important operating and
maintenance instructions for the device.
Safety. Environmental and Setup Instructions
•
Use the device in dry indoor environments only.
•
Protect the device from humidity.
•
Do not open the device. RISK OF ELECTRIC SHOCK! Refer opening and servicing to
qualified personnel.
•
Connect this device to a properly installed and earthed wall outlet only. Make sure the
mains voltage corresponds with the specifications on the rating plate.
•
Make sur e the mains cable stays dry during operation. Do not pinch or damage the mains
cable in any way.
3
English Wooden turntable with USB encoding, CD-player and FM

4
• Children should be supervised by parents when using the device.
• Clean the device with a dry cloth only.
Do NOT use CLEANING AGENTS or ABRASIVE CLOTHS!
• Do not expose the device to direct sunlight or other heat sources.
• Install the device at a location with sufficient ventilation in order to prevent heat
accumulation.
• Do not cover the ventilation openings!
• Install the device at a safe and vibration-free location.
• Install the device as far away as possible from computers and microwave unit
s; otherwise
radio reception may be disturbed.
• Do not open or repair the enclosure. It is not safe to do so and will void your warranty.
Repairs are only allowed by an authorized service/customer center.
• The device is equipped with a “Class 1 Lase”. Avoid exposure to the laser beam as this
could cause eye injuries.
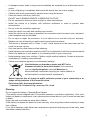
• Only use mercury and cadmium-free batteries.
• Used batteries are hazardous waste and NOT to be disposed of with the household waste!
Return the batteries to your dealer or to collection p
oints in your community.
• Keep batteries away from children. Children might swallow batteries. Contact a physician
immediately if a battery was swallowed.
• Check your batteries regularly to avoid battery leakage.
Used batteries are hazardous waste and NOT to be
disposed of with the household waste! As a consumer
you are legally obligatedto return all batteries for
environmentally responsible recycling no matter whether or
not the batteries contain harmful substances*).
Return batteries free of charge to public collection points in your community or to
shops selling batteries of the respective kind.
Only return fully discharged batteries.
*) marked
Cd = cadmium, Hg = mercury, Pb = lead
•
A damaged mains cable or plug must immediately be replaced by an authorized service
center.
•
In case of lightning, immediately disconnect the device from the mains supply.
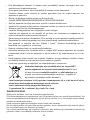
Do not ingest the battery, Chemical Burn Hazard
(The remote control supplied with) This product contains a coin/button cell battery. If the coin/
button cell battery is swallowed, it can cause severe internal burns in just 2 hours and can lead
to death.
Keep new and used batteries away from children.
If the battery compartment does not close securely, stop using the product and keep it away
from children.
If you think batteries might have been swallowed or placed inside any part of the body, seek
immediate medical attention.
Warning

5
PREPARATION FOR USE
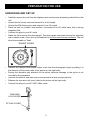
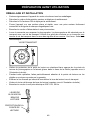
UNPACKING AND SET UP
• Carefully remove the unit from the display carton and remove all packing material from the
unit.
• Unwind the AC power cord and extend it to its full length.
• Unwind the FM Antenna wire and extend it to its full length.
• Place the unit on a stable, level surface, convenient to an AC outlet away from a strong
magnetic field.
• Connect the plug to your AC outlet.
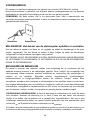
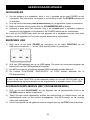
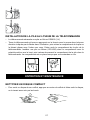
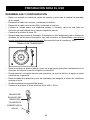
• Raise the lid to expose the phonograph. The phonograph has been secured for shipment
with a transit screw. Use a coin or screwdriver to turn the transit screw clockwise. This will
allow the turntable to "float".
• Remove the opaque white plastic stylus cover from the phonograph stylus by sliding it in
the direction of the arrow (refer to the picture on the right side).
• During this operation pay attention to the stylus, because damage to the stylus is not
covered by the guarantee.
• Remove the twist-tie that was used to secure the tone arm during shipment.
• Release the tone arm lock lever (refer to the picture on the right side).
• Connect the plug to your AC 230V, 50Hz outlet.
TRANSIT SCREW
TONE ARM
LOCK LEVER
STYLUS COVER

6
POWER SOURCE
This system is designed to operate on normal 230V 50Hz AC only.
Attempting to operate from any other power source may cause damage to the system, and
such damage is not covered by your warranty.
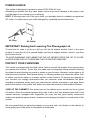
NOTE: If this plug does not fit into your outlet, you probably have an outdated non-polarized
AC outlet. You should have your outlet changed by a qualified licensed electrician.
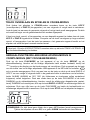
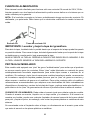
IMPORTANT: Raising And Lowering The Phonograph Lid
To open the lid, raise it as far as it will go until the lid support bracket ‘locks’ in the open
position.To close the lid, lift it upward slightly until the lid support bracket ‘unlocks’, and then
gently lower the lid.
TO AVOID DAMAGING THE CABINET OR THE LID, NEVER FORCE THE LID TO CLOSE.
ALAWYS RAISE THE LID TO RELEASE THE LID SUPPORT BRACKET.
PROTECT YOUR FURNITURE
This model is equipped with non-skid rubber ‘feet’ to prevent the product from moving when
you operate the controls. These ‘feet’ are made from nonmigrating rubber material specially
formulated to avoid leaving any marks or stains on your furniture. However, cartain types of oil
based furniture polishes, wood preservatives, or cleaning sprays may cause the rubber ‘feet’
to soften, and leave marks or a rubber residue on the furniture. To prevent any damage to
your furniture we strongly recommend that you purchase small self-adhesive felt pads,
available at hardware stores and home improvement centres everywhere, and apply these
pads to the bottom of the rubber’feet’ before you place the product on fine wooden furniture.
CARE OF THE CABINETS: You should care for the cabinet as you would care for any piece
of furniture. When the cabinet becomes dirty, wipe it with a soft, non-abrasive dust cloth. If the
cabinet becomes smudged with fingerprints you may use any good quality commercial
dusting and polishing spray cleaner; however avoid spraying the plastic or metal parts of this
system.
We recommend that you spray the cleaner on your dust cloth, not directly on the cabinet, to
avoid getting any of the spray on the plastic or metal parts.
AC Plug
AC Outlet

1
7
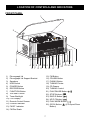
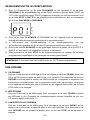
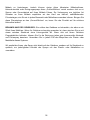
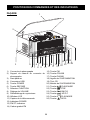
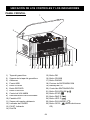
LOCATION OF CONTROLS AND INDICATORS
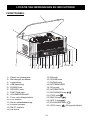
FRONT PANEL
1) Phonograph Lid
2) Phonograph Lid Support Bracket
3) Speakers
4) USB Socket
5) POWER Button
6) RECORD Button
7) FUNCTION Button
8) VOLUME Control
9) Tuner Backlight
10) LCD Display
11) Remote Control Sensor
12) POWER Indicator
13) FM ST. Indicator
14) FM Dial Scale
15) FM Button
16) CD/USB Button
17) PHONO Button
18) TUNING Pointer
19) CD Drawer
20) TUNING Control
21) PLAY/PAUSE Button ( )
22) STOP Bottuon ( )
23) DN/F-R Button ( )
24) UP/F-F Button ( )
25) PLAY-MODE Button ( )
26) OP/CL Button ( ) (CD Open/Close
Button)
2
3
4
5
6
7
8
9
10
11
12
13
14
15
16
17
18
19
20
21
22
23
24
25
26
9
3

8
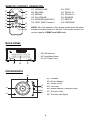
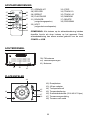
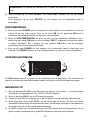
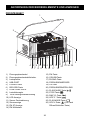
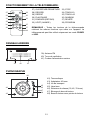
REMOTE CONTROL OPERATION:
27) OPEN/CLOSE
28) RECORD
29) REPEAT
30) PLAY/PAUSE
31) DOWN/FB (SKIP REV.)
32) UP/FF (SKIP Forward.)
33) STOP
34) TRACK-10
35) TRACK+10
36) RANDOM
37) DELETE
38) PROGRAM
NOTE: AII of the buttons on the remote control have the same
function as these buttons in the unit. This remote control can
only be used for CD/MP3 and USB mode.
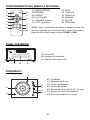
BACK PANEL
39) FM Antenna
40) Ventilation Holes
41) AC Power Cord
PHONOGRAPH
42) Turntable
43) 45 rpm Adaptor
44) Transit Screw
45) Cue Lever
46) Speed Selector (33&45&78 rpm)
47) Tone Arm Lock
48) Tone Arm with Stylus
27
28
29
30
31
32
33
34
35
36 37
38
39
40
41
42
43
44
45
46
47
48

9
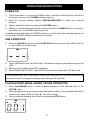
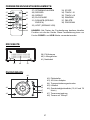
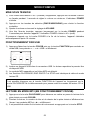
OPERATING INSTRUCTIONS
POWER ON
1) To turn the system ‘on’, press the POWER button 1 second on the front panel, and set the
volume to a low level. The POWER indicator lights up.
2) Press the function selector buttons (FM/CD/USB/PHONO) to select your desired
function.
3) Start to adjust the volume by rotating the VOLUME control.
4) When you have finished your listening, press and hold the POWER button 2 seconds to
turn off the unit. The POWER indictor goes ‘off’.
If nobody presses and holds the POWER button to turn off the unit after stopping playing, the
unit will often POWER off automatically after 10 minutes.
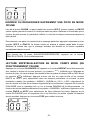
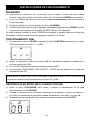
USB OPERATION
1) Press the CD/USB button first and the FUNCTION button second to enter USB mode, the
‘---’ and ‘USB’ icon will be shown.
2) Insert a USB device into the USB socket. The player will begin to play the first song of the
USB.
3) MP3 icon will be shown while MP3 is detected.
4) PLAY/PAUSE, DN/F-R/UP/F-F and STOP functions are the same as in CD play mode.
You may press the FUNCTION button on the unit or long press the PLAY/PAUSE button on
the remote control to change the playing mode between CD and USB.
PLAYING IN MP3 MODE (UNDER CD/USB OPERATION)
1) Press PLAY/PAUSE button to start or pause playback of the selected track in the
CD/USB mode.
2) While playing the song, the song number and folder number of your selected track will be
shown on the screen. MP3 icon and ‘►’ icon will be shown.
3) You can stop the playback at any time by pressing the STOP button.

10
TRACK SKIP AND HIGH SPEED TRACK SEARCH IN CD/USB MODE
During CD/USB playback, pressing the UP/F-F (Fast Forward) or the DN/F-R (Fast Reverse)
button repeatedly will skip to next or previous tracks. Release the button when next or
previous track number is shown. The disc will begin to play from your selected track.
To rapidly search forward or backward within a track and locate a specific passage of it, press
and hold UP/F-F or DN/F-R button. The player will search forward or backward at a high
speed. Release the button when you hear your desired passage and the playback will resume
normal from that point.
To skip 10 tracks FORWARDS/BACKWARDS, press TRACK+10/TRACK-10 button on the
remote control.
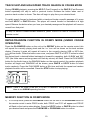
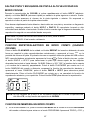
REPEAT/RANDOM FUNCTION IN CD/MP3 MODE (UNDER CD/USB
OPERATION)
Press the PLAY.MODE button on the unit or the REPEAT button on the remote control; this
will repeat the currently playing track and the ‘
REP
’ icon will be shown on the track number
display. Pressing it again will repeat all tracks in the currently playing USB or MP3 disc,
will be shown. Press the button once more, and press DN/F-R or UP/F-F button to select
the desired track in desired folders backward or forward for repeating, both ‘ALBUM’ and ‘001’
‘002’ (the folder name and song name will flash by returns) will flash. Press the PLAY.MODE
button for the fourth time or the RANDOM button on the remote control; the random playback
function will begin and ‘RANDOM’ will be shown; press DN/F.R or UP/F.F button to select
tracks randomly. Press the PLAY.MODE button a fifth time and both the repeat and random
playback function will be cancelled. Press the STOP button to stop playing.
NOTE: There is no folder in the disc if no MP3 is detected. During playing the CD Disc,
there is no ALBUM repeating function.
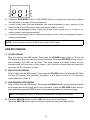
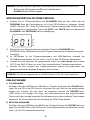
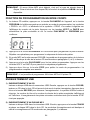
MEMORY FUNCTION IN CD/MP3 MODE
1) In CD stop mode, press the PLAY.MODE button on the unit or the PROGRAM button on
the remote control to enter PROG mode, both ‘PROG’ and ‘P01’ will appear and ‘PROG’
will flash on the track number display. Press the UP/F.F button or DN/F.R button to select
your desired track and press the PLAY.MODE or PROGRAM button to confirm.

11
2) Press the PLAY.MODE button or PROGRAM button to program the next track. Repeat
this operation to program the track sequence.
3) In MP3 mode under CD/USB operation, the setting procedure of MP3 memory is the
same as that of the CD memory mentioned above under 1) and 2).
4) Press the PLAY/PAUSE button to play the stored tracks, press UP/F-F or DN/F-R to
select a track in the sequence saved.
5) Press the STOP button twice to leave the program mode. The entire program stored in
memory is cancelled.
NOTE: You can store a total of 99 MP3 tracks and 20 CD tracks.
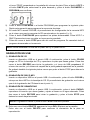
USB RECORDING
1) CD RECORDING
Plug a U-disk into the USB socket. Then press the CD/USB button, place a CD into the
CD drawer and play the track that will be recorded. Press the RECORD button twice to
start recording, the USB icon will flash. The song number and folder number of your
recorded track will be shown on the screen, it will continue to record the next track until
you press the STOP button to finish.
2) Mp3 DISC RECORDING
Plug a U-disk into the USB socket. Then press the CD/USB button and place an MP3 disk
into the CD drawer; the recording procedure is the same as that of CD recording
mentioned above under 1).
3) PHONOGRAPH RECORDING
Plug a U-disk into the USB socket. Then press the PHONO button, play the phono that will
be recorded and set the tone arm to the right place. Press the RECORD button twice to
start recording, press the STOP button to stop recording when you finish recording.
NOTE: Recording will fail if you press the STOP button during the recording.
4) Press the DELETE button one time, DEL will be shown on the display.
Press the DELETE button again to confirm to delete the track that was playing.

12
RADIO OPERATION
1) Press the POWER button at the front panel to turn the system ‘on’ and set the volume to a
low level. Press the FM button to select the FM band as desired. The tuner backlight
comes ‘on’.
2) Rotate the TUNING control to tune the desired radio station. If you tune to an FM stereo
station, the FM ST. indicator will light and reception will be in stereo. If you tune to a
weaker FM station, the reception will automatically switch to mono.
3) When you finish listening, press the POWER button again to turn the system off. The
POWER indicator and the tuner backlight go ‘off’.
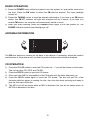
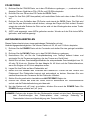
ANTENNA INFORMATION
The FM wire antenna is located on the back of the cabinet. If necessary, adjust the position
and direction of this antenna until you find the position that provides the best reception.
CD OPERATION
1) Press the CD/USB button to enter the CD mode; the ‘---’ icon will be shown on the screen.
The unit can play CD, CD-R and CD-RW.
2) Press the OP/CL button to open the CD drawer.
3) Place your disc (MP3 is compatible) in the CD drawer with the label side facing up.
4) Press the OP/CL button again to close the CD drawer. The disc will spin for a few
seconds while the player is reading the disc, then the disc stops spinning and starts to
play the first track of the disc.
5) The MP3 icon will be shown while an MP3 is detected. No icon will be shown when no
MP3 file is detected in the disc.

13
PLAYING RECORDS
This system includes a full-size, 3-speed, belt-drive turntable. You can play 33, 45 and 78 rpm
records.
1) Press the POWER button at the front panel and set the volume to a low level.
2) Press the PHONO button to enter the PHONO mode.
3) Make sure that you have removed the stylus cover from the stylus and have released the
tone arm lock that secured the tone arm to the tone arm rest.
4) Set the turntable speed selector to the appropriate speed 33, 45 or 78 rpm. If you are
playing 45 rpm ‘singles’, place the 45 rpm adapter on the centre spindle.
5) Place your record on the centre spindle.
6) Raise the cue lever to lift the tone arm off its rest. Move the tone arm to the edge of the
record. The turntable starts automatically. Use the cue lever to gently lower the tone arm
onto the record.
7) Adjust the VOLUME control to the desired level.
8) When the tone arm reaches the end of the record it automatically returns to the tone arm
rest and the record player stops.
9) To turn the system ‘off’, press the POWER button again and the POWER indicator goes
‘off’.
NOTE: Do not turn or stop the turntable manually. Moving or jarring the turntable without
securing the tone arm clamp could result in damage to the tone arm.
IMPORTANT!!
•
TO PROTECT THE TURNTABLE FROM DAMAGE DURING TRANSPORTATION, A
SILVER TRANSIT SCREW IS LOCATED AT THE UPPER RIGHT OF THE TURNTABLE
PLATFORM.
•
BEFORE PLAYING, PLEASE USE A SCREWDRIVER TO TURN THE TRANSIT SCREW
IN CLOCKWISE DIRECTION (SCREW GOING DOWN) COMPLETELY TO UNLOCK
THE TURNTABLE.
•
TO LOCK THE TURNTABLE AGAIN FOR TRANSPORTATION, PLEASE TURN THE
SCREW IN COUNTER-CLOCKWISE DIRECTION.

14
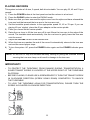
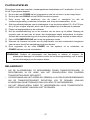
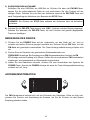
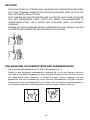
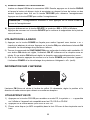
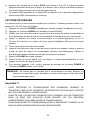
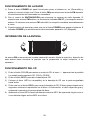
LITHIUM BATTERY INSTALLATION OF REMOTE CONTROL
• The remote control requires one CR2025 (3V) lithium battery.
• Hold and lever pressing the clasp with the thumb in the right direction of the arrow in the
illustration, and take out the battery compartment by sliding with forefinger in the direction
towards you. Take out the battery compartment from the remote control. Install a lithium
battery (CR-2025) in the compartment with the positive polarity upturned Level hold and
push the battery compartment into the remote control lightly. It’s okay once you hear a
click.
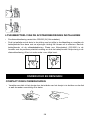
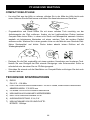
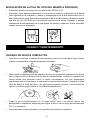
CARE AND MAINTENANCE
COMPACT DISC CARE
• To remove a disc from its storage case, press down on the centre of the case and lift the
disc out, holding it carefully by the edges.
• Fingerprints and dust should be carefully wiped off the discs recorded surface with a soft
cloth. Unlike conventional records, compact discs have no grooves to collect dust and
microscopic debris, so gently wiping with a soft cloth should remove most particles. Wipe
in a straight line from the inside to the outside of the disc.Small dust particles and light
stains will have absolutely no effect on reproduction quality.
• Clean the disc periodically with a soft, lint-free, dry cloth. Never use detergents or abrasive
cleaners to clean the disc. If necessary, use a CD cleaning kit.
• Never write on or affix labels to the surface of compact discs.

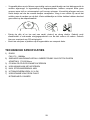
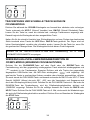
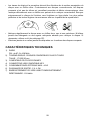
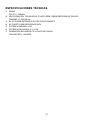
TECHNICAL SPECIFICATIONS
1) RADIO
FM: 87.5 - 108MHz
2) TURNTABLE SPEED:33/45/78 RPM CAN PLAY DISC
SIZE:17.5/25/30mm
3) CD CAN PLAY CD/CD-R/CD-RW/MP3
4) USB CONNECTOR PLAY MP3
5) MAX CONSUMPTION POWER: 40W
6) OUTPUT POWER: 2 X 4.5W
7) USB RECORDING FROM CD AND RECORD:
BITRATE: 128KBPS
15

16
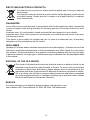
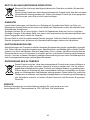
RECYCLING ELECTRICAL PRODUCTS
You should now recycle your waste electrical goods and in doing so help the
environment.
This symbol means an electrical product should not be disposed of with normal
household waste. Please ensure it is taken to a suitable facility for disposal
when finished with.
GUARANTEE
This symbol indicates that the relevant electrical product or battery should not be
disposed of as general household waste in Europe. To ensure the correct waste
treatment of the product and battery, please dispose them in accordance to any
applicable local laws of requirement for disposal of electrical equipment or batter-
ies. In so doing, you will help to conserve natural resources and improve standards
of environmental protection in treatment and disposal of electrical waste (Waste
Electrical and Electronic Equipment Directive).
DISPOSAL OF THE OLD DEVICE
Lenco offers service and warranty in accordance with the European law, which means that
in case of repairs (both during and after t
he warranty period) you should contact your local
dealer.
Important note: It is not possible to send products that need repairs to Lenco directly.
Important note: If this unit is opened or accessed by a non-official service center in any way,
the warranty expires.
This device is not suitable for professional use. In case of professional use, all warranty
obligations of the manufacturer will be voided.
SERVICE
For more information and helpdesk support, please visit www.lenco.com
Lenco Benelux BV, Thermiekstraat 1a, 6361 HB Nuth, The Netherlands.
DISCLAIMER
Updates to Firmware and/or hardware components are made regularly. Therefore some of the
instruction, specifications and pictures in this documentation may differ slightly from your partic-
ular situation. All items described in this guide for illustration purposes only and may not apply
to particular situation. No legal right or entitlements may be obtained from the description made
in this manual.

MILIEUBESCHERMING
Dank dit product aan het einde van de levensduur ervan niet af al
s
normaal huishoudelijk afval. Lever het echter in bij een inzamelpun
t
voor de recycling van elektrische en elektronische apparatuur. Di
t
staat aangegeven door het symbooltje op het product, in d
e
gebruikshandleiding of op de verpakking.
De materialen zijn geschikt voor hergebruik volgens hun markeringen. Door hergebruik,
reycling of andere vormen van gebruik van oude appar atuur, levert u een belangrijke bijdrage
aan de bescherming van ons milieu.
Neem a.u.b. contact op met uw plaatselijke autoriteiten voor m eer informatie over
inzamelpunten.
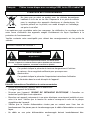
KLASSE 1 LASERPRODUCT
WAARSCHUWING
Risico op elektrische schok
Niet openen!
Let op: Om het risico op elektrische schokken te voorkomen, nooit de
behuizing (of achterzijde) openen. Er zitten geen door de gebruiker te
onderhouden onderdelen in. Laat reparaties over aan gekwalificeerd
onderhoudspersoneel.
Dit symbooltje duidt op de aanwezigheid van gevaarlijke spanning
binnenin de productbehuizing, die krachtig genoeg is om elektrische
schokken te veroorzaken.
Dit symbooltje duidt op de aanwezigheid van belangrijke gebruik- en
onderhoudinstructies voor het apparaat.
Veiligheid. Omgevinginstructies en instellingen
•
Gebruik het apparaat uitsluitend in droge omgevingen binnenshuis.
•
Bescherm het apparaat tegen vochtigheid.
•
Het apparaat nooit openen. RISICO OP ELEKTRISCHE SCHOKKEN! Laat openen en
reparaties over aan gekwalificeerd personeel.
•
Sluit dit apparaat aan op een correct geïnstalleerd en geaard stopcontact. Controleer of
de netspanning overeenkomt met de specificaties op het nominale typeplaatje.
17
Nederlands Houten platenspeler met USB-codering, CD-speler en FM
•
Zorg ervoor de netkabel tijdens gebruik droog te houden. De netkabel op geen enkele
wijze indrukken of beschadigen.

geautoriseerd onderhoudcentrum.
• In het geval van bliksem, haal onmiddellijk de stekker uit het stopcontact.
• Kinderen dienen onder toezicht te worden gehouden door de ouders wanneer het
apparaat in gebruik is.
• Reinig het apparaat uitsluitend met een droog doekje.
Gebruik GEEN REINIGINGSMIDDELEN of SCHUURSPONSJES!
• Stel het apparaat niet bloot aan direct zonlicht of andere hittebronnen.
•
• Blokkeer geen van de ventilatieopeningen!
• Installeer het apparaat op een veilige plek zonder trillingen.
• Installeer het apparaat
zo ver mogelijk uit de buurt van computers en magnetrons; de
radio-ontvangst kan anders worden verstoord.
• Het apparaat is voorzien van een “Klasse 1 Laser”. Voorkom blootstelling aan de
laserstraal, om oogletsel te voorkomen.
• Gebruik uitsluitend kwik- en cadmiumvrije batterijen.
• Verbruikte batterijen zijn schadelijk afval en mogen NIET worden afgedankt als normaal
huishoudelijk afval! Lever de batterijen in bij de winkel of bij inzamelpunten bij u in de
buurt.
• Houd batterijen buiten berei
k van kinderen. Kinderen kunnen batterijen inslikken. Neem
onmiddellijk contact op met een arts als een batterij is ingeslikt.
• Controleer regelmatig uw batterijen, om batterijlekkage te voorkomen..
Verbruikte batterijen zijn schadelijk afval en mogen NIET
worden afgedankt als normaal huishoudelijk afval! U bent
als een consument wettelijk verplicht om alle batterijen in te
leveren voor milieuverantwoordelijke recycling – ongeacht of
de batterijen schadelijke stoffen bevatten*).
Lever ba
tterijen kosteloos in bij openbare inzamelpunten bij u in de buurt of bij de
winkel waar het betreffende batterijtype wordt verkocht.
Lever uitsluitend volldig uitgeputte batterijen in.
*) gemarkeerd Cd = cadmium, Hg = kwik, Pb = lood
•
Een beschadigde netkabel of stekker moet onmiddellijk worden vervangen door een
WAARSCHUWING
Installeer het apparaat op een plek met voldoende ventilatie om opbouw van hitte te voorkomen.
De behuizing niet openen of repareren. Dit is onveilig en zal uw garantie ongeldig verklaren.
Reparaties zijn alleen toegestaan door een geautoriseerd reparatie/klantencentrum
Batterij niet inslikken, risico op chemische brandwonden
(De afstandsbediening meegeleverd met) Dit product bevat een munt/knoopcelbatterij. Als
deze knoopcelbatterij wordt ingeslikt, kan dit binnen slechts 2 uur tot ernstige interne brand-
wonden en fataal letsel leiden.
Houd nieuwe en gebruikte batterijen buiten bereik van kinderen.
Als de batterijhouder niet goed kan worden gesloten, dient u het product niet meer te gebrui-
ken en buiten bereik van kinderen te houden.
Als u denkt dat batterijen zijn ingeslikt of binnenin een willekeurig lichaamsdeel terecht zijn
gekomen, dient u onmiddellijk medische hulp te zoeken.
18

19
1
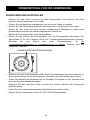
VOORBEREIDING VOOR GEBRUIK
UITPAKKEN EN INSTELLEN
• Haal het apparaat voorzichtig uit de verpakking en verwijder alle verpakkingsmaterialen
van het apparaat.
• Wikkel de voedingskabel volledig uit.
• Wikkel de FM-antenne volledig uit.
• Plaats het apparaat op een stabiel en vlak oppervlak, in de buurt van een stopcontact en
uit de buurt van krachtige magnetische velden.
• Steek de stekker in een stopcontact.
• Til het deksel op voor toegang tot het draaiplateau. Het draaiplateau zit voor
transportveiligheid nog vast met een transportschroef. Gebruik een muntje of
schroevendraaier om de transportschroef rechtsom los te draaien.
Het draaiplateau kan
vervolgens “zweven”.
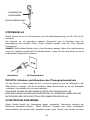
• Verwijder de ondoorzichtige witte kunststof naaldcover van de naald door deze in de
richting van het pijltje te schuiven.
• Let hierbij goed op de naald, omdat een beschadigde naald niet door de garantie wordt
gedekt.
• Verwijder de binder waar de toonarm mee vast is gezet voor transportveiligheid.
• Ontgrendel het hendel van de toonarm (zie rechter afbeelding).
• Sluit de stekker aan op een AC 230V, 50Hz stopcontact.
TRANSPORTSCHROEF
VERGRENDEL
HENDEL VAN
TOONARM
NAALDCOVER
Seite wird geladen ...
Seite wird geladen ...
Seite wird geladen ...
Seite wird geladen ...
Seite wird geladen ...
Seite wird geladen ...
Seite wird geladen ...
Seite wird geladen ...
Seite wird geladen ...
Seite wird geladen ...
Seite wird geladen ...
Seite wird geladen ...
Seite wird geladen ...
Seite wird geladen ...
Seite wird geladen ...
Seite wird geladen ...
Seite wird geladen ...
Seite wird geladen ...
Seite wird geladen ...
Seite wird geladen ...
Seite wird geladen ...
Seite wird geladen ...
Seite wird geladen ...
Seite wird geladen ...
Seite wird geladen ...
Seite wird geladen ...
Seite wird geladen ...
Seite wird geladen ...
Seite wird geladen ...
Seite wird geladen ...
Seite wird geladen ...
Seite wird geladen ...
Seite wird geladen ...
Seite wird geladen ...
Seite wird geladen ...
Seite wird geladen ...
Seite wird geladen ...
Seite wird geladen ...
Seite wird geladen ...
Seite wird geladen ...
Seite wird geladen ...
Seite wird geladen ...
Seite wird geladen ...
Seite wird geladen ...
Seite wird geladen ...
Seite wird geladen ...
Seite wird geladen ...
Seite wird geladen ...
Seite wird geladen ...
Seite wird geladen ...
Seite wird geladen ...
Seite wird geladen ...
Seite wird geladen ...
Seite wird geladen ...
Seite wird geladen ...
Seite wird geladen ...
-
 1
1
-
 2
2
-
 3
3
-
 4
4
-
 5
5
-
 6
6
-
 7
7
-
 8
8
-
 9
9
-
 10
10
-
 11
11
-
 12
12
-
 13
13
-
 14
14
-
 15
15
-
 16
16
-
 17
17
-
 18
18
-
 19
19
-
 20
20
-
 21
21
-
 22
22
-
 23
23
-
 24
24
-
 25
25
-
 26
26
-
 27
27
-
 28
28
-
 29
29
-
 30
30
-
 31
31
-
 32
32
-
 33
33
-
 34
34
-
 35
35
-
 36
36
-
 37
37
-
 38
38
-
 39
39
-
 40
40
-
 41
41
-
 42
42
-
 43
43
-
 44
44
-
 45
45
-
 46
46
-
 47
47
-
 48
48
-
 49
49
-
 50
50
-
 51
51
-
 52
52
-
 53
53
-
 54
54
-
 55
55
-
 56
56
-
 57
57
-
 58
58
-
 59
59
-
 60
60
-
 61
61
-
 62
62
-
 63
63
-
 64
64
-
 65
65
-
 66
66
-
 67
67
-
 68
68
-
 69
69
-
 70
70
-
 71
71
-
 72
72
-
 73
73
-
 74
74
-
 75
75
-
 76
76


Lenco Classic Benutzerhandbuch
- Kategorie
- CD-Spieler
- Typ
- Benutzerhandbuch
- Dieses Handbuch eignet sich auch für
in anderen Sprachen
- français: Lenco Classic Manuel utilisateur
- español: Lenco Classic Manual de usuario
- Nederlands: Lenco Classic Handleiding
Verwandte Artikel
Andere Dokumente
-
Hyundai RTCC 513 RIP Benutzerhandbuch
-
Elta 2750G Benutzerhandbuch
-
-
Ricatech RMC100 - 5 in 1 MUSIC CENTER Benutzerhandbuch
-
Ricatech RR510 Benutzerhandbuch
-
Fenton RP180 Bedienungsanleitung
-
Denver MRD-51BLACK Benutzerhandbuch
-
Denver MRD-51BLACK Benutzerhandbuch
-
Silvercrest SUP 128 A1 Bedienungsanleitung
-
Denver MRD-165 Benutzerhandbuch