Yamaha EMX2 Bedienungsanleitung
- Kategorie
- Gitarrenzubehör
- Typ
- Bedienungsanleitung

Page 1
POWERED MIXER
Introduction
Thank you and congratulations on your purchase of the Yamaha Powered Mixer EMX2.
Please read this manual thoroughly to get the most out of the product and ensure long-
term, trouble-free use. After reading this manual, keep it readily available for future
reference.
* Please read the “Precautions” on the back.
Main Features
• 500-watt power amplier for versatility in a wide variety of performance applications
• 10-channel mixer with four mono mic/line and three stereo line input channels, supporting
a wide range of inputs
• Yamaha’s high-quality SPX reverb, providing optimum processing for instruments or
vocals
• Feedback Suppressor, which automatically cuts and prevents undesirable feedback noise
• Independent three-band equalizer on each channel for tonal adjustment and sound
control
Accessories (Please check that they are included with
your powered mixer.)
• AC power cord (2 m)
• Technical Specications (English only): Includes general specications, input/output
characteristics, a block diagram, dimensions, and a jack and plug list.
• Owner’s Manual (this leaet)
Quick Start Guide
Setup
1 Make sure that all switches, including the mixer’s power switch
[
],
are not on
(N).
Use the mixer with the operating panel facing up.
Connecting speakers, microphones, instruments,
and audio devices
2 Refer to the connection example in the illustration below.
Connection Example
Set to “8Ω” if speakers
are connected as
shown in the gure
above.
Micro-
phones
Micro-
phones
Electric
acoustic
guitar
Electric
guitar
Keyboard
Audio
device
Portable
audio
player
Footswitch
(Yamaha FC5)
See “Precautions for
Connecting the
Speakers” below.
Passive speakers
(Impedance: 8 Ω)
Precautions for Connecting the Speakers
6 Ω
Set to “4Ω.”
Parallel connection
8 Ω 8 Ω
Set to “4Ω.”
• You must set the [IMPEDANCE SELECT] switch correctly
according to the connection method and number of
speakers. Be sure that the impedance of your speakers is
no less than the impedance that you set on the mixer.
Setting this switch incorrectly could result in damage to
the mixer/your speakers.
Actual speaker impedance* [IMPEDANCE SELECT] switch
4 Ω to less than 8 Ω Set to “4Ω.”
8 Ω and over Set to “8Ω.”
If you are unsure of the
impedance of the connected
speakers
Set to “4Ω.”
* For parallel connections: synthetic impedance
• Make sure to insert the speaker cables all the way inside
until secure. Failure to do so may result in damage to your
equipment.
• Use speaker cables with an insulated-housing connector.
Getting sound to the speakers
3 Connect the included power cord.
First, connect it to the mixer’s [AC IN] jack, then to
a power outlet.
NOTE Reverse the order when removing the power cord.
Equalizer
4 Turn the mixer’s
[LEVEL] controls (white
knobs) and [MASTER
LEVEL] control (red
knob) to the minimum
(zero). Also, set the
equalizer controls
(green knobs) to the
center “D” or “MUSIC”
position.
5 Set the [N MIC/O LINE] switch
to the “
N MIC” position for
microphone connection, and to
the “
O LINE” position for
connection of an instrument or
audio device.
NOTE If you are using condenser microphones,
turn on the [PHANTOM (CH1/2)] switch.
6 Turn on the power of the
connected sound source (if
applicable), then the mixer.
The [POWER] LED lights.
WARNING
To avoid any loud, unexpected noise from the
speaker, first turn off the power to the mixer, then
the connected sound source (such as an
instrument or audio device).
7 For channels to which a microphone, instrument, or audio device
is connected, set [LEVEL] to the “D” position.
8 While outputting sound from the microphone, instrument, or
audio device, slowly turn the [MASTER LEVEL] to the right until
you reach the optimal volume.
9 Adjust [LEVEL] on each channel as necessary to set the volume
balance between the microphone, instrument, and audio device.
AC IN
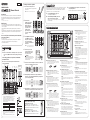
Controls and Functions
Applying Reverb
The EMX2 features a built-in reverb processor that is in the same league as our famed
SPX effect processor series. This reverb lets you simulate the acoustics of different
performance environments, such as concert halls and small clubs, and add warm,
natural ambience to your vocals or instrument performance.
1 Press the [REVERB] button to turn it on.
The LED lights when REVERB is on.
2 Turn the REVERB [TYPE/TIME] control to the
desired reverb type and time (length).
Turning the control to the right lengthens the time of the
selected reverb type.
Short
Long
Making optimum volume settings
When the volume is too loud
Turn the [LEVEL] control to the minimum (zero). Set the
[
N MIC/O LINE] switch to the “O LINE” position, then slowly
raise the [LEVEL] control until the desired volume is reached.
When the volume is too soft
Turn the [LEVEL] control to the minimum (zero). Set the
[
N MIC/O LINE] switch to the “ N MIC” position, then slowly
raise the [LEVEL] control until the desired volume is reached.
3 Use the [REVERB] control to adjust the reverb amount of the
corresponding channel.
If necessary, repeat steps 2 and 3 to determine the optimum reverb setting.
1
23
1 Mic/Line input jacks (channels 1– 4)
Connect microphones, guitars, electronic musical instruments
or audio devices. Channels 3 and 4 provide combo jacks that
support both XLR and phone plugs.
XLR Phone
2 [N MIC/O LINE] switches (channels 1– 4)
For low-level signals (including microphones), set the switch to
the “
N MIC” position. For high-level signals (including
electronic instruments and audio devices), set the switch to the
“
O LINE” position.
3 [Hi-Z] switch (channel 4)
This switch is used when connecting a device directly to the
mixer without a DI (direct injection box) — for example,
instruments with passive pickups, such as an acoustic-electric
guitar or electric bass without battery. This function is effective
only for the phone jack input.
4 [LINE] input jacks (channels 5/6, 7/8, 9/10)
Connect line-level devices such as electronic instruments,
acoustic-electric guitars, CD players, and portable audio
players. These jacks support phone, RCA-pin, and stereo-mini
plugs.
RCA-pin Stereo-mini
NOTE For the channel 7/8 input, if both phone and RCA-pin jacks are
used at the same time, the phone jack will take priority. For the
channel 9/10 input, if both phone and stereo-mini jacks are
used at the same time, the stereo-mini jack will take priority.
The signal from the device connected to another jack will be
muted.
5 [MONITOR OUT] jacks
These are for connection to a powered speaker for monitoring
purposes, and output a mix of the signals from channels 1 to
9/10. You can adjust the output level using the [MONITOR OUT]
control !. If only the [L (MONO)] jack is used, the signals from
the L and R channels are mixed and output.
6|[SUBWOOFER OUT] jack
This is for connection to a powered subwoofer, and outputs a
mono signal. If this jack is in use, the low frequencies below
120 Hz to the [SPEAKERS L/R] jacks will be cut. The output
level is linked to that of the [MASTER LEVEL] control (C).
7 [REVERB FOOT SW] jack
This is for connection to an unlatched-type footswitch such as
the Yamaha FC5 — useful for solo performers, since you can
toggle the reverb on and off as needed with your foot.
8 [SPEAKERS L/R] jacks
Use commercially available speaker cables to connect the
speakers. These jacks support TS phone plugs.
9 [IMPEDANCE SELECT] switch
Set this switch to match the impedance of the connected
speakers. If you are unsure of the impedance of the connected
speakers, set this switch to “4Ω”. Changing this setting changes
the maximum output from the amp and changes the conditions
for which the [LIMITER] LED comes on.
NOTICE
• Make sure the power switch is off before changing the setting of this
switch.
• Setting this switch incorrectly could result in damage to the mixer/your
speakers.
) [PHANTOM (CH1/2)] switch/LED
When this switch is on, the LED lights indicating that phantom
power is available for channels 1 and 2. Turn this switch on to
supply power to condenser microphones or a DI (direct
injection box).
NOTICE
Follow the important precautions below, in order to prevent noise and
possible damage to external devices and the mixer when you operate
this switch.
• Be sure to leave this switch off if you do not need phantom power, or
when you connect a device that does not support phantom power to
channels 1 and 2.
• Do not connect/disconnect a cable to/from channel 1 or 2 while this
switch is on.
• Turn the [LEVEL] control of channels 1 and 2 to the minimum before
operating this switch.
! [MONITOR OUT] control
Determines the signal level output from the [MONITOR OUT]
jacks (5). The [MASTER LEVEL] control does not affect the
[MONITOR OUT] signal.
@ Equalizer controls [HIGH, MID, LOW]
The equalizer shapes the [HIGH], [MID], and [LOW] audio
frequencies. Turning the control to the right amplies (boosts)
the corresponding frequency band, while turning it to the left
attenuates (cuts) the band. Setting the control to the “D”
position produces a at response in the corresponding band.
# [REVERB] button/LED
When this button is on, the LED lights indicating that you can
apply reverb. This button is off when you turn on the mixer.
(Unlike other switches, this button cannot be locked.)
$ REVERB [TYPE/TIME] control
Determines the reverb type and its length. Turning the control to
the right lengthens the time of the selected reverb type.
“HALL”: Simulated reverb of a large space, such as a
concert hall.
“PLATE”: Simulated metal plate reverb, producing a more
hard-edged and bright sound.
“ROOM”: Simulated acoustic ambience of a small room.
“ECHO”: Echo effect suitable for vocals.
% [REVERB] controls (channels 1– 4)
Determines the amount of reverb for each channel when the
[REVERB] button (#) is on.
^ [N STEREO /O MONO] switches
(channels 5/6, 7/8, 9/10)
Setting the switch to “
N
STEREO” will assign the signals from
the L and R channels to each left and right speaker and output
each signal. Setting the switch to “
O
MONO” will mix the output
of different L and R sources to output the same signal to both
the left and right speakers. For keyboards with mono output,
guitars, or other non-stereo sound sources, when the switch is
set to “
O
MONO”, the stereo jacks can be conveniently used as
multiple mono jacks.
& Level meter
The level meter shows the level of output signal from the
[SPEAKERS L/R] jacks.
NOTICE
If used at a high volume so that the [LIMITER] LED flashes continuously,
the internal power amplifier section is being excessively overloaded and
may malfunction. Reduce the output level with the [MASTER LEVEL]
control so that the indicator flashes only briefly on the highest transient
peaks.
* [POWER] LED
This LED lights when the power is turned on by pressing the
power switch.
( [FEEDBACK SUPPRESSOR] switch/LED
When this switch is on, the LED lights indicating that feedback
is automatically suppressed. (This utilizes a seven-band notch
lter. When this switch or the power switch is off, the notch lter
will be reset.)
A [LEVEL] controls
Use these controls to adjust the volume for each channel. To
reduce noise, set any [LEVEL] controls on unused channels to
the minimum.
B [MASTER EQ] control
Use this control to adjust the overall sound frequency balance.
The center position “MUSIC” is a basic setting and if you turn
the control to the left, this creates an optimum setting for
speech, cutting unneeded low range frequencies. Turning the
control to the right creates an optimum setting for playback of
sound sources, by boosting the low and high ranges. If you turn
the control further to the right, the [BASS BOOST] LED lights
indicating that the bass boost function is active, giving you an
even more powerful bass tone.
C [MASTER LEVEL] control
Determines the volume of the signal output from the
[SPEAKERS L/R] and [SUBWOOFER OUT] jacks. This allows
you to adjust the overall volume without changing the relative
volume balance among the various channels.
D Vents
There are vents located on both sides of the mixer, and a
cooling fan is installed on the exhaust side. Do not block the
vents on either side when using the mixer.
E [AC IN] jack
Connect the included power cord here.
F [ ] (Power) switch
For turning the power of the mixer on (O) and off (N).
NOTICE
Rapidly turning the mixer on and off in succession can cause it to
malfunction. After turning the mixer off, wait for about 10 seconds before
turning it on again.
Owner’s Manual
ZR97470
EN
AC IN

Page 2
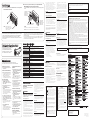
Mounting to a Microphone Stand
The mixer can be mounted onto a microphone
stand as illustrated at right, by using the
optionally available Yamaha BMS-10A Mic
Stand Adaptor. For instructions on mounting,
refer to the BMS-10A Owner’s Manual.
Yamaha Pro Audio global website:
http://www.yamahaproaudio.com/
Yamaha Downloads:
http://download.yamaha.com/
Manual Development Group
©2015 Yamaha Corporation
Published 04/2016 MWHD-B0
Printed in China
Rack Mounting
1 Use a screwdriver to loosen and remove the screws (4) on the
handles installed on the mixer.
2 Use the screws you removed in Step 1 to securely install the RK-
EMX2 Rack-Mount Kit (sold separately) on the mixer.
Orient the RK-EMX2 rack-mount brackets with the engraved lettering facing toward
the rear.
NOTICE
Be sure to use the screws removed in Step 1. Using other screws can cause damage.
NOTE Separate screws for mounting the mixer in a rack are not included with the mixer.
General Specications
Maximum Output Power
(1 kHz)
THD+N<10% 250 W + 250 W (4 Ω), 170 W + 170 W (8 Ω)
THD+N<1% 110 W + 110 W (4 Ω), 110 W + 110 W (8 Ω)
Input Channels
10 channels (Mono (MIC/LINE): 4, Stereo (LINE): 3)
CH4: Hi-Z input supported
Output Channels
SPEAKERS (L, R): 1, MONITOR OUT(L, R): 1, SUBWOOFER OUT: 1
Bus
Stereo: 1, Effect: 1
Input Channel Equalization
HIGH: 8 kHz ±15 dB
MID: 2.5 kHz ±15 dB
LOW: 100 Hz ±15 dB
Level Meter
6 points (-20, -6, 0, +3, +6, LIMITER)
Phantom Power Voltage
+30 V (CH1, 2)
Built-in
Effect
SPX
Algorithm
4 programs
REVERB FOOT SW
Effect Mute on/off
DSP Processing
FEEDBACK SUPPRESSOR, MASTER EQ
Protection
Load Protection: DC-fault
Amplier Protection: Over heat protection, Over current protection
Power Supply Protection: Over heat protection, Over current protection
Power Requirements
AC 100-240 V, 50 Hz/60 Hz
Power Consumption
35 W (Idle) / 90 W (1/8 Power)
Dimensions (W × H × D)
375 mm × 147 mm × 220 mm (14.8" × 5.8" × 8.7")
Net Weight
4.2 kg (9.3 lbs)
Optional Accessory
Foot Switch: FC5, Rack-Mount Kit: RK-EMX2, Mic Stand Adaptor: BMS-10A
Operating Temperature
0 to +40˚C
For other specications, see the included “Technical Specications.”
The contents of this manual apply to the latest specications as of the publishing date. To obtain the latest manual, access the Yamaha
website then download the manual le.
PRECAUTIONS
PLEASE READ CAREFULLY BEFORE
PROCEEDING
Please keep this manual in a safe place for
future reference.
WARNING
Always follow the basic precautions listed below to
avoid the possibility of serious injury or even death
from electrical shock, short-circuiting, damages, re
or other hazards. These precautions include, but are
not limited to, the following:
Power supply/power cord
•Do not place the power cord near heat sources such as
heaters or radiators, and do not excessively bend or
otherwise damage the cord, place heavy objects on it, or
place it in a position where anyone could walk on, trip over,
or roll anything over it.
•Only use the voltage specified as correct for the device.
The required voltage is printed on the name plate of the
device.
•Use only the supplied power cord/plug.
If you intend to use the device in an area other than in the
one you purchased, the included power cord may not be
compatible. Please check with your Yamaha dealer.
•Check the electric plug and each jack periodically, and
remove any dirt or dust which may have accumulated. Failure
to do so may cause electrical shock, short-circuiting or fire.
•When setting up the device, make sure that the AC outlet
you are using is easily accessible. If some trouble or
malfunction occurs, immediately turn off the power switch
and disconnect the plug from the outlet. Even when the
power switch is turned off, as long as the power cord is not
unplugged from the wall AC outlet, the device will not be
disconnected from the power source.
•Remove the electric plug from the outlet when the device is
not to be used for extended periods of time, or during
electrical storms.
•Be sure to connect to an appropriate outlet with a
protective grounding connection.
Do not open
•This device contains no user-serviceable parts. Do not
open the device or attempt to disassemble the internal
parts or modify them in any way. If it should appear to be
malfunctioning, discontinue use immediately and have it
inspected by qualified Yamaha service personnel.
Water warning
•Do not expose the device to rain, use it near water or in
damp or wet conditions, or place on it any containers
(such as vases, bottles or glasses) containing liquids
which might spill into any openings. If any liquid such as
water seeps into the device, turn off the power immediately
and unplug the power cord from the AC outlet. Then have
the device inspected by qualified Yamaha service
personnel.
•Never insert or remove an electric plug with wet hands.
Hearing loss
•Avoid setting all equalizer and level controls to their
maximum. Depending on the condition of the connected
devices, doing so may result in feedback that can cause
hearing loss and damage the speakers.
•Do not use speakers for a long period of time at a high or
uncomfortable volume level, since this can cause
permanent hearing loss. If you experience any hearing loss
or ringing in the ears, consult a physician.
•When turning on the AC power in your audio system,
always turn on the device LAST, to avoid hearing loss and
speaker damage. When turning the power off, the device
should be turned off FIRST for the same reason.
Fire warning
•Do not place any burning items or open flames near the
device, since they may cause a fire.
If you notice any abnormality
•If any of the following problems occur, immediately turn off
the power switch and disconnect the electric plug from the
outlet.
- The power cord or plug becomes frayed or damaged.
- Unusual smells or smoke are emitted.
- Some object has been dropped into the device.
- There is a sudden loss of sound during use of the device.
- Cracks or other visible damage appear on the device.
Then have the device inspected or repaired by qualified
Yamaha service personnel.
•If this device should be dropped or damaged, immediately
turn off the power switch, disconnect the electric plug from
the outlet, and have the device inspected by qualified
Yamaha service personnel.
CAUTION
Always follow the basic precautions listed below to
avoid the possibility of physical injury to you or others,
or damage to the device or other property. These precau-
tions include, but are not limited to, the following:
Power supply/power cord
•When removing the electric plug from the device or an
outlet, always hold the plug itself and not the cord. Pulling
by the cord can damage it.
Location
•Do not place the device in an unstable position where it
might accidentally fall over and cause injuries. Use the
device with the operating panel facing up.
•Do not block the vents. This device has ventilation holes at
the sides to prevent the internal temperature from
becoming too high. In particular, do not place the device
on its side or upside down. Inadequate ventilation can
result in overheating, possibly causing damage to the
device(s), or even fire.
•When using the device:
- Do not cover it with any cloth.
- Do not install it on a carpet or rug.
- Do not use the device in a confined, poorly-ventilated
location.
Inadequate ventilation can result in overheating, possibly
causing damage to the device(s), or even fire. If this device
is to be used in a small space other than an EIA-standard
rack, make sure that there is adequate space around the
device: at least 30cm above, 30cm at the sides and 30cm
behind.
•Do not place the device in a location where it may come
into contact with corrosive gases or salt air. Doing so may
result in malfunction.
•Before moving the device, remove all connected cables.
•If the device is mounted in an EIA standard rack, carefully
read the section “Precautions for Rack Mounting” on page
2. Inadequate ventilation can result in overheating, possibly
causing damage to the device(s), malfunction, or even fire.
Connections
•Do not use speaker cables with a metal-housing connector.
Doing so may result in electrical shock due to differences
in voltage. Use speaker cables with a nonmetal-housing
connector, or with a insulated-housing connector.
•Before connecting the device to other devices, turn off the
power for all devices. Also, before turning the power of all
devices on or off, make sure that all volume levels are set
to the minimum. Failing to do so may result in electric
shock or equipment damage.
•Use only speaker cables for connecting speakers to the
speaker jacks. Use of other types of cables may result in
fire.
Maintenance
•Remove the power plug from the AC outlet when cleaning
the device.
Handling caution
•Avoid inserting or dropping foreign objects (paper, plastic,
metal, etc.) into any gaps or openings on the device (vents,
panel, etc.) If this happens, immediately turn off the power,
unplug the power cord from the AC outlet, and have the
device inspected by qualified Yamaha service personnel.
•Do not rest your weight on the device or place heavy
objects on it. Avoid applying excessive force to the buttons,
switches or connectors to prevent injuries.
Yamaha cannot be held responsible for damage caused
by improper use or modifications to the device.
(PA_en_7)
European Models
Purchaser/User Information specified in EN55103-2:2009.
Conforms to Environments: E1, E2, E3 and E4
The model number, serial number, power requirements, etc., may be found on or near the name plate, which is
at the bottom of the unit. You should note this serial number in the space provided below and retain this manual
as a permanent record of your purchase to aid identication in the event of theft.
Model No.
Serial No.
(bottom_en_01)
FCC INFORMATION (U.S.A.)
1. IMPORTANT NOTICE: DO NOT MODIFY THIS UNIT!
This product, when installed as indicated in the instructions contained in this manual, meets FCC
requirements. Modications not expressly approved by Yamaha may void your authority, granted by the
FCC, to use the product.
2. IMPORTANT: When connecting this product to accessories and/or another product use only high quality
shielded cables. Cable/s supplied with this product MUST be used. Follow all installation instructions.
Failure to follow instructions could void your FCC authorization to use this product in the USA.
3. NOTE: This product has been tested and found to comply with the requirements listed in FCC
Regulations, Part 15 for Class “B” digital devices. Compliance with these requirements provides a
reasonable level of assurance that your use of this product in a residential environment will not result in
harmful interference with other electronic devices. This equipment generates/uses radio frequencies and, if
not installed and used according to the instructions found in the users manual, may cause interference
harmful to the operation of other electronic devices. Compliance with FCC regulations does not guarantee
that interference will not occur in all installations. If this product is found to be the source of interference,
which can be determined by turning the unit “OFF” and “ON”, please try to eliminate the problem by using
one of the following measures:
Relocate either this product or the device that is being affected by the interference.
Utilize power outlets that are on different branch (circuit breaker or fuse) circuits or install AC line lter/s.
In the case of radio or TV interference, relocate/reorient the antenna. If the antenna lead-in is 300 ohm
ribbon lead, change the lead-in to co-axial type cable.
If these corrective measures do not produce satisfactory results, please contact the local retailer authorized
to distribute this type of product. If you can not locate the appropriate retailer, please contact Yamaha
Corporation of America, Electronic Service Division, 6600 Orangethorpe Ave, Buena Park, CA90620
The above statements apply ONLY to those products distributed by Yamaha Corporation of America or its
subsidiaries.
* This applies only to products distributed by YAMAHA CORPORATION OF AMERICA. (class B)
In Finland: Laite on liitettävä suojamaadoituskoskettimilla varustettuun pistorasiaan.
In Norway: Apparatet må tilkoples jordet stikkontakt.
In Sweden: Apparaten skall anslutas till jordat uttag.
(class I hokuo)
NOTICE
To avoid the possibility of malfunction/ damage to the
product, damage to data, or damage to other property, follow
the notices below.
Handling and maintenance
•Do not use the device in the vicinity of a TV, radio, AV
equipment, mobile phone, or other electric devices.
Otherwise, the device, TV, or radio may generate noise.
•Do not expose the device to excessive dust or vibration, or
extreme cold or heat (such as in direct sunlight, near a
heater, or in a car during the day), in order to prevent the
possibility of panel disfiguration, unstable operation, or
damage to the internal components.
•Do not place vinyl, plastic or rubber objects on the device,
since this might discolor the panel.
•When cleaning the device, use a dry and soft cloth. Do not
use paint thinners, solvents, cleaning fluids, or chemical-
impregnated wiping cloths.
•Condensation can occur in the device due to rapid, drastic
changes in ambient temperature—when the device is
moved from one location to another, or air conditioning is
turned on or off, for example. Using the device while
condensation is present can cause damage. If there is
reason to believe that condensation might have occurred,
leave the device for several hours without turning on the
power until the condensation has completely dried out.
•Always turn the power off when the device is not in use.
Connectors
•XLR-type connectors are wired as follows (IEC60268
standard): pin 1: ground, pin 2: hot (+), and pin 3: cold (-).
Information
About this manual
•The illustrations as shown in this manual are for
instructional purposes only.
•The company names and product names in this manual
are the trademarks or registered trademarks of their
respective companies.
Information for users on collection and
disposal of old equipment:
This symbol on the products, packaging,
and/or accompanying documents means that
used electrical and electronic products
should not be mixed with general household
waste.
For proper treatment, recovery and recycling
of old products, please take them to applicable collection
points, in accordance with your national legislation.
By disposing of these products correctly, you will help to
save valuable resources and prevent any potential
negative effects on human health and the environment
which could otherwise arise from inappropriate waste
handling.
For more information about collection and recycling of old
products, please contact your local municipality, your
waste disposal service or the point of sale where you
purchased the items.
For business users in the European Union:
If you wish to discard electrical and electronic equipment,
please contact your dealer or supplier for further
information.
Information on Disposal in other Countries outside the
European Union:
This symbol is only valid in the European Union. If you
wish to discard these items, please contact your local
authorities or dealer and ask for the correct method of
disposal.
(weee_eu_en_02)
IMPORTANT NOTICE FOR THE UNITED
KINGDOM
Connecting the Plug and Cord
WARNING: THIS APPARATUS MUST BE EARTHED
IMPORTANT. The wires in this mains lead are coloured in
accordance with the following code:
GREEN-AND-YELLOW : EARTH
BLUE : NEUTRAL
BROWN : LIVE
As the colours of the wires in the mains lead of this
apparatus may not correspond with the coloured
markings identifying the terminals in your plug proceed
as follows:
The wire which is coloured GREEN-and-YELLOW must
be connected to the terminal in the plug which is marked
by the letter E or by the safety earth symbol
or
colored GREEN or GREEN-and-YELLOW.
The wire which is coloured BLUE must be connected to
the terminal which is marked with the letter N or
coloured BLACK.
The wire which is coloured BROWN must be connected
to the terminal which is marked with the letter L or
coloured RED.
(3 wires)
Precautions for Rack Mounting
This mixer is rated for operation at ambient temperatures ranging from 0 to 40 degrees
Celsius. If you install this mixer along with other devices in a poorly ventilated EIA
standards rack, the ambient temperature inside the rack may rise, resulting in
inefficient performance. Be sure to rack-mount in the following conditions so the mixer
does not overheat.
• When mounting the mixer in a rack with devices such as power ampliers that generate a
signicant amount of heat, leave more than 1U of space between it and other equipment. Also,
either leave the open spaces uncovered or install appropriate ventilating panels to minimize the
possibility of heat buildup.
• To ensure sufficient airow, leave the rear of the rack open. If you’ve installed a fan kit in the rack,
there may be cases in which closing the rear of the rack will produce a greater cooling effect.
Refer to the rack and/or fan kit manual for details.
Troubleshooting
Check the following items before contacting a Yamaha dealer.
If the symptoms are not improved, contact your nearest Yamaha dealer.
Power does not come on.
Did you rmly and securely connect
the power cord?
Power shuts down suddenly.
Are the vents of the mixer blocked?
Since inadequate ventilation can result in
overheating the mixer, the power may be
turned off automatically to prevent
overheating. Ensure proper ventilation for
cooling, and then turn on the power again.
No sound is heard.
Did you connect the mixer’s
[SPEAKERS L/R] jacks and the
speakers’ input jacks using the proper
speaker cables?
Did you rmly and securely connect
the speaker cables?
Is the [POWER] LED ashing at
intervals?
There may be a short in the speaker cable or
the connection may be faulty. Check that the
speaker cable is not scratched and is
connected properly to the mixer, and then
turn the power on again.
For channels 7/8, are both phone and
RCA-pin jacks connected at the same
time? Or, for channels 9/10, are both
phone and stereo-mini jacks connected
at the same time?
The phone jack has priority for channels 7/8
and the stereo-mini jack has priority for
channels 9/10.
Is the [POWER] LED ashing
continuously?
If the internal power amplier section is
excessively overloaded, the amplier will be
muted for protection. The mixer will
automatically reset itself after a while.
Sound is distorted or noise is
produced.
Are the [LEVEL] controls of all relevant
channels and/or the [MASTER LEVEL]
control set too high?
Is the [
N MIC/O LINE] switch of the
corresponding channel set to
“
N MIC”?
If the input level from the source is high,
setting the [
N MIC/O LINE] switch to
“
N MIC” may result in distorted sound. Set
the switch to the “
O LINE” position.
Is the volume of the device connected
to the mixer too high?
Lower the volume of the external device.
Is the speaker cable or power cord
located near the input cables?
Please keep speaker cables and the power
cord away from the input cables.
Sound is not loud enough.
Are the [LEVEL] controls of all relevant
channels and/or the [MASTER LEVEL]
control set too low?
Is the [
N MIC/O LINE] switch of the
corresponding channel set to
“
O LINE”?
Turn the [LEVEL] control to the minimum
(zero). Next, set the switch to the “
N MIC”
position, and then slowly raise the [LEVEL]
control.
Is the volume of the device connected
to the mixer too low?
Raise the volume of the external device.
Is the [PHANTOM (CH1/2)] switch set to
on when using a microphone that
requires phantom power?
The high sounds and low
sounds are unbalanced.
Are the equalizer controls raised or
lowered too much?
Set the equalizer controls to the center
position.
Orient the rack-
mount bracket
with the engraved
lettering facing
toward the rear.
Orient the rack-
mount bracket
with the engraved
lettering facing
toward the rear.
The mixer can be rack mounted
without the handles installed.
NOTE The EMX2 requires at least 6 U of
rack space. To take into account the
cable connections, we recommend
to ensure 7 U of rack space.
-
 1
1
-
 2
2


Yamaha EMX2 Bedienungsanleitung
- Kategorie
- Gitarrenzubehör
- Typ
- Bedienungsanleitung
in anderen Sprachen
- English: Yamaha EMX2 Owner's manual
- français: Yamaha EMX2 Le manuel du propriétaire
- español: Yamaha EMX2 El manual del propietario
- italiano: Yamaha EMX2 Manuale del proprietario
- русский: Yamaha EMX2 Инструкция по применению
- Nederlands: Yamaha EMX2 de handleiding
- português: Yamaha EMX2 Manual do proprietário
- dansk: Yamaha EMX2 Brugervejledning
- polski: Yamaha EMX2 Instrukcja obsługi
- čeština: Yamaha EMX2 Návod k obsluze
- svenska: Yamaha EMX2 Bruksanvisning
- Türkçe: Yamaha EMX2 El kitabı
- suomi: Yamaha EMX2 Omistajan opas
- română: Yamaha EMX2 Manualul proprietarului
Verwandte Artikel
-
Yamaha EMX5014C Benutzerhandbuch
-
-
Yamaha EMX5 Bedienungsanleitung
-
-
Yamaha EMX7 Bedienungsanleitung
-
-
Yamaha MGP16X/MGP12X Benutzerhandbuch
-
-
-