Equip Converter SATA -> IDE Controller Benutzerhandbuch
- Kategorie
- Schnittstellenkarten / Adapter
- Typ
- Benutzerhandbuch

SATA - IDE
CONVERTER
Expansion | 111831

1
1. Introduction
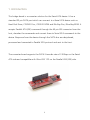
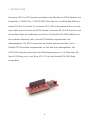
This bridge board is a converter solution for the Serial ATA device. It has a
standard 22 pin SATA port which can connect to a Serial ATA device such as
Hard Disk Drive, CD/DVD Disc, CD/DVD ROM and Blu-Ray Disc, Blue-Ray ROM. It
accepts Parallel ATA (IDE) command through the 40 pin IDE connector from the
host, decodes the commands and convert them to Serial ATA commands to the
device. Response from the device through the SATA bus are deciphered,
processed and converted to Parallel ATA protocol and sent to the host.
The converter board supports the SATA II transfer rate of 3.0Gbps on the Serial
ATA side and compatible with Ultra ATA 133 on the Parallel ATA (IDE) side.

2
2. Features
SATA II 3.0Gbps Adapter Board (size 75mm x 26mm)
Supports any types of SATA devices like Hard Disk Drive, CD/DVD Disc,
CD/DVD ROM and Blu-Ray Disc, Blue-Ray ROM to work with IDE host
controller.
Convert SATA Drive like a standard IDE/ATAPI Drive
48 bits LBA can Break Capacity-Limit to Support HDD larger than 137GB
Compliant with Serial ATA 2.6
Supports IDE Master, Slave and Cable Select Mode
Supports SATA Hot-pluggable and SATA Power Save mode
ATA/ATAPI PIO mode data transfer
ATA/ATAPI UDMA data transfer rate of 150, 133, 100, 66, 44, 33, 25, 16.7
MB/s
ATA/ATAPI-7 Streaming feature set
100% OS-transparent hardware bridge converter to support PC, MAC and
Linux, no driver required.

3
3. Installation
Step 1.
Connect Y-type power cable to J1 connector and PC
Power Supply.
Step 2.
Set J3 jumper on IDE Master mode or Slave mode or cable select mode.
Step 3.
Attaches 22 pin SATA connector (P1) to the back of SATA Device.
Step 4.
Connect IDE cable to J2 (40Pin connector) and Motherboard IDE Host.
Important Notice
J1, J2 and J3 are indicated on the bridge board, please refer to the bridge
board for installation.
J3 must be set on Master Mode for Booting device; the default is set to be
Slave mode.

4
1. Einführung
Der equip SATA zu IDE Konverter ermöglicht den Betrieb von SATA-Geräten wie
Festplatten, CD/DVD-Disc, CD/DVD-ROM, Blue-Ray Disc und Blue-Ray-ROM mit
einem IDE-Host-Controller. Er hat einen 22 Pin SATA-Standardanschluss auf der
einen Seite zum Anschluss der SATA-Geräte, und einen 40 Pin IDE-Anschluss auf
der anderen Seite als Verbindung zum Host. Die Parallel-ATA (IDE) Befehle vom
Host werden dekodiert und in Serial-ATA-Befehle umgewandelt und
weitergegeben. Die SATA-Antworten der Geräte werden entziffert und in
Parallel-ATA-Protokolle umgewandelt und an den Host weitergeleitet. Der
SATA-IDE Konverter unterstützt eine Übertragungsrate von 3.0 Gbps über die
Serial-ATA-Seite und ist mit Ultra ATA 133 auf der Parallel-ATA-(IDE)-Seite
kompatibel.

5
2. Leistungsmerkmale
3.0Gbps SATA-II-Adapterkarte (Größe: 75mm x 26mm)
Unterstützt alle Arten von SATA-Geräten wie Festplatten, CD/DVD-Disc,
CD/DVD-ROM, Blue-Ray Disc und Blue-Ray-ROM für den Betrieb mit einem
IDE-Host-Controller.
Konvertiert das SATA-Laufwerk wie ein Standard IDE/ATAPI-Laufwerk
48 Bit LBA dient zur Unterstützung von größeren Festplatten mit mehr als
137 GB
Kompatibel mit Serial ATA 2.6
Unterstützt IDE-Master-Modus, Slave-Modus und Cable-Select-Modus
Unterstützt SATA Hot-Pluggable und SATA-Power-Save-Modus
ATA / ATAPI PIO - Datenübertragungsmodus
ATA / ATAPI-UDMA Datentransferrate von 150, 133, 100, 66, 44, 33, 25,
16,7 Mbps
ATA/ATAPI-7 Streaming-Funktionen
100% OS-kompatibler Konverter zur Unterstützung von PC, Mac und Linux,
kein Treiber erforderlich.

6
3. Installation
Schritt 1.
Verbinden Sie das Y-Stromkabel mit J1 und der Stromversorgung des PC.
Schritt 2.
Setzen Sie Jumper J3 auf IDE-Master-Modus oder Slave-Modus oder Cable-
Select-Modus.
Schritt 3.
Stecken Sie den 22 Pin SATA-Anschluss (P1) in die Rückseite des SATA-Gerätes.
Schritt 4.
Verbinden Sie das IDE-Kabel mit J2 (40 PIN-Anschluss) und den Motherboard IDE
Host.
Wichtiger Hinweis
# J1, J2 und J3 sind voreingestellt, orientieren Sie sich bitte an der
Installationsbeschreibung.
# Zum Booten der Festplatte muss J3 auf den Master-Modus gesetzt sein, die
Standardeinstellung ist der Slave-Modus.

7
-
 1
1
-
 2
2
-
 3
3
-
 4
4
-
 5
5
-
 6
6
-
 7
7
-
 8
8


Equip Converter SATA -> IDE Controller Benutzerhandbuch
- Kategorie
- Schnittstellenkarten / Adapter
- Typ
- Benutzerhandbuch
in anderen Sprachen
Andere Dokumente
-
DeLOCK 61664 Datenblatt
-
DeLOCK 61391 Datenblatt
-
-
Asus M2N-VM SE HDMI Benutzerhandbuch
-
Renkforce GBIC [1x IDE plug 44-pin - 1x SATA socket 2-pin] Bedienungsanleitung
-
Acer Altos G520 Benutzerhandbuch
-
-
Trendnet TU-IDES Datenblatt
-
-
Seagate SATA/300 PCI CARD Bedienungsanleitung