Samsung BN68-01416A-00 Benutzerhandbuch

Kategorie
LCD-Fernseher
Typ
Benutzerhandbuch
Thank you for purchasing this Samsung product.
To receive more complete service, please register
your product at
www.samsung.com/global/register
imagine the possibilities
Plasma TV
user manual
BN68-01416A-00
Contact SAMSUNG WORLD-WIDE
If you have any questions or comments relating to Samsung products, please contact the SAMSUNG
customer care centre.
Country
Customer Care Centre
Web Site
AUSTRIA 0800-SAMSUNG(726-7864) www.samsung.com/at
BELGIUM 0032 (0)2 201 24 18 www.samsung.com/be
CZECH REPUBLIC
844 000 844 www.samsung.com/cz
Distributor pro Českou republiku:
Samsung Zrt., česka organizační složka Vyskočilova 4, 14000 Praha 4
DENMARK 70 70 19 70 www.samsung.com/dk
EIRE 0818 717 100 www.samsung.com/ie
ESTONIA 800-7267 www.samsung.ee
FINLAND 030-6227 515 www.samsung.com/fi
FRANCE
"3260 SAMSUNG (€ 0,15/Min)
08 25 08 65 65 (€ 0,15/Min)"
www.samsung.com
GERMANY 01805 - SAMSUNG(726-7864 € 0,14/Min) www.samsung.com
HUNGARY 06-80-SAMSUNG(726-7864) www.samsung.com
ITALIA 800-SAMSUNG(726-7864) www.samsung.com
KAZAKHSTAN 8-10-800-500-55-500 www.samsung.kz
KYRGYZSTAN 00-800-500-55-500 -
LATVIA 800-7267 www.samsung.com/lv
LITHUANIA 8-800-77777 www.samsung.lt
LUXEMBURG 0035 (0)2 261 03 710 www.samsung.com/be
NETHERLANDS 0900-SAMSUNG (726-7864 € 0,10/Min) www.samsung.com/nl
NORWAY 815-56 480 www.samsung.com/no
POLAND
"0 801 801 881
022-607-93-33"
www.samsung.com/pl
PORTUGAL 80820-SAMSUNG(726-7864) www.samsung.com/pt
RUSSIA 8-800-555-55-55 www.samsung.com
SLOVAKIA 0800-SAMSUNG(726-7864) www.samsung.com/sk
SPAIN 902 10 11 30 www.samsung.com
SWEDEN 0771-400 200 www.samsung.com/se
SWITZERLAND 0800-SAMSUNG(726-7864) www.samsung.com/ch
TURKEY 444 77 11 www.samsung.com
TADJIKISTAN 8-10-800-500-55-500 -
U.K 0845 SAMSUNG (7267864) www.samsung.com
UKRAINE 8-800-502-0000 www.samsung.com
UZBEKISTAN 8-10-800-500-55-500 www.samsung.uz
Model__________Serial No.___________
BN68-01416A-Eng.indb 1 2008-2-29 17:19:59
English - 5
Control Panel
1
SOURCE
Toggles between all the available input sources
(TV, Ext.1, Ext.2, AV, S-Video, Component,
PC, HDMI1, HDMI2, HDMI3 and DTV).
In the on-screen menu, use this button as
you would use the ENTER button on the
remote control.
2
MENU
Press to see an on-screen menu of your TV’s
features.
3
+
Press to decrease or increase the volume. In
the on-screen menu, use the + buttons
as you would use the ◄ and ► buttons on the
remote control.
4
C/P.
Press to change channels. In the on-screen
menu, use the C/P. buttons as you
would use the ▲ and ▼ buttons on the remote
control.
5
Power Indicator
Blinks and turns off when the power is on and
lights up in stand-by mode.
6
POWER
Press to turn the TV on and off.
7
Remote Control Sensor
Aim the remote control towards this spot on the
TV.
8
Speakers
Front (or Side) Panel
The product colour and shape may vary depending on the model.
BN68-01416A-Eng.indb 5 2008-2-29 17:20:05
English - 6
Connection Panel
Continued...
Whenever you connect an audio or video system to your set, ensure that all elements are
switched off.
When connecting an external device, match the colour of the connection terminal to the cable.
1
POWER IN
Connect the supplied power cord.
2
COMPONENT IN
Audio (AUDIO L/R) and video (Y/P
B/PR) inputs
for Component.
3
PC IN(PC) / (AUDIO)
Connect to the video and audio output jack on
your PC.
4
EXT 1, EXT 2
Inputs or outputs for external devices, such as
VCR, DVD, video game device or video disc
players.
Input/Output Specification
Connector
Input Output
Video Audio(L/R) RGB
Video + Audio(L/R)
EXT 1
Only TV or DTV
output is available.
EXT 2
Output you can
choose.
5
DIGITAL AUDIO OUT (OPTICAL)
Connect to a Digital Audio Component.
6
Connecting external Audio Devices
Connect RCA audio signals from the TV to an
external source, such as Audio equipment.
7
SERVICE
Connector for service.
Connect the serial jack between the
electro-motion wall mount bracket and your
TV when you want to adjust the TV viewing
angle using your remote control.
Rear Panel
The product colour and shape may vary depending on the model.
Cable Television
Network
or
or
1
432 6 85
9
7
BN68-01416A-Eng.indb 6 2008-2-29 17:20:09
English - 8
Viewing the Remote Control
The performance of the remote control may be affected by bright light.
1
POWER button
(turns the TV on and off)
2
Selects the TV and DTV
mode directly
3
Number buttons for direct
channel access
4
One/Two-digit channel
selection
5
Temporary sound switch-off
6
Volume increase
Volume decrease
7
Electronic Program Guide
(EPG) display
8
Use to quickly select
frequently used functions.
9
Control the cursor in the
menu
0
Use to see information on
the current broadcast
#
Press to select the optional
display and sound modes for
sports, cinema and games.
$
VCR/DVD Function (Rewind,
Stop, Play/Pause, Fast/
Forward)
%
Available source selection
^
Previous channel
&
Next channel
Previous channel
*
Displays the main on-screen
menu
(
Channel control button
(Refer to page 15)
)
Returns to the previous
menu
a
Exit the on-screen menu
b
Picture size selection
c
Use this when connecting
a SAMSUNG DMA (Digital
Media Adapter) device
through an HDMI interface and
switching to DMA mode.(The
DMA button is optional.)
For more information on the
operating procedures, refer
to the user manual of the
DMA. This button is available
when “Anynet+(HDMI-CEC)"
is “On” (see page 43)
d
Digital subtitle display
e
Selects the HDMI mode
directly
Teletext Functions
(Refer to page 46)
2
Exit from the teletext display
(depending on the model)
7
Teletext store
8
Teletext size
0
Teletext reveal
!
Fastext topic selection
@
Teletext display/mix both
teletext information and the
normal broadcast
%
Teletext mode selection
(LIST/FLOF)
^
Teletext sub page
&
P :Teletext next page
P :Teletext previous page
*
Teletext index
)
Teletext hold
a
Teletext cancel
Continued...
TV/DTV
GUIDE
TTX/MIX P.SIZE DMA
E.MODE SUBT.HDMI
-
/
--
MENU
P
BN68-01416A-Eng.indb 8 2008-2-29 17:20:12
English - 12
Viewing External Signal Sources
You can switch between viewing signals from connected
equipment, such as a VCR, DVD, Set-Top Box, and the TV
source (broadcast or cable).
1 Press the MENU button to display the menu.
2 Press the ▲ or ▼ button to select Input, then press the
ENTER button.
3 Press the ENTER button again to select Source List.
4 Press the ▲ or ▼ button to select the signal source, then
press the ENTER button.
Available signal sources:
TV, Ext.1, Ext.2, AV, S-Video,
Component, PC, HDMI1, HDMI2, HDMI3, DTV
You can choose only those external devices that are connected
to the TV.
You can select these options simply by pressing the SOURCE
button on the remote control.
To watch television programme again, press the TV/DTV button
and select the channel number required.
You can also watch HDMI mode simply by pressing the HDMI
button on the remote control.
Using the TOOLS Button
You can use the TOOLS button to select your frequently used functions quickly and easily. The
“Tools” menu changes depending on which external input mode you are viewing.
1 Press the TOOLS button.
The Tools menu will appear.
2 Press the ▲ or ▼ button to select a menu, then press the
ENTER button.
3 Press the ▲/▼/◄/►/ENTER buttons to display, change, or
use the selected items.
For a more detailed description of each function, refer to the
corresponding page.
Anynet
+
(HDMI-CEC), see page 43
• Picture Mode, see page 18
• Sound Mode, see page 23
• Sleep Timer, see page 25
• SRS TS XT, see page 23
• Energy Saving, see page 27
• Dual I-II, see page 24
Move
Enter
Return
Source List :
TV
Edit Name
Anynet
+
(HDMI-CEC)
Input
T V
Move
Enter
Return
TV
Ext.1 :−−−−
Ext.2 :−−−−
AV :−−−−
S-Video :−−−−
Component :−−−−
PC :−−−−
HDMI1 :−−−−
HDMI2 :−−−−
HDMI3 :−−−−
DTV
Source List
T V
Tools
Anynet+ (HDMI-CEC)
Picture Mode : Standard
Sound Mode : Custom
Sleep Timer : Off
SRS TS XT : Off
Energy Saving : Off
Dual I-II : Mono
Move Enter Exit
BN68-01416A-Eng.indb 12 2008-2-29 17:20:18
English - 14
Storing Channels Manually
Not available in DTV or external input mode.
You can store television channels, including those received
via cable networks.
When storing channels manually, you can choose:
Whether or not to store each of the channels found.
The programme number of each stored channel which you
wish to identify.
1 Press the MENU button to display the menu.
2 Press the ▲ or ▼ button to select Channel, then press the
ENTER button.
3 Press the ▲ or ▼ button to select Manual Store, then press
the ENTER button.
4 Select the required option by pressing the ▲ or ▼ button, then
press the ENTER button.
5 When you are satisfied with your setting, press the ENTER
button.
6 Press the EXIT button to exit.
Programme (Programme number to be assigned to a channel)
Press the ▲ or ▼ button until you find the correct number.
You can also select the channel number directly by pressing the numeric buttons (0~9).
Colour System: Auto/PAL/SECAM/NTSC4.43
Press the ▲ or ▼ button to select the required colour standard.
Sound System: BG/DK/I/L
Press the ▲ or ▼ button to select the required sound standard.
Channel (When you know the number of the channel to be stored)
Press the ▲ or ▼ button to select
C (Air channel) or S (Cable channel).
Press the ► button, then press the ▲ or ▼ button to select the required number.
You can also select the channel number directly by pressing the numeric buttons (0~9).
If there is abnormal sound or no sound, re-select the sound standard required.
Search (When you do not know the channel numbers)
Press the ▲ or ▼ button to start the search.
The tuner scans the frequency range until the first channel or the channel that you selected is
received on the screen.
Store (When you store the channel and associated programme number)
Set to
OK by pressing the ENTER button.
Channel mode
P (Programme mode): When completing tuning, the broadcasting stations in your area have
been assigned to position numbers from P00 to P99. You can select a channel by entering the
position number in this mode.
C (Air channel mode): You can select a channel by entering the assigned number to each air
broadcasting station in this mode.
S (Cable channel mode): You can select a channel by entering the assigned number for each
cable channel in this mode.
Move
Enter
Return
Country :
United Kingdom
Auto Store
Manual Store
Channel Manager
Sort
Name
Fine Tune
LNA : Off
Channel
T V
Move
Enter
Return
Programme :
P 1
Colour System : Auto
Sound System : BG
Channel : C --
Search : 40 MHz
Store : ?
Manual Store
T V
BN68-01416A-Eng.indb 14 2008-2-29 17:20:20
English - 15
Adding / Locking Channels
Not available in DTV or external input mode.
Using the Channel Manager, you can conveniently lock or add
channels.
1 Press the MENU button to display the menu.
2 Press the ▲ or ▼ button to select Channel, then press the
ENTER button.
3 Press the ▲ or ▼ button to select Channel Manager, then
press the ENTER button.
Adding channels
Using the Channel List, you can add channels.
4 Select Channel List by pressing the ENTER button.
5 Move to the ( ) field by pressing the ▲/▼/◄/► buttons,
select a channel to be added, and press the ENTER button to
add the channel.
➢
If you press the ENTER button again, the ( ) symbol
next to the channel disappears and the channel is not
added.
Locking channels
This feature allows you to prevent unauthorized users, such as
children, from watching unsuitable programmes by muting out
video and audio.
6 Press the ▲ or ▼ button to select Child Lock, then press the
ENTER button.
7 Select On by pressing the ▲ or ▼ button, then press the
ENTER button.
8 Press the ▲ or ▼ button to select Channel List, then press
the ENTER button.
9 Move to the ( ) field by pressing the ▲/▼/◄/► buttons, select a channel to be locked, and press
the ENTER button.
➢
If you press the ENTER button again, the ( ) symbol next to the channel disappears and the
channel lock is canceled.
➢
A blue screen is displayed when Child Lock is activated.
10 Press the EXIT button to exit.
➢
You can select these options simply by pressing the CH LIST
button on the remote control.
Move
Enter
Return
Country :
United Kingdom
Auto Store
Manual Store
Channel Manager
Sort
Name
Fine Tune
LNA : Off
Channel
T V
Move
Enter
Return
Channel List
Child Lock : Off
Channel Manager
T V
Channel List
P 1 C 6
1 / 10
Prog.
0
C 1
1 C --
2 C --
3 C --
4 C --
5 C --
6 C --
7 C --
8 C --
9 C --
Add Lock
Move Enter
Page Return
BN68-01416A-Eng.indb 15 2008-2-29 17:20:21
English - 16
Sorting the Stored Channels
Not available in DTV or external input mode.
This operation allows you to change the programme numbers
of the stored channels.
This operation may be necessary after using the auto store.
1 Press the MENU button to display the menu.
2 Press the ▲ or ▼ button to select Channel, then press the
ENTER button.
3 Press the ▲ or ▼ button to select Sort, then press the ENTER
button.
4 Select the channel that you wish to move by pressing the ▲ or
▼ button, then press the ENTER button.
5 Select the number of the programme to which the channel is to
be moved by pressing the ▲ or ▼ button.
Press the ENTER button. The channel is moved to its new
position and all other channels are shifted accordingly.
6 Repeat steps 4 to 5 until you have moved all the channels to
the required programme numbers.
7 Press the EXIT button to exit.
Assigning Names to Channels
Not available in DTV or external input mode.
Channel names will be assigned automatically when channel
information is broadcast. These names can be changed,
allowing you to assign new names.
1 Press the MENU button to display the menu.
2 Press the ▲ or ▼ button to select Channel, then press the
ENTER button.
3 Press the ▲ or ▼ button to select Name, then press the
ENTER button.
4 Press the ▲ or ▼ button to select the channel to be assigned
to a new name, then press the ENTER button.
5 Press the ▲ or ▼ button to select a letter, a number, or a
symbol (Results in this sequence: A~Z, 0~9, +, -, *, /, blank).
Move on to the previous or next letter by pressing the ◄ or ►
button, then press the ENTER button.
6 Repeat steps 4 to 5 for each channel to be assigned to a new
name.
7 Press the EXIT button to exit.
Move
Enter
Return
Country :
United Kingdom
Auto Store
Manual Store
Channel Manager
Sort
Name
Fine Tune
LNA : Off
Channel
T V
Move
Enter
Return
Prog. Ch. Name
0 C01 −−−−−
1 C-- −−−−−
2 C-- −−−−−
3 C-- −−−−−
4 C-- −−−−−
5 C-- −−−−−
6 C-- −−−−−
7 C-- −−−−−
8 C-- −−−−−
9 C-- −−−−−
Sort
T V
Move
Enter
Return
Prog. Ch. Name
0 C01 −−−−−
1 C-- −−−−−
2 C- - −−−−−
3 C- - −−−−−
4 C- - −−−−−
5 C- - −−−−−
6 C- - −−−−−
7 C- - −−−−−
8 C- - −−−−−
9 C- - −−−−−
Name
T V
Move
Enter
Return
Country :
United Kingdom
Auto Store
Manual Store
Channel Manager
Sort
Name
Fine Tune
LNA : Off
Channel
T V
BN68-01416A-Eng.indb 16 2008-2-29 17:20:22
English - 24
Selecting the Sound Mode (depending on the model)
The DUAL I-II button displays/controls the processing and output of the audio signal. When power
is switched on, the mode is automatically preset to either “DUAL-I” or “Stereo”, depending on the
current transmission.
Easy Setting
1 Press the TOOLS button on the remote control.
2 Press the ▲ or ▼ button to select Dual I-II.
3 Press the ◄ or ► button to select the required option.
Type of broadcast On-screen indication
NICAM
Stereo
Regular broadcast
(Standard audio)
Mono (Normal use)
Regular + NICAM Mono NICAM
Mono
(Normal)
NICAM Stereo
NICAM
stereo
Mono
(Normal)
NICAM DUAL-I/II
NICAM
dual-1
NICAM
dual-2
Mono
(Normal)
A2
Stereo
Regular broadcast
(Standard audio)
Mono (Normal use)
Bilingual or DUAL-I/II Dual I Dual II
Stereo Stereo
Mono
(Forced mono)
➢
If the receiving conditions deteriorate, listening will be easier if the mode is set to Mono.
If the stereo signal is weak and automatic switching occurs, switch to Mono.
This function is only available in Analog TV mode.
Connecting Headphones (Sold separately)
You can connect a set of headphones to your set if you wish to watch a TV program
without disturbing other people in the room.
When you insert the head set jack into the corresponding
port, you can operate only “Auto Volume” in Sound menu.
Prolonged use of headphones at a high volume may
damage your hearing.
You will not hear sound from the speakers when you connect
headphones to the TV.
The headphone volume and TV volume are adjusted
separately.
TV Side Panel
Tools
Anynet+ (HDMI-CEC)
Picture Mode : Standard
Sound Mode : Custom
Sleep Timer : Off
SRS TS XT : Off
Energy Saving : Off
DualI-II ◄ Mono
Move
Adjust
Exit
15
BN68-01416A-Eng.indb 24 2008-2-29 17:20:29
English - 28
Input Mode (PC)
Both screen position and size will vary depending on the type of PC monitor and its resolution.
The table below shows all of the display modes that are supported:
D-Sub Input
Mode Resolution
Horizontal
Frequency
(kHz)
Vertical
Frequency
(Hz)
Pixel Clock
Frequency
(MHz)
Sync
Polarity
(H/V)
PS42A456/
PS42A457
PS50A456/
PS50A457
IBM
640 x 350
720 x 400
31.469
31.469
70.086
70.087
25.175
28.322
+ / -
- / +
VESA
640 x 480
640 x 480
640 x 480
800 x 600
800 x 600
800 x 600
1024 x 768
1024 x 768
1024 x 768
1360 x 768
31.469
37.861
37.500
37.879
48.077
46.875
48.363
56.476
60.023
47.712
59.940
72.809
75.000
60.317
72.188
75.000
60.004
70.069
75.029
60.015
25.175
31.500
31.500
40.000
50.000
49.500
65.000
75.000
78.750
85.500
- / -
- / -
- / -
+ / +
+ / +
+ / +
- / -
- / -
+ / +
+ / +
HDMI/DVI Input
Mode Resolution
Horizontal
Frequency
(kHz)
Vertical
Frequency
(Hz)
Pixel Clock
Frequency
(MHz)
Sync
Polarity
(H/V)
PS42A456/
PS42A457
PS50A456/
PS50A457
VESA
640 x 480
800 x 600
1024 x 768
1360 x 768
31.469
37.879
48.363
47.712
59.940
60.317
60.004
60.015
25.175
40.000
65.000
85.500
- / -
+ / +
- / -
+ / +
When using an HDMI/DVI cable connection, you must use the HDMI IN 2 jack.
The interlace mode is not supported.
The set might operate abnormally if a non-standard video format is selected.
Separate and Composite modes are supported. SOG is not supported.
For the PS42A456, PS42A457, PC text quality is optimum in VESA mode(1024 x 768@60Hz).
For the PS50A456, PS50A457, PC text quality is optimum in VESA mode (1360 x 768@60Hz).
BN68-01416A-Eng.indb 28 2008-2-29 17:20:31
English - 30
Previewing the DTV Menu System
➢
The company does not guarantee the normal operation
of the DTV menu for countries other than the 8 supported
countries (United Kingdom, France, Germany, Italy,
Netherlands, Spain, Switzerland, Austria) because only
these country standards are supported. In addition, when
the country of the broadcast stream differs from the
country selected by the current user, the string appearing
in the channel banner, Info, Guide, Channel List, etc. may
not be displayed properly.
Available in DTV mode. Preset to the DTV mode by using
the TV/DTV button on your remote control.
To help you navigate around the on-screen menu system
and adjust the various settings available, refer to the
following illustration.
Press the MENU button to display the menu.
Press the ▲ or ▼ button to select
Digital Menu, then press
the ENTER button.
Guide
Now & Next Guide
Full Guide
Scheduled List
Default Guide Now/Next
Full Guide
Digital Channel
Country
Auto Store
Manual Store
Edit Favourite Channels
Channel List All
Favourites
Default/Favourites/All
Setup
Menu Transparency High
Medium
Low
Opaque
Change PIN
Parental Lock Parental Rating
Subtitle Off
On
Subtitle Mode Normal
Hard of hearing
Audio Format PCM
Dolby Digital
Audio Description Audio Description
Volume
Digital Text Disable
Enable
Time Zone
Common Interface
System Product Information
Signal Information
Software Upgrade
Reset
Continued...
Move
Enter
Return
Guide
Digital Channel
Setup
Language
Digital Menu
T V
Move
Enter
Return
Now & Next Guide
Full Guide
Scheduled List
Default Guide : Full Guide
Guide
DTV
Country : United Kingdom
Auto Store
Manual Store
Edit Favourite Channels
Channel List
Channel
Move
Enter
Return
DTV
Menu Transparency : Medium
Change PIN
Parental Lock
Subtitle : On
Subtitle Mode
Setup
Move
Enter
Return
DTV
BN68-01416A-Eng.indb 30 2008-2-29 17:20:33
English - 31
Language
Audio Language
Subtitle Language
Teletext Language
Preference Primary Audio Language
Secondary Audio Language
Primary Subtitle Language
Secondary Subtitle Language
Primary Teletext Language
Secondary Teletext Language
(depending on the Country)
The sub-items of the CI Menu may vary depending on the CAM model. (refer to page 40)
Displaying Programme Information
While viewing a channel, additional information about the
current programme may be displayed.
While viewing a programme, press the INFO button.
The programme information is displayed.
➢
The information is displayed:
Parental Rating
Video Type: SD, HD, Radio
Audio Type: Mono, Stereo, Dual, Dolby Digital
Existence of Teletext or DVB Subtitle
Audio Language
➢
To exit from banner information, press the INFO button.
Exit
1 AFDO, 16:9
AFDO, 16:9
No Block
SD
Stereo
Subtitle
English
21:49 Sat 1 May
All Channels
14:20 - 14:33
Contains video with AFD O; coded frame
is 16:9
Audio Language
Subtitle Language
Teletext Language
Preference
Language
Move
Enter
Return
DTV
BN68-01416A-Eng.indb 31 2008-2-29 17:20:34
English - 32
Operating the DTV Menu
Viewing the DTV Menu
After installing your antenna system and TV with appropriate
connectors.
Plug in the AC main power and switch on the TV.
Press the MENU button to display the menu.
Press the ▲ or ▼ button to select Digital Menu, then press
the ENTER button.
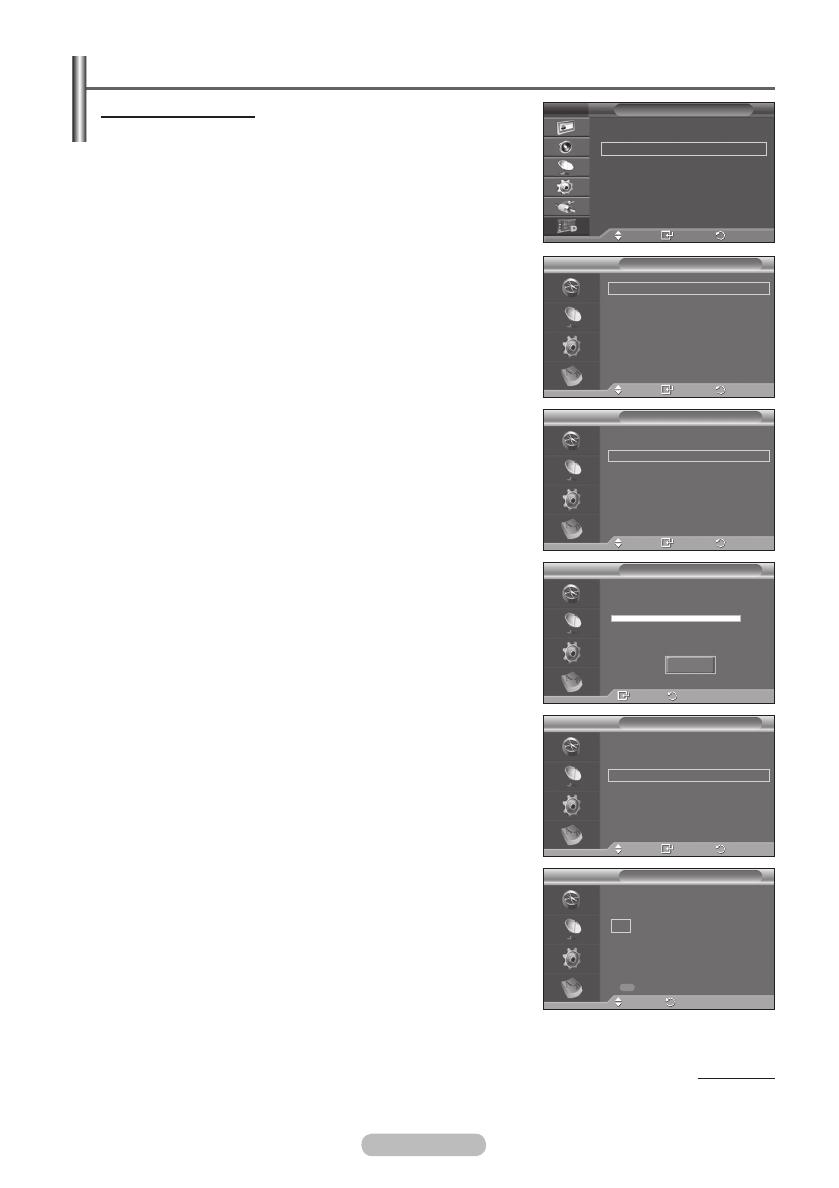
The main menu appears on the screen. Its left side has four
icons: Guide, Digital Channel, Setup, and Language.
1. Digital Channel
This menu consists of 5 sub-menus:
Country, Auto Store, Manual Store, Edit Favourite
Channels, and Channel List.
Press the ▲ or ▼ button to select Channel, then press
the ENTER button. The Channel menu is displayed.
1.1 Country
Press the ENTER button. The Country menu is displayed.
Select your country by pressing the ▲ or ▼ button, then
press the ENTER button.
Even though you have changed the country setting
in this menu, the country setting for Analog TV is not
changed.(Refer to page 10)
1.2 Auto Store
You can update the channel list when the broadcaster adds
new services or if you move the TV to a new location.
Press the ENTER button to select Auto Store. Press
the ENTER button again to start the search. When it has
finished, the number of scanned services will be displayed.
The existing favourite channel list will not be deleted
when the channel list is updated.
To stop the scan before it has finished, press the
ENTER button with Stop selected.
If the signal status is poor, No service found! Check the
aerial connection. message is displayed.
1.3 Manual Store
You can specify the channel for a fast channel search.
 Channel
Press the ▲, ▼ or numeric buttons (0~9) to select a
channel.
The available channels are 21~68. The corresponding
frequency for the selected channel is automatically set.
Frequency
If you do not know the exact frequency, follow the above
step to select the frequency automatically using channel.
Bandwidth
The available bandwidths are 7 and 8 MHz.
Continued...
Country : United Kingdom
Auto Store
Manual Store
Edit Favourite Channels
Channel List
Channel
Move
Enter
Return
DTV
Auto Store
Enter
Return
0%
Services found: 0 Channel:
-
Start
DTV
Country : United Kingdom
Auto Store
Manual Store
Edit Favourite Channels
Channel List
Channel
Move
Enter
Return
DTV
Channel Frequency Bandwidth
5 177500 KHz 7 MHz
Manual Store
Adjust
Return
Search
DTV
Move
Enter
Return
Guide
Digital Channel
Setup
Language
Digital Menu
T V
Country : United Kingdom
Auto Store
Manual Store
Edit Favourite Channels
Channel List
Channel
Move
Enter
Return
DTV
BN68-01416A-Eng.indb 32 2008-2-29 17:20:35
English - 35
To view programme information, press the ▲/▼/◄/► button to select a programme of your
choice, then press the INFO button.
➢
Information such as the channel number, programme title and running time, status bar,
and brief summary of the highlighted programme will be displayed in the top right corner
of the screen. If there is a lengthy summary, “…” will be displayed. Press the INFO button
for the full summary text.
Six channels are displayed. To scroll between channels, move to a channel using the ▲
or ▼ button. To display page by page, use the P or button.
2.2
Scheduled List
If you make a scheduled viewing list of programs you may
like to see, the channel will be automatically switched to the
scheduled program at the scheduled time even if you are
watching another program.
Press the red button to add a new programme. The
menu for adding a programme is displayed with Channel
selected.
Press the ▲/▼ and ENTER buttons to set the required
channel, time, date, and frequency. When you are satisfied
with your settings, save the adjusted schedule by pressing
the red button.
If you want to edit the scheduled programme, select a
programme by pressing the ▲ or ▼ button, then press
the green button. If necessary, select the programme to
be deleted by pressing the ▲ or ▼ button, then press the
blue button.
➢
When watching analog TV, the reserved DTV channel
cannot be changed. The channel is only changed
automatically to the reserved channel when you are
watching DTV.
➢
Scheduling programme only functions with the
television already turned on, and not from standby
mode. For details about switching the television on
and off automatically, refer to page 9.
2.3
Default Guide
You can preset the default guide style.
Press the ▲ or ▼ button to select the required option
(Now/Next or Full Guide), then press the ENTER button.
The selected option for default guide is displayed on the
EPG menu and the channel list appears.
Continued...
Scheduled List
Move
Return
Thursday 22 Apr 15:30 ~ 18:00 Once
2 BBC TWO
Animal Park
Thursday 22 Apr 20:00 ~ 21:00 Once
2 BBC TWO
The Hairy Biker’s
Add Programme Edit Delete
DTV
Scheduled List
Adjust
Move
Return
Save Cancel
Channel
Time
Date
Frequency
20 MOJO
19:00 - 21:00
Thu 6 Jan 2008
Once
DTV
Now & Next Guide
Full Guide
Scheduled List
Default Guide : Full Guide
Guide
Move
Enter
Return
DTV
Now & Next Guide
Full Guide
Scheduled List
Default Guide : Full Guide
Guide
Move
Enter
Return
Now/Next
Full Guide
DTV
BN68-01416A-Eng.indb 35 2008-2-29 17:20:38
English - 44
Anynet
+
Menu
The Anynet
+
menu changes depending on the type and status of the Anynet
+
devices connected
to the TV.
Anynet
+
Menu Description
View TV Switches from Anynet
+
to TV broadcast mode.
Select Device Your TV connects to the corresponding device.
Record Starts a recording. (This menu works only for a device supporting
recording.)
Menu on Device Shows the menu of the connected device.
Example. When a DVD Recorder is connected, the DVD Recorder’s
title menu appears.
Device Operation Shows the play control menu of the connected device.
Example. When a DVD Recorder is connected, the play control
menu of the DVD Recorder appears.
Receiver Sound is output through the receiver.
Setup You can set the environment for using Anynet
+
.
TV Remote Control Buttons Available in Anynet
+
Mode
Device Type Operating Status Available Buttons
Anynet
+
Device
After switching to the
device, when the menu of
the corresponding device is
displayed on the screen.
Numeric buttons
▲/▼/◄/►/ENTER buttons
Colour buttons
EXIT button
After switching to the device,
while playing a file
W.LINK
(Backward search)
W.LINK
(Forward search)
W.LINK
(Stop)
W.LINK
(Play/Pause)
Device with built-in Tuner
After switching to the device,
when you are watching a TV
programme
P / button
Audio Device When a Receiver is activated
W.LINK
/
W.LINK
button
MUTE button
➢
The Anynet
+
function only works when the remote control is set to TV.
➢
The REC button works only while in the recordable state.
➢
You cannot control Anynet
+
devices using the buttons on the side of the TV. You can control Anynet
+
devices only using the TV remote control.
➢
The TV remote control may not work under certain conditions. In this case, reselect the Anynet
+
device.
➢
The Anynet
+
functions don’t operate for the products from other manufacturers.
➢
In Anynet
+
mode, the colour buttons may not work properly.
➢
The
W.LINK
,
W.LINK
operations may differ depending on the device.
Recording
You can make a recording of a TV programme using a recorder.
Press the REC button.
Recording begins. (Only when the Anynet
+
enabled recording device is connected.)
➢
The current TV programme is recorded in the Watching TV status. If you are watching video from
another device, the video from the device is recorded.
➢
You can also record the source streams by selecting Record after pressing the TOOLS button.
➢
Before recording, check whether the antenna jack is properly connected to the recording device.
For the antenna connection to the recording device, refer to its user manual.
BN68-01416A-Eng.indb 44 2008-2-29 17:20:49
English - 48
Wall Mount Kit Specifications (VESA)
Install your wall mount on a solid wall perpendicular to the floor.
When attaching to other building materials, please contact your nearest dealer.
If installed on a ceiling or slanted wall, it may fall and result in severe personal injury.
Product Family inch VESA Spec. (A * B) Standard Screw Quantity
LCD-TV
23 ~ 26 200
*
100 M4
4
32 ~ 40 200
*
200 M6
46 ~ 52
400 * 400
600 * 400
M8
57
700 * 400
(No VESA)
57 ~ 70 800 * 400
80 ~ 1400 * 800
PDP-TV
42 ~ 58
400 * 400
600 * 400
M8
4
63
676 * 407
(No VESA)
6
63 ~ 70 800 * 400 4
80 ~ 1400 * 800 4
➢
We provided the standard dimensions for wall mount kits as shown in the table above.
➢
When purchasing our wall mount kit, a detailed installation manual and all parts necessary for
assembly are provided.
➢
Do not use screws longer than the standard dimension, as they may cause damage to the inside of
the TV set.
➢
For wall mounts that do not comply with the VESA standard screw specifications, the length of the
screws may differ depending on their specifications.
➢
Do not use screws that do not comply with the VESA standard screw specifications.
Do not use fasten the screws too strongly, this may damage the product or cause the product to fall,
leading to personal injury. Samsung is not liable for these kinds of accidents.
➢
Samsung is not liable for product damage or personal injury when a non-VESA or non-specified wall
mount is used or the consumer fails to follow the product installation instructions.
➢
Our 57” and 63” models do not comply with VESA Specifications. Therefore, you should use our
dedicated wall mount kit for this model.
➢
Do not exceed 15 degrees tilt when mounting this TV.

Do not install your Wall Mount Kit while your TV is turned on.
It may result in personal injury due to electric shock.
BN68-01416A-Eng.indb 48 2008-2-29 17:20:53
English - 52
Specifications
The descriptions and characteristics in this booklet are given for information purposes only and
are subject to modification without notice.
Model Name PS42A456/PS42A457 PS50A456/PS50A457
Screen Size (Diagonal) 42 inch 50 inch
PC Resolution 1024 x 768 @ 60 Hz 1360 x 768 @ 60 Hz
Sound (Output) 10 W + 10 W 10 W + 10 W
Dimension (WxHxD)
Body
With stand
1055 x 725 x 94 mm
1055 x 725 x 316 mm
1231 x 756 x 95 mm
1231 x 756 x 316 mm
Weight
Body
With stand
27 Kg
31 Kg
35 Kg
37 Kg
Environmental
Considerations
Operating Temperature
Operating Humidity
Storage Temperature
Storage Humidity
10 °C to 40 °C (50 °F to 104 °F)
10% to 80%, non-condensing
-20 °C to 45 °C (-4 °F to 113 °F)
5% to 95%, non-condensing
This device is a Class B digital apparatus.
Design and specifications are subject to change without prior notice.
For the power supply and Power Consumption, refer to the label attached to the product.
BN68-01416A-Eng.indb 52 2008-2-29 17:20:57
Français - 24
Sélection du mode Son (en fonction du modèle)
Le bouton DUAL I-II affiche/commande le traitement et la sortie du signal audio. A la mise sous
tension, le mode est préréglé automatiquement soit sur “DUAL-I” soit sur “Stéréo”, en fonction de
la transmission en cours.
Réglages simple
1 Appuyez sur le bouton TOOLS de la télécommande.
2 Appuyez sur le bouton ▲ ou ▼ pour sélectionner Dual I-II.
3 Appuyez sur le bouton ◄ ou ► pour sélectionner l’option de
votre choix.
Type de programme
Indication à l’écran
NICAM
Stéréo
Programme normal
(Audio standard)
Mono (Usage normal)
Normal + Mono NICAM
NICAM
Mono
(Normal)
NICAM Stéréo
NICAM
Stéréo
Mono
(Normal)
NICAM DUAL-I/II
NICAM
dual 1
NICAM
dual 2
Mono
(Normal)
A2
Stéréo
Programme normal
(Audio standard)
Mono (Usage normal)
Bilingue ou DUAL-I/II
Dual I Dual II
Stéréo Stéréo
Mono
(Mono forcé)
➢
Si les conditions de réception se détériorent, le mode Mono facilitera l’écoute.
Si le signal stéréo est faible et qu’une permutation automatique se produit, passez alors en
Mono.
Cette fonction est uniquement disponible en mode Analog TV (TV analogique).
15
Branchement du casque (vendu séparément)
Vous pouvez brancher un casque à votre téléviseur si vous souhaitez regarder un
programme télévisé sans déranger les autres personnes présentes dans la pièce.
Lorsque vous insérez la prise casque dans le port
correspondant, vous pouvez utiliser uniquement les options
Volume auto. dans le menu Son.
L’utilisation prolongée d’un casque à un niveau sonore élevé
peut endommager l’ouïe.
Aucun son n’est émis des enceintes lorsque vous connectez le
casque au téléviseur.
Le volume du casque et celui du téléviseur sont réglés
séparément.
Panneau latéral du téléviseur
Outils
Anynet+ (HDMI-CEC)
Mode Image : Standard
Mode Son : Personnalisé
Veille : Arrêt
SRS TS XT : Arrêt
Mode éco. : Arrêt
Dual I-II Mono
QuitterDéplacer
Régler
Français - 28
Mode d’entrée (PC)
La taille et la position de l’écran varient en fonction du type d’écran du PC et de sa résolution.
Le tableau ci-dessous indique tous les modes d’affichage pris en charge :
D-Sub Entrée
Mode Résolution
Horizontale
Fréquence
(kHz)
Verticale
Fréquence
(Hz)
Horloge
pixels
Fréquence
(MHz)
Polarité
synchronisée
(H/V)
PS42A456/
PS42A457
PS50A456/
PS50A457
IBM
640 x 350
720 x 400
31.469
31.469
70.086
70.087
25.175
28.322
+ / -
- / +
VESA
640 x 480
640 x 480
640 x 480
800 x 600
800 x 600
800 x 600
1024 x 768
1024 x 768
1024 x 768
1360 x 768
31.469
37.861
37.500
37.879
48.077
46.875
48.363
56.476
60.023
47.712
59.940
72.809
75.000
60.317
72.188
75.000
60.004
70.069
75.029
60.015
25.175
31.500
31.500
40.000
50.000
49.500
65.000
75.000
78.750
85.500
- / -
- / -
- / -
+ / +
+ / +
+ / +
- / -
- / -
+ / +
+ / +
HDMI/DVI Entrée
Mode Résolution
Horizontale
Fréquence
(kHz)
Verticale
Fréquence
(Hz)
Horloge
pixels
Fréquence
(MHz)
Polarité
synchronisée
(H/V)
PS42A456/
PS42A457
PS50A456/
PS50A457
VESA
640 x 480
800 x 600
1024 x 768
1360 x 768
31.469
37.879
48.363
47.712
59.940
60.317
60.004
60.015
25.175
40.000
65.000
85.500
- / -
+ / +
- / -
+ / +
Lorsque vous utilisez une connexion avec câble HDMI/DVI, vous devez utiliser la borne HDMI IN 2.
Le mode interface n’est pas pris en charge.
Le téléviseur peut fonctionner de façon anormale si un format vidéo non standard est sélectionné.
Des modes séparés et composites sont pris en charge. SVSV n’est pas pris en charge.
La qualité du texte du PC est optimale en mode VESA (1024 x 768 à 60 Hz) avec le PS42A456,
PS42A457.
La qualité du texte du PC est optimale en mode VESA (1360 x 768 à 60 Hz) avec le PS50A456,
PS50A457.
Français - 48
Caractéristiques du kit de fixation murale (VESA)
Installez votre fixation murale sur un mur solide perpendiculaire au sol.
Si vous souhaitez la fixer sur d’autres matériaux de construction, veuillez prendre contact avec
votre revendeur le plus proche. Si vous l’installez au plafond ou sur un mur non droit, elle peut
tomber et provoquer des blessures corporelles graves.
Famille de produit pouce Caract. VESA (A * B) Vis standard Quantité
TELEVISEUR LCD
23 ~ 26 200
*
100 M4
4
32 ~ 40 200
*
200 M6
46 ~ 52
400 * 400
600 * 400
M8
57
700 * 400
(Pas VESA)
57 ~ 70 800 * 400
80 ~ 1400 * 800
TELEVISEUR
ECRAN A
PLASMA
42 ~ 58
400 * 400
600 * 400
M8
4
63
676 * 407
(Pas VESA)
6
63 ~ 70 800 * 400
4
80 ~ 1400 * 800
4
➢
Nous avons fourni les dimensions standard pour tous les kits de fixation murale, comme indiqué dans
le tableau ci-dessus.
➢
Un manuel d’installation détaillé et toutes les pièces nécessaires au montage sont fournis avec le kit
de fixation mural.
➢
N’utilisez pas de vis plus longues que la dimension standard car elles pourraient endommager
l’intérieur du téléviseur.
➢
Pour les fixations murales non conformes aux caractéristiques des vis VESA standard, la longueur
des vis peut varier, selon leurs caractéristiques.
➢
N’utilisez pas de vis non conformes aux caractéristiques des vis VESA standard. Ne serrez pas
trop les vis : cela pourrait endommager le produit ou provoquer sa chute, entraînant des blessures
corporelles. Samsung ne peut être tenue responsable de ce type d’accident.
➢
Samsung ne peut être tenue responsable de tout dommage au produit ou toute blessure corporelle
dans le cas de l’utilisation d’une fixation murale non-VESA ou non spécifié, ni si l’utilisateur ne suit
pas les instructions d’installation du produit.
➢
Nos modèles 57” et 63” ne sont pas conformes aux caractéristiques VESA. Vous devez par
conséquent utiliser notre kit de fixation mural approprié pour ce modèle.
➢
Lors du montage, l’inclinaison du téléviseur ne doit pas dépasser 15 degrés.
N’installez pas votre kit de montage mural lorsque votre téléviseur est en fonctionnement.
Une blessure par choc électrique pourrait en résulter.
  • Page 1 1
  • Page 2 2
  • Page 3 3
  • Page 4 4
  • Page 5 5
  • Page 6 6
  • Page 7 7
  • Page 8 8
  • Page 9 9
  • Page 10 10
  • Page 11 11
  • Page 12 12
  • Page 13 13
  • Page 14 14
  • Page 15 15
  • Page 16 16
  • Page 17 17
  • Page 18 18
  • Page 19 19
  • Page 20 20
  • Page 21 21
  • Page 22 22
  • Page 23 23
  • Page 24 24
  • Page 25 25
  • Page 26 26
  • Page 27 27
  • Page 28 28
  • Page 29 29
  • Page 30 30
  • Page 31 31
  • Page 32 32
  • Page 33 33
  • Page 34 34
  • Page 35 35
  • Page 36 36
  • Page 37 37
  • Page 38 38
  • Page 39 39
  • Page 40 40
  • Page 41 41
  • Page 42 42
  • Page 43 43
  • Page 44 44
  • Page 45 45
  • Page 46 46
  • Page 47 47
  • Page 48 48
  • Page 49 49
  • Page 50 50
  • Page 51 51
  • Page 52 52
  • Page 53 53
  • Page 54 54
  • Page 55 55
  • Page 56 56
  • Page 57 57
  • Page 58 58
  • Page 59 59
  • Page 60 60
  • Page 61 61
  • Page 62 62
  • Page 63 63
  • Page 64 64
  • Page 65 65
  • Page 66 66
  • Page 67 67
  • Page 68 68
  • Page 69 69
  • Page 70 70
  • Page 71 71
  • Page 72 72
  • Page 73 73
  • Page 74 74
  • Page 75 75
  • Page 76 76
  • Page 77 77
  • Page 78 78
  • Page 79 79
  • Page 80 80
  • Page 81 81
  • Page 82 82
  • Page 83 83
  • Page 84 84
  • Page 85 85
  • Page 86 86
  • Page 87 87
  • Page 88 88
  • Page 89 89
  • Page 90 90
  • Page 91 91
  • Page 92 92
  • Page 93 93
  • Page 94 94
  • Page 95 95
  • Page 96 96
  • Page 97 97
  • Page 98 98
  • Page 99 99
  • Page 100 100
  • Page 101 101
  • Page 102 102
  • Page 103 103
  • Page 104 104
  • Page 105 105
  • Page 106 106
  • Page 107 107
  • Page 108 108
  • Page 109 109
  • Page 110 110
  • Page 111 111
  • Page 112 112
  • Page 113 113
  • Page 114 114
  • Page 115 115
  • Page 116 116
  • Page 117 117
  • Page 118 118
  • Page 119 119
  • Page 120 120
  • Page 121 121
  • Page 122 122
  • Page 123 123
  • Page 124 124
  • Page 125 125
  • Page 126 126
  • Page 127 127
  • Page 128 128
  • Page 129 129
  • Page 130 130
  • Page 131 131
  • Page 132 132
  • Page 133 133
  • Page 134 134
  • Page 135 135
  • Page 136 136
  • Page 137 137
  • Page 138 138
  • Page 139 139
  • Page 140 140
  • Page 141 141
  • Page 142 142
  • Page 143 143
  • Page 144 144
  • Page 145 145
  • Page 146 146
  • Page 147 147
  • Page 148 148
  • Page 149 149
  • Page 150 150
  • Page 151 151
  • Page 152 152
  • Page 153 153
  • Page 154 154
  • Page 155 155
  • Page 156 156
  • Page 157 157
  • Page 158 158
  • Page 159 159
  • Page 160 160
  • Page 161 161
  • Page 162 162
  • Page 163 163
  • Page 164 164
  • Page 165 165
  • Page 166 166
  • Page 167 167
  • Page 168 168
  • Page 169 169
  • Page 170 170
  • Page 171 171
  • Page 172 172
  • Page 173 173
  • Page 174 174
  • Page 175 175
  • Page 176 176
  • Page 177 177
  • Page 178 178
  • Page 179 179
  • Page 180 180
  • Page 181 181
  • Page 182 182
  • Page 183 183
  • Page 184 184
  • Page 185 185
  • Page 186 186
  • Page 187 187
  • Page 188 188
  • Page 189 189
  • Page 190 190
  • Page 191 191
  • Page 192 192
  • Page 193 193
  • Page 194 194
  • Page 195 195
  • Page 196 196
  • Page 197 197
  • Page 198 198
  • Page 199 199
  • Page 200 200
  • Page 201 201
  • Page 202 202
  • Page 203 203
  • Page 204 204
  • Page 205 205
  • Page 206 206
  • Page 207 207
  • Page 208 208
  • Page 209 209
  • Page 210 210
  • Page 211 211
  • Page 212 212
  • Page 213 213
  • Page 214 214
  • Page 215 215
  • Page 216 216
  • Page 217 217
  • Page 218 218
  • Page 219 219
  • Page 220 220
  • Page 221 221
  • Page 222 222
  • Page 223 223
  • Page 224 224
  • Page 225 225
  • Page 226 226
  • Page 227 227
  • Page 228 228
  • Page 229 229
  • Page 230 230
  • Page 231 231
  • Page 232 232
  • Page 233 233
  • Page 234 234
  • Page 235 235
  • Page 236 236
  • Page 237 237
  • Page 238 238
  • Page 239 239
  • Page 240 240
  • Page 241 241
  • Page 242 242
  • Page 243 243
  • Page 244 244
  • Page 245 245
  • Page 246 246
  • Page 247 247
  • Page 248 248
  • Page 249 249
  • Page 250 250
  • Page 251 251
  • Page 252 252
  • Page 253 253
  • Page 254 254
  • Page 255 255
  • Page 256 256
  • Page 257 257
  • Page 258 258
  • Page 259 259
  • Page 260 260
  • Page 261 261
  • Page 262 262
  • Page 263 263
  • Page 264 264
  • Page 265 265
  • Page 266 266
  • Page 267 267
  • Page 268 268
  • Page 269 269
  • Page 270 270
  • Page 271 271
  • Page 272 272
  • Page 273 273
  • Page 274 274
  • Page 275 275
  • Page 276 276
  • Page 277 277
  • Page 278 278
  • Page 279 279
  • Page 280 280
  • Page 281 281
  • Page 282 282
  • Page 283 283
  • Page 284 284
  • Page 285 285
  • Page 286 286
  • Page 287 287
  • Page 288 288
  • Page 289 289
  • Page 290 290
  • Page 291 291
  • Page 292 292
  • Page 293 293
  • Page 294 294
  • Page 295 295
  • Page 296 296
  • Page 297 297
  • Page 298 298
  • Page 299 299
  • Page 300 300
  • Page 301 301
  • Page 302 302
  • Page 303 303
  • Page 304 304
  • Page 305 305
  • Page 306 306
  • Page 307 307
  • Page 308 308
  • Page 309 309
  • Page 310 310
  • Page 311 311
  • Page 312 312
  • Page 313 313
  • Page 314 314
  • Page 315 315
  • Page 316 316
  • Page 317 317
  • Page 318 318
  • Page 319 319
  • Page 320 320
  • Page 321 321
  • Page 322 322
  • Page 323 323
  • Page 324 324
  • Page 325 325
  • Page 326 326
  • Page 327 327
  • Page 328 328
  • Page 329 329
  • Page 330 330
  • Page 331 331
  • Page 332 332
  • Page 333 333
  • Page 334 334
  • Page 335 335
  • Page 336 336
  • Page 337 337
  • Page 338 338
  • Page 339 339
  • Page 340 340
  • Page 341 341
  • Page 342 342
  • Page 343 343
  • Page 344 344
  • Page 345 345
  • Page 346 346
  • Page 347 347
  • Page 348 348
  • Page 349 349
  • Page 350 350
  • Page 351 351
  • Page 352 352
  • Page 353 353
  • Page 354 354
  • Page 355 355
  • Page 356 356
  • Page 357 357
  • Page 358 358
  • Page 359 359
  • Page 360 360
  • Page 361 361
  • Page 362 362
  • Page 363 363
  • Page 364 364
  • Page 365 365
  • Page 366 366
  • Page 367 367
  • Page 368 368
  • Page 369 369
  • Page 370 370
  • Page 371 371
  • Page 372 372
  • Page 373 373
  • Page 374 374
  • Page 375 375
  • Page 376 376
  • Page 377 377
  • Page 378 378
  • Page 379 379
  • Page 380 380
  • Page 381 381
  • Page 382 382
  • Page 383 383
  • Page 384 384
  • Page 385 385
  • Page 386 386
  • Page 387 387
  • Page 388 388
  • Page 389 389
  • Page 390 390
  • Page 391 391
  • Page 392 392
  • Page 393 393
  • Page 394 394
  • Page 395 395
  • Page 396 396
  • Page 397 397
  • Page 398 398
  • Page 399 399
  • Page 400 400
  • Page 401 401
  • Page 402 402
  • Page 403 403
  • Page 404 404
  • Page 405 405
  • Page 406 406
  • Page 407 407
  • Page 408 408
  • Page 409 409
  • Page 410 410
  • Page 411 411
  • Page 412 412
  • Page 413 413
  • Page 414 414
  • Page 415 415
  • Page 416 416
  • Page 417 417
  • Page 418 418
  • Page 419 419
  • Page 420 420
  • Page 421 421
  • Page 422 422
  • Page 423 423
  • Page 424 424
  • Page 425 425

Samsung BN68-01416A-00 Benutzerhandbuch

Kategorie
LCD-Fernseher
Typ
Benutzerhandbuch