
Oop‘s 2 Instructions
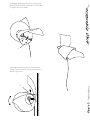
5. Papierbogen mit Magneten xieren / x the paper shade
with magnets / Fixer la feuille de papier avec les aimants./Fissa-
re il foglio di carta con le calamite.
6. Papierbogen drehen und ausrichten / Turn lamp shade
and align / Tourner et ajuster la feuille de papier / Ruotare e
allineare il foglio di carta.
5
6

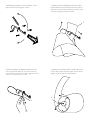
2. Silikonring einhängen und Kabelschlaufe bilden / Hook in
silicone ring and form cable loop / Accrocher l‘anneau en
silicone et faire une boucle avec le câble. / Agganciare l‘anello
in silicone e formare un‘asola con il cavo.
1. Wandhalterung anbringen / mount wall bracket / Fixer le
support mural / Fissare il supporto a parete
3. Papierbogen zwischen Blechbiegeteil einfädeln / Thread
paper sheet between sheet metal part/ Insérer la feuille de
papier entre les plis du support métallique. / Inserire il foglio
di carta tra le pieghe del supporto metallico.
4. Papierbogen zur Fassung schieben / Slide the paper sheet
to the socket / Pousser la feuille de papier jusqu‘a la douille /
Spingere il foglio di carta no al portalampada.
2
3
4

Deutsch English
Vor Inbetriebnahme aufmerksam lesen und aufbewahren.
Bitte nehmen Sie die Leuchte vorsichtig aus der Verpackung.
Entfernen Sie die Kabelbinder und wickeln Sie die Kabel vollständig
ab.
Wichtig: Achten Sie unbedingt auf den Verlauf von
Elektroleitungen, damit auf keinen Fall ein Kabel angebohrt wird.
Verwenden Sie (je nach Beschaffenheit der Wand) geeignete
Befestigungsmittel.
Montieren Sie nicht auf feuchtem und leitendem Untergrund!
Inbetriebnahme
1. Postitionieren Sie die Wandhalterung in gewünschter
Position, achten Sie auf die Ausrichtung des Lichts. Markieren
Sie die Bohrungen. (1)
2. 2 Dübellöcher bohren, Dübel einsetzen und die Wandhalter-
ung der Leuchte festschrauben.
3. Fädeln Sie den Silikon-O-Ring am Kabel in den vorgesehenen
Haken ein, damit sich eine Schlaufe formt. (2)
4. Fädeln Sie das offene Ende des Papierbogens zwischen den
beiden Meatllstreben der Wandhalterung hindurch bis die
Fassung im Papierschirm verschwindet. (3)
5. Schieben Sie den Papierschirm in Richtung Fassung, sodass
dieser an der Wandhalterung anschlägt. (4)
6. Fixieren Sie nun den Papierschirm mit den mitgelieferten
Magneten. (5)
7. Richten Sie den Papierbogen durch Drehen aus, damit die
vordere Öse nach oben zeigt. (6)
8. Drücken Sie die Stifte des Leuchtmittels bei gleichzeitiger leich-
ter Drehung nach rechts in die Bajonettlöcher der Fassung.
Um die Helligkeit der Leuchte zu regeln, halten Sie den Taster im
Kabel gedrückt.
Kurzes Drücken der Taste schaltet die Leuchte aus und ein.
Pege
Wichtig: Den Papierschirm unter keinen Umständen feucht
abwischen! Bitte nur mit einem Staubwedel, Pinsel o. ä. reinigen.
Die Metallteile und das Kabel können mit einem trockenen Tuch
abgestaubt werden.
Technische Daten
100-240V 50-60Hz. Fassung GU10, max.10 Watt LED, (Lieferung
ohne Leuchtmittel), Kabellänge 300cm. Die Leuchte ist geeignet für
Leuchtmittel der Energieklassen A - G.
Eine defekte Leuchte muss als Elektroschrott entsorgt werden
und darf nicht in den Hausmüll gelangen.
Eventuell notwendige Reparaturen dürfen nur von einer Elektro-
fachkraft durchgeführt werden. Die äußere Leitung darf bei Be-
schädigung nur von der Ingo Maurer GmbH ausgetauscht werden.
Bei Schäden, die durch Nichtbeachten dieser Bedienungsanleitung,
unsachgemäßer Inbetriebnahme und/oder baulicher Veränderung z.
B. durch Fremdbauteile, Handhabung oder Fremdeingriff verursacht
werden, erlischt der Garantieanspruch.
Ingo Maurer GmbH Kaiserstrasse 47 80801 München Germany T. +49. 89. 381606-0 F. +49. 89. 381606-20 info@ingo-maurer.com www.ingo-maurer.com
Please read these instructions carefully and keep them in a safe
place for future reference.
Please take the lamp carefully out of the packaging. Remove the
cable ties and unwind the cables completely.
Imporant: Pay attention that you prevent drilling into electrical
or water mains. Use screws and anchors according to the mate-
rial and stability of the wall. Do not attach the lamp to a damp
and/or conductive surface!
Assembly
1. Position the wall mount in the desired position, paying atten-
tion to the orientation of the light. Mark the holes. (1)
2. Drill the holes and mount the anchor.
3. Thread the silicone O-ring into the hooks provided to form
a loop.
4. Thread the open end of the sheet of paper between the
two slats of the wall bracket until the frame disappears into
the lampshade.(3)
5. Slide the paper shade toward the socket so that it touches
the wall bracket. (4)
6. Now x the lampshade with the supplied magnets. (5)
7. Rotate the paper so that the front eyelet points up. (6)
8. While lightly turning it to the right, push the pins of the bulb
into the bayonet holes of the socket.
To adjust the brightness of the lamp, press and hold the button in
the cable. Briey pressing the button switches the light off and on.
Cleaning
Important: DO NOT use damp cloths, sponges or cleaning liquids
on the paper shade! Clean the shade with a light feather duster,
anti-static cloth or paintbrush. The metal parts can be wiped with
a dry cloth.
Technical specification
100-240V 50-60Hz max. 10W LED / GU10 socket. (Lightbulb not
includet) Cable length 300 cm. The lightbulb is suitable with an
energy efciency classes A - G.
A defective lamp must be disposed as electronic scrap, it
must not get into domestic waste.
Any repairs that may become necessary must be carried out by a
qualied electrician. In the event of damage to the external power
cord, replacements may only be tted by Ingo Maurer GmbH. The
legal and contractual warranty for defects and product liability will
be void, should the installation instructions not be duly followed or
non-original components be employed.

Français Italiano
Stand September 2021 Made in GermanyDesign: Ingo Maurer und Team 2019
A lire attentivement avant l‘utilisation et à conserver.
Veuillez sortir la lampe soigneusement de son emballage. Retirer
les attaches de câble et déroulez complètement les câbles.
Important: Faire attention au positionnement des conduites
électriques et aux conduites d‘eau. Utiliser (selon la nature du
mur) des moyens de xation appropriés. Ne pas installer sur une
surface humide et/ou conductrice!
Mise en service
1. Placez le support mural dans la position désirée, en faisant
attention à l‘orientation de la lumière. Marquer les trous. (1)
2. Percer le trou de la cheville. Insérer la cheville.
3. Accrocher l‘anneau en silicone (2) et faire une boucle avec le
câble.
4. Insérer l‘extrémité ouverte de la feuille de papier entre les
deux tiges métalliques du support mural, jusqu‘à ce que la
douille disparaisse dans le diffuseur en papier. (3)
5. Faites glisser l‘écran en papier vers la douille jusqu‘à ce qu‘il
s‘arrête sur le support mural. (4)
6. Fixer maintenant l‘écran papier avec les aimants fournis. (5)
7. Aligner la feuille de papier en la faisant pivoter de façon à ce
que l‘oeillet avant soit tourné vers le haut. (6)
8. Insérer les broches de l‘ampoule dans la douille à baionnette,
en la poussant vers l‘intérieur tout en la tournant légèrement
vers la droite.
Pour régler la luminosité de la lampe, appuyez et maintenez
enfoncé le bouton dans le câble. Un appui bref sur le bouton éteint
et allume la lumière.
Entretien
Important: Ne jamais nettoyer la feuille de papier avec un chiffon
humide! Nettoyer uniquement avec un plumeau, pinceau ou
equivalent.
Nettoyer les pièces métalliques et le câble avec un chiffon sec.
Données techniques
100-240 V 50-60Hz, Douille GU10 max. 10 watts LED (ampoule
non incluse), longueur du câble 300 cm. compatible avec des
ampoules des classes énergétiques A - G.
Un lampe défectueux devra être jeté avec des déchets
électroniques, ne pas les jeter avec vos ordures ménagères.
Des réparations éventuellement nécessaires ne doivent être
effectuées que par un spécialiste. En cas de dommage, le câble
électrique externe ne doit être échangé que par la société Ingo
Maurer GmbH. La garantie légale et contractuelle pour les défauts
et la responsabilité pour les dommages causés par des produits
défectueux, expireront en cas de dommages ou de ré- clamations
résultant du non-respect des instructions d‘installation et/ou des
modifications Structurelles, en particulier si des composants non
originaux sont utilisés
Prima della messa in funzione, leggere attentamente le presenti
istruzioni e conservarle per futuro riferimento.
Con entrambe le mani estrarre cautamente la lampada
dall’imballaggio. Rimuovere le fascette per cavi e svolgere
completamente i cavi.
Importante: Fare assolutamente attenzione al percorso delle
linee di alimentazione e delle condutture dell’acqua. Impiegare
(a seconda del tipo di parete) dipositivi di ssaggio idonei. Non
montare su superci umide e/o conduttrici di corrente!
Messa in funzione
1. Posizionare il supporto a parete nella posizione desiderata,
prestando attenzione all‘orientamento della luce. Segnare i
fori. (1)
2. Effettuare i due fori per i tasselli, inserire i tasselli e avvitare
il supporto a parete della lampada. Percez 2 trous pour les
chevilles, insérez les chevilles et serrez le support mural de
l‘appareil.
3. Inlare il l‘anello in silicone in silicone del cavo nell‘apposito
gancio, in modo che il cavo formi un‘asola. (2)
4. Inserire l‘estremità aperta del foglio di carta tra le due aste
metalliche del supporto a parete, no alla scomparsa del
portalampada nel diffusore in carta. (3)
5. Far scorrere lo schermo di carta verso il portalampada finche
questo sia in battuta del supporto a parete. (4)
6. Fissare ora lo schermo di carta con le calamite in dotazione.
(5)
7. Allineare il foglio di carta ruotandolo in modo che l‘occhiello
anteriore sia rivolto verso l‘alto. (6)
8. Inserire i perni della lampadina nel portalampada a baionetta,
spingendola e contemporaneamente ruotandola leggermente
verso destra.
Per regolare la luminosità della lampada, tieni premuto il pulsante nel
cavo. Premendo brevemente il pulsante si accende e si spegne la luce.
Cura
Importante: Non pulire mai il paralume con un panno umido! Usare
esclusivamente uno spolverino o un pennello ecc. Le parti in metallo
e il cavo possono essere puliti con un panno asciutto.
Dati tecnici
100-240 V 50-60Hz. Portalampada GU10, max. 10 Watt LED
(lampadina non inclusa), lunghezza del cavo cm. 300. Adatta per
lampadine delle classi di efficienza energetica A - G.
Un lampada difettoso è da considerarsi un rifiuto elettrici e
non deve essere smaltito con i rifi uti domestici.
Eventuali riparazioni possono essere effettuate esclusivamente
da un elettricista. Il cavo esterno – se danneggiato – può essere
sostituito soltanto dalla Ingo Maurer GmbH. In caso di danni
causati dall‘inosservanza delle presenti istruzioni d‘uso, da una
messa in servizio e/o da una modifica costruttiva non corretta, ad
es. a causa di componenti estranei, manipolazione o interferenze
esterne, Il diritto alla garanzia decade.
-
 1
1
-
 2
2
-
 3
3
-
 4
4


in anderen Sprachen
Verwandte Artikel
-
Ingo Maurer Oop's Bedienungsanleitung
-
-
-
-
-
-
-
-
-