Stealth Products P133D12R2 Benutzerhandbuch
- Typ
- Benutzerhandbuch

Lower Extremities (EN)
Untere Extremitäten (DE)
Membres inférieurs (FR)
Estremità più basse (IT)
Extremidades inferiores (ES)
Residual Limb Support
Amputationsbeinstütze
Soutien du membre résiduel
Supporto dell'arto residuo
Soporte para extremidades residuales
Owner’s Manual - Maintenance Guide
Benutzerhandbuch - Wartungsanleitung
Manuel d'utilisation - Guide d'entretien
Manuale d'uso - Guida alla manutenzione
Manual de usuario - Guía de mantenimiento

1EN
Table of Contents
Customer Satisfaction ..........................................................................i
General............................................................................................................... i
General Information ............................................................................ii
Warranty ...........................................................................................................ii
Supplier Reference Table............................................................................ii
Warning Labels....................................................................................iii
Warning Labels..............................................................................................iii
Limited Liability.............................................................................................iii
Testing ..............................................................................................................iii
Design & Function ...............................................................................1
Intended Use...................................................................................................1
Features.............................................................................................................1
Mounting Options ........................................................................................1
Installation........................................................................................1-4
Mounting the Cane Hardware .................................................................1
Mounting the Track Hardware .................................................................2
Mounting the Pad to the Hardware.......................................................3
Swing-Away Removal ..................................................................................4
Pad Adjustment .............................................................................................4
First Time Use .......................................................................................5
Dealer Assistance ..........................................................................................5
User Testing.....................................................................................................5
Conditions of Use .........................................................................................5
Care and Maintenance................................................................................5
Disposal.............................................................................................................5
Notes .....................................................................................................6

i
Customer Satisfaction
EN
Stealth Products is committed to 100% customer satisfaction. Your complete satisfaction is
important to us. Please contact us with feedback or suggestions to help us improve the quality
and usability of our products.
You may reach us at:
General
Read and understand all instructions prior to the use of the product. Failure to adhere to
instructions and warnings in this document may result in property damage, injury, or death.
Product misuse or failure to follow instructions will void the warranty.
Immediately discontinue use if any function is compromised, if parts are missing or loose, or if
any component shows signs of excessive wear. Consult with your supplier for repair,
adjustment, or replacement.
All persons responsible for tting, adjustment, and daily use of the devices discussed in these
instructions must be familiar with and understand all safety aspects of the devices mentioned.
In order for our products to be used successfully, you must read and understand all instructions
and warnings, and maintain our products according to our instructions on care and
maintenance.
The installation instructions will guide you through this product’s options and possibilities.
Instructions are written with the expressed intent of use with standard congurations. They
also contain important safety and maintenance information, as well as describe possible
problems that can arise during use. For further assistance, or more advanced applications,
please contact Stealth Products at (512) 715-9995 or toll free at (800) 965-9229 or your
supplier.
Always keep the operating instructions in a safe place so they may be referenced as necessary.
All information, pictures, illustrations, and specications are based on the product information
that was available at the time of printing. Pictures and illustrations shown in these instructions
are representative examples and are not intended to be exact depictions of the various parts
of the product.
Stealth Products, LLC
104 John Kelly Drive, Burnet, TX 78611
Phone: (512) 715-9995 Toll Free: (800) 965-9229
Fax: (512) 715-9954 Toll Free: (800) 806-1225
www.stealthproducts.com
UK Authorized Representative
MDSS GmbH
Schigraben 41
30175 Hannover
Germany
SODIMED SA
Chemin Praz Devant 12
1032 Romanel sur-Lausanne
Switzerland
MDSS-UK RP
6 Wilmslow Road, Rusholme
Manchester M14 5TP
United Kingdom

ii EN
General Information
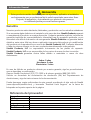
These products are designed to be tted, applied, and installed exclusively by a
healthcare professional trained for these purposes. The tting, application, and
installation by a non-qualied individual could result in serious injury.
CAUTION
Warranty
Our products are designed, manufactured, and produced to the highest of standards.
If any defect in material or workmanship is found, Stealth Products will repair or
replace the product at our discretion. Any implied warranty, including the implied
warranties of merchantability and tness for a particular purpose, shall not extend
beyond the duration of this warranty. Stealth Products does not warrant damage due
to, but not limited to: Misuse, abuse, or misapplication of product, and/or modication
of product without written approval from Stealth Products, LLC. Any alteration or lack
of serial number, where applicable, will automatically void all warranty.
Stealth Products, LLC Is liable for replacement parts only. Stealth Products, LLC is
not liable for any incurred labor costs.
Stealth Products warrants against failure due to defective materials or workmanship:
Covers: 2 years
Hardware: 5 years
Electronics: 3 years
In the event of a product failure covered by our warranty, please follow the
procedures outlined below:
Call Stealth Products at (512) 715-9995 or toll free at (800) 965-9229.
Request a Return Authorization (RA) form from the Returns Department and follow
the documentation instructions.
You can download additional copies of this manual by accessing the Stealth website
(www.stlpro.site/stealth-docs) and searching “Residual Limb Support” in the search
bar at the top of the page.
Supplier Reference
Supplier:
Telephone:
Address:
Purchase Date:
Model:

iii
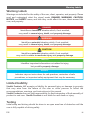
Warning Labels
EN
Warning Labels
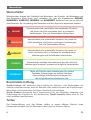
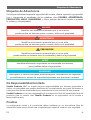
Warnings are included for the safety of the user, client, operator, and property. Please
read and understand what the signal words DANGER,WARNING,CAUTION,
NOTICE, and SAFETY mean, and how they could aect the user, those around the
user, and property.
Limited Liability
Stealth Products, LLC accepts no liability for personal injury or damage to property
that may arise from the failure of the user or other persons to follow the
recommendations, warnings, and instructions in this manual.
Stealth Products does not hold responsibility for nal integration of nal assembly of
product to end user. Stealth Products is not liable for user death or injury.
Testing
Initial setup and driving should be done in an open area free of obstacles until the
user is fully capable of driving safely.
DANGER
Identies an imminent situation which, if not avoided,
may result in severe injury,death, and property damage.
NOTICE
CAUTION
Identies a potential situation which, if not avoided,
may result in minor to moderate injury and property damage.
WARNING
Identies a potential situation which, if not avoided,
may result in severe injury,death, and property damage.
Identies important information not related to injury,
but possible property damage.
NOTICE
SAFETY
Indicates steps or instructions for safe practices, reminders of safe
procedures, or important safety equipment that may be necessary.

1 EN
Design & Function
Intended Use
The Residual Limb Support system increases user comfort and supports a residual
limb with multiple angles of adjustment and features an easy-to-clean cover.
The Residual Limb Support allows the client to remove the pad or swing it away
while keeping the installed foot rigging in place.
Features
The Residual Limb Support system features:
• easy swing-away and removal for greater assistance in client transfers;
• full tilt angle adjustability;
• multiple mounting congurations;
• a track that promotes easy length adjustability; and,
• a soft, non-abrasive cover to increase user comfort.
Mounting Options
The Residual Limb Support system is able to be mounted in the following ways:
• clamp-style cane mounting; and,
• track-style chair mounting.
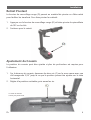
Mounting the Hardware
There are two ways of mounting the Residual Limb Support hardware, detailed
below.
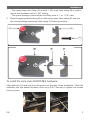
To install the clamp-style (RLSPKG100) hardware:
1. Interlock the opposing ends of the tube clamp around the wheelchair frame.
2. Tighten the screw (C) through the adjacent holes on the clamp with a 3/16" hex
key.

2
Installation
EN
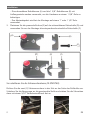
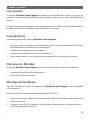
- The swing away tube clamp (A) and the 1 3/8" male tube clamp (B) is used to
mount the hardware onto a 1 3/8" tubing.
- The spacer package is used when mounting onto a 1" or 1 1/8" tube.
3. Place the appropriate bushing (E) on the swing-away tube clamp (D) and use
the corresponding-sized male tube clamp (F) before mounting.
(A) (B)
(C)
(F)(E)
(D)
To install the track-style (RLSPKGTB3) hardware:
Align the two (2) track nuts into the groove on the side of the wheelchair. Slide the
assembly into the desired location, then use a 5/32" hex key to tighten the screws
rmly in place.

3 EN
Installation
1.
3. 4.
2.
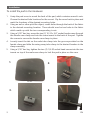
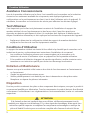
To install the pad to the hardware:
1. Unzip the pad cover to reveal the back of the pad, which contains several t-nuts.
Choose the desired hole locations for the mount. Zip the cover back in place and
mark the locations of the desired mounting holes.
2. Using an awl or other pick-like object, create holes through the back of the fabric
in the desired mounting location. There should now be two holes in the fabric
which match up with the two corresponding t-nuts.
3. Using a 5/32" hex key, screw the two (2) 10-32 x 3/4" socket head screws through
the female cane clamp and into the screw inserts in the back of the pad. Tighten
the screws to secure the female cane clamp in place.
4. Loosely insert the tab on the male tube clamp into the groove provided on the
female clamp and slide the swing-away tube clamp to the desired location in the
clamp assembly.
5. Using a 3/16" hex key, tighten the two (2) 1/4-20 socket head screws into the two
inserts on top of the male cane clamp to lock the pad in place on the cane.

4
Installation
EN
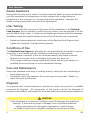
Swing-Away Removal
The red button lock (D) allows the hardware to swing away or be removed to assist
in transfers. To swing the hardware away:
1. Press the red button lock (D) and swing the hardware 90º to the side.
2. Lift for removal.
Pad Adjustment
The pad's position can be adjusted if more depth is required for the user.
1. On the underside of the pad, loosen the two screws (C) on the cane clamp with a
3/16" hex key until the position can be adjusted on the horizontal tube.
2. Adjust to the desired position, then tighten the screws.
Pad is shown upside
down for clarity.

5 EN
First Time Use
CAUTION
If the wheelchair is involved in a collision, check all hardware thoroughly for
damage. If there are any signs of damage, have a qualied technician
inspect and replace the damaged components or send the parts
to Stealth Products for a complete overhaul to ensure future safety.
During rst time use by the client, it is advised that the dealer or service technician
not only assembles the components, but also explains the congurations or
positioning to the customer (i.e., the user and/or the attendant). If needed, the
dealer or service technician can make nal adjustments.
Dealer Assistance
It is important that the customer is fully aware of the installation of the Residual
Limb Support, how to operate it, and the ways in which it can be adjusted to t the
specic needs of the client. A dealer should explain and demonstrate the necessary
installation steps, and should explain the functions of the device's components.
• Explain and demonstrate the initial setup of the Residual Limb Support, and
explain the functions of all attached equipment.
User Testing
The Residual Limb Support is intended for use as installed by the dealer or service
technician, in accordance with the installation instructions in this manual.
• The foreseen conditions of use are communicated by the dealer or service
technician to the user and/or attendant during the rst-time use.
• If the usage conditions change signicantly, please contact your dealer or a
qualied service technician to avoid unintended damage.
Conditions of Use
Ensure the hardware used stays in working order by caring for and maintaining it.
• Keep electronics dry.
• Periodically check any hardware for loose screws or worn parts. Replace or
repair the parts as necessary.
For products that contain batteries or electronics, return the product to qualied
personnel for disposal. All components of the product should be disposed of
properly in accordance with respective local and national environmental regulations.
Care and Maintenance
Disposal

1
Inhaltsverzeichnis
1
Kundenzufriedenheit............................................................................i
Allgemein ..........................................................................................................i
Allgemeine Informationen..................................................................ii
Garantie ............................................................................................................ii
Lieferantenreferenz ......................................................................................ii
Warnschilder........................................................................................iii
Warnschilder ..................................................................................................iii
Beschränkte Haftung ..................................................................................iii
Testen................................................................................................................iii
Design & Funktion...............................................................................1
Verwendungszweck......................................................................................1
Merkmale .........................................................................................................1
Montageoptionen.........................................................................................1
Installation........................................................................................1-4
Montage der Cane-Hardware ..................................................................1
Montage der Schienenhardware.............................................................2
Montage des Pads an der Hardware.....................................................3
Wegswenken-Entfernung ..........................................................................4
Pad-Anpassung..............................................................................................4
Erstmalige Verwendung ......................................................................5
Händlerunterstützung.................................................................................5
Benutzertests ..................................................................................................5
Nutzungsbedingungen...............................................................................5
Pege und Wartung.....................................................................................5
Verfügung ........................................................................................................5
Anmerkungen.......................................................................................6

i DE
Kundenzufriedenheit
Stealth Products verpichtet sich zu 100 % Kundenzufriedenheit. Ihre vollste Zufriedenheit ist
uns wichtig. Bitte kontaktieren Sie uns mit Feedback oder Vorschlägen, die uns helfen, die
Qualität und Benutzerfreundlichkeit unserer Produkte zu verbessern.
Sie erreichen uns unter:
Allgemein
Lesen und verstehen Sie alle Anweisungen vor der Verwendung des Produkts. Die
Nichtbeachtung der Anweisungen und Warnungen in diesem Dokument kann zu Sachschäden,
Verletzungen oder zum Tod führen. Der Missbrauch des Produkts oder die Nichtbeachtung der
Anweisungen führt zum Erlöschen der Garantie.
Stellen Sie die Verwendung sofort ein, wenn eine Funktion beeinträchtigt ist, wenn Teile fehlen
oder locker sind oder wenn eine Komponente Anzeichen von übermäßigem Verschleiß
aufweist. Wenden Sie sich bezüglich Reparatur, Einstellung oder Austausch an Ihren Lieferanten.
Alle Personen, die für die Montage, Einstellung und den täglichen Gebrauch der in dieser
Anleitung beschriebenen Geräte verantwortlich sind, müssen alle Sicherheitsaspekte der
genannten Geräte kennen und verstehen. Damit unsere Produkte erfolgreich verwendet
werden können, müssen Sie alle Anweisungen und Warnungen lesen und verstehen und unsere
Produkte gemäß unseren Pege- und Wartungsanweisungen warten.
Die Installationsanleitung führt Sie durch die Optionen und Möglichkeiten dieses Produkts.
Anweisungen wurden mit der ausdrücklichen Absicht geschrieben, sie mit
Standardkongurationen zu verwenden. Sie enthalten auch wichtige Sicherheits- und
Wartungsinformationen und beschreiben mögliche Probleme, die während des Gebrauchs
auftreten können. Für weitere Unterstützung oder erweiterte Anwendungen wenden Sie sich
bitte an Ihren Lieferanten oder an Stealth Products unter (512) 715-9995 oder gebührenfrei
unter (800) 965-9229.
Bewahren Sie die Bedienungsanleitung immer an einem sicheren Ort auf, damit Sie bei Bedarf
nachschlagen können.
Alle Informationen, Bilder, Illustrationen und Spezikationen basieren auf den
Produktinformationen, die zum Zeitpunkt der Drucklegung verfügbar waren. Die in dieser
Anleitung gezeigten Bilder und Illustrationen sind repräsentative Beispiele und sollen keine
genauen Darstellungen der verschiedenen Teile des Produkts sein.
Stealth Products, LLC
104 John Kelly Drive, Burnet, TX 78611
Telefon: (512) 715-9995 Zollfrei: (800) 965-9229
Fax: (512) 715-9954 Zollfrei Fax: (800) 806-1225
www.stealthproducts.com
Bevollmächtigter Vertreter in
Großbritannien
MDSS GmbH
Schigraben 41
30175 Hannover
Germany
SODIMED SA
Chemin Praz Devant 12
1032 Romanel sur-Lausanne
Switzerland
MDSS-UK RP
6 Wilmslow Road, Rusholme
Manchester M14 5TP
United Kingdom

ii
Allgemeine Informationen
DE
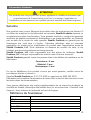
Diese Produkte sind so konzipiert, dass sie ausschließlich von medizinischem
Fachpersonal angepasst, angewendet und installiert werden, das für diese Zwecke
ausgebildet wurde. Die Montage, Anwendung und Installation durch eine nicht
qualizierte Person kann zu schweren Verletzungen führen.
VORSICHT
Garantie
Unsere Produkte werden nach den höchsten Standards entworfen, hergestellt und
produziert. Wenn ein Material- oder Verarbeitungsfehler festgestellt wird, wird Stealth
Products das Produkt nach unserem Ermessen reparieren oder ersetzen. Jegliche
stillschweigende Garantie, einschließlich der stillschweigenden Garantien der
Marktgängigkeit und Eignung für einen bestimmten Zweck, erstreckt sich nicht über die
Dauer dieser Garantie hinaus. Stealth Products garantiert keine Schäden aufgrund von,
aber nicht beschränkt auf: Missbrauch, Missbrauch oder falsche Anwendung des Produkts
und/oder Modikation des Produkts ohne schriftliche Genehmigung von Stealth Products,
LLC. Jegliche Änderung oder das Fehlen der Seriennummer führt gegebenenfalls
automatisch zum Erlöschen der Garantie.
Stealth Products,LLC haftet nur für Ersatzteile. Stealth Products, LLC haftet nicht für
anfallende Arbeitskosten.
Stealth Products garantiert gegen Ausfälle aufgrund von Material- oder
Verarbeitungsfehlern:
Bezüge: 2 Jahre
Hardware: 5 Jahre
Elektronik: 3 Jahre
Im Falle eines Produktfehlers, der von unserer Garantie abgedeckt wird, gehen Sie bitte
wie folgt vor:
Rufen Sie Stealth Products unter (512) 715-9995 oder gebührenfrei unter (800) 965-9229
an.
Fordern Sie ein Rücksendegenehmigungsformular (RA) bei der Rücksendeabteilung an
und befolgen Sie die Dokumentationsanweisungen.
Sie können zusätzliche Exemplare dieses Handbuchs herunterladen, indem Sie auf die
Stealth-Website (https://stlpro.site/stealth-docs) zugreifen und in der Suchleiste oben auf
der Seite nach „Residual Limb Support“ suchen.
Lieferantenreferenz
Lieferant:
Telefon:
Adresse:
Kaufdatum:
Modell:

iii DE
Warnschilder
Warnschilder
Warnhinweise dienen der Sicherheit des Benutzers, des Kunden, des Bedieners und
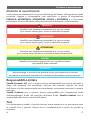
des Eigentums. Bitte lesen und verstehen Sie, was die Signalwörter GEFAHR,
WARNUNG, VORSICHT, HINWEIS und SICHERHEIT bedeuten und wie sie sich auf
den Benutzer, die Umgebung des Benutzers und das Eigentum auswirken können.
Beschränkte Haftung
Stealth Products, LLC übernimmt keine Haftung für Personen- oder Sachschäden, die
dadurch entstehen können, dass der Benutzer oder andere Personen die Empfehlungen,
Warnungen und Anweisungen in diesem Handbuch nicht befolgen.
Stealth Products übernimmt keine Verantwortung für die endgültige Integration der
Endmontage des Produkts für den Endbenutzer. Stealth Products haftet nicht für Tod
oder Verletzung des Benutzers.
Testen
Die Ersteinrichtung und das Fahren sollten in einem oenen Bereich ohne
Hindernisse erfolgen, bis der Benutzer in der Lage ist, sicher zu fahren.
VORSICHT
Kennzeichnet eine potenzielle Situation, die, wenn sie
nicht vermieden wird, zu leichten bis mittelschweren
Verletzungen und Sachschäden führen kann.
WARNUNG
Kennzeichnet eine potenzielle Situation, die, wenn sie
nicht vermieden wird, kann zu schweren Verletzungen,
Tod und Sachschäden führen.
GEFAHR
Kennzeichnet eine unmittelbar bevorstehende Situation,
die, wenn sie nicht vermieden wird, zu schweren
Verletzungen, Tod und Sachschäden führen kann.
HINWEIS Kennzeichnet wichtige Informationen, die sich nicht auf
Verletzungen beziehen, sondern auf mögliche Sachschäden.
SICHERHEIT
Weist auf Schritte oder Anweisungen für sichere
Praktiken, Erinnerungen an sichere Verfahren
oder wichtige Sicherheitsausrüstungen hin,
die möglicherweise erforderlich sind.

1
Design und Funktion
DE
Verwendungszweck
Das Amputationsbeinstütze erhöht den Benutzerkomfort und stützt einen Stumpf
mit mehreren Einstellwinkeln und verfügt über eine leicht zu reinigende Abdeckung.
Die Amputationsbeinstütze ermöglicht es dem Kunden, das Polster zu entfernen
oder wegzuschwenken, während die installierte Fußhalterung an Ort und Stelle bleibt.
Merkmale
Das Amputationsbeinstütze zeichnet sich aus durch:
• einfaches Wegschwenken und Entfernen für mehr Unterstützung bei
Kundentransfers;
• volle Einstellbarkeit des Neigungswinkels;
• mehrere Montagekongurationen;
• eine Schiene, die eine einfache Längenanpassung fördert; und,
• eine weiche, nicht scheuernde Abdeckung zur Erhöhung des Benutzerkomforts.
Montageoptionen
Die Amputationsbeinstütze kann auf folgende Arten montiert werden:
• Klemmschellemontage; und,
• Stuhlbefestigung im Schienenstil.
Montage der Hardware
Es gibt zwei Möglichkeiten, die Hardware der Stumpfstütze zu montieren, die unten
beschrieben werden.
So installieren Sie die Befestigungselemente im Klemmebefestigungen
(RLSPKG100):
1. Verriegeln Sie die gegenüberliegenden Enden der Rohrschelle um den
Rollstuhlrahmen.
2. Ziehen Sie die Schraube (C) durch die angrenzenden Löcher an der Klemme mit
einem 3/16" Sechskantschlüssel fest.

2 DE
Installation
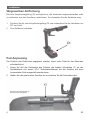
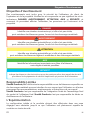
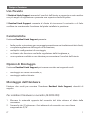
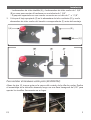
- Die schwenkbare Rohrklemme (A) und die 1 3/8"-Rohrklemme (B) mit
Außengewinde werden verwendet, um die Hardware an einem 1 3/8"-Rohr zu
befestigen.
- Das Abstandspaket wird bei der Montage auf einem 1" oder 1 1/8" Rohr
verwendet.
3. Platzieren Sie die passende Buchse (E) auf der schwenkbaren Rohrschelle (D) und
verwenden Sie vor der Montage die entsprechende männliche Rohrschelle (F).
(A) (B)
(C)
(F)(E)
(D)
So installieren Sie die Schienenhardware (RLSPKGTB3):
Richten Sie die zwei (2) Schienenmuttern in der Nut an der Seite des Rollstuhls aus.
Schieben Sie die Baugruppe an die gewünschte Stelle und ziehen Sie die Schrauben
dann mit einem 5/32" Sechskantschlüssel fest an.

3
Installation
DE
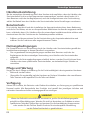
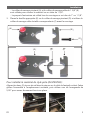
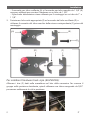
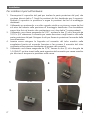
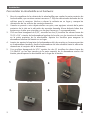
So installieren Sie das Kissen an der Hardware:
1. Önen Sie die Kissenhülle, um die Rückseite des Kissens freizulegen, die mehrere
T-Muttern enthält. Wählen Sie die gewünschten Lochpositionen für die
Halterung. Bringen Sie die Abdeckung wieder an und markieren Sie die
Positionen der gewünschten Befestigungslöcher.
2. Bohren Sie mit einer Ahle oder einem anderen einem geeigneten Werkzeug
Löcher durch die Rückseite des Stoes an der gewünschten Montagestelle. Es
sollten jetzt zwei Löcher im Sto sein, die mit den beiden entsprechenden T-
Muttern übereinstimmen.
3. Schrauben Sie mit einem 5/32" Sechskantschlüssel die zwei (2) 10-32 x 3/4"
Innensechskantschrauben durch die Klemmeschelle und in die
Schraubeneinsätze auf der Rückseite des Polsters. Ziehen Sie die Schrauben fest,
um die Rohrklemme zu befestigen.
4. Führen Sie die Lasche an der Schellenhälfte Schlauchklemme locker in die Nut an
der Schellenhälfte Klemme ein und schieben Sie die wegschwenkbare
Schlauchklemme an die gewünschte Stelle in der Klemmenbaugruppe.
5. Ziehen Sie mit einem 3/16" Sechskantschlüssel die zwei (2) 1/4-20 x 3/4"
Innensechskantschrauben in den beiden Einsätzen oben auf der männlichen
Stockklemme fest, das Polster am Rohr zu xieren.
1.
3. 4.
2.

4 DE
Installation
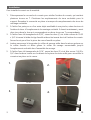
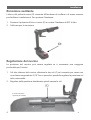
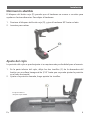
Wegswenken-Entfernung
Die rote Knopfverriegelung (D) ermöglicht es, die Hardware wegzuschwenken oder
zu entfernen, um den Transfer zu erleichtern. So schwenken Sie die Hardware weg:
1. Drücken Sie die rote Knopfverriegelung (D) und schwenken Sie die Hardware um
90º zur Seite.
2. Zum Entfernen anheben.
Pad-Anpassung
Das Pad ist zur Verdeutlichung auf
dem Kopf stehend dargestellt.
Die Position des Pads kann angepasst werden, wenn mehr Tiefe für den Benutzer
erforderlich ist.
1. Lösen Sie auf der Unterseite des Polsters die beiden Schrauben (C) an der
Stockklemme mit einem 3/16" Sechskantschlüssel, bis die Position auf dem
horizontalen Rohr eingestellt werden kann.
2. Stellen Sie die gewünschte Position ein und ziehen Sie die Schrauben fest.

5
Erstmalige Verwendung
DE
VORSICHT
Wenn der Rollstuhl in eine Kollision verwickelt ist, prüfen Sie alle Befestigungsteile
gründlich auf Beschädigungen. Wenden Sie sich bei Anzeichen von Schäden an einen
qualizierten Techniker Überprüfen und ersetzen Sie die beschädigten Komponenten
oder senden Sie die Teile an Stealth Products für eine komplette Überholung,
um die Zukunftssicherheit zu gewährleisten.
Bei der erstmaligen Verwendung durch den Kunden wird empfohlen, dass der Händler oder
Servicetechniker nicht nur die Komponenten zusammenbaut, sondern dem Kunden (d. h.
dem Benutzer und/oder der Begleitperson) auch die Kongurationen oder Positionierung
erklärt. Bei Bedarf kann der Händler oder Servicetechniker letzte Einstellungen vornehmen.
Händlerunterstützung
Es ist wichtig, dass der Kunde die Installation der Amputationsbeinstütze, deren Bedienung
und die Art und Weise, wie sie an die spezischen Bedürfnisse des Kunden angepasst werden
kann, vollständig kennt. Ein Händler sollte die notwendigen Installationsschritte erklären und
demonstrieren und die Funktionen der Gerätekomponenten erklären.
• Erklären und demonstrieren Sie die Ersteinrichtung der Amputationsbeinstütze und
erklären Sie die Funktionen aller angeschlossenen Geräte.
Benutzertests
Die Stumpfstütze ist zur Verwendung durch den Händler oder Servicetechniker gemäß den
Installationsanweisungen in diesem Handbuch vorgesehen.
• Die vorgesehenen Nutzungsbedingungen werden dem Benutzer und/oder der
Begleitperson bei der erstmaligen Verwendung vom Händler oder Servicetechniker
mitgeteilt.
• Wenn sich die Nutzungsbedingungen erheblich ändern, wenden Sie sich bitte an Ihren
Händler oder einen qualizierten Servicetechniker, um unbeabsichtigte Schäden zu
vermeiden.
Nutzungsbedingungen
Sorgen Sie durch Pege und Wartung für die Funktionsfähigkeit der eingesetzten Hardware.
• Elektronik trocken halten.
• Überprüfen Sie regelmäßig jegliche Hardware auf lockere Schrauben oder verschlissene
Teile. Ersetzen oder reparieren Sie die Teile nach Bedarf.
Pege und Wartung
Geben Sie Produkte, die Batterien oder Elektronik enthalten, zur Entsorgung an qualiziertes
Personal zurück. Alle Bestandteile des Produkts sind gemäß den jeweiligen örtlichen und
nationalen Umweltvorschriften ordnungsgemäß zu entsorgen.
Verfügung

1FR
Table des Matières
Satisfaction du Client............................................................................i
Général............................................................................................................... i
Informations Générales.......................................................................ii
Garantie ............................................................................................................ii
Référence du fournisseur...........................................................................ii
Étiquettes d'Avertissement................................................................iii
Étiquettes d'Avertissement.......................................................................iii
Responsabilité Limitée ...............................................................................iii
L' Expérimentation.......................................................................................iii
Conception et Fonction .......................................................................1
Utilisation Prévue ..........................................................................................1
Fonctionnalités...............................................................................................1
Options de Montage ...................................................................................1
Installation........................................................................................1-4
Montage du Matériel de Canne..............................................................1
Montage du Matériel de Voie ..................................................................2
Montage du Coussin Sur le Matériel.....................................................3
Retrait Pivotant ..............................................................................................4
Ajustement du Coussin...............................................................................4
Première Utilisation .............................................................................5
Assistance Concessionnaire ......................................................................5
Test Utilisateur................................................................................................5
Conditions d'Utilisation ..............................................................................5
Entretien et Maintenance...........................................................................5
Disposition.......................................................................................................5
Remarques ............................................................................................6
Seite wird geladen ...
Seite wird geladen ...
Seite wird geladen ...
Seite wird geladen ...
Seite wird geladen ...
Seite wird geladen ...
Seite wird geladen ...
Seite wird geladen ...
Seite wird geladen ...
Seite wird geladen ...
Seite wird geladen ...
Seite wird geladen ...
Seite wird geladen ...
Seite wird geladen ...
Seite wird geladen ...
Seite wird geladen ...
Seite wird geladen ...
Seite wird geladen ...
Seite wird geladen ...
Seite wird geladen ...
Seite wird geladen ...
Seite wird geladen ...
Seite wird geladen ...
Seite wird geladen ...
Seite wird geladen ...
Seite wird geladen ...
Seite wird geladen ...
Seite wird geladen ...
-
 1
1
-
 2
2
-
 3
3
-
 4
4
-
 5
5
-
 6
6
-
 7
7
-
 8
8
-
 9
9
-
 10
10
-
 11
11
-
 12
12
-
 13
13
-
 14
14
-
 15
15
-
 16
16
-
 17
17
-
 18
18
-
 19
19
-
 20
20
-
 21
21
-
 22
22
-
 23
23
-
 24
24
-
 25
25
-
 26
26
-
 27
27
-
 28
28
-
 29
29
-
 30
30
-
 31
31
-
 32
32
-
 33
33
-
 34
34
-
 35
35
-
 36
36
-
 37
37
-
 38
38
-
 39
39
-
 40
40
-
 41
41
-
 42
42
-
 43
43
-
 44
44
-
 45
45
-
 46
46
-
 47
47
-
 48
48


