

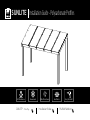
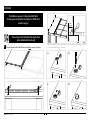
SUNLITE® Installation Guide 2
SUNLITE Sheets
10mm or 16mm
U Polycarbonate Prole
10mm or 16mm
H Polycarbonate Prole
10mm or 16mm
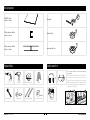
Required Tools Safety comes first
Kit Components
Do not step directly on the sheets between
the purlins!
When installing SUNLITE or doing maintenance
work, always consider the sheet to be unfit to
support a person’s weight. Always use stepping
ladders or crawling boards, supported by minimum
three roof structural elements, when working on
a glazed roof of any kind.
Drill Screw Gun
Profile Spacer BarRubber Mallet Angle Grinder
Circular Saw with Ladder
Fixing Kit
Breather Tape
123
Impermeable Tape
Palram DE GmbH
Profile Spacer Bar

SUNLITE® Installation Guide 3
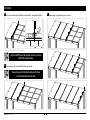
Before Installation - Guidelines for substructure Before Installation - Preparation of sheets
Purlin Spacing Measure and Cutting
Protective Film Removal
13
4
Purlin distance (crossbar-connection): For 16 mm SUNLITE: less than 800 mm, For 10 mm
SUNLITE less than 600 mm.
NOTE For arched applications: For 16 mm SUNLITE maintain a radius above 3.2 m and for 10
mm SUNLITE a radius above 2.0 m.
Slope: 5.7o
100mm
Ensure Minimum Roof Pitch
Confirm that the roof pitch is at least 10% (200mm rise for 2m length or 250mm for 2.5m length).
This minimum pitch will ensure proper water runoff and help keep the Roof Panels clean.
2
100mm
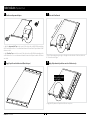
Cut the sheet to the desired length (if needed). Make sure to allow an overhang of 50-100mm
beyond the bottom purlin.
Remove 100 mm of protective film from the edges of both open sides of the sheet to allow
the application of the sealing tapes.
H Joiner
SUNLITE Sheet
Ensure that the underlying roof structure is square before starting
installation of the SUNLITE® Sheets.
NOTE: All accessories and Sheets length suite each other. If a shorter length
is required remember to cut the H prole to the same length of the sheet.

SUNLITE® Installation Guide 4
Breather and Impermeable tapes
5
Apply the Impermeable Tape to the top end of the sheet, and carefully fold the protruding
sides over both sheet faces to cover the internal channels. Ensure that all open channels of the
sheet are sealed.
Apply Breather Tape over the lower end of the sheet, and carefully fold the protruding sides
over both sheet faces to cover the internal channels. Ensure that all open channels of the sheet
are sealed.
Apply U profiles on both sheet ends (Over the tapes).
Protective Film Removal
6
7
Slope
Peel off the masking along the edges of length sides at both sides of the sheet, for about
80-100 mm from the edges.
Before Installation - Preparation of sheets
100mm
Apply Polycarbonate H profile on one side of the sheet only
8
Make sure the H is applied
over the U prole.
Apply the Polycarbonate H profile on all sheets except one.
123

SUNLITE® Installation Guide 5
Remove the protective lm from the bottom of the Panel
before installation. Bottom side only!
This installations sequence is for the pergola that t the kit.
If your pergola is already built you should place the SUNLITE sheets
as indicted on page 7.
Installation
9Place and Fasten the first SUNLITE sheet and H Profile - pergola edge (side).
Align the SUNLITE side with the structure make sure to allow the desired overhang (see stage #3).
Screw fasten the SUNLITE sheet each purlin.
Min
40mm
c.
a. b.
d.

SUNLITE® Installation Guide 6
Installation
11
12
Place and fasten the second SUNLITE sheet and H Profile.
Repeat stage 10 until all the pergola is covered.
10 Place and Fasten the first SUNLITE sheet and H Profile - through first H Profile.
Screw fasten through the H profile each purlin .
After the SUNLITE Panel is fully installed remove the protective
lm from the top of the Panel.
Remove the protective lm from the bottom of the Panel
before installation. Bottom side only!

605870 - 06.2023
Da Palram Industries keine Kontrolle über den Einsatz der Produkte durch Dritte hat, übernimmt die Firma keine Garantie für die Einhaltung der vorgenannten Werte. Jeder Benutzer des Materials sollte seine eigenen Versuche zur Feststellung der Eignung des Materials für seinen eigenen Gebrauch durchführen. Aussagen
über mögliche oder vorgeschlagene Verwendungen der hierin beschriebenen Materialien sind nicht als eine Lizenz unter einem PALRAM Industries Patent, das eine solche Verwendung deckt oder als Empfehlungen für die Verwendung derartiger Materialien in der Verletzung eines Patents, zu verstehen. Palram Industries und
seine Vertriebshändler haften nicht für Verluste durch falsche Installation des Materials. Im Einklang mit unserer Firmenpolitik der kontinuierlichen Produktentwicklung empfehlen wir Ihnen, mit Ihrem lokalen PALRAM Industries Lieferanten zu sprechen, um sicherzustellen, dass Sie über die aktuellsten Informationen verfügen.
©1997 PALRAM Industries Ltd. | SUNLITE® ist eine Marke von PALRAM Industries Ltd.
Installation
-
 1
1
-
 2
2
-
 3
3
-
 4
4
-
 5
5
-
 6
6
-
 7
7


Palram SUNLITE DIY Benutzerhandbuch
- Typ
- Benutzerhandbuch
- Dieses Handbuch eignet sich auch für
in anderen Sprachen
- English: Palram SUNLITE DIY User guide


