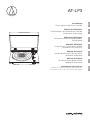
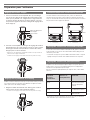
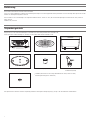
Audio Technica AT-LP3 Benutzerhandbuch
- Kategorie
- Drehscheibe
- Typ
- Benutzerhandbuch
Dieses Handbuch eignet sich auch für

AT-LP3
User Manual
Fully Automatic Belt-Drive Turntable
Manuel de l’utilisateur
Tourne-disque à entraînement par courroie
entièrement automatique
Manuel de l’utilisateur
Vollautomatischer, riemenbetriebener
Plattenspieler
Manuale dell’utente
Giradischi con trasmissione a cinghia
totalmente AUTOMATICO
Manual de usuario
Tocadiscos de transmisión por correa
totalmente automático
Manual do Usuário
Toca-discos acionado por correia
totalmente automático
Руководство пользователя
Полностью автоматический проигрыватель
виниловых пластинок с ре менным приводом

1
Introduction
Thank you for purchasing this Audio-Technica product.
Read through this user manual before using the product to ensure its correct use. Also, keep this manual, along with the warranty, for future reference.
This product is only for use in the following countries. Make sure that the operating voltage of the product is correct for the country you live in.
Country list: EU, Russia
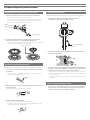
Package contents
Make sure that you have all the included items listed below before using this product.
If some items are missing or damaged, contact your local Audio-Technica dealer.
•
Turntable body
•
Rubber mat
•
Dust cover
•
Platter (with drive belt)
•
Counterweight
•
Headshell (AT-HS3) with VM stereo cartridge
(AT91R)
•
Power cable (Use the correct power cable for the country you live in.)
•
User manual (this document)
•
45 RPM adapter
After purchase, we suggest that you save all packaging materials for possible future storage, moving, or shipping.

2
Safety precautions
Important information
Warning:
To prevent fire or shock hazard, do not expose this apparatus to rain or moisture.
Caution:
Do not expose this apparatus to drips or splashes.
To avoid electric shock, do not open the cabinet.
Refer servicing to qualified personnel only.
Do not expose this apparatus to excessive heat such as sunshine, fire
or the like.
Do not subject this apparatus to strong impact.
This apparatus should be located close enough to the AC outlet so that you can easily grasp the power cord plug at any time.
In case of emergency, disconnect the power cord plug of this apparatus quickly.
Do not place any objects filled with liquids, such as vases, on this apparatus.
To prevent fire, do not place any naked flame sources (such as lighted candles) on this apparatus.
Do not install this apparatus in a confined space such as a bookcase or similar unit.
To install this apparatus only in the place where ventilation is good.
Notes on use
Turntable body
•
Do not set and use the product in locations that are considerably hot or humid, dirty, or subject to extreme vibrations.
•
The product should be positioned on a flat, level surface.
Cartridge
•
Attach the provided protector to the cartridge when the product is not in use.
•
Do not touch the stylus of the cartridge with your finger.
•
Do not allow the stylus to bump against the platter, rubber mat, or edge of the record.

3
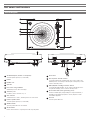
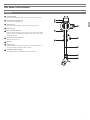
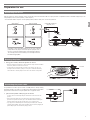
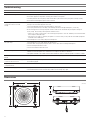
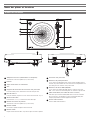
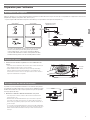
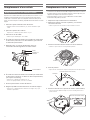
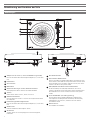
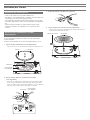
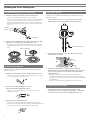
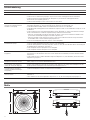
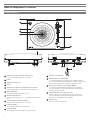
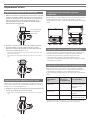
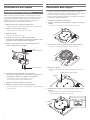
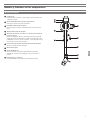
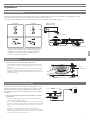
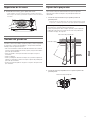
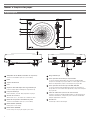
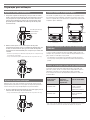
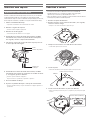
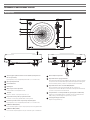
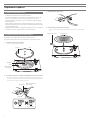
Part names and functions
Overall diagram
8 9
10
11
12 13
15
14
1
2
3
4
5
5
6
7
1
45 RPM adapter (shown in receptacle)
Select the platter speed (33-1/3 or 45 RPM).
2
Platter
3
Rubber mat
4
Spindle
5
Dust cover hinge holders
Attachment points for dust cover hinges.
6
Tonearm part
For details, refer to “Tonearm” on p. 4.
7
Size selector
Switch between 12" and 7", according to the size of the record.
8
Platter speed button
Select the platter speed (33-1/3 or 45 RPM).
9
START button
Spins the platter and moves the tonearm.
10
STOP button
Returns the tonearm to its original position and stops the platter.
11
Dust cover
12
Pre-amplifier selector switch
If using an amplifier with a PHONO input jack, set this switch to the
PHONO position. If connecting to the AUX jack of an amplifier, set this
switch to the LINE position.
13
MM (VM)/MC cartridge selector switch
If using an MM (VM) cartridge, set this switch to the MM position. If
using an MC cartridge, set this switch to the MC position.
14
RCA audio cable (with grounding wire)
Connect to PHONO input jack (grounding wire to ground terminal, if
available) or AUX (LINE) input jack of a receiver, amplifier or other
connectable equipment.
15
AC inlet
Insert the power cable here.

4
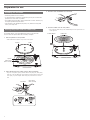
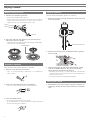
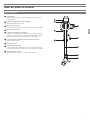
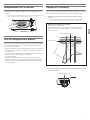
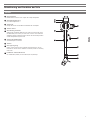
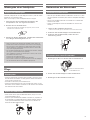
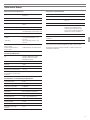
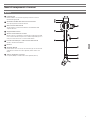
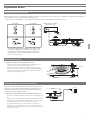
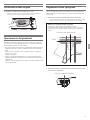
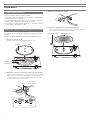
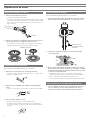
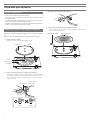
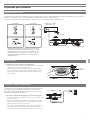
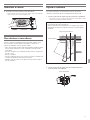
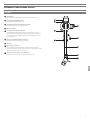
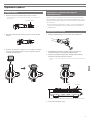
Part names and functions
Tonearm
1
2
3
5
6
8
4
9
7
1
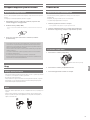
Counterweight
Balances the tonearm and adjusts to provide the proper tracking force.
2
Tracking force gauge ring
Use to adjust the tracking force.
3
Tonearm lift
Moves the tonearm vertically to and from the face of the record.
4
Tonearm rest
5
Anti-skate control dial
While the record is playing, a force acts on the stylus tip to pull it inward.
This force can be counteracted by setting the same values for anti-skate
and the tracking force.
6
Tonearm lift control lever
Operates the tonearm lift.
7
Tonearm
8
Locking ring
Rotate the ring to the left (counterclockwise) to secure the headshell. To
remove the headshell, rotate the ring to the right.
9
Headshell and cartridge
The cartridge (AT91R) is mounted to the headshell (AT-HS3).

5
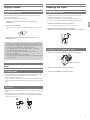
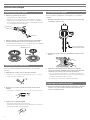
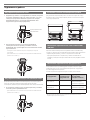
Preparation for use
Installing the turntable
•
Mount the product on a level surface.
•
To avoid the effects of vibrations and acoustic pressure, do not mount the
product next to such items as speakers.
•
The product may pick up radio static if placed next to a radio. Therefore, try
to keep the product away from radios.
•
If the product is near equipment (cell phone, etc.) that emits strong radio
waves, noise may occur.
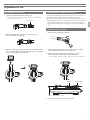
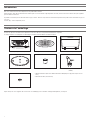
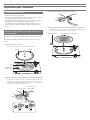
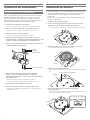
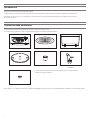
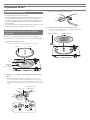
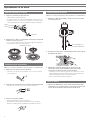
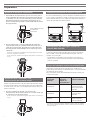
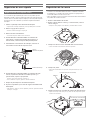
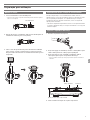
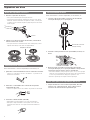
Placing the platter and the rubber mat
This product requires some assembly before using it for the first time.
Do not connect the power cable until assembly is complete.
1. Set the platter on the spindle.
•
Make certain that the platter is fully seated on the spindle.
2. Place the belt on the motor pulley (brass-colored).
•
Align one of the platter openings with the brass motor pulley, and, while pulling
both ends of the red ribbon that comes attached to the belt, place the belt on the
motor pulley, as per the diagram. When doing this, be careful not to twist the
belt.
Belt
Motor pulley
(brass-colored)
Red ribbon
Straight Twisted
3. Remove the red ribbon from the belt.
4. Set the rubber mat on the platter.
•
After setting the rubber mat, put the 45 RPM adapter into the space made for it
on the upper left.
Rubber mat45 RPM adapter
PlatterOpening
Motor pulley
(brass-colored)
Spindle

6
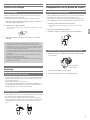
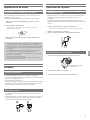
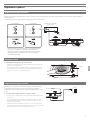
Preparation for use
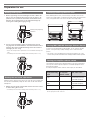
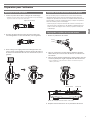
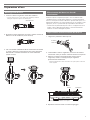
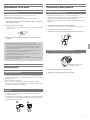
Assembling the tonearm
1. Insert the headshell into the locking ring.
•
Hold the right and left edges of the headshell so that you do not damage the
stylus or cut the cartridge’s wires.
2. With the headshell inserted, turn the locking ring
counterclockwise (to the left).
3. With the tracking force gauge ring facing forward, attach
the counterweight to the back of the tonearm, and slowly
turn it counterclockwise (to the left).
Tonearm balance and tracking force
In order for the cartridge to pick up sound correctly from the record’s grooves,
the tonearm’s balance and tracking force must be adjusted to fit the
specifications of the cartridge. If the tonearm’s balance and tracking force are
not properly adjusted, the record or the cartridge’s stylus may become damaged.
•
Do not drag the cartridge’s stylus across the record or rubber mat when
adjusting the tonearm’s balance or tracking force. Doing so may damage the
stylus.
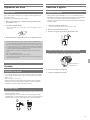
Setting tonearm balance
1. Remove the cartridge’s protector.
2. While holding headshell, remove the cable tie used to
secure the tonearm at the time of delivery.
3. While still lightly holding the headshell, turn the
counterweight to adjust the tonearm’s balance.
•
Adjust the balance so that the tonearm is level when you release the headshell.
4. Return the tonearm to the tonearm rest.
Locking ring
Tonearm Counterweight
Adjust so that tonearm is level

7
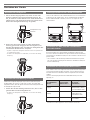
Preparation for use
Setting tracking force
1. While supporting the counterweight so that it does not
move, turn the tracking force gauge ring so that its “0”
position lines up with the centerline on the back of the
tonearm (the tracking force is not adjusted simply by
turning the tracking force gauge ring).
2. Turn the counterweight and the tracking force gauge
ring together counterclockwise until the centerline value
matches the recommended tracking force value for the
cartridge you are using.
•
Refer to the cartridge maker’s specifications for the recommended tracking force
value.
•
The tracking force value for the cartridge provided with this product is 2.0 g.
Setting the anti-skate adjustment
While the record is playing, a force acts on the stylus tip to pull it inward. This
force can be counteracted by setting the same values for anti-skate and the
tracking force.
1. Adjust the anti-skate control dial to have the same value
as the tracking force value.
•
The tracking force value for the cartridge provided with this product is 2.0 g.
Installing/removing the dust cover
When attaching the dust cover, insert the hinges of the dust cover into the
two dust cover hinge holders on the back of the body. When removing the dust
cover, slowly pull the dust cover out from the dust cover hinge holders.
Setting MM (VM)/MC Cartridge Selector Switch
If using a moving magnet (MM or VM) cartridge, set this switch to the MM
position. If using a moving coil (MC) cartridge, set this switch to the MC
position.
•
This switch is set to the MM position at the time of purchase. This is the
correct setting for the AT91R VM stereo cartridge included with the product.
Setting pre-amplifier selector switch
This product has a built-in phono equalizer function. You can use the product,
even if you do not have a phono amplifier or connectable equipment with a
built-in phono amplifier.
Use the pre-amplifier selector switch to set the output, as shown below.
Connectable
equipment being
used
Position of
pre-amplifier
selector switch
Where to connect
RCA audio cable
Device with phono
input
PHONO Phono input jack and
ground (earth) terminal of
connectable equipment
Device without phono
input
LINE AUX or line input jack of
connectable equipment
PC sound card LINE PC sound card’s line input
jack
*1
*1
An audio adapter (sold separately) may be required to connect the RCA audio cable to
the line input jack of the PC sound card.
Centerline
Tracking force gauge ring
Hinge

8
Preparation for use
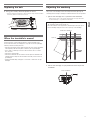
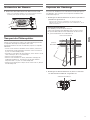
Connecting the device
Align the settings for the pre-amplifier selector switch and connect the RCA audio cable to an input jack that is compatible with the connectable equipment you are
using (amplifier, receiver, active speakers, sound card, etc.).
•
The RCA audio cable's red jack is for the right (R) channel, and the white jack is for the left (L) channel.
Rotating the platter
1. Using your hands, rotate the platter ten times.
•
Raise the tonearm lift control lever to lift the tonearm. Slowly rotate the turntable
ten times by hand in the direction of the arrow.
•
You may want to hold the tonearm to prevent it from moving. This step is for
resetting the auto mechanism, getting rid of any twists in the belt and making
sure the belt rides smoothly along the drive rim on the underside of the platter.
Connecting the power cable
This product does not have a power switch. A standby current is always running
through the product, even when it is not being used; disconnect the power cable
plug from the outlet when not using the product for a long period of time.
1. Connect the power cable plug to the outlet.
•
For safety, raise the tonearm by lifting the tonearm lift control lever to the UP
position.
•
Connect the power cable plug to the outlet without removing the cartridge’s
protector. If the platter has rotated, press the STOP button without touching the
tonearm, and then wait until the tonearm returns to its original position.
•
If you play a record immediately after inserting the power cable, the sound that
is played may be garbled. Wait a short time (about 30 seconds) after plugging the
power cable plug into the outlet before playing a record.
*1
Depending on the connectable equipment you are using, a ground
(earth) terminal may be present near the phono input jack. If this is
the case, connect the grounding wire of the RCA audio cable to it.
This will help prevent a low humming noise that might otherwise
be heard during playback.
With PHONO
*1
Without PHONO
To outlet
To outlet
Connectable equipment
(Amplifier, etc.)
Tonearm

9
Playing a record
Before playing a record
1. Remove the cartridge’s protector.
•
Pull the protector straight forward to remove it.
•
Applying a downward force may cause the stylus to come off the body. Only low
volume is output if the stylus has come off, or is about to come off, so refer to
“Replacing the stylus” on p. 10 to reattach the stylus correctly.
2. Place the record on the rubber mat so that the center
hole aligns with the spindle.
•
If playing a 45 RPM record with a large center hole, attach the 45 RPM adapter
(see the right side of the diagram below).
Automatic operation
Lower the volume of the amplifier, speakers, etc. sufficiently.
1. Select the size with the size selector.
•
Select “12"” for an LP record with a 12" diameter, and “7"” for a 45 RPM record
with a 7" diameter.
2. Press the speed with the platter speed button.
•
Select “33” for a 33-1/3 RPM record, and “45” for a 45 RPM record.
3. Press the START button.
•
Do not bump the product while the record is playing.
•
Do not switch the record size selection while the record is playing. Doing either of
these can cause the product to malfunction.
Manual operation
Lower the volume of the amplifier, speakers, etc. sufficiently.
1. Raise the tonearm by lifting the tonearm lift control lever
to the UP position.
Tonearm lift control lever
2. Position the tonearm over the desired location (groove)
on the record.
3. Lower the tonearm by moving the tonearm lift control
lever to the DOWN position. The tonearm descends
slowly onto the record and play begins.
•
Alternatively, you can skip steps 1 to 3, and use the finger-lift on the headshell to
position the tonearm over the desired location on the record. Carefully lower the
tonearm to the record surface.
•
Do not subject the product to strong impact during playback.
Pausing the record
1. After lowering the volume of the amplifier, speakers, etc.
sufficiently, lift the tonearm with the tonearm lift control
lever.
protector
45 RPM adapter

10
Playing a record
Stopping the record
Once the record has been played until the end, the tonearm automatically
returns to the tonearm rest.
To manually stop the record, do the following.
1. Lower the volume of the amplifier, speakers, etc.
sufficiently.
2. Press the STOP button.
•
Once the record stops playing, the tonearm automatically returns to the tonearm
rest.
3. Remove the record after the platter has come to a
complete stop.
•
When the tonearm reaches the end (center) of the record, it will automatically
lift and return to the tonearm rest. Do not interfere with its motion. Doing so can
cause the product to malfunction. If the tonearm does not lift and return to the
tonearm rest, press the STOP button to complete this operation.
•
If the rubber mat gets dirty, it can easily scratch the record, so remove the
rubber mat periodically and wipe off any dust.
•
To prevent the record from scratches and warping, remove it after use.
•
Do not use a disk stabilizer.
•
Do not use a platter other than the one provided.
•
This product is not intended for DJs. Do not touch the record or the platter while
the record is playing.
Care
Turntable body
•
When the turntable body is dirty or dusty, first disconnect the power cable
plug, and then wipe off the dirt and dust with a soft, dry cloth.
•
Do not use benzenes, thinners, etc.
•
When storing the product for a long time, disconnect the power cable plug
from the outlet and wrap the equipment in plastic; do not allow it to become
damp.
Stylus tip
•
If dirt and grime are stuck to the stylus tip, clean it with a commercially sold
brush.
•
We recommend using a stylus cleaner (sold separately) if the stylus tip is
considerably dirty. Clean the stylus tip by moving the brush from the rear to
the front of the stylus tip.
Replacing the stylus
Removing the stylus
•
In addition to the deterioration of sound quality, records may also be
damaged as the cartridge’s stylus tip wears down.
•
As a rule of thumb, replace the stylus after 300 to 500 hours of use.
•
Be sure to disconnect the product’s power cable plug from the outlet.
1. Release the headshell from the tonearm.
•
Hold the tonearm tightly and then remove the headshell gently.
2. Remove the protector from the cartridge.
3. Remove the stylus by pulling in the direction of the arrow.
Installing a new replacement stylus
1. Mount the new replacement stylus to the cartridge.
2. Mount the protector onto the cartridge.
3. Mount the headshell onto the tonearm.
Engage rear tab first.

11
Replacing a cartridge
Replacing a new cartridge
Refer to the user manual for the cartridge that you will be using if you are
replacing the cartridge (AT91R) included with this product with another,
commercially sold cartridge. After you replace the old cartridge with a new one,
you must readjust the overhang and the tonearm’s balance and tracking force.
1. Release the headshell from the tonearm.
•
Hold the tonearm tightly and then remove the headshell gently.
2. Remove the stylus from the cartridge.
•
Refer to “Removing the stylus” on p. 10.
3. Remove the lead wires.
•
Be careful not to damage the lead wires.
4. Using a commercially sold, non-metallic slotted
screwdriver, remove the installation screws, and then
remove the cartridge from the headshell.
5. Refer to the user manual for the new cartridge for
mounting instructions.
6. Using a commercially sold, non-metallic slotted
screwdriver, tighten the screws in both places, and then
adjust the overhang.
•
Refer to "Adjusting the overhang" on p. 12.
•
After the adjustments are complete, tighten the screws securely.
7. Attach the headshell to the tone arm.
8. Adjust the tonearm balance and tracking force.
•
Refer to “Tonearm balance and tracking force” on p. 6 to perform the
readjustments.
Replacing the belt
•
The belt is a consumable part. Replace the belt if the speed of playback
slows down or irregular rotation occurs. As a rule of thumb, we suggest
replacing the belt once a year.
•
Before replacing the belt, be sure to disconnect the product’s power cable
plug from the outlet.
1. Remove the rubber mat.
2. Remove the platter, turn the platter over, and then
remove the old belt.
•
Place your thumbs in the openings and pull up strongly.
3. Place the new belt around the inner circle.
•
Be careful not to twist the belt while doing this.
4. Attach the platter.
•
Align one of the openings with the position of the motor pulley (brass-colored).
5. Place the belt on the motor pulley (brass-colored).
•
Grasp the belt that was attached in step 3 and, while pulling it, place it on the
brass motor pulley.
Installation screws
Plastic washers
Nuts
Motor pulley (brass-colored)
Opening
Place the belt
Motor pulley (brass-colored)
Belt

12
Replacing the belt
6. Using your hands, rotate the platter ten times.
•
Raise the tonearm lift control lever to lift the tonearm. Slowly rotate the turntable
ten times by hand in the direction of the arrow.
When the turntable is moved
Using the product's original packing materials, wrap the turntable in the
reverse order from when you unwrapped it. If you do not have the packaging
materials, take the following measures:
•
After disconnecting the power cable plug from the outlet, remove the rubber
mat and platter, and then wrap them so that they do not get damaged.
•
Use a string or something similar to tie the tonearm to the rest so that it
does not move.
•
Remove the counterweight.
•
Remove the headshell from the tonearm with the protector attached to the
cartridge, and then wrap the entire headshell assembly so that it does not
get damaged.
•
Wrap the turntable body with paper or a soft cloth so that it does not get
damaged.
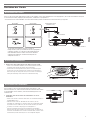
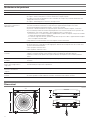
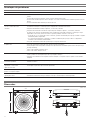
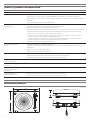
Adjusting the overhang
The position of the cartridge must be accurately determined (adjusting the
overhang) when mounting a cartridge or headshell other than the one provided.
1. Mount the cartridge so it is parallel to the headshell.
•
Match up the positions of the cartridge and headshell to the figure below and
mount the cartridge so it is parallel to the headshell.
2. Mount the cartridge it is perpendicular to the top of the
headshell.
Front of headshell
This illustration represents the actual size.
Place the headshell on the figure below, and then adjust the stylus tip of
the new cartridge along the lines for the "Stylus tip" of the cartridge.
Overhang adjustment guide
45.0 mm
Stylus tip
Underside of headshell

13
Troubleshooting
Problem Solution
The platter does not spin.
•
Is the power cable plug connected to the outlet? Connect the power cable plug to the outlet.
•
Has the belt slipped from the platter? Correctly place the belt on the platter.
•
Is the belt placed on the motor pulley? Check that the belt is placed on the motor pulley (brass-colored) correctly.
•
Has the belt been damaged? Replace it with a new belt.
The platter spins, but there is no
sound or the volume is not loud
enough.
•
Are the function settings and input for connected equipment (amplifier, etc.) selected correctly? Check whether the
settings for the connected equipment are correct.
•
Is the stylus damaged? Check the stylus and replace it, if necessary.
•
Is the stylus placed correctly on the body of the cartridge? Check the cartridge and adjust it, if necessary.
•
Are the setting positions for the pre-amplifier selector switch correct? Check that the pre-amplifier settings are
correct, noting the following common problems and their causes:
– If there is no sound, or if the volume is not loud enough, the product is set to the “PHONO” position and connected
to the amplifier’s AUX/LINE input.
– If the volume is too loud or is distorted, the product is set to the “LINE” position, and the connectable equipment is
connected to the PHONO input.
•
Is the tracking force set too heavy? Adjust the tracking force.
The stylus skips.
•
Is the tracking force set too light? Adjust the tracking force.
•
Is the anti-skate set improperly? Verify anti-skate is set for same value as cartridge tracking force.
•
Is the record warped? Check the record.
•
Is the record scratched? Check the record.
There is howling.
•
Is the product picking up excessive vibrations from the floor, surfaces of the walls, or nearby speakers? Decrease the
vibrations or mount the product on a surface that is not subject to the effects of vibrations.
•
Is the product mounted on an unstable surface? Check whether the surface on which the product is mounted is suitable.
There is noise when the record is
playing.
•
Is there dust on the cartridge’s stylus tip? If dust is stuck to the stylus tip, clean it with a commercially sold brush.
The sound when the record is playing
is either too fast or too slow.
•
Are the speed settings for this product correct? Use the platter speed button to select the correct speed for the type
of record being played.
Playback speed slows down or there
is irregular rotation.
•
Is the belt stretched out? Replace it with a new belt.
Hum is heard during playback.
•
Is the ground line connected correctly? Make sure the ground line is properly connected.
•
Is the headshell attached to the tonearm firmly? Make sure the locking ring is tight.
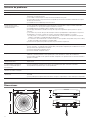
Dimensions
435
353
(Unit: mm)
128

14
Specifications
Turntable specifications
Type 2-Speed, fully automatic operation
Motor DC motor
Drive method Belt drive
Speeds 33-1/3 RPM, 45 RPM
Turntable platter Die-cast aluminium
Wow and flutter < 0.2 % WRMS (33 RPM) at 3 kHz
Signal-to-noise ratio > 60 dB
Outputs levels
“PHONO”
“LINE (MM)”
3.5 mV nominal at 1 kHz, 5 cm/sec
220 mV nominal at 1 kHz, 5 cm/sec
Phono Pre-amp gain (MM)
Phono Pre-amp gain (MC)
36 dB nominal, RIAA equalized
56 dB nominal, RIAA equalized
Tonearm specifications
Type Static balanced straight shaped w/soft
damping control
Effective length 221.5 mm
Overhang 19 mm
Maximum tracking error angle Less than 3°
Stylus pressure adjustment range 1 to 4 g
Applicable cartridge weight range
(including headshell)
14.5 to 20 g
Cartridge and headshell specifications
Cartridge Model AT91R
Cartridge Type VM Dual Magnet
Recommended load impedance 47,000 ohms
Output voltage 3.5 mV (mV at 1 kHz, 5 cm/sec)
Stylus 0.6 mil bonded conical
Cantilever Aluminum pipe
Tracking force range 1.5 to 2.5 g (standard 2.0 g)
Cartridge weight 5.0 g
Headshell model AT-HS3
Headshell weight 11.1 g
Headshell overhang adjustment 8 mm
General specifications
Power supply requirements 220 to 240 V / 50, 60 Hz
Power consumption 2 W
Dimensions 435 mm (17.13")×353 mm (13.90")×
128 mm (5.04")
(W×D×H)
Weight 5.2 kg (11.46 lbs)
Accessories included Rubber mat, Dust cover, Platter (with
drive belt), Counterweight, Headshell
(AT-HS3) with VM stereo cartridge
(AT91R), 45 RPM adapter, Power cable*
Replacement stylus (sold
separately)
ATN91R
Replacement headshell (sold
separately)
AT-HS3
Replacement belt (sold separately) AT-LP3 exclusive belt
*Use the correct power cable for the country you live in.
Specifications are subject to change without notice due to improvements.

1
Introduction
Nous vous remercions d’avoir fait l’acquisition de ce produit Audio-Technica.
Avant utilisation, merci de lire attentivement ce manuel pour vous assurer du bon usage du produit. De meme, veuillez conserver ce manuel ainsi que la garantie
pour consultations ultérieures.
Ce produit n’est destiné qu’à une utilisation dans les pays suivants. Veillez à ce que la tension d’utilisation du produit corresponde à celle utilisée dans le pays où
vous vivez.
Liste des pays : Union européenne, Russie
Contenu de l’emballage
Assurez-vous que tous les articles inclus répertoriés sur la liste ci-dessous soient présents avant d’utiliser le produit.
Si certains éléments sont manquants ou endommagés, contactez votre distributeur local Audio-Technica.
•
Corps du plateau de la platine
•
Tapis amortissant en caoutchouc
•
Couvercle anti-poussière
•
Plateau (avec courroie d’entraînement)
•
Contrepoids
•
Porte-cellule (AT-HS3) avec cellule stéréo VM
(AT91R)
•
Câble d’alimentation (Utilisez le câble d’alimentation adéquat pour le pays dans lequel où vous
vivez.)
•
Manuel d’utilisation (ce document)
•
Adaptateur 45 tours
Après l’achat, nous vous suggérons de conserver tous les emballages pour un éventuel stockage, déménagement, ou transport.

2
Consignes de sécurité
Informations importantes
Avertissement:
Pour éviter tout risque de choc électrique ou d’incendie, n’exposez pas cet appareil à la pluie ou à l’humidité.
Mise en garde:
Protégez cet appareil des projections et des gouttes d’eau.
Pour éviter tout risque de choc électrique, n’ouvrez pas le boîtier.
Confiez tous travaux d’entretien à un technicien qualifié.
N’exposez pas cet équipement à des températures excessives, telles que celles de la lumière directe du soleil, d’une flamme ou autres.
Ne soumettez pas cet équipement à de forts impacts.
Placez l’appareil à proximité d’une prise de courant pour une utilisation aisée du câble d’alimentation.
En cas d’urgence, déconnectez immédiatement la prise du câble d’alimentation de l’appareil.
Ne placez pas d’objets remplis de liquides, tels que des vases, sur l’appareil.
Pour éviter tout risque d’incendie, ne placez pas de flammes nues (telles que des bougies allumées) sur l’appareil.
N’installez pas cet appareil dans un espace confiné tel qu’une étagère ou un endroit similaire.
Installez cet appareil uniquement dans des endroits avec une bonne ventilation.
Remarques d’utilisation
Corps du plateau de la platine
•
Ne placez pas et n’utilisez pas le produit dans des endroits soumis à de fortes chaleurs ou une humidité élevée, très sales ou soumis à des vibrations extrêmes.
•
Le produit doit être placé sur une surface plane et lisse.
Cellule
•
Fixez la protection fournie sur la cellule lorsque le produit n’est pas utilisé.
•
Ne touchez pas la pointe de lecture de la cellule avec votre doigt.
•
Empêchez la pointe de lecture de percuter le plateau, le tapis amortissant en caoutchouc ou le bord du disque.

3
Noms des pièces et fonctions
Schéma de l’ensemble
8 9
10
11
12 13
15
14
1
2
3
4
5
5
6
7
1
Adaptateur 45 tours (affiché dans le réceptacle)
Sélectionnez la vitesse du plateau (33-1/3 ou 45 tours).
2
Plateau
3
Tapis amortissant en caoutchouc
4
Axe
5
Supports de charnières du couvercle anti-poussière
Points de fixation pour les charnières du couvercle anti-poussière.
6
Bras de lecture
Pour plus de détails, reportez-vous à la section “Bras de lecture” en p. 4.
7
Sélecteur de taille
Permuter entre 12" et 7", en fonction de la taille du disque.
8
Bouton de vitesse du plateau
Sélectionnez la vitesse du plateau (33-1/3 ou 45 tours).
9
Bouton START
Fait tourner le plateau et déplace le bras de lecture.
10
Bouton STOP
Replace le bras de lecture dans sa position d’origine et arrête le plateau.
11
Couvercle anti-poussière
12
Sélecteur de préamplificateur
Si vous utilisez un amplificateur avec une prise entrée PHONO, placez le
sélecteur en position PHONO. En cas de connexion d’un amplificateur à la
prise AUX, placez ce sélecteur sur la position LINE.
13
Sélecteur de cellule MM (VM)/MC
Si vous utilisez une cellule MM (VM), placez ce sélecteur en position
MM. Si vous utilisez une cellule MC, placez ce sélecteur en position MC.
14
Câble audio RCA (avec câble de mise à la terre)
Raccordez la prise d’entrée PHONO (câble de mise à la terre à la borne
de mise à la terre, si disponible) ou la prise d’entrée AUX (LINE) d’un
récepteur, amplificateur ou autre équipement connecté.
15
Entrée d’alimentation
Insérez le câble d’alimentation ici.

4
Noms des pièces et fonctions
Bras de lecture
1
2
3
5
6
8
4
9
7
1
Contrepoids
Equilibre le bras de lecture et permet un réglage pour obtenir la force
d’appui adéquate.
2
Bague de réglage de la force d’appui
Utilisez pour régler la force d’appui.
3
Porte-bras de lecture
Déplace le bras de lecture verticalement vers et depuis la face du disque.
4
Pose-bras de lecture
5
Cadran de contrôle anti-skating
Pendant la lecture du disque, une force agit sur la pointe de lecture pour
la tirer vers l’intérieur. Cette force peut être contre-balancée en réglant
les mêmes valeurs pour la force anti-skating et la force d’appui.
6
Levier de commande de levage du bras de lecture
Soulève le bras de lecture.
7
Bras de lecture
8
Bague de verrouillage
Tournez la bague vers la gauche (dans le sens anti-horaire) pour fixer le
porte-cellule. Pour enlever le porte-cellule, tournez la bague vers la droite.
9
Porte-cellule et cellule
La cellule (AT91R) est montée sur le porte-cellule (AT-HS3).

5
Préparation pour l’utilisation
Installation de la platine
•
Montez le produit sur une surface plane.
•
Pour éviter les effets de vibrations et la pression acoustique, ne montez pas
le produit à côté d’éléments tels que des haut-parleurs.
•
Le produit peut percevoir des parasites s’il est placé à côté d’une radio. Par
conséquent, essayez de garder le produit éloigné des radios.
•
Si le produit est proche d’équipements (téléphone portable, etc.) qui
émettent de fortes perturbations de radio, des bruits parasites peuvent
survenir.
Placement du plateau et du tapis amortissant
en caoutchouc
Ce produit nécessite un peu de montage avant de l’utiliser pour la première
fois.
Ne connectez pas le câble d’alimentation jusqu’à ce que le montage soit
terminé.
1. Placez le plateau sur l’axe.
•
Assurez-vous que le plateau est correctement installé sur l’axe.
2. Placez la courroie sur la poulie du moteur (laiton coloré).
•
Alignez une des ouvertures du plateau avec la poulie du moteur en laiton, et, tout
en tirant les deux extrémités de la languette rouge qui est fixée sur la courroie,
placez la courroie sur la poulie du moteur, selon le schéma. Tout en effectuant
cette opération, veillez à ne pas tordre la courroie.
Courroie
Poulie de moteur
(laiton coloré)
Languette rouge
Droite Tordue
3. Déposez la languette rouge de la courroie.
4. Placez le tapis amortissant en caoutchouc sur le plateau.
•
Après avoir placé le tapis amortissant en caoutchouc, placez l’adaptateur 45 tours
dans l’espace prévu à cet effet dans le coin supérieur gauche.
Tapis amortissant en caoutchoucAdaptateur 45 tours
PlateauOuverture
Poulie de moteur
(laiton coloré)
Axe
Seite wird geladen ...
Seite wird geladen ...
Seite wird geladen ...
Seite wird geladen ...
Seite wird geladen ...
Seite wird geladen ...
Seite wird geladen ...
Seite wird geladen ...
Seite wird geladen ...
Seite wird geladen ...
Seite wird geladen ...
Seite wird geladen ...
Seite wird geladen ...
Seite wird geladen ...
Seite wird geladen ...
Seite wird geladen ...
Seite wird geladen ...
Seite wird geladen ...
Seite wird geladen ...
Seite wird geladen ...
Seite wird geladen ...
Seite wird geladen ...
Seite wird geladen ...
Seite wird geladen ...
Seite wird geladen ...
Seite wird geladen ...
Seite wird geladen ...
Seite wird geladen ...
Seite wird geladen ...
Seite wird geladen ...
Seite wird geladen ...
Seite wird geladen ...
Seite wird geladen ...
Seite wird geladen ...
Seite wird geladen ...
Seite wird geladen ...
Seite wird geladen ...
Seite wird geladen ...
Seite wird geladen ...
Seite wird geladen ...
Seite wird geladen ...
Seite wird geladen ...
Seite wird geladen ...
Seite wird geladen ...
Seite wird geladen ...
Seite wird geladen ...
Seite wird geladen ...
Seite wird geladen ...
Seite wird geladen ...
Seite wird geladen ...
Seite wird geladen ...
Seite wird geladen ...
Seite wird geladen ...
Seite wird geladen ...
Seite wird geladen ...
Seite wird geladen ...
Seite wird geladen ...
Seite wird geladen ...
Seite wird geladen ...
Seite wird geladen ...
Seite wird geladen ...
Seite wird geladen ...
Seite wird geladen ...
Seite wird geladen ...
Seite wird geladen ...
Seite wird geladen ...
Seite wird geladen ...
Seite wird geladen ...
Seite wird geladen ...
Seite wird geladen ...
Seite wird geladen ...
Seite wird geladen ...
Seite wird geladen ...
Seite wird geladen ...
Seite wird geladen ...
Seite wird geladen ...
Seite wird geladen ...
Seite wird geladen ...
Seite wird geladen ...
Seite wird geladen ...
Seite wird geladen ...
Seite wird geladen ...
Seite wird geladen ...
Seite wird geladen ...
-
 1
1
-
 2
2
-
 3
3
-
 4
4
-
 5
5
-
 6
6
-
 7
7
-
 8
8
-
 9
9
-
 10
10
-
 11
11
-
 12
12
-
 13
13
-
 14
14
-
 15
15
-
 16
16
-
 17
17
-
 18
18
-
 19
19
-
 20
20
-
 21
21
-
 22
22
-
 23
23
-
 24
24
-
 25
25
-
 26
26
-
 27
27
-
 28
28
-
 29
29
-
 30
30
-
 31
31
-
 32
32
-
 33
33
-
 34
34
-
 35
35
-
 36
36
-
 37
37
-
 38
38
-
 39
39
-
 40
40
-
 41
41
-
 42
42
-
 43
43
-
 44
44
-
 45
45
-
 46
46
-
 47
47
-
 48
48
-
 49
49
-
 50
50
-
 51
51
-
 52
52
-
 53
53
-
 54
54
-
 55
55
-
 56
56
-
 57
57
-
 58
58
-
 59
59
-
 60
60
-
 61
61
-
 62
62
-
 63
63
-
 64
64
-
 65
65
-
 66
66
-
 67
67
-
 68
68
-
 69
69
-
 70
70
-
 71
71
-
 72
72
-
 73
73
-
 74
74
-
 75
75
-
 76
76
-
 77
77
-
 78
78
-
 79
79
-
 80
80
-
 81
81
-
 82
82
-
 83
83
-
 84
84
-
 85
85
-
 86
86
-
 87
87
-
 88
88
-
 89
89
-
 90
90
-
 91
91
-
 92
92
-
 93
93
-
 94
94
-
 95
95
-
 96
96
-
 97
97
-
 98
98
-
 99
99
-
 100
100
-
 101
101
-
 102
102
-
 103
103
-
 104
104


Audio Technica AT-LP3 Benutzerhandbuch
- Kategorie
- Drehscheibe
- Typ
- Benutzerhandbuch
- Dieses Handbuch eignet sich auch für
in anderen Sprachen
- English: Audio Technica AT-LP3 User manual
- français: Audio Technica AT-LP3 Manuel utilisateur
- español: Audio Technica AT-LP3 Manual de usuario
- italiano: Audio Technica AT-LP3 Manuale utente
- русский: Audio Technica AT-LP3 Руководство пользователя
- português: Audio Technica AT-LP3 Manual do usuário
Verwandte Artikel
Andere Dokumente
-
Lenco LS-410 Benutzerhandbuch
-
Lenco LS-430BK Turntable Benutzerhandbuch
-
Lenco LS-440 Bedienungsanleitung
-
-
1byone 1-AD07US02 Benutzerhandbuch
-
Yamaha TT-400 Bedienungsanleitung
-
Thorens TD 160 HD Benutzerhandbuch
-
-
-