
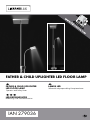
FATHER & CHILD UPLIGHTER
LED FLOOR LAMP
Operation and Safety Notes
LAMPA LED
Wskazówki dotyczące obsługi i bezpieczeństwa
LED-DECKENFLUTER
Bedienungs- und Sicherheitshinweise
FATHER & CHILD UPLIGHTER LED FLOOR LAMP
IAN 279036

GB Operation and Safety Notes Page 5
PL Wskazówki dotyczące obsługi i bezpieczeństwa Strona 11
DE / AT / CH Bedienungs- und Sicherheitshinweise Seite 17
Before reading, unfold the page containing the illustrations and familiarise yourself with all functions of the
device.
Przed przeczytaniem proszę rozłożyć stronę z ilustracjami, a następnie proszę zapoznać się z wszystkimi
funkcjami urządzenia.
Klappen Sie vor dem Lesen die Seite mit den Abbildungen aus und machen Sie sich anschließend mit allen
Funktionen des Gerätes vertraut.

14115302L
3
4
5
6
7
9
16
10
2
1
12
14
15
13
8
11
17


5 GB
Table of contents
List of pictograms used ........................................................................................................ Page 6
Introduction ................................................................................................................................... Page 6
Proper use ............................................................................................................................................Page 6
Included items .....................................................................................................................................Page 6
Description of parts and features ....................................................................................................... Page 7
Technical data ..................................................................................................................................... Page 7
Safety .................................................................................................................................................Page 7
Safety advice .......................................................................................................................................Page 7
Preparing the product for use .......................................................................................Page 8
Assembling the lamp ...........................................................................................................................Page 8
Switching the lamp on / off .................................................................................................................Page 8
Directing the lamp ............................................................................................................................... Page 8
Care and cleaning .................................................................................................................... Page 9
Disposal ............................................................................................................................................Page 9
Warranty and Service .......................................................................................................... Page 9
Warranty Declaration .........................................................................................................................Page 9
Service address ................................................................................................................................... Page 9
Declaration of Conformity ..................................................................................................................Page 9
Manufacturer .......................................................................................................................................Page 9

6 GB
Introduction
Father & Child uplighter led
floor lamp
Introduction
We congratulate you on the purchase of
your new device. You have chosen a
high
quality product. Please read carefully
and completely through these operating instructions.
Fold out the page with the illustrations. These instruc-
tions form part of the product and contain important
information about bringing the product into use and
its handling. Always observe all the safety advice.
Check that the correct mains voltage is available and
that all the parts have been properly assembled be-
fore bringing into use. Should you have any questions
or be uncertain as to how to operate the device,
please get in touch with your dealer or service point.
Please keep these instructions in a safe place and
hand them on to a third party if necessary.
Proper use
This light is suitable only for interior use,
in dry and enclosed spaces. This lamp
is intended for use only in a domestic
environment.
Included items
Check that all the items and accessories are present
and that the lamp is in perfect condition immediately
after unpacking.
1 Father & Child uplighter led floor lamp,
Model 14115302L
1 Tool
1 Support tube (reading light)
1 Support tube (torchiere)
2 Serrated washers
2 Nuts
1 Strain relief
List of pictograms used:
Read the instructions! Observe the warning and
safety instructions!
Volt (AC) Caution!
Risk of electric shock
Hertz (mains frequency) This light is not suitable for dimmer
or electronic switches.
Watt (effective power) Safe working
Protection class II Dispose of packaging and device
in an environmentally-friendly way!
Short-circuit proof safety transformer Independent control unit
This light is suitable only for interior
use, in dry and enclosed spaces.

7 GB
Introduction / Safety
2 Screws
1 Base
1 Set of instructions for use
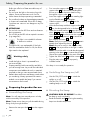
Description of parts
and features
1 Lamp head (torchiere)
2 Lamp head (reading light)
3 Flexible arm
4 ON/ OFF switch (torchiere)
5 ON / OFF switch (reading light)
6 Transportation lock
7 Support tube (reading light)
8 Mains plug
9 Base
10 Serrated washers
11 Nut
12 Tool
13 Support tube guide
14 Support tube (torchiere)
15 Upper support tube (torchiere)
16 Strain relief
17 Screws (strain relief)
Technical data
Model No.: 14115302L
Operating voltage: 230–240 V∼, 50 Hz,
25 W
Light bulb: LED (not replaceable)
Torchiere: Power factor / rated current
LED module: 0.92 / 100 mA
Reading lamp: Power factor / rated current
LED module: 0.55 / 36 mA
Protection class: II /
Safety
Safety advice
The right to claim under the guarantee shall be
rendered invalid in respect of damage caused by
the non-observance of these operating instructions!
No liability is accepted for consequent damage!
No liability is accepted for damage to property
or persons caused by improper handling or non-ob-
servance of the safety advice!
To avoid danger to
life from electric shock
Every time before connecting the lamp the mains,
check it and the mains lead for damage. Never
use your light if you find it is damaged in any way.
CAUTION! A damaged light bulb means your
life is at risk from electric shock. If there is any
damage, repairs to be carried out or other prob-
lems related to the light bulb, please contact the
service centre or a qualified electrician.
In order to prevent hazards, if the outer flexible
cable of this lamp becomes damaged it may
only be replaced by the manufacturer, a service
representative of the manufacturer or a similar
specialist!
Before assembly, ensure that the mains voltage
available corresponds to the operating voltage
necessary of the light (230–240 V∼).
Never let the lamp come into contact with water
or other liquids.
Always unplug the light from the mains prior to
assembly, disassembly, cleaning or if the light
will not be used for extended periods.
Never open or insert anything into electrical
fittings or equipment. Doing this sort of thing can
lead to a serious danger to life from electric shock.
To avoid danger
of fire and injury
CAUTION! RISK OF INJURY! Check bulbs
for damage immediately after unpacking. Do
not fit defective bulbs into the light. If they are,
contact the service point for a replacement.
CAUTION! RISK OF INJURY FROM
BURNS! Ensure the lamp has been switched
off and allowed to cool before you touch it. In
this way you will avoid the danger of burns.

8 GB
Safety / Preparing the product for use
Bulbs give off a lot of heat around the top of
the lamp.
Do not cover the light or the mains plug with
objects. Excessive heat can result in a fire.
Never leave the lamp operating unattended.
Do not allow the lamp or the packaging materials
to lie around unattended. Plastic film or bags,
Styrofoam etc. can turn into dangerous toys for
children.
ATTENTION!
Do not look into the LED from a close distance
during operation.
Do not look at the LED with an optical instrument
(e.g. magnifier).
This light is not suitable for dimmer
or electronic switches.
The light bulb is not replaceable. If the light
bulb has reached the end of its life, the entire
light needs to be replaced.
Working safely
Install the light so that it is protected from
moisture and dirt.
Prepare carefully before assembly and allow
yourself enough time. Lay out all the individual
components and additional tools or materials
required so that you can see and reach them.
Remain alert at all times and always watch what
you are doing. Always proceed with caution
and do not assemble the lamp if you cannot
concentrate or feel unwell.
Preparing the product for use
Assembling the lamp
Note: You will require a second person to help
with the assembly of the product.
Note: Please ensure that you pull the cable during
fitting slowly through the base.
Remove the transport lock 6 from the support
tube.
First insert the support tube 14 into the upper
support tube 15 of the torchiere and tighten.
Ensure not to pinch the mains lead running
through the support tube 14 .
Insert the support tube 7 for the reading light
into the flexible arm 3 and tighten.
Slide the support tube guide 13 over the
support tubes.
Insert the floor lamp with both support tubes 7,
14 into the designated holes in the base 9.
Place the serrated washers 10 over the support
tubes 7, 14 on the underside of the base 9.
Screw the nuts 11 clockwise over the support
tubes 7, 14 using the tool 12 to secure the
floor lamp to the base 9.
Note: Verify the support tubes 7, 14 remain
steady when tightening the nuts 11 .
Note: Be sure to screw in the support tubes
7, 14 as far as possible so the light is stable.
Note: Ensure the cable is inside the designated
opening in the base 9 so it cannot be pinched.
Secure the supply cable with the strain relief 16 .
Tighten the strain relief 16 with the screws 17 .
Plug the mains plug 8 into a properly
installed socket.
Your lamp is now ready for operation.
Switching the lamp on / off
Use the ON / OFF switch 4 to switch the
uplight on or off.
Use the ON / OFF switch 5 to switch the
reading lamp on or off.
Directing the lamp
CAUTION! RISK OF BURNS! First allow
the lamp to cool completely.
Bend the flexible arm 3 to bring the reading
lamp into the desired position.

9 GB
Care and cleaning / Disposal / Warranty and Service
Care and cleaning
RISK OF ELECTRIC SHOCK!
First pull the mains plug 8 out of the mains socket.
CAUTION! RISK OF BURNS! First allow the
lamp to cool completely.
RISK OF ELECTRIC SHOCK!
For electrical safety reasons, never clean the lamp
with water or other fluids nor immerse it in water.
Do not use any solvents, petrol or similar. This
would cause damage to the light.
Always use a dry, fluff-free cloth for cleaning.
Plug the mains plug 8 into the socket again.
Disposal
The packaging and ancillary packing
consist entirely of environmentally-friendly
materials. They can be disposed of at
your local recycling facility.
The symbol of the wheelie bin with the line
through it means that, in the European
Union, the product has to be disposed
of in a separate refuse collection. This applies to the
product and to all components bearing this symbol.
Products marked in this way may not be disposed
of along with normal domestic waste but have to be
handed in at a recycling collection point for electrical
and electronic appliances. Recycling helps to reduce
the consumption of raw materials and to ease the
burden on the environment.
Warranty and Service
Warranty Declaration
You receive a 36 month warranty on this product,
valid from the date of purchase. The appliance has
been carefully produced under strict quality control.
Within the warranty period we shall rectify without
charge all material and manufacturing defects. In the
event of a defect arising during the warranty period,
please send the appliance to the listed Service Centre
address, making reference to the following article
number: 14115302L.
Wear parts (such as bulbs) and damage caused by
improper handling, non-observance of the operating
instructions or unauthorised interference are excluded
from the warranty. The performance of services un
der
the warranty does not extend or renew the warranty
period.
Service address
Briloner Leuchten GmbH
Im Kissen 2, 59929 Brilon, Germany
Tel.: +49 (0) 2961 / 9712–800
Fax: +49 (0) 2961 / 9712–199
E-Mail: [email protected]
www.briloner.com
IAN 279036
Please have your receipt and the product number
(e.g. IAN 12345) available for all queries as proof
of purchase.
Declaration of Conformity
This product fulfils the requirements of the applicable
European and national directives. Conformity has
been demonstrated. The relevant declarations and
documents are held by the manufacturer.
Manufacturer
Briloner Leuchten GmbH
Im Kissen 2
59929 Brilon
Germany

10

11 PL
Spis zawartości
Legenda zastosowanych piktogramów ...........................................................Strona 12
Wstęp ..............................................................................................................................................Strona 12
Użytkowanie urządzenia zgodne z przeznaczeniem ...................................................................Strona 12
Zakres dostawy ................................................................................................................................Strona 12
Opis części ....................................................................................................................................... Strona 13
Parametry techniczne .......................................................................................................................Strona 13
Bezpieczeństwo ......................................................................................................................Strona 13
Wskazówki dotyczące bezpieczeństwa ........................................................................................Strona 13
Uruchomienie............................................................................................................................Strona 14
Montaż lampy ..................................................................................................................................Strona 14
Włączanie / wyłączanie lampy ......................................................................................................Strona 15
Ustawianie lampy ............................................................................................................................Strona 15
Konserwacja i czyszczenie............................................................................................Strona 15
Usuwanie ..................................................................................................................................... Strona 15
Gwarancja i serwis ..............................................................................................................Strona 15
Oświadczenie gwarancyjne ...........................................................................................................Strona 15
Adres serwisu ...................................................................................................................................Strona 15
Deklaracja zgodności ......................................................................................................................Strona 16
Producent ..........................................................................................................................................Strona 16

12 PL
Wstęp
Lampa LED
Wstęp
Gratulujemy zakupu nowego urządzenia.
Tym samym zdecydowali się Państwo na
zakup produktu wysokiej jakości. Proszę
dokładnie przeczytać całą niniejszą instrukcję ob
sługi.
Proszę wypiąć stronę z rysunkami. Iniejsza instrukcja
obsługi należy do produktu. Zawiera ona ważne
wskazówki dotyczące uruchamiania i posługiwania
się produktem. Zawsze należy przestrzegać wszyst-
kich wskazówek dotyczących bezpieczeństwa. Przed
uruchomieniem proszę sprawdzić, czy występuje
prawidłowe napięcie, i czy wszystkie części są pra-
widłowo zamontowane. Jeżeli mielibyście Państwo
pytania lub bylibyście niepewni co do obchodzenia
się z urządzeniem, to proszę skontaktować się ze
sprzedawcą lub punktem serwisowym. Proszę sta-
rannie przechowywać niniejszą instrukcję obsługi,
a w razie oddania urządzenia osobom trzecimprze-
kazać ją wraz z nim.
Użytkowanie urządzenia
zgodne z przeznaczeniem
Lampa jest przeznaczona wyłącznie do
używania we wnętrzach, w suchych i za-
mkniętych pomieszczeniach.
Produkt jest
przeznaczony wyłącznie do użytku w gospodar-
stwie domowym.
Zakres dostawy
Bezpośrednio po wypakowaniu należy zawsze
skontrolować dostawę pod względem kompletności
oraz nienagannego stanu urządzenia.
Legenda zastosowanych piktogramów:
Przeczytać instrukcję obsługi! Przestrzegać wskazówek ostrze-
gawczych i bezpieczeństwa!
Wolt (napięcie przemienne) Ostrożnie!
Zagrożenie porażeniem prądem
Herc (częstotliwość)
Lampa nie nadaje się do użycia w
połączeniu z regulatorami jasności
światła lub wyłącznikami elektro-
nicznymi.
Wat (moc czynna)
Sposób prawidłowego postępowa-
nia
Klasa ochrony II Opakowanie i urządzenie przeka-
zać do utylizacji zgodnie z przepi-
sami o ochronie środowiska!
Odporny na zwarcie transformator
bezpieczeństwa Niezależne urządzenie sterujące
Lampa jest przeznaczona wyłącznie
do używania we wnętrzach, w su-
chych i zamkniętych pomieszczeniach.

13 PL
Wstęp / Bezpieczeństwo
1 lampa LED, model 14115302L
1 narzędzie
1 stojak rurowy (lampa do czytania)
1 stojak rurowy (lampa oświetlająca sufit)
2 podkładki
2 nakrętki
1 uchwyt kablowy odciążający
2 śruby
1 podstawka
1 instrukcja obsługi
Opis części
1 Głowica lampy (lampa oświetlająca sufit)
2 Głowica lampy (lampa do czytania)
3 Ramię elastyczne
4 Przełącznik WŁĄCZ / WYŁĄCZ
(lampa oświetlająca sufit)
5 Przełącznik WŁĄCZ / WYŁĄCZ
(lampa do czytania)
6 Zabezpieczenie na czas transportu
7 Stojak rurowy (lampa do czytania)
8 Wtyczka
9 Podstawka
10 Podkładki
11 Nakrętka
12 Narzędzie
13 Prowadnik stojaka
14 Stojak rurowy (lampa oświetlająca sufit)
15 Górna rura stojaka (lampa oświetlająca sufit)
16 Uchwyt kablowy odciążający
17 Śruby (uchwyt kablowy odciążający)
Parametry techniczne
Nr modelu: 14115302L
Napięcie robocze: 230–240 V∼, 50 Hz,
25 W
Żarówki: LED (niewymienne diody)
Lampa oświetlająca
sufit: Współczynnik mocy / Prąd
znamionowy moduł LED:
0,92 / 100 mA
Lampa do czytania: Współczynnik mocy / Prąd
znamionowy moduł LED:
0,55 / 36 mA
Klasa ochrony: II /
Bezpieczeństwo
Wskazówki dotyczące
bezpieczeństwa
W przypadku szkód, które powstały wskutek nie-
przestrzegania niniejszej instrukcji obsługi wygasa
roszczenie gwarancyjne! Za szkody pośrednie nie
ponosimy żadnej odpowiedzialności! W przypadku
szkód materialnych lub osobowych, które powstały
wskutek niewłaściwego obchodzenia się z urządze-
niem lub nieprzestrzegania wskazówek dotyczących
bezpieczeństwa nie ponosimy żadnej odpowie-
dzialności!
Unikać zagrożenia życia
wskutek porażenia prądem
elektrycznym
Przed każdym użyciem sprawdzić lampę pod ką-
tem ewentualnych uszkodzeń. Nie używać lampy
w razie stwierdzenia jakichkolwiek uszkodzeń.
OSTROŻNIE! Uszkodzona lampa oznacza
zagrożenie dla życia ze strony porażenia prą-
dem. W razie uszkodzeń, konieczności wyko-
nania naprawy lub innych problemów należy
zwrócić się do serwisu lub wezwać elektryka.
W celu uniknięcia zagrożeń uszkodzony kabel
zewnętrzny lampy może być wymieniany
wyłącznie przez producenta, serwis lub innego
odpowiednio wykwalifikowanego specjalistę!
Przed użyciem upewnić się, że dostępne napięcie
sieciowe jest zgodne z wymaganym napięciem
roboczym lampy (230–240 V∼).
Koniecznie unikać kontaktu urządzenia z wodą
lub innymi płynami.
Przed przystąpieniem do montażu, demontażu
bądź czyszczenia lub jeśli lampa nie jest przez
długi czas nieużywana, należy zawsze wycią-
gnąć wtyczkę z gniazda sieciowego.
Nie otwierać elektrycznych elementów wyposa-
żenia i nie wkładać do nich żadnych przedmiotó
w.
Ingerencje tego rodzaju stanowią zagrożenie
dla życia ze strony porażenia prądem.

14 PL
Bezpieczeństwo / Uruchomienie
Unikać zagrożenia pożarem i
niebezpieczeństwa obrażeń ciała
OSTROŻNIE! NIEBEZPIECZEŃSTWO
OBRAŻEŃ! Od razu po rozpakowaniu spraw-
dzić każdą żarówkę pod kątem uszkodzeń. Nie
montować lampy z uszkodzonymi żarówkami.
W celu uzyskania zamiennego źródła światła
należy skontaktować się z serwisem.
OSTROŻNIE! NIEBEZPIECZEŃSTWO
OPARZENIA! Aby uniknąć oparzeń, przed
dotykaniem lampy upewnić się, czy jest wyłą-
czona i poczekać aż ostygnie. Klosz lampy
bardzo się rozgrzewa.
Nie należy zakrywać lampy lub wtyczki żad-
nymi przedmiotami. Nadmierne wydzielanie się
ciepła może spowodować pożar.
Nie pozostawiać włączonej lampy bez nadzoru.
Nie pozostawiać lampy ani materiałów opako-
waniowych w nieodpowiednich miejscach. Folie
i torebki plastikowe oraz elementy z tworzywa
sztucznego mogą być niebezpieczne dla dzieci.
UWAGA!
Podczas uruchomienia nie patrzeć w diody LED
z bliskiej odległości.
Diod LED nie należy oglądać za pomocą optycz-
nego instrumentu (np. lupy).
Lampa nie nadaje się do użycia w po-
łączeniu z regulatorami jasności świa-
tła lub wyłącznikami elektronicznymi.
Element świetlny jest niewymienny. Jeśli żarówka
przestanie działać z powodu zużycia, należy
wymienić całą lampę.
Postępować rozsądnie
Zamontować lampę w miejscu, w którym będzie
chroniona przed wilgocią i zabrudzeniem.
Przeznaczyć na montaż wystarczającą ilość
czasu i starannie się do niego przygotować.
Przed montażem przygotować wszystkie poje-
dyncze elementy i dodatkowe narzędzia lub
materiały, tak aby były łatwo dostępne.
Zawsze zachowywać uwagę! Zawsze zwracać
uwagę na wykonywane czynności i kierować się
rozsądkiem. Nie wykonywać montażu lampy w
razie braku koncentracji lub złego samopoczucia.
Uruchomienie
Montaż lampy
Wskazówka: Do montażu jest potrzebna druga
osoba.
Wskazówka: Podczas montażu należy uważać
na to, aby jednocześnie powoli przeciągnąć kabel
przez spód.
Usunąć zabezpieczenie na czas transportu 6
z rury stojaka.
Najpierw włożyć rurę stojaka 14 w górną rurę
stojaka 15 lampy oświetlającej sufit i przykrę-
cić ją. Zwrócić uwagę, aby przewód sieciowy
przechodzący przez stojak 14 nie został zak-
leszczony.
Następnie włożyć rurę stojaka 7 lampy do
czytania w ramię elastyczne 3 i dokręcić ją.
Nasunąć prowadnik stojaka 13 na rury stojaka.
Włożyć lampę stojącą z obiema rurami sto-
jaka 7, 14 w przewidziane do tego otwory
podstawki 9.
Założyć podkładki 10 na spodzie podstawki 9
na rury stojaka 7, 14 . Za pomocą narzędzia
12 , obracając wkierunku zgodnym zruchem
wskazówek zegara, przykręcić nakrętki 11 na
rurach stojaka 7, 14 wcelu przymocowania
lampy do podstawki 9.
Wskazówka: Zwrócić uwagę, aby stojaki
rurowe 7, 14 były stabilnie przytrzymywane
podczas dokręcania nakrętek 11 .
Wskazówka: Zwrócić uwagę, aby możliwie
najgłębiej wkręcić rury stojaka 7, 14 wcelu
zapewnienia odpowiedniej stabilności lampy.
Wskazówka: Należy uważać na to, aby
kabel leżał w przewidzianej do tego szczelinie
9 i nie został zmiażdżony.
Zamocować przewód za pomocą uchwytu
kablowego odciążającego 16 .
Przykręcić uchwyt kablowy odciążający 16 za
pomocą śrub 17 .
Włożyć wtyczkę 8 do gniazdka zainstalowa-
nego wsposób zgodny zprzepisami.
Lampa jest gotowa do używania.

15 PL
Uruchomienie / Konserwacja i czyszczenie / Usuwanie / Gwarancja i serwis
Włączanie / wyłączanie lampy
Włączyć lub wyłączyć sufitową lampę oświe-
tlającą przy użyciu wyłącznika głównego 4.
Włączyć lub wyłączyć lampę do czytania przy
użyciu wyłącznika głównego 5.
Ustawianie lampy
OSTROŻNIE! NIEBEZPIECZEŃSTWO
POPARZENIA! Następnie zaczekać, aż
lampa całkowicie ostygnie.
Wygiąć przeguby elastyczne 3 lampy do
czytania do wybranej pozycji.
Konserwacja i czyszczenie
NIEBEZPIECZEŃSTWO
PORAŻENIA ELEKTRYCZNEGO! Najpierw
wyciągnąć wtyczkę sieciową 8 z gniazda.
OSTROŻNIE! NIEBEZPIECZEŃSTWO
OPARZENIA! Następnie zaczekać, aż lampa
całkowicie ostygnie.
NIEBEZPIECZEŃSTWO
PORAŻENIA ELEKTRYCZNEGO! Ze względów
bezpieczeństwa elektrycznego lampy nie wolno
czyścić wodą i innymi płynami ani zanurzać jej w
wodzie.
Nie używać rozpuszczalników, benzyny i
podobnych substancji. W przeciwnym razie
lampa może zostać uszkodzona.
Do czyszczenia używać wyłącznie suchych,
nie strzępiących się szmatek.
Włożyć ponownie wtyczkę 8 do gniazdka
zasilania.
Usuwanie
Opakowanie i materiał opakowania
składają się wyłącznie z materiałów
nieszkodliwych dla środowiska. Mogą
one być wyrzucane do miejscowych
pojemników na odpady do recyklingu.
Symbol przekreślonego pojemnika na
odpady oznacza, iż w Unii Europejskiej
produkt winien być usuwany osobno.
Dotyczy to produktu i wszystkich części wyposażenia
oznaczonych tym symbolem. Oznaczonych w ten
sposób produktów nie można wyrzucać do odpadów
komunalnych, lecz muszą być oddane do punktu
zbiórki zużytych urządzeń elektrycznych i elektro-
nicznych do recyklingu. Recykling przyczynia się do
zmniejszenia zużycia surowców i zanieczyszczenia
środowiska.
Gwarancja i serwis
Oświadczenie gwarancyjne
W momencie zakupu otrzymują Państwo na to
urządzenie 36 miesięcy gwarancji. Urządzenie
wyprodukowano starannie i poddano dokładnej
kontroli jakości. Wokresie gwarancji usuwamy
bezpłatnie wszystkie wady materiałowe ifabryczne.
Jeśli mimo to w okresie gwarancji pojawią się usterki,
urządzenie należy przesłać na podany adres ser-
wisowy, podając następujący numer artykułu:
14115302L.
Gwarancji nie podlegają uszkodzenia spowodow
ane
pr
zez nieprawidłowe użytkowanie, nieprzestrzeganie
instrukcji obsługi lub ingerencję nieautoryzowanyc
h
osób, a także części szybkozużywające się (jak np.
elementy świetlne). Usługa gwarancyjna nie prze-
dłuża ani nie odnawia okresu gwarancji.
Adres serwisu
Briloner Leuchten GmbH
Im Kissen 2, 59929 Brilon, Niemcy
Tel.: +49 (0) 2961 / 9712–800
Faks: +49 (0) 2961 / 9712–199
E-Mail: [email protected]
www.briloner.com
IAN 279036

16 PL
Gwarancja i serwis
Przed skontaktowaniem się z działem serwisowym
należy przygotować paragon i numer artykułu
(np. IAN 12345) jako dowód zakupu.
Deklaracja zgodności
Niniejszy produkt spełnia wymagania obowiązują-
cych dyrektyw europejskich i przepisów krajowych.
Zgodność została wykazana. Odpowiednie objaśnie-
nia i podkładki dokumentacyjne są zdeponowa
ne u
producenta.
Producent
Briloner Leuchten GmbH
Im Kissen 2
59929 Brilon
Niemcy
Inhaltsverzeichnis

17 DE/AT/CH
Inhaltsverzeichnis
Legende der verwendeten Piktogramme ........................................................... Seite 18
Einleitung ......................................................................................................................................... Seite 18
Bestimmungsgemäße Verwendung ....................................................................................................Seite 18
Lieferumfang ........................................................................................................................................ Seite 18
Teilebeschreibung ...............................................................................................................................Seite 19
Technische Daten ................................................................................................................................Seite 19
Sicherheit ......................................................................................................................................... Seite 19
Sicherheitshinweise .............................................................................................................................Seite 19
Inbetriebnahme ......................................................................................................................... Seite 20
Leuchte montieren ...............................................................................................................................Seite 20
Leuchte ein- / ausschalten ...................................................................................................................Seite 21
Leuchte ausrichten ............................................................................................................................... Seite 21
Wartung und Reinigung .....................................................................................................Seite 21
Entsorgung .....................................................................................................................................Seite 21
Garantie und Service ............................................................................................................Seite 21
Garantieerklärung ...............................................................................................................................Seite 21
Serviceadresse ....................................................................................................................................Seite 21
Konformitätserklärung .........................................................................................................................Seite 22
Hersteller ..............................................................................................................................................Seite 22

18 DE/AT/CH
Einleitung / SicherheitEinleitung
LED-Deckenfluter
Einleitung
Wir beglückwünschen Sie zum Kauf Ihres
neuen Gerätes. Sie haben sich damit für
ein hochwertiges Produkt entschieden.
Bitte lesen Sie diese Bedienungsanleitung vollständig
und sorgfältig durch. Klappen Sie die Seite mit den
Abbildungen aus. Diese Anleitung gehört zu diesem
Produkt und enthält wichtige Hinweise zur Inbetrieb-
nahme und Handhabung. Beachten Sie immer alle
Sicherheitshinweise. Prüfen Sie vor der Inbetriebnahme,
ob die korrekte Spannung vorhanden ist und ob alle
Teile richtig montiert sind. Sollten Sie Fragen haben
oder unsicher in Bezug auf die Handhabung des
Gerätes sein, setzen Sie sich bitte mit Ihrem Händler
oder der Servicestelle in Verbindung. Bewahren Sie
diese Anleitung bitte sorgfältig auf und geben Sie
sie ggf. an Dritte weiter.
Bestimmungsgemäße
Verwendung
Diese Leuchte ist ausschließlich für den
Betrieb im Innenbereich, in trockenen
und geschlossenen Räumen geeignet.
Dieses Gerät ist nur für den Einsatz in privaten
Haushalten vorgesehen.
Lieferumfang
Kontrollieren Sie unmittelbar nach dem Auspacken
immer den Lieferumfang auf Vollständigkeit sowie
den einwandfreien Zustand des Gerätes.
1 LED-Deckenfluter, Modell 14115302L
1 Werkzeug
1 Standrohr (Leseleuchte)
1 Standrohr (Deckenfluter)
2 Fächerscheiben
2 Muttern
1 Zugentlastung
Legende der verwendeten Piktogramme:
Bedienungsanleitung lesen! Warn- und Sicherheitshinweise
beachten!
Volt (Wechselspannung) Vorsicht!
Gefahr von elektrischem Schlag
Hertz (Frequenz) Diese Leuchte ist nicht geeignet für
Dimmer und elektronische Schalter.
Watt (Wirkleistung) So verhalten Sie sich richtig
Schutzklasse II Entsorgen Sie Verpackung
und Gerät umweltgerecht!
Kurzschlussfester Sicherheitstrans formator
Unabhängiges Betriebsgerät
Diese Leuchte ist ausschließlich
für den Betrieb im Innenbereich,
in trockenen und geschlossenen
Räumen geeignet.

19 DE/AT/CH
Einleitung / SicherheitEinleitung
2 Schrauben
1 Standfuß
1 Bedienungsanleitung
Teilebeschreibung
1 Leuchtenkopf (Deckenfluter)
2 Leuchtenkopf (Leseleuchte)
3 Flexarm
4 EIN- / AUS-Schalter (Deckenfluter)
5 EIN- / AUS-Schalter (Leseleuchte)
6 Transportsicherung
7 Standrohr (Leseleuchte)
8 Netzstecker
9 Standfuß
10 Fächerscheiben
11 Mutter
12 Werkzeug
13 Standrohrführung
14 Standrohr (Deckenfluter)
15 Oberes Standrohr (Deckenfluter)
16 Zugentlastung
17 Schrauben (Zugentlastung)
Technische Daten
Modell-Nr.: 14115302L
Betriebsspannung: 230–240 V∼, 50 Hz,
25 W
Leuchtmittel: LED (nicht austauschbar)
Deckenfluter: Leistungsfaktor / Nennstrom
LED-Modul: 0,92 / 100 mA
Leseleuchte: Leistungsfaktor / Nennstrom
LED-Modul: 0,55 / 36 mA
Schutzklasse: II /
Sicherheit
Sicherheitshinweise
Bei Schäden, die durch Nichtbeachtung dieser
Bedienungsanleitung verursacht werden, erlischt der
Garantieanspruch! Für Folgeschäden wird keine
Haftung übernommen! Bei Sach- oder
Personenschäden, die durch unsachgemäße Hand-
habung oder Nichtbeachtung der Sicherheitshin-
weise verursacht werden, wird keine Haftung
übernommen!
Vermeiden Sie Lebensgefahr
durch elektrischen Schlag
Überprüfen Sie vor jedem Gebrauch die Leuchte
auf etwaige Beschädigungen. Benutzen Sie
Ihre Leuchte niemals, wenn Sie irgendwelche
Beschädigungen feststellen.
VORSICHT! Eine beschädigte Leuchte bedeutet
Lebensgefahr durch elektrischen Schlag. Wenden
Sie sich bei Beschädigungen, Reparaturen oder
anderen Problemen an der Leuchte an die
Servicestelle oder eine Elektrofachkraft.
Zur Vermeidung von Gefährdungen darf die
beschädigte äußere flexible Leitung dieser
Leuchte ausschließlich vom Hersteller, seinem
Servicevertreter oder einer vergleichbaren
Fachkraft ausgetauscht werden!
Vergewissern Sie sich vor der Benutzung, dass die
vorhandene Netzspannung mit der benötigten
Betriebsspannung der Leuchte übereinstimmt
(230–240 V∼).
Vermeiden Sie unbedingt die Berührung der
Leuchte mit Wasser oder anderen Flüssigkeiten.
Ziehen Sie immer den Netzstecker vor der
Montage, Demontage, Reinigung oder, wenn
Sie die Leuchte eine Zeit lang nicht verwenden,
aus der Steckdose.
Öffnen Sie niemals eines der elektrischen
Betriebsmittel oder stecken irgendwelche
Gegenstände in dieselben. Derartige Eingriffe
bedeuten Lebensgefahr durch elektrischen Schlag.
Vermeiden Sie Brand- und
Verletzungsgefahr
VORSICHT! VERLETZUNGSGEFAHR!
Überprüfen Sie unmittelbar nach dem Auspacken
jedes Leuchtmittel auf Beschädigungen. Montieren
Sie die Leuchte nicht mit defekten Leuchtmitteln.
Setzen Sie sich in diesem Fall für Ersatz mit der
Servicestelle in Verbindung.

20 DE/AT/CH
Inbetriebnahme / Wartung und Reinigung / Entsorgung / Garantie und ServiceSicherheit / Inbetriebnahme
VORSICHT! VERBRENNUNGSGEFAHR!
Stellen Sie sicher, dass die Leuchte ausgeschaltet
und abgekühlt ist, bevor Sie diese berühren,
um Verbrennungen zu vermeiden. Leuchtmittel
entwickeln im Bereich des Lampenkopfes eine
starke Hitze.
Decken Sie die Leuchte bzw. den Netzstecker
nicht mit Gegenständen ab. Eine übermäßige
Wärmeentwicklung kann zu Brandentwicklung
führen.
Lassen Sie die Leuchte im Betrieb nicht unbe-
aufsichtigt.
Lassen Sie die Leuchte oder Verpackungsmaterial
nicht achtlos liegen. Plastikfolien / -tüten, Kunst-
stoffteile etc. könnten für Kinder zu einem
gefährlichen Spielzeug werden.
ACHTUNG!
Bei Betrieb nicht aus kurzem Abstand in die
LED schauen.
Die LED nicht mit einem optischen Instrument
(z.B. Lupe) betrachten.
Diese Leuchte ist nicht geeignet für
Dimmer und elektronische Schalter.
Das Leuchtmittel ist nicht austauschbar. Sollte
das Leuchtmittel am Ende seiner Lebensdauer
ausfallen, ist die gesamte Leuchte zu ersetzen.
So verhalten Sie sich richtig
Montieren Sie die Leuchte so, dass sie vor
Feuchtigkeit und Verschmutzung geschützt ist.
Bereiten Sie die Montage sorgfältig vor und
nehmen Sie sich ausreichend Zeit. Legen Sie alle
Einzelteile und zusätzlich benötigtes Werkzeug
oder Material vorher übersichtlich und griffbereit
zurecht.
Seien Sie stets aufmerksam! Achten Sie immer
darauf was Sie tun und gehen Sie stets mit
Vernunft vor. Montieren Sie die Leuchte in
keinem Fall, wenn Sie unkonzentriert sind oder
sich unwohl fühlen.
Inbetriebnahme
Leuchte montieren
Hinweis: Für die Montage benötigen Sie eine
zweite Person.
Hinweis: Achten Sie während der Montage
darauf, dass Sie das Kabel gleichzeitig langsam
durch den Boden ziehen.
Entfernen Sie die Transportsicherung 6 aus
dem Standrohr.
Stecken Sie zunächst das Standrohr 14 in das
obere Standrohr 15 des Deckenfluters und
schrauben Sie es fest. Achten Sie darauf, dass
die Netzleitung, die durch das Standrohr 14
führt, dabei nicht eingeklemmt wird.
Stecken Sie dann das Standrohr 7 der
Leseleuchte in den Flexarm 3 und schrauben
Sie es fest.
Schieben Sie die Standrohrführung 13 über
die Standrohre.
Stecken Sie die Stehleuchte mit beiden Standroh-
ren 7, 14 in die dafür vorgesehenen Löcher
in den Standfuß 9.
Setzen Sie die Fächerscheiben 10 an der Un-
terseite des Standfußes 9 auf die Standrohre
7, 14 . Drehen Sie die Muttern 11 mittels
Werkzeug 12 im Uhrzeigersinn auf die
Standrohre 7, 14 , um die Stehleuchte am
Standfuß 9 zu fixieren.
Hinweis: Achten Sie darauf, dass Sie die
Standrohre 7, 14 beim Festziehen der
Muttern 11 festhalten.
Hinweis: Achten Sie darauf, dass die Stand-
rohre 7, 14 so weit wie möglich eingedreht
werden, um einen sicheren Stand der Leuchte
zu gewährleisten.
Hinweis: Achten Sie darauf, dass das Kabel
in der dafür vorgesehenen Aussparung im Stand-
fuß 9 liegt und nicht gequetscht werden kann.
Fixieren Sie die Zuleitung mit Hilfe der Zugent-
lastung 16 .
Schrauben Sie die Zugentlastung 16 mit den
Schrauben 17 fest.
Stecken Sie den Netzstecker 8 in eine vor-
schriftsmäßig installierte Steckdose.
Seite wird geladen ...
Seite wird geladen ...
Seite wird geladen ...
Seite wird geladen ...
Seite wird geladen ...
Seite wird geladen ...
-
 1
1
-
 2
2
-
 3
3
-
 4
4
-
 5
5
-
 6
6
-
 7
7
-
 8
8
-
 9
9
-
 10
10
-
 11
11
-
 12
12
-
 13
13
-
 14
14
-
 15
15
-
 16
16
-
 17
17
-
 18
18
-
 19
19
-
 20
20
-
 21
21
-
 22
22
-
 23
23
-
 24
24
-
 25
25
-
 26
26


in anderen Sprachen
- English: LIVARNO 279036 Owner's manual
- polski: LIVARNO 279036 Instrukcja obsługi
Verwandte Artikel
-
LIVARNO 338652 Bedienungsanleitung
-
-
-
-
-
-
-
-
-