
www.aeg.com
1
KD91403
KD91404
KD92903
KD92923
EN User Manual 03
DE Gebrauchsanweisung 18
RU Инструкция 32
AR 50


www.aeg.com
3
CONTENTS
SAFETY INFORMATION .......................................................................................... 4
SAFETY INSTRUCTIONS ........................................................................................ 6
PRECAUTIONS DURING USE ................................................................................ 7
APPLIANCE DESCRIPTION .................................................................................... 8
USE ........................................................................................................................... 9
LOAD CAPACITY ................................................................................................... 12
CLEANING AND MAINTENANCE .......................................................................... 12
WHAT SHOULD I DO IF THE CROCKERY WARMER DOESN’T WORK? .......... 13
ENVIRONMENTAL CONCERNS ........................................................................... 14
INSTALLATION INSTRUCTIONS .......................................................................... 15
INSTALLATION ...................................................................................................... 63
WE'RE THINKING OF YOU
Thank you for purchasing an AEG appliance. You’ve chosen a product that brings with
it decades of professional experience and innovation. Ingenious and stylish, it has been
designed with you in mind. So whenever you use it, you can be safe in the knowledge
that you’ll get great results every time. Welcome to AEG.
Visit our website to:
Get usage advice, brochures, trouble shooter, service information:
www.aeg.com
Register your product for better service:
www.aeg.com/productregistration
Buy Accessories, Consumables and Original spare parts for your appliance:
www.aeg.com/shop
CUSTOMER CARE AND SERVICE
We recommend the use of original spare parts.
When contacting Service, ensure that you have the following data available.
The information can be found on the rating plate. Model, PNC, Serial Number.
Warning / Caution-Safety information.
General information and tips.
Environmental information.
Subject to change without notice.

ENGLISH
4
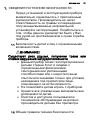
1. SAFETY INFORMATION
Carefully read the instructions before installing
and using the equipment. The manufacturer is not
liable for improper installation and use of the
equipment that may cause injuries and damage.
lways keep the instructions at hand, so they can
be easily referred to during use.
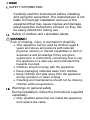
1.1. Safety of children and vulnerable adults
WARNING!
Risk of choking, injury or permanent disability.
This appliance can be used by children aged 8
years and above and persons with reduced
physical, sensory or mental capabilities or lack of
experience and knowledge if they are given
supervision or instructions concerning how to use
the appliance in a safe way and understand the
hazards involved.
Children should not play with the appliance.
Keep packaging materials away from children.
Keep children and pets away from the appliance
during operation or when cooling.
Cleaning and maintenance should not be done by
children without supervision.
1.2. Warnings on general safety
During installation, follow the instructions supplied
separately.
Only qualified personnel can install the appliance
and replace the cable.

www.aeg.com
5
WARNING: The appliance and its accessible parts
become hot during use. Care should be taken to
avoid touching heating elements. Children less than
8 years of age shall be kept away unless
continuously supervised.
During use the appliance becomes hot. Care
should be taken to avoid touching heating elements
inside the oven.
WARNING: Accessible parts may become hot
during use. Young children should be kept away.
Do not use harsh abrasive cleaners or sharp metal
scrapers to clean the oven door glass since they
can scratch the surface, which may result in
shattering of the glass.
Do not use steam cleaners to clean the appliance.
Do not use abrasive detergents or metal scrapers
to clean the appliance.
The electric connection is made via an omnipolar
switch, which is suitable for the intensity to be
tolerated and which has a minimum gap of 3mm
between its contacts, which will ensure
disconnection in case of emergency or when
cleaning the crockery warmer. If a plug is used for
the electric connection, then it must be accessible
after installation.
The connection should include correct earthing, in
compliance with current norms.
Disconnect the appliance from the power supply
before carrying out any maintenance operation.

ENGLISH
6
2. SAFETY INSTRUCTIONS
WARNING!
Before connecting the appliance
compare the power data (voltage and
frequency) indicated on the
characteristics plate with those of the
power supply in question. If these data
do not match there may be problems.
In case of doubt, contact an electrician.
WARNING!
If the electrical wire plug is removed,
the appliance must be installed and
connected by a technician. Contact a
qualified electrician who knows and
respects current safety standards. The
manufacturer cannot be held
responsible for damage resulting from
fitting or connecting errors.
WARNING!
The electrical safety of the appliance
can only be guaranteed if it is earthed.
The manufacturer cannot be held
responsible for damage resulting from
the absence of or defects in the
installation’s protection system (e.g.
electrical shock).
WARNING!
Only use the appliance once it has
been fitted into its built-in position. Only
in this manner can it be guaranteed
that users cannot access the electrical
components.
WARNING!
Never open up the appliance’s frame.
Possible contacts with electrical
conducting parts or changes to
electrical or mechanical components
may represent a danger to users’
safety and prejudice the correct
working of the appliance.
WARNING!
Repairs and maintenance, especially
of parts carrying electrical current,
must only be done by technicians
authorised by the manufacturer. The
manufacturer and retailers do not
accept responsibility for any damaged
caused to people, animals or property
as a result of repairs and maintenance
carried out by non-authorised
personnel.
WARNING!
Repairs undertaken during the
guarantee period must only be done by
technicians authorised by the
manufacturer. If this is not the case
then any damage resulting from the
repair in question is excluded from the
guarantee
WARNING!
The appliance must be disconnected
from the electrical current when
installation and repair work is being
done. To disconnect the appliance
from the current, one of the following
conditions must apply:
The switchboard fuses / circuit
breakers must be disconnected.
The plug should be removed from
the socket. To remove the plug from
the socket do not pull on the electric
cable but rather pull out the plug
itself directly.

www.aeg.com
7
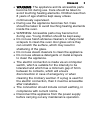
3. PRECAUTIONS DURING USE
This appliance complies with current
safety standards. Improper use of the
appliance may put the user at risk.
Read the operating instructions
carefully before using the appliance
for the first time. In this way you will
avoid the risk of injuring yourself or
damaging the appliance.
Depending on the temperature
selected and the operating time, the
temperature inside the appliance may
reach 80 ºC. To take crockery out of
the crockery warmer protect your
hands by using oven gloves or an
oven cloth.
Do not sit or hang on the drawer. The
telescopic runners will be damaged.
The maximum load capacity of the
drawer is 25 kg.
Do not store synthetic containers or
easily inflammable objects inside the
crockery warmer. When you switch on
the appliance such containers and
objects may melt or catch fire. Fire
danger.
Do not use the appliance to heat up
the air temperature in the kitchen. The
high temperatures reached may
cause easily inflammable objects
close to the appliance to catch fire.
Do not use high pressure or steam jet
cleaning devices. The steam may
affect electrical components and
cause a short circuit. The steam
pressure may also cause damage to
the appliance’s surface and
components in the long term.
When you stop using the appliance at
the end of its working life, disconnect
it from the power supply and render
the electrical cable unusable so that
the appliance is not a danger if, for
example, children use it for playing

ENGLISH
8
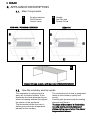
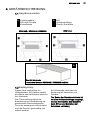
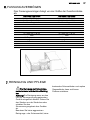
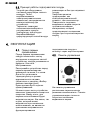
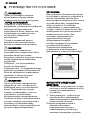
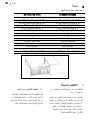
4. APPLIANCE DESCRIPTION
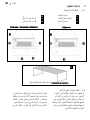
4.1. Main Components
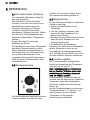
4.2. How the crockery warmer works
This appliance is equipped with a
warm air circulation system. A fan
distributes the heat generated by an
electrical heating element throughout
the interior of the appliance.
The thermostat allows the user to
define and control the temperature
wanted for the crockery.
The circulating hot air that is generated
heats up the crockery quickly and
evenly.
A metal grille protects both the heating
element and the fan.
The base of the drawer is fitted with a
non-slip mat to prevent plates and
dishes sliding around when the drawer
is opened and closed..
Function selector
Handle
On/Off switch
Anti-Slip mat
Control Lamp
Drawer Grid *
6
3
5
2
4
1
KD91403 / KD92903 / KD92923
KD91404
6
*Drawer Grid only available with the model KD92903E/KD92923E
6

9
www.aeg.com
5. USE
5.1. Before using for the first
time
Before using the appliance for the first
time you should clean the interior and
the exterior, following the cleaning
instructions given in the section
“Cleaning and Maintenance”.
Then heat the crockery warmer for at
least 2 hours. For this, turn the
temperature control to the maximum
position (see section ‘Selecting
temperature”).
Make sure the kitchen is well-
ventilated when you are doing this.
The appliance’s parts are protected by
a special product. For this reason,
during the first heating an odour will be
released. Both the odour and any
smoke that may form will disappear
after a short time and neither signifies
that there is anything wrong with the
connection or the appliance.
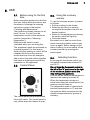
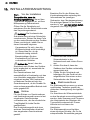
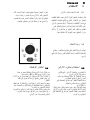
5.2. Control Panel
The control panel has a function and
the on/off switch. The control panel is
only visible when the drawer is open.
5.3. Using the crockery
warmer
To use the crockery warmer, proceed
as follows:
Put the crockery in the drawer.
Select the function you want by
turning the thermostat control to the
desired position.
Switch on the appliance by pressing
the switch, which will light up.
Close the drawer.
Be careful not to use too much force
when closing the drawer since it may
open up again. Before taking out the
warm crockery you must switch off the
crockery warmer by pressing the
switch again
5.4. Selecting function
By turning the thermostat control you
can select temperatures between 30
and 80 °C.
Do not force the thermostat control to
the left of the “0” position or to the right
of the maximum position since this
may damage the appliance.
As soon as the selected temperature is
reached, the heating is turned off.
When the temperature drops to a
value below than the one selected, the
heating is turned back on.
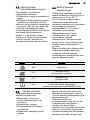
The temperature scale is marked with
absolute temperatures in ºC and also
has symbols which correspond to the
optimum temperatures for groups of
crockery:

ENGLISH
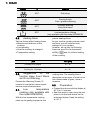
10
Symbol
ºC
Function
30ºC
Defrosting
40ºC
Proving dough
Cups / glasses warming
60ºC
Crockery warming
Keep food warm
80ºC
Food Warming
Low temperature cooking
(only available with the model KD92903E)
5.5. Heating times
Various factors affect heating times:
Material and thickness of the
crockery;
Load quantity;
How the crockery is arranged;
Temperature setting.
It is therefore not possible to give any
precise heating times.
As you use the crockery warmer more
and more you will learn the best
settings for your crockery.
However, as a guide, the following
times are given for the thermostat
setting and for uniform heating
of the crockery:
Load
Time (min)
Crockery for 6 people
30 – 35
Crockery for 12 people
40 – 45
5.6. Suggestions for the
function Keep Food Warm
and Food Warming:
Preheat the Warming Drawer 15
minutes to ensure the interior space
has the required temperature.
5.7. Low temperature
cooking (only available with
the model KD92903E)
With the low temperature cooking
meat can be gently prepared at low
temperatures over a longer period of
cooking time. The cooking time is
dependent on the piece of meat’s size.
Use dishes made of glass, china or
ceramics.
5.8. Preparation:
Preheat the device with the dishes at
80°C for 10 minutes.
Sear the meat in a pan using fat and
place it into the heat drawer on the
preheated dishes. Keep the setting
at 80° C.

www.aeg.com
11
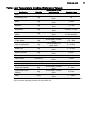
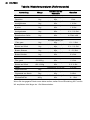
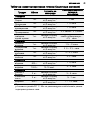
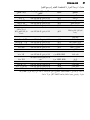
Table: Low Temperature Cooking (Reference Values)
Application
Quantity
Roast gently on the
cooking plate
Cooking times
Beef
Completely rare
1kg
on all sides, on each
2min.
1hr
Rare
1kg
on all sides, on each
3min
1.25hrs
Medium
1kg
on all sides, on each
3min
1.75 hrs
Well-done
1kg
on all sides, on each
3min
2.25hrs – 2.5hrs.
Roast beef in one
piece
1kg
on all sides, on each
3min
3 hrs rare
4.5 hrs medium
Veal
Filet, whole
1kg
on all sides, on each
2min.
1.75 – 2hrs.
Loin, in one piece
1kg
on all 4 sides, on
each 3min.
2 – 2.5hrs.
Roast, vat
1kg
on all sides, on each
3min.
2 – 2.5hrs.
Roast, shoulder
1kg
on all sides, on each
3min.
2.5hrs.
Porc
Filet, whole
500-600 g
on all sides, on each
2min.
1.5hrs
Loin
600 -1000g
all around 10-15min.
2 - 3hrs
Lamb
Gigot with haunch
2kg
on all sides, on each
4min.
3 – 4hrs
Gigot steak of the
haunch
2kg
on all sides, on each
2min
0.75-1hr
Filet
400g
on all sides, on each
2min
1 – 1.25hrs.
If you wish to keep the cooked meat warm, put the setting back to 60° C. We recommend
not to use the warming function for more than 1hr.

ENGLISH
12
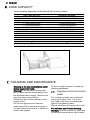
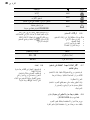
6. LOAD CAPACITY
Load capacity depends on the size of the crockery items:
KD 91403 / KD 91404
KD 92903 / KD 92923
6 persons servings
12 persons servings
6 x 24cm Dinner Plates
12 x 24cm Dinner Plates
6 x 10cm Soup Bowls
12 x 10cm Soup Bowls
1 x 19cm Serving Dish
1 x 19cm Serving Dish
1 x 17cm Serving Dish
1 x 17cm Serving Dish
1 x 32cm Meat Plates
2 x 32cm Meat Plates
or
or
20 dishes with 28 cm
40 dishes with 28 cm
or
or
80 espresso coffee cups
160 espresso coffee cups
or
or
40 tea cups
80 tea cups
or
or
…
…
7. CLEANING AND MAINTENANCE
Cleaning is the only maintenance action
that is required normally.
Warning! Cleaning must be done with
the crockery warmer disconnected from
the electrical power supply. Remove the
plug from the power socket or
disconnect the crockery warmer power
supply circuit.
Do not use aggressive or abrasive
cleaning products, abrasive sponges or
pointed objects since stains or abrasion
marks may appear.
Do not use high pressure or steam jet
cleaning appliances.
7.1. Appliance front and control
panel
The crockery warmer can be cleaned
using just a damp cloth. If it is very
dirty, add a few drops of washing-up
liquid to the washing water.
Wipe the surfaces dry using a dry cloth.
For stainless steel fronted crockery
warmers, special products for treatment
of stainless steel surfaces can be used.

www.aeg.com
13
These products prevent the surfaces
becoming dirty again for some time.
Apply a thin layer of such a product on
the surface using a soft cloth
On aluminium fronted crockery warmers
use a gentle glass cleaning product and
a soft cloth that does not release fluff.
Wipe horizontally without pressing on
the surface since aluminium is sensitive
to scratches and cuts.
7.2. Interior of the crockery
warmer
Clean the inside of the crockery warmer
regularly using a damp cloth.
If it is very dirty add a few drops of
washing-up liquid to the washing water.
Wipe the surfaces dry using a dry cloth.
Avoid water entering through the air
circulation opening.
Only use the crockery warmer again
when it is completely dry.
7.3. Mat with non-slip surface
The non-slip surface mat can be
removed to facilitate cleaning of the
drawer.
The mat can be cleaned by hand using
hot water with a few drops of washing-
up liquid. Dry thoroughly.
The non-slip mat should only be
replaced when it is completely dry.
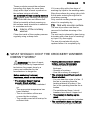
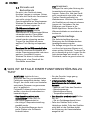
8. WHAT SHOULD I DO IF THE CROCKERY WARMER
DOESN’T WORK?
WARNING! Any type of repair
must only be done by a specialised
technician. Any repair done by a
person not authorised by the
manufacturer is dangerous.
Before contacting Technical
Assistance, check on the following:
The crockery doesn’t heat up
enough. Check whether:
The appliance has been switched
on.
The appropriate temperature has
been selected.
The air circulation orifices are
covered by the crockery.
The crockery was left to heat up for
sufficient time.
Heating time depends on several
factors, such as, for example:
Crockery material type and
thickness.
Quantity of crockery.
How the crockery is arranged.
The crockery doesn’t heat up at all.
Check whether:
You can hear the noise of a fan. If
the fan is operating then the
heating element is broken; if the
fan is not operating then the fan is
broken.
The switchboard fuses / circuit
breakers have fused / tripped out.
The crockery is heating up too
much:
The temperature selector is broken.
The on/off switch does not light up:
The switch’s pilot light has blown.

ENGLISH
14
9. ENVIRONMENTAL CONCERNS
Recycle the materials with the
symbol . Put the packaging in
applicable containers to recycle it.
Help protect the environment and
human health and to recycle waste of
electrical and electronic appliances.
Do not dispose appliances marked
with the symbol with the
household waste. Return the product
to your local recycling facility or
contact your municipal office.

15
www.aeg.com
10. INSTALLATION INSTRUCTIONS
10.1. Before installation
Check that the input voltage indicated
on the characteristics plate is the same
as the voltage of the power outlet you
are going to use.
Open the drawer and take out all the
accessories and remove the packing
material.
Attention! The front surface of the
crockery heater may be wrapped in
a protective film. Before using the
crockery warmer for the first time,
remove this film carefully.
Make sure that the crockery warmer
is not damaged in any way. Check
that the drawer opens and closes
correctly. If you find any damage,
contact the Technical Assistance
Service.
Attention: the power socket should
be easily accessible after the
crockery warmer has been
installed.
The crockery warmer should only
be built-in in combination with those
appliances indicated by the
manufacturer. If it is fitted in
combination with other appliances,
the guarantee is no longer valid
since it is impossible to guarantee
that the crockery warmer will work
correctly.
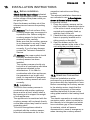
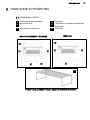
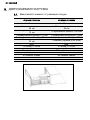
10.2. Installation
To build-in the crockery warmer in
combination with another appliance
there must be a fixed, interim shelf in
the housing unit to support the weight
of both appliances.
The appliance to be combined with the
crockery warmer will be placed directly
on the latter without any need to have a
separating shelf.
To build-in the appliance which is
combined with the crockery warmer,
follow the instructions set out in the
respective instructions and fitting
booklet.
The relevant installation dimensions
are indicated in mm in the diagrams
shown at the end of this booklet.
Proceed as follows:
1. Place the crockery warmer on the
shelf and slide it towards the interior
of the niche in such a way that it is
centred and completely lined up
with the front of the unit.
2. Check that the crockery warmer’s
frame is properly levelled and is
sitting evenly on the shelf.
3. Open the drawer and fix the
crockery warmer to the sides of the
unit using the provided screws.
10.3. Electrical Connection
Electrical installation must be
performed by an electrician qualified in
accordance with the legislation in force.
Before connecting the crockery warmer
to the electric mains, check that the
voltage and frequency of the mains
matches that which is shown on the
rating plate located in the heating block
inside.
The electric connection is made via an
omnipolar switch, which is suitable for
the intensity to be tolerated and which
has a minimum gap of 3mm between
its contacts, which will ensure
disconnection in case of emergency or
when cleaning the crockery warmer.

ENGLISH
16
If a plug is used for the electric
connection, then it must be accessible
after installation.
The connection should include correct
earthing, in compliance with current
norms.
WARNING: THE CROCKERY
WARMER MUST BE EARTHED.
If the flexible supply cable fitted to the
crockery warmer ever needs to be
changed, it should be replaced by an
official After Sales Service, because it
requires special tools.
The manufacturer and retailers do not
accept responsibility for any damage
that may be caused to people, animals
or property if these installation
instructions are not observed.

17
ENGLISH

DEUTSCH
18
INHALTSVERZEICHNIS
INFORMATIONEN ZUR SICHERHEIT .................................................................. 19
SICHERHEITSHINWEISE ...................................................................................... 21
VORSICHTSMAßNAHME WÄHREND BENUTZUNG ........................................... 22
GERÄTEBESCHREIBUNG .................................................................................... 23
BEDIENUNG ........................................................................................................... 24
FASSUNGSVERMÖGEN ....................................................................................... 27
REINIGUNG UND PFLEGE.................................................................................... 27
WAS IST IM FALLE EINER FUNKTIONSSTÖRUNG ZU TUN? ............................ 28
UMWELT- UND GESUNDHEITSSCHUTZ ............................................................. 29
INSTALLATIONSANLEITUNG ............................................................................... 30
EINBAU ................................................................................................................... 63
WIR DENKEN AN SIE
Vielen Dank, dass Sie sich für ein Gerät von AEG entschieden haben. Sie haben ein
Produkt gewählt, hinter dem jahrzehntelange professionelle Erfahrung und Innovation
stehen. Bei der Entwicklung dieses großartigen und eleganten Geräts haben wir an Sie
gedacht. So haben Sie bei jedem Gebrauch die Gewissheit, dass Sie stets großartige
Ergebnisse erzielen werden. Willkommen bei AEG.
Besuchen Sie uns auf unserer Website, um:
Anwendungshinweise, Prospekte, Fehlerbehebungs- und Service-Informationen
zu erhalten:
www.aeg.com
Lhr erworbenes Produkt zu registrieren, um den besten Service dafür zu
gewährleisten:
www.aeg.com/productregistration
Zubehör,
Verbrauchsmaterial und Original-Ersatzteile für Ihr Gerät zu erwerben:
www.aeg.com/shop
REPARATUR- UND KUNDENDIENST
Bitte verwenden Sie ausschließlich Original-Ersatzteile für Ihre Produkte.
Halten Sie folgende Angaben bereit, wenn Sie sich an den Kundendienst wenden
(diese Informationen finden Sie auf dem Typenschild): Modell, Produktnummer (PNC),
Seriennummer.
Warnungs-/ Sicherheitshinweise.
Allgemeine Informationen und Empfehlungen.
Informationen zum Umweltschutz.
Änderungen vorbehalten.

19
www.aeg.com
1. INFORMATIONEN ZUR SICHERHEIT
Lesen Sie die Anweisungen sorgfältig vor der
Installation und bevor Sie Ihr Gerät in Betrieb
setzen. Der Hersteller haftet nicht für
unsachgemäße Installation und Nutzung der
Geräte, die Verletzungen und Schäden
verursachen können. Halten Sie die Anweisungen
griffbereit, so dass sie während des Gebrauchs
leicht konsultierbar sind.
1.1 Sicherheit von Kindern und gefährdeten
Erwachsenen
WARNUNG!
Erstickungs-, Verletzungs- und dauerhafte
Unfähigkeitsgefahr:
Dieses Gerät kann von Kindern ab acht Jahren und
von Personen mit eingeschränkten körperlichen,
Wahrnehmungs- oder geistigen Fähigkeiten bzw.
fehlender Erfahrung verwendet werden, sofern sie
dabei beaufsichtigt werden oder über die sichere
Verwendung des Geräts unterrichtet wurden und
die damit verbundenen Gefahren verstehen.
Kinder dürfen nicht mit dem Gerät spielen.
Kinder dürfen das Gerät nicht reinigen oder warten,
wenn sie dabei nicht beaufsichtigt werden.

DEUTSCH
20
1.2 Warnungen zur allgemeinen Sicherheit
Während der Installation folgen Sie die Anweisungen die
getrennt geliefert wurden.
Nur qualifiziertes Personal darf das Gerät
installieren und ersetzen Sie das Kabel ersetzen.
WARNUNG!
Dieses Gerät und seine Teile werden bei Gebrauch
heiß. Achten Sie darauf, die heißen Teile nicht zu
berühren. Halten Sie Kinder unter acht Jahren von
dem Gerät fern, es sei denn, diese werden dabei
ständig beaufsichtigt.
Der Ofen wird bei Gebrauch heiß. Halten Sie
während des Backens oder Bratens Kinder in
sicherem Abstand von dem Ofen.
Fassen Sie die Elemente im Inneren erst an,
nachdem der Ofen abgekühlt ist
Verwenden Sie keine Scheuermittel oder scharfe
Metallschaber zum Reinigen des Türglases, da
diese die Oberfläche zerkratzen und somit zum
Zersplittern des Glases führen können.
Aus Gründen der elektrischen Sicherheit darf das
Gerät nicht mit Hochdruckreinigern oder
Dampfreinigern gereinigt werden.
Wenn das Anschlusskabel beschädigt ist, kann
dieses nur vom Hersteller, seinem Servicepartner
oder einer anderen qualifizierten Person
ausgetauscht werden, um eine gefährliche Situation
zu verhindern.
Wenn Sie einen festen Anschluss herstellen
möchten, achten Sie darauf, dass ein allpoliger
Schalter mit einer Kontaktöffnung von mindestens
3mm in der Zufuhrleitung installiert wird.
Seite wird geladen ...
Seite wird geladen ...
Seite wird geladen ...
Seite wird geladen ...
Seite wird geladen ...
Seite wird geladen ...
Seite wird geladen ...
Seite wird geladen ...
Seite wird geladen ...
Seite wird geladen ...
Seite wird geladen ...
Seite wird geladen ...
Seite wird geladen ...
Seite wird geladen ...
Seite wird geladen ...
Seite wird geladen ...
Seite wird geladen ...
Seite wird geladen ...
Seite wird geladen ...
Seite wird geladen ...
Seite wird geladen ...
Seite wird geladen ...
Seite wird geladen ...
Seite wird geladen ...
Seite wird geladen ...
Seite wird geladen ...
Seite wird geladen ...
Seite wird geladen ...
Seite wird geladen ...
Seite wird geladen ...
Seite wird geladen ...
Seite wird geladen ...
Seite wird geladen ...
Seite wird geladen ...
Seite wird geladen ...
Seite wird geladen ...
Seite wird geladen ...
Seite wird geladen ...
Seite wird geladen ...
Seite wird geladen ...
Seite wird geladen ...
Seite wird geladen ...
Seite wird geladen ...
Seite wird geladen ...
Seite wird geladen ...
Seite wird geladen ...
Seite wird geladen ...
Seite wird geladen ...
-
 1
1
-
 2
2
-
 3
3
-
 4
4
-
 5
5
-
 6
6
-
 7
7
-
 8
8
-
 9
9
-
 10
10
-
 11
11
-
 12
12
-
 13
13
-
 14
14
-
 15
15
-
 16
16
-
 17
17
-
 18
18
-
 19
19
-
 20
20
-
 21
21
-
 22
22
-
 23
23
-
 24
24
-
 25
25
-
 26
26
-
 27
27
-
 28
28
-
 29
29
-
 30
30
-
 31
31
-
 32
32
-
 33
33
-
 34
34
-
 35
35
-
 36
36
-
 37
37
-
 38
38
-
 39
39
-
 40
40
-
 41
41
-
 42
42
-
 43
43
-
 44
44
-
 45
45
-
 46
46
-
 47
47
-
 48
48
-
 49
49
-
 50
50
-
 51
51
-
 52
52
-
 53
53
-
 54
54
-
 55
55
-
 56
56
-
 57
57
-
 58
58
-
 59
59
-
 60
60
-
 61
61
-
 62
62
-
 63
63
-
 64
64
-
 65
65
-
 66
66
-
 67
67
-
 68
68


