
2191125-11
DE Gebrauchsanweisung
EN Operating Instructions
FR Mode d‘emploi
NL Gebruiksaanwijzing
ES Instrucciones de uso
IT Istruzioni per l‘uso
PT Instruções de utilização
SV Bruksanvisning
GR Οδηγίες χρήσεως
TR Kullanma Kılavuzu
VivaControl
2191125-01Boritó.indd 1-2 5/23/05 1:29:19 PM
Seite wird geladen ...
Seite wird geladen ...

3
Vielen Dank, dass Sie sich für den AEG Viva Control-
Staubsauger entschieden haben. Die Bedienungs-
anleitung gilt für alle Viva Control-Modelle. Das
bedeutet, dass Ihr Modell bestimmte Zubehörteile
und/oder Funktionen möglicherweise nicht enthält.
Um bestmögliche Ergebnisse zu erzielen, sollten Sie
ausschließlich das speziell für Ihren Staubsauger
entwickelte Original-AEG-Zubehör verwenden.
Deutsch 4-16
Nous vous remercions d’avoir choisi l’aspirateur AEG
Viva Control. Ces instructions d’utilisation portent
sur l’ensemble des modèles Viva Control. Cela signifi e
qu’il est possible que certains accessoires ou fonctions
ne soient pas fournis avec le modèle que vous avez
en votre possession. Afi n d’obtenir des performances
optimales, utilisez toujours des accessoires originaux
AEG. Ils ont été spécialement conçus pour votre
aspirateur.
Français 5-17
Ευχαριστούµε που επιλέξατε την ηλεκτρική σκούπα
AEG Viva Control. Οι παρούσες Οδηγίες Λειτουργίας
καλύπτουν όλα τα µοντέλα Viva Control. Εποµένως,
ορισµένα εξαρτήµατα ή λειτουργίες που αναφέρονται
εδώ ενδέχεται να µη συµπεριλαµβάνονται στο
µοντέλο που διαθέτετε. Για να έχετε τα καλύτερα
δυνατά αποτελέσµατα, χρησιµοποιείτε πάντα
τα γνήσια εξαρτήµατα AEG. Έχουν σχεδιαστεί
αποκλειστικά για τη δική σας ηλεκτρική σκούπα.
Ελληνικά 19-31
Gefeliciteerd met uw keuze van een AEG Viva
Control-stofzuiger. Deze bedieningsinstructies zijn
van toepassing op alle Viva Control-modellen. Dit
betekent dat mogelijk niet alle accessoires/kenmerken
van uw model worden beschreven. Gebruik altijd
originele AEG-accessoires voor de beste resultaten.
Deze accessoires zijn speciaal ontworpen voor uw
stofzuiger.
Nederlands 5-17
Thank you for having chosen an AEG Viva Control
vacuum cleaner. These Operating Instructions cover
all Viva Control models. This means that with your
specifi c model, some accessories/features may not be
included. In order to ensure the best results, always
use original AEG accessories. They have been designed
especially for your vacuum cleaner.
English 4-16
Grazie per avere scelto un aspirapolvere AEG Viva
Control. Queste Istruzioni per l’uso sono valide per
tutti i modelli Viva Control. Questo signifi ca che
per il modello specifi co acquistato, alcuni accessori
o funzionalità potrebbero non essere inclusi. Per
ottenere sempre i migliori risultati, utilizzare
esclusivamente accessori originali AEG, pensati in
modo specifi co per questo aspirapolvere.
Italiano 18-30
Obrigado por ter escolhido um aspirador AEG Viva
Control. Estas instruções de funcionamento abrangem
todos os modelos Viva Control. Isto signifi ca que
alguns acessórios/funções podem não estar incluídos
no seu modelo específi co. De modo a assegurar os
melhores resultados utilize sempre acessórios originais
AEG. Estes foram concebidos especialmente para o seu
aspirador.
Português 18-30
Gracias por elegir una aspiradora AEG Viva Control.
En este manual de instrucciones se incluyen todos
los modelos Viva Control. Es posible que su modelo
no incluya algunos accesorios o funciones. Para
lograr el mejor resultado, utilice únicamente los
accesorios originales de AEG, que han sido diseñados
específi camente para su aspiradora.
Español 5-17
Tack för att du valde en AEG Viva Control-
dammsugare. De här instruktionerna gäller alla
Viva Control-modeller. Det är möjligt att inte alla
funktioner och tillbehör för just din modell fi nns med.
Använd alltid originaltillbehör från AEG så uppnår
du bästa resultat. De är speciellt utformade för din
dammsugare.
Svenska 19-31
AEG Viva Control elektrikli süpürgeyi seçtiginiz için
tesekkür ederiz. Bu Kullanim Talimatlari tüm Viva
Control modelleri için geçerlidir. Bu, bahsi geçen
aksesuarlarin/özelliklerin bazilarinin sahip oldugunuz
modelde bulunmayabilecegi anlamina gelmektedir.
En iyi sonuçlari elde etmek için daima orjinal AEG
aksesuarlarini kullanin. Bu aksesuarlar elektrikli
süpürgeniz için özel olarak tasarlanmistir.
Türkçe 19-31
vivacontrol1_inlaga.indd 3vivacontrol1_inlaga.indd 3 04-05-12 13.55.3504-05-12 13.55.35

4
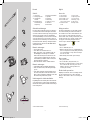
* Nur bestimmte Modelle. * Certain models only.
1
6
27
3a 8
3b 9
5
104
Sicherheitsvorkehrungen
Der Viva Control-Staubsauger darf nur von Erwachse-
nen und nur für normales Staubsaugen im Haushalt
verwendet werden. Der Staubsauger ist doppelt isoliert
und muss nicht geerdet werden. Vor dem Reinigen
oder der Durchführung von Servicearbeiten am Staub-
sauger den Netzstecker aus der Steckdose ziehen. Si-
cherstellen, dass der Staubsauger an einem trockenem
Ort aufbewahrt wird. Wartungs- und Reparaturarbei-
ten dürfen nur vom autorisierten AEG-Kundendienst
durchgeführt werden.
Niemals staubsaugen:
• In nassen Bereichen.
• In der Nähe von brennbaren Gasen etc.
• Ohne eingesetzten s-bag®-Staubbeutel, um eine
Beschädigung des Staubsaugers zu vermeiden.
Damit vermieden wird, dass der Deckel ohne den
s-bag® geschlossen werden kann, ist eine Sicher-
heitseinrichtung vorhanden. Nicht versuchen, den
Deckel mit Gewalt zu schließen
• Wenn das Gehäuse sichtbare Schäden aufweist.
Niemals staubsaugen:
• Scharfkantige und spitze Objekte, Flüssigkeiten
• Heiße oder kalte Asche, brennende Zigarettenkip-
pen etc.
• Feine Stäube (z. B. Gips, Zement, Mehl oder heiße
oder kalte Asche). Dieses Substanzen können den
Motor schwer beschädigen. Schäden dieser Art sind
durch die Gerätegarantie nicht gedeckt.
Vorkehrungen bei elektrischen Kabeln:
Regelmäßig Kabel auf Schäden prüfen. Den Staubsau-
ger niemals benutzen, wenn das Kabel beschädigt ist.
Schäden am Staubsagerkabel sind durch die Gerätega-
rantie nicht gedeckt.
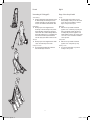
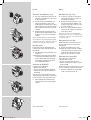
1* Teleskoprohr
2* Verlängerungsrohre
3a* Schlauchgriff +
Schlauch
3b* Schlauchgriff mit
Fernbedienung der
Saugleistung
4 Kombinationsbodendüse
5 Fugendüse
6 Polsterdüse
7 Zubehör-Clip
8 Staubbeutel, s-bag®
9* Turbobürste
10* Parkettbürste
Zubehör
Deutsch English
Safety precautions
Viva Control should only be used by adults and only
for normal vacuuming in a domestic environment.
The vacuum cleaner features double insulation and
does not need to be earthed. Disconnect the plug
from the mains before cleaning or maintenance of the
vacuum cleaner. Be sure to keep the vacuum cleaner
in a dry place. All servicing and repairs must be
carried out by an authorised AEG service centre.
Never vacuum:
• In wet areas.
• Close to fl ammable gases etc.
• Without a dust bag s-bag® to avoid damaging the
cleaner. A safety device is fi tted, which prevents the
cover closing without a s-bag®. Do not attempt to
force the cover shut.
• When housing shows visible signs of damage.
Never vacuum:
• Sharp objects, fl uids.
• Hot or cold cinders, lit cigarette butts, etc.
• Fine dust, for example from plaster, concrete, fl our,
hot or cold ashes. The above may cause serious
damage to the motor – damage which is not
covered by the warranty.
Electrical cable precautions:
Regularly check that the cable is not damaged. Never
use the vacuum cleaner if the cable is damaged.
Damage to the machine’s cable is not covered by the
warranty.
1* Telescopic tube
2* Extension tubes
3a* Hose handle + hose
3b* Hose handle with
remote suction control
4 Combination fl oor
nozzle
5 Crevice nozzle
6 Upholstery nozzle
7 Accessories clip
8 Dust bag, s-bag®
9* Turbo nozzle
10* Parquet nozzle
Accessories
vivacontrol1_inlaga.indd 4vivacontrol1_inlaga.indd 4 04-05-12 13.55.3704-05-12 13.55.37
Seite wird geladen ...

6
* Nur bestimmte Modelle. * Certain models only.
11 16a
12 16b
13 16c
14
15
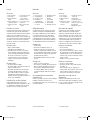
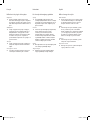
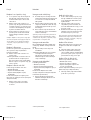
Vorbereitungen
11 Frontabdeckung des Geräts öffnen und kontrol-
lieren, dass Staubbeutel s-bag® und Motorfi lter
eingesetzt sind (siehe auch “Filterwechsel”).
12 Hintere Abdeckung des Geräts öffnen und
kontrollieren, dass Abluftfi lter eingesetzt ist.
13 Schlauch einführen, bis Verriegelung einrastet.
Zur Freigabe des Schlauches Verriegelung
drücken.
14 Verlängerungsrohre* oder Teleskoprohr* durch
Drehen und Zusammenschieben an Schlauchgriff
und Bodendüse anbringen. (Zum Zerlegen drehen
und auseinanderziehen.)
15 Elektrokabel herausziehen und an Steckdose
anschließen. Der Staubsauger verfügt über eine
automatische Kabelaufwicklung. Nach dem
Herausziehen des Kabels arretiert die Kabelauf-
wicklung. Zum Aufwickeln des Kabels kurz am
Kabel ziehen und dann loslassen. Das Kabel wird
dann automatisch aufgewickelt.
16a Ein- und Ausschalten des Staubsaugers durch
Knopfdruck.
16b Zum Einstellen der Saugleistung Leistungsregler
nach rechts (Max) oder Links (Min) drehen. Die
Saugleistung kann auch mithilfe der Saugsteue-
rung am Schlauchgriff eingestellt werden.
16c* Bei einem Staubsauger mit Fernbedienung die
Taste +/- drücken, um den Leistungsregler ein-
zustellen (stellen Sie sicher, dass zuvor Batterien
eingelegt wurden). Durch Drücken auf die Mitte
des Schalters lässt sich der Staubsauger eben-
falls ein-/ausschalten (sofern der Hauptschalter
des Staubsaugers eingeschaltet ist).
Deutsch
Before starting
11 Open the front cover on the machine and check
that the dust bag s-bag®, and the motor-fi lter
are in place. (See also Replacement of fi lter)
12 Open the back lid on the machine and check that
the exhaust fi lter is in place.
13 Insert the hose until the catches click to engage
(press the catches to release the hose).
14 Attach the extension tubes* or telescopic tube*
to the hose handle and nozzle by pushing and
twisting together. (Twist and pull apart to
dismantle.)
15 Extend the electric cable and connect it to
the mains. The vacuum cleaner is fi tted with a
cable winder. Once the electric cable has been
extended, it stays in that position. To rewind the
cable, give it a slight sharp pull and then release.
The cable will then automatically rewind.
16a Start/stop the vacuum cleaner by pushing the
button.
16b Adjust suction power by rotating the power
control to the right (Max) or to the left (Min).
Suction power can also be adjusted by using the
suction control on the hose handle.
16c* If you have a vacuum cleaner with remote
control, press the +/- buttons to adjust suction
control (be sure batteries have been inserted
beforehand). You can also start/stop the cleaner
by pressing the centre of the control (as long as
the main cleaner switch is set to on).
English
vivacontrol1_inlaga.indd 6vivacontrol1_inlaga.indd 6 04-05-12 13.55.3804-05-12 13.55.38
Seite wird geladen ...

8
18
17
19
20
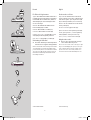
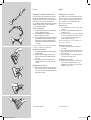
Verwendung des Teleskopgriffs
Aufbewahrung
17 Praktische Parkpositionen für Arbeitspausen und
die Aufbewahrung des Staubsaugers. Der Tele-
skopgriff verfügt über einen integrierten Mag-
neten, der den Schlauch an Ort und Stelle hält.
Handhabung
18 Mit ausgezogenem Teleskopgriff kann der
Staubsauger sehr leicht bewegt werden, und Sie
haben während des Staubsaugens jederzeit die
volle Kontrolle. Dies erhöht die Beweglichkeit des
Geräts und verhindert, dass es gegen Möbel oder
Türen stößt. Der Staubsauger kann natürlich
auch mit eingezogenem Griff verwendet werden.
Transport
19 Mit ausgezogenem Teleskopgriff kann der Staub-
sauger sehr leicht transportiert werden.
Reinigen von Stufen
20 Der Teleskopgriff ermöglicht das problemlose
und sichere Reinigen von Stufen.
Deutsch English
Usage of the telescopic handle
Storage
17 Practical parking position when you pause
during cleaning or when you store the vacuum
cleaner. The telescopic handle has a built-in
magnet to keep the tube in place.
Manouvring
18 With the telescopic handle extended the
appliance can be carried along very easily and
under control during cleaning. This increases
its mobility and prevents the appliance from
striking furniture and doors. The vacuum cleaner
can of course also be used with the handle in a
retracted position.
Transportation
19 With the telescopic handle extended the
appliance can be transported very easily.
Cleaning of stairs
20 The telescopic handle makes easy and save
cleaning of stairs possible.
vivacontrol1_inlaga.indd 8vivacontrol1_inlaga.indd 8 04-05-12 13.55.4004-05-12 13.55.40
Seite wird geladen ...

10
* Nur bestimmte Modelle. * Certain models only.
26
21a
21b
22
23
25
24
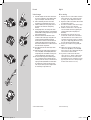
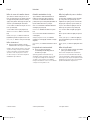
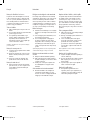
Die Düsen wie folgt benutzen:
Teppiche: Die Kombinationsbodendüse mit dem Hebel
in Stellung (21a) verwenden. Wenn Sie eine Kombina-
tionsbodendüse mit zwei Pedalen haben, können Sie
durch Betätigung des rechten Pedals (22) Tierhaare
usw. besser aufsaugen.
Hartböden: Die Kombinationsbodendüse mit dem
Hebel in Stellung (21b) verwenden.
Holzböden: Die Parkettdüse* verwenden (23).
Polstermöbel: Die Polsterdüse verwenden (24).
Vorhänge, leichte Stoffe etc.: Die Polsterdüse verwen-
den (24). Gegebenfalls Saugleistung reduzieren.
Fugen, Ecken etc.: Die Fugendüse verwenden (25).
Verwendung der Turbodüse:*
26 Ideal für die Entfernung von hartnäckigen Flusen
und Tierhaaren von Teppichen und Teppichböden.
Hinweis: Die Turbodüse nicht auf Vorlegern aus Tierhaut
oder Teppichfransen verwenden. Um Schäden am Tep-
pich zu vermeiden, Düse bei rotierender Bürste nicht auf
einer Stelle lassen. Mit der Düse nicht über elektrische
Kabel fahren und Staubsauger unmittelbar nach der
Verwendung ausschalten.
Deutsch English
Use the nozzles as follows:
Carpets: Use the combination fl oor nozzle with the
lever in position (21a). If you have a combination fl oor
nozzle with two pedals – press the pedal on the right
(22) to vacuum up animal hair, etc. more effectively.
Hard fl oors: Use the combination fl oor nozzle with the
lever in position (21b).
Wooden fl oors: Use the parquet nozzle* (23).
Upholstered furniture: Use the upholstery nozzle (24).
Curtains, lightweight fabrics, etc.: Use the upholstery
nozzle (24). Reduce suction power if necessary.
Crevices, corners, etc.: Use the crevice nozzle (25).
Using the turbo nozzle*
26 Ideal for carpets and wall-to-wall carpeting to
remove stubborn fl uff and pet hairs.
Note: Do not use the turbo nozzle on skin rugs or carpet
fringes. To avoid damaging the carpet, do not keep the
nozzle stationary whilst the brush is rotating. Do not
pass the nozzle across electric cables, and be sure to
switch off the vacuum cleaner immediately after use.
vivacontrol1_inlaga.indd 10vivacontrol1_inlaga.indd 10 04-05-12 13.55.4004-05-12 13.55.40
Seite wird geladen ...

12
* Nur bestimmte Modelle * Certain models only
27
28
29
30a
31
30b
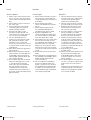
Austauschen des Staubbeutels, s-bag®
27 Den s-bag®-Staubbeutel austauschen, wenn das
Anzeigefenster vollständig rot ist. Ablesen, wenn
die Düse angehoben ist.
28 Frontabdeckung öffnen und durch Ziehen des
Pappstreifens Staubbeutel s-bag® aus dem
Staubbeutelhalter herausheben. Auf diese Weise
wird der Staubbeutel s-bag® automatisch staub-
dicht verschlossen und das Austreten von Staub
verhindert.
29 Durch Einschieben des Pappstreifens direkt in
das Ende der Nut des Staubbeutelhalters neuen
Staubbeutel s-bag® einsetzen und Abdeckung
schließen.
Hinweis: Nach dem Aufsaugen von Teppichreinigungs-
pulver Staubbeutel s-bag® austauschen. Nur Original-
Staubbeutel (s-bag® Classic, s-bag® Clinic, s-bag® Long
Performance oder s-bag® Anti-odour) verwenden.
Motorfi lterwechsel
Der Filterwechsel sollte bei jedem fünften Staub-
beutelaustausch erfolgen. Staubsauger niemals ohne
Filter benutzen.
28 Frontabdeckung öffnen und Staubbeutel s-bag®
herausheben.
30ab Filterhalter nach vorne kippen und verschmutz-
ten Filter behutsam herausheben. Neuen Filter
einsetzen und Filterhalter wieder in Ausgangs-
position bringen. Staubbeutel s-bag® austau-
schen und Abdeckung schließen.
Austauschen des Abluftfi lters*
Es gibt drei Arten von Abluftfi ltern:
• Mikrofi lter* (Bez.-Nr. EF17)
• Hepa H12* nicht auswaschbar (Bez.-Nr. EF H12)
• Hepa H12* auswaschbar (optional erhältlich, Bez.-
Nr. EF H12W)
Filter müssen stets gegen neue Filter ausgetauscht
werden und können – mit Ausnahme des auswaschba-
ren Hepa H12*-Filter – nicht ausgewaschen werden.
31 Hintere Abdeckung öffnen und Filter heraus-
heben. Neuen Filter einsetzen und Abdeckung
schließen.
Deutsch English
Replacing the dust bag, s-bag®
27 The dust bag, s-bag® must be replaced latest
when the indicator window is completely red.
Read with the nozzle lifted up.
28 Open the front lid and lift out the the s-bag®
from the dust bag holder by pulling the card-
board. This automatically seals the s-bag® and
prevents dust leaking out.
29 Insert a new s-bag® by pushing the cardboard
right into the end of the groove in the dust bag
holder and close the lid.
Note. Replace the s-bag® after vacuuming carpet-
cleaning powder. Be sure to use only original dust bags
s-bag® Classic, s-bag® Clinic, s-bag® Long Performance
or s-bag® Anti-odour.
Replacement of the motor fi lter
Should be done with every 5th replacement of the
dust bag, s-bag®. Never use the vacuum cleaner
without fi lter(s).
28 Open the front lid and lift out the s-bag®.
30ab Flip the fi lter holder forwards and carefully lift
out the dirty fi lter. Replace it with a new fi lter
and fl ip the fi lter holder back into position.
Replace the s-bag® and then close the lid.
Replacement of the exhaust fi lter*
There are three types of exhaust fi lter:
• Microfi lter* (Ref. No. EF 17)
• Hepa H12* non washable (Ref. No. EF H12)
• Hepa H12* washable (can be bought as an option,
Ref. No. EF H12W)
The fi lters must always be replaced with new ones and
cannot be washed (except the Hepa H12* washable).
31 Open the back lid and lift out the fi lter. Replace
it with a new fi lter and close the lid.
vivacontrol1_inlaga.indd 12vivacontrol1_inlaga.indd 12 04-05-12 13.55.4204-05-12 13.55.42
Seite wird geladen ...

14
* Nur bestimmte Modelle. * Certain models only.
33
32
34
35
36
37
38
Reinigung des Schlauches und der Düsen
Der Staubsauger stoppt automatisch, wenn die Düse,
das Rohr, der Schlauch, der Filter oder der s-bag®-
Staubbeutel blockiert ist. Ziehen Sie in solchen Fällen
den Netzstecker und lassen Sie den Staubsauger
20 - 30 Minuten abkühlen. Die Blockierung beseitigen
und/oder den Filter und den s-bag®-Staubbeutel
ersetzen und wieder beginnen.
Rohre und Schläuche
32 Die Rohre und Schläuche mit einem Reinigungs-
band oder Ähnlichem reinigen.
33* Der Schlauchgriff kann zum Reinigen vom
Schlauch abgenommen werden.
34 Es ist auch möglich, die Blockierung im Schlauch
durch Drücken auf den Schlauch zu beseitigen.
Dabei jedoch vorsichtig sein, falls die Blockie-
rung durch Glas oder Nadeln im Schlauch verur-
sacht wurde.
Hinweis: Die Garantie deckt keinerlei durch Reinigung
verursachte Schäden an den Schläuchen ab.
Reinigung der Bodendüse
35 Auf regelmäßige Reinigung der Kombinationsbo-
denbürste achten.
36* Radnabe drücken und Räder abziehen. Staub-
mäuse, Haare und andere verhedderte Objekte
entfernen.
37* Größere Objekte können nach Abnehmen des
Verbindungsschlauchs von der Düse entfernt
werden.
Reinigung der Turbobürste*
38 Düse vom Staubsaugerrohr entfernen und in der
Düse verwickelte Fäden etc. zum Entfernen mit
einer Schere durchschneiden. Mit dem Schlauch-
griff die Düse reinigen.
Deutsch English
Cleaning the hose and nozzle
The vacuum cleaner stops automatically if the nozzle,
tube, hose or fi lters and s-bag® becomes blocked. In
such cases, disconnect from mains and allow to cool
for 20-30 minutes. Clear blockage and/or replace
fi lters and s-bag® and restart.
Tubes and hoses
32 Use a cleaning strip or similar to clear the tubes
and hose.
33* Hose handle could be dismantled from hose if
cleaning is needed.
34 It may also be possible to remove the obstruction
in the hose by squeezing it. However, be careful
in case the obstruction is caused by glass or
needles caught inside the hose.
Note: The warranty does not cover any damage to the
hose caused by cleaning it.
Cleaning the fl oor nozzle
35 Be sure to frequently clean the combination
fl oor nozzle.
36* Press each wheel-hub and draw away the wheels.
Remove dust-balls, hair or other objects that
may be entangled.
37* Larger objects can be accessed by removing the
connection tube from the nozzle.
Cleaning the turbo nozzle*
38 Disconnect the nozzle from the vacuum cleaner
tube and remove entangled threads, etc. by
snipping them away with scissors. Use the hose
handle to clean the nozzle.
vivacontrol1_inlaga.indd 14vivacontrol1_inlaga.indd 14 04-05-12 13.55.4404-05-12 13.55.44
Seite wird geladen ...

16
39
Fehlersuche
• Prüfen, ob das Netzkabel an die Netzsteckdose
angeschlossen ist.
• Prüfen, ob der Stecker und das Kabel nicht beschä-
digt sind.
• Prüfen, ob eine Sicherung durchgebrannt ist.
Der Staubsauger stoppt.
• Prüfen, ob der Staubbeutel s-bag® voll ist. In die-
sem Fall durch einen neuen ersetzen.
• Sind Düse, Rohr oder Schlauch blockiert?
• Sind die Filter blockiert?
Die Fernbedienung* funktioniert nicht
Vermutlich sind die Batterien erschöpft. Frische Batte-
rien einlegen.
Batterieaustausch
39 Erschöpfte Batterien im Griff der Fernbedienung*
wie in der Abbildung gezeigt austauschen. Wir
empfehlen die Verwendung von Alkaline-Batteri-
en.
Hinweis! Batterien nicht im Hausmüll entsorgen. Die
Verkaufsstellen halten für die Rücknahme von Batterien
spezielle, den gesetzlichen Vorgaben entsprechende
Recyclingbehälter bereit.
Wasser ist in den Staubsauger eingedrungen.
Der Motor muss durch den autorisierten AEG-Kun-
dendienst ausgetauscht werden. Durch das Eindringen
von Wasser verursachte Motorschäden sind durch die
Gerätegarantie nicht gedeckt.
Verbraucher-Information
Electrolux übernimmt keine Verantwortung für
Schäden, die durch den unsachgemäßen Einsatz des
Geräts oder unbefugten Eingriff in den Staubsauger
entstehen.
Dieses Produkt wurde mit Rücksicht auf die Umwelt
hergestellt. Alle Plastikteile sind für Recyclingzwecke
markiert. Einzelheiten darüber fi nden Sie in unserer
Website: www.electrolux.com
Wenn Sie irgendwelche Kommentare zum Staubsauger
oder zum Bedienungsanleitungsheft haben, senden Sie
uns bitte eine E-Mail an: fl oorcare@electrolux.com
Wenn Sie Für Ihren Electrolux Staubsauger keine passenden
Staubbeutel oder Zubehör bei Ihrem Händler fi nden sollten, so
erhalten Sie weitere Informationen im Internet unter www.electrolux.
de oder wählen Sie 01801 20 30 60 (Deutsche Telekom / bundesweit
zum Ortstarif).
Für die Schweiz:
Electrolux AG, Kleingeräte, Industriestrasse 10, 5506 Mägenwil
Kundendienst: Tel. 0848 / 899 300, Fax 062 / 889 93 10
E-Mail: [email protected],
www.aeg.ch
Für Österreich:
Husqvarna-Ges.mb.H Nfg. KG, Industriezeile 36, 4010 Linz
Tel. 0732 / 770101-30, Fax 0732 / 772564,
Deutsch English
Troubleshooting
• Check that the cable is connected to the mains.
• Check that the plug and cable are not damaged.
• Check for a blown fuse.
The vacuum cleaner stops
• Check whether the dust bag, s-bag® is full. If so,
replace it with a new one.
• Is the nozzle, tube or hose blocked?
• Are the fi lters blocked?
Remote control* does not operate
The batteries are probably worn out. Replace with new
batteries.
Battery replacement
39 When fl at, replace the batteries in the remote
control handle*, as shown in the picture. We
recommend use of alkaline batteries.
Note! Do not throw away the batteries with household
waste. Discard of them in special recycling containers
and heed local regulations.
Water has entered the vacuum cleaner
It will be necessary to replace the motor at an
authorised AEG service centre. Damage to the motor
caused by the penetration of water is not covered by
the warranty.
Consumer information
AEG decline all responsibility for all damages arising
from any improper use of the appliance or in cases of
tampering with the appliance. This product is designed
with the environment in mind. All plastic parts are
marked for recycling purposes. For details see our web
site: www.aeg.hausgeraete.de
vivacontrol1_inlaga.indd 16vivacontrol1_inlaga.indd 16 04-05-12 13.55.4504-05-12 13.55.45
Seite wird geladen ...
-
 1
1
-
 2
2
-
 3
3
-
 4
4
-
 5
5
-
 6
6
-
 7
7
-
 8
8
-
 9
9
-
 10
10
-
 11
11
-
 12
12
-
 13
13
-
 14
14
-
 15
15
-
 16
16
-
 17
17
-
 18
18


Aeg-Electrolux AV1121 Benutzerhandbuch
- Kategorie
- Staubsauger
- Typ
- Benutzerhandbuch
in anderen Sprachen
- English: Aeg-Electrolux AV1121 User manual
- français: Aeg-Electrolux AV1121 Manuel utilisateur
- español: Aeg-Electrolux AV1121 Manual de usuario
- Nederlands: Aeg-Electrolux AV1121 Handleiding