Kicker 2018 KM Subwoofer Grille Bedienungsanleitung
- Kategorie
- Lautsprecher
- Typ
- Bedienungsanleitung

KM Grille Rejilla KM
KM-Gitter Grille KM
©2017 Stillwater Designs
KICKER products are warranted against defects. Duration and terms of warranty depend on the laws in the
country in which it was purchased. For details see your local KICKER Dealer or www.kicker.com/warranty.
Our goods come with guarantees that cannot be excluded under the Australian Consumer Law. You
are entitled to a replacement or refund for a major failure and for compensation for any other reasonably
foreseeable loss or damage. You are also entitled to have the goods repaired or replaced if the goods fail to
be of acceptable quality and the failure does not amount to a major failure.
Les produits KICKER sont garantis contre les défauts. La durée et les modalités de la garantie dépendent
des lois du pays dans lequel le produit a été acheté. Pour plus d’information veuillez vérifi er auprès de votre
distributeur local KICKER ou visiter le site : www.kicker.com/warranty.
KICKER-Produkte haben eine Garantie gegen Material- und Verarbeitungsfehler. Dauer und Bedingungen
der Garantie hängen von den Gesetzen des Landes ab, in dem sie erworben wurden. Bzgl. Einzelheiten
wenden Sie sich bitte an Ihren örtlichen KICKER-Händler oder besuchen Sie www.kicker.com/warranty
Los productos KICKER están garantizados contra defectos. La duración y los términos de la garantía
dependen de las leyes del país en donde se realizó la compra. Para más detalles consulte a su distribuidor
local de KICKER o visite www.kicker.com/warranty.
KMGrille+C-20171102
1
Color Combinations: Splice and combine the ground wires to yield a
different color.
Combinaciones de color: Empalme y combine los cables a tierra para conseguir un
color diferente.
Farbkombinationen: Verbinden und kombinieren Sie die Masseleiter, um eine andere
Farbe zu erhalten.
Combinaisons de couleurs: raccorder et combiner les fi ls de prise de terre
pour obtenir une couleur différente.
Red | Rojo | Rot | Rouge Red | Rojo | Rot | Rouge
Green | Verde | Grün | Vert Green | Verde | Grün | Vert
Blue | Azul | Blau | Bleu Blue | Azul | Blau | Bleu
Red/Green | Rojo/Verde
Rot/Grün | Rouge/Vert
Lime Green | Verde Limón
Lindgrün | Vert citron
Red/Blue | Rojo/Azul |
Rot/Blau | Rouge/Bleu
Magenta
Blue/Green | Azul/Verde
Blau/Grün | Bleu/Vert
Aquamarine | Aguamarina
Aquamarin | Aigue-marine
Red/Green/Blue | Rojo/Verde/Azul
Rot/Grün/Blau | Rouge/Vert/Bleu
Blue-White | Azul-Blanco
Blau-Weiß | Bleu-blanc
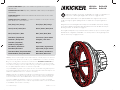
Attach the new grille to the speaker. The KM Grilles use a snap-on confi guration. You
may need to rotate the grille slightly in either direction to engage the teeth.
Coloque la nueva rejilla del altavoz. Las rejillas KM utilizan una confi guración a presión. Es
posible que tenga que girar la rejilla ligeramente en cualquier dirección para enganchar los
dientes.
Bringen Sie den neuen Kühlergrill an den Lautsprecher. Die KM-Gitter sind mit einer Schnap-
pverschlusskonfi guration ausgestattet. Unter Umständen müssen Sie das Gitter leicht in jede
Richtung zu drehen, um die Zähne zu engagieren.
Fixer la grille au haut-parleur en procédant de la même manière que pour son retrait. Les grilles
KM utilisent une confi guration encliquetable. Vous devrez peut-être tourner la grille légèrement
dans les deux sens pour engager les dents.

2
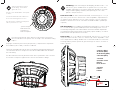
LED Wiring: When hard-wiring the RGB lighting, the black lead is +12V
and the red, green, and blue leads are ground. There are seven colors
available, depending on your wiring confi guration. KICKER recommends
using the KMLC lighting controller (sold separately) for more colors,
patterns, and special effects.
Cableado de LED: Al cablear la iluminación RGB, el terminal negro es +12V y el
rojo, verde y azul son a tierra. Existen siete colores disponibles, dependiendo de
su confi guración de cableado. Para más colores, patrones y efectos especiales,
KICKER recomienda el uso de un controlador de alumbrado KMLC (vendido por
separado).
LED-Verdrahtung: Bei Verkablung der RGB-Beleuchtung gilt: Der schwarze Draht
ist +12V und die roten, grünen und blauen Drähte sind Erdungsdrähte. Je nach
Verdrahtungskonfi guration sind sieben Farben vorhanden. KICKER empfi ehlt die
Verwendung der KMLC-Beleuchtungssteuereinheit (separat erhältlich), um weitere
Farben, Muster und Spezialeffekte zu erhalten.
Câblage LED: en cas de câblage d’éclairage RGB, le fi l noir est à +12V et les fi ls
rouge, vert et bleu sont reliés à la masse. Il existe sept couleurs disponibles, selon
votre confi guration de câblage. KICKER vous recommande d’utiliser la commande
d’éclairage KMLC (vendue séparément) pour davantage de couleurs, de motifs et
d’effets spéciaux.
3
Peel off the protective fi lm on the adhesive for the new back gasket and
place it on the back of the speaker. This also helps cover and hold the wiring
in place.
Despegue el adhesivo para la nueva junta posterior y colóquelo detrás del parlante.
Esto también ayuda a cubrir y mantener el cableado.
Ziehen Sie den Klebestreifen für die neue rückseitige Dichtung ab und platzieren Sie
sie an der Rückseite des Lautsprechers. Dies hilft auch beim Abdecken und Halten
der Verdrahtung.
Décoller l’adhésif du nouveau joint d’étanchéité arrière et positionner celui-ci à l’arrière
de l’enceinte. Cela permet également de couvrir et de maintenir le câblage.
12V
}
3.
4.
1.
1. +12V
2. 2A Fuse (Max)
2A Fusible (Max)
2A Sicherung (Max)
2 A fusible (Max)
3. Ground
Conexión a tierra
Erdung
Prise de terre
4. battery
batería
batteríe
2.
≤7”
(17.5cm)
speaker fl ange
brida del altavoz
Boxenfl ansch
bride haut-parleur
Wrap the LED wiring around the
speaker fl ange. The new back
gasket will cover it.
Envolver rodea el brida alambre. Nueva junta
lo cubrirá.
Wickeln Sie LED-Draht um Boxenfl ansches.
Neue zurück Dichtung Wird es decken.
Enrouler fi l autour de la bride du haut-parleur
LED. Le joint arrière va couvrir.
4
-
 1
1
-
 2
2


Kicker 2018 KM Subwoofer Grille Bedienungsanleitung
- Kategorie
- Lautsprecher
- Typ
- Bedienungsanleitung
in anderen Sprachen
Verwandte Artikel
-
Kicker 2014 KM Coaxial Speakers Bedienungsanleitung
-
-
-
Kicker KMF12 Bedienungsanleitung
-
-
Kicker 2018 KMTC / KMTDC Bedienungsanleitung
-
-
Kicker KMLC Bedienungsanleitung
-
-
Stillwater Designs and Audio KMLC Remote Benutzerhandbuch