
CD Copy Station Pico-4
User's manual
®
To ensure the smooth handling of your warranty please write the serial number of
your device into the box. In the case of warranty you are expected to send it to-
gether with a copy of your invoice to your nearest TEAC sales representative.

• Copyright © 2002, TEAC Deutschland GmbH. All rights re-
served. First edition: March 2002
• Company and product names provided herein are trade-
marks of their respective companies.
• Changes in specifications and features may be made with-
out notice or obligation.

31
ENGLISH
Contents
CONTENTS
INTRODUCTION ............................................................................ 32
IMPORTANT SAFETY PRECAUTIONS.......................................... 32
IMPORTANT (for U.K. Customers) ............................................. 32
IMPORTANT (for U.S.A. Customers) .......................................... 33
For the Consumers in Europe .................................................... 33
1. IMPORTANT SAFETY INSTRUCTIONS ..................................... 34
2. GENERAL DESCRIPTION ......................................................... 37
2.1 Installing the Pico-4 .............................................................. 38
2.2 Components of the Pico-4 ................................................... 38
2.3 Basic Operations .................................................................. 41
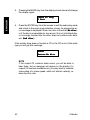
3. MODES ....................................................................................... 43
3.1 Disc Copy ............................................................................. 43
3.2 Test Write Mode.................................................................... 46
3.3 Possible Problems When Copying or in Test Write Mode .... 47
3.4 Compare CD-ROM............................................................... 49
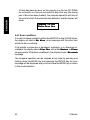
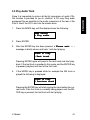
3.5 Play Audio Track ................................................................... 51
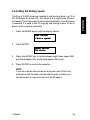
3.6 Setting the Writing Speed .................................................... 53
4. SPECIFICATION ......................................................................... 54
5. TECHNICAL SUPPORT .............................................................. 55
Technical Service Depots (Europe)............................................ 55
WARRANTY ................................................................................... 57

32
ENGLISH
Introduction
INTRODUCTION
The stand-alone CD Copy Station reproduces CDs without the neces-
sity for a PC, additional software packages, or any kind of adapter
cards. It is equipped with four TEAC IDE Writers and an IDE CD-ROM
drive, and so can copy CDs quickly and without any problems – the
data are simply read by the CD-ROM. So: insert the “master CD”, put
the blank CDs into the recorders and start the burn procedure at the
press of a button. It could not be any easier!
IMPORTANT SAFETY PRECAUTIONS
IMPORTANT (for U.K. Customers)
DO NOT cut off the mains plug from this equipment.
If the plug fitted is not suitable for the power points in your home or the
cable is too short to reach a power point, then obtain an appropriate
safety approved extension fead or consult your dealer. If nonetheless
the mains plug is cut off, remove the fuse and dispose the plug imme-
diately, to avoid a possible shock hazard by inadvertent connection to
the mains supply.
If this product is not provided with mains plug, or one has to be fitted,
then follow the instructions given below:
IMPORTANT:
The wires in this mains lead are coloured in accordance with
the following code:
GREEN-AND-YELLOW EARTH
BLUE NEUTRAL
BROWN LIVE
WARNING:
This apparatus must be earthed.
As the colours of the wires in the mains lead of this apparatus may not
correspond with the coloured markings identifying the terminals in your
plug proceed as follows:

33
ENGLISH
The wire which is coloured GREEN-and-YELLOW must be connected
to the terminal in the plug which is marked by the letter E or by the
safety earth symbol or coloured GREEN or GREEN-and-YELLOW.
The wire which is coloured BLUE, must be connected to the terminal
which is marked with the letter N or coloured BLACK.
The wire which is coloured BROWN must be connected to the terminal
which is marked with the letter L, or coloured RED.
When replacing the fuse only a correctly rated approved type should
be used and be sure to re-fit the fuse cover.
IF IN DOUBT – CONSULT AN APPROVED ELECTRICIAN.
IMPORTANT (for U.S.A. Customers)
This equipment has been tested and found to comply with the limits for
a Class A digital device, pursuant to Part 15 of the FCC Rules. These
limits are designed to provide reasonable protection against harmful
interference when the equipment is operated in a commercial environ-
ment. This equipment generates, uses, and can radiate radio frequency
energy and, if not installed and used in accordance with the instruction
manual, may cause harmful interference to radio communications.
Operation of this equipment in a residental area is likely to cause harmful
interference in which case the user will be required to correct the inter-
ference at his own expense.
CAUTION
Changes or modifications to this equipment not expressly
approved by TEAC Deutschland GmbH for compliance could
void the users authority to operate this equipment.
For the Consumers in Europe
WARNING
This is a Class A product in a domestic environment. This
product may cause radio interference in which case the user
may be required to take adequate measures.
Important Safety Precautions

34
ENGLISH
1. IMPORTANT SAFETY INSTRUCTIONS
CAUTION:
– Read all of these instructions.
– Save these Instructions for later use.
– Follow all warnings and instructions later on the audio equip-
ment.
1) Read Instructions – All the safety and operating instructions should
be read before the product is operated.
2) Retain Instructions – The safety and operating instructions should
be retained for future reference.
3) Head warnings – All warnings on the product and in the operating
instructions should be adhered to.
4) Follow Instructions – All operating and use instructions should be
followed.
5) Cleaning – Unplug this product from the wall outlet before cleaning.
Do not use liquid cleaners or aerosol cleaners. Use a damp cloth for
cleaning.
6) Attachments – Do not use attachments not recommended by the
product manufacturer as they may cause hazards.
7) Water and Moisture – Do not use this product near water – for
example near bath rub, wash bowl, kitchen sink, or laundry tab, in a
wet basement; or near a swimming pool; and the like.
8) Accessories – Do not place this product on an unstable cart, stand,
tripod, bracket, or table. The product may fall, causing serious injury to
persons, and serious damage to the product. Use only with a cart,
stand, tripod, bracket, or table recommended by the manufacturer, or
sold with the product. Any mounting of the product should follow the
manufacturer’s instructions, and should use a mounting accessory rec-
ommended by the manufacturer.
9) A product and cart combination should be moved with care. Quick
stops, excessive force, and uneven surfaces may cause the product
and cart combination to overturn.
1. Important Safety Instructions

35
ENGLISH
10) Ventilation – Slots and openings in the cabinet are provided for
ventilation and to ensure reliable operation of the product and to pro-
tect it from overheating, and these openings must not be blocked or
covered. The openings should never be blocked by placing the product
on a bed, sofa, rug, or other similiar surface. This product should not be
placed in a built-in installation such as a bookcase or rack unless proper
ventilation is provided or the manufacturer’s instructions have been
adhered on.
11) Power Sources – This product should be operated only from the
type of power source indicated on the marking label. If you are not sure
of the type of power supply to your home, consult your product dealer
or your local power company.
12) Grounding or Polarization – This product may be equipped with
a polarized alternating-current line plug (a plug having one blade wider
than the other). This plug will fit into the power outlet only one way. This
is a safety feature. If you are unable to insert the plug fully into the
outlet, try reversing the plug. If the plug should still fail to fit, contact
your electrician to replace your obsolete outlet. Do not defeat the safety
purpose of the polarized plug.
13) Power-Cord Protection – Power-supply cords should be routed
so that they are not likely to be walked on or pinched by items placed
upon or against them, paying particular attention to cords at plugs,
convenience receptacles and the point where they exit from the prod-
uct.
14) Lightning – For added protection for this product during a light-
ning storm, or when it is left unattended and unused for long periods of
time, unplug it from the wall outlet and disconnect the cables system.
This will prevent damage to the product due to lightning and power-line
surges.
15) Overloading – Do not overload wall outlets, extension cords, or
integral convenience receptacles as this can result in the risk of fire or
electric shock.
16) Object and Liquid Entry – Never push objects of any kind into this
product through openings as they may touch dangerous voltage points
or short-out parts that could result in a fire or electric shock. Never spill
liquid of any kind on the product.
1. Important Safety Instructions

36
ENGLISH
1. Important Safety Instructions
17) Servicing – Do not attempt to service this product yourself as
opening or removing covers may expose you to dangerous voltage or
other hazards. Refer all servicing to qualified service personnel.
18) Damage Requiring Service – Unplug this product from the wall
outlet and refer servicing to qualified service personnel under the fol-
lowing conditions:
a) When the power supply cord or plug is damaged.
b If liquid has been spilled, or objects have fallen into the product.
c) If the product has been exposed to rain or water.
d) If the product does not operate normally by following the operating
instructions. Adjust only those controls that are covered by the op-
erating instructions as an improper adjustment of other controls may
result in damage and will often require extensive work by a qualified
technician to restore the product to its normal operation.
e) If the product has been dropped or damaged in any way.
f) When the product exhibits a distinct change in performance – this
indicates a need for service.
19) Replacement Parts – When replacement parts are required, be
sure the service technician has used replacement parts specified by
the manufacturer or have the same characteristics as the original part.
Unauthorized substitutions may result in fire, electric shocks, or other
hazards.
20) Safety check – Upon completion of any service or repairs to this
product, ask the service technician to perform safety checks to deter-
mine that the product is in proper operating condition.
21) Heat – The product should be situated away from heat sources
such as radiators, heat registers, stoves, or other products (including
amplifiers) that produce heat.

37
ENGLISH
2. GENERAL DESCRIPTION
The Pico-4 CD duplicator provides you with a quick and simple method
of copying your original audio material in CD format at more than real-
time speeds, using easily-obtainable, low-cost CD-R and CD-RW me-
dia, with no auxiliary equipment or computer system required. It it es-
pecially useful for duplicating material produced using the TEAC CD
Writer series on CD-R media. The Pico-4 can also be used to duplicate
CD-ROM material of which you own copyright or for which you have
appropriate permission.
NOTE
This product is designed to aid professional users in publishing
small CD-based circulations. To copy and distribute CDs you
have to own the copyright, or the permission from the copyright
owner or the rightful licensor. Unless you own the copyright, or
have obtained the appropriate permission from the copyright
owner or the rightful licensor, your unauthorized recording, re-
production or distribution thereof, may result in severe civil and
criminal penalties under copyright laws and international copy-
right treaties. If you are uncertain about your rights, contact
your legal advisor. Under no circumstances will TEAC
Deutschland GmbH be responsible for any consequences of
any illegal copying performed using the Pico-4.
Depending on the quality of the source CD, it is possible to copy mate-
rial at up to eight times the real-time rate (selectable from the front
panel), making it convenient for rapid duplication of a number of iden-
tical discs, etc.
Please consider that it is impossible to copy UDF-CDs (Incremental
Packet Writing). Please consider also that copying of CDs with copy
protection or scratched surface may be impossible.
2. General Description

38
ENGLISH
NOTE
Although the operation of the Pico-4 is relatively straightfor-
ward, we strongly suggest that you read this manual before
starting operations. There are a few factors affecting the pro-
duction of CD-R discs using the Pico-4 which may not be im-
mediately obvious.
2.1 Installing the Pico-4
There are no connections to be made to and from the Pico-4 other
than the power connection on the rear Panel, as the unit is completely
self-contained.
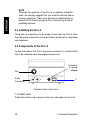
2.2 Components of the Pico-4
On the rear side of the Pico-4 the power connector is located which
has to be connected with the shipped power cord.
2. General Description
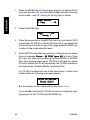
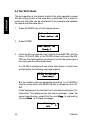
➀ POWER switch
Press this switch once to power on the unit, and again to turn it off.
The Rear Panel of the Pico-4
Fan
Audio
Connector
➀
I
0
Connector
for power
adapter

39
ENGLISH
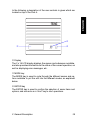
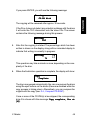
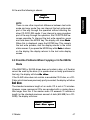
In the following a description of the user controls is given which are
located on top of the Pico-4.
➁ Display
The 2 x 16 LCD display displays the menus and submenus available,
and also provides information on the status of the current operation, as
well as displaying error messages, etc.
➂ MODE key
The MODE key is used to cycle through the different menus and op-
tions available to put the unit into the different modes, as explained
below.
➃ ENTER key
The ENTER key is used to confirm the selection of menu items and
options, and also acts as a ‘’start’’ key to start operations.
2. General Description
➁
➂
➃
MODE
ENTER

40
ENGLISH
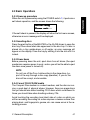
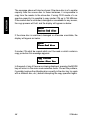
In the following a description of the user controls is given which are
located on the front of the Pico-4.
2. General Description
➄
➅
➄ MASTER drive
The MASTER drive is used to hold the source CD. This may be a pre-
recorded audio CD or CD-ROM which you have permission to copy, or
a CD-R disc. The eject button is used to eject the master disc when no
operation is in progress. The indicator on this drive shows when the
disc is being accessed. In the “Play audio” mode (see 3.5 “Play Audio
Track ”), a prerecorded CD may be inserted into this drive, and played
back, track by track.
➅ SLAVE drive
The SLAVE drive holds the destination CD. This must be a CD-R or
CD-RW disc. The eject button is used to eject the slave disc when no
operation is in progress. The indicator on this drive shows when the
disc is being accessed for reading or writing.
NOTE
If a disc is in a drive and cannot be removed by using the eject
button, you can insert a thin stiff wire (such as the end of a
paperclip) into the hole on the front panel of the drive (under
the tray). This will open the tray.

41
ENGLISH
2.3 Basic Operations
2.3.1 Power-up procedure
When the unit is powered up using the POWER switch ➀, it performs a
self-check operation, and the screen shows the following:
If the self-check is passed, the display will show the first menu screen,
otherwise an error message will be displayed.
2.3.2 Inserting discs
Press the eject button of the MASTER or the SLAVE drives to open the
disc tray. Place discs label side uppermost in the disc tray. If a disc is
placed into a tray upside-down or off-center, an error message will
appear on the display. Close the tray by shifting it into the slot until it is
locked.
2.3.3 Power down
Before powering down the unit, eject discs from all drives (the eject
mechanism requires power to work, and so you will not be able to eject
the discs once power is turned off).
NOTE
Do not turn off the Pico-4 while writing to the slave discs (i.e.,
part of the way through a disc copy operation). If you do, the
disc will be corrupt, and unusable.
2.3.4 Care of CD-R/CD-RW media
The Compact Disc medium is a robust medium, and the disc can sur-
vive a good deal of physical abuse. However, there are precautions
that you should take when handling CD-R discs which are different to
those you should take when handling ordinary CDs.
Avoid touching the recording (non-label) side of a disc on which you
will be recording. Recording on a disc requires a cleaner surface than
playing back, and fingerprints, grease, etc. can cause errors in the re-
cording process.
2. General Description
InitializingInitializing
InitializingInitializing
Initializing
Please wait...Please wait...
Please wait...Please wait...
Please wait...

42
ENGLISH
CD-R discs are more sensitive to the effects of heat than ordinary CDs.
It is important that they are not stored in a location where direct sun-
light will fall on them, and which is away from sources of heat such as
radiators or heat-generating electrical devices.
Always, store CD-R discs in their „jewel cases“ to avoid dirt and dust
accumulating on their surfaces.
When labeling CD-R discs, always use a soft felt-tipped pen to write
the information. Never use a ballpoint or hard-lipped pen, as this may
cause damage to the recorded side.
Dirty discs may be cleaned using a soft dry cloth and/or a commerial
CD cleaning fluid or ethyl alcohol.
Do not use thinner, gasoline, benzene or LP cleaning fluid, as these
will damage the disc. If you are in any doubt as to the care and han-
dling of a CD-R disc, read the precautions supplied with the disc, or
contact the disc manufacturer directly.
2.3.5 Discs recommended for use with the Pico-4
The best results and the highest performance are ensured when using
TEAC write-once CD-R media respectively CD-RW media.
Your dealer will tell you the sources of those CD-Rs/CD-RWs.
2. General Description

43
ENGLISH
3. MODES
The different modes available are:
– Copy
– Test write
– Compare CD-ROM
– Play audio
– Write speed selection
These are accessed by pressing the MODE key. Details of these modes
are given below.
When the required mode is shown on the top line of the display press
the ENTER key to enter the mode. When the word „Exit“ appears on
the display, the ENTER key will halt the current operation.
3.1 Disc Copy
NOTE
You should own the copyright, or have obtained the appropri-
ate permission from the copyright owner or the rightful licen-
sor, your unauthorized recording, reproduction or distribution
thereof, may result in severe civil and criminal penalties under
copyright laws and international copyright treaties
This procedure copies the material from the disc (either an audio CD
or a CD-ROM) in the MASTER drive to the CD-Rs/CD-RWs in the
SLAVE drives. You may find it useful to test the copy procedure before
committing yourself to an actual copy, however. See 3.2, „Test Write
Mode“ for details.
NOTES
Once a copy operation has started, it cannot be stopped be-
fore the disc has been finalized. The only way to stop a copy
operation is to turn off the power to the unit. However, this will
make the CD-R/CD-RW disc useless for any purpose. Do not
use warped discs or discs with off-center holes with the Pico-
4. While the copy operation is in progress, make sure that the
Pico-4 is not subjected to vibration or mechanical shocks.
3. Modes

44
ENGLISH
1. Press the MODE key until the display appears as below (the 8x
may also read 4x or 2x, and indicates the speed at which the copy
will be made – see 3.6 „Setting the Writing Speed“ below).
2. Press the ENTER key.
3. Place the source disc in the MASTER disc tray, and a blank CD-R
respectively CD-RW disc in the SLAVE disc tray. If you decide that
you do not want to make a copy at this stage, press the MODE key
to return to the mode selection menu.
4. Press ENTER to start the copy operation. If the trays are not closed
the error message „
Error, ## TRAY Open ##Error, ## TRAY Open ##
Error, ## TRAY Open ##Error, ## TRAY Open ##
Error, ## TRAY Open ##“ is shown. Close
the trays and continue by pressing the keys MODE or ENTER.
Start the copying process again. The Pico-4 will read the master
CD and it checks the CD-Rs respectively the CD-RWs inserted in
the slave drives (Checking Media, Cheching Data).
If a CD-RW is inserted into one of the slave drives to which was
written before the following message appears:
N is the number of the corresponding slave drive 1 to 4.
If you will not overwrite the CD-RW you have to cancel the copy-
ing process for this CD-RW with the MODE key.
Copy : 8XCopy : 8X
Copy : 8XCopy : 8X
Copy : 8X
Ready ? Ready ?
Ready ? Ready ?
Ready ?
Mode selectMode select
Mode selectMode select
Mode select
1 Copy : 8X1 Copy : 8X
1 Copy : 8X1 Copy : 8X
1 Copy : 8X
3. Modes
CD-RW in driveNCD-RW in driveN
CD-RW in driveNCD-RW in driveN
CD-RW in driveN
Erase disk? Erase disk?
Erase disk? Erase disk?
Erase disk?

45
ENGLISH
If you press ENTER, you will see the following message:
The copying will be resumed after approx. 30 seconds.
If the Pico-4 does not detect any potential problems with the discs
it will write the TOC information onto the slave CDs. The screen
contains the following message during this process:
5. After this the copying is started. The percentage which has been
written is shown on the display, along with an animated display to
indicate that writing is currently in progress:
This operation may take a minute or more, depending on the com-
plexity of the disc.
6. When the finalization operation is complete, the display will show:
The trays are opened automatically. You can now remove the discs
using the eject buttons on the drives (these are disabled while the
copy process is taking place). Alternatively, you can compare the
original with the copy (see: 3.4. „Compare CD-ROM“).
If one or more of the CD-RW(s) is/are skipped, the corresponding
drive N is shown with this message:
Copy complete, Err atCopy complete, Err at
Copy complete, Err atCopy complete, Err at
Copy complete, Err at
[N][N]
[N][N]
[N].
ErasingErasing
ErasingErasing
Erasing
CD-RW disk CD-RW disk
CD-RW disk CD-RW disk
CD-RW disk
WritingWriting
WritingWriting
Writing
TOC TOC
TOC TOC
TOC
Writing Writing
Writing Writing
Writing
7% 7%
7% 7%
7%
CopyCopy
CopyCopy
Copy
Complete Complete
Complete Complete
Complete
3. Modes

46
ENGLISH
3.2 Test Write Mode
The test operation is functionally similar to the write operation, except
that the writing of data to the slave disc is simulated. This is useful to
make sure that data can be transferred at the selected rate between
the master and the slave discs.
1. Press the MODE key until the display shows:
2. Press ENTER
3. Insert the disc into the disc tray (original in the MASTER, and the
blank CD-Rs/CD-RWs in the SLAVE drives) and press the EN-
TER key. The test operation continues in exactly the same way as
the copy operation described above.
If a CD-RW is inserted into one of the slave drives to which was
written before the following message appears:
N is the number of the corresponding slave drive 1 to 4. ENTER is
used to accept while with MODE the test is skipped for this CD-
RW.
At the beginning of the test the Pico-4 simulates writing the TOC
information. The display shows the same messages under the
same circumstances, except that the word
Copy Copy
Copy Copy
Copy is replaced by
the word
Test Test
Test Test
Test in all these messages.
Mode selectMode select
Mode selectMode select
Mode select
2 Test write: 8X2 Test write: 8X
2 Test write: 8X2 Test write: 8X
2 Test write: 8X
Test write: 8XTest write: 8X
Test write: 8XTest write: 8X
Test write: 8X
Ready ? Ready ?
Ready ? Ready ?
Ready ?
3. Modes
CD-RW in driveNCD-RW in driveN
CD-RW in driveNCD-RW in driveN
CD-RW in driveN
Continue? Continue?
Continue? Continue?
Continue?
Test Writing Test Writing
Test Writing Test Writing
Test Writing
36% 36%
36% 36%
36%

47
ENGLISH
At the end the following is shown:
NOTE
There is one other important difference between test write
mode and copy mode. You can interrupt the test write mode
part of the way through the operation without affecting the
slave CD-R/CD-RW media. If you interrupt a copy procedure
part of the way through the operation, the CD-R/CD-RW be-
comes unusable. To interrupt the test write operation, press
and hold down the MODE key. The display will show
ExitExit
ExitExit
Exit.
When this is displayed, press the ENTER key. This cancels
the test write process, and the display returns to the initial
status screen. If you press the MODE key while
ExitExit
ExitExit
Exit is shown
on the display, the display returns to the test write display
screen.
3.3 Possible Problems When Copying or in Test Write
Mode
If the MASTER or SLAVE drives does not contain a disc, or if the disc
cannot be read by the drive (it is upside-down or badly positioned in
the tray), the display will show
No discNo disc
No discNo disc
No disc.
If the SLAVE drive does not contain a recordable CD-R disc, or a CD-
R disc which has been previously partly recorded, the display will show
Bad discBad disc
Bad discBad disc
Bad disc.
The standard maximum length of an audio CD is set at 74 minutes.
However, some commercial CDs are recorded with a running time a
little longer than this. If the master audio CD exceeds 74 minutes in
length (or the standard maximum amount of data (650 MB) for a CD-
ROM), the display will show:
Test writeTest write
Test writeTest write
Test write
Complete Complete
Complete Complete
Complete
3. Modes
Master:Insuffi-Master:Insuffi-
Master:Insuffi-Master:Insuffi-
Master:Insuffi-
cient disc spacecient disc space
cient disc spacecient disc space
cient disc space

48
ENGLISH
The message above will also be shown if the slave disc is of a smaller
capacity than the source disc. In these instances, it is impossible to
copy from the master to the slave disc. If using CD-R media of a re-
spective capacitiy it is possible to copy master CDs up to 700 MB also.
If the master disc is scratched, damaged or unreadable for any reason,
the copy process will halt, and the display will appear as below.
If the slave disc is scratched, damaged or otherwise unwritable, the
display will appear as below.
If master CDs shall be copied which can’t be read or which contain a
copy protection this message appears:
In the event of any of these errors being displayed, pressing the MODE
key will return to the main mode selection menu. Correct the problem,
if possible (replace the offending disc correctly in the disc tray, try again
with a different disc, etc.) before attempting the copy operation again.
ErrorError
ErrorError
Error
Master:Bad discMaster:Bad disc
Master:Bad discMaster:Bad disc
Master:Bad disc
ErrorError
ErrorError
Error
Slave:Bad discSlave:Bad disc
Slave:Bad discSlave:Bad disc
Slave:Bad disc
3. Modes
Copy failedCopy failed
Copy failedCopy failed
Copy failed
Master:Disc ErrMaster:Disc Err
Master:Disc ErrMaster:Disc Err
Master:Disc Err
Seite laden ...
Seite laden ...
Seite laden ...
Seite laden ...
Seite laden ...
Seite laden ...
Seite laden ...
Seite laden ...
Seite laden ...
Seite laden ...
Seite laden ...
Seite laden ...
Seite laden ...
Seite laden ...
-
 1
1
-
 2
2
-
 3
3
-
 4
4
-
 5
5
-
 6
6
-
 7
7
-
 8
8
-
 9
9
-
 10
10
-
 11
11
-
 12
12
-
 13
13
-
 14
14
-
 15
15
-
 16
16
-
 17
17
-
 18
18
-
 19
19
-
 20
20
-
 21
21
-
 22
22
-
 23
23
-
 24
24
-
 25
25
-
 26
26
-
 27
27
-
 28
28
-
 29
29
-
 30
30
-
 31
31
-
 32
32
-
 33
33
-
 34
34


TEAC Pico-4 Benutzerhandbuch
- Typ
- Benutzerhandbuch
- Dieses Handbuch ist auch geeignet für
in anderen Sprachen
- English: TEAC Pico-4 User manual