
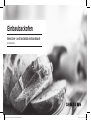
Built-in Oven
User & installation manual
NV75N7647RS
NV75N7647RS_EU_DG68-01056B-02_EN+DE.indb 1 2020-10-29 오후 8:27:39

2 English
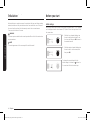
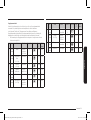
Contents
ContentsContents
Using this manual 3
The following symbols are used in this User Manual: 3
Safety instructions 3
Important safety precautions 3
Correct Disposal of This Product (Waste Electrical & Electronic Equipment) 6
Auto energy saving function 6
Installation 7
What’s included 7
Prepare to install the oven 8
Power connection 8
Cabinet mount 8
Before you start 10
Initial settings 10
New oven smell 11
Smart safety mechanism 11
Accessories 11
Flexible Door 13
Mechanical lock (applicable models only) 14
Dual cook mode 14
Operations 15
Control panel 15
Common settings 16
Cooking modes (except for grill) 19
Cooking modes (grill) 21
Dual cook mode temperature setting range 22
To stop cooking 23
Special function 23
Auto cook 24
Steam cleaning 25
Timer 26
Sound on/off 26
Wi-Fi on/off 26
Using the smart control feature 26
Cooking smart 27
Manual cooking 27
Auto cook programmes 33
Test dishes 39
Collection of frequent auto cook recipes 40
Maintenance 43
Cleaning 43
Detaching the door 45
Replacement 46
Troubleshooting 46
Checkpoints 46
Information codes 48
Technical specications 49
Appendix 50
Product data sheet 50
NV75N7647RS_EU_DG68-01056B-02_EN+DE.indb 2 2020-10-29 오후 8:27:39

English 3
Using this manual
Safety instructions
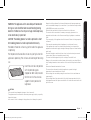
Thank you for choosing SAMSUNG Built-In Oven.
This User Manual contains important information on safety and instructions
intended to assist you in the operation and maintenance of your appliance.
Please take the time to read this User Manual before using your oven and keep
this book for future reference.
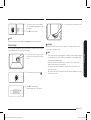
The following symbols are used in this User Manual:
WARNING
Hazards or unsafe practices that may result in severe personal injury, death and/
or property damage.
CAUTION
Hazards or unsafe practices that may result in personal injury and/or property
damage.
NOTE
Useful tips, recommendations, or information that helps users manipulate the
product.
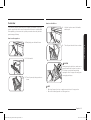
Installation of this oven must be performed only by a licensed electrician. The
installer is responsible for connecting the appliance to the mains power supply in
observance of the relevant safety recommendations.
Important safety precautions
WARNING
This appliance is not intended for use by persons (including
children) with reduced physical, sensory or mental capabilities,
or lack of experience and knowledge, unless they have
been given supervision or instruction concerning use of the
appliance by a person responsible for their safety.
Children should be supervised to ensure that they do not play
with the appliance.
The means for disconnection must be incorporated in the xed
wiring in accordance with the wiring rules.
This Appliance should be allowed to disconnection from the
supply after installation. The disconnection may be achieved by
having the plug accessible or by incorporating a switch in the
xed wiring in accordance with the wiring rules.
Using this manual
NV75N7647RS_EU_DG68-01056B-02_EN+DE.indb 3 2020-10-29 오후 8:27:39

4 English
Safety instructions
Safety instructions
Do not use harsh abrasive cleaners or sharp metal scrapers to
clean the oven door glass since they can scratch the surface,
which may result in shattering of the glass.
If this appliance has cleaning function, excess spillage must be
removed before cleaning and all utensils should not be left in
the oven during steam cleaning or self cleaning. The cleaning
function depends on the model.
If this appliance has cleaning function, during cleaning
conditions the surfaces may get hotter than usual and children
should be kept away. The cleaning function depends on the
model.
Only use the temperature probe recommended for this oven.
(Meat probe model only)
A steam cleaner is not to be used.
WARNING: Ensure that the appliance is switched off before
replacing the lamp to avoid the possibility of electric shock.
The appliance must not be installed behind a decorative door in
order to avoid overheating.
If the supply cord is damaged, it must be replaced by the
manufacturer, its service agent or similarly qualied persons in
order to avoid a hazard.
The method of xing stated is not to depend on the use of
adhesives since they are not considered to be a reliable xing
means.
This appliance can be used by children aged from 8 years and
above and persons with reduced physical, sensory or mental
capabilities or lack of experience and knowledge if they have
been given supervision or instruction concerning use of the
appliance in a safe way and understand the hazards involved.
Children shall not play with the appliance. Cleaning and user
maintenance shall not be made by children without supervision.
Keep the appliance and its cord out of reach of children less
than 8 years.
During use the appliance becomes hot. Care should be taken to
avoid touching heating elements inside the oven.
WARNING: Accessible parts may become hot during use. Young
children should be kept away.
NV75N7647RS_EU_DG68-01056B-02_EN+DE.indb 4 2020-10-29 오후 8:27:39

English 5
Safety instructions
Repairs should be performed by a licensed technician only. Improper repair may
result in considerable danger to you and others. If your oven needs repair, contact
a SAMSUNG Service center or your dealer.
Electrical leads and cables should not be allowed to touch the oven.
The oven should be connected to the mains power supply by means of an
approved circuit breaker or fuse. Never use multiple plug adapters or extension
leads.
The power supply of the appliance should be turned off when it is being repaired
or cleaned.
Take care when connecting electrical appliances to sockets near the oven.
If this appliance has a vapour or steam cooking function, do not operate this
appliance when the water supply cartridge is damaged. (Vapour or steam function
model only)
When the cartridge is cracked or broken, do not use it and contact your nearest
service center. (Vapour or steam function model only)
This oven has been designed only for the cooking of household foods.
During use, the oven interior surfaces become hot enough to cause burns. Do not
touch heating elements or interior surfaces of the oven until they have had time to
cool.
Never store ammable materials in the oven.
The oven surfaces become hot when the appliance is operated at a high
temperature for an extended period of time.
When cooking, take care when opening the oven door as hot air and steam can
escape rapidly.
When cooking dishes that contain alcohol, the alcohol may evaporate due to the
high temperatures and the Vapour can catch re if it comes into contact with a hot
part of the oven.
WARNING: The appliance and its accessible parts become hot
during use. Care should be taken to avoid touching heating
elements. Children less than 8 years of age shall be kept away
unless continuously supervised.
CAUTION: The cooking process has to be supervised. A short
term cooking process has to be supervised continuously.
The door or the outer surface may get hot when the appliance
is operating.
The temperature of accessible surfaces may be high when the
appliance is operating. The surfaces are liable to get hot during
use.
Insert the wire rack into position
with the protruding parts
(stoppers on both sides) towards
the front so that the wire rack
supports the rest position for
large loads.
CAUTION
If the oven has been damaged in transport, do not connect it.
This appliance must be connected to the mains power supply only by a specially
licensed electrician.
In the event of a fault or damage to the appliance, do not attempt to operate it.
NV75N7647RS_EU_DG68-01056B-02_EN+DE.indb 5 2020-10-29 오후 8:27:39

6 English
Safety instructions
Safety instructions
For your safety, do not use high-pressure water cleaners or steam jet cleaners.
Children should be kept at a safe distance when the oven is in use.
Frozen foods such as pizzas should be cooked on the big grid. If the baking tray is
used, it may become deformed due to the great variation in temperatures.
Do not pour water into the bottom of the oven when it is hot. This could cause
damage to the enamel surface.
The oven door must be closed during cooking.
Do not line the bottom of the oven with aluminum foil and do not place any baking
trays or tins on it. The aluminum foil blocks the heat, which may result in damage
to the enamel surfaces and cause poor cooking results.
Fruit juices will leave stains, which can become permanent on the enamel surfaces
of the oven.
When cooking very moist cakes, use the deep pan.
Do not rest bakeware on the open oven door.
Keep children away from the door when opening or closing it as they may bump
themselves on the door or catch their ngers in the door.
Do not step, lean, sit or place heavy items on the door.
Do not open the door with unnecessarily strong force.
WARNING: Do not disconnect the appliance from the main power supply even after
the cooking process is completed.
WARNING: Do not leave the door open while oven is cooking.
Correct Disposal of This Product (Waste Electrical & Electronic
Equipment)
(Applicable in countries with separate collection systems)
This marking on the product, accessories or literature
indicates that the product and its electronic accessories
(e.g. charger, headset, USB cable) should not be disposed
of with other household waste at the end of their working
life. To prevent possible harm to the environment or human
health from uncontrolled waste disposal, please separate
these items from other types of waste and recycle them
responsibly to promote the sustainable reuse of material
resources.
Household users should contact either the retailer where
they purchased this product, or their local government
ofce, for details of where and how they can take these
items for environmentally safe recycling.
Business users should contact their supplier and check the
terms and conditions of the purchase contract. This product
and its electronic accessories should not be mixed with
other commercial wastes for disposal.
For information on Samsung’s environmental commitments and product-specic
regulatory obligations, e.g. REACH, WEEE, Batteries, visit :
samsung.com/uk/aboutsamsung/samsungelectronics/corporatecitizenship/data_
corner.html
Auto energy saving function
• If no user input is made for a certain time while the appliance is operating, the
appliance stops operation and goes to Standby state.
• Light : During cooking process, you can switch off Oven lamp by pressing
‘Oven light’ button. For energy saving, the oven lighting is switched off a few
minutes after cooking program has started.
NV75N7647RS_EU_DG68-01056B-02_EN+DE.indb 6 2020-10-29 오후 8:27:40

English 7
Installation
Installation
WARNING
This oven must be installed by a qualied technician. The installer is responsible
for connecting the oven to the main power, while observing the relevant safety
regulations of your area.
What’s included
Make sure all parts and accessories are included in the product package. If you
have a problem with the oven or accessories, contact a local Samsung customer
centre or the retailer.
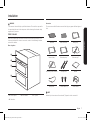
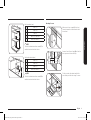
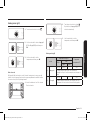
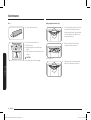
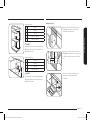
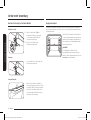
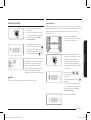
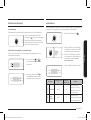
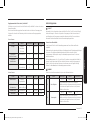
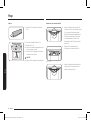
Oven at a glance
01
02
04
03
01 Control panel 02 Door handle 03 Up door
04 Main door
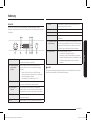
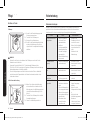
Accessories
The oven comes with different accessories that help you prepare different types of
food.
Wire rack Wire rack insert * Baking tray *
Universal tray * Extra-deep tray * Rotisserie spit *
Rotisserie spit and Shashlik *
Telescopic rail * Divider
Meat probe * 2 screws (M4 L25) Install Handle
NOTE
Availability of accessories with an asterisk (*) depends on the oven model.
NV75N7647RS_EU_DG68-01056B-02_EN+DE.indb 7 2020-10-29 오후 8:27:42

8 English
Installation
Installation
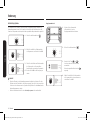
Prepare to install the oven
Phillips Screwdriver Drill
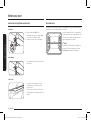
Power connection
01 02 03
L N
01 BROWN or BLACK
02 BLUE or WHITE
03 YELLOW and GREEN
Plug the oven into an electrical socket. If
a plug-type socket is not available due to
allowable current limitations, use a multi-
pole isolator switch (with at least 3 mm
spacing in-between) in order to meet safety
regulations. Use a power cord of sufcient
length that supports the specication H05
RR-F or H05 VV-F, min. 1.5-2.5 mm².
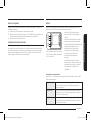
Rated current(A) Minimum cross-sectional area
10 < A ≤ 16 1.5 mm
2
16 < A ≤ 25 2.5 mm
2
Check the output specications on the label attached to the oven.
Open the rear cover of the oven using a screwdriver, and remove the screws on
the cord clamp. Then, connect the power lines to the relevant connection terminals.
The ( )-terminal is designed for earthgrounding. First connect the yellow
and green lines (earthgrounding), which must be longer than the others. If
you use a plug-type socket, the plug must remain accessible after the oven is
installed. Samsung is not responsible for accidents caused by missing or faulty
earthgrounding.
WARNING
Do not step on or twist the wires during installation, and keep them away from
heat-emitting parts of the oven.
Cabinet mount
If installing the oven in a built-in cabinet, the cabinet must have its plastic surfaces
and adhesive parts resistant up to 90 °C. Samsung is not responsible for damage to
furniture from the oven’s heat emission.
The oven must be properly ventilated. For ventilation, leave a gap of about 50 mm
between the lower shelf of the cabinet and the supporting wall. If you install the
oven under a cooktop, follow the cooktop’s installation instructions.
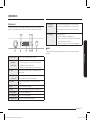
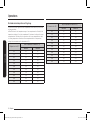
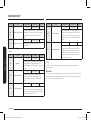
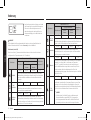
Required Dimensions for Installation
D
E
C
B
A
L
K
J
I
F
H
G
Oven (mm)
A 560 G Max. 506
B 175 H Max. 494
C 370 I 21
D Max. 50 J 549
E 595 K 572
F 595 L 550
NV75N7647RS_EU_DG68-01056B-02_EN+DE.indb 8 2020-10-29 오후 8:27:43

English 9
Installation
D
C
B
A
E
Built-in cabinet (mm)
A Min. 550
B Min. 560
C Min. 50
D Min. 590 - Max. 600
E Min. 460 x Min. 50
NOTE
The built-in cabinet must have vents (E) to
ventilate heat and circulate the air.
D
C
B
A
Under-sink cabinet (mm)
A Min. 550
B Min. 560
C Min. 600
D Min. 460 x Min. 50
NOTE
The built-in cabinet must have vents (D) to
ventilate heat and circulate the air.
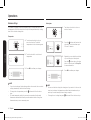
Mounting the oven
A
Make sure to leave a gap (A) of at least
5 mm between the oven and each side of
the cabinet.
B
Secure at least 3 mm of gap (B) so that the
door opens and closes smoothly.
Fit the oven into the cabinet and x the
oven rmly on both sides using 2 screws.
NV75N7647RS_EU_DG68-01056B-02_EN+DE.indb 9 2020-10-29 오후 8:27:44

10 English
Before you start
Before you startInstallation
After installation is complete, remove the protective lm, tape, and other packing
material, and take out the provided accessories from inside the oven. To remove
the oven from the cabinet, rst disconnect power to the oven and remove
2 screws on both sides of the oven.
WARNING
The oven requires ventilation for normal operation. Do not block the vents under
any circumstance.
NOTE
The actual appearance of the oven may differ with the model.
Before you start
Initial settings
When you power on the oven for the rst time, the default time of “12:00” appears
on the display where the hour element (“12”) blinks. Follow the steps below to set
the current time.
1. With the hour element blinking, turn
the value dial (right-sided dial) to set
the hour, and then press OK to move to
the minute element.
2. With the minute element blinking, turn
the value dial to set the minute, and
then press OK.
To change the current time after this
initial setting, hold down the button for
3 seconds and follow the above steps.
NV75N7647RS_EU_DG68-01056B-02_EN+DE.indb 10 2020-10-29 오후 8:27:45

English 11
Before you start
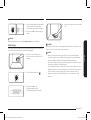
New oven smell
Before using the oven for the rst time, clean inside the oven to remove the new
oven smell.
1. Remove all accessories from inside the oven.
2. Run the oven with Convection 200 °C or Conventional 200 °C for an hour. This
will burn any remaining production substances in the oven.
3. When complete, turn off the oven.
Smart safety mechanism
If you open the door while the oven is operating, the oven light turns on and
both the fan and the heating elements stop operation. This is to prevent physical
injuries such as burns as well as to prevent unnecessary energy loss. When this
happens, simply close the door and the oven continues to operate normally
because this is not a system failure.
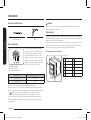
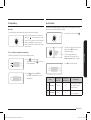
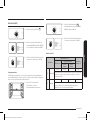
Accessories
For rst time use, clean the accessories thoroughly with warm water, detergent
and a soft clean cloth.
05
04
03
02
01
01 Level 1 02 Level 2
03 Level 3 04 Level 4
05 Level 5
• Insert the accessory to the correct
position inside of the oven.
• Allow at least a 1 cm space from the
accessory and the bottom of the oven,
and from any other accessory.
• Take caution in removing cookware
and/or accessories out of the oven. Hot
meals or accessories can cause burns.
• The accessories may be deformed while
they are gaining heat. Once they have
cooled down, they will recover their
original appearance and performance.
Basic use
For better cooking experience, familiarise yourself with how to use each accessory.
Wire rack The wire rack is designed for grilling and roasting. Insert the
wire rack into position with the protruding parts (stoppers
on both sides) towards the front.
Wire rack insert * The wire rack insert is used with the tray, and prevents
liquid from dropping onto the bottom of the oven.
Baking tray * The baking tray (depth: 20 mm) is used to bake cakes,
cookies, and other pastries. Put the slanted side to the front.
NV75N7647RS_EU_DG68-01056B-02_EN+DE.indb 11 2020-10-29 오후 8:27:45

12 English
Before you start
Before you start
Universal tray * The universal tray (depth : 30 mm) is used for cooking and
roasting. Use the wire-tray insert to prevent liquid from
dropping onto the bottom of the oven.
Put the slanted side to the front.
Extra-deep tray * The extra-deep tray (depth: 50 mm) is used for roasting with
or without the wire-tray insert. Put the slanted side to the
front.
Rotisserie spit * The rotisserie spit is used for grilling food such as chicken.
Use the rotisserie spit only in Single mode at level 4 where
the spit adapter is available. Unscrew the spit handle to
remove while grilling.
Rotisserie spit
and Shashlik *
Put the tray at rack position 1 to collect cooking juices, or
on the bottom of the oven for a large serving of meat. It is
recommended to use the spit accessories for meat under
1.5 kg.
1. Insert the spit into the meat. To help insert the spit,
screw the spit handle toward the blunt end.
2. Put parboiled potatoes and vegetables around the meat.
3. Put the cradle at the middle tray position with the “V”
shape to the front. Rest the spit onto the cradle with
the pointed end backward and gently push until the tip
of the spit enters the turning mechanism at the back of
the oven. The blunt end of the spit must rest on the “V”
shape. (The spit has two lugs which should be nearest
to the oven door so to stop the spit going forward, the
lugs also act as a grip for the handle.)
4. Unscrew the handle before cooking.
5. After cooking, screw the handle back to help remove
the spit from the cradle.
Telescopic rails * Use the telescopic rail plate to insert the tray as follows:
1. Stretch the rail plate out from the oven.
2. Put the tray on the rail plate and slide the rail plate into
the oven.
3. Close the oven door.
Divider The divider is designed to separate the oven in two
compartments. Use the divider with Dual cook mode.
Do not use the divider as a shelf.
Meat probe *
The meat probe measures the internal temperature of the
meat to cook. Use only the meat probe that comes with your
oven.
WARNING
• Make sure that the rotisserie handle is seated properly.
• Be careful when using the rotisserie. The forks and pins are pointed and sharp,
which can cause physical injury!
• To prevent burns, use gloves to remove the rotisserie because it is very hot.
NOTE
Availability of accessories with an asterisk (*) depends on the oven model.
NV75N7647RS_EU_DG68-01056B-02_EN+DE.indb 12 2020-10-29 오후 8:27:45

English 13
Before you start
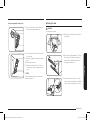
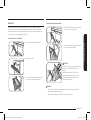
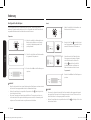
Flexible Door
This oven has a unique Flexible Door that is hinged in the middle, so you only
need to open the top half to access the upper zone. When you’re using the Dual
Cook capability, you can access the top oven space much more easily and with
greater energy efciency.
How to use the upper door
1. Completely press the handle lever.
2. Pull the handle.
3. This will open only the upper door as
shown.
How to use the full door
1. Hold the lever-less area of the handle,
and then pull.
2. This will open the whole door as shown.
CAUTION
When opening the whole door, make sure to
grasp the handle by the lever-less portion.
If the lever is pressed halfway through
opening the door, the upper door may open,
causing physical injury.
NOTE
• Do not put heavy objects on, or apply excessive force, to the upper door.
• Do not let children play with or on the upper door.
NV75N7647RS_EU_DG68-01056B-02_EN+DE.indb 13 2020-10-29 오후 8:27:47

14 English
Before you start
Before you start
Mechanical lock (applicable models only)
Installation
A
1. Insert the thin part (A) of the
mechanical lock into the corresponding
slot of the lock handle as shown.
2. Tighten the screw on the lock handle.
Uninstallation
• Loosen and remove the screw from the
lock handle.
Lock/unlock
• To open the door, slightly lift up the
lock handle to unlock the door. Then,
open the door.
• To lock the door, simply close the door.
The mechanical lock automatically locks
the door.
Dual cook mode
You can use both the upper and lower compartments to cook two different recipes,
or simply choose one compartment to cook with.
Insert the divider in level 3 to separate the
cooking chamber in two compartments. The
oven senses the divider and activates the
upper compartment by default.
NOTE
Availability of Dual cook mode depends on
the recipe. For more information, see the
Cooking smart section in this manual.
NV75N7647RS_EU_DG68-01056B-02_EN+DE.indb 14 2020-10-29 오후 8:27:48

English 15
Operations
11 Oven light /
Child Lock
Press to turn the internal light on or off. Hold down
for 3 seconds to activate Child lock, or hold down for
3 seconds again to deactivate the lock on the control
panel.
12 Value dial Use the value dial to:
• Set the cooking time or temperature.
• Choose a sub item of top-level menus: Cleaning, Auto
cook, Special function, or Grill.
• Choose a serving size for Auto Cook programmes.
NOTE
Tapping on the display while wearing plastic or oven gloves may not operate
properly.
Operations
Control panel
The front panel comes in a wide range of materials and colours. For improved
quality, the actual appearance of the oven is subject to change without notice.
01
0402 06 08 10
03 05 07 09 11 12
01 Mode selector Turn to select a cooking mode or function.
02 Fast preheat
(applicable
models only)
Fast Preheat heats the oven fast to a set temperature.
• Press to toggle on or off the Fast Preheat option.
• Available only with Single mode.
• Disabled for temperatures set at less than 100 °C.
03 Timer Timer helps you check the time or operating duration
while cooking.
04 Upper/Lower
compartment
The indicators turn on when the divider is inserted. You
can choose Upper or Lower for your recipe.
05 Display Shows necessary information of selected modes or
settings.
06 OK Press to conrm your settings.
07 Back Cancel current settings, and return to the main screen.
08 Temperature Use to set the temperature.
09 Cooking time Press to set the cooking time.
10 Smart Control Use to select the smart control feature.
NV75N7647RS_EU_DG68-01056B-02_EN+DE.indb 15 2020-10-29 오후 8:27:49

16 English
Operations
Operations
Common settings
It is common to change the default temperature and/or cooking time across all
cooking modes. Follow the steps below to adjust the temperature and/or cooking
time for the selected cooking mode.
Temperature
1. Turn the mode selector to choose
a mode or function. The default
temperature of each selection appears.
2. Turn the value dial to set a desired
temperature.
3. Press OK to conrm your changes.
NOTE
• If you do not make any further settings within a few seconds, the oven starts
cooking automatically with the default settings.
• To change the set temperature, press the button and follow the above
steps.
• The exact temperature inside the oven can be measured with authorized
thermometer and method dened by an authorized institution. Using other
thermometers may cause a measuring error.
Cooking time
1. Turn the mode selector to choose a
mode or function.
2. Press the button, and then turn the
value dial to set a desired time up to
23 hours 59 minutes.
3. Optionally, you can delay the end time
of your cooking to a desired point.
Press the button, and use the value
dial to set an end point. See Delay End
for more information.
4. Press OK to conrm your changes.
NOTE
• You can cook without setting the cooking time if you want to. In this case, the
oven starts cooking at set temperatures without time information, and you
must stop the oven manually when cooking is complete.
• To change the set cooking time, press button and follow the above steps.
NV75N7647RS_EU_DG68-01056B-02_EN+DE.indb 16 2020-10-29 오후 8:27:50

English 17
Operations
End time
1. Turn the mode selector to choose a
mode or function.
2. Press twice, and turn the value dial
to set a desired end time.
3. Press OK to conrm your changes.
NOTE
• You can cook without setting the end time if you want to. In this case, the
oven starts cooking at set temperatures without time information, and you
must stop the oven manually when cooking is complete.
• To change the end time, press twice, and follow the above steps.
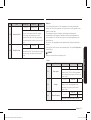
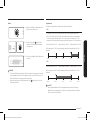
Delay End
Delay End is designed to make cooking more convenient.
Case 1
Suppose you select a one-hour recipe at 2:00 PM and you want the oven to
nish cooking at 6:00 PM. To set the end time, change the Ready At time to
6:00 PM. The oven will start cooking at 5:00 PM and end at 6:00 PM as you set.
Current time: 2 pm Set cooking time: 1 hour Set Delay End time: 6 pm
The oven will start cooking at 5:00 PM and end at 6:00 PM automatically.
2:00 pm 3:00 pm 4:00 pm 5:00 pm 6:00 pm
Case 2
Current time: 2 pm Set cooking time: 2 hour Set Delay End time: 5 pm
The oven will start cooking at 3:00 PM and end at 5:00 PM automatically.
2:00 pm 3:00 pm 4:00 pm 5:00 pm 6:00 pm
CAUTION
• Delay End is not available in Dual cook mode.
• Do not keep cooked food in the oven too long. The food may spoil.
NV75N7647RS_EU_DG68-01056B-02_EN+DE.indb 17 2020-10-29 오후 8:27:51

18 English
Operations
Operations
To clear the cooking time
You can clear the cooking time. This is useful if you want to stop the oven
manually at any time during the process.
1. While the oven is cooking, press the
button to display the default cooking
time.
2. Turn the value dial to set the cooking
time to “00:00”. Alternatively, simply
press .
3. Press OK.
NOTE
In Dual cook mode, you must rst select the upper or lower compartment that you
want to clear the cooking time for.
To clear the end time
You can clear the end time. This is useful if you want to stop the oven manually at
any time during the process.
1. While the oven is cooking, press
twice to display the set end time.
2. Turn the value dial to set the end time
to the current time. Alternatively,
simply press .
3. Press OK.
NOTE
In Dual cook mode, you must rst select the upper or lower compartment that you
want to clear the end time for.
NV75N7647RS_EU_DG68-01056B-02_EN+DE.indb 18 2020-10-29 오후 8:27:51

English 19
Operations
Cooking modes (except for grill)
1. Turn the mode selector to select an
cooking mode.
2. Set the cooking time and/or
temperature if necessary. See the
Common settings section for details.
3. Optionally, you can fast preheat the
oven. To do this, press the button,
and set the target temperature. The
corresponding indicator appears on
the display.
The oven starts preheating until the internal
temperature reaches the target temperature.
When preheating is complete, the indicator
disappears with a beep. Preheating is
recommended for all cooking modes unless
otherwise specied in the cooking guide.
NOTE
You can change the cooking time and/or temperature during cooking.
Dual cook mode
You can use the provided divider to separate the cooking chamber in the upper
and lower compartments. This allows users to enable two different cooking modes
simultaneously, or to simply choose one compartment to cook with.
1. Insert the Divider in level 3 to
separate the cooking chamber in two
compartments.
2. Turn the mode selector to select an
cooking mode. The upper compartment
is available with Grill, Convection,
or Top Heat + Convection mode. For
the lower compartment, Convection,
Bottom Heat + Convection and Bottom
Heat modes can be enabled.
3. Press to select the upper
compartment, or press to select the
lower compartment.
An indicator appears next to the
selected compartment.
4. Set the cooking time and/or
temperature if necessary. See the
Common settings section for details.
5. When done, press OK.
NV75N7647RS_EU_DG68-01056B-02_EN+DE.indb 19 2020-10-29 오후 8:27:53

20 English
Operations
Operations
The oven starts preheating until the internal
temperature reaches the target temperature.
Preheating is recommended for all cooking
modes unless otherwise specied in the
cooking guide.
NOTE
Availability of Dual cook mode depends on the cooking mode. For more
information, see the Cooking smart section in this manual.
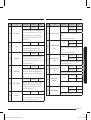
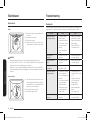
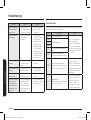
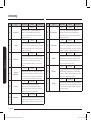
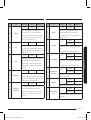
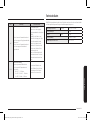
Cooking modes (except for Grill)
The cooking modes with an asterisk (*) are available for fast preheating and
disabled for temperatures set at less than 100 °C.
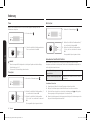
Mode
Temperature range (°C)
Suggested
temperature (°C)
Single
Dual
Upper Lower
Convection
* 30-275 40-250 40-250 170
The rear heating element generates heat, which is evenly
distributed by the convection fan. Use this mode for
baking and roasting on different levels at the same time.
Conventional
* 30-275 - - 200
The heat is generated from the top and bottom heating
elements. This function should be used for standard
baking and roasting for most types of dishes.
Top heat +
Convection
* 40-275 40-250 - 190
The top heating element generates heat, which is evenly
distributed by the convection fan. Use this mode for
roasting that requires a crispy top (for example, meat or
lasagne).
Mode
Temperature range (°C)
Suggested
temperature (°C)
Single
Dual
Upper Lower
Bottom heat
+ Convection
* 40-275 - 40-250 190
The bottom heating element generates heat, which is
evenly distributed by the convection fan. Use this mode
for pizza, bread, or cake.
Bottom heat
100-230 - 40-250 190
The bottom heating element generates heat. Use this
mode at the end of baking or cooking to brown the
bottoms of a quiche or pizza.
Pro-Roasting
80-200 - - 160
Pro-Roasting runs an automatic pre-heating cycle until the
oven temperature reaches 220 °C. Then, the top heating
element and the convection fan start operating to sear
food such as meat. After searing, the meat will be cooked
at low temperatures. Use this mode for beef, poultry, or
sh.
Eco
Convection
30-275 40-250 40-250 170
Eco Convection uses the optimized heating system to
save energy while cooking. The cooking times slightly
increases, but the cooking results remain the same. Note
that this mode does not require preheating.
NOTE
• ECO Convection mode of heating used to determine
the energy efciency class is in accordance with
EN60350-1.
• In Dual cook mode, Eco Convection mode cannot be
set on the upper and lower zone simultaneously.
NV75N7647RS_EU_DG68-01056B-02_EN+DE.indb 20 2020-10-29 오후 8:27:55
Seite wird geladen ...
Seite wird geladen ...
Seite wird geladen ...
Seite wird geladen ...
Seite wird geladen ...
Seite wird geladen ...
Seite wird geladen ...
Seite wird geladen ...
Seite wird geladen ...
Seite wird geladen ...
Seite wird geladen ...
Seite wird geladen ...
Seite wird geladen ...
Seite wird geladen ...
Seite wird geladen ...
Seite wird geladen ...
Seite wird geladen ...
Seite wird geladen ...
Seite wird geladen ...
Seite wird geladen ...
Seite wird geladen ...
Seite wird geladen ...
Seite wird geladen ...
Seite wird geladen ...
Seite wird geladen ...
Seite wird geladen ...
Seite wird geladen ...
Seite wird geladen ...
Seite wird geladen ...
Seite wird geladen ...
Seite wird geladen ...
Seite wird geladen ...
Seite wird geladen ...
Seite wird geladen ...
Seite wird geladen ...
Seite wird geladen ...
Seite wird geladen ...
Seite wird geladen ...
Seite wird geladen ...
Seite wird geladen ...
Seite wird geladen ...
Seite wird geladen ...
Seite wird geladen ...
Seite wird geladen ...
Seite wird geladen ...
Seite wird geladen ...
Seite wird geladen ...
Seite wird geladen ...
Seite wird geladen ...
Seite wird geladen ...
Seite wird geladen ...
Seite wird geladen ...
Seite wird geladen ...
Seite wird geladen ...
Seite wird geladen ...
Seite wird geladen ...
Seite wird geladen ...
Seite wird geladen ...
Seite wird geladen ...
Seite wird geladen ...
Seite wird geladen ...
Seite wird geladen ...
Seite wird geladen ...
Seite wird geladen ...
Seite wird geladen ...
Seite wird geladen ...
Seite wird geladen ...
Seite wird geladen ...
Seite wird geladen ...
Seite wird geladen ...
Seite wird geladen ...
Seite wird geladen ...
Seite wird geladen ...
Seite wird geladen ...
Seite wird geladen ...
Seite wird geladen ...
Seite wird geladen ...
Seite wird geladen ...
Seite wird geladen ...
Seite wird geladen ...
Seite wird geladen ...
Seite wird geladen ...
Seite wird geladen ...
Seite wird geladen ...
-
 1
1
-
 2
2
-
 3
3
-
 4
4
-
 5
5
-
 6
6
-
 7
7
-
 8
8
-
 9
9
-
 10
10
-
 11
11
-
 12
12
-
 13
13
-
 14
14
-
 15
15
-
 16
16
-
 17
17
-
 18
18
-
 19
19
-
 20
20
-
 21
21
-
 22
22
-
 23
23
-
 24
24
-
 25
25
-
 26
26
-
 27
27
-
 28
28
-
 29
29
-
 30
30
-
 31
31
-
 32
32
-
 33
33
-
 34
34
-
 35
35
-
 36
36
-
 37
37
-
 38
38
-
 39
39
-
 40
40
-
 41
41
-
 42
42
-
 43
43
-
 44
44
-
 45
45
-
 46
46
-
 47
47
-
 48
48
-
 49
49
-
 50
50
-
 51
51
-
 52
52
-
 53
53
-
 54
54
-
 55
55
-
 56
56
-
 57
57
-
 58
58
-
 59
59
-
 60
60
-
 61
61
-
 62
62
-
 63
63
-
 64
64
-
 65
65
-
 66
66
-
 67
67
-
 68
68
-
 69
69
-
 70
70
-
 71
71
-
 72
72
-
 73
73
-
 74
74
-
 75
75
-
 76
76
-
 77
77
-
 78
78
-
 79
79
-
 80
80
-
 81
81
-
 82
82
-
 83
83
-
 84
84
-
 85
85
-
 86
86
-
 87
87
-
 88
88
-
 89
89
-
 90
90
-
 91
91
-
 92
92
-
 93
93
-
 94
94
-
 95
95
-
 96
96
-
 97
97
-
 98
98
-
 99
99
-
 100
100
-
 101
101
-
 102
102
-
 103
103
-
 104
104


in anderen Sprachen
- English: Samsung NV75N7647RS User guide
Verwandte Artikel
-
Samsung NV75N7677RS Benutzerhandbuch
-
-
Samsung NV75N5672RS Benutzerhandbuch
-
Samsung NV75N5641BS Benutzerhandbuch
-
Samsung NV75N7647RS Benutzerhandbuch
-
-
Samsung NV75T8579RK Benutzerhandbuch
-
-
Samsung NV75T9579CD Benutzerhandbuch
-
Samsung NV75T8979RK Benutzerhandbuch