
LIVOX HAP
HAP (TX)
v1.0
Quick Start Guide
快速入门指南
クイックスタートガイド
Betriebsanleitung (Kurzfassung)


LIVOX HAP Quick Start Guide
2
DISCLAIMER
This product is NOT a toy and is not suitable for children under the age of 16. Adults should keep the product out of the reach of
children and exercise caution when operating this product in the presence of children.
This product incorporates various advanced technologies. However, inappropriate use of the product could result in personal injury or
property damage. Read the materials associated with the product before using for the rst time.
These documents are included in the product package and/or are available online on the LIVOX™ Technology Company Limited
(“Livox”) website (www.livoxtech.com).
The information in this document aects your safety and your legal rights and responsibilities. Read this entire document carefully to
ensure proper conguration before use. Failure to read and follow the instructions and warnings in this document may result in serious
injury to yourself or others, damage to or loss of your Livox product, or damage to other objects in the vicinity.
By using this product, you hereby signify that you have read this disclaimer carefully and that you understand and agree to abide
by the terms and conditions herein. EXCEPT AS EXPRESSLY PROVIDED IN LIVOX AFTER-SALES SERVICE POLICIES AVAILABLE
AT www.livoxtech.com, THE PRODUCT AND ALL MATERIALS, AND CONTENT AVAILABLE THROUGH THE PRODUCT ARE
PROVIDED “AS IS” AND ON AN “AS AVAILABLE” BASIS, WITHOUT WARRANTY OR CONDITION OF ANY KIND, EITHER EXPRESS
OR IMPLIED. LIVOX DISCLAIMS ALL WARRANTIES OF ANY KIND, EXCEPT AS EXPRESSLY PROVIDED IN LIVOX AFTERSALES
SERVICE POLICIES, WHETHER EXPRESS OR IMPLIED, RELATING TO THE PRODUCT, PRODUCT ACCESSORIES, AND ALL
MATERIALS, INCLUDING: (A) ANY IMPLIED WARRANTY OF MERCHANTABILITY, FITNESS FOR A PARTICULAR PURPOSE, TITLE,
QUIET ENJOYMENT, OR NONINFRINGEMENT; AND (B) ANY WARRANTY ARISING OUT OF COURSE OF DEALING, USAGE, OR
TRADE. LIVOX DOES NOT WARRANT, EXCEPT AS EXPRESSLY PROVIDED IN LIVOX WARRANTY, THAT THE PRODUCT, PRODUCT
ACCESSORIES, OR ANY PORTION OF THE PRODUCT, OR ANY MATERIALS, WILL BE UNINTERRUPTED, SECURE, OR FREE
OF ERRORS, VIRUSES, OR OTHER HARMFUL COMPONENTS, AND DOES NOT WARRANT THAT ANY OF THOSE ISSUES WILL
BE CORRECTED. NO ADVICE OR INFORMATION, WHETHER ORAL OR WRITTEN, OBTAINED BY YOU FROM THE PRODUCT,
PRODUCT ACCESSORIES, OR ANY MATERIALS WILL CREATE ANY WARRANTY REGARDING LIVOX OR THE PRODUCT THAT IS
NOT EXPRESSLY STATED IN THESE TERMS.
YOU ASSUME ALL RISKS FOR ANY DAMAGE THAT MAY RESULT FROM YOUR USE OF OR ACCESS TO THE PRODUCT,
PRODUCT ACCESSORIES, AND ANY MATERIALS. YOU UNDERSTAND AND AGREE THAT YOU USE THE PRODUCT AT YOUR
OWN DISCRETION AND RISK, AND THAT YOU ARE SOLELY RESPONSIBLE FOR ANY PERSONAL INJURY, DEATH, DAMAGE TO
YOUR PROPERTY (INCLUDING YOUR COMPUTER SYSTEM OR MOBILE DEVICE OR LIVOX HARDWARE USED IN CONNECTION
WITH THE PRODUCT) OR THIRD PARTY PROPERTY, OR THE LOSS OF DATA THAT RESULTS FROM YOUR USE OF OR INABILITY
TO USE THE PRODUCT. SOME JURISDICTIONS MAY PROHIBIT A DISCLAIMER OF WARRANTIES AND YOU MAY HAVE OTHER
RIGHTS THAT VARY FROM JURISDICTION TO JURISDICTION.
Livox accepts no liability for damage, injury or any legal responsibility incurred directly or indirectly from the use of this product. The
user shall observe safe and lawful practices including, but not limited to, those set forth in this quick start guide. You shall be solely
responsible for all your behaviors when using this product.
WARNINGS
1. Be careful when using Livox HAPTM in conditions with low visibility such as foggy or stormy weather. In such conditions, the
detection range may be reduced. For detection range in conditions with high visibility, refer to the Specications section.
2. When mounting Livox HAP, allow a space of at least 10 mm around Livox HAP to prevent poor air ow aecting heat dissipation,
and make sure the waterproof breathable valve is not blocked. It is normal for the temperature of Livox HAP to increase during use.
3. DO NOT touch the optical window of Livox HAP. Dust and stains on the optical window can negatively aect the performance. Use
compressed air, isopropyl alcohol, or a lens cloth to clean the optical window correctly. Refer to the Livox HAP User Manual for
more information on how to clean optical windows.

LIVOX HAP Quick Start Guide
3
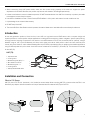
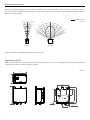
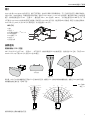
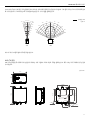
25°
120°
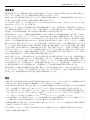
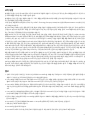
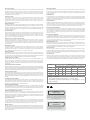
1. Optical Window
2. Locating Hole 1
3. M6 Mounting Hole (φ6.5) × 4
4. M12 Aviation Connector
5. M3 Mounting Hole × 4
6. Locating Hole 2
7. Waterproof Breathable Valve
HAP (TX)
7
1
2
3
4
5
6
4. When customizing Livox HAP power cables, make sure the current-carrying capacity of the cable can support the power
requirement of Livox HAP. Otherwise, the product may become a re hazard or be damaged permanently.
5. In order to avoid electric shocks or radiation exposure, DO NOT disassemble the Livox HAP. If an accessory or product part needs
to be replaced, contact Livox for support.
6. Livox HAP is classied as a Class 1 Laser Product (IEC/EN 60825-1: 2014) and is safe under all normal conditions of use.
7. Liquid damage is not covered under warranty.
8. DO NOT drop Livox HAP.
9. The Livox HAP Quick Start Guide contains important information. Make sure to read before rst use and keep for reference.
Introduction
As the next-generation product of Livox Horizon, Livox HAP is a high-performance LiDAR sensor with a compact design and
superior precision. It can be used for multiple applications including autonomous driving, robotic navigation, dynamic path planning,
and high-precision mapping. Compared to Livox Horizon, Livox HAP features a FOV of 120° (horizontal) and 25° (vertical), a longer
detection range of 150 m (at 10% reectivity, 100 klux), and a higher point rate of 452K points/s. Users can check real-time point
clouds using Livox Viewer 2, and a software development kit (Livox SDK) is provided to help you develop customizable applications
using 3D data acquired from point clouds. Livox HAP has two models which are HAP (T1) and HAP (TX). The document is intended
for the HAP (TX).
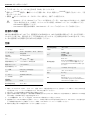
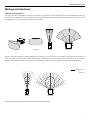
Installation and Connection
Eective FOV Range
HAP (TX) has a FOV of 120° (horizontal) × 25° (vertical) as shown below. When mounting HAP (TX), make sure that the FOV is not
blocked by any objects. Visit www.livoxtech.com/hap to download the 3D models of HAP (TX) and its FOV.
Vertical HorizontalHorizontal

LIVOX HAP Quick Start Guide
4
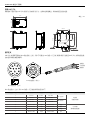
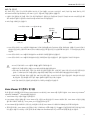
91.6
94.6
48.5
121.6
54
1316
105
65
2
92.65
0.65
62
47
4-M3 5
4-
310.05
+_
6.5 0.1
+_
310.05
+_
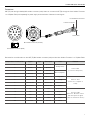
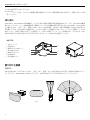
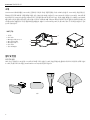
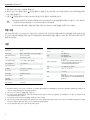
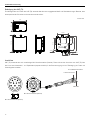
Note that the eective detecting distance of HAP (TX) varies based on where the object is within the FOV. The closer to the edge of
the FOV, the shorter the eective detecting distance is. The closer to the center of the FOV, the further the eective detecting distance.
Refer to the diagrams below:
Mounting the HAP (TX)
Refer to the dimensions and the mounting holes in the diagrams below to mount or embed HAP (TX) appropriately. Note that the
corresponding screws should be purchased in advance.
Vertical Horizontal
Reectivity:10%
Unit: m
Unit: mm
Always pay attention to the eective detecting range when in use.
0° 15°-15°
-30°
-45°
-60° 60°
200
175
150
125
100
75
50
45°
30°
0° 5°
-5°
-10°
200
175
150
125
100
50
75
10°15°
-15°

LIVOX HAP Quick Start Guide
5
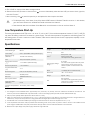
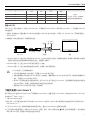
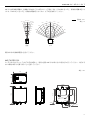
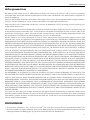
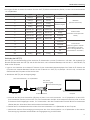
See below for more information on the HAP (TX) M12 aviation connector (male) and the Livox Aviation Connector 1-to-3 Splitter Cable.
Connectors
HAP (TX) uses the high-reliability M12 aviation connector (male). Users can connect to HAP (TX) through the Livox Aviation Connector
1-to-3 Splitter Cable (sold separately) for power supply and transmission of data and control signals.
M12AviationConnectorPin Signal Type Description Color Function
1 Power+ Power DC VCC
Red (positive)
Power cable
(Connects to DC power)
9 Power+ Power DC VCC
2 Ground Power Ground
Black (negative)
3 Ground Power Ground
4 Ethernet-TX+ Output Ethernet-TX+ Orange/white
Ethernet cable
(Connects to computer or
router)
5 Ethernet-TX- Output Ethernet-TX- Orange
6 Ethernet-RX+ Input Ethernet-RX+ Green/white
7 Ethernet-RX- Input Ethernet-RX- Green
8 N/A N/A N/A Purple/white
Function cable
(Not in use. DO NOT connect
with other power or signal
cables to avoid short circuits.)
10 N/A N/A N/A Gray/white
11 N/A N/A N/A Gray
12 N/A N/A N/A Purple
2&3 Ground Ground Ground Black
M12 Aviation Connector (Female)
Function Connector
RJ-45 Network Connector
Power cable
1
2
3
4
5
11
10
12
67
8
9
M12 Aviation Connector (Male)
12
3
4
5
11
10
12
6
7
8
9

LIVOX HAP Quick Start Guide
6
• The Livox Aviation Connector 1-to-3 Splitter Cable must be purchased separately.
• Refer to the Livox HAP User Manual on how to set the IP address of the computer.
• When multiple HAP (TX) LiDAR sensors are connected to one computer in static IP address mode, make sure all sensors
connected have dierent static IP addresses. Refer to Livox HAP User Manual for more information on how to set the IP
address for each LiDAR sensor.
• When HAP (TX) is directly connected to an external power source, as the working voltage of HAP (TX) is 9 to 18V DC,
make sure the voltage range of the power source is within the allowable range. Make sure the positive and negative ends
of the power cable are connected correctly.
• The function connector does not need to be used as it has no electrical connection inside HAP (TX).
Downloading and Using Livox Viewer 2
Visit http://www.livoxtech.com and download the latest Livox Viewer 2 to check the point cloud data. Livox Viewer 2 supports
WINDOWS® 10 (64 bit) and UBUNTUTM 18.04 (64 bit).
1. Download the le named “Livox Viewer 2”.
2. Unzip the Livox Viewer 2 le and click to open the .exe le named “Livox Viewer 2”. For Ubuntu users, unzip the Livox Viewer 2 le
and click to open the “./livox_viewer_2.sh” le under the root directory.
3. If a system window with network authorization pops up when opening Livox Viewer 2, allow Livox Viewer 2 to access network.
4. The device manager window is on the left side of Livox Viewer 2 and the main interface is on the right side. Click to display
or hide the device manager window. In this device manager window, users can check all Livox LiDAR sensors in the local area
network (LAN).
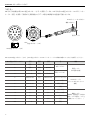
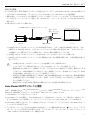
Connecting the HAP (TX)
All HAP (TX) are set to static IP address mode by default with an IP address of 192.168.1.100. The default subnet masks of HAP (TX)
are all 255.255.255.0 and their default gateways are 192.168.1.1. Directly connect HAP (TX) to the computer.
1. Before connecting, set the IP address of the computer to static IP address mode. Set the IP address of the computer to the
same network subnet as the IP address of HAP (TX) (example: 192.168.1.50), and set the subnet mask of the computer to
255.255.255.0.
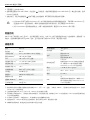
2. Connect HAP (TX) as shown below.
a. Connect the M12 aviation connector (female) on Livox Aviation Connector 1-to-3 Splitter Cable with the M12 aviation connector
(male) on HAP (TX). The lock nut of the M12 aviation connector (female) should be tightened with a wrench to ensure there is a
secure connection with the end face of the lock nut of the M12 aviation connector (male). Make sure there is no gap between
them.
b. Connect the RJ-45 network connector on the Livox Aviation Connector 1-to-3 Splitter Cable to the computer.
c. Connect the external power connector on the Livox Aviation Connector 1-to-3 Splitter Cable to the external power source. Pay
attention to the input voltage range and polarity.
HAP (TX)
Red (postive)
Black (negative)
External Power Source
Function Connector
Livox Aviation Connector 1-to-3 Splitter Cable
Computer

LIVOX HAP Quick Start Guide
7
• For Windows users, Livox Viewer 2 may fail to detect LiDAR sensors if Windows Firewall is turned on. In this situation,
go to the Control Panel to turn o Windows Firewall and restart Livox Viewer 2.
• Download and read the Livox Viewer 2 User Manual for more information on how to use Livox Viewer 2.
Low-Temperature Start-Up
The working temperature of HAP (TX) is from -40° to 85° C (-40° to 185° F). If the ambient temperature is below 0° C (32° F), HAP (TX)
may enter self-heating mode when connected to a power supply. The lower the temperature, the greater the self-heating power. The
self-heating power can reach a maximum of 40W. Therefore, make sure the external power source is appropriate, especially in a low-
temperature environment.
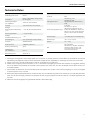
Specications
Model HAP (TX)
Laser Wavelength 905 nm
Laser Safety ①Class 1 (IEC 60825-1:2014) (safe for eyes)
Detection Range
(@100 klx)②150 m @ 10% reflectivity
FOV 120° (horizonal)×25° (vertical)
Distance Random Error
(1σ)③< 2 cm @ 20 m (80% reflectivity)
Distance System Error < ±3 cm @ 20 m
Angular Random Error
(1σ)< 0.1°
Beam Divergence 0.03° (horizonal)×0.28° (vertical)
Point Rate 452,000 points/s
Data Port 100BASE-TX Ethernet
Data Synchronization gPTP
False Alarm Ratio
(@100 klx) ④0.01%
Operation Temperatature
Range -40° to 85℃ (-40° to 185°F)
① The divergence of the embedded laser is approximately 25.2° (horizontal) × 8° (vertical), which was measured at full width at half maximum. The
maximum power of the embedded laser may exceed 65 W. In order to avoid being injured by the laser, DO NOT disassemble HAP (TX).
② HAP (TX) cannot precisely detect objects which are less than 0.5 m away.
③ Tested in an environment at a temperature of 25° C (77° F). The actual environment may dier from the testing environment. The gure listed is for
reference only. The point cloud may distort to a varying extent when the target object is within the range of 0.5 to 2 m.
④ The false alarm ratio of the noise created by the stray light in a test environment of 100 klx at a temperature of 25° C (77° F).
⑤ In low-temperature environments, HAP (TX) will rst enter self-heating mode, and its power may reach a maximum amount of 40 W. Make sure the
power supply is suitable based on the peak power value of HAP (TX). Refer to the Livox HAP User Manual for more information.
⑥ Make sure the output voltage of the power supply is within this range at all times.
Storage Temperature
Range -40° to 95℃ (-40° to 203°F)
IP Rating IP67
Power ⑤Rated power 12 W
Starting power 26 W
Low temperature heating power 40 W
Power Supply Voltage
Range ⑥
9-18 V DC
For versions that support 9-32 V DC power
supply voltage, please contact Livox or
submit a request via www.livoxtech.com/
contact.
Noise < 45 dB(A) (40 cm omnidirectional)
Dimensions 105 × 131.6 × 65 mm
Weight Approx. 1120 g
IMU
Not supported.
For versions that support IMUs, please
contact Livox or submit a request via www.
livoxtech.com/contact.
5. Click “LiDAR” on the top of the device manager window.
6. Select the Livox HAP you want to check and click to connect. Alternatively, select the Livox HAP you want to check, right click,
and click “Connect”.
7. After connecting, click or press the space key on the keyboard to view the point cloud data.

LIVOX HAP 快速入门指南
8
免责声明
本产品不适合未满 16 岁的人士使用。请勿让儿童接触本产品,在有儿童出现的场景操作时请务必特别小心注意。
使用前请仔细阅读并遵循本产品说明书指导,同时遵守任何相关的国家和国际相关的安全条例。本产品是一款激光探测测距仪,在
电源正常工作及各部件未损坏的情况下将提供三维激光扫描功能。访问 www.livoxtech.com 获取完整的《Livox HAPTM 用户手册》、
最新说明和警告。香港览沃科技有限公司(以下简称 “
LivoxTM ”)保留更新所有文档的权利。
请务必在使用产品之前仔细阅读本文档和《用户手册》,了解您的合法权益、责任和安全说明;否则,可能带来财产损失、安全事
故和人身安全隐患。一旦使用本产品,即视为您已理解、认可和接受本文档全部条款和内容。使用者承诺对自己的行为及因此而产
生的所有后果负责。使用者承诺仅出于正当目的使用本产品,并且同意本文档全部条款和内容及 Livox 可能制定的任何相关政策或
者准则。
Livox 不承担因用户未按本文档、《用户手册》使用产品所引发的一切损失。 在遵从法律法规的情况下,Livox 享有对本文档的最终
解释权。Livox 有权在不事先通知的情况下,对本条款进行更新,改版或终止。
警 告
1. 在空气能见度较差的情况下(例如雾霾、暴雨天气),Livox HAP 的有效检测范围将会减小,使用时请格外小心。空气能见度较
好情况下,Livox HAP 的有效检测范围请查看参数列表。
2. 安装时,建议在 Livox HAP 壳体周围留有 10mm 以上的空间用于通风散热,并确保防水透气阀不被堵塞。工作时,产品温度将
会有所上升,此为正常现象。
3. 切勿用手触摸 Livox HAP 窗口。若 Livox HAP 窗口上有污点或灰尘等杂质,请使用压缩空气除尘罐,酒精以及无尘布进行清洁 (具
体清洁方式,请查看《Livox HAP 用户手册》),以免污点灰尘等影响产品性能。
4. 如自行定制电源线,请确认所使用的线材负载能力达到产品功耗需求,否则可能导致产品损坏,甚至引发火灾。
5. 为减少触电危险以及防止可能存在的光辐射危险,请勿私自拆开或改装本产品。本产品不包含用户可维修零件,需售后服务请联
系 Livox。
6. Livox HAP 满足 Class 1 激光产品安全要求(IEC/EN 60825-1:2014),可于正常情况下安全使用。
7. 因液体造成的损坏不在保修范围内。
8. 切勿摔落 Livox HAP 。
9. 包装或说明书中含有重要信息,应保留。

LIVOX HAP 快速入门指南
9
竖直方向 水平方向
水平方向
25°
120°
0° 15°-15°
-30°
-45°
-60° 60°
200
175
150
125
100
75
50
45°
30°
0° 5°
-5°
-10°
200
175
150
125
100
50
75
10°15°
-15°
安装连线
有效视场角(FOV)范围
HAP (TX) 的FOV 为水平 120°,竖直 25°,如下图所示。安装时请注意 FOV 的有效范围, 避免遮挡 FOV 区域。可访问 www.
livoxtech.com/hap 下载 HAP (TX) 与其 FOV 的3D 模型。
请注意,HAP (TX) 的有效量程在不同的 FOV 区域内有所区别,越靠近 FOV 边缘的时候有效量程越短,越靠近 FOV 的中间位置,
有效量程越接近最大值,可参考下图 :
使用时请格外注意有效量程的范围。
竖直方向 水平方向
10% 反射率
单位:m
1. 窗口
2. 定位孔 1
3. M6 螺钉安装通孔(φ 6.5)×4
4. M12 航空插头
5. M3 安装孔 ×4
6. 定位孔 2
7. 防水透气阀
简介
Livox HAP 是Livox Horizon 的升级产品,继承了高可靠性、结构设计紧凑以及高精度特性,可广泛应用于包括无人驾驶环境感知、
机器人导航、动态路径规划、高精度测绘等众多领域。相较于 Livox Horizon,Livox HAP 在视场角、量程和点云输出上均有显著
提升,其中视场角达到水平 120°,竖直 25°,量程达到 150m(10% 反射率,100 klx),点云输出提升到 452,000 点/ 秒。用
户可通过 Livox Viewer 2 软件实时获取三维图像,更能基于 Livox SDK 进行开发,轻松获取 3D 点云数据,满足个性化的应用需求。
Livox HAP 分为 HAP (T1) 和HAP (TX) 两种型号。本文档适用于 HAP (TX)。
HAP (TX)
7
1
2
3
4
5
6

LIVOX HAP 快速入门指南
10
91.6
94.6
48.5
121.6
54
1316
105
65
2
92.65
0.65
62
47
4-M3 5
4-
310.05
+_
6.5 0.1
+_
310.05
+_
M12 航空插头(公头)和 Livox 航插一分三线的线序及其定义如下:
M12 航空插头(公头 / 母头)管脚 信号 属性 描述 线束颜色 功能
1 Power+ Power DC VCC 红(正极) 电源线
(接直流电源)
9 Power+ Power DC VCC
2 Ground Power Ground 黑(负极)
3 Ground Power Ground
4 Ethernet-TX+ Output Ethernet-TX+ 橙白
以太网线
(接电脑或路由器)
5 Ethernet-TX- Output Ethernet-TX- 橙
6 Ethernet-RX+ Input Ethernet-RX+ 绿白
7 Ethernet-RX- Input Ethernet-RX- 绿
接口定义
HAP (TX) 使用高可靠性的 M12 航空插头(公头),用户可以通过 Livox 航插一分三线(需额外购买)连接至 HAP (TX),实现电源连接、
控制信号传输及数据传输等。
M12 航空插头(公头)
12
3
4
5
11
10
12
6
7
8
9
M12 航空插头(母头)
电源线
以太网线
功能线
1
2
3
4
5
11
10
12
67
8
9
单位:mm
安装 HAP (TX)
请根据如下图所示的 HAP (TX) 机身尺寸及安装孔位尺寸,自购对应规格螺丝,将其安装至合适的位置。

LIVOX HAP 快速入门指南
11
连接 HAP (TX)
HAP (TX) 出厂默认为静态 IP,地址为 192.168.1.100,子网掩码为 255.255.255.0,默认网关为 192.168.1.1。可直接将 HAP (TX)
与电脑连接。
1. 连接前,将电脑的 IP 设置为静态 IP, 并将 IP 地址设置为与 HAP (TX) 的IP 地址同一个网段,如:192.168.1.50,子网掩码设置为:
255.255.255.0。
2. 电脑静态 IP 地址设置完成后,请按照图示连接。
a. 将Livox 航插一分三线的 M12 航插母头与 HAP (TX) 上的 M12 航插公头连接。为确保连接稳固,需用扳手将航插母头的锁紧
螺母拧至与航插公头的锁紧螺母的端面完全贴合,检查确认无缝隙。
b. 将Livox 航插一分三线上的 RJ-45 网口接头连接至个人电脑。
c. 将Livox 航插一分三线上的电源线连接至外部电源,注意输入电压范围和极性。
• Livox 航插一分三线需单独购买。
• 关于如何设置电脑的 IP 地址模式,可查看《Livox HAP 用户手册》。
• 当多台使用静态 IP 地址的 HAP (TX) 接入同一台电脑时,请确保每台 HAP (TX) 的IP 地址不同。具体如何设置静态 IP
地址,可查看《Livox HAP 用户手册》。
• 将HAP (TX) 直接连接至外部直流电源时,由于 HAP (TX) 的工作电压为 9-18V DC,因此请确保所连接的外部电源电
压在允许范围内。连接时,请注意电源接口按照正负极正确连接。
• 功能线在 HAP (TX) 内部无电气连接,无需使用。
下载并安装 Livox Viewer 2
用户可前往 Livox 官网 www.livoxtech.com 下载最新的 Livox Viewer 2,查看点云图。Livox Viewer 2 目前支持 Windows® 10(64 位)
和UBUNTUTM 18.04 (64 位)。
1. 下载 Livox Viewer 2 文件。
2. 解压文件,并于已解压的文件中打开文件名为 Livox Viewer 2 的程序 (Ubuntu 用户请于解压文件的根目录中打开终端并运行 ./
livox_viewer_2.sh)。
3. 打开 Livox Viewer 2 时,如果有网络授权的系统窗口弹出,请允许 Livox Viewer 2 的网络访问权限。
4. 打开后左侧为设备管理窗口,右侧为 Livox Viewer 2 主界面。同时,用户也可通过点击 隐藏 / 显示设备管理窗口。若当前局域
网中已有 Livox 设备,管理窗口中将会自动显示该设备。
M12 航空插头(公头 / 母头)管脚 信号 属性 描述 线束颜色 功能
8 N/A N/A N/A 紫白
功能线
(不适用,可不接;勿与其他电
源线或信号线相接导致短路)
10 N/A N/A N/A 灰白
11 N/A N/A N/A 灰
12 N/A N/A N/A 紫
2&3 Ground Ground Ground 黑
HAP (TX)
红(正极)
黑(负极)
电源线
功能线 电脑
Livox 航插一分三线

LIVOX HAP 快速入门指南
12
规格参数
① 激光探测测距仪中内置激光器辐射光的发散角为 25.2°(水平)×8°(竖直)(半高宽,FWHM),最大激光功率可能达到 65 W。切勿拆
开HAP (TX),以免造成危险。
② 当被测物体距离 HAP (TX) 小于 0.5 m 时,HAP (TX) 无法对其进行测量。
③ 测试条件为环境温度 25℃。 具体指标与测试条件相关,以实测结果为准。被测物处于 0.5~2 m 的范围内时,HAP (TX) 的点云图像可能会
产生不同程度的畸变。
④ 在100klx 日光条件下,环境温度 25℃,环境杂散光产生的虚警噪点的比例。
⑤ 在低温环境下,HAP (TX) 将自动运行自加热模式,最大功率可达 40W,请合理设计电源。
⑥ 请确保所使用的电源,其输出电压无论何时都不可超过此范围。
型号 HAP (TX)
激光波长 905 nm
人眼安全级别①Class 1 (IEC 60825-1:2014) 人眼安全
量程 (@100 klx) ②150 m @ 10% 反射率
FOV 120° (水平 )×25° (竖直 )
测距随机误差 (1σ)③< 2 cm @ 20 m (80% 反射率 )
测距系统误差 < ±3 cm @ 20 m
角度随机误差 (1σ) < 0.1°
光束发散角度 0.03° (水平 )×0.28° (竖直 )
点云输出 452,000 点/秒
数据网口 100 BASE-TX 标准以太网
数据同步方式 gPTP
虚警率 (@100 klx) ④0.01%
工作环境温度 -40℃至 85℃
存储环境温度 -40℃至 95℃
防护级别 IP67
功率⑤
额定功率 12 W
启动功率 26 W
低温加热功率 40 W
供电电压范围⑥
9-18 V DC
若需要支持 9-32 V DC 供电电压范围的版
本,请联系 Livox 客户经理团队或通过
www.livoxtech.com/contact 提交需求。
噪音 < 45 dB (A) (40 cm 全方向 )
尺寸 105 × 131.6 × 65 mm
重量 约 1120 g
IMU
无
若需要带 IMU 模块的版本,请联系 Livox
客户经理团队或通过 www.livoxtech.com/
contact 提交需求。
• 在Windows 系统下使用 Livox Viewer 2 时,由于操作系统的防火墙对网络数据的拦截, 可能导致 Livox Viewer 2 无
法扫描到 LiDAR。若出现此情况,请用户在电脑控制面板中关闭防火墙,然后再重启 Livox Viewer 2。
• 关于 Livox Viewer 2 更详细的使用方法,及每个按钮的详细说明,请查阅《Livox Viewer 2 用户手册》。
低温启动
HAP (TX) 的工作温度为 -40℃ 至 85℃。当环境温度低于 0℃时, HAP (TX) 上电后会根据自身状态进入自加热模式,温度越低,功
率越大,自加热模式最高功率可达 40 W。因此,当于低温环境下使用 HAP (TX) 时,请合理设计电源。
5. 于管理窗口上方勾选 LiDAR。
6. 选择需要查看的 Livox HAP LiDAR,点击图标 完成连接。或选择需要查看的 Livox HAP LiDAR 后,单击鼠标右键,选择
Connect 完成连接。
7. 连接完成后,点击开始播放图标 或按下键盘上的空格按键,即可观察到所选设备的点云图像。

13
LIVOX HAP クイックスタートガイド
免責事項
本製品は玩具ではなく、16歳未満のお子様による使用は前提としていません。本製品はお子様の手の届かない場所に保管してく
ださい。また、お子様がいるところで本製品を操作する場合は十分に注意してください。
本製品にはさまざまな高度技術が組み込まれていますが、本製品の不適切な使用により、傷害や物的損害を引き起こすおそれが
あります。初めてご使用になる前に、本製品に関連する資料をお読みください。
これらの資料は、製品パッケージに同梱されており、Livox™ Technology Company Limited (「LIVOX」) のウェブサイト(www.
livoxtech.com)からオンラインでも入手可能です。
本書では、ユーザーの安全および法的権利と責任に関する情報を記載しています。ご使用の前に、本書の内容をよくお読みいた
だき、確実に適切な設定を行うようにしてください。本書に記載されている指示と警告に従わなかった場合、ご自身や他人の深
刻な怪我、またはLivox製品の損傷、あるいは周辺の他の物の破損につながる恐れがあります。
本製品を使用することにより、お客様は本書の免責事項をよく読み、記載されている利用規約を理解し、順守することに同意し
たとみなされます。LIVOXアフターサービス ポリシー(www.livoxtech.comに掲載)に明確な規定がない限り、製品およびすべ
ての資料、製品を通して得られるコンテンツは「現状のまま」および「提供されているまま」で提供され、明示的または黙示的
に問わず、いかなる種類の保証も条件も伴いません。明示的または黙示的に問わず、LIVOXアフターサービス ポリシーに明確に
規定されない限り、製品、製品アクセサリー、すべての資料に関し、LIVOXは以下を含む、いかなる種類の保証も一切行いませ
ん。(A)商品性、特定目的の適切性、権限、平和享有権、非侵害に対する黙示的保証、および(B)取引の過程、使用、商慣習
から生ずる保証。LIVOXでの保証において明確に規定されない限り、製品、製品のアクセサリー、製品の一部や資料が、中断さ
れることなく、安全で、エラー、ウイルス、その他有害な部品がないこと、ならびに問題があった場合にそれらが是正されるこ
とを、LIVOXは保証しません。本規約に明確に記載されない限り、口頭であれ書面であれ、製品、製品のアクセサリー、資料か
ら得られる助言や情報により、LIVOXまたは製品に関する保証は発生しません。
本製品、製品アクセサリー、資料の使用またはアクセスに起因するあらゆる損害に対するすべてのリスクは、お客様が負担する
ものとします。お客様の裁量とリスクにおいて本製品を使用し、怪我、死亡、お客様の財産への損害(本製品と接続して使用し
たパソコンシステム、モバイル端末、LIVOXハードウェアを含む)、サードパーティの財産への損害、本製品の使用による、あ
るいは使用不能によるデータの損失に対して、お客様が単独で責任を負うことについてお客様は理解し、合意するものとしま
す。保証の免責を認めていない司法管轄区もあり、司法管轄区によってはお客様が別の権利を有する場合もあります。
本製品の使用により直接または間接的に発生する損害、傷害、およびその他法的責任に対して、Livoxは一切責任を負いません。
ユーザーは、本クイックスタートガイドの規定をはじめとする(ただしこれに限定しない)、安全で合法的な使用方法を順守す
るものとします。本製品使用時のあらゆる行為は全面的にお客様の責任となります。
警告
1. 霧や荒天などの視界が悪い条件でLivox HAPTMを使用する場合は注意してください。このような状況では、検知範囲が狭まる可
能性があります。視界が良好な条件での検知範囲については、仕様セクションを参照してください。
2. Livox HAPの取り付け時には、空気の流れが悪いことによる放熱への影響を防ぐためLivox HAPの周囲に10 mm以上の空間を確
保し、防水性通気バルブが塞がれることのないようにしてください。使用中にLivox HAPの温度が上昇するのは正常です。
3. Livox HAPの光学ウィンドウには触れないでください。光学ウィンドウのほこりや汚れは性能に悪影響を及ぼす可能性があり
ます。光学ウィンドウを正しくお手入れするには、圧縮空気、イソプロピル アルコール、またはレンズクロスを使用してくだ
さい。光学ウィンドウのお手入れの詳細については、Livox HAPのユーザーマニュアルを参照してください。
4. Livox HAP電源ケーブルを改造するときは、ケーブルの電流容量がLivox HAPの電源要件に従っていることを確認してくださ
い。確認を怠ると、製品が火災の危険を招いたり恒久的に損傷したりする可能性があります。
5. 感電や放射線被ばくを避けるため、Livox HAPを絶対に分解しないでください。アクセサリーや製品部分を交換する必要があ
る場合は、Livoxのサポートを受けてください。
6. Livox HAPは、クラス1レーザー製品(IEC/EN 60825-1: 2014)に等級分けされており、通常条件で使用するかぎり安全です。
7. 液体による損傷は保証の対象外です。

14
LIVOX HAP クイックスタートガイド
25°
120°
1. 光学ウィンドウ
2. 位置決め穴1
3. M6 取り付け穴 (φ6.5) × 4
4. M12 航空コネクター
5. M3 取り付け穴×4
6. 位置決め穴2
7. 防水性通気バルブ
HAP (TX)
1
2
3
4
5
6
8. Livox HAPを落下させないでください。
9. Livox HAPクイックスタートガイドには重要な情報が記載されています。初回使用時の前に必ず読んで、参照できるように保
管してください。
はじめに
Livox HAPは、Livox Horizonの次世代機種で、コンパクト設計で優れた精度を誇る高性能LiDARセンサーです。Livox HAPは自動運
転やロボットナビゲーション、動的経路計画、高精度マッピングなどの複数の用途に利用できます。Livox HAPは、Livox Horizon
と比較すると120°(水平)と25°(垂直)のFOV、150 m(10%の反射率、100 klux)の長い検知範囲と452,000 点/秒の高い点
率を備えています。Livox Viewer 2を使用するとリアルタイム点群データを確認できます。また、ソフトウェア開発キット(Livox
SDK)により、点群から取得した3Dデータを使用して、カスタム可能なアプリケーションを開発することができます。Livox
HAPにはHAP (T1)とHAP (TX)の2つのモデルがあります。本ドキュメントはHAP (TX)を意図しています。
取り付けと接続
有効FOV
HAP (TX)のFOVは、以下に示すように120°(水平)×25°(垂直)です。HAP (TX)を取り付ける際、FOVを妨げる物がないよう
にしてください。www.livoxtech.com/hapにアクセスし、HAP (TX)の3DモデルとそのFOVをダウンロードしてください。
垂直 水平水平
7

15
LIVOX HAP クイックスタートガイド
91.6
94.6
48.5
121.6
54
1316
105
65
2
92.65
0.65
62
47
4-M3 5
4-
310.05
+_
6.5 0.1
+_
310.05
+_
HAP (TX)の有効検知距離は、対象物がFOV内のどこにあるかによって異なります。FOVの端に近いほど、有効検出距離は短くな
ります。FOVの中心に近いほど、有効検出距離は長くなります。以下の図を参照してください。
HAP(TX)の取り付け
サイズと取り付け穴については以下の図を参照の上、適切な位置にHAP (TX)の取り付けや埋め込みを行ってください。対応する
ねじは事前に購入が必要であることに注意してください。
垂直 水平
反射率:10%
単位:m
単位:mm
使用中は常に有効検知範囲に注意してください。
0° 15°-15°
-30°
-45°
-60° 60°
200
175
150
125
100
75
50
45°
30°
0° 5°
-5°
-10°
200
175
150
125
100
50
75
10°15°
-15°

16
LIVOX HAP クイックスタートガイド
HAP (TX) M12 航空コネクター(オス)とLivox 航空コネクター1-to-3スプリッターケーブルの詳細な情報については以下を参照してください。
コネクター
HAP (TX)では信頼性の高いM12 航空コネクター(オス)を使用しています。HAP (TX)をLivox航空コネクター1-to-3スプリッター
ケーブル(別売)を使用して接続すると電源供給およびデータ転送や制御信号の送受信が可能になります。
M12航空コネクターのピン 信号 種類 説明 色 機能
1電源+ 電源 DC VCC
赤色(プラス)
電源ケーブル
(DC電源に接続)
9電源+ 電源 DC VCC
2アース 電源 アース
黒色(マイナス)
3アース 電源 アース
4 Ethernet-TX+ 出力 Ethernet-TX+ オレンジ/ホワイト
Ethernetケーブル
(パソコンまたはルーターに
接続)
5 Ethernet-TX- 出力 Ethernet-TX- オレンジ色
6 Ethernet-RX+ 入力 Ethernet-RX+ 緑色/白色
7 Ethernet-RX- 入力 Ethernet-RX- 緑色
8なし なし なし 紫色/白色
機能ケーブル
(未使用。短絡を防ぐため他の
電源ケーブルや信号ケーブルと
は接続しないでください。)
10 なし なし なし グレー/白色
11 なし なし なし グレー
12 なし なし なし 紫色
2&3アース アース アース 黒色
M12 航空コネクター(メス)
機能コネクター
RJ-45ネットワークコネクター
電源ケーブル
1
2
3
4
5
11
10
12
67
8
9
M12 航空コネクター(オス)
12
3
4
5
11
10
12
6
7
8
9

17
LIVOX HAP クイックスタートガイド
• Livox航空コネクター1-to-3スプリッターケーブルは別途購入いただく必要があります。
• パソコンのIPアドレスを設定する方法については、Livox HAPユーザーマニュアルを参照してください。
• 複数のHAP (TX) LiDAR センサーが静的IPアドレスモードで1台のパソコンに接続されている場合、接続されているす
べてのセンサーが異なる静的IPアドレスを持っていることを確認してください。各LiDAR センサーのIPアドレスの設
定方法の詳細は、Livox HAPユーザーマニュアルを参照してください。
• HAP (TX)が外部電源に直接接続されている場合は、HAP (TX)の動作電圧がDC9~18 Vであるため、電源の電圧範囲が
許容範囲内であることを必ず確認してください。電源ケーブルのプラス端子とマイナス端子が正しく接続されてい
ることを確認してください。
• 機能コネクターはHAP (TX)内部で電気的には接続されていないため使用する必要はありません。
Livox Viewer 2のダウンロードと使用
点群データを確認するには、http://www.livoxtech.comへアクセスし、最新のLivox Viewer 2 をダウンロードしてください。Livox
Viewer 2 は、WINDOWS® 10(64ビット)およびUbuntuTM 18.04(64ビット)に対応しています。
1. 「 Livox Viewer 2」ファイルをダウンロードします。
2. Livox Viewer 2 ファイルを解凍し、「Livox Viewer 2.exe」という名前の.exeファイルをクリックして開きます。Ubuntuユーザー
は、Livox Viewer 2 ファイルを解凍し、クリックして、ルートディレクトリの「./livox_viewer_2.sh」ファイルを開きます。
3. Livox Viewer 2 を開いたときにネットワーク認証のシステムウィンドウがポップアップしたときには、Livox Viewer 2 のネット
ワークへのアクセスを許可します。
4. デバイスマネージャーウィンドウはLivox Viewer 2 の左側にあり、メイン画面は右側にあります。 をクリックして、デバイス
マネージャーウィンドウを表示または非表示にします。デバイス マネージャーウィンドウでは、ローカルエリアネットワーク
(LAN)にあるすべてのLivox LiDAR センサーを確認できます。
HAP(TX)の接続
すべてのHAP (TX)は、既定で静的IPアドレスモードに設定されており、IPアドレスは192.168.1.100です。HAP (TX)の既定サブネ
ットマスクはすべて255.255.255.0、デフォルトゲートウェイは192.168.1.1です。HAP (TX)をパソコンに直接接続。
1. 接続する前に、パソコンのIPアドレスを静的IPアドレスモードに設定してください。パソコンのIPアドレスをHAP (TX)のIPア
ドレスと同一ネットワークサブネットに設定し(例:192.168.1.50)、コンピューターのサブネットマスクを255.255.255.0に
設定します。
2. HAP (TX)を以下に示すように接続します。
a. Livox航空コネクター1-to-3スプリッターケーブルの M12航空コネクター(メス)とHAP (TX)のM12航空コネクター(オス)
を接続します。M12 航空コネクター(メス)のロックナットはレンチで締め、M12 航空コネクター(オス)のロックナッ
トの端面がしっかり接続されていることを確認します。コネクター間には隙間がないようにします。
b. Livox航空コネクター1-to-3スプリッターケーブルのRJ-45ネットワークコネクターをパソコンに接続します。
c. Livox航空コネクター1-to-3スプリッターケーブルの外部電源コネクターを外部電源に接続します。入力電圧範囲と極性に注
意してください。
HAP (TX)
赤色(プラス)
黒色(マイナス)
外部電源
機能コネクター
Livox航空コネクター1-to-3スプリッターケーブル
パソコン

18
LIVOX HAP クイックスタートガイド
• Windowsユーザーは、Windowsファイアウォールが有効になっていると、Livox Viewer 2 がLiDAR センサーを検知
できない場合があります。この場合、コントロールパネルを開き、Windowsファイアウォールを無効にしてから、
Livox Viewer 2 を再起動してください。
• Livox Viewer 2 の使用方法の詳細は、Livox Viewer 2 ユーザーマニュアルをダウンロードしてお読みください。
低温時の起動
HAP (TX)の動作温度は-40℃~85℃です。周囲温度が0℃未満の場合には、HAP (TX)は電源に接続されているときに自己発熱モー
ドになることがあります。温度が低いほど、自己発熱電力は大きくなります。自己発熱電力は最大で40 Wに達します。このた
め、特に低温環境では外部電源が正常であるかを必ず確認してください。
仕様
モデル HAP (TX)
レーザー波長 905 nm
レーザー安全性①クラス1(IEC 60825-1:2014)(眼に対す
る安全基準)
検知範囲
(@100 klx)②150 m @反射率10%
FOV 120°(水平)×25°(垂直)
距離の偶発誤差(1σ)③< 2 cm @ 20 m(80%反射率)
距離システムエラー < ±3 cm @ 20 m
角度の偶発誤差(1σ)< 0.1°
ビーム発散 0.03°(水平) × 0.28°(垂直)
点率 452,000 点/秒
データポート 100 BASE-TX Ethernet
データの同期 gPTP
誤警報率
(@100 klx) ④0.01%
動作環境温度範囲 -40℃~85℃
① 内蔵レーザーの広がりは、約25.2°(水平)× 8°(垂直)であり、半値全幅で測定されました。埋め込みレーザーの最大ピーク出力は65 Wを超
える場合があります。レーザーによる損傷を防ぐため、HAP (TX)を分解しないでください。
② HAP (TX)は、0.5 m未満の距離にある物体を正確には検知できません。
③ 温度25℃の環境で試験した測定値です。実際の環境は試験環境と異なることがあります。掲載されている図は参考用です。対象物が0.5~2 mの範囲
内にある場合、点群は様々な度合いで歪む可能性があります。
④ ノイズの誤警報率は、25℃(77°F)の温度で、100 klxのテスト環境で迷光により発生したものです。
⑤ 低温環境下では、HAP (TX) は最初に自己発熱モードに入り、その電力は最大で40 Wに達する可能性があります。HAP (TX) のピーク出力値に基づ
き、電源供給が適切であることを確認してください。詳細は、Livox HAPのユーザーマニュアルを参照してください。
⑥ 電源の出力電圧が常にこの範囲内に収まっていることを確認してください。
保管環境温度範囲 -40℃~95℃
IP等級 IP67
出力⑤
定格電力 12 W
起動電力 26 W
低温発熱電力 40 W
電源電圧範囲⑥
DC9~18 V
DC9~32 Vの電源電圧に対応したバージョ
ンについては、Livoxにご連絡いただくか
www.livoxtech.com/contactからお問い合わ
せください。
ノイズ < 45 dB(A)(40 cm 全方向)
サイズ 105 × 131.6 × 65 mm
重量 約1120 g
IMU
非対応。
IMUに対応したバージョンについては、
Livoxにお問い合わせになるかwww.livoxtech.
com/contactからご依頼ください。
5. デバイス マネージャーウィンドウの上部にある「LiDAR」をクリックします。
6. 確認したいLivox HAPを選択し、 をクリックして接続します。または、確認したいLivox HAPを選択して右クリックし、「接
続」をクリックします。
7. 接続後、 をクリックするかキーボードのスペースキーを押すと、点群データを表示します。

19
LIVOX HAP
16 .
.
. , .
.
, LIVOX™ Technology Company Limited(Livox) (www.livoxtech.com)
.
.
. , Livox ,
.
. LIVOX A/S
(www.livoxtech.com)
. LIVOX ,
LIVOX A/S . (A)
, , , (B) , . LIVOX
LIVOX , , ,
, . ,
LIVOX .
, .
, , (
LIVOX ) 3 .
.
LIVOX , .
.
.
1. Livox HAP TM .
. .
2. Livox HAP Livox HAP 10mm
. Livox HAP .
3. Livox HAP . . ,
. Livox HAP
.
4. Livox HAP , Livox HAP .
.
5. Livox HAP . Livox
.
6. Livox HAP 1 (IEC/EN 60825-1: 2014) .
7. .
8. Livox HAP .
9. Livox HAP . .
Seite wird geladen ...
Seite wird geladen ...
Seite wird geladen ...
Seite wird geladen ...
Seite wird geladen ...
Seite wird geladen ...
Seite wird geladen ...
Seite wird geladen ...
Seite wird geladen ...
Seite wird geladen ...
Seite wird geladen ...
Seite wird geladen ...
Seite wird geladen ...
Seite wird geladen ...
Seite wird geladen ...
-
 1
1
-
 2
2
-
 3
3
-
 4
4
-
 5
5
-
 6
6
-
 7
7
-
 8
8
-
 9
9
-
 10
10
-
 11
11
-
 12
12
-
 13
13
-
 14
14
-
 15
15
-
 16
16
-
 17
17
-
 18
18
-
 19
19
-
 20
20
-
 21
21
-
 22
22
-
 23
23
-
 24
24
-
 25
25
-
 26
26
-
 27
27
-
 28
28
-
 29
29
-
 30
30
-
 31
31
-
 32
32
-
 33
33
-
 34
34
-
 35
35


in anderen Sprachen
- 日本語: Livox HAP ユーザーガイド
- română: Livox HAP Manualul utilizatorului
Verwandte Artikel
Andere Dokumente
-
Weller HAP 200 Operating Instructions Manual
-
-
-
-
Weller WAD 101 Operating Instructions Manual
-
-
-
-
Weller WR 2 Original Instructions Manual