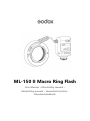
Godox ML-150 II Benutzerhandbuch
- Kategorie
- Kamera blinkt
- Typ
- Benutzerhandbuch

ML-150 II Macro Ring Flash
User Manual • Uživatelský manuál •
Užívateľský manuál • Használati utasítás •
Benutzerhandbuch

2
English
3 – 13
Čeština
14 – 24
Slovenčina
25 – 35
Magyar
36 – 46
Deutsch
47 – 57

3
Dear customer,
Thank you for purchasing our product. Please read the following instructions carefully before
first use and keep this user manual for future reference. Pay particular attention to the safety
instructions. If you have any questions or comments about the device, please contact the
customer line.
✉ www.alza.co.uk/kontakt
✆ +44 (0)203 514 4411
Importer Alza.cz a.s., Jankovcova 1522/53, Holešovice, 170 00 Praha 7, www.alza.cz

4
Foreword
Thank you for purchasing!
Macro ring flash ML-150II has highly precise output power adjustment, power-saving
dormancy mode and PC sync function. It is quite suitable for medical photography, jewellery
photography, microbiological photography, clothing detail photography and watch precision
detail photography.
Main Features
Compatible lens diameter: 49mm, 52mm, 55mm, 58mm, 62mm, 67mm, 72mm, 77mm
Support fine adjustment of output power from 1/1 to 1/32 in #1/2EV stop.
Single triggering hot shoe contact is compatible with most cameras on market.
Warning
Always keep this product from rain or damp in order to prevent fire or electric shock.
The flash unit contains high voltage electric parts, do not try to open, or repair the flash unit.
If you touch the high-voltage circuit inside this product, electric shock may occur. Return it
back to the nominated repair service station.
If the unit is extruded, fallen, suffered from strong impact and thus its inside is exposed, stop
using immediately so as to prevent electric shock leading from touching the inside electric
components.
Do not fire the flash direct to the eyes at short distances (especially baby's eyes), or it may
cause damage to the eyes. When taking flash picture toward baby, it is recommended to
keep the flash unit at least 1 meter (3.3 feet) away from the subject. Or use diffuser or bounce
the light to soften its intensity.
Always keep the battery or anything easy to be gulped out of children's reach. In case of
gulping due to carelessness, please contact a doctor immediately.
When there is caustic liquid leakage inside, it is necessary to wear gloves to take out the
battery.
Do not use the flash unit in the flammable gas, chemical or such liquids. These materials may
be sensitive to the flash from the unit in some circumstance. It may cause fire or
electromagnetic interference.
Do not leave or store the flash unit in temperature over 40°C (such like in the automobile), or
it may damage the electronic components.
The flash unit isn't water resistant. Please keep it away from rain or humidity.
If the flash unit is idle for long, please take out all batteries and keep the flash unit in dry
area.

5
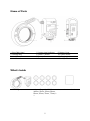
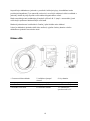
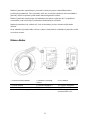
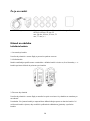
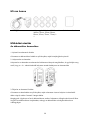
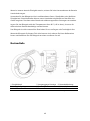
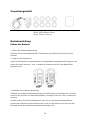
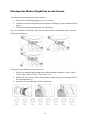
Name of Parts
1. Ring Flash Head
5. Output Level Indicator
9. Battery Cover
2. Locking Ring
6. Power + Button
10. Power Switch
3. Hot Shoe
7. Power - Button
11. Charging Indicator
4. Hot Shoe Contact
8. Test Button
12. PC Sync Socket
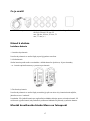
What’s Inside
Macro Ring Flash x 1
Adapter Rings Kit AR-R Kit
(49mm, 52mm, 55mm, 58mm,
62mm, 67mm, 72mm, 77mm) x
1
Instruction manual x 1

6
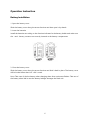
Operation Instruction
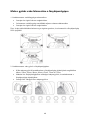
Battery Installation
1. Open the battery cover
Slide the battery cover along the arrow direction and then open it by thumb.
2. Insert the batteries
Install the batteries according to the direction indicated in the battery holder and make sure
the + and - battery contacts are correctly inserted at the battery compartment.
3. Close the battery cover
Slide the battery cover along the arrow direction and slide it back in place. The battery cover
will be locked when there is a “click” sound.
Note: Take care of the hot battery when changing them after continuous flashes. Take out of
the battery when idle in case the battery leakage damages the flash unit.

7
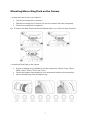
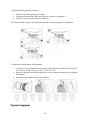
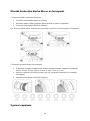
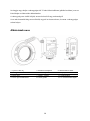
Mounting Macro Ring Flash on the Camera
1. Attach the Control Unit on the Camera
Twist the mounting lock to loosen it.
Slide the mounting foot of control unit into the camera's hoe shoe completely.
Twist the mounting lock to tighten it
Tip: To remove the flash, loosen the fixed knob and slide it out of the hot shoe of camera.
2. Attach the Flash Ring on the Camera.
8 types of adapter rings available to suit the camera lens: 49mm, 52mm, 55mm,
58mm, 62mm, 67mm, 72mm and 77mm
Choose the adapter ring needed for your camera and attach to the camera lens.
Mount the flash ring onto the adapter ring

8
Power Switch
Switch the power switch to ON position to power on.
Slide the power switch to OFF position to power off.
Charging Indicator Instruction
Turn the flash on, the charging indicator turns red, and it is ready to shoot.
If the charging indicator lamp blinks red in every 1s, it indicates low battery. In such case,
please replace the batteries.
Output Control
The flash unit has 6 stops of power output control from 1/32 to 1/1 in 1/2 stop of increment.
Press + button to increase power by 1/2 stop, otherwise, press - button to decrease power by
1/2 stop.
Synchronization Function
The flash and camera will trigger synchronously by using a PC sync cord to connect the sync
terminals of the camera and the flash together.
Note: PC sync cord is sold separately.
Power Saving Function
The flash unit is equipped with power saving mode. When idle for about 30 minutes, it will
enter deeper sleep state automatically to save power. To restart the unit, just press any
button.

9
Protection Function
To prevent the flash head from getting too hot and damage, please do not flash over 50
times when in power level 1/1, Please cool down the flash unit for at least 5 minutes The
over-temperature protection function will be activated if you continue to flash after 50 times.
In this case, the charging time will turn to 7s. Please cool down the flash unit around 5
minutes and it will turn to normal state.
Number of flashes that will activate over-temperature protection:
Power Output
Flashes (Approx.)
1/1
50
1/2 +0.5
75
1/2
100
1/4 +0.5
150
V/4
200
1/8 +0.5
300
1/8
400
1/16 +0.5
500
1/16
600
1/32 +0.5
700
1/32
800

10
Systematic Over-temperature Protection
When the inner circuit is over-heating, which indicates overuse of the flash unit, the inner
circuit will shut down power automatically. The flash unit will turn to normal state after the
inner circuit is cooled down (about 5 minutes).
Technical Data
Model
ML-150I1
Power Supply
4*AA alkaline batteries
Guide Number
GN12(ISO 100, in meter)
Flash Times
300—1000 times (AA alkaline batteries
used)
Recycle Time
Approx. 0.1~2s (AA alkaline batteries used)
CCT
5800K+200K
Flash Duration
1/200S - 1/5000S
Dimension
Controller: 116*71*48mm
Flash Head: 132*132*32mm
Net Weight
0.42kg

11
Warranty Conditions
A new product purchased in the Alza.cz sales network is guaranteed for 2 years. If you need
repair or other services during the warranty period, contact the product seller directly, you
must provide the original proof of purchase with the date of purchase.
The following are considered to be a conflict with the warranty conditions, for which
the claimed claim may not be recognized:
Using the product for any purpose other than that for which the product is intended or
failing to follow the instructions for maintenance, operation, and service of the product.
Damage to the product by a natural disaster, the intervention of an unauthorized person
or mechanically through the fault of the buyer (e.g., during transport, cleaning by
inappropriate means, etc.).
Natural wear and aging of consumables or components during use (such as batteries,
etc.).
Exposure to adverse external influences, such as sunlight and other radiation or
electromagnetic fields, fluid intrusion, object intrusion, mains overvoltage, electrostatic
discharge voltage (including lightning), faulty supply or input voltage and inappropriate
polarity of this voltage, chemical processes such as used power supplies, etc.
If anyone has made modifications, modifications, alterations to the design or adaptation
to change or extend the functions of the product compared to the purchased design or
use of non-original components.

12
EU Declaration of Conformity
Identification data of the manufacturer's / importer's authorized representative:
Importer: Alza.cz a.s.
Registered office: Jankovcova 1522/53, Holešovice, 170 00 Prague 7
CIN: 27082440
Subject of the declaration:
Title: ML 150 II
Model / Type:
The above product has been tested in accordance with the standard(s) used to
demonstrate compliance with the essential requirements laid down in the Directive(s):
Directive No. 2014/30/EU
Directive No. 2014/35/EU
Directive No. 2014/53/EU
Directive No. 2011/65/EU as amended 2015/863/EU
Prague, 13.2.2023

13
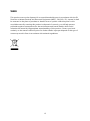
WEEE
This product must not be disposed of as normal household waste in accordance with the EU
Directive on Waste Electrical and Electronic Equipment (WEEE - 2012/19 / EU). Instead, it shall
be returned to the place of purchase or handed over to a public collection point for the
recyclable waste. By ensuring this product is disposed of correctly, you will help prevent
potential negative consequences for the environment and human health, which could
otherwise be caused by inappropriate waste handling of this product. Contact your local
authority or the nearest collection point for further details. Improper disposal of this type of
waste may result in fines in accordance with national regulations.

14
Vážený zákazníku,
Děkujeme vám za zakoupení našeho produktu. Před prvním použitím si prosím pečlivě
přečtěte následující pokyny a uschovejte si tento návod k použití pro budoucí použití. Zvláštní
pozornost věnujte bezpečnostním pokynům. Pokud máte k přístroji jakékoli dotazy nebo
připomínky, obraťte se na zákaznickou linku.
✉ www.alza.cz/kontakt
✆ +420 225 340 111
Dovozce Alza.cz a.s., Jankovcova 1522/53, Holešovice, 170 00 Praha 7, www.alza.cz

15
Předmluva
Děkujeme za nákup!
Kroužkový makroblesk ML-150II má vysoce přesné nastavení výstupního výkonu, úsporný
režim nečinnosti a funkci synchronizace s počítačem. Je velmi vhodný pro lékařskou
fotografii, fotografování šperků, mikrobiologickou fotografii, fotografování detailů oděvů a
přesné fotografování detailů hodinek.
Hlavní funkce
Průměr kompatibilního objektivu: 49 mm, 52 mm, 55 mm, 58 mm, 62 mm, 67 mm,
72 mm, 77 mm
Podpora jemného nastavení výstupního výkonu v rozsahu 1/1 až 1/32 v 1/2EV kroku.
Kontakt hotshoe s jednou spouští je kompatibilní s většinou fotoaparátů na trhu.
Varování
Tento výrobek vždy chraňte před deštěm nebo vlhkostí, aby nedošlo k požáru nebo úrazu
elektrickým proudem.
Záblesková jednotka obsahuje elektrické části pod vysokým napětím, nepokoušejte se ji
otevírat ani opravovat. Pokud se dotknete vysokonapěťového obvodu uvnitř tohoto výrobku,
může dojít k úrazu elektrickým proudem. Vraťte jej zpět do určeného servisu.
Pokud je jednotka vytlačena, spadla, utrpěla silný náraz a její vnitřek je tak odhalen, okamžitě
ji přestaňte používat, abyste zabránili úrazu elektrickým proudem způsobenému dotykem
vnitřních elektrických součástí.
Nestřílejte bleskem přímo do očí na krátkou vzdálenost (zejména do očí dítěte), jinak může
dojít k poškození očí. Při fotografování s bleskem směrem k dítěti se doporučuje udržovat
zábleskovou jednotku ve vzdálenosti nejméně 1 metrů od fotografovaného objektu. Nebo
použijte difuzér či odraz světla, abyste zmírnili jeho intenzitu.
Vždy uchovávejte baterii nebo cokoli, co lze snadno spolknout, mimo dosah dětí. V případě
spolknutí z neopatrnosti se ihned obraťte na lékaře.
Pokud uvnitř uniká žíravá kapalina, je nutné při vyjímání baterie používat rukavice.

16
Nepoužívejte zábleskovou jednotku v prostředí s hořlavými plyny, chemikáliemi nebo
podobnými kapalinami. Tyto materiály mohou být za určitých okolností citlivé na záblesk z
jednotky. Mohlo by dojít k požáru nebo elektromagnetickému rušení.
Blesk nenechávejte ani neskladujte při teplotě vyšší než 40 °C (např. v automobilu), jinak
může dojít k poškození elektronických součástek.
Blesková jednotka není voděodolná. Chraňte ji před deštěm nebo vlhkostí.
Pokud je záblesková jednotka delší dobu nečinná, vyjměte všechny baterie a uložte
zábleskovou jednotku na suchém místě.
Název dílů
1. Prstencová hlava blesku
5. Indikátor výstupní
úrovně
9. Kryt baterie
2. Pojistný kroužek
6. Tlačítko napájení +
10. Vypínač napájení
3. Hot shoe
7. Napájení – tlačítko
11. Indikátor nabíjení
4. Kontakt s hot shoe
8. Testovací tlačítko
12. Zásuvka pro
synchronizaci s PC

17
Co je uvnitř
Makro kroužkový blesk x 1
Sada adaptérových kroužků
AR-R Kit (49 mm, 52 mm, 55
mm, 58 mm, 62 mm, 67 mm, 72
mm, 77 mm) x 1
Návod k použití x 1
Návod k obsluze
Instalace baterie
1. Otevřete kryt baterie
Posuňte kryt baterie ve směru šipky a poté jej palcem otevřete.
2. Vložte baterie
Vložte baterie podle směru uvedeného v držáku baterií a ujistěte se, že jsou kontakty
+ a - baterie správně zasunuty v prostoru pro baterie.
3. Zavřete kryt baterie
Posuňte kryt baterie ve směru šipky a zasuňte jej zpět na místo. Kryt baterie bude zajištěn,
jakmile se ozve "cvaknutí".
Poznámka: Při výměně baterie po nepřetržitém záblesku dávejte pozor na horkou baterii. Při
nečinnosti vyjměte baterii, aby nedošlo k poškození zábleskové jednotky vytečením baterie.
Montáž kroužkového blesku Macro na fotoaparát

18
1. Připevněte řídicí jednotku na kameru
Otočením montážní pojistky ji uvolněte.
Zcela zasuňte montážní patku řídicí jednotky do botky fotoaparátu.
Otočením upevňovacího zámku jej utáhněte
Tip: Chcete-li blesk vyjmout, uvolněte pevný knoflík a vysuňte jej z patice fotoaparátu.
2. Připevněte kroužek blesku na fotoaparát.
K dispozici je 8 typů adaptérových kroužků podle objektivu fotoaparátu: 49 mm, 52
mm, 55 mm, 58 mm, 62 mm, 67 mm, 72 mm a 77 mm.
Vyberte si adaptérový kroužek potřebný pro váš fotoaparát a nasaďte jej na objektiv
fotoaparátu.
Nasaďte kroužek blesku na kroužek adaptéru
Vypínač napájení

19
Pro zapnutí přepněte vypínač napájení do polohy ON.
Chcete-li vypnout napájení, posuňte vypínač do polohy OFF.
Pokyn k indikátoru nabíjení
Zapněte blesk, indikátor nabíjení zčervená a blesk je připraven k fotografování.
Pokud kontrolka nabíjení bliká červeně každou 1 s, znamená to, že je baterie vybitá. V
takovém případě vyměňte baterie.
Řízení výstupu
Záblesková jednotka má 6 stupňů regulace výkonu od 1/32 do 1/1 s krokem 1/2 stupně.
Stisknutím tlačítka + zvýšíte výkon o 1/2 stupně, stisknutím tlačítka snížíte výkon o 1/2
stupně.
Synchronizační funkce
Blesk a fotoaparát se spustí synchronně pomocí synchronizačního kabelu PC, kterým se
propojí synchronizační svorky fotoaparátu a blesku.
Poznámka: Synchronizační kabel pro PC se prodává samostatně.
Funkce úspory energie
Blesková jednotka je vybavena režimem úspory energie. Při nečinnosti po dobu přibližně 30
minut přejde automaticky do stavu hlubšího spánku, aby šetřil energii. Chcete-li jednotku
znovu spustit, stačí stisknout libovolné tlačítko.

20
Funkce ochrany
Abyste předešli přílišnému zahřátí hlavy blesku a jejímu poškození, neprovádějte při úrovni
výkonu 1/1 více než 50 záblesků. Bleskovou jednotku nechte alespoň 5 minut chladnout.
Funkce ochrany proti přehřátí se aktivuje, pokud budete pokračovat v záblesku po 50
záblescích. V takovém případě se doba nabíjení změní na 7 s. Prosím, ochlaďte zábleskovou
jednotku přibližně 5 minut a změní se na normální stav.
Počet záblesků, které aktivují ochranu proti přehřátí:
Výstupní výkon
Záblesky (přibližně)
1/1
50
1/2 +0.5
75
1/2
100
1/4 +0.5
150
V/4
200
1/8 +0.5
300
1/8
400
1/16 +0.5
500
1/16
600
1/32 +0.5
700
1/32
800
Seite laden ...
Seite laden ...
Seite laden ...
Seite laden ...
Seite laden ...
Seite laden ...
Seite laden ...
Seite laden ...
Seite laden ...
Seite laden ...
Seite laden ...
Seite laden ...
Seite laden ...
Seite laden ...
Seite laden ...
Seite laden ...
Seite laden ...
Seite laden ...
Seite laden ...
Seite laden ...
Seite laden ...
Seite laden ...
Seite laden ...
Seite laden ...
Seite laden ...
Seite laden ...
Seite laden ...
Seite laden ...
Seite laden ...
Seite laden ...
Seite laden ...
Seite laden ...
Seite laden ...
Seite laden ...
Seite laden ...
Seite laden ...
Seite laden ...
-
 1
1
-
 2
2
-
 3
3
-
 4
4
-
 5
5
-
 6
6
-
 7
7
-
 8
8
-
 9
9
-
 10
10
-
 11
11
-
 12
12
-
 13
13
-
 14
14
-
 15
15
-
 16
16
-
 17
17
-
 18
18
-
 19
19
-
 20
20
-
 21
21
-
 22
22
-
 23
23
-
 24
24
-
 25
25
-
 26
26
-
 27
27
-
 28
28
-
 29
29
-
 30
30
-
 31
31
-
 32
32
-
 33
33
-
 34
34
-
 35
35
-
 36
36
-
 37
37
-
 38
38
-
 39
39
-
 40
40
-
 41
41
-
 42
42
-
 43
43
-
 44
44
-
 45
45
-
 46
46
-
 47
47
-
 48
48
-
 49
49
-
 50
50
-
 51
51
-
 52
52
-
 53
53
-
 54
54
-
 55
55
-
 56
56
-
 57
57


Godox ML-150 II Benutzerhandbuch
- Kategorie
- Kamera blinkt
- Typ
- Benutzerhandbuch
in anderen Sprachen
- slovenčina: Godox ML-150 II Používateľská príručka
Verwandte Papiere
-
Godox AD300Pro Outdoor Flash Benutzerhandbuch
-
-
Godox V860III Benutzerhandbuch
-
Godox V1C V1 Benutzerhandbuch
-
Godox AD200Pro Benutzerhandbuch
-
Godox TT600S Benutzerhandbuch
-
Godox TT600 Benutzerhandbuch
-
Godox TT685II-N Benutzerhandbuch
-
Godox TT685II-O Benutzerhandbuch
-
Godox TT685II-C Benutzerhandbuch