Midland Truck Guardian Pro Benutzerhandbuch
- Typ
- Benutzerhandbuch

O MANUALE D’USO
O INSTRUCTION GUIDE
O ANLEITUNG
SISTEMA PROFESSIONALE DI SORVEGLIANZA E REGISTRAZIONE PER CAMION
DVR AND SURVEILLANCE PROFESSIONAL SYSTEM FOR TRUCKS
PROFESSIONELLES ÜBERWACHUNGS UND AUFZEICHNUNGSSYSTEM FÜR LKW
TRUCK GUARDIAN PROTRUCK GUARDIAN PRO

2
Il manuale multilingua è disponibile sul sito
www.midlandeurope.com
The multi-language user manual is available on our website
www.midlandeurope.com
Die mehrsprachige Anleitung finden Sie auf unserer Webseite
www.midlandeurope.com
El manual multilingüe está disponible en
www.midlandeurope.com
Le manuel multi langue est disponible sur notre site internet
www.midlandeurope.com
Το πολύγλωσσο εγχειρίδιο χρήσης είναι διαθέσιμο στην ιστοσελίδα μας
www.midlandeurope.com
Instrukcja w wielu językach dostępna na stronie
www.midlandeurope.com

3
ITALIANO
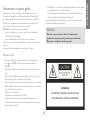
Informazioni su questa guida
Il contenuto del presente documento viene divulgato solo a scopo
informativo ed è soggetto a modifiche senza preavviso. Abbiamo fatto
il possibile per garantire che il presente manuale sia preciso e completo.
Tuttavia, non ci assumiamo alcuna responsabilità per eventuali errori e
omissioni che potrebbero essere stati commessi e fatti.
MIDLAND non si assume nessuna responsabilità:
• in caso di smarrimento o rotture accidentali dovute al cedimento o
rottura dei supporti di fissaggio;
• in caso di eventuali danni causati da tali rotture o cedimenti.
Il produttore si riserva il diritto di modificare le specifiche tecniche senza
preavviso.
Conservare il presente manuale per consultazione al bisogno.
Precauzioni d’uso
• Non esporre il Monitor a temperature estreme. La temperatura di
stoccaggio è -30÷80°C, mentre la temperatura di utilizzo è tra
-20÷70°C
• Non utilizzare il Monitor in presenza di eccessiva condensa, polvere o
fumo
• Non sottoporre il Monitor ad eccessive vibrazioni, forti urti o cadute
• Non perforare, grattare o utilizzare prodotti abrasivi
• Non posizionare i cavi dove possono essere strappati o provocare cadute
• Installare il Monitor lasciando almeno 5 cm dietro di esso per consentire
una corretta dissipazione del calore
• Il Monitor non è waterproof
• Il sistema può essere alimentato a 12 o 24 V
• Per una buona qualità dei video e per la pulizia del dispositivo, non
utilizzare sostanze chimiche, solventi o detergenti , ma unicamente un
panno morbido inumidito.
• Alla fine del suo ciclo di vita non smaltire la videocamera in modo casuale
e non gettarla nel fuoco: potrebbe esplodere.
• In base alle leggi locali e alle osservazioni sulla sicurezza dei veicoli, non
operare manualmente il dispositivo durante la guida
La presente telecamera è destinata ad un uso non commerciale, nei limiti
autorizzati dalla legislazione applicabile.
WARNING
Nel monitor sono presenti tensioni elevate, l’eventuale apertura e
riparazione deve avvenire da parte di personale esperto ed autorizzato.
Ogni apertura o modifica farà decadere la garanzia
ATTENZIONE:
PER RIDURRE IL RISCHIO DI SHOCK ELETTRICO
NON RIMUOVERE IL COPERCHIO POSTERIORE

4
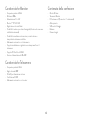
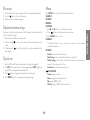
Caratteristiche Monitor
• Frequenza operativa: 2.4GHz
• Wireless a 200m
• Alimentazione a 12 o 24V
• Monitor 7” TFT LCD HD
• Registrazione ciclica dei filmati
• Possibilità di ruotare e specchiare l’immagine (in funzione di come viene
installata la telecamera)
• Possibilità di visualizzare a schermo intero, a metà schermo o
temporizzare le telecamere installate
• Abbinamento automatico con la telecamera
• Supporta visualizzazione e registrazione contemporanea fino a 4
telecamere
• Supporta SD Card fino a 128GB
• Tensione di alimentazione da 10 a 30V
Caratteristiche Telecamera
• Frequenza operativa 2.4GHz
• Angolo di visuale 100°
• 18 led IR per illuminazione notturna
• Certificazione IP 69K
• Abbinamento automatico con il monitor
Contenuto della confezione
• Monitor Wireless
• Telecamera Wireless
• N°2 antenne wi-fi (1 x monitor + 1 x telecamera)
• Alette parasole
• Staa e viti di fissaggio
• Biadesivo
• Chiave a brugola

5
ITALIANO
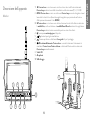
1. ◄ Pressione breve: scorre il menu verso sinistra e riduce i valori nelle funzioni selezionate.
Pressione lunga: seleziona la modalità di visualizzazione della videocamera (1, 1-2, 1-2 3 4)
2. MENU. Pressione breve: accede o esce dal menu. Pressione lunga: consente di regolare volume/
luminosità/contrasto/colore (una volta eseguita la regolazione per passare da una funzione
all’altra premere brevemente il tasto MENU).
3. ► Pressione breve: scorre il menu verso destra ed incrementa i valori delle funzioni selezionate.
In modalità foto, scatta un’istantanea. In modalità Manual Record avvia/arresta la registrazione.
Pressione lunga: seleziona la videocamera dalla quale si vuole ascoltare l’audio.
4. Premere per accendere/spegnere il dispositivo.
5. Flip. Inverte/capovolge la visualizzazione.
6. Premere per attivare o disattivare le linee guida utili per il parcheggio.
7. Ok/conferma/abbinamento. Pressione breve: consente di selezionare la telecamera da
visualizzare. Pressione breve all’interno del menu: conferma della funzione/valore selezionato.
Pressione lunga: avvia abbinamento.
8. Scheda SD
9. Altoparlante
10. Staa fissaggio
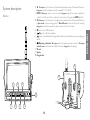
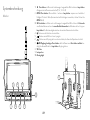
Descrizione dell’apparato
Monitor
1
2
3
4
5
6
7
10
MENU
8
9
MENU

6
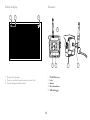
Simboli del display
1. Numero della telecamera
2. Questa icona indica da quale telecamera proviene l’audio
3. Intensità del segnale della telecamera
Telecamera
1. 18 Led IR infrarossi
2. Lente
3. Antenna
4. Cavo alimentazione
5. Staa di fissaggio
3
4
5
MENU
12
1 2 3

7
ITALIANO
Installazione del Kit
1. Collegare il connettore d’alimentazione del monitor all’adattatore
accendisigari.
2. Accendere la videocamera (pressione del tasto ).
3. È ora possibile visualizzare le immagini.
Installazione di telecamere opzionali
In caso di installazione di videocamere opzionali, occorrerà innanzitutto
abbinarle al monitor seguendo questa procedura:
1. Posizionarsi su un canale libero (sul quale non sia abbinata nessuna video
camera).
2. Premere brevemente per selezionare il numero della telecamera da
abbinare.
3. Premendo a lungo il tasto si avvia l’abbinamento.
4. Alimentare la videocamera entro lo scadere del timer visualizzato.
Funzionamento
1. Inserire la SD card (se è necessaria la registrazione delle immagini).
2. Accendere monitor e videocamera per iniziare a visualizzare le immagini.
Apparirà il simbolo • REC. La registrazione riprenderà in automatico.
3. Premere il pulsante per cambiare la videocamera visualizzata.
4. Premere il pulsante MENU per aprire il menu e personalizzare le
impostazioni.
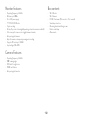
Menu
Premere il pulsante MENU ed appariranno le seguenti voci:
CAMERAS
SETTINGS
RECORD
PLAYBACK
1. Utilizzare i pulsanti ◄ e ► per scorrere tra le varie voci.
2. Premere per entrare nei menu e confermare.
3. Premere MENU per uscire.
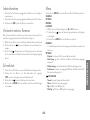
CAMERAS
• Questa modalità consente di aggiungere o rimuovere il collegamento alle
telecamere/a installate/a.
SETTINGS
• Calendar: consente di impostare data e ora.
• Date Stamp: permette di imprimere data e ora sul video.
• Default settings: questa modalità permette di eseguire il reset, cioè
ripristinare i valori impostati in fabbrica.
• Card format: consente di formattare la scheda di memoria.
ROTAZIONE IMMAGINE
• Normale: visualizza immagine normale
• Specchio: visualizza immagine ribaltata orizzontalmente
• Sotto-sopra: visualizza immagine ruotata di 180°
• Specchio verticale: visualizza ruotata ribaltata verticalmente

8
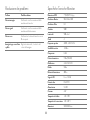
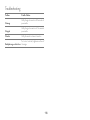
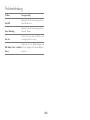
Risoluzione dei problemi
Problema Possibile soluzione
Nessuna immagine Verificare la corretta connessione dell’ali-
mentazione del monitor
Nessun segnale Verificare la corretta connessione dell’ali-
mentazione della telecamera
Nessun suono Verificare che il volume del monitor non sia
0 o sia spento
Immagini troppo scure/chiare
o pallide Regolare la luminosità, il contrasto ed il
colore dell’immagine
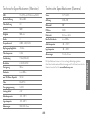
Specifiche Tecniche Monitor
Dimensione LCD 7” (16:9) IPS Display
Risoluzione Monitor 1024 RGB x 600
Risoluzione Video HD
Contrasto 500:1
Luminosità 500cd/m2
Canali 4
Frequenza operative 2400 – 2483.5 MHz
Sensibilità ricevitore -89dBm
Compression H264
Potenza trasmissione 17dBm (50mW)
Modulazione 2.4G FSK/GFSK
Ritardo 120ms
Distanza di trasmissione 200 m
Supporto SD Fino a 128GB
Formato video PAL/NTSC
Alimentazione 12-30V
Consumo <3W
Temperature di utilizzo -20 / +70°C
Temperatura di conservazione -30 / +80 °C
Dimensioni 180X120X18mm

9
ITALIANO
Specifiche Tecniche Telecamera
Sensore 1/2.7” CMOS
Risoluzione 1280x720
Angolo di visione 100
Impermeabilità IP69K
Visione Notturna 18 led IR
Distanza di trasmissione 200 m
Temperature di utilizzo -20 / +70°C
Temperatura di conservazione -30 / +80 °C
Dimensioni 72x42x52mm
Le specifiche possono variare senza preavviso.
Per scaricare eventuali aggiornamenti firmware e per informazioni sulla
garanzia visitate il sito www.midlandeurope.com

10

11
ENGLISH
CAUTION: TO REDUCE THE RISK OF ELECTRIC SHOCK
DO NOT REMOVE COVER (OR BACK).
NO USER SERVICEABLE PARTS INSIDE.
REFER SERVICING TO QUALIFIED SERVICE PERSONNEL.
About this Guide
The content in this document is for information purpose and is subject to
change without prior notice.
We made every eort to ensure that this User Guide is accurate and
complete. However, no liability is assumed for any errors and omissions that
may have occurred.
MIDLAND refuses any liability:
• in the event of loss or accidental breakage caused by the failure or
breakage of the fixing supports;
• in case of any possible damage caused by such failure or breakage.
The manufacturer reserves the right to change the technical specifications
without prior notice.
Keep this user manual for further reference.
Warnings
• Do not expose Monitor to extreme temperature. Storage temperature is
-30÷80°C, working temperature is -20÷70°C
• Do not use the Monitor with excessive moisture, dust or smoke.
• Do not use the Monitor with excessive vibrations, shock or falls.
• Do not puncture, scratch or use abrasive cleaning products.
• Install the wires in way they cannot be ripped or make you falling down
• Leave at least 5cm space behind the Monitor
• Monitor is not waterproof
• The system can be powered 12 or 24 V
• To clean the camera do not use thrill chemical substances or clean
solvents, but only a moist soft cloth.
• At the end of its life, do not discard the system randomly and do not throw
it into the fire, it may explode.
• Due to local laws and vehicles safety considerations, do not manually
operate the device while driving.
This camera is intended for non-commercial use, within the limits permitted
by applicable law.
WARNING
Monitor works with high voltage inside. Opening and repairing has to be done
by professional and authorised technicians. Any opening or modification will
void the warranty.

12
Monitor features
• Operating frequency: 2.4GHz
• Wireless up to200m
• 12 or 24V power supply
• 7” TFT LCD HD Monitor
• Cycle recording
• Rotate, flip or mirror the image (depending on how the camera is installed)
• Full screen, split screen or auto toggle between channels
• Auto pairing with camera
• Up to 4 cameras contemporary viewing and recording
• Supports SD cards up to 128GB
• Input voltage: 10 to 30V
Camera Features
• Operating frequency: 2.4GHz
• 100° viewing angle
• 18 IR leds for night vision
• IP69K certification
• Auto pairing with monitor
Box content
• Wi-fi Monitor
• Wi-fi Camera
• N°2 Wi-fi antennas (1 for monitor + 1 for camera)
• Sunshade protections
• Mounting bracket and fixing screws
• Double-sided tape
• Allen wrench

13
ENGLISH
1. ◄ Short press: scrolls the menu to the left and decreases the values of the selected functions.
Long press: selects the display mode of the camera (1, 1-2, 1-2-3-4)
2. MENU. Short press: enters or exits the menu. Long press: adjusts the volume / brightness /
contrast / color (to switch from one function to the other, shortly press the MENU button).
3. ► Short press: scrolls the menu to the right and increases the values of the selected functions.
In photo mode, it captures a single photo. In Manual Record mode it starts/stops the recording.
Long press: it selects the camera from which you want to listen to the audio.
4. Press to turn on/o the device.
5. Flip. Press to flip the visualization.
6. Press to activate/deactivate the guidelines, which are useful while are you are parking your
vehicle.
7. Ok/pairing confirmation. Short press: selects the camera you want to monitor. Short press
inside the menu: confirms the selected function/value. Long press: starts pairing.
8. SD card
9. Speaker
10. Fixing bracket
System description
Monitor
1
2
3
4
5
6
7
10
MENU
8
9
MENU

14
Display Symbol
1. Number of the camera
2. This icon indicates from which camera you hear the audio
3. Signal strength of the camera
Camera
1. 18 IR Leds
2. Lens
3. Antenna
4. Power supply cable
5. Mounting bracket
3
4
5
MENU
12
1 2 3

15
ENGLISH
Kit setup
1. Connect the monitor’s power supply cable to the cigarette lighter plug.
2. Press the button to turn on the camera.
3. Now it’s possible to view the images
Optional camera setup
If you want to install optional cameras, at first they have to be paired with the
monitor, follow these steps:
1. Select a free channel (no camera paired)
2. 2. Press shortly to select the number of the camera that you want
to pair.
3. 3. Keep pressed to start the pairing. Turn on the camera before the
timer expires
Quick use
1. Insert the SD card (if you are interested in recording the images).
2. Turn ON monitor and camera to start viewing images. (•REC symbol will
appear). The recording will automatically start.
3. Press button to change the camera view on the monitor.
4. Press MENU button to open menu and change settings.
Menu
Push MENU button, you will find the following options:
CAMERAS
SETTINGS
RECORD
PLAYBACK
1. Use ◄ and ► buttons to scroll the menu items.
2. Press button to enter menu items and confirm.
3. Press MENU button to exit.
CAMERAS
• This feature allows to add or remove the connection to the cameras
installed in the system.
SETTINGS
• Calendar: allows to set date and time.
• Date Stamp: allows to indicate date and time on the video.
• Default settings: in this mode, the device will make a reset and will be
restored to the values set in factory.
• Card format: to format the memory card.
FLIP FEATURE
• Normal: image is normal
• Mirror: image is horizontally mirrored
• Flip: image is 180° rotated
• Mir-Flip: image is 180° rotated and mirrored

16
Troubleshooting
Problem Possible Solution
No image Verify the good connection of the monitor’s
power cable
No signal Verify the good connection of the camera’s
power cable
No audio Verify the monitor volume is turned on
Dark/pale image or bad colour Set correct contrast, brightness and hue of
the image

17
ENGLISH
Monitor Technical Specs
LCD 7” (16:9) IPS Display
Monitor Resolution 1024 RGB x 600
Video Resolution HD
Contrast 500:1
Brightness 500cd/m2
Channels 4
Working Frequency 2400 – 2483.5 MHz
Receiver Sensitivity -89dBm
Compression H264
Tx Power 17dBm (50mW)
Modulation 2.4G FSK/GFSK
Delay 120ms
Tx Distance 200 m
SD Card Fino a 128GB
Video PAL/NTSC
Power Supply 12-30V
Power Consumption <3W
Working Temperature -20 / +70°C
Stocking Temperature -30 / +80 °C
Size 180X120X18mm
Camera Technical Specs
Sensor 1/2.7” CMOS
Resolution 1280x720
View Angle 100
IP Protection IP69K
Night Vision 18 led IR
Tx Distance 200 m
Working Temperature -20 / +70°C
Stocking Temperature -30 / +80 °C
Size 72x42x52mm
Specifications may vary without prior notice.
To download further updatings and for information about the warranty please
visit www.midlandeurope.com

18

19
DEUTSCH
CAUTION: TO REDUCE THE RISK OF ELECTRIC SHOCK
DO NOT REMOVE COVER (OR BACK).
NO USER SERVICEABLE PARTS INSIDE.
REFER SERVICING TO QUALIFIED SERVICE PERSONNEL.
Über diese Anleitung
Der Inhalt dieses Dokuments dient nur zur Information und kann ohne vor-
herige Ankündigung geändert werden.
Wir haben alle Anstrengungen unternommen, um sicherzustellen, dass dieses
Benutzerhandbuch korrekt und vollständig ist.
MIDLAND lehnt jede Haftung ab für
• Beschädigung oder Verlust des Geräts durch eine Beschädigung oder
Versagen der Befestigungshalterung.
• alle weiteren Schäden die durch eine Beschädigung oder Versagen der
Befestigungshalterung entstehen können.
Der Hersteller behält sich das Recht vor, die technischen Spezifikationen
ohne vorherige Ankündigung zu ändern.
Bewahren Sie dieses Benutzerhandbuch zum weiteren Nachschlagen auf.
Sicherheitshinweise
• Setzen Sie den Monitor keinen extremen Temperaturen aus. Die Lager-
temperatur liegt bei -30–80°C, die Betriebstemperatur bei -20–70°C.
• Verwenden Sie den Monitor nicht bei übermäßiger Luftfeuchtigkeit,
Staub- oder Rauchbelastung.
• Setzen Sie den Monitor keinen übermäßigen Erschütterungen, Stößen
oder Stürzen aus.
• Vermeiden Sie Einstiche, Kratzer oder die Verwendung von Scheuermit-
teln.
• Verlegen Sie die Kabel so, dass sie nicht abreißen oder ein Stolperrisiko
darstellen können.
• Lassen Sie mindestens 5 cm Platz hinter dem Monitor.
• Der Monitor ist nicht wasserdicht.
• Das System kann mit 12 oder 24 V betrieben werden.
• Verwenden Sie zur Reinigung der Kamera keine scharfen chemischen
Substanzen oder Lösungsmittel, sondern nur ein feuchtes, weiches Tuch.
• Setzen Sie das Gerät nicht Feuer aus, es besteht sonst Explosionsgefahr.
• Beachten Sie bei der Entsorgung des Gerätes die Vorgaben für Elektro-
schrott.
• Beachten Sie die gültigen Gesetze bezüglich der Bedienung des Gerätes
während der Fahrt. Wir empfehlen generell von der Bedienung während
der Fahrt abzusehen.
Beaachten Sie die gültigen Bild-, Datenschutz- und Verkehrsgestze zum Ein-
satz von und Aufzeichnung mittels Kameras im Straßenverkehr.
ACHTUNG
Der Monitor arbeitet mit Hochspannung im Gehäuse. Das Önen und Re-
parieren muss von professionellen und autorisierten Technikern durchgeführt
werden. Jedes unautorisierte Önen oder Modifizieren führt zum Erlöschen
der Garantie.

20
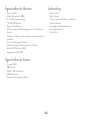
Eigenschaften des Monitors
• Frequenz: 2.4GHz
• Kabellose Reichweite bis zu 200m
• 12 oder 24 V Spannungsversorgung
• 7 Zoll HD-LCD-Bildschirm
• Ringspeicher für Aufnahmen
• Drehen und Spiegeln des Bildes (abhängig von der Art der Installation der
Kamera)
• Vollbild, geteilter Bildschirm oder automatisches Umschalten zwischen
den Kanälen
• Automatische Kopplung mit der Kamera
• Zeitgleiche Anzeige und Aufzeichnung von bis zu 4 Kameras
• Unterstützt SD-Karten bis zu 128 GB
• Eingangsspannung: 10 bis 30 V
Eigenschaften der Kamera
• Frequenz: 2.4GHz
• 100° Blickwinkel
• 18 Infrarot-LEDs für Nachtsicht
• IP69K-Zertifizierung
• Automatische Kopplung mit dem Monitor
Lieferumfang
• Kabelloser Monitor
• Kabellose Kamera
• 2 Antennen (jeweils eine für Monitor und Kamera)
• Sonnenschutzblenden
• Montagebügel und Befestigungsschrauben
• Doppelseitiges Klebeband
• Inbus-Schlüssel
Seite wird geladen ...
Seite wird geladen ...
Seite wird geladen ...
Seite wird geladen ...
Seite wird geladen ...
Seite wird geladen ...
Seite wird geladen ...
Seite wird geladen ...
-
 1
1
-
 2
2
-
 3
3
-
 4
4
-
 5
5
-
 6
6
-
 7
7
-
 8
8
-
 9
9
-
 10
10
-
 11
11
-
 12
12
-
 13
13
-
 14
14
-
 15
15
-
 16
16
-
 17
17
-
 18
18
-
 19
19
-
 20
20
-
 21
21
-
 22
22
-
 23
23
-
 24
24
-
 25
25
-
 26
26
-
 27
27
-
 28
28


Midland Truck Guardian Pro Benutzerhandbuch
- Typ
- Benutzerhandbuch
in anderen Sprachen
- English: Midland Truck Guardian Pro User manual
- italiano: Midland Truck Guardian Pro Manuale utente