
WET & DRY VACUUM CLEANER
Operation and safety notes
Translation of the original instructions
ΗΛΕΚΤΡΙΚΗ ΣΚΟΎΠΑ ΎΓΡΏΝ/ΣΤΕΡΕΏΝ
Υποδείξεις χειρισμού και ασφαλείας
Μετάφραση του πρωτοτύπου των οδηγιών χρήσης
NASS-/TROCKENSAUGER
Bedienungs- und Sicherheitshinweise
Originalbetriebsanleitung
IAN 404705_2107
WET & DRY VACUUM CLEANER PWD12B2

GB/IE/NI Operation and safety notes Page 7
GR/CY Υποδείξεις χειρισμού και ασφαλείας Σελίδα 23
DE/AT/CH Bedienungs- und Sicherheitshinweise Seite 39

A
B
[1]
[8]
[9]
[2] [3]
[5]
[6]
[7]
[4]
[][][]
[]
[]
[6]
[]
[]
[]
[]
[]
[]
[] [] [] []
[]
[]
[]
[]
[]
[]
[]

E
D
C
[9]
[4] [] []
[]
[] []
[]
[]
[8]

G
F
H
[] [] []
[] []
[] []
[]
[]
[]
[]
[]
[] []
[]

I
J
K
[1][2]
[1] [2]
[]
[6]
[8]
[6]
[2]
[6]
[8]
[]

N
M
L
[]
[]
[]
[]
[]
[] [] []

O
P
Q
[]
[8]
[]
[]
[3]
[8]
[]
[]
[]
[7]
[] []

7GB/IE/NI
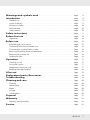
Warnings and symbols used .................................... Page 8
Introduction ........................................................ Page 9
Intended use.......................................................... Page 9
Scope of delivery...................................................... Page 9
Description of parts .................................................... Page 10
Technical data ........................................................ Page 10
Safety features ........................................................ Page 10
Safety instructions................................................. Page 11
Before first use ..................................................... Page 14
Unpacking ........................................................... Page 14
Before use .......................................................... Page 15
Assembling the swivel castors ............................................ Page 15
Connecting/removing the flexible hose ..................................... Page 15
Connecting the nozzles/extension tube..................................... Page 16
Removing/connecting the brush attachment ................................. Page 16
Removing the container lid............................................... Page 16
Installing the filter ...................................................... Page 16
Operation........................................................... Page 17
Switching on/off ...................................................... Page 17
Storing the nozzles..................................................... Page 17
Wrapping up the power cord ............................................ Page 17
Emptying the metal container............................................. Page 18
After use ............................................................ Page 18
Replacement parts/Accessories.................................. Page 18
Troubleshooting.................................................... Page 19
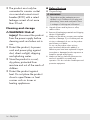
Cleaning and care ................................................. Page 20
Cleaning............................................................. Page 20
Maintenance ......................................................... Page 20
Repair............................................................... Page 20
Storage ............................................................. Page 20
Transportation ........................................................ Page 20
Disposal............................................................. Page 21
Warranty ........................................................... Page 22
Warranty claim procedure............................................... Page 22
Service .............................................................. Page 22

8 GB/IE/NI
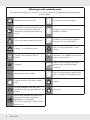
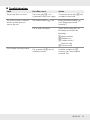
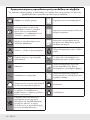
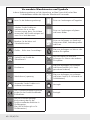
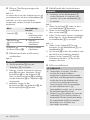
Warnings and symbols used
The following warnings are used in this instruction manual, on the packaging, rating label and
product labels:
Read the instruction manual! Nozzle for vacuuming carpets
Switch off the product and disconnect
it from the mains before replacing
attachments, cleaning and when not
in use.
Nozzle for vacuuming smooth and
hard floor surfaces
Follow the warnings and safety notes! Nozzle for vacuuming dust and dirt
from grooves, joints and cracks
Danger – risk of electric shock! Filter for vacuuming water or other
liquids
Symbol for a Protection Class II
product
The filter is not suitable for vacuuming
water or other liquids.
ØDiameter
Filter for vacuuming dry and small
particles (e.g. sand, dried paint
residues)
Alternating current/voltage Filter for vacuuming dry and fine dust
(e.g. wood dust from sanding works)
Use the product in dry indoor spaces
only. Locked
CE mark indicates conformity with
relevant EU directives applicable for this
product.
Unlocked
UKCA mark indicates conformity with
relevant Great Britain regulations
applicable for this product.
(The UKCA mark logo is valid in Great
Britain only.)

9GB/IE/NI
WET & DRY VACUUM CLEANER
Introduction
We congratulate you on the purchase of your
new product. You have chosen a high quality
product. The instructions for use are part of the
product. They contain important information
concerning safety, use and disposal. Before using
the product, please familiarise yourself with all
of the safety information and instructions for use.
Only use the product as described and for the
specified applications. If you pass the product on
to anyone else, please ensure that you also pass
on all the documentation with it.
Intended use
This product is a household appliance intended
for vacuuming floors, carpets, furniture, mattresses,
cars or garages. The product can also be used as
a blower or to suck up water.
The product is suitable for sucking up water and
dirt with a temperature not higher than +40°C.
Certain materials may produce explosive vapours
or mixtures when agitated by the suction air.
Never vacuum the following materials:
Explosive or flammable gases, liquids and
(reactive) dust particles
Vacuuming such materials poses a danger to
health and is therefore prohibited.
Reactive metal dust particles (e.g. aluminium,
magnesium and zinc in combination with
highly alkaline or acidic detergents)
Undiluted, strong acids and bases
Organic solvents (e.g. petrol, paint thinners,
acetone, heating oil)
These substances may cause corrosion on the
product.
Soot and glowing embers
Cement, gypsum and lime dust
Small objects or ash from chimneys, charcoal
stoves, ashtrays or barbecue grills
Ash or dirt of heating boilers and oil-burning
ovens
Any other use or modification of the product
are considered improper use and can result
in hazards such as death, personal injury and
damage. The manufacturer is not liable for any
damages caused by improper use. The product is
designed exclusively intended for household use.
The product is not intended for commercial use,
industrial operations or similar purposes.
Scope of delivery
After unpacking the product, check if the delivery
is complete and if all parts are in good condition.
Remove all packaging materials before use.
1 Container lid
1 Metal container
1 Flexible hose
3 Straight nozzles / Extension tubes
1 Floor/carpet nozzle
1 Crevice nozzle
1 Cloth filter bag
1 Foam filter
1 Paper filter bag
4 Swivel castors
1 Instruction manual

10 GB/IE/NI
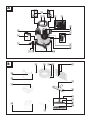
Description of parts
Before reading, familiarize yourself with all
functions of the product.
[1] Carry handle
[2] Container lid (incl. motor drive system and
housing)
[] Rib
[] Filter basket
[3] Power cord holder (upper hook)
[4] Blow connector
[5] On/off switch
[6] Latch
[7] Power cord holder (lower swivel hook)
[8] Metal container
[9] Vacuum connector
[] Internal suction connector
[] Circular slot
[] Swivel castor (with nozzle holder)
[] Power cord
[] Power cord clip
[] Power plug
[] Metal chain
[] Nozzle holder
[] Flexible hose
[] Clip lock
[] Hose coupler
[] Hose adaptor
[] Straight nozzle / Extension tube
[] Floor nozzle (incl. [] [])
[] Carpet nozzle
[] Brush attachment
[] Lock button
[] Crevice nozzle
[] Cloth filter bag
[] Foam filter
[] Paper filter bag
[] Seal ring
Technical data
Wet & dry
vacuum cleaner : PWD12B2
Model number
with VDE plug : HG08942
with BS plug : HG08942-BS
Rated input
power (power
consumption) : 1200W
Rated input voltage : 220–240V∼, 50/60Hz
Suction force : 180Airwatt
Suction rate : 25l/s
Power cord length : 4m
Protection class : II / (double insulation)
Ingress protection : IP24
Hose length : approx. 2m
Crevice nozzle
length : approx. 19cm
Straight nozzle/
Extension tube
length : approx. 34.5cm
Metal container capacity
Dimensions (ØxH) : 26 x 25cm
Gross volume : 12l
Net volume : 8l
Safety features
The product will be switched off by a floating
switch inside the filter basket[] once the
metal container[8] is full. This prevents
overflow and damage to the electric motor.
When dry vacuuming, the metal chain[]
grounds the product to prevent the build-up of
static electricity.

11GB/IE/NI
Safety instructions
BEFORE USING THE PRODUCT,
PLEASE FAMILIARISE
YOURSELF WITH ALL OF
THE SAFETY INFORMATION
AND INSTRUCTIONS FOR
USE! WHEN PASSING THIS
PRODUCT ON TO OTHERS,
PLEASE ALSO INCLUDE ALL
THE DOCUMENTS!
In the case of damage resulting
from non-compliance with these
operating instructions the warranty
claim becomes invalid! No liability
is accepted for consequential
damage! In the case of material
damage or personal injury
caused by incorrect handling
or non-compliance with the
safety instructions, no liability is
accepted!
Children and persons with
limitations
mWARNING!
DANGER OF DEATH
AND ACCIDENTS
FOR TODDLERS
AND CHILDREN!
Never leave children
unsupervised with the
packaging material.
The packaging material
represents a danger of
suffocation. Children
frequently underestimate
the dangers.
This product can be used by
children aged from 8 years
and above and persons with
reduced physical, sensory or
mental capabilities or lack of
experience and knowledge
if they have been given
supervision or instruction
concerning use of the product
in a safe way and understand
the hazards involved.
Children shall not play with the
product.

12 GB/IE/NI
Cleaning and user maintenance
shall not be made by children
unless they are older than
8 and supervised.
Intended use
mWARNING! Risk of
injury! Misuse may lead to
injury. Use this product solely
in accordance with these
instructions. Do not attempt to
modify the product in any way.
Electrical safety
mDANGER! Risk of electric
shock! Never attempt to
repair the product yourself. In
case of malfunction, repairs are
to be conducted by qualified
personnel only.
mWARNING! Risk of
electric shock! Do not
immerse the product’s electrical
components in water or other
liquids. Never hold the product
under running water.
mWARNING! Risk of
electric shock! Never use a
damaged product. Disconnect
the product from the socket
outlet and contact your retailer
if it is damaged.
mWARNING! Risk of
injury! Turn off the product
and disconnect it from the
power supply before cleaning
and when the product is not in
use.
Do not use the product
anymore if it has been
dropped.
Before connecting the power
plug to the power supply:
Check that the voltage and the
current rating correspond with
the power supply details shown
on the product’s rating label.

13GB/IE/NI
Regularly check the power
plug and the power cord for
damages. If the power cord is
damaged, it must be replaced
by the manufacturer, its service
agent or similarly qualified
persons in order to avoid a
hazard.
Protect the power cord against
damages. Do not let it hang
over sharp edges, do not
squeeze or bend it. Keep the
power cord away from hot
surfaces and open flames.
Operation
mWARNING! Risk of fire
and injury! Never use the
product to absorb
–water and any material with
a temperature exceeding
+40 °C,
–incandescent materials.
Disconnect the product from the
power supply
–when a malfunction occurs,
–before attaching/changing
accessories,
–before cleaning the product,
–if you will not use the product
for a long time,
–during a thunderstorm and
–after each use.
Disconnect the product from
the power supply by pulling the
power plug, but not by pulling
on the power cord.
Defective components must
always be replaced by original
spare parts.
Do not obstruct the ventilation
slots during operation. Risk of
overheating and damage to the
product.
Make sure that the mains
voltage corresponds with the
information on the rating plate.

14 GB/IE/NI
The product must only be
connected to a mains socket
via a residual-current circuit
breaker (RCD) with a rated
leakage current of not more
than 30mA.
Cleaning and storage
mWARNING! Risk of
injury! Disconnect the product
from the power supply before
cleaning work and when not in
use.
Protect the product, its power
cord and power plug against
dust, direct sunlight, dripping
and splashing water.
Store the product in a cool,
dry place, protected from
moisture and out of the reach of
children.
Protect the product against
heat. Do not place the product
close to open flames or heat
sources such as stoves or
heating appliances.
Before first use
Unpacking
m WARNING!
uThe product and the packaging are not
children’s toys! Children must not play with
plastic bags, sheets and small parts! There
is a danger of choking and suffocation!
Unpack all parts and lay them on a flat,
stable surface.
Remove all packaging materials and shipping
devices if applicable.
Make sure the delivery contents are complete
and free of damage. If you find that parts are
missing or damaged, do not use the product
and contact your dealer.
Do not use the product unless missing
parts have been delivered in addition or
defective parts have been replaced. Using an
incomplete or damaged product represents a
hazard to people and property.
Make sure that you have all the accessories
and tools needed for assembly and
operation. This also includes suitable personal
protective equipment.

15GB/IE/NI
Before use
m WARNING!
uThere is a risk of accident if the product is
operated using an electrical power supply
that does not match the specifications
shown on the rating label of the product.
uThe mains voltage and the frequency of
the power source must correspond with the
specifications on the product's rating plate.
m WARNING!
Switch off the product and disconnect
it from the mains before replacing
attachments, cleaning and when not
in use.
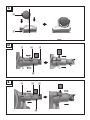
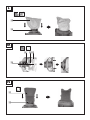
Assembling the swivel castors
Fig. C
Turn the metal container[8] upside down, so
its bottom is facing upward.
Insert the metal shaft of the swivel castor[]
into the hole of the plastic holder until it stops.
Check if the swivel castor[] can rotate
freely.
Connecting/removing the
flexible hose
Vacuuming
Fig.D
Align the hose coupler[] of the flexible
hose[] with the vacuum connector[9].
Push the hose coupler[] slowly into the
vacuum connector[9] until the clip lock[]
clicks into place.
Check if the flexible hose[] is connected
properly by pulling the hose coupler[]
slightly. If the hose coupler does not move, the
flexible hose is connected properly.
Check if the flexible hose[] can be rotated
freely.
Removing: Press the clip lock[] down.
Pull the hose coupler[] out of the vacuum
connector[9].
Blowing air
Fig.E
NOTE
uThis is an auxiliary function which can be
used to blow away dust or small objects.
Align the hose coupler[] of the flexible
hose[] with the blow connector[4].
Push the hose coupler[] slowly into the blow
connector[4] until the clip lock[] clicks into
place.
Check if the flexible hose[] is installed
properly by pulling the hose coupler[]
slightly. If the hose coupler does not move, the
flexible hose is connected properly.
Check if the flexible hose[] can be rotated
freely.
Removing: Press the clip lock[] down.
Pull the hose coupler[] out of the blow
connector[4].

16 GB/IE/NI
Connecting the nozzles/
extension tube
Fig.F, G
You can connect the nozzles/extension tube to
the hose adaptor[] in various ways in order to
adapt to different environments and degrees of
accessibility.
Nozzle Area of
application
Crevice nozzle[] Grooves, joints
and confined
spaces
Carpet nozzle[]
(without brush
attachment [])
Carpets or similar
types of surface
Floor nozzle[]
(with brush
attachment [])
Hard and flat
surfaces
Removing/connecting the
brush attachment
Fig.H
NOTE
uThe brush attachment[] is pre-installed on
the floor nozzle[].
Removing: Press both lock buttons[] down.
Remove the brush attachment[] from the
floor nozzle[].
When you remove the brush attachment[],
the floor nozzle[] becomes the carpet
nozzle[].
Connecting: Insert the brush attachment[]
into the carpet nozzle[] until the lock
button[] clicks in place.
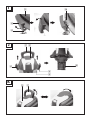
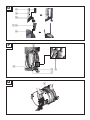
Removing the container lid
NOTE
uRemove the container lid[2] for installing
or replacing the filter bag and emptying the
metal container[8].
Fig.I
Unlock the latches[6] by pulling them away
from the metal container[8].
Lift up the latches[6] and disconnect them
from the rib[].
Reverse above steps to lock the container
lid[2] on the metal container[8].
Fig.J, K
Hold the carry handle[1] and remove the
container lid[2] from the metal container[8].
The filter basket[] is exposed for filter bag
installation or replacement.
Fold down the carry handle[1] after use and
before storing the product.
Installing the filter
m CAUTION!
uNever vacuum without a filter installed to
the product. Sucked in substances may
contain metal or hard, sharp particles,
which may damage the motor or cause an
electric shock. Dust would be blown out
from the blow connector[4] at a very high
speed which could cause serious personal
injury.
uOnly vacuum liquids with the foam filter[]
installed to the product. Otherwise the
product will be damaged. The paper filter
bag[] will also be damaged, if you use it
for wet vacuuming.

17GB/IE/NI
NOTE
uThe cloth filter bag[] and the paper filter
bag[] are suitable for dry vacuuming
only.
uDo not use the cloth filter bag[] for
vacuuming very fine dust or dirt (e.g.
sanding dust). The cloth filter bag can be
used for many other materials though.
Cloth filter bag[] (dry vacuuming)
Fig.L
Turn the container lid[2] over.
Install the cloth filter bag[] to the filter
basket[].
Pull down the rim of the cloth filter bag[]
until it covers the filter basket[] completely.
The rim of the cloth filter bag must reach and
touch the bottom surface of the filter basket.
Paper filter bag[] (dry vacuuming)
Fig.M
Turn the container lid[2] over.
Align the hole of the paper filter bag[] with
the internal suction connector[].
Press down the paper filter bag[] to insert
the internal suction connector [] into the hole
of the paper filter bag.
Press down the paper bag[] until the seal
ring[] is fitted into the circular slot[].
Foam filter[] (wet vacuuming)
Fig.N
Turn the container lid[2] over.
Install the foam filter[] to the filter
basket[].
Gently and slowly pull down the rim of
the foam filter[] until it covers the filter
basket[] completely. The rim of the foam
filter must reach and touch the bottom surface
of the filter basket.
Operation
Switching on/off
NOTE
uBefore use, check if all parts are connected
securely and the container lid[2] is locked
in place.
uBefore you connect the product to the
power supply, make sure it is switched off.
Fig.A
Connect the power plug[] with a suitable
socket-outlet.
Switching on: Press the on/off switch[5]
to positionI.
Switching off: Press the on/off switch[5]
to position0.
Storing the nozzles
Fig.O
Slide one end of the straight nozzle/ extension
tube[] or the crevice nozzle [] into the nozzle
holder on one of the swivel castors[] or into one
of the nozzle holders[] on the container lid [2].
Wrapping up the power cord
Fig.P
Wrap up the power cord[] around the
upper hook of the power cord holder[3]
and the lower swivel hook of the power cord
holder[7].
Fixing the power plug[]: Connect the
power cord clip[] to the wrapped up power
cord[].

18 GB/IE/NI
Emptying the metal container
m WARNING!
Switch off the product and disconnect
it from the mains before replacing
attachments, cleaning and when not
in use.
m WARNING!
uEmpty and clean the product before
and after use to avoid the collection of
materials that could pose a fire hazard in
the product.
Fig.Q
Remove the container lid[2] from the metal
container[8].
Empty the metal container[8].
After use
Switch off the product and disconnect the
power plug[] from the socket-outlet.
Let the product cool down.
Check, clean and store the product (see
“Cleaning and care”).
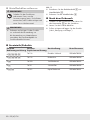
Replacement parts/Accessories
Position instruction
manual
Position exploded
drawing
Description Order number
B []/[]/[]/[] Part 16 Flexible hose 99940470505
B []/[]/[]/[] Part 18 Floor nozzle 99940470504
B [] Part 20 Cloth filter bag 99940470503
B [] Part 21 Foam filter 99940470502
B []/[] Part 22 Paper filter bag 99940470501
Seite laden ...
Seite laden ...
Seite laden ...
Seite laden ...
Seite laden ...
Seite laden ...
Seite laden ...
Seite laden ...
Seite laden ...
Seite laden ...
Seite laden ...
Seite laden ...
Seite laden ...
Seite laden ...
Seite laden ...
Seite laden ...
Seite laden ...
Seite laden ...
Seite laden ...
Seite laden ...
Seite laden ...
Seite laden ...
Seite laden ...
Seite laden ...
Seite laden ...
Seite laden ...
Seite laden ...
Seite laden ...
Seite laden ...
Seite laden ...
Seite laden ...
Seite laden ...
Seite laden ...
Seite laden ...
Seite laden ...
Seite laden ...
Seite laden ...
-
 1
1
-
 2
2
-
 3
3
-
 4
4
-
 5
5
-
 6
6
-
 7
7
-
 8
8
-
 9
9
-
 10
10
-
 11
11
-
 12
12
-
 13
13
-
 14
14
-
 15
15
-
 16
16
-
 17
17
-
 18
18
-
 19
19
-
 20
20
-
 21
21
-
 22
22
-
 23
23
-
 24
24
-
 25
25
-
 26
26
-
 27
27
-
 28
28
-
 29
29
-
 30
30
-
 31
31
-
 32
32
-
 33
33
-
 34
34
-
 35
35
-
 36
36
-
 37
37
-
 38
38
-
 39
39
-
 40
40
-
 41
41
-
 42
42
-
 43
43
-
 44
44
-
 45
45
-
 46
46
-
 47
47
-
 48
48
-
 49
49
-
 50
50
-
 51
51
-
 52
52
-
 53
53
-
 54
54
-
 55
55
-
 56
56
-
 57
57


in anderen Sprachen
- English: Parkside PWD 12 B2 User manual
Sonstige Unterlagen
-
Rowenta SILENCE FORCE EXTREME Bedienungsanleitung
-
Moulinex MO2441 Bedienungsanleitung
-
-
-
-
Moulinex MO5233PA Bedienungsanleitung
-
Aeg-Electrolux AG4112 Benutzerhandbuch
-