Brabantia BBEK1114 Benutzerhandbuch
- Kategorie
- Brotbackmaschinen
- Typ
- Benutzerhandbuch

2
www.brabantia.com/electrical-appliances
GUARANNTEE
YEAR
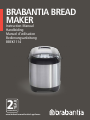
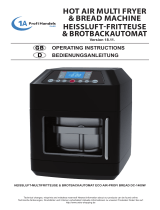
BRABANTIA BREAD
MAKER
Instruction Manual
Handleiding
Manuel d’utilisation
Bedienungsanleitung
BBEK1114

2
THANK YOU FOR
PURCHASING OUR
BREAD MAKER
We hope it will delight you and that it
will get a special place in your home.
Enjoy!

3
IMPORTANT SAFEGUARDS
When using this appliance, basic safety precautions should always be followed, including but not limited to the
following:
READ ALL INSTRUCTIONS BEFORE USE AND SAVE FOR FUTURE REFERENCE
1. Carefully read all instructions before operating the bread maker for the first time and save for future
reference.
2. Remove and safely discard any packaging material and promotional labels before using the bread maker for
the first time.
3. To eliminate a choking hazard for young children, remove and safely discard the protective cover fitted to the
power plug of this appliance.
4. Do not place the bread maker near the edge of a bench top, counter or table during operation.
5. Ensure that the surface is level, clean and free of water and other substances.
6. Do not place the bread maker on or near a hot gas or electric burner or where it could touch a heated oven.
7. Always operate the bread maker on a dry, stable and heat resistant surface. Do not use on cloth-covered
surface, near curtains or other flammable materials.
8. Position the bread maker with at least 20cm free space around the bread maker to prevent overheating.
9. Position the bread maker at a minimum distance of 20cm away from curtains, cloths and other heat
sensitive materials when in use. This will allow for adequate air circulation and help prevent the possibility of
discoloration due to radiated heat.
10. Do not use the bread maker on a sink drain board.
11. Always ensure the bread maker is properly assembled before connecting to a power outlet and operating.
Follow the instructions provided.
12. If the bread maker is not in use for an extended period, disconnect from the power outlet.
13. The lid and the outer surface may get hot when the bread maker is operating.
14. The bread maker is not intended to be operated by means of an external timer or separate remote-control
system.
15. Do not touch hot surfaces. Allow the bread maker to cool before cleaning any parts.
16. The temperature of accessible surfaces will be high when the bread maker is operating and for some time
after use.
17. Steam vents are very hot during baking. Do not place anything on top of the lid.
18. Do not cover the air vents when the bread maker is in use.
19. Use oven mitts when removing the hot bread or any contents from the pan.
20. Take care when pouring jam from the bread pan as the jam will be extremely hot.
21. Do not place any ingredients directly into the baking chamber. Place ingredients into the bread pan only.
22. The maximum quantities of flour and raising agent that may be used shall not exceed the quantities stated in
the recipes.
23. Do not place fingers or hands inside the bread maker during operation. Avoid contact with moving parts.
24. Ensure the bread maker is switched off and then unplugged from the power outlet when not in use and
before cleaning.

4
25. Do not immerse the bread pan in water. Doing so may interfere with the free movement of the drive shaft.
Wash only the interior of the bread pan.
26. Do not leave the lid standing open for extended periods of time.
27. Always ensure the kneading blade is removed from the base of the baked loaf prior to slicing.
28. Do not place the bread maker in direct sunlight. Colour fading and discolouration may occur when the bread
maker is consistently exposed to UV light.
29. Keep the inside and outside of the bread maker clean. Follow the cleaning instructions provided in this book.
30. Always switch off the bread maker at the power outlet, then unplug the power cord and cool completely,
if the bread maker is not in use, before cleaning, before attempting to move the bread maker, and when
storing the appliance
IMPORTANT SAFEGUARDS FOR ALL ELECTRICAL APPLIANCES
• Fully unwind the power cord before use.
• Connect only to 230V or 240V power outlet.
• Do not let the power cord hang over the edge of a bench or table, touch hot surfaces or become knotted.
• To protect against electric shock, do not immerse the power cord, power plug or bread maker in water or
any other liquid, unless it is recommended in the cleaning instructions.
• The bread maker is not intended for use by persons (including children) with reduced physical, sensory
or mental capabilities, or lack of experience and knowledge, unless they have been given supervision or
instruction concerning use of the bread maker, by a person responsible for their safety.
• Children should be supervised to ensure that they do not play with the bread maker.
• It is recommended to inspect the bread maker regularly. Do not use the bread maker if the power supply
cord, plug, connector or bread maker becomes damaged in anyway.
• Any maintenance other than cleaning should be performed by an authorised agent.
• This bread maker is for household use only. Do not use this bread maker for other than its intended use.
Do not use in moving vehicles or boats.
• Do not use outdoors.
• Misuse may cause injury.

5
Caution
The lid and the outer surface may get hot when the bread maker is operating.
The temperature of accessible surfaces may be high when the bread maker is operating.
Warning
Steam vents are very hot during baking.
FOR HOUSEHOLD USE ONLY SAVE THESE INSTRUCTIONS
This appliance is intended to be used in household and similar applications such as: staff kitchen areas
in shops, offices and other working environments. Farmhouses. By clients in hotels, motels, and other
residential type environments; bed & breakfast type environments.
HOT SURFACE:
The areas with the hot surface symbol may be hot during and after appliance use. Use caution
when touching these areas, as there is a burn risk. Wear protective gloves for protection when
possible.
FOR HOUSEHOLD USE ONLY
NOT INTENDED FOR COMMERCIAL USE

6
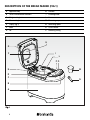
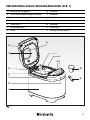
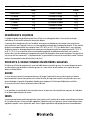
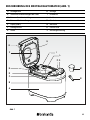
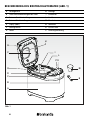
DESCRIPTION OF THE BREAD MAKER (FIG.1)
AAppliance body HPorthole
BTimer increase/decrease buttons IKneading blade
CWeight setting button LPan
DMenu setting button MMeasuring cup
EDisplay (fig. 2) NMeasuring spoon
FVents OOn/Off button
GLid PBrowning setting
A
B
C
D
E
F
G
H
OP
M
N
I
L

7
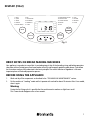
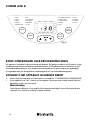
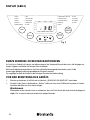
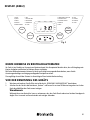
DISPLAY (FIG.2)
BRIEF NOTES ON BREAD MAKING MACHINES
Your appliance is a product to save effort. Its mainadvantage is that all the kneading, rising and baking operations
take place within a limited space. Your bread maker will easily and frequently produce superb loaves if you follow
the instructions and you fully understand a few basic principles. The careful selection of ingredients is the most
important phase of the bread preparation process.
BEFORE USING THE APPLIANCE
1. Wash and dry all the components as described in the “CLEANING AND MAINTENANCE” section.
2. Put the machine in “cooking” mode and let it operate with no load for about 10 minutes. After it has cooled,
clean it again.
Warning
During the first firing cycle it is possible that the machine emits smoke or a slight burnt smell.
This is normal and disappears after a few seconds.
Fig. 2
1. BASIC
2. QUICK
3. SWEET
4. FRENCH
5. WHOLE WHEAT Heat
Bake
Done
Keep
Warm
6. RYE
7. GLUTEN FREE
8. RICE BREAD
9. SANDWICH
10. CAKE
11. WHOLEMEAL DOUGH
12. PIZZA DOUGH
13. LEAVEN DOUGH
14. KNEAD
15. MIX
16. JAM
17. YOGURT
18. DEFROST
19. COOK
MENU
WEIGHT COLOR
SETTING
START
PAUSE/STOP
LIGHT MEDIUM DARK FRUIT
Preset
Stir
Rest
Ferment
500g 750g 1000g

8
INSTRUCTIONS FOR USE
3. Wash and dry well all components.
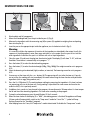
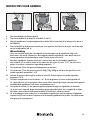
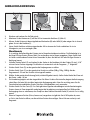
4. Mount the kneading blade (I) on the pin inside the pan (L) (Fig 3).
5. Measure the ingredients with the measuring cup (M) or spoon (N) supplied or weighing them and putting
them into the pan (L)
6. Insert the pan on the appropriate pin inside the appliance, turn it clockwise to lock it (Fig 4.)
Warning
It is essential to follow the sequence of insertion of the ingredients as described in the recipe. Usually this
sequence is: liquid ingredients, water, flour, eggs and other as in the recipe. Pour the yeast at last into the
other ingredients. Avoid that the yeast is in contact with salt or liquid ingredients.
7. Close the cover (G) and insert the plug into the electrical outlet. The display (E) will show “3:10”, with two
fixed dots. The machine is automatically set to program “1”.
8. Press the button (D) to select the desired cooking program.
9. Press the button (C) to select the desired weight (500g, 750g, 1000g). The weight cannot be set in programs
8-19.
10. Select the browning to be obtained (slight, medium, or intensive). The browning cannot be set in programs
8-19.
11. If necessary, set the timer with the + or - buttons (B). The processing will start after the time set. If you do
not set a time, the cooking will start immediately. Be careful when using the timer function with perishable
ingredients (such as eggs, dairy products, etc.).
12. Press the On / Off button (O). The machine beeps and begins processing the ingredients (if a timer has been
set, processing will start at the time set). During cooking it is possible that steam comes out from the fan
under the lid (G): this is perfectly normal.
13. If additions (nuts, seeds, etc.) are planned in the program, the machine emits 10 beeps when it is time to open
the lid and insert the remaining ingredients. This time varies according to the program.
14. To stop the selected program, press the on/off button (O) for 3 seconds.
15. When the time shown on the display (E) is “0:00”, the cooking process is finished. The appliance will beep
10 times and will automatically switch to the “Keep warm” mode for 1 hour. The “:” symbol will keep
flashing (Except for the “Kneading” program).
16. After keeping warm for 1 hour, the “keep warm” mode is deactivated. To disable the “keep warm” mode
Fig. 3
Fig. 3 Fig. 4 Fig. 5

9
before 60 minutes, press the on/off button (O) for 3 seconds.
17. Unplug it from the electrical outlet and open the lid (G).
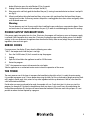
18. Wear oven mitts and firmly grab the handle of the pan (L) turning it counterclockwise to release it and pull it
out (Fig 5).
19. Allow to cool before taking the bread and then, using a non-stick spatula pull out the bread from the pan
starting from the sides. If necessary, overturn the pan on a cooling grid or on a clean surface and gently shake
until the bread comes out.
Warning
The pan becomes very hot. Be very careful when handling the pan, and always use protective gloves. Never
use metal utensils to remove the bread from the pan (L), in order to avoid damaging the non-stick coating.
POWER SUPPLY INTERRUPTIONS
If the power supply interruption lasts less than 10 minutes, the program will continue as soon as the power supply
is restored. If the interruption lasts more than 15 minutes, the program stops and the display returns to its default
settings. In this case disconnect the appliance from the electrical outlet, allow to cool, empty the pan, remove the
ingredients, clean and start again.
ERROR CODES
If an error occurs, the display (E) may show the following error codes:
”H:HH”: the temperature inside the pan is too high.
1. Press the On/Off button (O) for 3 seconds to stop the program.
2. Unplug.
3. Open the lid and allow the appliance to cool for 10-20 minutes.
4. Restart the program.
”E:EO”: the temperature sensor is disconnected or out of order.
Take the appliance to an authorized service center to check the operation of the sensor.
THE TIMER
The most common use of the timer is to prepare the bread during the night so that it is ready the next morning.
It is possible to program up to 15 hours preparation using the timer. Do not use for bread or dough containing fresh
milk, yoghurt, cheese, eggs, fruits, onions or any other ingredient which may deteriorate if left for a few hours on
a hot and humid environment.
Decide when you want your bread to be ready, for example at 6 a.m. Check what time it is when you start the
program, for example 9. Calculate the time between these two times, in this case 9 hours. By manipulating the
increase/decrease buttons (B), the timer will move forward or backward 10 minutes each time you press. It is not
possible to reduce the time required by a program.

10
CONSISTENCY OF THE DOUGH
Check the product during the first 5 minutes of kneading, through the dedicated porthole (H). A smooth loaf should
be formed. If not, maybe it is necessary to review the ingredients. If it is necessary to open the lid (G), do it during
the kneading or the resting time. In all other moments you may compromise the successful outcome of the bread.
If the dough seems sticky or sticks to the sides of the pan, sprinkle over a teaspoon of flour at a time. If it is too dry,
pour a teaspoon of hot water at a time. It is possible to gently remove the ingredients remained stuck to the sides of
the machine using a wooden or plastic spatula.
Warning
Do not leave the door open longer than necessary. Wait until the flour/water is completely absorbed in the
dough before adding more. Close the lid (G) before the end of the last kneading, otherwise the bread will
not rise properly.
STORING THE BREAD
The bread you find on the market usually contains additives (chlorine, limestone, mineral tar dye, sorbitol, soybean,
etc.). Your bread does not contain any of them, so it will not last long as the bread sold on the market and will look
different. Also, it will not have the flavour of the bread on the market, it will have the taste that bread should always
have.
It is preferable to eat it just made, but it can be store for two days at room temperature, in a polyethylene bag from
which you have removed all the air.
To freeze homemade bread, let it cool, put it in a polyethylene bag and remove all the air, then seal and freeze.
HOW TO ADD THE INGREDIENTS
- Follow the order indicated in the recipe.
- Keep additional ingredients (fruits, nuts, raisins, etc) on one side and add them during the second kneading
when the appliance beeps 10 times.
- First introduce the liquid ingredients. Usually it is water but can include milk and/or eggs. Water must be
warm (37°C / 100°F), but not hot. The too hot or too cold water prevents the leavening.
- Do not use milk with the timer. It could curdle before beginning the bread preparation process.
- Add sugar and salt as indicated in the recipe.Add the “liquid” ingredients (honey, syrup, molasses, etc).
- Add the “dry” ingredients (flour, milk powder, herbs and spices).
- If you use the timer, it will not be possible to add fruit or nuts during the second kneading, so add them now.
- At last add dry yeast (or baking powder/sodium bicarbonate). Place it over the other ingredients - do not put
it in the water, otherwise it will begin to act too soon.
- If you use the timer, it is essential to keep the yeast (baking powder/baking soda) separate from the water/
liquid, otherwise the yeast will come into action, it will rise and collapse before the bread making process
begins. The result will be a hard, dense, rough and edible product as a brick of a home. We advise to make
a hole in the centre of the dome of the flour and put the yeast.

11
FLOUR
The type of flour you use is very important. The most important element contained in the flour is the protein called
gluten, which is the natural agent that gives the dough the ability to mould and to retain the carbon dioxide
produced by the yeast. Buy flour which on the package shows “TYPE 0” or “FOR BREAD” (like Manitoba), the latter
has a high gluten content.
OTHER FLOURS FOR BREAD
They include wholegrain flour and other cereals. They provide an excellent dietary fibre intake but contain lower
levels of gluten than white “type 0” flour. This means that the wholegrain loaves tend to be smaller and denser
than the white loaves. In general terms, if in the recipe you replace white “type 0” flour with half wholegrain flour,
you can prepare a product with wholegrain bread taste and the texture of white bread.
YEAST
Yeast is a living organism that multiplies in the dough. In the presence of moisture, food and heat, the yeast will
grow and will release carbon dioxide gas. The latter produces bubbles that are trapped in the dough and make it
grow. Among the various types of yeast available we recommend using dried active yeast. These are normally sold
in bags and must not be previously dissolved in water. You may also find “fast-acting” yeast or “yeast for bread
machines”. These are stronger yeasts that can make the dough rise 50% faster compared to other ones. Use them
only with the “QUICK OPTION” setting. Yeast in bags is very sensitive to moisture, so do not store partially used
bags for more than one day. Alternatively, you can use fresh yeast blocks: 1 g of dry active yeast is equivalent to
3.5 g of fresh active yeast.

12
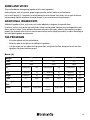
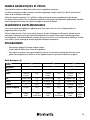
Dry and fresh active yeast equivalence table
Dry Fresh
1/4 bag 2g 1 tablespoon 7g
1/2 bag 4g 2 tablespoons 13g
3/4 bag 6g 3 tablespoons 21g
1 bag 7g 3.5 tablespoons 25g
1.5 bag 10g 5 tablespoons 37g
2 bag 14g 7 tablespoons 50g
LIQUID INGREDIENTS
The liquid ingredient normally consists of water or milk or from a mixture of the two. Water makes the crust crispier.
Milk makes it softer and the texture is softer.
There are conflicting opinions on what should be the temperature of the water. You can decide for yourself as you
get more familiar with the appliance. Water is another essential ingredient for bread. Generally, a water temperature
between 20°C (68°F) and 25°C (77°F) is the most appropriate. But if you want to accelerate the bread making
process the water temperature must be between 45°C (115°F) and 50°C (122°F). It is essential that water is of
good quality, and preferably bottled, as the limestone in the water can compromise the successful outcome of the
bread. Instead of water you can also put the fresh milk or water with 2% milk powder, which enhances the taste
and improves the colour of the crust. Some recipes even mention fruit juice.
LOW FAT CONTENT
Do not use oils, margarines etc with a low percentage of fat. These products contain little fat, while the recipe
requires a higher amount, and you may not get the desired results.
SUGAR
Sugar activates and feeds yeast allowing it to grow. It adds flavour and texture and helps browning the crust.
Honey, syrup and molasses can be used instead of sugar, provided that you adapt the liquid ingredient to
compensate. Artificial sweeteners must not be used, because they do not feed the yeast and some kill it.
SALT
Salt helps controlling the growth of yeast. Unsalted bread could grow too much and then collapse. It also gives
more flavour.
EGGS
Eggs will make your bread richer and more nutritious, add colour and help the shape and texture. Eggs are included
in the liquid ingredients of the bread, so adjust the other liquid ingredients if you add eggs. Otherwise the dough
may be too liquid to rise properly.

13
HERBS AND SPICES
They can be added at the beginning together with the main ingredients.
Herbs and spices, such as cinnamon, ginger, oregano, parsley and basil add taste and look better.
Use in small amounts (1-2 teaspoons) to avoid covering the taste of bread. Fresh herbs, such as garlic and chives,
contain enough liquid to unbalance the recipe dosages, so you must balance the liquid content.
ADDITIONAL INGREDIENTS
Additional ingredients (fruits, nuts, raisins, etc) can be added only in programs that provide them.
Dried fruits and nuts must be cut into small pieces, cheese must be grated, chocolate must be chopped into small
pieces and not in lumps. Do not add more than those indicated in the recipes, otherwise the bread may not grow
properly. Pay attention to the fresh fruit and nuts because they contain liquid (juice and oil), so adjust the dosage of
the main liquid ingredient to compensate.
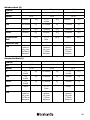
THE PROGRAMS
- Oil can be replaced with the melted butter.
- Follow the order of the table for the addition of ingredients.
- In all the recipes you can replace the high-gluten flour with gluten free flour, being careful with the other
ingredients for gluten intolerant persons.
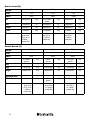
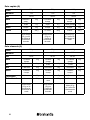
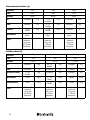
Basic (1)
Weight 500g 750g 1000g
Time 2:55 3:00 3:05
Water 210ml 260ml 320ml
Oil 1+1/2
tablespoons
15g 2+1/2
tablespoons
25g 3 tablespoons 45g
Salt 1/2 teaspoon 3g 1 tablespoon 6g 1 tablespoon 6g
Sugar 1 tablespoon 15g 2 tablespoons 30g 2 tablespoons 30g
Flour 2+1/3 glasses 320g 3 glasses 420g 3+1/2 glasses 500g
Yeast 1 cup
2 teaspoons
100g
5g dry
yeast
1 cup
1 + ½
teaspoon
80g
4g dry yeast
60g
3g dry yeast
½ cup
1 teaspoon
Wholegrain
our
Yeast
525g3+½ cup445g3 cups
345g2½
Flour
5g2 teaspoons4g1 + ½ teaspoon
3g1 teaspoon
Sugar
5g2 teaspoon4g1 + ½ teaspoon
3g
1 teaspoon
Salt
40g4 tablespoons30g3 tablespoons20g2 tablespoons
Oil
290ml230ml180ml
Water
3:053:002:55
Time
1000g750g500g
Weight
Basic (1)

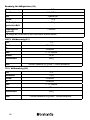
14
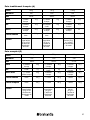
White our
1 fresh yeast
block (25 g)
or 1 baking
powder bag
1 fresh yeast
block (25 g)
or 1 baking
powder bag
3/4 of fresh
yeast block
(25 g) or 3/4
of baking
powder bag
Yeast
500g3+1/2 glasses380g2+3/4
glasses
290g2 glasses
70g1/2 glass47g1/3 glass35g1/4 glass
Skimmed milk
60g4 tablespoons45g3 tablespoons30g2 tablespoons
Sugar
60g1 whole egg60g1 whole egg60g1 whole egg
Egg
2g1/2 teaspoon2g1/2 teaspoon2g1/2 teaspoon
Salt
32g2+1/2 table-
spoons
26g2 table-
spoons
20g1+1/2 table-
spoons
Oil
200ml160ml120ml
Water
3:503:453:40
Time
1000g750g500g
Weight
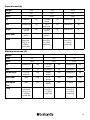
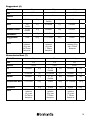
Sweet bread (3)
1 fresh yeast
block (25 g)
or 1 baking
powder bag
1 fresh yeast
block (25 g)
or 1 baking
powder bag
3/4 of fresh
yeast block
(25 g) or 3/4
of baking
powder bag
Yeast
435g
3 glasses
360g
2+1/2 glasses
290g
2 glasses
Flour
39g
3 tablespoons
30g
2 tablespoons
26g
1 tablespoon
Sugar
5g
1 tablespoon
4g
3/4 teaspoon
3g
2/3 teaspoon
Salt
39g
3 tablespoons
33g
2+1/2 table-
spoons
26g
2 tablespoons
Oil
230ml190ml140ml
Water
2:052:001:55
Time
1000g750g500g
Weight
Quick bread (2)

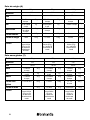
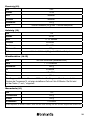
15
White our
White our
1 fresh yeast
block (25 g)
or 1 baking
powder bag
1 fresh yeast
block (25 g)
or 1 baking
powder bag
3/4 of fresh
yeast block
(25 g) or 3/4
of baking
powder bag
Yeast
220g2 glasses180g1+1/2
glasses
145g1 glass
Wholegrain
our
220g2 glasses180g1+1/2
glasses
145g1 glass
39g3 tablespoons26g2 table-
spoons
20g1+ 3/4 ta-
blespoons
Brown sugar
5g1 tablespoon4g3/4 teaspoon3g2/3 teaspoon
Salt
45g3 tablespoons38g2+1/2 table-
spoons
26g2 tablespoons
Oil
270ml220ml180ml
Water
4:054:003:55
Time
1000g750g500g
Weight
Wholegrain bread (5)
1 fresh yeast
block (25 g)
or 1 baking
powder bag
1 fresh yeast
block (25 g)
or 1 baking
powder bag
3/4 of fresh
yeast block
(25 g) or 3/4
of baking
powder bag
Yeast
500g3+1/2 glasses400g2+3/4
glasses
300g2+1/4
glasses
302 tablespoons23g1+1/2 table-
spoons
23g1+1/2 table-
spoons
Sugar
18g3 tablespoons15g2+1/2
teaspoons
12g2 tablespoons
Salt
20g2 tablespoons15g1 +1/2 table-
spoons
10g1 tablespoon
Oil
320ml260ml180ml
Water
4:054:003:55
Time
1000g750g500g
Weight
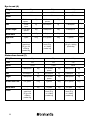
French bread (4)

16
Maize our
Gluten-free our
Rye our
White our
1 fresh yeast
block (25 g)
or 1 baking
powder bag
1 fresh yeast
block (25 g)
or 1 baking
powder bag
3/4 of fresh
yeast block
(25 g) or 3/4
of baking
powder bag
Yeast
110g3/4 glass70g1/2 glass35g
1/4 glass
325g2+1/4 glasses290g2 glasses255g
1+3/4 glasses
39g3 tablespoons38g2+1/2 table-
spoons
30g2 tablespoons
Sugar
5g1 tablespoon4g3/4 teaspoon3g2/3 teaspoon
Salt
45g3 tablespoons33g2+1/2 table-
spoons
26g2 tablespoons
Oil
230ml190ml140ml
Water
3:053:002:55
Time
1000g750g500g
Weight
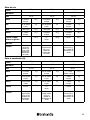
Gluten-free bread (7)
1 fresh yeast block
(25 g) or 1 baking
powder bag
1 fresh yeast
block (25 g)
or 1 baking
powder bag
3/4 of fresh
yeast block
(25 g) or 3/4
of baking
powder bag
Yeast
220g2 glasses180g1+1/2 glasses145g1 glass
220g2 glasses180g1+1/2 glasses145g1 glass
39g
3 tablespoons26g2 tablespoons20g1+ 3/4 table-
spoons
Brown sugar
5g
1 tablespoon4g3/4 teaspoon3g2/3 tea-
spoon
Salt
45g3 tablespoons38g2+1/2 table-
spoons
26g2 table-
spoons
Oil
270ml220ml180ml
Water
3:353:303:25
Time
1000g750g500g
Weight
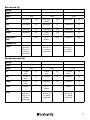
Rye bread (6)

17
High-gluten
our
1 fresh yeast
block (25 g)
or 1 baking
powder bag
1 fresh yeast
block (25 g)
or 1 baking
powder bag
3/4 of fresh
yeast block
(25 g) or 3/4
of baking
powder bag
Yeast
435g
3 glasses
360g
2+1/2
glasses
290g
2 glasses
Flour
5g
1 tablespoon
4g
3/4 teaspoon
3g
2/3 tea-
spoon
Sugar
5g
1 tablespoon
4g
3/4 teaspoon
3g
2/3 tea-
spoon
Salt
15g
1+1/3 table-
spoons
10g
3/4 table-
spoon
6g
1/2 table-
spoon
Oil
300ml250ml210ml
Water
5:055:004:55
Time
1000g750g500g
Weight
Sandwich bread (9)
1 fresh yeast
block (25 g)
or 1 baking
powder bag
1 fresh yeast
block (25 g)
or 1 baking
powder bag
3/4 of fresh
yeast block
(25 g) or 3/4
of baking
powder bag
Yeast
1/2 glass1/3 glass
1/4 glass
Cooked rice
435g3 glasses360g2+1/2
glasses
290g
2 glasses
30g
2 tablespoons30g2 table-
spoons
15g1 tablespoon
Sugar
60g1 whole egg
60g1 whole egg
60g1 whole egg
Egg
5g1 tablespoon4g3/4 teaspoon3g2/3 teaspoon
Salt
39g3 tablespoons38g2+1/2 table-
spoons
26g2 tablespoons
Oil
240ml190ml150ml
Water
2:502:452:40
Time
1000g750g500g
Weight
Rice bread (8)

18
White our
Self-raising our
1 fresh yeast block (25 g) or 1 baking powder bagYeast
425gWholegrain
our
370ml
Water
1+1/2 teaspoons
Salt
2 tablespoons
Oil
2 tablespoons
Sugar
175g
3:10
Time
70% wholegrain dough (11)
1 fresh yeast block (25 g) or 1 baking powder bagYeast
600g
Wholegrain
our
380ml
Water
1+1/2 teaspoons
Salt
2 tablespoons
Oil
2 tablespoonsSugar
3:10
Time
100% wholegrain dough (11)
The amount of sugar can be modied according to your taste
2 tablespoons
Custard powder
(optional)
150g
130g
Sugar
4 whole eggsEggs
3 tablespoons
Seed oil
2:20
Time
Dough for sweets (10)

19
White our
White our
White our
It is advisable to wait 20 minutes before adding the sugar that must be poured a little at a time
1/2 lemonLemon juice
150gSugar
300gFruit pulp
1:20Time
Jam (16)
The program 14 time is 15 minutes. The program 15 is the “Extended” version of the program
14, with an adjustable time from 8 to 45 minutes. The time is adjustable using the “+” and “-”
buttons.
330ml
Water
1 tablespoonSalt
2 tablespoonsOil
560g
1+1/4 tablespoons
Yeast
from 8 to 45 minutes (adjustable time)
Time
Mix Function (14-15)
1 fresh yeast block (25 g) or 1 baking powder bag
Yeast
600g
2 tablespoonsSugar
2 tablespoons
Olive oil
1+1/2 teaspoons
Salt
350ml
Water
1:30
Time
Leavened dough (13)
1 fresh yeast block (25 g) or 1 baking powder bagYeast
300g
1 tablespoonOlive oil
1 tablespoonSalt
170ml
Water
0:45Time
Pizza dough (12)

20
The time is adjustable using the “+” and “-” buttons.
For general cooking. The temperature is maintained at around 150 ° C.
00:30 (adjustable from 0:10 to 1:30)Time
Cooking (19)
The time is adjustable using the “+” and “-” buttons.
The appliance maintains a temperature around 50°C (122°F) to thaw the product.
00:30 (adjustable from 0:10 to 2:00)Time
Thawing (18)
60g
Sugar
100ml (or a jar of yoghurt)
Natural yoghurt
1000ml
Whole milk
8:00 (adjustable from 0:06 to 10:00 with the “Weight setting” button)
Time
Yoghurt (17)
Seite wird geladen ...
Seite wird geladen ...
Seite wird geladen ...
Seite wird geladen ...
Seite wird geladen ...
Seite wird geladen ...
Seite wird geladen ...
Seite wird geladen ...
Seite wird geladen ...
Seite wird geladen ...
Seite wird geladen ...
Seite wird geladen ...
Seite wird geladen ...
Seite wird geladen ...
Seite wird geladen ...
Seite wird geladen ...
Seite wird geladen ...
Seite wird geladen ...
Seite wird geladen ...
Seite wird geladen ...
Seite wird geladen ...
Seite wird geladen ...
Seite wird geladen ...
Seite wird geladen ...
Seite wird geladen ...
Seite wird geladen ...
Seite wird geladen ...
Seite wird geladen ...
Seite wird geladen ...
Seite wird geladen ...
Seite wird geladen ...
Seite wird geladen ...
Seite wird geladen ...
Seite wird geladen ...
Seite wird geladen ...
Seite wird geladen ...
Seite wird geladen ...
Seite wird geladen ...
Seite wird geladen ...
Seite wird geladen ...
Seite wird geladen ...
Seite wird geladen ...
Seite wird geladen ...
Seite wird geladen ...
Seite wird geladen ...
Seite wird geladen ...
Seite wird geladen ...
Seite wird geladen ...
Seite wird geladen ...
Seite wird geladen ...
Seite wird geladen ...
Seite wird geladen ...
Seite wird geladen ...
Seite wird geladen ...
Seite wird geladen ...
Seite wird geladen ...
Seite wird geladen ...
Seite wird geladen ...
Seite wird geladen ...
Seite wird geladen ...
Seite wird geladen ...
Seite wird geladen ...
Seite wird geladen ...
Seite wird geladen ...
Seite wird geladen ...
Seite wird geladen ...
Seite wird geladen ...
Seite wird geladen ...
Seite wird geladen ...
Seite wird geladen ...
Seite wird geladen ...
Seite wird geladen ...
Seite wird geladen ...
Seite wird geladen ...
Seite wird geladen ...
Seite wird geladen ...
Seite wird geladen ...
Seite wird geladen ...
Seite wird geladen ...
Seite wird geladen ...
Seite wird geladen ...
Seite wird geladen ...
Seite wird geladen ...
Seite wird geladen ...
Seite wird geladen ...
Seite wird geladen ...
Seite wird geladen ...
Seite wird geladen ...
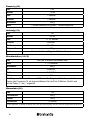
-
 1
1
-
 2
2
-
 3
3
-
 4
4
-
 5
5
-
 6
6
-
 7
7
-
 8
8
-
 9
9
-
 10
10
-
 11
11
-
 12
12
-
 13
13
-
 14
14
-
 15
15
-
 16
16
-
 17
17
-
 18
18
-
 19
19
-
 20
20
-
 21
21
-
 22
22
-
 23
23
-
 24
24
-
 25
25
-
 26
26
-
 27
27
-
 28
28
-
 29
29
-
 30
30
-
 31
31
-
 32
32
-
 33
33
-
 34
34
-
 35
35
-
 36
36
-
 37
37
-
 38
38
-
 39
39
-
 40
40
-
 41
41
-
 42
42
-
 43
43
-
 44
44
-
 45
45
-
 46
46
-
 47
47
-
 48
48
-
 49
49
-
 50
50
-
 51
51
-
 52
52
-
 53
53
-
 54
54
-
 55
55
-
 56
56
-
 57
57
-
 58
58
-
 59
59
-
 60
60
-
 61
61
-
 62
62
-
 63
63
-
 64
64
-
 65
65
-
 66
66
-
 67
67
-
 68
68
-
 69
69
-
 70
70
-
 71
71
-
 72
72
-
 73
73
-
 74
74
-
 75
75
-
 76
76
-
 77
77
-
 78
78
-
 79
79
-
 80
80
-
 81
81
-
 82
82
-
 83
83
-
 84
84
-
 85
85
-
 86
86
-
 87
87
-
 88
88
-
 89
89
-
 90
90
-
 91
91
-
 92
92
-
 93
93
-
 94
94
-
 95
95
-
 96
96
-
 97
97
-
 98
98
-
 99
99
-
 100
100
-
 101
101
-
 102
102
-
 103
103
-
 104
104
-
 105
105
-
 106
106
-
 107
107
-
 108
108


Brabantia BBEK1114 Benutzerhandbuch
- Kategorie
- Brotbackmaschinen
- Typ
- Benutzerhandbuch
in anderen Sprachen
- français: Brabantia BBEK1114 Manuel utilisateur
- Nederlands: Brabantia BBEK1114 Handleiding
Andere Dokumente
-
ARIETE 133 Benutzerhandbuch
-
-
 Profi-pumpe HeißluftMultifritteuse & Brotbackautomat ECO AIRPROFI BREAD DC1400W Bedienungsanleitung
-
H Koenig BAKE340 Benutzerhandbuch
-
Panasonic 2522 Bedienungsanleitung
-
Clatronic BBA 2983 Bedienungsanleitung
-
Panasonic SD-ZB2512KXE Bedienungsanleitung
-
Clatronic BBA 3449 Bedienungsanleitung
-
Philips HD9015/30 Recipe book
