Stadler Form PAUL Noir Bedienungsanleitung
- Kategorie
- Raumheizungen
- Typ
- Bedienungsanleitung
Dieses Handbuch eignet sich auch für

Paul
Gebrauchsanweisung
Operating instructions
Mode d‘emploi
Istruzioni per l‘uso
Manual de instrucciones
Gebruiksaanwijzing
Brugsanvisning
Käyttöohje
Bruksanvisning
Bruksanvisning
A
D
A
P
T
I
V
E
H
E
A
T
™
•
A
D
A
P
T
I
V
E
&
C
O
N
T
I
N
U
O
U
S
H
E
A
T
I
N
G
•

Paul
1
2
3
17
15
18
4
16
7
12

2
J
A
H
R
E
G
A
R
A
N
T
I
E
•
2
Y
E
A
R
S
W
A
R
R
A
N
T
Y
•
2
A
N
N
É
E
S
D
E
G
A
R
A
N
T
I
E
•
2
11
6
10
5
14
13
9
8
11

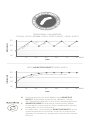
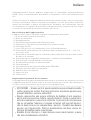
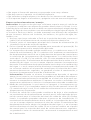
TIME
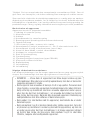
TRADITIONAL FAN HEATERS:
TYPICAL «COLD / WARM / COLD» EFFECT (QUIET / LOUD / QUIET)
TEMPERATURE
22°
20°
18°
16°
HEAT O N
ON
OFF
0 15 30 45 60 75 90 MIN.
TIME
WITH ADAPTIVE HEAT™ (VERY QUIET)
TEMPERATURE
22°
20°
18°
16°
0 15 30 45 60 75 90 MIN.
A
D
A
P
T
I
V
E
A
N
D
C
O
N
T
INUOUS HEAT I N G
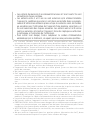
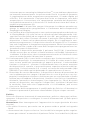
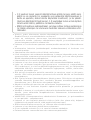
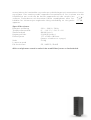
D Heizleistung wird im Auto Modus dank ADAPTIVE
HEAT™ Technologie automatisch adaptiert, um die
Ziel-Temperatur effizient zu erreichen und beizubehalten
E ADAPTIVE HEAT™ technology automatically adapts
heat output in auto mode to reach and keep the desired
temperature in an efficient way
F En mode auto, la technologie ADAPTIVE HEAT™ ajuste
automatiquement le niveau de sortie de la chaleur pour
atteindre et maintenir la température désirée de manière
efficace

Stadler Form Aktiengesellschaft, Chamerstrasse 174, 6300 Zug, Switzerland
Phone +41 41 720 48 48, Fax +41 41 720 48 44, www.stadlerform.com/contact
Teilen Sie Ihr Feedback von Paul auf:
Share your feedback about Paul on:
Partagez votre commentaire sur Paul :
www.stadlerform.com/Paul
Bedienungsanleitung hier herunterladen:
Download instruction manual:
Téléchargez le mode d’emploi :
www.stadlerform.com/Paul/manual
Für häufig gestellte Fragen besuchen Sie:
For frequently asked questions go to:
Trouvez la foire aux questions sur :
www.stadlerform.com/Paul/support
Schauen Sie sich das Video zu Paul an:
Watch the video of Paul:
Regardez la vidéo du Paul :
www.stadlerform.com/Paul/video

Gratulation! Sie haben soeben den aussergewöhnlichen Heizlüfter PAUL
erworben. Er wird Ihnen viel Freude machen und die Raumluft für Sie
verbessern.
Wie bei allen elektrischen Haushaltsgeräten wird auch bei diesem Gerät zur
Vermeidung von Verletzungen, Brand- oder Geräteschäden besondere Sorg-
falt verlangt. Bitte studieren Sie die vorliegende Betriebsanleitung vor der
Inbetriebnahme und beachten Sie die Sicherheitshinweise auf dem Gerät.
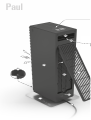
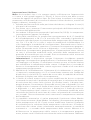
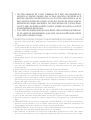
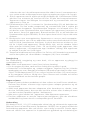
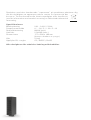
Gerätebeschreibung
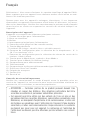
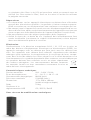
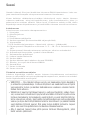
Das Gerät besteht aus den folgenden Komponenten:
1. Netzkabel für die Stromversorgung
2. Fuss aus Aluminium
3. Gehäuse
4. Hauptschalter für Stromversorgung
5. Touch Panel (berührungsempfindliches Bedienelement)
6. Ein/Aus-Taste
7. LED Statuslicht (rot=Heizung, blau=Kühlung)
8. Bedienfeld für die Wahl der Temperatur: 0 ° – 26 ° C oder maximal «Hi»
9. Bedienfeld für die Wahl der Heizleistungsstufe: niedrig bis hoch
10. Taste für Auto Modus, Anzeige «Auto Mode»
11. Tasten für Schwenkfunktion
12. Fach für Fernbedienung
13. Fernbedienung
14. Batteriefach Fernbedienung (Typ CR2032)
15. Klappe mit abwaschbarem Luftfilter
16. Tragegriff
17. Lufteintritt
18. Luftaustritt
Wichtige Sicherheitshinweise
Bitte lesen Sie die Gebrauchsanleitung genau durch, bevor Sie das Gerät
das erste Mal in Betrieb nehmen und bewahren Sie sie zum späteren Nach-
schlagen gut auf, geben Sie sie ggf. an den Nachbesitzer weiter.
Deutsch
•• VORSICHT•–•Einige•Teile•des•Produktes•können•sehr•heiss•werden•und•Ver-
brennungen•verur sachen.•Besondere•Vorsicht•ist•geboten,•wenn•Kinder•
und•schutzbedürftige•Personen•anwesend•sind.
•• Dieses•Gerät•kann•von•Kindern•ab•8•Jahren•und•Personen•mit•einge-
schränk ten•körperlichen,•sensorischen•oder•geistigen•Fähigkeiten,•aber•
auch•von•unerfahrenen•und•unwissenden•Personen•verwendet•werden,•
sofern•diese•das•Gerät•unter•Aufsicht•verwenden•oder•von•einer•anderen•
Person•über•die•sichere•Verwendung•des•Gerätes•unterwiesen•wurden•
und•sich•der•damit•verbundenen•Gefahren•bewusst•sind.•Kinder•dürfen•
nicht•mit•dem•Gerät•spielen.•Kinder•dürfen•das•Gerä t•nur•unter•Aufsicht•
reinigen•und•wart en.
•• Kinder•unter•3• Ja h ren•sind•vom•Gerät•fernzuhalten;•es•sei•denn•sie•wer-
den•ständig•überwacht.

• Für Schäden, die durch Nichtbeachten dieser Gebrauchsanleitung ent-
stehen, lehnt Stadler Form jegliche Haftung ab.
• Das Gerät ist nur im Haushalt für die in dieser Gebrauchsanweisung be-
schriebenen Zwecke zu benutzen. Ein nicht bestimmungsgemässer Ge-
brauch sowie technische Veränderungen am Gerät können zu Gefahren
für Gesundheit und Leben führen.
• Gerät nie in Wasser / andere Flüssigkeiten tauchen. Kurzschlussgefahr!
• Beschädigte Geräte (inkl. Netzkabel) nie in Betrieb nehmen.
• Nie unter Spannung stehende Teile berühren.
• Schliessen Sie das Kabel nur an Wechselstrom an. Gerät nur an fach-
gerecht installierter Steckdose mit korrekter Spannung betreiben. Keine
Verlängerungskabel verwenden.
• Der Heizer darf nicht unmittelbar unter einer Steckdose platziert werden.
• Das Gerät nie selber öffnen (Reparaturen nur durch Fachleute).
• Das Gerät ist gemäss Norm IP21 spritzwassergeschützt (vertikal) und
darf nur im Badezimmer benützt werden, wenn ein Mindestabstand von
100 cm zu folgenden Objekten eingehalten wird: Badewannen, Duschen,
Schwimmbecken, Wasserhähne, Waschbecken, etc.
• Das Netzkabel nicht über scharfe Kanten ziehen oder einklemmen. Den
Stecker nie am Netzkabel oder mit nassen Händen aus der Steckdose
ziehen.
• Gerät nicht in der Nähe einer Wärmequelle aufstellen. Das Netzkabel
keiner direkten Hitzeeinwirkung (wie z.B. heisse Herdplatten, offene
Flammen, heisse Bügeleisen oder Heizöfen) aussetzen. Netzkabel vor Öl
schützen.
• Die benutzte Steckdose muss jederzeit zugänglich bleiben.
• Gerät nie aufw unebenen Flächen oder weichen Unterlagen betreiben.
• VORSICHT: Um eine Gefährdung durch ein unbeabsichtigtes Rücksetzen
des Schutztemperaturbegrenzers zu vermeiden, darf das Gerät nicht
über ein externe Schaltvorrichtung wie beispielsweise eine Zeitschaltuhr
versorgt werden.
• WARNUNG: Während des Betriebs den Lufteinlass und Luftauslass nicht
abdecken – Brandgefahr!
• Gerät nicht in kleinen Räumen (unter 4 m
2
Fläche), nicht in explosiver Um-
gebung, nicht zum Wäsche trocknen einsetzen.
• Der Bereich des Luftauslasses nicht berühren, da er hohe Temperatur
erreichen kann.
• Gerät nie unbeaufsichtigt stehen lassen.
•• Kinder•ab•3•Jahren•und•jünger•als•8•Jahre•dür fen•das•Gerät• n u r•ein-•und•
ausschalten,•wenn•sie•beaufsichtigt•werden•oder•bez üglich•des•sicheren•
Gebrauchs•des•Gerätes•unterwiesen•wurden•und•die•daraus•resultieren-
den•Gefahren•verstanden•haben,•vorausgesetzt,•dass•das•Gerät•in•seiner•
normalen•Gebrauchslage•platziert•oder•installiert•ist.•Kinder•ab•3•Jahren•
und•jünger•als•8•Jahre•dürfen•das•Gerät•nicht•an•das•Stromnetz•anschlie-
ssen,•es•nicht•regulieren•oder•reinigen•und•keine•Wartung•durchführen.
•• Wenn•das•Netzkabel•beschädigt•ist,•muss•es•vom•Hersteller•oder•in•einer•
vom•Hersteller•zugelassenen•Werkstatt•oder•von•ähnlich•qualifizierten•
Personen•ersetzt•werden,•um•Gefahren•zu•v ermeiden.

• Keine Gegenstände und/oder Finger in Geräteöffnungen stecken.
• Brennende Geräte nur mit Löschdecke löschen.
Inbetriebnahme / Bedienung
Hinweis: Stellen Sie sicher, dass zwischen dem Heizer und der Wand oder
anderen grossen Objekten immer genügend Platz ist (> 50 cm). Der Luft-
strom darf nicht durch etwaige Objekte blockiert werden. Wenn Paul in ei-
nem Badezimmer verwendet wird, muss ein Mindestabstand von 100 cm zu
Dusche, Badewanne, Wasserhahn, Waschbecken, etc. eingehalten werden.
1. Nachdem Sie Paul am gewünschten Ort platziert haben, schliessen Sie
das Kabel (1) an der Steckdose an.
2. Drücken Sie zuerst auf den Hauptschalter (4) auf der Geräterückseite.
3. Schalten Sie das Gerät ein, indem Sie auf die Ein/Aus-Taste (6) drücken.
Auf dem Display erscheint die Ziel-Temperatur.
4. Die Ziel-Temperatur kann durch eine vertikale Streichbewegung über
das rechte Bedienfeld (8) «Temperature» verändert werden, von 0 °C
(Kühlungsmodus) bis 26 °C oder maximal «Hi». Von 1 ° – 26 °C & «Hi»
ist der Wärmemodus aktiv. Die Zahl blinkt im Einstellmodus. Nach oben
streichen oder im oberen Bereich «+» tippen, erhöht die Ziel-Temperatur.
Nach unten streichen oder im unteren Bereich «–» tippen verringert die
Ziel-Temperatur. Die Einstellung wird gespeichert, wenn 3 Sekunden
lang keine Veränderung auf dem Bedienfeld erfolgt. Danach zeigt das
Display die aktuelle Raumtemperatur an.
Info: Wird die Ziel-Temperatur erreicht, schaltet das Gerät das Heiz-
element aus und auf dem Display blinkt die Temperaturanzeige. Der
Ventilator bleibt auf der untersten Stufe eingeschaltet, um die Raum-
temperatur zu überwachen. Sinkt die gemessene Raumtemperatur unter
die eingestellte Ziel-Temperatur, schaltet das Gerät wieder ein.
5. Kühlungsmodus: wird die Temperatur auf 0 °C eingestellt, schaltet das
Heizelement aus und der Ventilator bläst kühle Luft aus dem Gerät. Das
LED Statuslicht (7) wechselt von rot auf blau. Auf dem Display erscheint
im Kühlungsmodus keine Temperaturanzeige.
6. Die Heizleistungsstufe kann durch eine vertikale Streichbewegung über
das linke Bedienfeld (9) «Power Level» verändert werden, von niedrig
bis hoch. Die Anzeige blinkt während der Eingabe. Nach oben streichen
oder im oberen Bereich «+» tippen, erhöht die Leistungsstufe. Nach un-
ten streichen oder im unteren Bereich «–» tippen, verringert die Leis-
tungsstufe. Die Einstellung wird gespeichert, wenn 3 Sekunden lang
keine Veränderung auf dem Bedienfeld erfolgt. Danach zeigt das Display
die aktuelle Raumtemperatur an.
7. Der Auto Modus wird durch Drücken der «Auto Mode» Taste (10) ak-
tiviert, im Display wird «Auto Mode» angezeigt. Die voreingestellte
Ziel-Temperatur von 22 °C kann über das rechte Bedienfeld (8) verän-
dert werden. Die Heizleistungsstufe wird im Auto Modus automatisch
gewählt, in Abhängigkeit zur Raumtemperatur. Je kleiner die Differenz
zwischen Raumtemperatur und Ziel-Temperatur, desto kleiner die ge-
wählte Heizleistungsstufe. Diese Technologie nennen wir «Adaptive
Heat
TM
» und haben wir international zum Patent angemeldet. Damit
stellt Paul sicher, dass die Ziel-Temperatur schnell und effizient erreicht
und beibehalten wird. Paul verhindert dadurch einen starken Tempera-

turabfall sowie ein ständiges Ein- und Ausschalten des Geräts. Wird
die Heizleistungsstufe manuell verändert (9), wird der Auto Modus de-
aktiviert.
Info: Wird die Ziel-Temperatur erreicht, schaltet das Gerät das Heizele-
ment aus und auf dem Display blinkt die Temperaturanzeige.
8. Die Schwenkfunktion kann durch Drücken einer der «Swing Mode»
Tasten (11) auf der linken und rechten Gehäuseseite aktiviert werden.
Das Gerät schwenkt nun in einem Winkel von ca. 90°, um eine weite
Wärmeverteilung zu gewährleisten. Soll das Gerät in einem gewissen
Winkel stehen bleiben, drücken Sie die «Swing Mode» Taste erneut.
Wird die Ziel-Temperatur erreicht, bleibt das Gerät in dem derzeitigen
Winkel stehen, bis die Raumtemperatur unter die Ziel-Temperatur fällt
und das Gerät erneut einschaltet.
9. Schalten Sie das Gerät aus, indem Sie auf die Ein/Aus-Taste (6) drücken.
Der Ventilator bleibt noch während 3 Minuten auf der untersten Stufe
eingeschaltet, um das Heizelement abzukühlen. Das Gerät speichert die
Eingabe der Temperatur und der Heizleistungsstufe, auch wenn das Ge-
rät ausgeschaltet wird.
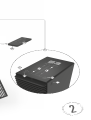
10. Die Fernbedienung (13) befindet sich im Fach (12) auf der Geräterücksei-
te. Die Temperatur und die Heizleistungsstufe können durch Drücken auf
die jeweiligen Tasten verändert werden. Die Fernbedienung funktioniert
über Infrarot – halten Sie dazu die Fernbedienung Richtung Vorderseite
des Geräts (der Sensor befindet sich ganz oben an der Gerätevordersei-
te). Das Batteriefach (14) befindet sich auf der Rückseite der Fernbedie-
nung (Typ CR2032). Dieses kann geöffnet werden, indem die Abdeckung
nach unten geschoben wird.
11. Überhitzungssicherung: das Gerät ist mit einer Überhitzungssicherung
ausgestattet, die bei einer technischen Störung oder bei unsachgemäs-
sem Einsatz das Gerät ausschaltet (der Ventilator läuft einige Zeit auf
der untersten Stufe weiter, um das Gerät abzukühlen). Sollte dieser Fall
eintreten, beseitigen Sie die Störung bzw. korrigieren Sie den Einsatz
(z.B. > 50 cm Platz ums Gerät, Gerät nicht abdecken, Gerät aufrecht auf-
stellen). Das Gerät kann wieder in Betrieb genommen werden, wenn das
Gerät abgekühlt ist.
12. Die Temperaturanzeige kann durch Drücken der «Auto Mode» Taste (10)
während 5 Sekunden von Celsius zu Fahrenheit und umgekehrt gewech-
selt werden.
Reinigung
Vor jeder Wartung, Reinigung und nach jedem Gebrauch das Gerät ausschal-
ten und das Netzkabel (1) von der Steckdose trennen.
Achtung: Das Gerät nie ins Wasser tauchen (Kurzschlussgefahr).
• Zur äusseren Reinigung nur mit einem feuchten Lappen abreiben und da-
nach gut trocknen.
• Darauf achten, dass Luftein- und austritt regelmässig gereinigt werden,
um eine Staubansammlung zu vermeiden. Den Luftaustritt (18) mit einem
trockenen Pinsel oder Staubsauger reinigen. Das Lufteintrittsgitter (17)
ist mit einem Luftfilter (15) ausgestattet, der herausnehmbar und mit ei-
nem feuchten Lappen gereinigt werden kann. Entnehmen Sie den Filter,
indem Sie die Klappe mit Hilfe der Griffmulde unten rausziehen.

Reparaturen
• Reparaturen an Elektrogeräten (Wechseln des Netzkabels) dürfen nur
von instruierten Fachkräften durchgeführt werden. Bei unsachgemässen
Reparaturen erlischt die Garantie und jegliche Haftung wird abgelehnt.
• Nehmen Sie das Gerät nie in Betrieb, wenn ein Kabel oder Stecker be-
schädigt ist, nach Fehlfunktionen des Gerätes, wenn dieses herunterge-
fallen ist oder auf eine andere Art beschädigt wurde (Risse/Brüche am
Gehäuse).
• Nicht mit irgendwelchen Gegenständen in das Gerät eindringen.
• Ausgedientes Gerät sofort unbrauchbar machen (Netzkabel durchtren-
nen) und bei der dafür vorgesehenen Sammelstelle abgeben.
Entsorgung
Die europäische Richtlinie 2012 / 19 / CE über Elektro- und Elektronik-Alt-
geräte (WEEE) verlangt, dass elektrische Haushaltsgeräte nicht über den
Restmüll oder sonstigen Haushaltsabfall entsorgt werden dürfen, sondern
an Sammelpunkten für das Recycling von elektrischen und elektronischen
Geräten abgegeben werden müssen. So können die Verwertung der ent-
haltenen Materialien optimiert und ihre Auswirkungen auf die menschliche
Gesundheit und die Umwelt reduziert werden. Das durchgestri-
chene Abfalltonnensymbol auf dem Produkt erinnert Sie an diese
Verpflichtung. Bitte fragen Sie bei Ihrer Gemeindeverwaltung
nach der zuständigen Entsorgungsstelle.
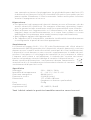
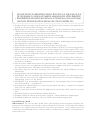
Technische Daten
Nennspannung 220 – 240 V / 50 Hz
Temperaturbereich 0 ° – 26 °C / > 26 °C = Hi
Leistungsaufnahme 800 W (min.)
Nennleistung 2‘000 W (max.)
Abmessungen 177 x 536 x 189 mm
(Breite x Höhe x Tiefe)
Gewicht 5.0 kg
Erfüllt EU-Vorschrift CE / WEEE / RoHS
Technische Änderungen vorbehalten

Congratulations! You have just purchased the exceptional PAUL fan heater.
It will bring you great pleasure and improve the ambient air for you.
As with all domestic electrical appliances, particular care is needed with
this model also, in order to avoid injury, fire damage or damage to the
appliance. Please study these operating instructions carefully before us-
ing the appliance for the first time and follow the safety advice on the
appliance itself.
Description of the appliance
The appliance consists of the following main components:
1. Mains cable for power supply
2. Aluminium base
3. Housing
4. Main switch for power supply
5. Touch Panel (touch-sensitive control element)
6. On/Off button
7. LED light (red=heating, blue=cooling)
8. Control panel for selection of temperature: 0° – 26 °C or maximum «Hi»
9. Control panel for selection of heat output level: low to high
10. Button for Auto Mode, symbol «Auto Mode»
11. Buttons for swing mode
12. Compartment for remote control
13. Remote control
14. Battery compartment remote control (type CR2032)
15. Flap with washable air filter
16. Carrying handle
17. Air inlet
18. Air outlet
Important safety instructions
Please read through the operating instructions carefully before you use
the appliance for the first time and keep them safely for later reference; if
necessary pass them on to the next owner.
English
•• CAUTION• –• Some• parts• of• this• product• can• become• very• hot• and•
cause•burns.•Particular•attention•has•to•be•giv en•where•children•and•
vulnerable•people•are•present.
•• This•appliance•can•be•used•by•children•aged•fr om•8•years•and•above•
and•persons•with•reduced•physical,•sensory•or•mental•capabilities•or•
lack•of•experience•and•knowledge•if•they•have•been•given•supervision•or•
instruction•concerning•use•of•the•appliance•in•a•safe•way•and•understand•
the•hazards•involved.•Children•shall•not•play•with•the•appliance.•Cleaning•
and•user•main tenance•shall•not•be•made•by•children•without•supervision.
•• Children•of•less•than•3•y ea rs•should•be•kept•away•unless•cont inuously•
supervised.
•• Children•aged•from•3•years•and•less•than•8•years•shall•only•swi tch•on/
off•the•appliance•provided•that•it•has•been•placed•or•installed•in•its

• Stadler Form refuses all liability for loss or damage which arises as a
result of failure to follow these operating instructions.
• The appliance is only to be used in the home for the purposes described in
these instructions. Unauthorised use and technical modifications to the
appliance can lead to danger to life and health.
• Never submerge the unit in water (danger of short circuiting).
• Never run a defective unit (e.g. supply cord).
• Never touch energized parts.
• Only connect the cable to alternating current. Observe the voltage infor-
mation given on the appliance. Do not use extension cords.
• The heater must not be located directly below a socket-outlet.
• Do not open the appliance (repairs only by service agents).
• The appliance is dripping water-proof (vertical) according to the classifi-
cation IP21 and may only be used in bathrooms in case you keep a safety
distance of at least 100 cm to the following objects: bathtubs, showers,
swimming pools, water faucets, wash basins, etc.
• Do not run the power cord over sharp edges and make sure that it does
not get trapped. Do not pull the plug from the socket with wet hands or by
holding on to the power cord.
• Do not place the appliance near a heat source. Do not subject the power
cord to direct heat (such as a heated hotplate, open flames, hot iron sole
plates or heaters for example). Protect power cords from oil.
• Please make sure that the used socket remains accessible.
• Do not run the heater on an uneven or soft surface.
• CAUTION: In order to avoid a hazard due to inadvertent resetting of the
thermal cut-out, this appliance must not be supplied through an external
switching device, such as a timer.
• WARNING: In order to avoid overheating, do not cover the air inlet or air
outlet – fire hazard!
• Do not use the heater in small rooms (below 4 m
2
in size), in explosive
environnment, or for drying laundry.
• Do not touch the front part of the appliance, it might reach hot tempera-
ture.
• Use the heater only under supervision.
• Do not insert any object and/or finger into the openings of the heater.
• To extinguish burning appliances only use fire blankets.
Setting up / operation
Note: Make sure that there is always sufficient space between the appli-
ance and the wall or other large objects (> 50 cm). The air flow must not be
blocked by objects of any kind. If Paul is set up in a bathroom, keep a safety
intended• normal•operating•position•and• they•have•been•given•super-
vision•or•ins truction•concerning•use•of•the•appliance•in•a•safe•way•and•
understand•the•haz a rds•involved.•Children•aged•from•3•years•and•less•
than•8•years•shall•not•plug•in,•regulate•and•clean•the•appliance•or•per-
form•user•maintenance.
•• If•the• su pply•cord•is•damaged,•it•must•be•replaced•by•the•manuf acturer,•
or•its•service•agent,•or•a•qualified•person•in•order•to•avoid•a•haz ard.

distance of at least 100 cm to showers, bathtubs, water faucets, washba-
sins, etc.
1. Having set up Paul in the desired position connect the cable (1) to the
household supply socket.
2. First, push the main switch for power supply (4) on the back of the ap-
pliance.
3. Switch on the appliance by pressing the On/Off button (6). The target
temperature appears on the display.
4. The target temperature can be changed from 0 °C (cooling mode) to
26 °C or maximum «Hi» by making a vertical sliding movement across the
right-hand control panel for selection of temperature (8) «Temperature».
The heating mode is active from 1 ° – 26 °C & «Hi». The digit flashes in
configuration mode. Making a sliding movement upwards or typing «+»
in the upper field increases the target temperature. Making a sliding
movement downwards or typing «–» in the lower field reduces the tar-
get temperature. The setting is saved if no change occurs on the control
panel for selection of temperature for three seconds. The current room
temperature is subsequently shown on the display.
Info: The appliance switches off the heating element when the target
temperature is reached and the temperature indicator flashes on the
display. The ventilator remains switched on at the lowest level in order
to monitor room temperature. The appliance switches on again if the
room temperature recorded drops below the set target temperature.
5. Cooling mode: the heating element switches off if the temperature is
set to 0 °C and the ventilator blows cool air out of the appliance. The LED
light (7) changes from red to blue. There is no temperature shown on the
display in cooling mode.
6. The heat output level can be changed from low to high by making a
vertical sliding movement across the left-hand control panel for selec-
tion of heat output level (9) «Power Level». The display flashes during
the input process. Making a sliding movement upwards or typing «+» in
the upper field increases the output level. Making a sliding movement
downwards or typing «–» in the lower field reduces the output level. The
setting is saved if no change occurs on the control panel for selection
of heat output level for three seconds. The current room temperature is
subsequently shown on the display.
7. Auto mode is activated by pressing the «Auto Mode» button (10). «Auto
Mode» is shown in the display. The preset target temperature of 22 °C
can be changed using the right-hand control panel for selection of tem-
perature (8). The heat output level is selected automatically in auto
mode - depending on the room temperature. The smaller the difference
between the room temperature and the target temperature, the smaller
the heat output level selected. We refer to this as «Adaptive Heat
TM
»
technology and we have filed for an international patent. This allows
Paul to make sure that the target temperature is reached, quickly and
efficiently, and maintained. Paul thus prevents a sharp temperature drop
and prevents the appliance from being constantly switched on and off.
Auto mode is deactivated if the heat output level is changed manually
(9).
Info: The appliance switches off the heating element when the target
temperature is reached and the temperature indicator flashes on the
display.

8. The swing function can be activated by pressing one of the «Swing
Mode» buttons (11) on the left-hand and right-hand side of the hous-
ing. The appliance now swings at an angle of approx. 90° to ensure a
wide distribution of heat. Press the «Swing Mode» button again if the
appliance is to remain at a certain angle. If the target temperature is
reached, the appliance remains at the angle it was in at the point the tar-
get temperature was reached until the room temperature drops below
the target temperature and the appliance switches on again.
9. Switch off the appliance by pressing the On/Off button (6). The ventila-
tor remains switched on for three minutes at the lowest level to cool
down the heating element. The appliance saves the temperature input
and the heat output level even if the appliance is switched off.
10. The remote control (13) is in the compartment for remote control (12) on
the back of the appliance. The temperature and the heat output level
can be changed by pressing the appropriate buttons. The remote control
operates via infrared - to this end, point the remote control at the front
of the appliance (the sensor is at the very top on the front of the appli-
ance). The battery compartment (14) is on the back of the remote control
(type CR2032). This can be opened by pushing the cover downwards.
11. Protection against overheating: the appliance is equipped with over-
heating protection which switches off the appliance in the event of a
technical fault or improper use (the ventilator continues to run for some
time at the lowest level to cool down the appliance). Should this occur,
rectify the fault or cease the improper use (e.g. 50 cm space around the
appliance, do not cover the appliance, set the appliance up in an upright
position). Once the appliance has cooled down it can be put back into
service.
12. The temperature indicator can be changed from Celsius to Fahrenheit
and vice versa by pressing the «Auto Mode» button (10) for five seconds.
Cleaning
Prior to any maintenance, cleaning and after each use, switch off the appli-
ance and unplug the mains cable (1) from the socket.
Attention: Never immerse the device in water (danger of short circuit).
• For external cleaning, rub with a damp cloth and then dry thoroughly.
• Make sure that the air inlet and outlet are cleaned regularly to prevent
the build-up of dust. Clean the air outlet (18) with a dry brush or vacuum
cleaner. The air inlet grid (17) is fitted with an air filter (15) which can be
removed and cleaned with a damp cloth. Remove the filter by pulling out
the flap at the bottom using the recessed grip.
Repairs
• Repairs to electrical appliances must only be carried out by a qualified
electrical technician. If improper repairs are carried out, the warranty
lapses and all liability is refused.
• Never operate the appliance if the adaptor or plug is damaged, after it has
malfunctioned, if it has been dropped or has been damaged in any other
way (cracks/breaks in the casing).
• Do not push any object into the appliance.
• If the appliance is beyond repair, make it unusable immediately by cutting
through the cable and hand it in at the collection point provided for the
purpose.

Disposal
The European directive 2012 / 19 / CE on Waste Electrical and Electronic
Equipment (WEEE), requires that old household electrical appliances must
not be disposed in the normal unsorted municipal waste stream. Old appli-
ances must be collected separately in order to optimize the recovery and
recycling of the materials they contain and reduce the impact on human
health and the environment. The crossed out “wheeled bin” symbol on the
product reminds you of your obligation, that when you dispose of
the appliance it must be separately collected. Consumers should
contact their local authority or retailer for information concerning
the correct disposal of their old appliance.
Specifications
Rated voltage 220 – 240 V / 50 Hz
Temperature range 0 ° – 26 °C / > 26 °C = Hi
Power consumption 800 W (min.)
Rated power 2‘000 W (max.)
Dimensions 177 x 536 x 189 mm
(width x height x depth)
Weight 5.0 kg
Complies with EU
Regulations CE / WEEE / RoHS
All rights for any technical modifications are reserved

Félicitations ! Vous venez d‘acheter le superbe chauffage d’appoint PAUL.
Nous espérons que cet appareil vous donnera entière satisfaction et amé-
liorera l’air intérieur pour vous.
Comme pour tous les appareils ménagers électriques, il est important
d’entretenir cet appareil correctement afin d’éviter les blessures, les incen-
dies ou les dommages. Veuillez lire attentivement le présent mode d’emploi
avant la mise en service et respecter les conseils de sécurité indiqués sur
l’appareil.
Description de l’appareil
L’appareil est composé des éléments principaux suivants :
1. Cordon électrique pour l’alimentation
2. Base en aluminium
3. Boîtier
4. Interrupteur principal pour l’alimentation
5. Panneau tactile (dispositif de contrôle tactile)
6. Touche Marche/Arrêt
7. Lumière LED (rouge = chauffe, bleu = refroidissement)
8. Panneau de configuration pour la sélection de la température : 0° à
26 °C ou maximum « Hi »
9. Panneau de configuration pour la sélection du niveau de sortie de la
chaleur : faible à élevé
10. Touche pour le Mode Auto, symbole « Auto Mode »
11. Touches pour le Mode Oscillation (swing)
12. Compartiment pour télécommande
13. Télécommande
14. Compartiment à pile pour télécommande (type CR2032)
15. Grille avec filtre à air lavable
16. Poignée de transport
17. Entr ée d’air
18. Sortie d’air
Conseils de sécurité importants
Veuillez lire attentivement le mode d‘emploi avant la première mise en
service de l’appareil et conservez-le pour toute consultation ultérieure ou
remettez-le, le cas échéant, au nouveau propriétaire.
Français
•• ATTENTION• –• C ertaines• parties• de• ce• produit• peuvent• devenir• très•
chaudes•et•causer•des• brûlures.• Une• atten tion•particulière•doit• être•
accordée•aux•enfants•et•personnes•vulnérables•présentes.
•• Cet•appar eil•peut•être•utilisé•par•des•enfants•de•8•ans•et•plus•et•des•
personnes•dont•les•capacités•physiques,•sensorielles•ou•mentales•sont•
diminuées,•ou•manquent•d‘expérience•et•de•connaissances•si•elles•ont•
été•for mées•ou•encadrées•pour•l ‘utilisa tion•de•l‘appareil•d‘une•manière•
sécuritaire,•et•elles•sont•conscientes•des•risques•encourus.•Les•enfants•
ne•doivent•pas•jouer•avec•cet•appareil.•Le•nettoyage•et•l‘entretien•de•
l‘utilisateur•ne•doivent•pas•être•effectués•par•des•enfants•sans•surveil-
lance.

• La société Stadler Form décline toute responsabilité des dommages
résultant du non-respect des indications données dans ce mode d‘emploi.
• Cet appareil ne doit être utilisé qu’aux fins domestiques décrites dans ce
mode d’emploi. Toute utilisation contraire à sa destination ainsi que toute
modification technique apportée à l’appareil peut entraîner des risques
pour la santé et la vie.
• Ne mouillez jamais l‘appareil (risque de court-circuit).
• Ne jamais utiliser d’appareils endommagés (y compris cordons élec-
triques).
• Ne jamais toucher des pièces se trouvant sous tension.
• Ne branchez le câble qu’au courant alternatif. Utiliser l’appareil en res-
pectant le voltage correct et uniquement sur une prise installée par un
professionnel. Ne pas utiliser de rallonge électrique.
• L‘appareil de chauffage ne doit pas être placé juste en dessous d‘une
prise de courant.
• Ne jamais ouvrir l’appareil (réparations uniquement par des professionnels).
• Cet appareil est résistant aux écoulements d’eau (verticaux) conformé-
ment à la classification IP21 et ne doit être utilisé dans une salle de bains
que si une distance d’au moins 100 cm peut être respectée entre les élé-
ments suivants : baignoires, douches, piscines, robinets d’eau, lavabos,
etc.
• Ne pas faire passer ou coincer le câble d’alimentation par-dessus des
arêtes vives. Ne jamais retirer la fiche de courant de la prise en tirant sur
le câble d’alimentation ou en ayant les mains mouillées.
• Ne pas placer l’appareil à proximité directe d’une source de chaleur. Ne
pas exposer le câble d’alimentation à la chaleur (comme p. ex. une plaque
chaude de cuisinière, flammes nues, semelle chaude de fer à repasser ou
poêles). Protéger le câble d’alimentation de tout contact avec de l’huile.
• La prise de courant utilisée doit rester accessible en tout temps.
• Ne jamais utiliser l‘appareil sur des surfaces inégales ou molles.
• PRÉCAUTION : Afin d‘éviter tout danger dû au réarmement intempestif du
coupe-circuit thermique, cet appareil ne doit pas être alimenté par l‘inter-
médiaire d‘un interrupteur externe, comme une minuterie.
• ATTENTION : Pour éviter la surchauffe, ne couvrez pas l’entrée et la sortie
d’air – risque d’incendie !
• Ne pas utiliser l‘appareil dans les petites pièces (de moins de 4 m
2
), dans
un environnement explosif ou pour faire sécher du linge.
•• Les•enf a nts•de•moins•de•3•ans•doivent•être•tenus•à•l‘écart•sauf•s‘ils•sont•
surveillés•de•façon•continue.•
•• Les•enfants•entre•3•et•8•ans•ne•sont•autorisés•qu ‘à•allumer/éteindre•
l‘appareil•à• condition•que•celui-ci•soit•placé•ou•installé•dans•son•empla-
cement•d‘utilisation•ordinaire• prévu•et•que•les•enfants•aient•été•formés•
ou•encadrés•pour•l‘utilisation•de•l‘appareil•d‘une•manière•sécurit aire,•et•
ils•sont•conscients•des•risques•encourus.•Les•enfants•entre•3•et•8•ans•ne•
sont•pas•autorisés•à•brancher•l‘appareil,•faire•des•réglages•ou•effectuer•
le•nettoyage•e t•l‘entretien•de•l‘utilisateur.
•• Pour• éviter• tout• danger,• faites• remplacer• le• cordon• d‘alimentation•
endommagé•par•le•fabricant,•un•agen t•ag réé•ou•une•personne•qualifiée.

• Ne jamais toucher la partie avant de l’appareil, elle peut atteindre des
températures très élevées.
• Ne jamais laisser l’appareil sans surveillance.
• Ne pas introduire d’objets et/ou mettre les doigts dans les ouvertures
de l’appareil.
• Jeter une couverture isolante sur les appareils en flammes pour éteindre
le feu.
Mise en marche / Manipulation
Remarque : Veillez à placer le radiateur à une certaine distance du mur ou
d’autres gros objets (> 50 cm). Cela permet au flux d’air de s’écouler sans
entrave. Le flux d’air ne doit être bloqué par aucun objet. Si Paul est ins-
tallé dans la salle de bains, veillez à conserver une distance de sécurité d’au
moins 100 cm entre l’appareil et les douches, baignoires, robinets, lavabos,
etc.
1. Une fois que vous avez placé Paul à l’endroit prévu, branchez le cordon
d’alimentation (1) à une prise secteur
2. Appuyez sur l’interrupteur principal à l’arrière de l’appareil pour sa mise
sous tension (4).
3. Appuyez sur la touche Marche/Arrêt (6) pour allumer l’appareil. La tem-
pérature souhaitée apparaît sur l’affichage.
4. La température souhaitée peut être modifiée de 0 °C (mode refroidis-
sement) à 26 °C ou maximum « Hi » d’un mouvement vertical sur le côté
droit du panneau de configuration pour choisir la température (8) « Tem-
perature ». Le mode de chauffe est actif de 1 °C à 26 °C et sur « Hi ». En
mode configuration, le nombre clignote. Pour augmenter la température
souhaitée, glissez vers le haut ou entrez « + » dans le champ supérieur.
Pour réduire la température souhaitée, glissez vers le bas ou entrez « - »
dans le champ inférieur. Le réglage est sauvegardé si aucune modifica-
tion de température n’est réalisée pendant trois secondes. La tempéra-
ture actuelle de la pièce s’affiche en conséquence.
Information : L’appareil éteint le chauffage quand la température
souhaitée est atteinte, et l’indicateur de température clignote sur l’affi-
chage. Le ventilateur reste allumé à une faible puissance pour contrôler
la température de la pièce. Si la température de la pièce est plus basse
que la température souhaitée, l’appareil se remet en marche.
5. Mode refroidissement : le chauffage s’éteint si la température est ré-
glée à 0 °C et que le ventilateur rejette de l’air froid de l’appareil. L’éclai-
rage LED (7) passe du rouge au bleu. En mode refroidissement, aucune
température n’apparaît sur l’affichage.
6. Vous pouvez changer le niveau de sortie de la chaleur de faible à élevé
en effectuant un glissement vertical le long du côté gauche du panneau
de configuration, pour la sélection du niveau de sortie de la chaleur (9)
« Power Level ». L’affichage clignote lors de l’entrée d’air. Pour augmen-
ter le niveau de sortie, glissez vers le haut ou entrez « + » dans le champ
supérieur. Pour réduire le niveau de sortie, glissez vers le bas ou entrez
« – » dans le champ inférieur. Le réglage est sauvegardé si aucune modi-
fication de sortie d’air n’est réalisée pendant trois secondes. La tempé-
rature actuelle de la pièce s’affiche en conséquence
7. Pour activer le mode Auto, appuyez sur la touche « Auto Mode » (10).
« Auto Mode » apparaît sur l’affichage. La température d’origine, 22 °C
peut être modifiée à l’aide de la sélection de température (8) sur le

côté droit du panneau de configuration. Le niveau de sortie de la cha-
leur se règle automatiquement en mode auto, selon la température de
la pièce. Le niveau de sortie de chaleur sélectionné sera plus petit si
la différence entre la température de la pièce et celle souhaitée n’est
pas grande. Nous faisons référence à cette technologie sous le nom
« Adaptive Heat™ » et avons introduit une demande de brevet interna-
tional. Paul assure et maintient donc l’objectif de température souhaitée
efficacement et rapidement. Il prévient de grandes chutes de tempéra-
ture et évite que l’appareil ne s’éteigne et ne se rallume constamment.
Le mode auto se désactive si le niveau de sortie de la chaleur est modifié
manuellement (9).
Information : l’appareil éteint le chauffage si la température souhaitée
est atteinte, l’indicateur de température clignote sur l’affichage.
8. Pour activer la fonction oscillation, appuyez sur l’une des touches
« Swing Mode » (11) sur les côtés gauche et droit du boîtier. L’appareil
oscille sur un angle d’environ 90° afin d’apporter une large distribution
de chaleur. Appuyez de nouveau sur la touche « Swing Mode » si l’appa-
reil reste sur un angle précis. Si la température souhaitée est atteinte,
l’appareil maintient la position d’angle qu’il avait au moment jusqu’à ce
que la température descende en-dessous de celle souhaitée, auquel cas
l’appareil se remet en marche.
9. Éteignez l’appareil en appuyant sur la touche Marche/Arrêt (6). Le ven-
tilateur fonctionne encore pendant trois minutes à son niveau le plus
bas pour évacuer la chaleur. L’appareil conserve la température d’entrée
d’air et le niveau de sortie de chaleur même si celui-ci s’éteint.
10. La télécommande (13) se situe dans le compartiment à télécommande
(12) à l’arrière de l’appareil. Les niveaux de température et de sortie de
chaleur peuvent être modifiés en appuyant sur les touches adéquates.
La télécommande agit par infrarouge – pointez la télécommande vers
l’avant de l’appareil (le capteur est situé tout en haut de l’avant de l’ap-
pareil). Le compartiment à pile (14) se trouve à l’arrière de la télécom-
mande (type CR2032). Pour l’ouvrir, poussez le cache vers le bas.
11. Protection anti-surchauffe : Paul est équipé d’une protection anti-sur-
chauffe qui arrête l’appareil en cas d’anomalie technique ou d’utilisation
non-conforme (le ventilateur fonctionne encore un certain temps à un
niveau faible pour refroidir l’appareil). Le cas échéant, réparez l’anoma-
lie ou interrompez l’utilisation non-conforme (distance de 50 cm autour
de l’appareil, ne pas couvrir l’appareil, placer l’appareil dans sa position
verticale). Une fois que l’appareil a refroidi, il peut être remis en marche.
12. L’indicateur de température peut passer des degrés Celsius aux degrés
Fahrenheit et inversement : appuyez sur la touche « Auto Mode » (10)
pendant cinq secondes.
Nettoyage
Avant toute opération d’entretien, de nettoyage et après chaque utilisation,
éteignez l’appareil et débranchez le câble secteur (1) de la prise.
Attention : Ne jamais plonger l’appareil dans l’eau (risque de court-circuit).
• Pour le nettoyage extérieur, utilisez un chiffon humide et séchez bien
l‘appareil.
• Assurez-vous que les entrée et sortie d’air sont nettoyées régulièrement
afin d’empêcher l’accumulation de poussière. Nettoyez la sortie d’air (18)
à l’aide d’une brosse sèche ou d’un aspirateur. La grille d’entrée d’air (17)

est équipée d’un filtre à air (15) qui peut être retiré et nettoyé avec un
chiffon sec. Pour retirer le filtre, tirez sur le cache à l’arrière en utilisant
la poignée encastrée.
Réparations
• Les réparations sur les appareils électriques ne doivent être effectuées
que par des électriciens qualifiés. La garantie s’éteint et toute responsa-
bilité est exclue en cas de réparations non conformes aux règles de l‘art.
• Ne mettez jamais l‘appareil en service en cas d’endommagement d’un cor-
don ou d’une fiche, après un dysfonctionnement de l’appareil causé par une
chute ou par une autre détérioration de l’appareil (boîtier fissuré/cassé).
• Ne pas pénétrer avec des objets quelconques dans l’appareil.
• Arrivé au bout de sa durée de vie, l’appareil doit immédiatement être
rendu inutilisable (sectionner le cordon d’alimentation) et être déposé
dans une déchetterie prévue à cet effet.
Elimination
Conformément à la directive européenne 2012 / 19 / EC sur la mise au
rebut des déchets d’équipements électriques et électroniques (DEEE), les
appareils ménagers usés ne doivent pas être jetés avec les déchets non
triés. Ces appareils usés doivent être collectés séparément des déchets
ménagers pour optimiser la récupération et le recyclage de leurs compo-
sants dans le but de réduire les effets négatifs sur la santé humaine et sur
l’environnement. Le symbole de poubelle avec roulettes et croix indique que
ces produits doivent être collectés et mis au rebut séparément
des ordures ménagères. Les consommateurs doivent contacter
les autorités locales ou leurs revendeurs concernant la mise au
rebut de leurs vieux appareils.
Caractéristiques techniques
Tension nominale 220 – 240 V / 50 Hz
Écart de température 0 ° – 26 °C / > 26 °C = Hi
Consommation énergétique 800 W (min.)
Puissance nominale 2‘000 W (max.)
Dimensions 177 x 536 x 189 mm
(width x height x depth)
Poids 5.0 kg
Conforme à la
réglementation UES CE / DEEE / RoHS
Sous réserve de modifications techniques
Seite wird geladen ...
Seite wird geladen ...
Seite wird geladen ...
Seite wird geladen ...
Seite wird geladen ...
Seite wird geladen ...
Seite wird geladen ...
Seite wird geladen ...
Seite wird geladen ...
Seite wird geladen ...
Seite wird geladen ...
Seite wird geladen ...
Seite wird geladen ...
Seite wird geladen ...
Seite wird geladen ...
Seite wird geladen ...
Seite wird geladen ...
Seite wird geladen ...
Seite wird geladen ...
Seite wird geladen ...
Seite wird geladen ...
Seite wird geladen ...
Seite wird geladen ...
Seite wird geladen ...
Seite wird geladen ...
Seite wird geladen ...
Seite wird geladen ...
Seite wird geladen ...
Seite wird geladen ...
Seite wird geladen ...
Seite wird geladen ...
Seite wird geladen ...
Seite wird geladen ...
Seite wird geladen ...
Seite wird geladen ...
Seite wird geladen ...
Seite wird geladen ...
Seite wird geladen ...
Seite wird geladen ...
Seite wird geladen ...
-
 1
1
-
 2
2
-
 3
3
-
 4
4
-
 5
5
-
 6
6
-
 7
7
-
 8
8
-
 9
9
-
 10
10
-
 11
11
-
 12
12
-
 13
13
-
 14
14
-
 15
15
-
 16
16
-
 17
17
-
 18
18
-
 19
19
-
 20
20
-
 21
21
-
 22
22
-
 23
23
-
 24
24
-
 25
25
-
 26
26
-
 27
27
-
 28
28
-
 29
29
-
 30
30
-
 31
31
-
 32
32
-
 33
33
-
 34
34
-
 35
35
-
 36
36
-
 37
37
-
 38
38
-
 39
39
-
 40
40
-
 41
41
-
 42
42
-
 43
43
-
 44
44
-
 45
45
-
 46
46
-
 47
47
-
 48
48
-
 49
49
-
 50
50
-
 51
51
-
 52
52
-
 53
53
-
 54
54
-
 55
55
-
 56
56
-
 57
57
-
 58
58
-
 59
59
-
 60
60


Stadler Form PAUL Noir Bedienungsanleitung
- Kategorie
- Raumheizungen
- Typ
- Bedienungsanleitung
- Dieses Handbuch eignet sich auch für
in anderen Sprachen
- English: Stadler Form PAUL Noir Owner's manual
- français: Stadler Form PAUL Noir Le manuel du propriétaire
- español: Stadler Form PAUL Noir El manual del propietario
- italiano: Stadler Form PAUL Noir Manuale del proprietario
- Nederlands: Stadler Form PAUL Noir de handleiding
- dansk: Stadler Form PAUL Noir Brugervejledning
- svenska: Stadler Form PAUL Noir Bruksanvisning
- suomi: Stadler Form PAUL Noir Omistajan opas
Verwandte Artikel
-
Stadler Form PAUL Bedienungsanleitung
-
Stadler Form Anna big Benutzerhandbuch
-
Stadler Form Sam & Sam little Fan Heater Benutzerhandbuch
-
Stadler Form Peter leatherette Benutzerhandbuch
-
Stadler Form Leo 3D Air Circulator Benutzerhandbuch
-
Stadler Form ANNA0004 Blanc Bedienungsanleitung
-
Stadler Form LEO Benutzerhandbuch
-
Stadler Form Fan heater 25 m² Black 14134 Benutzerhandbuch
-
Andere Dokumente
-
Tristar KA-5860 Series Benutzerhandbuch
-
Amica FK3296.4F Benutzerhandbuch
-
Silvercrest SKD 2300 D4 Bedienungsanleitung
-
Olsberg Minerva plus Bedienungsanleitung
-
Fakir Trend HL 140 Bedienungsanleitung
-
-
Silvercrest SHLF 2000 B1 Operating Instructions Manual