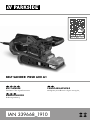
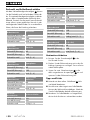
Parkside 339668 1910 Translation Of The Original Instructions
- Kategorie
- Power Sanders
- Typ
- Translation Of The Original Instructions
Dieses Handbuch eignet sich auch für

IAN 339668_1910
BELT SANDER PBSD 600 A1
BANDSCHLEIFER
Bedienungsanleitung
BELT SANDER
Translation of the original instructions
ΤΑΙΝΙΟΛΕΙΑΝΤΉΡΑΣ
Μετάφραση των αυθεντικών οδηγιών λειτουργίας

GB / IE / NI/CY Translation of the original instructions Page 1
GR / CY Μετάφραση των αυθεντικών οδηγιών λειτουργίας Σελίδα 13
DE / AT / CH Originalbetriebsanleitung Seite 25
Before reading, unfold the page containing the illustrations and familiarise yourself with all functions of
the device.
Πριν ξεκινήσετε την ανάγνωση, ανοίξτε τη σελίδα με τις εικόνες και εξοικειωθείτε με όλες τις λειτουργίες
της συσκευής.
Klappen Sie vor dem Lesen die Seite mit den Abbildungen aus und machen Sie sich anschließend mit allen
Funktionen des Gerätes vertraut.

A

GB
│
IE
│
NI
│
CY
│
1 ■
PBSD 600 A1
Contents
Introduction .........................................................2
Intended use .................................................................... 2
Depicted components ............................................................. 2
Package contents ................................................................. 2
Technical data ................................................................... 2
General Power Tool Safety Warnings ....................................3
1. Work area safety .............................................................. 3
2. Electrical safety ................................................................ 3
3. Personal safety ................................................................ 4
4. Power tool use and care ......................................................... 4
5. Service ....................................................................... 5
Appliance-specific safety instructions for grinders ........................................ 5
Operation ...........................................................5
Tensioning/replacing the abrasive belt ................................................ 5
Adjusting the additional handle ...................................................... 6
Flipping up the front cover .......................................................... 6
Attaching/removing a dust extraction unit .............................................. 6
Working procedures .............................................................. 7
Use ................................................................. 7
Switching on and off .............................................................. 7
Emptying the dust collector ......................................................... 7
Selecting speed and abrasive belt .................................................... 8
Stationary work .................................................................. 8
Tips and tricks ................................................................... 9
Maintenance and cleaning .............................................9
Disposal .............................................................9
Kompernass Handels GmbH warranty ..................................10
Service ............................................................. 11
Importer ...........................................................11
Translation of the original Conformity Declaration .........................12

■ 2
│
GB
│
IE
│
NI
│
CY
PBSD 600 A1
BELT SANDER PBSD 600 A1
Introduction
Congratulations on the purchase of your new appli-
ance. You have chosen a high-quality product. The
operating instructions are part of this product. They
contain important information about safety, usage
and disposal. Before using the product, please famil-
iarise yourself with all operating and safety instruc-
tions. Use the product only as described and for the
range of applications specified. Please also pass
these operating instructions on to any future owner.
Intended use
The belt grinder is designed for the dry surface
sanding of wood, plastic, metal and plaster and
painted surfaces (depending on the type of sand-
paper used). The appliance may only be used for
dry sanding. Please note that you need to use
appropriate abrasive belts with different grains for
working different materials, and that you may need
to adapt the speed to suit the material. The appli-
ance is not intended for commercial use. Any other
use of or modification to the appliance is deemed
to be improper and carries the risk of serious
personal injury. The manufacturer accepts no
responsibility for damage(s) attributable to misuse.
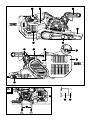
Depicted components
ON/OFF switch
Additional handle (rubberised grip)
Front cover
Clamping lever for abrasive belt
Belt speed adjusting wheel
Handle (rubberised grip)
Screw for adjusting the handle
Recesses for screw clamps
Connection for dust collector
Locking button for ON/OFF switch
Dust collector
Adjustment screw for belt tracking
Abrasive belt
Screw clamp
Reducer
Dust extraction adapter
Package contents
1 belt sander PBSD 600 A1
1 abrasive belt for wood (grain 80)
1 dust collector
1 dust extraction adapter and reducer
(for external dust extraction)
2 screw clamps
1 set of operating instructions
Technical data
Rated voltage 230 V ∼, 50 Hz
(AC)
Rated power consumption 600 W
Idling belt speed 170–250 m/min
Rated idling speed
n
0
360–560 rpm
Abrasive belt 75 x 457 mm
Protection class II /
(double insulation)
Noise emission value
Noise measurement value determined in accord-
ance with EN 62841. The A-rated noise level of
the power tool is typically as follows:
Sound pressure level L
pA
= 91 dB (A)
Uncertainty K
pA
= 3 dB
Sound power level L
WA
= 102 dB (A)
Uncertainty K
WA
= 3 dB
Wear hearing protection!
Total vibration value
Total vibration value (vector total of three direc-
tions) determined in accordance with EN 62841:
Grinding with the grinding disc a
h
= 4.2 m/s
2
Uncertainty K = 1.5 m/s
2

GB
│
IE
│
NI
│
CY
│
3 ■
PBSD 600 A1
NOTE
► The vibration emission values and the noise
emission values given in these instructions
have been measured in accordance with a
standardised test procedure and can be used
for comparison of the power tool with
another tool.
► The specified total vibration values and the
noise emission values can also be used to
make a provisional load estimate.
WARNING!
► Depending on the manner in which the
power tool is being used, and in particular
the kind of workpiece that is being worked,
the vibration and noise emission values can
deviate from the values given in these instruc-
tions during actual use of the power tool.
► Try to keep the load as low as possible.
Measures to reduce the vibration load are,
e.g. wearing gloves and limiting the working
time. Wherein all states of operation must be
included (e.g. times when the power tool is
switched off and times where the power tool
is switched on but running without load).
General Power Tool
Safety Warnings
WARNING!
► Read all safety warnings, instructions,
illustrations and specifications provided
with this power tool. Failure to follow all
instructions listed below may result in electric
shock, fire and/or serious injury.
Save all warnings and instructions for future
reference.
The term „power tool“ in the warnings refers to
your mains-operated (corded) power tool or
battery-operated (cordless) power tool.
1. Work area safety
a) Keep work area clean and well lit. Cluttered
or dark areas invite accidents.
b) Do not operate power tools in explosive
atmospheres, such as in the presence of
flammable liquids, gases or dust. Power tools
create sparks which may ignite the dust or
fumes.
c) Keep children and bystanders away while
operating a power tool. Distractions can cause
you to lose control.
2. Electrical safety
a) Power tool plugs must match the outlet. Never
modify the plug in any way. Do not use any
adapter plugs with earthed (grounded)
power tools. Unmodified plugs and matching
outlets will reduce risk of electric shock.
b) Avoid body contact with earthed or grounded
surfaces, such as pipes, radiators, ranges and
refrigerators. There is an increased risk of elec-
tric shock if your body is earthed or grounded.
c) Do not expose power tools to rain or wet
conditions. Water entering a power tool will
increase the risk of electric shock.
d) Do not abuse the cord. Never use the cord
for carrying, pulling or unplugging the power
tool. Keep cord away from heat, oil, sharp
edges or moving parts. Damaged or entangled
cords increase the risk of electric shock.
e) When operating a power tool outdoors, use
an extension cord suitable for outdoor use.
Use of a cord suitable for outdoor use reduces
the risk of electric shock.
f) If operating a power tool in a damp location
is unavoidable, use a residual current device
(RCD) protected supply. Use of an RCD
reduces the risk of electric shock.

■ 4
│
GB
│
IE
│
NI
│
CY
PBSD 600 A1
3. Personal safety
a) Stay alert, watch what you are doing and use
common sense when operating a power tool.
Do not use a power tool while you are tired
or under the influence of drugs, alcohol or
medication. A moment of inattention while
operating power tools may result in serious
personal injury.
b) Use personal protective equipment. Always
wear eye protection.
Protective equipment such
as a dust mask, non-slip safety shoes, hard hat or
hearing protection used for appropriate condi-
tions will reduce personal injuries.
c) Prevent unintentional starting. Ensure the
switch is in the off-position before connecting
to power source and/or battery pack, picking
up or carrying the tool. Carrying power tools
with your finger on the switch or energising
power tools that have the switch on invites
accidents.
d) Remove any adjusting key or wrench before
turning the power tool on. A wrench or a key
left attached to a rotating part of the power tool
may result in personal injury.
e) Do not overreach. Keep proper footing and
balance at all times. This enables better control
of the power tool in unexpected situations.
f) Dress properly. Do not wear loose clothing or
jewellery. Keep your hair and clothing away
from moving parts. Loose clothes, jewellery or
long hair can be caught in moving parts.
g) If devices are provided for the connection of
dust extraction and collection facilities, ensure
these are connected and properly used. Use
of dust collection can reduce dust-related
hazards.
h) Do not let familiarity gained from frequent
use of tools allow you to become complacent
and ignore tool safety principles. A careless
action can cause severe injury within a fraction
of a second.
4. Power tool use and care
a) Do not force the power tool. Use the correct
power tool for your application. The correct
power tool will do the job better and safer at
the rate for which it was designed.
b) Do not use the power tool if the switch does
not turn it on and off. Any power tool that
cannot be controlled with the switch is dangerous
and must be repaired.
c) Disconnect the plug from the power source
and/or remove the battery pack, if detach-
able, from the power tool before making any
adjustments, changing accessories, or storing
power tools. Such preventive safety measures
reduce the risk of starting the power tool acci-
dentally.
d) Store idle power tools out of the reach of
children and do not allow persons unfamiliar
with the power tool or these instructions to
operate the power tool. Power tools are
dangerous in the hands of untrained users.
e) Maintain power tools and accessories. Check
for misalignment or binding of moving parts,
breakage of parts and any other condition
that may affect the power tool’s operation. If
damaged, have the power tool repaired
before use. Many accidents are caused by
poorly maintained power tools.
f) Keep cutting tools sharp and clean. Properly
maintained cutting tools with sharp cutting
edges are less likely to bind and are easier to
control.
g) Use the power tool, accessories and tool bits
etc. in accordance with these instructions,
taking into account the working conditions
and the work to be performed. Use of the
power tool for operations different from those
intended could result in a hazardous situation.
h) Keep handles and grasping surfaces dry,
clean and free from oil and grease. Slippery
handles and grasping surfaces do not allow for
safe handling and control of the tool in unex-
pected situations.

GB
│
IE
│
NI
│
CY
│
5 ■
PBSD 600 A1
5. Service
a) Have your power tool serviced by a qualified
repair person using only identical replace-
ment parts. This will ensure that the safety of
the power tool is maintained.
Appliance-specific safety instructions
for grinders
■ Hold the appliance by the insulated handles
as the abrasive belt can come into contact
with its own power cable. Damage to a live
wire may make exposed metal parts of the
power tool live and could give the operator an
electric shock.
WARNING!
■ Dusts from materials such as leaded paint,
some types of wood and metal can be
harmful to your health.
■ Contact with or inhalation of these dusts can
represent a health hazard for the person
operating the appliance and other people in
the vicinity.
■ Wear safety goggles and a protective dust
mask!
Operation
Tensioning/replacing the abrasive
belt
WARNING! RISK OF INJURY!
■ Always remove the power plug from the wall
socket before carrying out any work on the
belt grinder.
1. Loosen the clamping device for the abrasive
belt by swivelling the clamping lever
all the
way out. The abrasive belt can now be
removed.
2. Now fit a new abrasive belt
or swap the
belt to work on a different material or to use
adifferent grain size.
IMPORTANT: The direction of the arrows on
the inside of the abrasive belt and on the
appliance housing must match.
3. Push the clamping lever
back into its initial
position.
Manually adjusting the abrasive belt
If the belt tracking is not centred when you switch
on the appliance, you may need to manually
adjust it.
♦ To do this, turn the adjusting screw
on the
front roller until the abrasive belt is running
centred.
IMPORTANT: It is important to ensure that
the abrasive belt does not rub against the
housing. Check the belt tracking regularly and
adjust it with the adjusting screw if required .

■ 6
│
GB
│
IE
│
NI
│
CY
PBSD 600 A1
Adjusting the additional handle
You can position the additional handle in
several different positions.
♦ To reposition the additional handle
undo the
screw .
♦ Move the additional handle
to the required
position.
♦ Retighten the screw
.
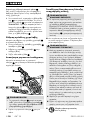
Flipping up the front cover
You can flip up the front cover to grind in hard-
to-reach areas (see illustration).
WARNING!
► The front cover
can only be flipped
upwards if the additional handle is also
positioned upwards (see section "Adjusting
the additional handle").
♦ Flip up the front cover
.
Attaching/removing a dust
extraction unit
WARNING! RISK OF EXPLOSION!
■ If there is an explosive dust/air mixture, you
must use a specially designed extraction
appliance. RISK OF FIRE DUE TO FLYING
SPARKS! Do not use dust extraction systems
(dust collector
or vacuum cleaner) when
grinding metals.
■ Materials containing asbestos must not be
processed. Asbestos is a known carcinogen.
WARNING! RISK OF FIRE!
■ When working with power tools which have
a dust collector or can be connected to a
vacuum cleaner via a vacuum cleaner adapter,
there is a risk of fire! In unfavourable condi-
tions, e.g. when sparks are flying while
sanding metal or metal residues in wood,
wood dust in the dust collector (or the bag of
the vacuum cleaner) can spontaneously
ignite. This is a particular risk if the wood dust
is mixed with paint residues or other chemi-
cals and the workpiece has become hot after
being worked for a long time. Therefore, do
not allow the workpiece to overheat and
always empty the dust box or the dust bag
ofthe vacuum cleaner before taking a break
from work.
■ Ensure that your workplace is adequately
ventilated.
■ Observe the regulations applicable in your
country regarding the materials to be
worked.
■
Wear a dust mask.

GB
│
IE
│
NI
│
CY
│
7 ■
PBSD 600 A1
Fitting the dust collector
♦ Push the dust collector onto the dust collector
connection from above.
Dismantling/removing the dust collector
♦ Pull the dust collector
off upwards.
Connecting a dust extraction adapter and
reducer for an external extraction appliance
♦ Push the dust extraction adapter
onto the
connection .
♦ Push the reducer
for the dust extraction
adapter into the adapter fitting .
♦ Push the hose from a suitable dust extraction
appliance (e.g. a workshop vacuum cleaner)
onto the reducer
for external vacuum
extraction.
Removing the dust extraction adapter and
reducer for an external extraction appliance
♦ Pull off the hose of the dust extraction
appliance.
♦ Remove the reducer
for external dust
extraction.
♦ Pull the dust extraction adapter
upwards
offthe connection .
Working procedures
A light grinding pressure is sufficient
■ Apply minimal pressure when grinding. The belt
grinder's own weight is sufficient for a good
grinding result. In addition, working this way
helps to reduce the wear on the abrasive belt
and the surface of the workpiece will become
more smooth.
Removal and surface
■ The material removal rate and surface quality
are determined by the belt speed and grain
strength of the abrasive belt
(see also the
section "Selecting speed and abrasive belt").
Grinding
■ Place the appliance on the workpiece when
switched on and work at a moderate feed rate.
Guide the grinder in parallel and overlapping
sanding motions over the workpiece. To avoid
unpleasant transverse grinding marks, always
sand in the direction of the grain.
After completing the task, lift the appliance from
the workpiece and then switch it off.
NOTE
► Always hold the appliance firmly with two
hands while working.
Use
Switching on and off
While operating the belt grinder, you can choose
between instantaneous and continuous operation.
Switching to instantaneous operation
♦ Press the ON/OFF switch
.
Switching off instantaneous operation
♦ Release the ON/OFF switch
.
Switching to continuous operation
♦ Press the ON/OFF switch
, keep it pressed in
and then press the lock button .
Switching off continuous operation
♦ Press the ON/OFF switch
and then
release it.
Emptying the dust collector
The dust collector should be emptied after every
10 minutes of operation at least.
♦ Pull the dust collector
off (see section
"Attaching/removing a dust extraction unit")
♦ Shake the dust collector
over a rubbish
binto empty it.
♦ Fit the dust collector
back onto the
appliance.

■ 8
│
GB
│
IE
│
NI
│
CY
PBSD 600 A1
Selecting speed and abrasive belt
You can use the belt speed adjusting wheel to
adjust the speed, even while the appliance is
running. The optimum belt speed is dependent on
the workpiece or material being processed. We
recommend carrying out a practice run to deter-
mine the correct speed. In the table below, you will
find some recommended values which will help you
determine which belt and speed to use for which
job.
Material/
working area
Softwood
Rough sanding
(grain size)
60
Finishing (grain size) 240
Speed preselection high (5–6)
Material/
working area
Hardwood
Rough sanding
(grain size)
60
Finishing (grain size) 180
Speed preselection high (5–6)
Material/
working area
Chipboard
Rough sanding
(grain size)
60
Finishing (grain size) 150
Speed preselection high (5–6)
Material/
working area
Removing
paint/varnish
Rough sanding
(grain size)
60
Finishing (grain size) ––
Speed preselection high (5–6)
Material/
working area
Rubbing down
paintwork/varnish
Rough sanding
(grain size)
150
Finishing (grain size) 320
Speed preselection low (1–2)
Material/
working area
Removing
rust from steel
Rough sanding
(grain size)
40
Finishing (grain size) 120
Speed preselection medium/high (3–4)
Material/
working area
Plastics
Rough sanding
(grain size)
120
Finishing (grain size) 240
Speed preselection low/medium (2–3)
Material/
working area
Non-ferrous metals
(e.g. aluminium)
Rough sanding
(grain size)
80
Finishing (grain size) 150
Speed preselection medium/high (3–4)
Stationary work
♦ Turn the additional handle to the horizontal
position.
♦ Turn the power tool as shown in the illustration
and place it on a stable worktop.
♦ Fit the two screw clamps
in the recesses
provided and clamp the power tool tightly.

GB
│
IE
│
NI
│
CY
│
9 ■
PBSD 600 A1
Tips and tricks
■ Never use the same abrasive belt to work
wood and metal.
■ Worn or cracked abrasive belts can damage
the workpiece. Therefore, be sure to replace
worn abrasive belts before starting work.
■ Always hang up the abrasive belts to store
them, as kinks etc. can make them unusable.
Maintenance and cleaning
WARNING! RISK OF INJURY! Switch
off the appliance and pull out the
power plug before starting any
work on the appliance.
The belt grinder is maintenance-free.
■ Always clean the appliance directly after
finishing work.
■ Use a dry cloth to clean the housing. Under no
circumstances should you use fuel, detergents,
solvents or abrasive cleaners.
Emptying/cleaning the dust collector
♦ Pull the dust collector off the appliance.
♦ Empty the dust collector
completely by
knocking out the contents and then push the
dust collector back onto the appliance.
♦ Ensure ventilation openings are always free.
♦ Remove any adhering grinding dust with a
brush.
Disposal
The packaging is made from environ-
mentally friendly material and can be
disposed of at your local recycling
plant.
Do not dispose of power tools
in your normal domestic waste!
European Directive 2012/19/EU
requires that worn-out power tools be
collected separately and recycled in an environ-
mentally compatible manner.
Your local community or municipal authorities
can provide information on how to dispose of the
appliance.
Dispose of the packaging in an
environmentally friendly manner.
Note the labelling on the packaging
and separate the packaging material
components for disposal if necessary. The pack-
aging material is labelled with abbreviations (a)
and numbers (b) with the following meanings:
1–7: plastics, 20–22: paper and cardboard,
80–98: composites.
Your local community or municipal
authorities can provide information
on how to dispose of the worn-out
product.

■ 10
│
GB
│
IE
│
NI
│
CY
PBSD 600 A1
Kompernass Handels GmbH
warranty
Dear Customer,
This appliance has a 3-year warranty valid from
the date of purchase. If this product has any faults,
you, the buyer, have certain statutory rights. Your
statutory rights are not restricted in any way by the
warranty described below.
Warranty conditions
The warranty period starts on the date of purchase.
Please keep your receipt in a safe place. This will
be required as proof of purchase.
If any material or manufacturing fault occurs within
three years of the date of purchase of the product,
we will either repair or replace the product for you
or refund the purchase price (at our discretion).
This warranty service requires that you present the
defective appliance and the proof of purchase
(receipt) within the three-year warranty period,
along with a brief written description of the fault
and of when it occurred.
If the defect is covered by the warranty, your
product will either be repaired or replaced by us.
The repair or replacement of a product does not
signify the beginning of a new warranty period.
Warranty period and statutory claims for
defects
The warranty period is not prolonged by repairs
effected under the warranty. This also applies to
replaced and repaired components. Any damage
and defects present at the time of purchase must
be reported immediately after unpacking. Repairs
carried out after expiry of the warranty period shall
be subject to a fee.
Scope of the warranty
This appliance has been manufactured in accord-
ance with strict quality guidelines and inspected
meticulously prior to delivery.
The warranty covers material faults or production
faults. The warranty does not extend to product
parts subject to normal wear and tear or to fragile
parts which could be considered as consumable
parts such as switches or parts made of glass.
The warranty does not apply if the product has
been damaged, improperly used or improperly
maintained. The directions in the operating instruc-
tions for the product regarding proper use of
the product are to be strictly followed. Uses and
actions that are discouraged in the operating
instructions or which are warned against must be
avoided.
This product is intended solely for private use and
not for commercial purposes. The warranty shall
be deemed void in cases of misuse or improper
handling, use of force and modifications / repairs
which have not been carried out by one of our
authorised Service centres.
The warranty period does not apply to
■ Normal reduction of the battery capacity
overtime
■ Commercial use of the product
■ Damage to or alteration of the product by the
customer
■ Non-compliance with safety and maintenance
instructions, operating errors
■ Damage caused by natural hazards

GB
│
IE
│
NI
│
CY
│
11 ■
PBSD 600 A1
Warranty claim procedure
To ensure quick processing of your case, please
observe the following instructions:
■ Please have the till receipt and the item number
(e.g.IAN12345) available as proof of purchase.
■ You will find the item number on the type plate
on the product, an engraving on the product,
on the front page of the operating instructions
(below left) or on the sticker on the rear or
bottom of the product.
■ If functional or other defects occur, please
contact the service department listed either by
telephone or by e-mail.
■ You can return a defective product to us free
of charge to the service address that will be
provided to you. Ensure that you enclose the
proof of purchase (till receipt) and information
about what the defect is and when it occurred.
You can download these instructions
along with many other manuals,
product videos and installation
software at www.lidl-service.com.
This QR code will take you directly to
the Lidl service page (www.lidl-service.com) where
you can open your operating instructions by
entering the item number (IAN) 123456.
Service
WARNING!
■ Have the power tool repaired by the
service centre or a qualified electrician and
only using genuine replacement parts. This
will ensure that the safety of the appliance is
maintained.
■ Always ensure that the power plug or the
mains cable is replaced only by the manu-
facturer of the appliance or by an approved
customer service provider. This will ensure
that the safety of the appliance is maintained.
NOTE
► Replacement parts not listed (such as carbon
brushes, switches, dust collector) can be
ordered via our service hotline.
Service Great Britain
Tel.: 0800 404 7657
E-Mail: kom[email protected]
Service Ireland
Tel.: 1890 930 034
(0,08 EUR/Min., (peak))
(0,06 EUR/Min., (off peak))
E-Mail: kom[email protected]
CY
Service Cyprus
Tel.: 8009 4409
E-Mail: kom[email protected]
IAN 339668_1910
Importer
Please note that the following address is not the
service address. Please use the service address
provided in the operating instructions.
KOMPERNASS HANDELS GMBH
BURGSTRASSE 21
44867 BOCHUM
GERMANY
www.kompernass.com

■ 12
│
GB
│
IE
│
NI
│
CY
PBSD 600 A1
Translation of the original Conformity Declaration
We, KOMPERNASS HANDELS GMBH, documents officer: Mr. Semi Uguzlu, BURGSTR. 21,
44867 BOCHUM, GERMANY, hereby declare that this product complies with the following
standards, normative documents and EC directives:
Machinery Directive
(2006/42/EC)
EMC (Electromagnetic Compatibility)
(2014/30/EU)
RoHS Directive
(2011/65/EU)*
* The manufacturer bears the full responsibility for compliance with this conformity declaration. The object of the
declaration described above complies with the requirements of the Directive 2011/65/EU of the European Parliament
and Council of 8 June 2011 on the limitations of use of certain dangerous substances in electrical and electronic
appliances.
Applied harmonised standards:
EN 62841-1:2015
EN 62841-2-4:2014
EN 55014-1:2017
EN 55014-2:2015
EN 61000-3-2:2014
EN 61000-3-3:2013
EN 50581:2012
Type designation of machine: Belt sander PBSD 600 A1
Year of manufacture: 01–2020
Serial number: IAN 339668_1910
Bochum, 27/01/2020
Semi Uguzlu
- Quality Manager -
We reserve the right to make technical changes in the context of further product development.

GR
│
CY
│
13 ■
PBSD 600 A1
Περιεχόμενα
Εισαγωγή ...........................................................14
Προβλεπόμενη χρήση ............................................................14
Απεικονιζόμενα στοιχεία ..........................................................14
Παραδοτέος εξοπλισμός .........................................................14
Τεχνικά χαρακτηριστικά ........................................................... 14
Γενικές υποδείξεις ασφαλείας για ηλεκτρικά εργαλεία ....................... 15
1. Ασφάλεια στο χώρο εργασίας ...................................................15
2. Ηλεκτρική ασφάλεια ...........................................................15
3. Ασφάλεια ατόμων .............................................................16
4. Χρήση και χειρισμός του ηλεκτρικού εργαλείου ......................................16
5. Σέρβις ......................................................................17
Συγκεκριμένες υποδείξεις ασφαλείας για λειαντήρες ....................................17
Θέση σε λειτουργία ...................................................17
Σύσφιξη/Αλλαγή λειαντικού ιμάντα .................................................17
Ρύθμιση πρόσθετης χειρολαβής ....................................................18
Ανασήκωμα μπροστινού καλύμματος ................................................18
Τοποθέτηση/Απομάκρυνση διάταξης αναρρόφησης σκόνης .............................18
Υποδείξεις εργασίας .............................................................19
Χειρισμός ...........................................................19
Ενεργοποίηση και απενεργοποίηση .................................................19
Εκκένωση κουτιού σκόνης .........................................................19
Επιλογή αριθμού στροφών και λειαντικού ιμάντα .......................................20
Σταθερή εργασία ................................................................ 21
Συμβουλές .....................................................................21
Συντήρηση και καθαρισμός ...........................................21
Απόρριψη ..........................................................21
Εγγύηση της Kompernass Handels GmbH ................................22
Σέρβις .............................................................23
Εισαγωγέας .........................................................23
Μετάφραση της Πρωτότυπης Δήλωση συμμόρφωσης .......................24

■ 14
│
GR
│
CY
PBSD 600 A1
ΤΑΙΝΙΟΛΕΙΑΝΤΉΡΑΣ
PBSD 600 A1
Εισαγωγή
Συγχαρητήρια για την αγορά της νέας σας συ-
σκευής. Το προϊόν που αποκτήσατε είναι ένα προϊ-
όν υψηλής ποιότητας. Οι οδηγίες χρήσης αποτε-
λούν τμήμα αυτού του προϊόντος. Περιλαμβάνουν
σημαντικές υποδείξεις για την ασφάλεια, τη χρήση
και την απόρριψη. Πριν από τη χρήση του προϊό-
ντος, εξοικειωθείτε με όλες τις υποδείξεις χειρισμού
και ασφάλειας του προϊόντος. Χρησιμοποιείτε το
προϊόν μόνο όπως περιγράφεται και για τους ανα-
φερόμενους τομείς χρήσης. Παραδώστε όλα τα
έγγραφα σε περίπτωση παράδοσης του προϊόντος
σε τρίτους.
Προβλεπόμενη χρήση
Ο ταινιολειαντήρας, ανάλογα με το γυαλόχαρτο,
έχει κατασκευαστεί για στεγνή λείανση επιφανειών
ξύλου, πλαστικού, μετάλλου και στόκου, καθώς και
βαμμένων επιφανειών. Η συσκευή επιτρέπεται να
χρησιμοποιείται μόνο για στεγνή λείανση. Για την
επεξεργασία των διαφορετικών υλικών θα πρέπει
να χρησιμοποιούνται αντίστοιχα γυαλόχαρτα με
διαφορετική κόκκωση και, επίσης, να προσαρμόζεται
και ο αριθμός στροφών στο υλικό. Η συσκευή δεν
προορίζεται για επαγγελματική χρήση. Κάθε άλλη
χρήση ή μετατροπή της μηχανής ισχύει ως μη σύμ-
φωνη με τους κανονισμούς και κρύβει σημαντικούς
κινδύνους ατυχημάτων. Για βλάβες από χρήση μη
σύμφωνη με τους κανονισμούς, ο κατασκευαστής
δεν αναλαμβάνει καμία ευθύνη.
Απεικονιζόμενα στοιχεία
Διακόπτης ON/OFF
Πρόσθετη χειρολαβή (λαστιχένια επιφάνεια
λαβής)
Μπροστινό κάλυμμα
Μοχλός τάνυσης για τον λειαντικό ιμάντα
Τροχίσκος ρύθμισης ταχύτητας ιμάντα
Χειρολαβή (λαστιχένια επιφάνεια λαβής)
Βίδα ρύθμισης χειρολαβής
Εσοχές για τη μέγγενη
Σύνδεση κουτιού σκόνης
Πλήκτρο ασφάλισης διακόπτη ON/OFF
Κουτί σκόνης
Βίδα ρύθμισης για τη διαδρομή του ιμάντα
Λειαντικός ιμάντας
Μέγγενη
Εξάρτημα συστολής
Αντάπτορας αναρρόφησης
Παραδοτέος εξοπλισμός
1 Ταινιολειαντήρας PBSD 600 A1
1 Λειαντικός ιμάντας για ξύλο (κόκκωση 80)
1 Κουτί σκόνης
1 Αντάπτορας αναρρόφησης και εξάρτημα συστο-
λής (για εξωτερική αναρρόφηση της σκόνης)
2 Μέγγενες
1 Οδηγίες χρήσης
Τεχνικά χαρακτηριστικά
Τάση μέτρησης 230 V ∼, 50 Hz
(εναλλασσόμενο ρεύμα)
Κατανάλωση μέτρησης 600 W
Ταχύτητα ταινίας στο
ρελαντί 170–250 m/min
Αριθμός στροφών ρελαντί
μέτρησης
n
0
360–560 min
-1
Λειαντικός ιμάντας 75 x 457 mm
Κατηγορία προστασίας II /
(διπλή μόνωση)
Τιμή εκπομπής θορύβου
Η τιμή μέτρησης θορύβου υπολογίστηκε σύμφωνα
με το πρότυπο EN 62841. Η Α-σταθμισμένη στάθ-
μη θορύβου του ηλεκτρικού εργαλείου παρουσιά-
ζει συνήθως τα ακόλουθα στοιχεία:
Στάθμη ηχητικής πίεσης L
pA
= 91 dB (A)
Αβεβαιότητα K
pA
= 3 dB
Στάθμη ηχητικής ισχύος L
WA
= 102 dB (A)
Αβεβαιότητα K
WA
= 3 dB
Φοράτε προστασία για την ακοή!
Συνολική τιμή κραδασμών
Οι ολικές τιμές κραδασμών (διανυσματικό
άθροισμα τριών κατευθύνσεων) υπολογίστηκαν
σύμφωνα με το πρότυπο EN 62841:
Λείανση με δίσκο λείανσης a
h
= 4,2 m/s
2
Συντελεστής αβεβαιότητας K = 1,5 m/s
2

GR
│
CY
│
15 ■
PBSD 600 A1
ΥΠΟΔΕΙΞΗ
► Οι αναφερόμενες συνολικές τιμές κραδασμών
και οι αναφερόμενες τιμές εκπομπής θορύ-
βου έχουν μετρηθεί σύμφωνα με μία πρότυπη
διαδικασία ελέγχου και μπορούν να χρησιμο-
ποιηθούν για τη σύγκριση ενός ηλεκτρικού
εργαλείου με ένα άλλο.
► Οι αναφερόμενες τιμές εκπομπής κραδασμών
και οι αναφερόμενες τιμές εκπομπής θορύβου
μπορούν, επίσης, να χρησιμοποιηθούν για
μια αρχική εκτίμηση του φορτίου.
ΠΡΟΕΙΔΟΠΟΙΉΣΉ!
► Οι εκπομπές κραδασμών και θορύβου μπορεί,
κατά τη διάρκεια της πραγματικής χρήσης
του ηλεκτρικού εργαλείου, να αποκλίνουν
από τις αναφερόμενες τιμές, ανάλογα με το
είδος και τον τρόπο που χρησιμοποιείται το
ηλεκτρικό εργαλείο, κυρίως ανάλογα με το
είδος του τεμαχίου επεξεργασίας.
► Προσπαθείτε να διατηρείτε την επιβάρυνση
σε όσο το δυνατόν χαμηλότερα επίπεδα.
Παραδειγματικά μέτρα μείωσης της επιβάρυν-
σης λόγω δονήσεων είναι η χρήση γαντιών
κατά τη χρήση του εργαλείου και ο περιορι-
σμός του χρόνου εργασίας. Εδώ πρέπει να
συνυπολογίζονται όλα τα μέρη του κύκλου
εργασίας (παραδείγματος χάριν, χρόνοι,
κατά τους οποίους το ηλεκτρικό εργαλείο
είναι απενεργοποιημένο, και χρόνοι, κατά
τους οποίους είναι μεν ενεργοποιημένο, αλλά
λειτουργεί χωρίς φορτίο).
Γενικές υποδείξεις
ασφαλείας για ηλεκτρικά
εργαλεία
ΠΡΟΕΙΔΟΠΟΙΉΣΉ!
► Διαβάστε όλες τις υποδείξεις ασφαλείας,
τις οδηγίες, τις εικόνες και τα τεχνικά
χαρακτηριστικά που συνοδεύουν αυτό το
ηλεκτρικό εργαλείο. Παραλείψεις κατά την
τήρηση των παρακάτω οδηγιών μπορούν να
προκαλέσουν ηλεκτροπληξία, πυρκαγιά
και/ή σοβαρούς τραυματισμούς.
Φυλάξτε όλες τις υποδείξεις ασφαλείας και τις
οδηγίες, για να μπορείτε να ανατρέξετε σε αυτές
μελλοντικά.
Ο χρησιμοποιούμενος σε αυτές τις υποδείξεις
ασφαλείας όρος «Ηλεκτρικό εργαλείο» αναφέρεται
σε ηλεκτρικά εργαλεία (με καλώδιο ρεύματος) που
λειτουργούν με ρεύμα και σε ηλεκτρικά εργαλεία
(χωρίς καλώδιο ρεύματος) που λειτουργούν μέσω
συσσωρευτή.
1. Ασφάλεια στο χώρο εργασίας
α) Διατηρείτε το χώρο εργασίας σας καθαρό και
φροντίζετε για επαρκή φωτισμό. Η ακαταστα-
σία και οι μη φωτισμένοι χώροι εργασίας
μπορούν να οδηγήσουν σε ατυχήματα.
β) Μην εργάζεστε με το ηλεκτρικό εργαλείο σε
εκρήξιμα περιβάλλοντα με εύφλεκτα υγρά,
αέρια ή σκόνη. Τα ηλεκτρικά εργαλεία δημιουρ-
γούν σπινθήρες, οι οποίοι μπορούν να προκα-
λέσουν ανάφλεξη στη σκόνη ή στους ατμούς.
γ) Κρατάτε τα παιδιά και άλλα άτομα μακριά
κατά τη χρήση του ηλεκτρικού εργαλείου. Σε
περίπτωση διάσπασης της προσοχής, μπορεί
να χάσετε τον έλεγχο του ηλεκτρικού εργαλείου.
2. Ήλεκτρική ασφάλεια
α) Το βύσμα σύνδεσης του ηλεκτρικού εργαλείου
πρέπει να ταιριάζει στην πρίζα. Το βύσμα δεν
επιτρέπεται να τροποποιηθεί με κανέναν
τρόπο.
Μην χρησιμοποιείτε βύσματα προσαρμογέων
μαζί με γειωμένα ηλεκτρικά εργαλεία.
Τα βύσματα που δεν έχουν τροποποιηθεί και οι
κατάλληλες πρίζες μειώνουν τον κίνδυνο ηλε-
κτροπληξίας.
β) Αποφεύγετε τη σωματική επαφή με γειωμένες
επιφάνειες, όπως σωλήνες, θερμαντικά σώμα-
τα, εστίες και ψυγεία. Υπάρχει αυξημένος
κίνδυνος λόγω ηλεκτροπληξίας όταν το σώμα
σας είναι γειωμένο.
γ) Κρατάτε τα ηλεκτρικά εργαλεία μακριά από τη
βροχή ή την υγρασία. Η διείσδυση νερού σε
ένα ηλεκτρικό εργαλείο αυξάνει τον κίνδυνο
ηλεκτροπληξίας.

■ 16
│
GR
│
CY
PBSD 600 A1
δ) Μη χρησιμοποιείτε το καλώδιο σύνδεσης
άσκοπα, π.χ. για να μεταφέρετε το ηλεκτρικό
εργαλείο, να το κρεμάσετε ή για να αποσυνδέ-
σετε το βύσμα από την πρίζα. Κρατάτε το
καλώδιο σύνδεσης μακριά από υψηλές θερμο-
κρασίες, λάδια, αιχμηρές άκρες ή κινούμενα
μέρη. Τα φθαρμένα ή μπερδεμένα καλώδια σύν-
δεσης αυξάνουν τον κίνδυνο ηλεκτροπληξίας.
ε) Όταν εργάζεστε με ένα ηλεκτρικό εργαλείο σε
εξωτερικό χώρο, χρησιμοποιείτε αποκλειστικά
εγκεκριμένα για εξωτερικούς χώρους καλώδια
προέκτασης. Η χρήση κατάλληλου για εξωτερικό
χώρο καλωδίου προέκτασης μειώνει τον κίνδυνο
ηλεκτροπληξίας.
στ) Εάν δεν μπορεί να αποφευχθεί η λειτουργία
του ηλεκτρικού εργαλείου σε υγρό περιβάλ-
λον, χρησιμοποιείτε διακόπτη ασφαλείας.
Η χρήση διακόπτη ασφαλείας μειώνει τον
κίνδυνο ηλεκτροπληξίας.
3. Ασφάλεια ατόμων
α) Να είστε προσεκτικοί, προσέχετε τι κάνετε και
χρησιμοποιείτε τη λογική όταν εργάζεστε με
ένα ηλεκτρικό εργαλείο. Μη χρησιμοποιείτε
ηλεκτρικά εργαλεία εάν είστε κουρασμένοι ή
υπό την επήρεια ναρκωτικών, αλκοόλ ή φαρ-
μάκων. Ένα μόνο λεπτό απροσεξίας κατά τη
χρήση του ηλεκτρικού εργαλείου αρκεί για να
οδηγήσει σε σοβαρούς τραυματισμούς.
β) Φ
οράτε ατομικό προστατευτικό εξοπλισμό και
πάντα γυαλιά προστασίας. Όταν φοράτε ατομι
-
κό προστατευτικό εξοπλισμό, όπως μάσκα για
τη σκόνη, αντιολισθητικά υποδήματα ασφαλείας,
κράνος ή προστασία για την ακοή, ανάλογα με
το είδος και τη χρήση του ηλεκτρικού εργαλείου,
μειώνεται ο κίνδυνος τραυματισμών.
γ) Αποφεύγετε τυχόν ακούσια έναρξη λειτουργί-
ας. Βεβαιώνεστε ότι το ηλεκτρικό εργαλείο έχει
απενεργοποιηθεί, προτού το συνδέσετε στην
τροφοδοσία ρεύματος και/ή το συσσωρευτή,
το σηκώσετε ή το μεταφέρετε. Όταν μεταφέρετε
το ηλεκτρικό εργαλείο και έχετε το δάχτυλο στο
διακόπτη ή συνδέετε το ηλεκτρικό εργαλείο
ενεργοποιημένο στην παροχή ρεύματος, μπορεί
να προκληθούν ατυχήματα.
δ) Απομακρύνετε εργαλεία ρύθμισης ή μηχανικά
κλειδιά, πριν ενεργοποιήσετε το ηλεκτρικό
εργαλείο. Ένα εργαλείο ή κλειδί, το οποίο βρί-
σκεται σε ένα περιστρεφόμενο τμήμα του ηλε-
κτρικού εργαλείου, μπορεί να οδηγήσει σε
τραυματισμούς.
ε) Αποφεύγετε λάθος στάση του σώματος.
Φροντίζετε για μια ασφαλή στάση και διατη-
ρείτε πάντα την ισορροπία. Έτσι, μπορείτε να
ελέγχετε το ηλεκτρικό εργαλείο καλύτερα σε μη
αναμενόμενες καταστάσεις.
στ) Φοράτε κατάλληλο ρουχισμό. Μη φοράτε
μακριά ρούχα ή κοσμήματα. Κρατάτε τα μαλ-
λιά και τα ρούχα μακριά από κινούμενα τμή-
ματα. Τα χαλαρά ρούχα, τα κοσμήματα ή τα
μακριά μαλλιά μπορούν να πιαστούν από κι-
νούμενα τμήματα.
ζ) Εάν μπορούν να συναρμολογηθούν διατάξεις
απορρόφησης και συλλογής σκόνης, αυτές
θα πρέπει να συνδέονται και να χρησιμοποι-
ούνται σωστά. Η χρήση μιας διάταξης αναρ-
ρόφησης σκόνης μπορεί να μειώσει τους κινδύ-
νους από τη σκόνη.
η) Μη νιώθετε τόσο σίγουροι για τον εαυτό σας
και μην αγνοείτε τους κανόνες ασφαλείας για
ηλεκτρικά εργαλεία, ακόμη και εάν έχετε εξοι-
κειωθεί με το ηλεκτρικό εργαλείο λόγω συ-
χνής χρήσης. Απρόσεκτες ενέργειες μπορούν
να οδηγήσουν μέσα σε κλάσματα του δευτερο-
λέπτου σε σοβαρούς τραυματισμούς.
4. Χρήση και χειρισμός του
ηλεκτρικού εργαλείου
α) Μην καταπονείτε το ηλεκτρικό εργαλείο. Χρη-
σιμοποιείτε για την εργασία σας το αντίστοιχο
ηλεκτρικό εργαλείο. Με το κατάλληλο ηλεκτρικό
εργαλείο εργάζεστε καλύτερα και ασφαλέστερα
στο δοθέν πεδίο απόδοσης.
β) Μη χρησιμοποιείτε ηλεκτρικά εργαλεία, των
οποίων ο διακόπτης έχει υποστεί βλάβη. Ένα
ηλεκτρικό εργαλείο, το οποίο δεν μπορεί πλέον
να ενεργοποιηθεί ή απενεργοποιηθεί, είναι
επικίνδυνο και πρέπει να επισκευαστεί.
γ) Αποσυνδέετε το βύσμα από την πρίζα και/ή
απομακρύνετε τον αποσπώμενο συσσωρευτή,
πριν διεξάγετε ρυθμίσεις στη συσκευή, πριν
αλλάξετε μέρη εργαλείων χρήσης ή πριν απο-

GR
│
CY
│
17 ■
PBSD 600 A1
θηκεύσετε το ηλεκτρικό εργαλείο. Αυτό το
μέτρο ασφαλείας εμποδίζει τη μη ηθελημένη
εκκίνηση του ηλεκτρικού εργαλείου.
δ) Φυλάτε τα μη χρησιμοποιημένα ηλεκτρικά
εργαλεία σε σημεία μη προσβάσιμα για τα
παιδιά. Μην επιτρέπετε να χρησιμοποιούν το
ηλεκτρικό εργαλείο άτομα, τα οποία δεν
έχουν εξοικειωθεί μαζί του ή δεν έχουν διαβά-
σει αυτές τις οδηγίες. Τα ηλεκτρικά εργαλεία
είναι επικίνδυνα όταν χρησιμοποιούνται από
άπειρα άτομα.
ε) Φροντίζετε τα ηλεκτρικά εργαλεία και τα ερ-
γαλεία χρήσης με προσοχή. Ελέγχετε εάν τα
κινούμενα μέρη λειτουργούν σωστά και δεν
κολλάνε, εάν κάποια μέρη έχουν σπάσει ή
παρουσιάζουν τέτοια βλάβη, ώστε να επηρεά-
ζεται η λειτουργία του ηλεκτρικού εργαλείου.
Τα εξαρτήματα με βλάβη πρέπει να επισκευά-
ζονται πριν από τη χρήση του ηλεκτρικού
εργαλείου. Πολλά από τα ατυχήματα οφείλονται
στην κακή συντήρηση των ηλεκτρικών εργαλείων.
στ) Διατηρείτε τα εργαλεία κοπής αιχμηρά και
καθαρά. Τα προσεκτικά φροντισμένα εργαλεία
κοπής με αιχμηρές ακμές κοπής κολλάνε λιγό-
τερο και είναι ευκολότερα στο χειρισμό.
ζ) Χρησιμοποιείτε το ηλεκτρικό εργαλείο, τα
εργαλεία χρήσης, κλπ., σύμφωνα με αυτές τις
οδηγίες. Λαμβάνετε υπόψη τις συνθήκες
εργασίας και την προς διεξαγωγή ενέργεια. Η
χρήση ηλεκτρικών εργαλείων για διαφορετικές
από τις προβλεπόμενες χρήσεις μπορεί να οδη-
γήσει σε επικίνδυνες καταστάσεις.
η) Οι χειρολαβές και οι επιφάνειες αυτών πρέπει
να είναι στεγνές, καθαρές, χωρίς λάδια και
γράσα. Οι ολισθηρές λαβές και επιφάνειες δεν
επιτρέπουν τον ασφαλή χειρισμό και έλεγχο
του ηλεκτρικού εργαλείου σε απρόβλεπτες
καταστάσεις.
5. Σέρβις
α) Το ηλεκτρικό εργαλείο σας πρέπει να επισκευ-
άζεται αποκλειστικά από εξειδικευμένο ειδικό
προσωπικό και μόνο με γνήσια ανταλλακτικά.
Κατά αυτόν τον τρόπο, διατηρείται η ασφάλεια
του ηλεκτρικού εργαλείου.
Συγκεκριμένες υποδείξεις ασφαλείας
για λειαντήρες
■ Πιάνετε τη συσκευή από τις μονωμένες επιφά-
νειες των λαβών, διότι ο λειαντικός ιμάντας
μπορεί να προσεγγίσει το ίδιο το καλώδιο
δικτύου. Ζημιά σε ένα ρευματοφόρο αγωγό
μπορεί να θέσει υπό τάση μεταλλικά τμήματα
της συσκευής με συνέπεια να προκληθεί ηλε-
κτροπληξία.
ΠΡΟΕΙΔΟΠΟΙΉΣΉ!
■ Σκόνες από υλικά, όπως μπογιά που περιέχει
μόλυβδο, ορισμένα είδη ξύλου και μέταλλο,
μπορεί να είναι επιβλαβή για την υγεία.
■ Η επαφή ή η εισπνοή αυτών των σκονών μπο-
ρεί να αποτελέσει κίνδυνο για το χειριστή ή
για άτομα, τα οποία βρίσκονται κοντά.
■ Φοράτε γυαλιά προστασίας και μάσκα προ-
στασίας από τη σκόνη!
Θέση σε λειτουργία
Σύσφιξη/Αλλαγή λειαντικού ιμάντα
ΠΡΟΕΙΔΟΠΟΙΉΣΉ!
ΚΙΝΔΥΝΟΣ ΤΡΑΥΜΑΤΙΣΜΟΥ!
■ Αποσυνδέετε πάντα το βύσμα από την πρίζα,
προτού διεξάγετε εργασίες στον ταινιολεια-
ντήρα.
1. Λασκάρετε τη διάταξη σύσφιξης για τον λεια-
ντικό ιμάντα περιστρέφοντας εντελώς προς τα
έξω το μοχλό τάνυσης
. Ο λειαντικός ιμά-
ντας μπορεί να αφαιρεθεί.
2. Τοποθετήστε τώρα ένα νέο λειαντικό ιμάντα
ή αντικαταστήστε τον, για επεξεργασία διαφο-
ρετικού υλικού ή για να αλλάξετε το πάχος
κόκκωσης.
ΣΗΜΑΝΤΙΚO: Η κατεύθυνση των βελών στην
εσωτερική πλευρά του λειαντικού ιμάντα και
στο περίβλημα της συσκευής πρέπει να συμ-
φωνούν.
3. Πιέστε πάλι το μοχλό τάνυσης
στην αρχική
θέση.
Seite wird geladen ...
Seite wird geladen ...
Seite wird geladen ...
Seite wird geladen ...
Seite wird geladen ...
Seite wird geladen ...
Seite wird geladen ...
Seite wird geladen ...
Seite wird geladen ...
Seite wird geladen ...
Seite wird geladen ...
Seite wird geladen ...
Seite wird geladen ...
Seite wird geladen ...
Seite wird geladen ...
Seite wird geladen ...
Seite wird geladen ...
Seite wird geladen ...
Seite wird geladen ...
Seite wird geladen ...
-
 1
1
-
 2
2
-
 3
3
-
 4
4
-
 5
5
-
 6
6
-
 7
7
-
 8
8
-
 9
9
-
 10
10
-
 11
11
-
 12
12
-
 13
13
-
 14
14
-
 15
15
-
 16
16
-
 17
17
-
 18
18
-
 19
19
-
 20
20
-
 21
21
-
 22
22
-
 23
23
-
 24
24
-
 25
25
-
 26
26
-
 27
27
-
 28
28
-
 29
29
-
 30
30
-
 31
31
-
 32
32
-
 33
33
-
 34
34
-
 35
35
-
 36
36
-
 37
37
-
 38
38
-
 39
39
-
 40
40


Parkside 339668 1910 Translation Of The Original Instructions
- Kategorie
- Power Sanders
- Typ
- Translation Of The Original Instructions
- Dieses Handbuch eignet sich auch für
in anderen Sprachen
- English: Parkside 339668 1910
Verwandte Artikel
-
Parkside PBSD 600 A1 Original Instructions Manual
-
-
Parkside PPS 200 C2 Translation Of The Original Instructions
-
-
-
Parkside 315834 1904 Translation Of The Original Instructions
-
-
-
-
Andere Dokumente
-
Hitachi SB 8V2 Handling Instructions Manual
-
Stanley SFMCE210D2K Benutzerhandbuch
-
-
EINHELL TC-BS 8038 Benutzerhandbuch
-
 UNITED OFFICE UAVK 180 A1 Operating Instructions Manual
-
Metabo BAE 75 Belt Sander Benutzerhandbuch
-
 MaxPro MPFS250VQ Benutzerhandbuch
-
GYS Sander belt 20 x 520mm Datenblatt
-
Bavaria BBS 850 E Original Operating Instructions
-
EINHELL TC-US Benutzerhandbuch

