Black & Decker BHSM1610 Benutzerhandbuch
- Kategorie
- Dampfreiniger
- Typ
- Benutzerhandbuch

www.blackanddecker.eu
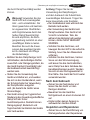
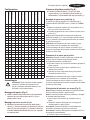
2
1
12
11
3 4
5
7
9
10
6
8
12a
FSMH1321
BHSM166DSM
BHSM168D
BHSM168DSM
BHSM168U
BHSM169DSM
BHSM1610DSM
BHSM1615DSM
BHSM1615DSG
BHSM1615DAM

2
3
English (original instructions) 7
Deutsch (übersetzt von den originalanweisungen) 16
Français (traduction de la notice d’instructions originale) 26
Italiano (tradotto dalle istruzioni originali)
36
Nederlands (vertaald vanuit de originele instructies)
46
Español (traducido de las instrucciones originales)
56
Português (traduzido das instruções originais) 66
Svenska (översatt från de ursprungliga instruktionerna)
76
Norsk (oversatt fra de originale instruksjonene)
85
Dansk (oversat fra original brugsvejledning)
94
Suomi (käännetty alkuperäisestä käyttöohjeesta)
103
Ελληνικά (μετάφραση από τις πρωτότυπες οδηγίες) 112

2
3
12a
12c
12b
5
10
11
11a
8
11
12
13
14
7
9
15
6
A B
C D
E F

4
5
5
16
25
17
19
20
21
22
22a
24
27
18
22b
22c
23
21a
18a
20a
16a
12d
28
29
26
G

4
5
18
17
20
19
22
22a
22c
22b
H
I
26 24
24
26
26a
24a
J

6
7
OFF
2
4
K L
M
N
O
P

7
ENGLISH
(Original instructions)
6
7
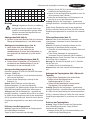
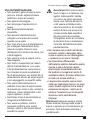
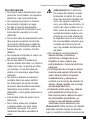
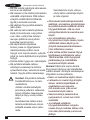
u Do not leave the appliance connected
to an electrical outlet when not in use.
u Never pull the power lead to
disconnect the appliance from the
socket. Keep the appliance lead away
from heat, oil and sharp edges.
u Do not handle steam cleaner with wet
hands.
u Do not pull or carry by cord, use cord
as a handle, close door on cord, pull
cord around sharp corners or expose
cord to heated surfaces.
u Do not use appliance in an enclosed
spacelledwithvapourgivenoffby
oil-base paint thinner, some
mothproongsubstances,ammable
dust, or other explosive or toxic
vapours.
u Checkthetypeofoorwiththe
manufacturer.
u Do not use on leather, wax polished
furnitureoroors,syntheticfabrics,
velvet or other delicate, steam
sensitive materials.
@
Warning! Do not use on
unsealed wood or unsealed
laminateoors.Onsurfacesthat
have been treated with wax or
somenowaxoors,thesheen
may be removed by the heat
and steam action. It is always
recommended to test an isolated
area of the surface to be
cleaned before proceeding. We
also recommend that you check
the use and care instructions
fromtheoormanufacturer.
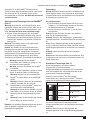
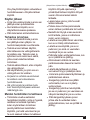
Intended use
Your BLACK+DECKER
TM
FSMH1321,BHSM166DSM,
BHSM168D, BHSM168DSM, BHSM168U, BHSM169DSM,
BHSM1610DSM, BHSM1615DSM, BHSM1615DSG,
BHSM1615DAM steam mop has been designed for sanitising
and cleaning sealed hardwood, sealed laminate, linoleum,
vinyl,ceramictile,stoneandmarbleoors.Thisapplianceis
intended for indoor household use only.
Safety Instructions
Warning! Read all safety
warnings and all instructions.
Failure to follow the warnings
and instructions listed below
mayresultinelectricshock,re
and/or serious injury.
@
Warning! When using
mains-powered appliances,
basic safety precautions,
including the following, should
always be followed to reduce
theriskofre,electricshock,
personal injury and material
damage.
u The intended use is described in this
manual.
u The use of any accessory or
attachment or the performance of any
operation with this appliance other
than those recommended in this
instruction manual may present a risk
of personal injury.
u Retain this manual for future
reference.
Using your appliance
u Do not direct steam at people,
animals, electrical appliances or
electrical outlets.
u Do not expose to rain.
u Do not immerse the appliance in water.
u Do not leave the applianceunattended.

8
ENGLISH
(Original instructions)
u Never put descaling, aromatic,
alcoholic or detergent products into the
steam cleaner, as this may damage it
or make it unsafe for use.
u If the home circuit breaker activates
while using the steam function,
discontinue product use immediately
and contact the customer support
centre. (Beware of the risk of electrical
shock.)
u The appliance emits very hot steam to
sanitize the area of use. This means
that the steam head, cleaning pads
and carpet attachment get very hot
during use.
Caution! Always wear suitable shoes
when using your steam mop and when
changing the accessories on your steam
mop. Do not wear slippers or open toed
footwear.
u The lid may become hot during use.
u Steam may escape from the appliance
during use.
Care should be taken when using this
appliance.DONOTtouchanyparts
which may become hot during use.
u Switch the appliance off and return the
handle to the upright position before
removing the water tank.
u If steam is observed escaping from the
body of the hand held steam cleaner,
switch off and disconnect the unit
from the mains supply, allow to cool.
Contact your nearest authorised repair
agent. Do not continue to use the
appliance.
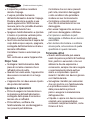
After use
u Unplug the appliance and allow to cool
before cleaning.
u When not in use, the appliance should
be stored in a dry place.
u Children should not have access to
stored appliances.
Inspection and repairs
u Unplug the appliance and allow to cool
before performing any maintenance or
repairs.
u Before use, check the appliance for
damaged or defective parts. Check for
breakage of parts, damage to switches
and any other conditions that may
affect its operation.
u Regularly check the power lead for
damage.
u Do not use the appliance if any part is
damaged or defective.
u Have any damaged or defective parts
repaired or replaced by an authorized
repair agent.
u Never attempt to remove or replace
anypartsotherthanthosespeciedin
this manual.
Safety of others
u This appliance can be used by
persons with reduced physical,
sensory or mental capabilities or
lack of experience and knowledge
if they have been given supervision
or instruction concerning use of
the appliance in a safe way and
understand the hazards involved.
Children shall not play with the
appliance.

9
ENGLISH
(Original instructions)
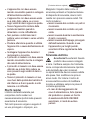
u Children should be supervised to
ensure that they do not play with the
appliance.
u The plug must be removed from
the socket-outlet before cleaning or
maintaining the appliance.
u The liquid or steam must not be
directed towards equipment containing
electrical components, such as the
interior of ovens.
u The appliance shall not be left
unattended while it is connected to the
supply mains.
u The appliance is not to be used if it
has been dropped, if there are visible
signs of damage or it is leaking.
u Keep the appliance out of reach of
children when it is energized or cooling
down.
u Never point or direct the mitt at
yourself or any other person.
u Care should be taken when using
the appliance due to the emission of
steam
u Unplugtheapplianceduringllingand
cleaning.
u The fabric steamer must not be left
unattended while it is connected to the
supply mains.
u The fabric steamer is not to be used if
it has been dropped, if there are visible
signs of damage or if it is leaking.
u keep the fabric steamer and its cord
out of reach of children less than 8
years of age when it is energized or
cooling down.
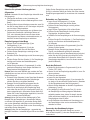
Residual risks
Additional residual risks may arise when
using the tool which may not be included
in the enclosed safety warnings. These
risks can arise from misuse, prolonged
use etc.
Even with the application of the
relevant safety regulations and the
implementation of safety devices, certain
residual risks can not be avoided. These
include:
u Injuries caused by touching any
moving parts.
u Injuries caused by touching any hot
parts.
u Injuries caused when changing any
parts or accessories.
u Injuries caused by prolonged use
of the appliance. When using any
appliance for prolonged periods
ensure you take regular breaks.
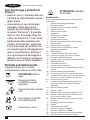
Electrical safety
@
Warning! Warning! This product
must be earthed. Always check
that the power supply
corresponds to the voltage on
the rating plate.
Power plugs must match the outlet.
Never modify the plug in any way.
Unmodiedplugsandmatchingoutlets
will reduce risk of electric shock
u If the supply cord is damaged, it must
be replaced by the manufacturer or an
authorised BLACK+DECKER Service
Centre in order to avoid a hazard.

10
ENGLISH
(Original instructions)
Extension cables & Class 1
product
u A 3-core cable must be used as your
appliance is earthed and of Class 1
construction.
u Always use an approved extension
cable suitable for the power input of
this appliance (see technical data).
Up to 30m of 1.50mm
2
extension
cable can be used without loss of
product performance. Before use,
inspect the extension cable for signs
of damage, wear and ageing. Replace
the extension cable if damaged or
defective. When using a cable reel,
always unwind the cable completely.
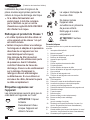
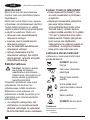
Labels on appliance
The following pictograms along with the
date code are shown on the appliance.
CAUTION! Hot Steam
Water dripping when used
upside down
Steam escapes from all
sides
Do not leave unsuper-
vised with young children
Hand wash only
CAUTION! Hot surface
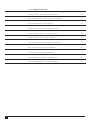
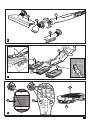
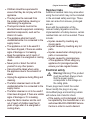
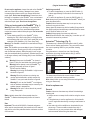
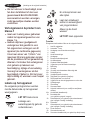
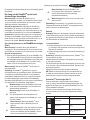
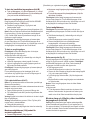
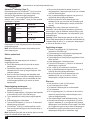
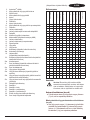
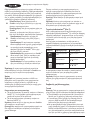
Features
This appliance includes some or all of the following features.
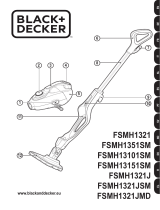
1. On/offswitch
2. Autoselect
TM
dial
3. Hand held steam unit handle
4. Filler cap
5. Hand held steam unit
6. Hand grip
7. Top cable tidy hook
8. Main handle
9. Bottom cable tidy hook
10. Hand held steam unit release button
11. Main body
12. Floor cleaning head
12a. Floor cleaning head with lift-out delta section
12b. Delta head
12c. Steam head removal tab
12d. Carpet glider (for use on carpets)
13. Floor cleaning pad
14. Floor cleaning pad release tab
15. Hanging Bracket
16. Steam hose
17. Steam nozzle
18. Angle brush accessory
(for use on hard to remove stains)
18a. Angle brush (wire brush)
19. Brush accessory
(for use on tiles / grout)
20. Squeegee accessory
(for use on shower screens / glass / mirrors / clothing /
upholstery)
20a. Squeegee sock
21. Large squeegee accessory
(for use on shower screens / glass / mirrors / clothing /
upholstery)
21a. Large squeegee sock
22. Steam burst brush unit
22a. Steam burst wire brush
( for use on BBQ / ovens)
22b. Steam burst brush
( for use on BBQ / ovens / oven hobs / taps / grout)
22c. Steam burst wide brush
(for use on larger work surfaces)
23. Delta head cleaning pad.
24. SteaMitt
TM
25. SteaMitt
TM
hose
26. SteaMitt
TM
cleaning pad
27. SteaMitt
TM
cleaning pad 2
28. Ultra-absorbentoorcleaningpad
29. Large brush with built-in scraper

11
ENGLISH
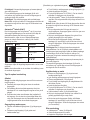
(Original instructions)
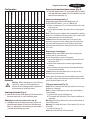
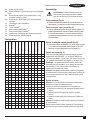
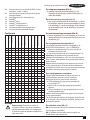
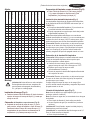
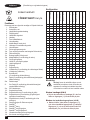
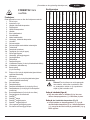
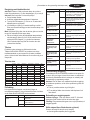
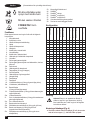
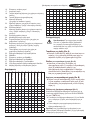
Conguration
F
S
M
H
1
3
2
1
B
H
S
M
1
6
8
D
B
H
S
M
1
6
8
U
B
H
S
M
1
6
6
D
S
M
B
H
S
M
1
6
8
D
S
M
B
H
S
M
1
6
9
D
S
M
B
H
S
M
1
6
1
0
D
S
M
B
H
S
M
1
6
1
5
D
S
M
B
H
S
M
1
6
1
5
D
S
G
B
H
S
M
1
6
1
5
D
A
M
S
E
T
T
I
N
G
S
12
All
12a
All
12d
All
13
All
16
All
18
●
18a
●●●
19
●●●
20
●
20a
●
21
●
21a
●
22
All
22a
All
22b
All
22c
All
23
All
24
All
25
All
26
All
27
All
28
All
29
All
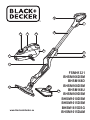
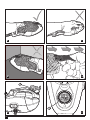
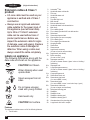
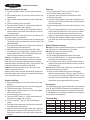
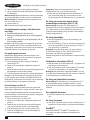
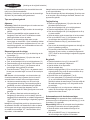
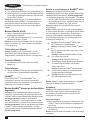
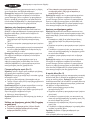
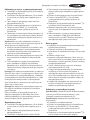
Assembly
@
Warning! Before attempting any of the following
instructions, make sure that the appliance is
switched off and unplugged and the appliance is
cold and does not contain any water.
Attaching the handle (Fig. A)
u Slide the bottom end of the handle (8) into the top end of
the steam mop body (11) until it clicks into place.
Attaching the hand held steam cleaner (Fig. B)
u Holding the back of the steam mop body (11) push the
handheldsteamcleaner(5)rmlyintothesteammop
body (11) making sure it sits correctly over the interface
(11a) and clicks securely into place.
Removing the hand held steam cleaner (Fig. B)
u Push the release button (10) on the main body (11) and lift
the hand held steam cleaner (5) off the interface (11a) and
away from the main body (11).
Attaching a cleaning pad (Fig. C)
Replacement cleaning pads are available from your
BLACK+DECKER dealer :- (cat no. FSMP20-XJ).
u Placeacleaningpad(13)ontheoorwiththevelcro'loop'
side facing up.
u Lightly press the steam mop down onto the cleaning pad
(13).
Note: Thisunitmaybesuppliedwithastandardoorcleaning
head (12) or a steam burst cleaning head (12a). In either case
usetheseinstructionstotacleaningpad.
Caution! Never leave the steam mop in one spot on any
surface for any period of time. Always place the steam mop
with the handle (8) supported in the upright position when
stationary and make sure the steam mop is turned off when
not in use.
Removing a cleaning pad
Caution! Always wear suitable shoes when changing the
cleaning pad on your steam mop.
Do not wear slippers or open toed footwear.
u Return the handle (8) to the upright position and turn the
steammop'OFF'.
u Wait until the steam mop cools down (approximately 5
minutes).
u Lift the steam mop away from the cleaning pad freeing it
from the velcro fastening.
Caution! Never leave the steam mop in one spot on any
surface for any period of time.
Always place the steam mop with the handle (8) supported in
the upright position when stationary and make sure the steam
mop is turned off when not in use.
Filling the water tank (Fig. O)
Note! Fill the water tank with clean tap water (Do not use any
additives or chemicals).
Note! In areas of hard water, the use of de-ionised water is
recommended.
u Openthellercap(4)byippingitup.
u Fill the water tank with water (Do not use any additives or
chemicals).
Warning!Whenlling,detachfrommainunitandmaintainin
a horizontal position.
Warning! Your water tank has a 0.5 litre capacity. Do not over
llthetank.
u Closethellercap(4).
Note! Ensurethellercapisrmlysecured.

12
ENGLISH
(Original instructions)
Attaching the carpet glider (12d) (For use on
carpets only)
u Placethecarpetglider(12d)ontheoor.
u Attachacleaningpadtotheoorcleaninghead(12,12a)
u Lightly press the steam mop down onto the carpet glider
(12d) until it clicks into place.
Caution! Never leave the steam mop in one spot on any
surface for any period of time. Always place the steam mop
with the handle (8) supported in the upright position when
stationary and make sure the steam mop is turned off when
not in use.
Removing the carpet glider
Caution! Always wear suitable shoes when changing the
carpet glider on your steam mop. Do not wear slippers or
open toed footwear.
u Return the handle (8) to the upright position and turn the
steammop'OFF'.
u Wait until the steam mop cools down (approximately 5
minutes).
u Place the front of your shoe onto the carpet glider removal
tabandpressdownrmly.
u Lift the steam mop up and off the carpet glider.
Caution! Never leave the steam mop in one spot on any
surface for any period of time. Always place the steam mop
with the handle (8) supported in the upright position when
stationary and make sure the steam mop is turned off when
not in use.
The Delta Head (Fig. D)
This steam mop incorporates a built-in delta head which
enables you to access tight corners and narrow spaces.
Caution! Always wear suitable shoes when accessing the
delta head on your steam mop. Do not wear slippers or
open-toed footwear.
u Turnthesteam-mopto‘OFF’
u Waituntilthesteam-mopcoolsdown(approximatelyve
minutes).
u Place the front of your shoe onto the steam head removal
tab (12c) and press down gently.
u Lift the delta head (12b) up off the steam head (12a)
u Fit the delta head cleaning pad to the bottom of the delta
head.
Note:Removethecleaningpadbeforerettingthedelta
head to the steam head.
u TorefittheDeltahead,placethetipoftheDeltaheadinto
thesteamheadthenpressdownfirmlyensuringthatthe
Delta head clicks into place.
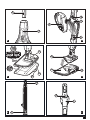
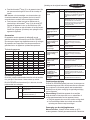
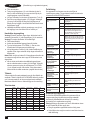
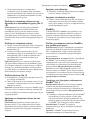
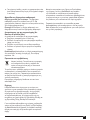
Attaching the hose and accessories to the
hand held steam cleaner (Fig. G - M)
Warning! Inspect the seal between the connection point on
the hand held steam cleaner (5) and the steam hose (16)
before each use. If the seal malfunctions or is damaged,
please contact your nearest authorised repair agent. Do not
use the appliance.
Attaching the hose
u Press the steam hose release button (16a) on the steam
hose (16).
u Connect the steam hose (16) to the hand held steam
cleaner (5) and release the steam hose release button
(16a) making sure it clicks into place.
Important! Ensure that the steam hose (16) is securely
connected to the hand held steam cleaner (5). If steam
escapesfromthejoint,thehoseisincorrectlytted.Switchoff,
allowtheunittocoolthenremoveandretthehose.
Attaching accessories (Fig H)
u Align the lugs on the steam nozzle (17) with the recesses
on the accessory.
u Press the accessory onto the steam nozzle (17) and twist
anti-clockwise until the accessory clicks into place.
Important! All accessories, apart from the SteaMitt
TM
(24)
which has its own hose and connector (25), must be attached
to the steam hose (16) for use.
Removing the hose and accessories
Warning! The steam hose (16), Steam nozzle (17) and
accessories become hot during use. Allow the unit and all
accessories to cool before attempting to remove.
Removing an accessory
u Twist the accessory clockwise then pull away from the
hose (16).
Removing the hose
u Press the steam hose release button (16a) on the steam
hose (16) and pull away from the hand held steam unit.
SteaMitt
TM
Your BLACK+DECKER
TM
SteaMitt
TM
has been designed for
sanitising and cleaning tiles, work tops, kitchen surfaces and
bathroom surfaces. This appliance is intended for indoor
household use only.
Attaching the SteaMitt
TM
hose to the hand held
steam unit
Warning! Inspect the seal on the steam nozzle and hose
before each use. If the seal is missing or damaged then
please contact your nearest authorised repair agent.

13
ENGLISH
(Original instructions)
Do not use the appliance. Inspect the seal on the SteaMitt
TM
and hose If the seal is missing, damaged or any steam
is escaping then please contact your nearest authorised
repair agent. Do not use the appliance. Ensure there is no
blockage or impedence in the SteaMitt
TM
hose or attachment
hose. If any are detected then please contact your nearest
authorised repair agent. Do not use the appliance.
Fitting a cleaning pad to the SteaMitt
TM
(Fig. J)
Warning! Ensure there is no blockage or impedence in
the steam release vents If any are detected then please
contact your nearest authorised repair agent. Do not use the
appliance.
u Fit the cleaning pad (26) to the SteaMitt
TM
(24) by
attachingthe'loop'velcrostrips(26a)ontheupperside
ofthecleaningpad,tothe'hook'velcropads(24a)onthe
underside of the SteaMitt
TM
(24).Pressdownrmly.
Warning! The SteaMitt
TM
shouldnotbeusedwithoutttinga
cleaning pad.
Note: The SteaMitt
TM
accommodates 4 types of cleaning pads
of varying thickness. Scouring pad (for use on tough stains
and non delicate surfaces), Bathroom pad (for use on taps
and other moulded bathroom surfaces), Standard pad (for use
on all larger surfaces) and Polishing pad (for use on delicate
surfaces).
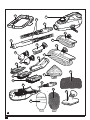
@
@
Warning!
Always use the SteaMitt
TM
as shown in
figure
K
, with your hand inside the protective glove.
Warning! Never attempt to use the SteaMitt
TM
by
gripping it externally as shown in figure L.
This will result in scalding.
@
@
@
@
Warning! Avoid using the SteaMitt
TM
in tight corners
asshowninfigureM.
Warning! Should a problem occur during use,
use the quick release tab to quickly remove the
SteaMitt
TM
fromyourhandasshowninfigureN
Warning! Do not use the SteaMitt
TM
on cold glass,
such as windows as damage may be caused by the
sudden change in temperature.
Warning! Never point or direct the mitt at yourself
or any other person.
Note: Variable steam dial is disconnected when the
SteaMitt
TM
isttedandsubsequentlytheowofsteamis
limited.
Use
Important! This unit will kill 99.9% of bacteria and germs
when used in accordance with the instructions in this manual
andwiththemicrobrepadsttedandacontinuousruntime
of 90 seconds.
Switching on and off
u Toswitchtheapplianceon,presstheON/Offswitch(1).
It takes approximately 20 seconds for the steam mop to
heat up.
u Toswitchtheapplianceoff,presstheON/Offswitch(1).
Note: always have your hand inside the SteaMitt
TM
before you
press the steam button.
Caution! Never leave the steam mop in one spot on any
surface for any period of time.
Always place the steam mop with the handle (8) supported in
the upright position when stationary and make sure the steam
mop is turned off when not in use.
Caution! Always empty the steam mop after use.
Note! Whenrstlledorafterrunningdry,itcantakeupto45
seconds for steam to be produced.
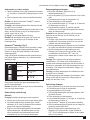
Autoselect
TM
Technology (Fig. P)
ThissteammopisttedwithanAutoselect
TM
dial (2) which
shows various cleaning applications. They are used to select
the correct operating mode for your particular cleaning
operation.
Using Autoselect
TM
, choose from one of the following
applications by turning the Autoselect
TM
dial (2) until the
required setting is selected.
Setting Mop Hand held
Wood/Laminate Lowsteamow
Tiles/Vinyl
Mediumsteamow
Stone/Marble
Highsteamow
The steam mop will select the correct volume of steam
required for your particular cleaning operation.
Note: Always check you are using the correct setting before
using your steam mop.
Hints for optimum use
General
Caution:Neverusethesteammopwithoutrstattachinga
cleaning pad.
u Alwaysvacuumorsweeptheoorbeforeusingthesteam
mop.
u The easiest way to use the appliance is to tilt the handle
to a 45º angle and clean slowly, covering a small area at a
time.
u Use water only with no additives or chemicals with your
steam mop. To remove stubborn stains from vinyl or
linoleumoors,youcanpre-treatwithamilddetergent
and some water before using the steam mop.

14
ENGLISH
(Original instructions)
Steam Cleaning with the mop
u Fit hand held steam cleaner (5) to the steam mop body
(11)
u Placeacleaningpad(13)onthefloorwiththevelcro'loop'
side facing up.
u Lightly press the steam mop down onto the cleaning pad
(13).
u Connect the steam mop to the mains.
u PresstheON/OFFbutton(1).Ittakesapproximately20
seconds for the steam mop to heat up.
u Turn the Autoselect
TM
dial (2) until the required setting is
reached. After a few seconds steam will start to come out
of the steam head.
Note!Whenrstlledorafterrunningdry,itcantakeupto45
seconds for steam to be produced.
u It takes a few seconds for steam to enter the cleaning pad.
The steam mop will now glide easily over the surface to be
sanitized/cleaned.
u Push and pull the steam mop slowly across the surface to
thoroughly steam clean each section.
u Whenyouhavenishedusingthesteammop,return
the handle (8) to the upright position, making sure that it
issupportedandturnit'OFF'.Waituntilthesteammop
coolsdown(approximatelyveminutes).
Caution! It is important to monitor the water level in the
watertank.Torellthewatertankandcontinuetosanitize/
clean stand the mop upright making sure that the handle is
supportedandturnthesteammop'OFF'.Unplugtheunitfrom
theelectricalwalloutlet,andrellthewatertank.
Caution! Never leave the steam mop in one spot on any
surface for any period of time.
Always place the steam mop with the handle (8) supported in
the upright position when stationary and make sure the steam
mop is turned off when not in use.
Carpet refreshing
u Placeacleaningpad(13)ontheoorwiththe'loop'side
facing up.
u lightly press the steam mop down onto the cleaning pad.
u Placethecarpetglider(12d)ontheoor.
u Lightly press the steam mop down onto the carpet glider
until it clicks into place.
u Connect the steam mop to the mains.
u
u
u
u
PresstheON/OFFbutton(1).Ittakesapproximately20
seconds for the steam mop to heat up.
Turn the Autoselect
TM
dial (2) to the Wood/Laminate
setting.
Push and pull the steam mop slowly across the carpet to
thoroughly refresh each section.
Whenyouhavenishedusingthesteammop,returnthe
handle(8)totheuprightpositionandturntheunitOFF.
Waituntilthesteammopcoolsdown(approximatelyve
minutes).
After use
u Turn the Autoselect
TM
dial(2)totheOFFposition.
u Wait until the steam mop cools down.
u Unplug the steam mop from the electrical wall outlet.
u Empty the water tank.
u remove the cleaning pad (13) and wash it ready for next
use (take care to follow the wash care instructions printed
on the cleaning pad).
u Wrap the supply cable around the cable tidy hooks (7 and
9).
u There is a hanging bracket (15) built into the hand grip (6)
which allows your steam mop to be hung from a suitable
hook on the wall. Always ensure that your wall hook is
capable of supporting the weight of the steam mop safely.
u The handle also includes a rubber stopper which allows
your steam mop to be rested safely against a vertical
surface.
Hand held steam cleaning
Warning! Unit will not produce steam unless it is connected to
themainbody(11)orthesteamhose(16)istted.
Warning!Onlyuseinahorizontalposition.
u Attach the required accessory.
u Connect the hand held steam cleaner to the mains.
u PresstheON/OFFbutton(1).Ittakesapproximately20
seconds for the steam mop to heat up.
u Turn the Autoselect
TM
dial (2) until the required setting is
reached. After a few seconds steam will start to come out
of the steam head.
Note!Whenrstlledorafterrunningdry,itcantakeupto45
seconds for steam to be produced.
u Whenyouhavenishedusingthehandheldsteam
cleaner turn the Autoselect
TM
dial(2)totheOFFposition.
TurntheunitOFFbypressingtheON/OFFbutton(1)and
disconnect from the mains supply. Wait until the unit cools
downbeforestoring(approximatelyveminutes).
Accessories
The performance of your appliance depends on the accessory
used. BLACK+DECKER accessories are engineered to high
quality standards and designed to enhance the performance
of your appliance. By using these accessories you will get the
very best from your equipment.
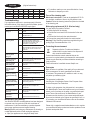
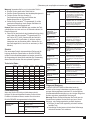
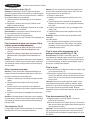
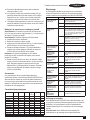
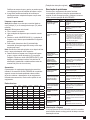
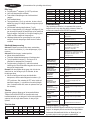
Technical Data
Voltage Power Tank
Capacity
Heat-up
time
Cable length Weight
V
ac
W ml secs m kg
FSMH1321 230 1600 500 ≤20 6 2.7
BHSM168D 230 1600 500 ≤20 6 2.8
BHSM168U 230 1600 500 ≤20 6 2.8
BHSM166DSM 230 1600 500 ≤20 6 2.8
BHSM1615DSM 230 1600 500 ≤20 7 2.9

15
(Übersetzung der ursprünglichen
Anweisungen)
DEUTSCH
ENGLISH
(Original instructions)
u For stubborn marks you can use a mild solution of soap
and water to dampen your cloth.
Care of the cleaning pads
Wash care instructions - Pads can be washed at 60°C. Do
not use fabric conditioner. Allow to dry fully before re-use.
Caution! Follow the cleaning instructions printed on the label
of the cleaning pad.
Mains plug replacement (U.K. & Ireland only)
Ifanewmainsplugneedstobetted:
u Safely dispose of the old plug.
u Connect the brown lead to the live terminal in the new
plug.
u Connect the blue lead to the neutral terminal.
u Connect the green/yellow lead to the earth terminal.
Warning!Followthettinginstructionssuppliedwithgood
quality plugs. Recommended fuse: 13A.
Protecting the environment
Z
Separate collection. Products and batteries
marked with this symbol must not be disposed of
with normal household waste
Products and batteries contain materials that can be
recovered or recycled reducing the demand for raw materials.
Please recycle electrical products and batteries according to
local provisions.
Further information is available at www.2helpU.com
Guarantee
Black&Deckeriscondentofthequalityofitsproductsand
offers consumers a 24 month guarantee from the date
of purchase. This guarantee is in addition to and in no way
prejudices your statutory rights.
The guarantee is valid within
the territories of the Member States of the European Union
and the European Free Trade Area.
To claim on the guarantee, the claim must be in accordance
with Black&Decker Terms and Conditions and you will need to
submit proof of purchase to the seller or an authorised repair
agent. Terms and conditions of the Black&Decker 2 year
guarantee and the location of your nearest authorised repair
agent can be obtained on the Internet at www.2helpU.com, or
bycontactingyourlocalBlack&Deckerofceattheaddress
indicated in this manual.
Please visit our website www.blackanddecker.co.uk to register
your new Black & Decker product and receive updates on new
products and special offers.
BHSM1615DAM 230 1600 500 ≤20 7 2.9
BHSM1615DSG 230 1600 500 ≤20 8 2.9
BHSM168DSM 230 1600 500 ≤20 8 2.9
BHSM169DSM 230 1600 500 ≤20 8 2.9
BHSM1610DSM 230 1600 500 ≤20 8 2.9
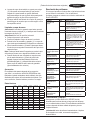
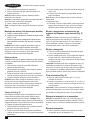
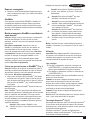
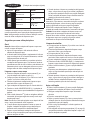
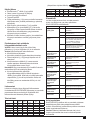
Troubleshooting
If your appliance seems not to operate properly, follow the
instructions below. If this does not solve the problem, please
contact your local BLACK+DECKER repair agent.
Problem Step Possible solution
The steam mop is not
turning on
1. Check the unit is plugged in at the wall
socket.
2. Check the unit is switched on using the
ON/OFF switch (1)
3. Check the fuse in the plug.
The steam mop is not
producing steam
4. The steam mop will only produce steam if
the hand held steam cleaner (5) is
correctly docked into the main body (11)
or the steam hose is tted or the
Autoselect
TM
is turned to ON
5. Check that the water tank is full. Note:
Whenrstlledorafterrunningdryitcan
take up to 45 seconds for steam to be
produced.
6. Check steps 1, then 2, then 3
The steam mop stops
producing steam
during use
7. Check steps 4, then 5, then 3
The steam mop is
producing too much
steam during use
8. Turn the Autoselect
TM
dial (2)
anti-clockwise to reduce the amount of
steam being produced
The steam mop is
producing too little
steam during use
9. Turn the Autoselect
TM
dial (2) clockwise to
increase the amount of steam being
produced
No steam is being
produced from the
hand held steam
cleaner
10. Check that the Autoselect
TM
dial (2) is at
the ON position
11. Check steps 5, then 1, then 2, then 3
The hand held steam
cleaner is producing
too little steam during
use
12. Turn the Autoselect
TM
dial (2) clockwise to
increase the amount of steam being
produced
13. Check step 5
The hand held steam
cleaner is producing
too much steam during
use
14. Turn the Autoselect
TM
dial (2)
anti-clockwise to reduce the amount of
steam being produced
The accessories keep
falling off the unit
15. Refer to the assembly chapter for correct
tting instructions of all parts and
accessories
Steam is escaping
from unexpected areas
of the unit
16. Refer to the assembly chapter for correct
tting instructions of all parts and
accessories
Where can I get further
information/
accessories
17. www.blackanddecker.co.uk/steammop
www.blackanddecker.ie/steammop
Maintenance and cleaning
Your BLACK+DECKER corded appliance has been designed
to operate over a long period of time with a minimum of
maintenance. Continuous satisfactory operation depends
upon proper appliance care and regular cleaning.
Warning! Before performing any maintenance or cleaning on
corded appliances switch off and unplug the appliance.
u Wipe your appliance over using a soft damp cloth.

16
(Übersetzung der ursprünglichen Anweisungen)
DEUTSCH
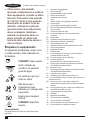
Verwendungszweck
Ihr BLACK+DECKER
TM
FSMH1321,BHSM166DSM,
BHSM168D, BHSM168DSM, BHSM168U, BHSM169DSM,
BHSM1610DSM, BHSM1615DSM, BHSM1615DSG,
BHSM1615DAM Dampfreiniger FSM13E1 wurde zum
hygienischen Säubern von Bodenbelägen aus versiegeltem
Hartholz,Laminat,Linoleum,PVC,Keramikiesen,Steinund
Marmor entwickelt. Dieses Gerät darf nur im Innenbereich
verwendet werden und ist nicht für den gewerblichen Einsatz
vorgesehen.
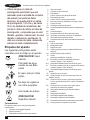
Sicherheitshinweise
Warnung! Lesen Sie alle
Sicherheitswarnhinweise
und alle Anweisungen. Die
Nichteinhaltung der folgenden
Warnungen und Anweisungen
kann einen elektrischen Schlag,
Brand und/oder schwere Ver-
letzungen verursachen.
Warnung! Beachten Sie beim
Umgang mit netzstrombetrie-
benen Geräten stets die grund-
legenden Sicherheitshinweise,
die im Folgenden beschrieben
werden. Dadurch verhindern Sie
Brände, Stromschläge sowie
Sach- und Personenschäden.
u Der vorgesehene Verwendungszweck
ist in dieser Anleitung beschrieben.
u Bei Verwendung von Zubehör oder
Anbauteilen, die nicht in dieser
Anleitung empfohlen werden, sowie
bei der Verwendung des Geräts
in Abweichung von den in dieser
Anleitung beschriebenen Verfahren
besteht Verletzungsgefahr.
u Bewahren Sie diese Anleitung auf.
Verwendung des Geräts
u Richten Sie den Dampfstrahl nicht auf
Menschen, Tiere, elektrische Geräte
oder Steckdosen.
u Vor Regen schützen.
u Tauchen Sie das Gerät nicht in
Wasser.
u Lassen Sie das Gerät niemals
unbeaufsichtigt.
u Trennen Sie die Stromversorgung des
Geräts, wenn dieses nicht verwendet
wird.
u Ziehen Sie den Netzstecker nicht am
Kabel aus der Netzsteckdose. Achten
Sie darauf, dass das Gerätekabel nicht
in Kontakt mit starker Hitze, Öl oder
scharfkantigen Gegenständen kommt.
u Bedienen Sie den Dampfreiniger nicht
mit nassen Händen.
u Verwenden Sie das Kabel nicht zum
Ziehen bzw. Tragen des Geräts oder
als Haltegriff. Achten Sie darauf, dass
das Kabel nicht in Türen eingeklemmt,
über scharfe Kanten gezogen oder
Hitzequellen ausgesetzt wird.
u Verwenden Sie das Gerät nicht in
geschlossenen Räumen, in denen
Dämpfe von Verdünnungsmitteln
für Ölfarben, bestimmte
Mottenschutzmittel, brennbare Stäube
oder andere explosive bzw. giftige
Dämpfe austreten.
u Lassen Sie die Art des Bodenbelags
durch den Hersteller bestätigen.
u Verwenden Sie das Gerät nicht auf
Leder, gewachsten Möbelstücken
oder Böden, synthetischem Gewebe,
SamtoderempndlichenMaterialien,

17
(Übersetzung der ursprünglichen Anweisungen)
DEUTSCH
die durch Dampf beschädigt werden
können.
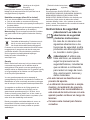
Warnung! Verwenden Sie das
Gerät nicht auf unversiegelten
Holz - und Laminatböden. Der
Glanz gewachster und bestimm-
terungewachsterOberächen
wird möglicherweise durch den
heißen Dampf beeinträchtigt.
Es wird empfohlen, die Reini-
gungswirkung zunächst an einer
unauffälligen Stelle zu testen.
Beachten Sie auch die Anwei-
sungen des jeweiligen Herstel-
lerszuGebrauchundPege
des Bodenbelags.
u Befüllen Sie den Dampfreiniger nicht
mit Entkalker, alkoholhaltigen Stoffen
sowie Duft- oder Reinigungsmitteln, da
das Gerät hierdurch beschädigt oder
die Gerätesicherheit beeinträchtigt
werden kann.
u Stellen Sie die Verwendung des
Geräts unmittelbar ein, und wenden
Sie sich an den Kundendienst, wenn
der Schutzschalter bei Verwendung
der Dampffunktion ausgelöst
wird. (Es besteht die Gefahr eines
Stromschlags.)
u Das Gerät erzeugt zur hygienischen
SäuberungderAnwendungsoberäche
Dampf mit sehr hoher
Austrittstemperatur. Deshalb können
Reinigungskopf, Bodentuch und
Teppichaufsatz bei Betrieb des Geräts
sehr heiß werden.
Achtung! Tragen Sie bei der
Verwendung des Dampfreinigers
und dem Austausch der Zubehörteile
zweckmäßiges Schuhwerk. Tragen Sie
keine Hausschuhe oder Sandalen.
u Der Gerätedeckel kann während des
Betriebs heiß werden.
u Bei Verwendung des Geräts kann
Dampf austreten. Das Gerät ist mit
Vorsicht zu betreiben. Teile, die
während des Betriebs heiß werden
können, dürfen NICHT BERÜHRT
WERDEN.
u Schalten Sie das Gerät aus, und
bewegen Sie den Griff in die aufrechte
Stellung, bevor Sie den Wassertank
entfernen.
u Schalten Sie das Gerät aus, trennen
Sie es von der Stromversorgung,
und lassen Sie das Gerät abkühlen,
wenn Dampf aus dem Gehäuse des
Handdampfreinigers austritt. Wenden
Sie sich an eine Vertragswerkstatt in
Ihrer Nähe. Das Gerät darf nicht weiter
verwendet werden.
Nach dem Gebrauch
u Ziehen Sie den Netzstecker und
lassen Sie das Gerät vor dem
Reinigen abkühlen.
u Bewahren Sie das Gerät bei
NichtgebrauchaneinemtrockenenOrt
auf.
u Kinder sollten keinen Zugang zu
aufbewahrten Geräten haben.
Inspektion und Reparaturen
u Ziehen Sie vor der Durchführung von
Wartungsarbeiten oder Reparaturen

18
(Übersetzung der ursprünglichen Anweisungen)
DEUTSCH
den Netzstecker und lassen Sie das
Gerät abkühlen.
u Prüfen Sie das Gerät vor der
Verwendung auf beschädigte oder
defekte Teile. Prüfen Sie, ob Teile
gebrochen sind, Schalter beschädigt
sind oder andere Bedingungen
vorliegen, welche die Funktion
beeinträchtigen könnten.
u Überprüfen Sie das Netzkabel
in regelmäßigen Abständen auf
Beschädigungen.
u Betreiben Sie das Gerät nicht, wenn
ein Teil beschädigt oder defekt ist.
u Lassen Sie beschädigte oder defekte
Teile in einer Vertragswerkstatt
reparieren oder austauschen.
u Ersetzen oder entfernen Sie keine
Teile, für die in dieser Anleitung
keine entsprechende Beschreibung
enthalten ist.
Sicherheit anderer Personen
u Dieses Gerät darf von Personen
mit eingeschränkten körperlichen,
sensorischen oder geistigen
Fähigkeiten sowie mangelnder
Erfahrung und Wissen in Bezug auf
dessen Gebrauch bedient werden,
wenn sie bei der Verwendung des
Geräts beaufsichtigt oder angeleitet
werden und die möglichen Gefahren
verstehen. Kinder dürfen nicht mit dem
Gerät spielen.
u Kinder müssen beaufsichtigt werden,
um sicherzustellen, dass sie nicht mit
dem Gerät spielen.
u Der Stecker muss vor der Reinigung
oder Wartung des Geräts aus der
Steckdose gezogen werden.
u Halten Sie Flüssigkeiten oder
Dampf von Geräten mit elektrischen
Komponenten fern, z.B. vom Inneren
eines Backofens.
u Das Gerät darf nicht unbeaufsichtigt
gelassen werden, während es an das
Stromnetz angeschlossen ist.
u Das Gerät darf nicht verwendet wer-
den, wenn es fallen gelassen wurde,
wenn es sichtbare Beschädigungen
aufweist oder undicht ist.
u Halten Sie das Gerät außerhalb der
Reichweite von Kindern, wenn es an
eine Stromzufuhr angeschlossen ist
oder abkühlt.
u Richten Sie den Dampfreiniger
niemals auf sich selbst oder andere
Personen.
u Es sollte darauf geachtet werden,
wenn das Gerät aufgrund der
Emission von Dampf.
u Ziehen Sie das Gerät während des
Füllens und Reinigung.
u Der Stoffdampfer darf nicht
unbeaufsichtigt bleiben, solange er an
das Versorgungsnetz angeschlossen
ist.
u Der Stoffdampfer darf nicht verwendet
werden, wenn er heruntergefallen
ist, sichtbare Anzeichen von
Beschädigungen vorliegen oder wenn
er undicht ist.

19
(Übersetzung der ursprünglichen Anweisungen)
DEUTSCH
u Bewahren Sie den Stoffdampfer
und seine Schnur außerhalb der
Reichweite von Kindern unter 8 Jahren
auf, wenn diese unter Spannung
stehen oder abkühlen.
Restrisiken
Beim Gebrauch dieses Geräts
verbleiben zusätzliche Restrisiken,
die möglicherweise nicht in den
Sicherheitswarnungen genannt werden.
Diese Risiken bestehen beispielsweise
bei Missbrauch oder längerem Gebrauch.
Auch bei der Einhaltung der
entsprechenden Sicherheitsvorschriften
und der Verwendung aller
Sicherheitsgeräte bestehen weiterhin
bestimmte Restrisiken. Diese sind:
u Verletzungen, die durch das Berühren
von sich bewegenden Teilen
verursacht werden.
u Verletzungen, die durch das Berühren
von erhitzten Teilen verursacht
werden.
u Verletzungen, die durch das
Austauschen von Teilen oder Zubehör
verursacht werden.
u Verletzungen, die durch längeren
Gebrauch des Geräts verursacht
werden. Legen Sie bei längerem
Gebrauch regelmäßige Pausen ein.
Elektrische Sicherheit
Warnung! Warnung! Das
Gerät muss geerdet werden.
Überprüfen Sie immer, dass die
Stromversorgung der Spannung
auf dem Typenschild entspricht.
Der Netzstecker des Gerätes muss
in die Steckdose passen. Ändern Sie
niemals den Stecker in irgendeiner Form.
Unveränderte Stecker und passende
Steckdosen mindern die Gefahr eines
elektrischen Schlages
u Bei einer Beschädigung des
Netzkabels muss dieses
durch den Hersteller oder eine
BLACK+DECKER-Vertragswerkstatt
ausgetauscht werden, um mögliche
Gefahren zu vermeiden.
Verlängerungskabel und Produkt
der Klasse 1
u Wenn das Gerät geerdet ist und es
sich um ein Produkt der Klasse 1
handelt, muss ein dreiadriges Kabel
verwendet werden.
u Verwenden Sie ausschließlich geprüfte
Verlängerungskabel, die für die
Leistungsaufnahme dieses Geräts
ausgelegt sind (siehe „Technische
Daten“). Es kann ein 1,50mm
2
-
Verlängerungskabel von einer Länge
von bis zu 30m verwendet werden,
ohne dass die Leistung des Geräts
beeinträchtigt wird. Prüfen Sie vor
der Inbetriebnahme das Netzkabel
auf Verschleiß und Beschädigungen.
Wechseln Sie beschädigte oder
fehlerhafte Verlängerungskabel
aus. Wenn Sie eine Kabeltrommel
verwenden, wickeln Sie das Kabel
vollständig ab.

20
(Übersetzung der ursprünglichen Anweisungen)
DEUTSCH
Warnsymbole am Gerät
Folgende Piktogramme sowie der
Datumscodebendensichaufdem
Gerät.
ACHTUNG! Heißer
Dampf
Wasser tropft, wenn
das Gerät umgedreht
verwendet wird
Dampf entweicht von
allen Seiten
Lassen Sie kleine Kinder
nicht unbeaufsichtigt
Nur für Handwäsche
ACHTUNG! Heiße
Oberäche
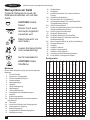
Merkmale
Dieses Gerät verfügt über einige oder alle der folgenden
Merkmale.
1. Ein-/Aus-Schalter
2. Autoselect
TM
-Programmwahl
3. Griff des Handdampfreinigers
4. Verschlusskappe
5. Handdampfreiniger
6. Handgriff
7. ObereKabelhalterung
8. Haupthandgriff
9. Untere Kabelhalterung
10. Freigabetaste des Handdampfreinigers
11. Hauptteil
12. Bodenreinigungsdüse
12a. Bodenreinigungsdüse mit herausnehmbarem
Delta-Element
12b. Delta-Kopf
12c. Lasche zum Entfernen des Reinigungskopfs
12d. Teppichgleiter (für Teppiche)
13. Bodenreinigungstuch
14. Freigabelasche für Bodenreinigungstuch
15. Aufhängevorrichtung
16. Dampfschlauch
17. Dampfdüse
18. Winkelbürstenzubehör (für schwer entfernbare
Flecken)
18a. Winkelbürste (Drahtbürste)
19. Bürstenzubehör (für Fliesen/Mörtel)
20. Gummiabzieherzubehör (für Duschwände/Glas/
Spiegel/Bekleidung/Polster)
20a. Hülle für Gummiabzieher
21. Großes Gummiabzieherzubehör (für Duschwände/
Glas/Spiegel/Bekleidung/Polster)
21a. Hülle für großen Gummiabzieher
22. Dampfstoß-Bürsteneinheit
22a. Dampfstoß-Drahtbürste (für Grills/Öfen)
22b. Dampfstoß-Bürste (für Grills/Öfen/Kochfelder/
Wasserhähne/Mörtel)
22c. BreiteDampfstoß-Bürste(fürgrößereOberächen)
23. Deltakopf-Bodentuch
24. SteaMitt
TM
25. SteaMitt
TM
-Schlauch
26. SteaMitt
TM
-Reinigungstuch
27. SteaMitt
TM
-Reinigungstuch 2
28. Ultra-absorbierendes Bodenreinigungstuch
29. Große Bürste mit integriertem Schaber
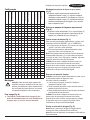
Konguration
F
S
M
H
1
3
2
1
B
H
S
M
1
6
8
D
B
H
S
M
1
6
8
U
B
H
S
M
1
6
6
D
S
M
B
H
S
M
1
6
8
D
S
M
B
H
S
M
1
6
9
D
S
M
B
H
S
M
1
6
1
0
D
S
M
B
H
S
M
1
6
1
5
D
S
M
B
H
S
M
1
6
1
5
D
S
G
B
H
S
M
1
6
1
5
D
A
M
S
E
T
T
I
N
G
S
12
Alle
12a
Alle
12d
Alle
13
Alle
16
Alle
18
●
18a
● ●●
19
● ●●
20
●
20a
●
21
●
21a
●
22
Alle
22a
Alle
22b
Alle
22c
Alle
23
Alle
24
Alle
Seite wird geladen ...
Seite wird geladen ...
Seite wird geladen ...
Seite wird geladen ...
Seite wird geladen ...
Seite wird geladen ...
Seite wird geladen ...
Seite wird geladen ...
Seite wird geladen ...
Seite wird geladen ...
Seite wird geladen ...
Seite wird geladen ...
Seite wird geladen ...
Seite wird geladen ...
Seite wird geladen ...
Seite wird geladen ...
Seite wird geladen ...
Seite wird geladen ...
Seite wird geladen ...
Seite wird geladen ...
Seite wird geladen ...
Seite wird geladen ...
Seite wird geladen ...
Seite wird geladen ...
Seite wird geladen ...
Seite wird geladen ...
Seite wird geladen ...
Seite wird geladen ...
Seite wird geladen ...
Seite wird geladen ...
Seite wird geladen ...
Seite wird geladen ...
Seite wird geladen ...
Seite wird geladen ...
Seite wird geladen ...
Seite wird geladen ...
Seite wird geladen ...
Seite wird geladen ...
Seite wird geladen ...
Seite wird geladen ...
Seite wird geladen ...
Seite wird geladen ...
Seite wird geladen ...
Seite wird geladen ...
Seite wird geladen ...
Seite wird geladen ...
Seite wird geladen ...
Seite wird geladen ...
Seite wird geladen ...
Seite wird geladen ...
Seite wird geladen ...
Seite wird geladen ...
Seite wird geladen ...
Seite wird geladen ...
Seite wird geladen ...
Seite wird geladen ...
Seite wird geladen ...
Seite wird geladen ...
Seite wird geladen ...
Seite wird geladen ...
Seite wird geladen ...
Seite wird geladen ...
Seite wird geladen ...
Seite wird geladen ...
Seite wird geladen ...
Seite wird geladen ...
Seite wird geladen ...
Seite wird geladen ...
Seite wird geladen ...
Seite wird geladen ...
Seite wird geladen ...
Seite wird geladen ...
Seite wird geladen ...
Seite wird geladen ...
Seite wird geladen ...
Seite wird geladen ...
Seite wird geladen ...
Seite wird geladen ...
Seite wird geladen ...
Seite wird geladen ...
Seite wird geladen ...
Seite wird geladen ...
Seite wird geladen ...
Seite wird geladen ...
Seite wird geladen ...
Seite wird geladen ...
Seite wird geladen ...
Seite wird geladen ...
Seite wird geladen ...
Seite wird geladen ...
Seite wird geladen ...
Seite wird geladen ...
Seite wird geladen ...
Seite wird geladen ...
Seite wird geladen ...
Seite wird geladen ...
Seite wird geladen ...
Seite wird geladen ...
Seite wird geladen ...
Seite wird geladen ...
Seite wird geladen ...
Seite wird geladen ...
Seite wird geladen ...
Seite wird geladen ...
-
 1
1
-
 2
2
-
 3
3
-
 4
4
-
 5
5
-
 6
6
-
 7
7
-
 8
8
-
 9
9
-
 10
10
-
 11
11
-
 12
12
-
 13
13
-
 14
14
-
 15
15
-
 16
16
-
 17
17
-
 18
18
-
 19
19
-
 20
20
-
 21
21
-
 22
22
-
 23
23
-
 24
24
-
 25
25
-
 26
26
-
 27
27
-
 28
28
-
 29
29
-
 30
30
-
 31
31
-
 32
32
-
 33
33
-
 34
34
-
 35
35
-
 36
36
-
 37
37
-
 38
38
-
 39
39
-
 40
40
-
 41
41
-
 42
42
-
 43
43
-
 44
44
-
 45
45
-
 46
46
-
 47
47
-
 48
48
-
 49
49
-
 50
50
-
 51
51
-
 52
52
-
 53
53
-
 54
54
-
 55
55
-
 56
56
-
 57
57
-
 58
58
-
 59
59
-
 60
60
-
 61
61
-
 62
62
-
 63
63
-
 64
64
-
 65
65
-
 66
66
-
 67
67
-
 68
68
-
 69
69
-
 70
70
-
 71
71
-
 72
72
-
 73
73
-
 74
74
-
 75
75
-
 76
76
-
 77
77
-
 78
78
-
 79
79
-
 80
80
-
 81
81
-
 82
82
-
 83
83
-
 84
84
-
 85
85
-
 86
86
-
 87
87
-
 88
88
-
 89
89
-
 90
90
-
 91
91
-
 92
92
-
 93
93
-
 94
94
-
 95
95
-
 96
96
-
 97
97
-
 98
98
-
 99
99
-
 100
100
-
 101
101
-
 102
102
-
 103
103
-
 104
104
-
 105
105
-
 106
106
-
 107
107
-
 108
108
-
 109
109
-
 110
110
-
 111
111
-
 112
112
-
 113
113
-
 114
114
-
 115
115
-
 116
116
-
 117
117
-
 118
118
-
 119
119
-
 120
120
-
 121
121
-
 122
122
-
 123
123
-
 124
124


Black & Decker BHSM1610 Benutzerhandbuch
- Kategorie
- Dampfreiniger
- Typ
- Benutzerhandbuch
in anderen Sprachen
- English: Black & Decker BHSM1610 User manual
- français: Black & Decker BHSM1610 Manuel utilisateur
- español: Black & Decker BHSM1610 Manual de usuario
- italiano: Black & Decker BHSM1610 Manuale utente
- Nederlands: Black & Decker BHSM1610 Handleiding
- português: Black & Decker BHSM1610 Manual do usuário
- dansk: Black & Decker BHSM1610 Brugermanual
- svenska: Black & Decker BHSM1610 Användarmanual
- suomi: Black & Decker BHSM1610 Ohjekirja
Verwandte Artikel
-
BLACK+DECKER FSMH1300FX Benutzerhandbuch
-
-
BLACK+DECKER FSMH13151SM Benutzerhandbuch
-
BLACK+DECKER FSM1600 Bedienungsanleitung
-
-
-
-
-
BLACK + DECKER FSH10SM-QS Bedienungsanleitung
-
Andere Dokumente
-
 Black Et Decker FSMH1321JSM avec gant vapeur SteaMitt Bedienungsanleitung
-
 Black Et Decker FSM1616 Bedienungsanleitung
-
Hoover CA2IN1D Bedienungsanleitung
-
Shark S6001 DAMPMOPP, HVIT Bedienungsanleitung
-
-
Silvercrest SDM 1500 B2 - IAN 273089 Bedienungsanleitung
-
-
-
Monster CLASSIC FLOOR STEAMER (EZ1) Benutzerhandbuch
-
Silvercrest SDM 1500 D2 Assembly, Operating And Safety Instructions

