
Instructions for Use
ENGLISH 1
Gebrauchsanleitung
DEUTSCH 6
Instructions d’utilisation
FRANÇAIS 11
Flowhood 5
Scott Health & Safety O
y
P.O.BOX 501
FI-65101 Vaasa, Finland
TECHNICAL SUPPORT & SALES
Tel. +358 (0)6 3244 543 or 544 or 535
TEKNINEN TUKI JA MYYNTI
Puh. (06) 3244 536 tai 537
Fax +358 (0)6 3244 591
www.scottsafety.com
Ref. No. 009919
Edition A 05/2004

1
ENGLISH
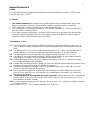
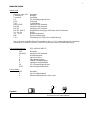
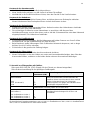
1 Pivot arm
2 Face seal
8a
9
8b
5
6 3
4
2
1
7
3 Visor (polycarbonate)
4 Exhalation valve disc + seat
5 Helmet shell
6 Brim trim
7 Hose
8 Head harness
a) Headband
b) Crown strap
9 Sweatband
Spare parts Accessories
064297
064513
064295
064505
064296
064515
Hose PU FL3/5/25 (3 pcs)
Visor PC FL5 anti-mist
+ face seal FL5
Visor cover FL5/25 (10 pcs)
Head harness
Exhalation valve disc FL (2 pcs)
Brim trim
063780
064024
063581
063781
062976
063180
Blower device Proflow2, complete
Blower device Proflow2 SC, complete
Blower device Proflow3, complete
Blower device Proflow2 Ex, complete
Blower device Autoflow 120, complete
Blower device Autoflow 120 Ex, complete

2
MARKINGS
Helmet shell
Protector or PSP manufacturer
Tuffmaster II helmet type
Tornado 6 device type
CE CE mark
0121 notified body
TH2 protective performance class
prEN 12941 conforms to European standard
EN 166 conforms to European standard
EN 175 conforms to European standard
EN 397 1996-1 helmet Certification, date and level of protection
50 – 60 cm size
-10 – 50 ºC operating temperature
MM molten metal splashes
L (S) head harness size adjustment
The helmet can be used safely down to -30 ºC and provides electrical protection against up to
1000 V (DC or AC) peak.
Visor frame PSP prEN166 48B CE
PSP manufacturer
prEN166 conforms to European standard
x shade
1 optical class
4 liquid splashes
B medium energy impact
F low energy impact
CE CE mark
0121 certifying body
Visor
PSP manufacturer
S high energy impact
8 non-adherence of molten metals
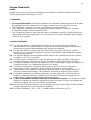
Symbols
+30
-10
C
C
< 75 %
See Instructions for Use! Recommended storage conditions
(temperature and humidity).

3
Helmet Flowhood 5
064286
EC Type-examined by Berufsgenossenschaftliches Institut für Arbeitssicherheit, D- 53754 Sankt
Augustin, Germany, ID: 0121.
1. General
o The helmet Flowhood 5 is designed to be used together with a powered blower device and
filters to protect the respiratory system and face against hazardous gases and particles.
o The Flowhood 5 consists of a helmet, a visor and a breathing hose.
o The Flowhood 5 is connected to the blower unit Proflow2, Proflow2 SC, Proflow3, Proflow2 Ex,
Autoflow 120A or Autoflow 120 Ex.
o Air is drawn through particle filters connected to the blower, by an electronically-controlled fan
and led through the breathing hose into the facepiece (airduct). Exhaled air exits through an
exhalation valve found in the lower part of the hood.
2. Limitations of use
2.1 The filtering device must not be used if the environment and contamination are unknown. In
case of doubt, insulating respirators which function independently of the atmosphere must be
used.
2.2 The filtering device must not be used in restricted spaces (e.g. cisterns, tunnels) because of
oxygen deficiency or presence of heavy oxygen-displacing gases (e.g. carbon dioxide).
2.3 The filtering device may be used only if the oxygen content of the air is 18 - 23 vol.%.
2.4 Gas filters do not protect against particles. Similarly, particle filters do not provide protection
against gases or vapours. In case of doubt, use combined filters.
2.5 Normal filtering devices do not protect against certain gases such as CO (carbon monoxide),
CO
2
(carbon dioxide) and N
2
(nitrogen).
2.6 Particle filters are allowed only for single use if they are applied against radioactive agents, micro-
organisms (virus, bacteria, fungi and spores) or enzymes.
2.7 It is likely that adequate protection cannot be guaranteed if the user’s beard, hair, spectacle
frames or clothing intrude into the faceseal.
2.8 When a breathing protector is used in explosive atmospheres, please follow the instructions
given for such areas. The use of Flowhood 5 is permitted when connected to an intrinsically
safe (ex) blower device.
2.9 The blower must be running while using the respirator. If the blower turns off by accident, the
device ceases to function as a respirator, and carbon dioxide levels may instantly rise. This is
considered an abnormal situation.
2.10 At a very intense working pace, the pressure in the facepiece can change into negative pressure
at peak inhalation.
2.11 Conditions -10 °C...+50 °C, relative humidity (RH) under 75 %.

4
3. Start-up
See Instructions for Use of the blower device to be used and of the filters. Only use Pro2000 filters.
o Check intactness of helmet and breathing hose.
o Check intactness of visor+face seal.
• Fix the breathing hose of the helmet tightly to the blower device.
• Screw the filters tightly to the blower device.
• Don the blower unit according to its instructions.
• Switch on the blower device, then check adequate air flow (see Instructions for Use of the blower
unit).
• Loosen the headband using the ratchet knob (handwheel), and don the helmet.
• Slip the face seal under the chin.
• Tighten the ratchet knob so that the head harness fits comfortably over the forehead. It may be
necessary to adjust the crown strap to position the visor to the correct height.
• Pull te facepiece back so that it fits
comfortably and securely under the chin and around the
cheeks. The face seal shall fit above the ears and under the head harness.
•
The breathing hose trails freely down the back and is not kinked or looped.
4. Maintenance and storage
• Store in a cool and dry place (-10 °C...+30 °C, max. 75 % RH), protected from sunlight and any
impurities.
• Clean with a damp cloth or sponge (be careful not to scratch the visor). Use lukewarm water and
mild detergent (neutral, pH 6-8) (e.g. washing-up liquid). Allow to dry. Do not use solvents (e.g.
acetone, turpentine) or bleaching agents (perborate, percarbonate). Never clean with compressed
air or compressed water.
• Check intactness of visor, helmet and hose, and replace damaged items.
• Recommend replacement after 2 years if in every day use, particularly when used outdoors.
Service life of 5 years when properly stored.
• Only use original spare parts.
Replacing the breathing hose
• Unscrew the old hose from the airduct and screw in the new one.
Replacing the visor
• Release the elastic loops from the head harness. Tilt the visor fully up until the visor is released
from pivot arm. Pull the exhalation valve from the face seal and fit it to the new visor’s face seal.
• Check that the face seal is fully located arount the valve body. Locate the visor in the pivot arms
in a tilted-up attitude, then tilt down to clip into place.

5
Replacing the exhalation valve
• Pull the valve cover from the valve and remove the disc.
• Insert a new disc ensuring that it lies flat on the seat.
• Align the valve cover with the slots and snap it in its place.
Replacing the pivot arms
• Use side clip to release pivot arm and withdraw arm from pivot post. Slide new pivot arm into
pivot post and secure with side clip.
Replacing the brim trim
• Release the elastic loops from the head harness. Untie the retaining cord of the old brim trim and
remove it from the helmet.
• Locate the rectangular slots in the new brim trim over the airducts at the front of the helmet,
arrange the brim trim around the brim of the helmet with the sponge pads tucked under the
helmet brim. Tie the retaining cord.
Replacing the head harness
• Tilt the visor to the fully-up position. By using both thumbs, press down on the white retaining tabs
to release the head harness from the helmet.
• When mounting, insert the white retaining tabs into the slots in the rim of the helmet, and press
down until they clik into place.
• Tilt the visor to the required position.
Replacing the sweatband
• Pull the old sweatband from the head harness hooks.
• Fit the new sweatband onto the four hooks in the lower front of the headband, fold across the
headband, then clip on to the two hooks at the top of the headband.
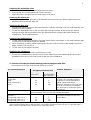
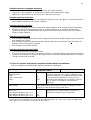
5. Selection of blower-assisted breathing protector equipped with filter
See Instructions for Use of the blower device to be used.
APF
(Assigned protection factor)
T
ype of protective device
Values as given
in BS 4275
Values as given
in German BGR
190 - ZH1/701
Remarks, limitations
Power-assisted face shield with
particle filter
TH1P
TH2P (Flowhood 5)
TH3P
10
20
40
5
20
100
“Open” facepieces, such as helmets
or hoods, do not provide sufficient
protection in case of breakdown or
inferior output of the blower.
Therefore, devices of class TH1 must
never be used against carcinogenic,
very poisonous or radioactive gases
and vapours.
Device with combined filter The specified multiples of threshold value for the gas or particle filters are
given separately, but in all cases the lowest value applies.
Power-assisted face shield with
gas filter *)
TH1 gas filter class 1 or 2
TH2 gas filter class 1 or 2
TH3 gas filter class 1 or 2
10
20
40
5
20
100
For devices with combined filter apply
the relevant limitations of gas and
particle filters.
*) Provided that the maximum permissible detrimental gas concentration for the gas filter is not exceeded. For
power-assisted filtering devices with gas filter, concentration must not exceed 0.05 vol.% in gas filter class 1
and 0.1 vol.% in gas filter class 2 and 0.5 vol.% in gas filter class 3.

6
DEUTSCH
1 Hebelarm
2 Randdichtung
8a
9
8b
5
6 3
4
2
1
7
3 Sichtscheibe (Polykarbonat)
4 Ausatemventilscheibe und Sitz
5 Helmschale
6 Helmrahmen
7 Atemschlauch
8 Kopfbänderung
a) Kreuzverband
b) Kopfband
9 Stirnpolster
Ersatzteile Zusatzausstattung
064297
064513
064295
064505
064296
064515
Atemschlauch PU FL3/5/25 (3 St)
Sichtscheibe PC FL5, unbereift
+ Randddichtung FL5
Visierschutz FL5/25 (10 St)
Kopfbänderung
Ausatemventilscheibe FL (2 St)
Helmrahmen
063780
064024
063581
063781
062976
063180
Gebläseeinheit Proflow2, komplett
Gebläseeinheit Proflow2 SC, komplett
Gebläseeinheit Proflow3, komplett
Gebläseeinheit Proflow2 Ex, komplett
Gebläseeinheit Autoflow 120, komplett
Gebläseeinheit Autoflow 120 Ex, komplett

7
MARKIERUNGEN
Helmschale
Protector oder PSP Hersteller
Tuffmaster II Helmtyp
Tornado 6 Gerätetyp
CE CE-Genehmigungszeichen
0121 Prüforgan
TH2 Schutzklasse
prEN 12941 entspricht EN Standard
EN 166 entspricht EN Standard
EN 175 entspricht EN Standard
EN 397 1996-1 Helmprüfbescheinigung mit Datum und Schutzstufe
50 – 60 cm Größe
-10 – 50 ºC Betriebstemperatur
MM Heisse Metallspritzer
L (S) Einstellung der Größe der Kopfbänderung
Der Helm kann ungefährdet bei Temperaturen bis zu -30 ºC eingesetzt werden und bietet
elektrischen Schutz bis zu 1000 Volt Gleich-und Wechselstrom (Spitzenspannung).
Sichtscheibenrahmen PSP prEN166 48B CE
PSP Hersteller
prEN166 entspricht EN Standard
x Dunkelheitsgrad
1 optische Klasse
4 Flüssigkeitsspritzer
B mittlere Schlagfestigkeit
F niedrige Schlagfestigkeit
CE CE-Genehmigungszeichen
0121 bescheinigende Behörde
Sichtscheibe
PSP Hersteller
S hohe Schlagfestigkeit
8 Metallschmeltzspritzer haften nicht
Symbole
+30
-10
C
C
< 75 %
Siehe Gebrauchsanleitung! Vom Hersteller empfohlene Lagerbedingungen
(Temperatur und Luftfeuchtigkeit).

8
Helm Flowhood 5
064286
EG-Baumustergeprüft durch Berufsgenossenschaftliches Institut für Arbeitssicherheit, D- 53754
Sankt Augustin, Deutschland, Kenn-Nr.: 0121.
1. Allgemeines
o Der Helm Flowhood 5 wird zusammen mit einem batteriebetriebenen Gebläse und Filter
verwendet, um Atmungsorgane und Gesicht vor gas- und partikelförmigen Schadstoffen zu
schützen.
o Die Flowhood 5 besteht aus Helm, Sichtscheibe und Atemschlauch.
o Die Flowhood 5 wird mit dem Gebläsegerät Proflow2, Proflow2 SC, Proflow3, Proflow2 Ex,
Autoflow 120A oder Autoflow 120 Ex verwendet.
o Die Atemluft wird von dem Gebläse durch die Filter angesaugt und mit elektronisch gesteuertem
Druck durch den Atemschlauch in den Atemanschluß (Luftkanal) geführt. Die Luft entweicht durch
Ausatemventil im unteren Teil des Helms.
2. Einschränkungen
2.1 Filtergeräte dürfen nicht benutzt werden, wenn die Umgebungsverhältnisse unbekannt sind. In
Zweifelsfällen sind Isoliergeräte zu benutzen, die von der Umgebungsatmosphäre unabhängig
wirken.
2.2 Filtergeräte dürfen nicht in engen Räumen (z.B. Behälter, Tunnel) eingesetzt werden, da es
Sauerstoffmangel gibt oder schwere sauerstoffverdrängende Gase (z.B. Kohlendioxyd)
vorkommen.
2.3 Bei der Verwendung der Filtergeräte muß der Sauerstoffgehalt der Raumluft 18 – 23 Vol.%
betragen.
2.4 Ein Gasfilter schützt nicht gegen Partikel und ein Partikelfilter schützt nicht gegen Gase und
Dämpfe. Im Zweifelsfall Kombinationsfilter einsetzen.
2.5 Normale Filtergeräte schützen nicht gegen bestimmte Gase wie z.B. CO (Kohlenmonoxyd),
CO
2
(Kohlendioxyd) oder N
2
(Stickstoff).
2.6 Partikelfilter gegen radioaktive Stoffe, Mikroorganismen (Viren, Bakterien, Pilze und deren
Sporen) und Enzyme sollen nur einmal verwendet werden.
2.7 Es ist unwahrscheinlich, daß die Anforderungen an Leckage erreicht werden, wenn sich Bart,
Haare, Brillenbügel oder Teile der Kleidung zwischen Dichtungsrand und Gesicht befinden.
2.8 Bei Gebrauch des Atemschutzgerätes in Räumen mit Explosionsgefahr sind die dafür
zutreffenden Vorschriften zu beachten. Anwendung der Flowhood 5 zugelassen, wenn in
Verbindung mit einem explosionsgeschützte (ex) Gebläsegerät verwendet.
2.9 Das Gerät muß bei laufendem Gebläse verwendet werden. Bei Ausfall des Gebläses kann
keine oder nur eine geringe Atemschutzfunktion des Gerätes erwartet werden; es besteht die
Gefahr einer sofortigen starken Anreicherung von Kohlendioxid. Gebläseausfall wird als ein
aussergewöhnlicher Zustand angesehen.
2.10 Bei starkem Atmen/grosser körperlicher Anstrengung kann im Atemanschluß ein Unterdruck
entstehen.
2.11 Anwendungsverhältnisse -10 °C...+50 °C, relative Feuchtigkeit (RH) unter 75 %.

9
3. Inbetriebnahme
Siehe Gebrauchsanleitungen für das Gebläsegerät und die Filter. Es dürfen nur Pro2000 Filter
verwendet werden.
o Überprüfen den Zustand und die Unversehrtheit des Helms und des Atemschlauchs.
o Überprüfen daß die Sichtscheibe+Randdichtung unversehrt ist.
• Den Atemschlauch vom Helm sicher an das Gebläsegerät drehen.
• Filter am Gebläsegerät sicher festmachen.
• Gebläsegerät nach der jeweiligen Gebrauchsanleitung anlegen.
• Gebläsegerät anschalten, dann die erforderliche Luftströmung überprüfen (siehe
Gebrauchsanleitung des Gebläsegeräts).
• Den Kreuzverband mit Hilfe des Ratschenknopfes lockern, und den Helm aufsetzen.
• Die Randdichtung unter das Kinn ziehen.
• Den Ratschenknopf drehen bis die Kopfbänderung bequem auf der Stirn sitzt.
Bei Bedarf, das Kopfband so spannen daß die Sichtscheibe auf passende Höhe liegt.
•
Den Gesichtsschutz rückwärts ziehen, um einen festen Sitz unter dem Kinn und an den Wangen
erzielen. Die Randdichtung soll über den Ohren und unter dem Kreuzverband liegen.
•
Der Atemschlauch bleibt ohne Drehung über den Rücken hängen.
4. Wartung und Lagerung
• Einlagern an einem kühlen und trockenen Ort (-10 °C...+30 °C, max. 75 % RH), geschützt gegen
Sonnenlicht und Kontamination.
• Reinigen mit einem feuchten Tuch oder Schwamm (die Sichtscheibe nicht kratzen). Benutzen
Sie lauwarmem Wasser und mildem Reinigungsmittel (neutral, pH 6-8) (z.B. Geschirrspülmittel).
Trocknen lassen. Keine Lösungsmittel (z.B. Azeton, Terpentin) oder Bleichmittel (Perborat,
Perkarbonat) verwenden. Benutzung der Druckluft oder Druckwasser ist verboten.
• Überprüfen den Zustand der Sichtscheibe, des Helms und des Atemschlauchs, und diese bei
Bedarf austauschen.
• Empfohlene Austauschperiod 2 Jahre bei täglicher Benutzung, besonders in Freien. Lebensdauer
5 Jahre wenn ordentlich gelagert.
• Es dürfen nur Originalersatzteile verwendet werden.
Austausch des Atemschlauchs
• Alten Schlauch von Luftkanal losschrauben und einen neuen einschrauben.
Austausch der Sichtscheibe
• Elastische Schlaufen von Kreuzverband lösen. Sichtscheibe ganz hochklappen, bis sich dieser
von Hebelarm löst. Ausatemventil aus der Randdichtung ziehen und in die neue Randdichtung
einsetzen.
• Überprüfen daß die Randdichtung gut um das Ventilgehäuse sitzt. Sichtscheibe in hochgeklappter
Stellung in die Hebelarme einsetzen und dann nach unten klappen, damit die Sichtscheibe
einrasten kann.

10
Austausch des Ausatemventils
• Ventildeckel ziehen und die Ventilscheibe entfernen.
• Neue Ventilscheibe einlegen, so daß sie flach auf dem Sitz aufliegt.
• Ventildeckel in die Positionierschlitzen richten, dann den Deckel in das Ventil einrasten.
Austausch des Hebelarms
• Den Hebelarm mit der seitliche Klemme lösen, und dieser dann vom Drehzapfen abziehen.
Neuen Hebelarm auf den Drehzapfen führen und mit der Klemme sichern.
Austausch des Helmrahmens
• Elastische Schlaufen von Kreuzverband lösen. Halteschnur des alter Helmrahmens losbinden
und diesen dann vom Helm abnehmen.
• Die rechteckigen Schlitze im neuen Helmrahmen so ausrichten, daß diese auf den
Ventilationsöffnungen vorn im Helm sitzen, und so daß die Schwammstücke unter dem Helmrand
eingestopft werden. Die Halteschnur festbinden.
Austausch der Kopfbänderung
• Sichtscheibe ganz hoch klappen. Weiße Haltezungen mit beiden Daumen von ihren Schlitze
herausdrücken, um die Kopfbänderung von Helm zu lösen.
• Beim Montieren, weiße Haltezungen in die Schlitze des Helmrands einpassen, und so lange
drücken bis sie in Position einrasten.
• Sichtscheibe in die gewünschte Stellung bringen.
Austausch des Stirnpolsters
• Alten Stirnpolster von den Haken des Kreuzverbands abziehen.
• Neuen Stirnpolster an den vier Haken vorn unten am Kreuzverband befestigen, dann über den
Kreuzverband falten, und dann an die beiden Haken oben am Kreuzverband befestigen.
5. Auswahl von Filtergeräten mit Gebläse
Siehe auch BGR 190 (ZH 1/701) (Regeln für den Einsatz von Atemschutzgeräten).
Siehe Gebrauchsanleitung für das jeweiligen Gebläsegerät.
Geräteart Vielfaches des
Grenzwertes (GW)
Bemerkungen, Einschränkungen
Gesichtsschutz mit Gebläse
und Partikelfilter
TH1P
TH2P (Flowhood 5)
TH3P
5
20
100
Die “offenen” Atemanschlüsse (Helm oder Haube)
bieten bei Ausfall oder Schwächerwerden des
Gebläses keinen ausreichenden Schutz. Deshalb
dürfen Geräte der Klasse TH1 nicht gegen
krebserregende, sehr giftige und radioaktive Gase
und Dämpfe eingesetzt werden.
Geräte mit Kombinationsfilter Es gelten die jeweiligen Vielfachen des Grenzwertes für den Gas- oder
Partikelfilterteil, und zwar jeweils der schärfere Wert.
Gesichtsschutz mit Gebläse
und Gasfilter *)
TH1 Gasfilterklasse 1 oder 2
TH2 Gasfilterklasse 1 oder 2
TH3 Gasfilterklasse 1 oder 2
5
20
100
Bei Geräten mit Kombinationsfilter gelten die
jeweiligen Einschränkungen für die Gas- und
Partikelfiter.
*) Sofern damit nicht bereits die auf das Gasaufnahmevermögen von Gasfiltergeräten mit Gebläse bezogenen
höchstzulässigen Einsatzkonzentrationen von 0,05 Vol.% in Gasfilterklasse 1 und 0,1 Vol.% in Gasfilterklasse 2
und 0,5 Vol.% in Gasfilterklasse 3 überschritten werden.

11
FRANÇAIS
1 Pivot-bras
2 Joint du bord
8a
9
8b
5
6 3
4
2
1
7
3 Visière (polycarbonate)
4 Disque et siège de soupape expiratoire
5 Casquel
6 Bordure
7 Tuyau respiratoire
8 Harnais
a) Serre-tête
b) Sangle de tête
9 Coussinet frontal
Pièces de rechange Accessoires
064297
064513
064295
064505
064296
064515
Tuyau PU FL3/5/25 (3 pc)
Visière PC FL5, anti-buée
+ joint du bord L5
Protège-visière FL5/25 (10 pc)
Harnais
Disque de soupape expir. FL (2 pc)
Bordure
063780
064024
063581
063781
062976
063180
Appareil ventilateur Proflow2, complet
Appareil ventilateur Proflow2 SC, complet
Appareil ventilateur Proflow3, complet
Appareil ventilateur Proflow2 Ex, complet
Appareil ventilateur Autoflow 120, complet
Appareil ventilateur Autoflow 120 Ex, complet

12
MARQUAGE
Casque
Protector ou PSP fabricant
Tuffmaster II type de casque
Tornado 6 type d’appareil
CE marque CE
0121 institut de test
TH2 classe de protection
prEN 12941 conforme à la norme europpéenne
EN 166 conforme à la norme europpéenne
EN 175 conforme à la norme europpéenne
EN 397 1996-1 certification du casque avec date et niveau de protection
50 – 60 cm taille
-10 – 50 ºC temperature d’utilisation
MM projections de métal en fusion
L (S) réglage de la taille du serre-tête
Le casque peut être utilisé avec sécurité en temperatures basses jusqu’à -30 ºC et offre
protection électrique contre jusque 1000 V (DC or AC) (de pointe).
Cadre de visière PSP prEN166 48B CE
PSP fabricant
prEN166 conforme à la norme europpéenne
x teinte
1 classe optique
4 projections liquides
B choc de moyenne énergie
F choc de bas énergie
CE marque CE
0121 institut de test
Visière
PSP fabricant
S choc de grande intensité
8 non-adhérence de métal en fusion
Symboles
+30
-10
C
C
< 75 %
Voir instructions d’utilisation! Recommandations de stockage du fabricant
(température et humidité).

13
Casque Flowhood 5
064286
Examen CE de type par l'organisme Berufsgenossenschaftliches Institut für Arbeits-sicherheit, D-
53754 Sankt Augustin, Allemagne, ID: 0121.
1. Généralités
o Le casque Flowhood 5 est destiné à l’utilisation avec l’appareil ventilateur motorisé et les filtres
pour protéger les voies respiratoires et le visage contre les gaz et les particules nocives.
o The Flowhood 5 comprend un casque, une visière et un tuyau respiratoire.
o The Flowhood 5 est employé avec un appareil ventilateur Proflow2, Proflow2 SC, Proflow3,
Proflow2 Ex, Autoflow 120A or Autoflow 120 Ex.
o L’air à respirer est aspiré à travers les filtres dans le ventilateur et envoyé à la pièce faciale par
l'intermédiaire d'un tuyau respiratoire. L'air est évacué par le soupape expiratoire dans la partie
inférieure de la cagaoule.
2. Limites d’utilisation
2.1 Les appareils filtrants ne doivent pas être utilisés si l’on ne connaît pas les conditions
d'environnement. En cas d'incertitude, il est nécessaire d'utiliser des appareils de protection
isolants qui fonctionnent indépendamment de l’atmosphère ambiante.
2.2 Les appareils filtrants ne doivent pas être utilisés dans des espaces etroits (ex. citernes,
tunnels) si il y a un manque d'oxygène ou présence de matières lourdes déplaçant l'oxygène
(ex. dioxyde de carbone).
2.3 Les appareils filtrants peuvent uniquement être utilisés si l'air contaminé contient un volume
d'oxygène de 18 - 23 % en volume.
2.4 Les filtres à gaz ne protègent pas contre les particules. De même, les filtres à particule ne
protègent ni des gaz ni des vapeurs. En cas d'incertitude, il faut utiliser un filtre combiné.
2.5 Les appareils filtrants normaux ne protègent pas contre certains types de gaz, par exemple CO
(oxyde de carbone), CO
2
(dioxyde de carbone) et N
2
(azote).
2.6 Les filtres à particules ne doivent être utilisés qu'une seule fois contre les substances
radioactives, les micro-organismes (virus, bactéries, moisissures) et les enzymes.
2.7 Il est probable qu’une protection sufficante ne peut être fournie si par example la barbe, les
cheveux, la monture de lunettes ou les vêtements sont entre le visage et le joint du bord.
2.8 Si l’appareil respiratoire est utilisé en atmosphère à risque d’explosion, il faut absolument
respecter le règlement afférent. L’utilisation de la Flowhood 25 est permise lorsqu’elle est
employée avec l’appareil ventilateur intrinsèquement sûr (ex).
2.9 Le bloc d’alimentation doit être utilisé avec le ventilateur en marche. Si le ventilateur s’arrête,
l’appareil ne sert pas de protection respiratoire et il peut se former une forte concentration de
dioxyde de carbone. Ceci est une condition exceptionelle.
2.10 Dans un travail au rythme intense il est possible que la pression dans la pièce faciale devienne
négative (dépression) lors du summum de l’inspiration.
2.11 Conditions d’utilisation: -10 °C...+50 °C, humidité relative (HR) moins de 75 %.

14
3. Mise en service
Voir les instructions d’utilisation de l’appareil ventilateur et du filtre. Utiliser uniquement des filtres
Pro2000.
o Vérifier l’état et l’intégrité du casque et le tuyau respiratoire.
o Vérifier l’état et l’intégrité de la visière+joint du bord.
• Fixer le tuyau respiratoire du casque à l’appareil ventilateur.
• Visser bien les filtres à l’appareil ventilateur.
• Enfiler l’appareil ventilateur suivant ses instuctions d’utilisation.
• Démarrer l’appareil ventilateur, et vérifier la suffisance du flux d’air (voir les instructions d’appareil
ventilateur).
• Deserrer le serre-tête à l’aide du bouton de réglage (ratchet), et enfiler le casque.
• Glisser le joint du bord sous le menton.
• Serrer le bouton de réglage de manière a ce que le harnais reste bien sur la tête. Il est peut être
nécessaire ajuster régler la sangle de tête afin que la visière se trouve bien devant le visage.
• Tirer le joint du bord en arrière pour une confortable position sous le menton et autour des joues.
Le joint du bord doit s’étendre au-dessus des oreilles et sous le serre-tête.
•
Le tuyau descende le long du dos sans spirales ni coudes.
4. Entretien et entreposage
• Entreposer dans un endroit sec et frais (-10 °C...+30 °C, max. 75 % HR) à l’abri de la lumière du
soleil et des impuretés.
• Vérifier que la cagoule n’est pas froissée, éraillée ou déchirée.
• Nettoyer avec un chiffon ou éponge moite (prendre soin de ne pas rayer la visière). Utiliser l’eau
tiède contenant un détergent doux (neutre, pH 6-8) (ex. produit-vaisselle). Permettre sécher. Ne
pas se servir de solvants (ex. acétone, térébenthine), de l'eau brûlante ou d’agents de
blanchiment (perborate, percarbonate). L’utilisation de l’air comprimé ou de l’eau sous pression
est interdite.
• Vérifier l’état de la visière, le casque et du tuyau, et les remplacer en cas de défaillance.
• La fréquence de changement recommandée pour une utilisation quotidienne est de 2 ans, en
particulier dans utilisation en plein air. Durée de service est de 5 ans si correctement conservé.
• Utiliser uniquement des pièces de rechange originales.
Remplacement du tuyau respiratoire
• Deserrer le tuyau du conduite d’air et visser le nouveau tuyau.
Remplacement de la visière
• Libérer les élastiques du harnais. Plier la visière complètement vers le haut jusqu’à ce que la
visière se détache des pivot-bras. Tirer la soupape expiratoire du joint du bord, et fixer-la dans le
joint du bord de la nouvelle visière.
• Vérifier que le joint du bord se trouve complètement autour du corps de soupape. Avec les pivot-
bras vers le haut, positioner la visière en les bras, ensuite plier en bas pour laisser la visière
enclencher en place.

15
Remplacement de la soupape expiratoire
• Détacher le couvercle de la soupape expiratoire et enlever le disque.
• Inserer un nouveau disque, et vérifier que le disque reste aplati dans le siège.
• Aligner le couvercle dans les encoches et enclenchez-le en place.
Remplacement des pivot-bras
• Libérer le pivot-bras à l’aide de la clip latérale et retirer le bras. Faire glisser le nouveau pivot-bra
dans l’attache et bloquer avec la pince latérale.
Remplacement de la bordure
• Libérer les élastiques du harnais. Dénouer le ruban d’attache de la bordure et retirer la bordure.
• Positionner les trous rectangulaires dans la nouvelle bordure sur le conduite d’air devant le
casque, et arranger la bordure autour du ourlet du casque entassant les bourres sous l’ourlet.
Nouer le ruban d’attache.
Remplacement du harnais
• Plier la visière complètement vers le haut. Appuyer les blanches brides d’attache avec les pouces
pour détacher le harnais.
• Pour montage, inserer les blanches brides d’attache dans les encoches au bord
du casque, et
appuyer pour enclencher-les en place.
• Plier la visière en position désirée.
Remplacement du coussinet frontal
• Tirer le coussinet des crochets du harnais.
• Placer le nouveau coussinet sur les quatre crochets ses trouvants dans le bord inférieur devant le
serre-tête, ensuite plier le coussinet de l’autre côté du serre-tête, et finalement fixer sur les deux
crochets en haut du serre-tête.
5. Choix de l’appareil de protection respiratoire filtrant équipé de ventilateur
Voir les instructions d’utilisation de l’appareil ventilateur en question.
Type d’appareil Multiple de valeur moyenne
d’exposition (V.M.E.)
Remarques, limitations
Écran facial équipé de ventilateur et
filtre à particules
TH1P
TH2P (Flowhood 5)
TH3P
5
20
100
Les appareils de protection respiratoire “ouverts”,
comme un casque ou une cagoule, n’offrent pas une
protection suffisante si le ventilateur défaille ou faiblit.
C’est pourquoi les protections de classe TH1 ne
doivent pas être utilisées pour se protéger contre les
gaz ou vapeurs cancérigénes, très toxiques ou
radioactifs.
Appareil de protection respiratoire et
filtre combiné
Les multiples des valeurs moyennes d’exposition sont communiqués
séparément pour les filtres à gaz et les filtres à particules, et dans
chaque cas il faut respecter la plus petite valeur.
Écran facial équipé de ventilateur et
filtre à gaz *)
TH1 catégorie de filtre à gaz 1 ou 2
TH2 catégorie de filtre à gaz 1 ou 2
TH3 catégorie de filtre à gaz 1 ou 2
5
20
100
Lors de l’utilisation de l’appareil de protection
respiratoire avec un filtre combiné, respecter les
restrictions des filtres à gaz et à particules.
*) À condition de ne pas dépasser les concentrations maximums autorisées de gaz nocifs qui sont pour les filtre
à gaz utilisés avec ventilateur 0,05 vol.% dans la catégorie de filtre à gaz 1 et 0,1 vol.% dans la catégorie de
filtre à gaz 2 et 0,5 vol.% dans la catégorie de filtre à gaz 3.
-
 1
1
-
 2
2
-
 3
3
-
 4
4
-
 5
5
-
 6
6
-
 7
7
-
 8
8
-
 9
9
-
 10
10
-
 11
11
-
 12
12
-
 13
13
-
 14
14
-
 15
15
-
 16
16


Tyco 5 Benutzerhandbuch
- Typ
- Benutzerhandbuch
- Dieses Handbuch eignet sich auch für
in anderen Sprachen
- français: Tyco 5 Manuel utilisateur
Andere Dokumente
-
 3D Cabin 3D FACESV 3 Bedienungsanleitung
-
DeWalt DXIR1FFM Benutzerhandbuch
-
Plymovent Cutting & Grinding helmet Benutzerhandbuch
-
GYS AIR FED HELMET GYSMATIC 5/13 XXL TRUE COLOR Datenblatt
-
Kasco KOMPAT88 Series Use Instructions
-
cleanAIR CNA-012-R06 Benutzerhandbuch
-
-
SCOTT VISION 2RFF4000 Bedienungsanleitung
-
GYS PREMIUM INTEGRAL RESPIRATOR FFP3 Bedienungsanleitung
-
Parkside PSHL 2 A2 Operation And Safety Notes Translation Of The Original Instructions
