Whirlpool KN3E11(W)/I Benutzerhandbuch
- Kategorie
- Kochfelder
- Typ
- Benutzerhandbuch

English
Italiano
IT
GB
Istruzioni per l’uso
CUCINA E FORNO
Sommario
Istruzioni per l’uso,1
Descrizione dell’apparecchio- Vista d’insieme,2
Descrizione dell’apparecchio- Pannello di controllo,3
Installazione, 4
Avvio e utilizzo,6
Programmi di cottura,6
Utilizzo del piano cottura,8
Precauzioni e consigli,10
Manutenzione e cura,11
Assistenza,11
Operating Instructions
COOKER AND OVEN
Contents
Operating Instructions,1
Description of the appliance-Overall view,2
Description of the appliance-Control Panel,3
Installation,12
Start-up and use,14
Cooking modes,15
Using the hob,16
Precautions and tips,18
Care and maintenance,19
Assistance,19
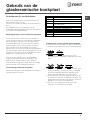
Nederland
NL
Gebruiksaanwijzing
FORNUIS EN OVEN
Inhoud
Gebruiksaanwijzing,1
Beschrijving van het apparaat-Aanzichttekening,2
Beschrijving van het apparaat-Bedieningspaneel,3
Installatie, 28
Starten en gebruik, 30
De kookzones,33
Gebruik van de oven,30
Voorzorgsmaatregelen en advies,34
Onderhoud en verzorging,35
Servicedienst,35
PT
Português
Instruções para a utilização
FOGÃO E FORNO
Índice
Instruções para a utilização,1
Descrição do aparelho-Vista de conjunto,2
Descrição do aparelho-Painel de comandos,3
Instalação,20
Início e utilização, 22
Utilização do plano de cozedura,25
Utilização do forno,23
Precauções e conselhos,26
Manutenção e cuidados,27
Assistência técnica,27
BG
Български
Инструкции за употреба
ЕЛЕКТРИЧЕСКА ПЕЧКА И ФУРНА
Резюме
Инструкции за употреба,1
Описание на уреда-Общ преглед,2
Описание на уреда- Управляващ панел,3
Инсталиране,43
Пуск и експлоатация, 45
Използване на фурната,46
Kотлони,48
Предпазни мерки и препоръки,49
Поддръжка и почистване,50
Техническо обслужване,50
DE
Deutsch
Bedienungsanleitungen
HERD UND OFEN
Inhalt
Bedienungsanleitungen,1
Beschreibung des Geräts-Übersicht,2
Beschreibung des Geräts-Schalttafel,3
Installation,36
Inbetriebnahme und Benutzung,38
Gebrauch des Ofens,38
Gebrauch des Kochfeldes,40
Vorsichtsmaßnahmen und Tipps,41
Pflege und Wartung,42
Hilfe,42
KN3E11/I

2
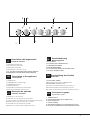
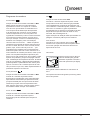
1.ELECTRIC HOTPLATE
2.Control panel
3..Sliding grill rack
4.DRIPPING pan
5.Containment surface for spills
6.GUIDE RAILS for the sliding racks
7.position 5
8.position 4
9.position 3
10.position 2
11.position 1
12.Adjustable foot
Description of the appliance
Overall view
GB
2
1
3
6
9
10
11
5
12
12
7
8
4
1.PIASTRE ELETTRICHE
2.Pannello di controllo
3.Ripiano GRIGLIA
4.Ripiano LECCARDA
5.Piano di contenimento eventuali trabocchi
6.GUIDE di scorrimento dei ripiani
7.posizione 5
8.posizione 4
9.posizione 3
10.posizione 2
11.posizione 1
12.Piedino di regolazione
IT
Descrizione dell’apparecchio
Vista d’insieme
1. Elektrische kookplaat
2. Bedieningspaneel
3. Ovenrek
4. Lekplaat of bakplaat
5. Plaat voor opvangen van overkooksel
6. Geleidersvan de roosters
7. stand 5
8. stand 4
9. stand 3
10. stand 2
11. stand 1
12. Stelschroeven
Aanzichttekening
Aanzichttekening
NL
1 Plano eléctrico
2 Painel de comandos
3 Prateleira GRADE
4 Prateleira BANDEJA PINGADEIRA
12 Pé de regulação
5 Plano de retenção dos eventuais vazamentos
6 GUIAS de deslizamento das prateleiras
7 Posição 5
8 Posição 4
9 Posição 3
10 Posição 2
11 Posição 1
Descrição do aparelho
Vista de conjunto
PT
1 Elektrische Kochzone
2 Bedienfeld
3 Einschub BACKOFENROST
4 Einschub FETTPFANNE
5 Kochfeld- Überlaufschutz
6 GLEITFÜHRUNGEN für die Einschübe
7 position 5
8 position 4
9 position 3
10 position 2
11 position 1
12 Höhenverstellbarer Stellfuß
Beschreibung des Gerätes
Geräteansicht
DE
1 Електрически котлони
2 Командно табло
3 Решетка
4 Тава
5 Плот
6 BOДAЧИ за двата
7 Положение 5
8 Положение 4
9 Положение 3
10 Положение 2
11 Положение 1
12 Регулируеми крачета
Описание на уреда
Общ преглед
BG

GB
3
Description of the appliance
Control panel
GB
1.TIMER knob
2.THERMOSTAT indicator light
3.THERMOSTAT knob
4.SELECTOR knob
5.ELECTRIC HOTPLATE indicator light
6.Electric HOTPLATE control knob
IT
Descrizione dell’apparecchio
Panello di controllo
1.Manopola Contaminati
2.La spia termostato forno
3.Manopola termostato
4.Manopola di selezione forno
5.
La spia di funzionamento delle piastre elettriche
6.Manopole di comando delle piastre elettriche
Aanzichttekening
Bedieningspaneel
NL
Descrição do aparelho
Painel de comandos
PT
1.Manípulo conta-minutos
2.Indicador de funcionamento termostato
3.Selector para a temperatura de cozedura (termostato)
4.Botão selector das funções de cozedura
5.Indicador de funcionamento chapas
6.Botões de comando das chapas eléctricas
1.Knop TIMER
2.Controlelampje THERMOSTAAT
3.THERMOSTAATKNOP
4.PROGRAMMAKNOP
5.Controlelampje WERKING KOOKPLATEN
6. Knoppen KOOKPLATEN
Beschreibung des Gerätes
Bedienfeld
DE
1.Drehschalter TIMER
2.Betriebskontrollleuchte THERMOSTAT
3.Drehschalter THERMOSTAT
4.Schalter zur Wahl der Backofenfunktionen
5.Betriebskontrollleuchte Elektrokochzonen
6.Schalter zur Einstellung der Kochfeld-Kochzonen
Описание на уреда
Управляващ панел
BG
1. TIMER копчето
2. Светлинен индикатор на термостата
3. Бучка термостат
4. ключа за избор
5. Светлинен индикатор на електрически котлон
6. Копчето за управление на електрически котлон
1
3
5
6
4
2

4
IT
! È importante conservare questo libretto per poterlo
consultare in ogni momento. In caso di vendita, di
cessione o di trasloco, assicurarsi che resti insieme
all’apparecchio.
! Leggere attentamente le istruzioni: ci sono importanti
informazioni sull’installazione, sull’uso e sulla sicurezza.
! L’installazione dell’apparecchio va effettuata secondo
queste istruzioni da personale qualifi cato.
! Qualsiasi intervento di regolazione o manutenzione
deve essere eseguito con l’apparecchio disinserito
dall’impianto elettrico.
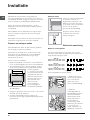
Posizionamento e livellamento
! È possibile installare l’apparecchio di fi anco a mobili
che non superino in altezza il piano di lavoro.
! Assicurarsi che la parete a contatto con il retro
dell’apparecchio sia di materiale non infi ammabile e
resistente al calore (T 90°C).
Per una corretta installazione:
• porre l’apparecchio in cucina, in sala da pranzo o in
un monolocale (non in bagno);
• se il piano della cucina è più alto di quello dei
mobili, essi devono essere posti ad almeno 200 mm
dall’apparecchio;
• se la cucina viene
installata sotto un pensile,
esso dovrà mantenere
una distanza minima dal
piano di 420 mm.
Tale distanza deve
essere di 700 mm se i
pensili sono infi ammabili
(vedi fi gura);
• non posizionare
tende dietro la cucina o a meno di 200 mm dai suoi
lati;
• eventuali cappe devono essere installate secondo le
indicazioni del relativo libretto di istruzione.
Livellamento
Se è necessario livellare
l’apparecchio, prendere i
piedini* di regolazione in
dotazione e avvitarli nelle
apposite sedi, poste negli angoli
alla base della cucina
(vedi fi gura).
Le gambe* fornite in dotazione
si montano a incastro sotto la
base della cucina.
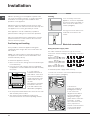
Collegamento elettrico
Montaggio del cavo di alimentazione
Il cavo va dimensionato in base al tipo di collegamento
elettrico utilizzato, secondo questo schema di
connessione:
1 2
3
4
5
12345
1
2
3
4
5
R
S
T
N
R
S
N
R
N
400 3N
H05RR-F 5x2.5 CEI-UNEL 35363
H05VV-F 5x2.5 CEI-UNEL 35746
400V 2N
H05RR-F 4x4 CEI-UNEL 35363
H05VV-F 4x4 CEI-UNEL 35746
230V
H05RR-F 3x4 CEI-UNEL 35363
H05VV-F 3X4 CEI-UNEL 35746
Per mettere in opera il cavo di alimentazione:
1. Svitare la vite V della morsettiera e tirare il coperchio
per aprirla (vedi fi gura).
2. posizionare
il cavallotto di
collegamento A
(vedi fi gura) secondo
lo schema di
connessione riportato
sopra. La morsettiera
è predisposta per il
collegamento monofase
230V: i morsetti 1,
2 e 3 sono collegati
uno all’altro; il ponte
4-5 è situato nella
zona inferiore della
morsettiera.
3. posizionare i fi li N e
secondo il disegno
(vedi fi gura) ed effettuare il collegamento stringendo a
fondo le viti dei morsetti.
4. posizionare i fi li rimanenti sui morsetti 1-2-3 e
stringere le viti.
5. fi ssare il cavo di alimentazione nell’apposito
Installazione
HOOD
420
Min.
min.
650
mm. with hood
min.
700
mm. without hood
mm.
600
Min. mm.
420
Min. mm.
V
1
2
3
N
A
B

IT
5
fermacavo.
6. chiudere il coperchio della morsettiera avvitando la
vite V.
Allacciamento del cavo di alimentazione alla rete
Montare sul cavo una spina normalizzata per il
carico indicato nella targhetta caratteristiche posta
sull’apparecchio.
In caso di collegamento diretto alla rete è necessario
interporre tra l’apparecchio e la rete un interruttore
onnipolare con apertura minima fra i contatti di 3
mm, dimensionato al carico e rispondente alle norme
in vigore (il fi lo di terra non deve essere interrotto
dall’interruttore). Il cavo di alimentazione deve essere
posizionato in modo tale che in nessun punto superi di
50°C la temperatura ambiente.
Prima di effettuare l’allacciamento accertarsi che:
• la presa abbia la messa a terra e sia a norma di legge;
• la presa sia in grado di sopportare il carico massimo
di potenza della macchina, indicato della targhetta
caratteristiche;
• la tensione di alimentazione sia compresa nei valori
nella targhetta caratteristiche;
• la presa sia compatibile con la spina
dell’apparecchio. In caso contrario sostituire la presa
o la spina; non usare prolunghe e multiple.
! Ad apparecchio installato, il cavo elettrico e la presa
della corrente devono essere facilmente raggiungibili.
! Il cavo non deve subire piegature o compressioni.
! Il cavo deve essere controllato periodicamente e
sostituito solo da tecnici autorizzati.
! L’azienda declina ogni responsabilità qualora
queste norme non vengano rispettate.
TARGHETTA CARATTERISTICHE
Dimensioni
Forno HxLxP
34x39x44cm
Volume
lt. 58
Dimensioni utili
del cassetto
scaldavivande
larghezza cm 42
profondità cm 44
altezza cm 18
Tensione e
frequenza
d'alimentazione
vedi targhetta caratteristiche
Piano Elettrico
Rapida Ø 180 mm: 2000 W
Rapida Ø 145 mm: 1500 W
Assorbimento Max Piano: 7000 W
ENERGY
LABEL
Direttiva 2002/40/CE
sull’etichetta dei forni elettrici.
Norma EN 50304
Consumo energia convezione
Naturale – funzione di
riscaldamento: Statico
Questa apparecchiatura è
conforme alle seguenti Direttive
Comunitarie: 2006/95/EC del
12/12/06 (Bassa Tensione) e
successive modificazioni -
2004/108/EC del 15/12/04
(Compatibilità Elettromagnetica)
e successive modificazioni -
2002/96/CE
1275/2008 (Stand-by/ Off mode)

6
IT
Avvio e utilizzo
Uso del forno
! Alla prima accensione fare funzionare il forno a vuoto
per almeno un’ora con il termostato al massimo e a
porta chiusa. Poi spegnere, aprire la porta del forno
e aerare il locale. L’odore che si avverte è dovuto
all’evaporazione delle sostanze usate per proteggere il
forno.
! Prima dell’uso, togliere tassativamente le pellicole in
plastica poste ai lati dell’apparecchio
1. Selezionare il programma di cottura desiderato
ruotando la manopola PROGRAMMI.
2. Scegliere la temperatura consigliata per il
programma o quella desiderata ruotando la manopola
TERMOSTATO.
Una lista con le cotture e le relative temperature
consigliate è consultabile nell’apposita tabella (vedi
Tabella cottura in forno).
Durante la cottura è sempre possibile:
• modifi care il programma di cottura agendo sulla
manopola PROGRAMMI;
• modifi care la temperatura agendo sulla manopola
TERMOSTATO;
• pianifi care la durata e l’ora di fi ne della cottura (vedi
sotto);
• interrompere la cottura riportando la manopola
PROGRAMMI in posizione “0”.
! Non appoggiare mai oggetti sul fondo del forno perché
si rischiano danni allo smalto.
! Porre sempre i recipienti di cottura sulla griglia in
dotazione.
Spia TERMOSTATO
La sua accensione segnala che il forno sta producendo
calore. Si spegne quando all’interno viene raggiunta
la temperatura selezionata. A questo punto la spia
si accende e si spegne alternativamente, indicando
che il termostato è in funzione e mantiene costante la
temperatura.
Luce del forno
Si accende ruotando la manopola PROGRAMMI in
qualsiasi posizione diversa da “0” e resta accesa
fi nché il forno è in funzione. Selezionando
con
la manopola, la luce si accende senza attivare alcun
elemento riscaldante.
Programmi di cottura
! Per tutti i programmi è impostabile una temperatura
tra 50°C e MAX, tranne per il programma GRILL, per il
quale si consiglia di impostare solo su MAX.
Programma FORNO STATICO
Si attivano i due elementi riscaldanti inferiore e
superiore. Con questa cottura tradizionale è meglio
utilizzare un solo ripiano: con più ripiani si ha una
cattiva distribuzione della temperatura.
Programma FORNO DOLCE (FONDO)
Si accende l’elemento riscaldante inferiore. Questa
posizione è consigliata per ritoccare la cottura di cibi
(posti in teglie) che risultino già ben cotti in superfi cie
ma siano ancora mollicci internamente, o per dolci con
ricopertura di frutta o marmellata, che richiedono un
moderato colore superfi ciale. Viene fatto notare che
questa funzione non consente il raggiungimento della
massima temperatura all’interno del forno (250°C), non
è pertanto consigliabile una cottura di cibi mantenendo
il forno sempre in questa posizione, ammenochè non
si tratti di torte che richiedono temperature inferiori o
uguali ai 180°C.
Programma FORNO SOPRA
Si accende l’elemento riscaldante superiore. La
temperatura assai elevata e diretta del grill consente
la immediata rosolatura superfi ciale delle carni che
ostacolando la fuoriuscita degli umori le mantiene più
tenere.
Programma GRILL
Si attiva l’elemento riscaldante superiore. La cottura
al grill è particolarmente consigliata per quei piatti
che necessitano di elevata temperatura superfi ciale:
bistecche di vitello e manzo, entrecôte, fi letto,
hamburger ecc...
! Le cotture GRILL debbono essere effettuate a porta
chiusa.
Timer
Per azionare il Timer (Contaminuti) procedere come
segue:
1. ruotare in senso orario la manopola TIMER di un
giro quasi completo per caricare la suoneria;
2. ruotare in senso antiorario la manopola TIMER
impostando il tempo desiderato.

IT
7
Vano inferiore*
Sotto al forno è presente un vano che
puo essere utilizzato per il deposito
di accessori o casseruole. Per aprire lo
sportello ruotarlo verso il basso (vedi
fi gura).
Consigli pratici di cottura
! Nelle cotture GRILL, disporre
la leccarda in posizione 1 per raccogliere i residui
di cottura (sughi e/o grassi).
GRILL
• Inserire la griglia in posizione 3 o 4, disponendo
gli alimenti al centro della griglia.
• Si consiglia di impostare il livello di energia
al massimo. Non allarmarsi se la resistenza
superiore non resta costantemente accesa: il suo
funzionamento è controllato da un termostato.
PIZZA
• Utilizzare una teglia in alluminio leggero,
appoggiandola sulla griglia in dotazione.
Con la leccarda si allungano i tempi di cottura
e diffi cilmente si ottiene una pizza croccante.
• Nel caso di pizze molto farcite è consigliabile inserire
la mozzarella a metà cottura.

8
IT
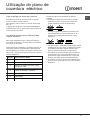
Utilizzo del piano cottura
vetroceramica
Accendere e spegnere le zone di cottura
Per accendere una zona di cottura ruotare in senso
orario la manopola corrispondente.
Per spegnere, ruotare la manopola in senso antiorario
fi no allo “0”.
L’accensione della spia FUNZIONAMENTO PIASTRE
segnala che almeno una piastra del piano cottura è in
funzione.
Le zone di cottura
Per evitare dispersioni di calore e danni alla piastra è
bene usare recipienti con fondo piano e di diametro non
inferiore a quello della piastra.
! Prima di utilizzarle per la prima volta, è necessario
riscaldare le piastre di cottura alla massima temperatura
per circa 4 minuti, senza pentola. Durante questa
fase iniziale, il rivestimento protettivo si indurisce e
raggiunge la massima resistenza.
Consigli pratici per l’uso del piano cottura
• Adoperare pentole con fondo piatto e di elevato
spessore, per essere certi che aderiscano
perfettamente alla zona riscaldante;
• adoperare pentole di diametro suffi ciente a coprire
completamente la zona riscaldante, in modo da
garantire lo sfruttamento di tutto il calore;
• accertarsi che il fondo delle pentole sia sempre
perfettamente asciutto e pulito: l’aderenza alle zone
di cottura sarà così ottimale e sia le pentole sia il
piano cottura dureranno più a lungo;
• evitare di utilizzare le stesse pentole utilizzate
sui bruciatori a gas: la concentrazione di calore sui
bruciatori a gas può deformare il fondo della pentola,
che perde aderenza;
• non lasciare mai una zona di cottura accesa senza
pentola poiché potrebbe danneggiarsi.
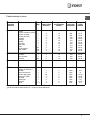
Pos. Piastra normale o rapida
0
Spento
1
Cottura di verdure, pesci
2
Cottura di patate (a vapore) minestre, ceci,
fagioli
3
Proseguimento di cottura di grandi quantitŕ di
cibi, minestroni
4
Arrostire (medio)
5
Arrostire (forte)
6
Rosolare o raggiungere bollitura in poco tempo

IT
9
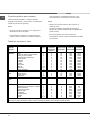
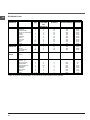
Tabella cottura in forno
Posizione
manopola
selezione
Cibo da cucinare Peso
(Kg)
Posizione di
cottura ripiani
dal basso
Tempo di pre-
riscaldamento
(minuti)
Posizione
manopola
termostato
Tempo di
cottura
(minuti)
1 Statico
Anatra
Arrosto di vitello o manzo
Arrosto di maiale
Biscotti (di frolla)
Crostate
Lasagne
Agnello
Sgombro
Plum-cake
Bignč
Pan di spagna
Tor te salat e
1
1
1
-
1
1
1
1
1
0.3
0.5
1.5
3
3
3
3
3
3
2
2
2
3
3
3
15
15
15
15
15
10
10
10
10
10
10
15
200
200
200
180
180
190
180
180
170
180
170
200
65-75
70-75
70-80
15-20
30-35
35-40
50-60
30-35
40-50
30-35
20-25
30-35
2 Forno Dolce
Torte lievitate
Crostate
Torte di frutta
Brioches
0,5
1
1
0,5
3
3
3
3
15
15
15
15
160
180
180
160
30-40
35-40
50-60
25-30
3 Forno Sopra
Ritocchi di cottura - 3/4 15 220 -
4 Grill
Sogliole e seppie
Spiedini di calamari e
gamberi
Filetto di merluzzo
Verdure alla griglia
Bistecca di vitello
Cotolette
Hamburger
Sgombri
Toast
1
1
1
1
1
1
1
1
n.° 4
4
4
4
3/4
4
4
4
4
4
5
5
5
5
5
5
5
5
5
Max
Max
Max
Max
Max
Max
Max
Max
Max
8-10
6-8
10
10-15
15-20
15-20
7-10
15-20
2-3
NB: i tempi di cottura sono indicativi e possono essere modificati in base ai propri gusti personali. Nelle cotture al
grill la leccarda va posta sempre al 1° ripiano a partire dal basso.

10
IT
Precauzioni e consigli
! L’apparecchio è stato progettato e costruito in
conformità alle norme internazionali di sicurezza.
Queste avvertenze sono fornite per ragioni di sicurezza
e devono essere lette attentamente.
Sicurezza generale
• Le istruzioni sono valide solo per i paesi di
destinazione i cui simboli figurano sul libretto e
sulla targa matricola.
• L’apparecchio è stato concepito per un uso di tipo
non professionale all’interno dell’abitazione.
• L’apparecchio non va installato all’aperto, nemmeno
se lo spazio è riparato, perché è molto pericoloso
lasciarlo esposto a pioggia e temporali.
• Non toccare la macchina a piedi nudi o con le mani o
con i piedi bagnati o umidi.
• L’apparecchio deve essere usato per cuocere
alimenti, solo da persone adulte e secondo le
istruzioni riportate in questo libretto. Ogni altro
uso (ad esempio: riscaldamento di ambienti) è
da considerarsi improprio e quindi pericoloso.
Il costruttore non può essere considerato
responsabile per eventuali danni derivanti da usi
impropri, erronei ed irragionevoli.
• Il libretto riguarda un apparecchio di classe 1
(isolato) o classe 2 – sottoclasse 1 (incassato tra due
mobili).
• Tenere lontani i bambini.
• Evitare che il cavo di alimentazione di altri
elettrodomestici entri in contatto con parti calde
dell’apparecchio.
• Non ostruire le aperture di ventilazione e di
smaltimento di calore.
• Evitare di chiudere il coperchio di vetro del piano
cottura (presente su alcuni modelli) quando i
bruciatori sono accesi o sono ancora caldi.
• Utilizzare sempre guanti da forno per inserire o
estrarre recipienti.
• Non utilizzare liquidi infi ammabili (alcol, benzina,
ecc.) in prossimità dell’apparecchio quando esso è in
uso.
• Non riporre materiale infi ammabile nel vano inferiore
di deposito o nel forno: se l’apparecchio viene messo
inavvertitamente in funzione potrebbe incendiarsi.
• Quando l’apparecchio non è utilizzato, assicurarsi
sempre che le manopole siano nella posizione • e
che rubinetto del gas sia chiuso.
• Non staccare la spina dalla presa della corrente
tirando il cavo, bensì afferrando la spina.
• Non fare pulizia o manutenzione senza aver prima
staccato la spina dalla rete elettrica.
• In caso di guasto, in nessun caso accedere ai
meccanismi interni per tentare una riparazione.
Contattare l’Assistenza.
• Non appoggiare oggetti pesanti sulla porta del forno
aperta.
• Non è previsto che l’apparecchio venga utilizzato
da persone (bambini compresi) con ridotte capacità
fi siche, sensoriali o mentali, da persone inesperte
o che non abbiano familiarità con il prodotto, a
meno che non vengano sorvegliate da una persona
responsabile della loro sicurezza o non abbiano
ricevuto istruzioni preliminari sull’uso dell’apparecchio.
• Evitare che i bambini giochino con l’apparecchio.
• Se la cucina viene posta su di un piedistallo, prendere
adeguati accorgimenti affi nchè l’apparecchio non
scivoli dal piedistallo stesso.
Smaltimento
• Smaltimento del materiale di imballaggio: attenersi
alle norme locali, così gli imballaggi potranno essere
riutilizzati.
• La direttiva Europea 2002/96/CE sui rifi uti di
apparecchiature elettriche ed elettroniche (RAEE),
prevede che gli elettrodomestici non debbano essere
smaltiti nel normale fl usso dei rifi uti solidi urbani.
Gli apparecchi dismessi devono essere raccolti
separatamente per ottimizzare il tasso di recupero e
riciclaggio dei materiali che li compongono e impedire
potenziali danni per la salute e l’ambiente. Il simbolo
del cestino barrato è riportato su tutti i prodotti per
ricordare gli obblighi di raccolta separata.
Si potranno consegnare gli elettrodomestici dismessi
al servizio di raccolta pubblico, portarli presso
le apposite aree comunali o, se previsto dalla
legge nazionale in materia, renderli ai rivenditori
contestualmente all’acquisto di nuovi prodotti di tipo
equivalente.
Tutti i principali produttori di elettrodomestici sono
attivi nella creazione e gestione di sistemi di raccolta e
smaltimento degli apparecchi dismessi.
Risparmiare e rispettare l’ambiente
• Azionando il forno negli orari che vanno dal tardo
pomeriggio fi no alle prime ore del mattino si collabora
a ridurre il carico di assorbimento delle aziende
elettriche.
• Si raccomanda di effettuare sempre le cotture GRILL a
porta chiusa: sia per ottenere migliori risultati che per
un sensibile risparmio di energia (10% circa).
• Mantenere effi cienti e pulite le guarnizioni, in modo
che aderiscano bene alla porta e non procurino
dispersioni di calore.

IT
11
Manutenzione e cura
Escludere la corrente elettrica
Prima di ogni operazione isolare l’apparecchio dalla
rete di alimentazione elettrica.
Pulire l’apparecchio
! Evitare l’uso di detergenti abrasivi o corrosivi, quali gli
smacchiatori e prodotti antiruggine, i detersivi in polvere
e le spugne con superfi cie abrasiva: possono graffi are
irrimediabilmente la superfi cie.
! Non utilizzare mai pulitori a vapore o ad alta pressione
per la pulizia dell’apparecchio.
• Per una manutenzione ordinaria, è suffi ciente lavare
il piano con una spugna umida, asciugando quindi
con una carta assorbente per cucina.
• Le parti esterne smaltate o inox e le guarnizioni in
gomma possono essere pulite con una spugnetta
imbevuta di acqua tiepida e sapone neutro. Se le
macchie sono diffi cili da asportare usare prodotti
specifi ci. Sciacquare abbondantemente e asciugare
dopo la pulizia. Non usare polveri abrasive o
sostanze corrosive.
• Le griglie, i cappellotti, le corone spartifi amma
e i bruciatori del piano cottura sono estraibili
per facilitare la pulizia; lavarli in acqua calda e
detersivo non abrasivo, avendo cura di togliere ogni
incrostazione e attendere che siano perfettamente
asciutti.
• Nelle cucine dotate di accensione elettronica occorre
procedere frequentemente ad una accurata pulizia
della parte terminale dei dispositivi di accensione
elettronica e verifi care che i fori di uscita del gas non
siano ostruiti.
• L’interno del forno va pulito preferibilmente ogni volta
dopo l’uso, quando è ancora tiepido. Usare acqua
calda e detersivo, risciaquare e asciugare con un
panno morbido. Evitare gli abrasivi.
• Pulire il vetro della porta con spugne e prodotti non
abrasivi e asciugare con un panno morbido; non
usare materiali ruvidi abrasivi o raschietti metallici
affi lati che possono graffi are la superfi cie e causare
la frantumazione del vetro.
• Gli accessori possono essere lavati come normali
stoviglie, anche in lavastoviglie.
• L’acciaio inox può rimanere macchiato se a contatto
per lungo tempo con acqua fortemente calcarea
o con detergenti aggressivi (contenenti fosforo).
Si consiglia di sciacquare abbondantemente ed
asciugare dopo la pulizia. E’ inoltre opportuno
asciugare eventuali trabocchi d’acqua.
! Evitare di chiudere il coperchio quando i bruciatori
sono accesi o sono ancora caldi.
Controllare le guarnizioni del forno
Controllare periodicamente lo stato della guarnizione
attorno alla porta del forno. In caso risulti danneggiata
rivolgersi al Centro Assistenza Autorizzato più vicino.
È consigliabile non usare il forno fi no all’avvenuta
riparazione.
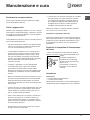
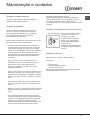
Sostituire la lampadina di illuminazione
del forno
1. Dopo aver disinserito il forno dalla rete elettrica,
togliere il coperchio in vetro del portalampada (vedi
fi gura).
2. Svitare la lampadina e
sostituirla con una analoga:
tensione 230V, potenza 25 W,
attacco E 14.
3. Rimontare il coperchio e
ricollegare il forno alla rete
elettrica.
Assistenza
Comunicare:
• il modello della macchina (Mod.)
• il numero di serie (S/N)
Queste ultime informazioni si trovano sulla targhetta
caratteristiche posta sull’apparecchio e/o sull’imballo.

12
GB
! Before operating your new appliance please read
this instruction booklet carefully. It contains important
information concerning the safe installation and
operation of the appliance.
! Please keep these operating instructions for future
reference. Make sure that the instructions are kept with
the appliance if it is sold, given away or moved.
! The appliance must be installed by a qualified
professional according to the instructions provided.
! Any necessary adjustment or maintenance must be
performed after the cooker has been disconnected
from the electricity supply.
Positioning and levelling
! It is possible to install the appliance alongside
cupboards whose height does not exceed that of the
hob surface.
! Make sure that the wall in contact with the beck of
the appliance is made from a non-flammable, heat-
resistant material (T 90°C).
To install the appliance correctly:
• Place it in the kitchen, dining room or the bed-sit (not
in the bathroom).
• If the top of the hob is higher than the cupboards,
the appliance must be installed at least 200 mm away
from them.
• If the cooker is
installed underneath a
wall cabinet, there must
be a minimum distance
of 420 mm between this
cabinet and the top of
the hob.
This distance should be
increased to 700 mm
if the wall cabinets are
flammable (see gure).
• Do not position blinds behind the cooker or less than
200 mm away from its sides.
• Any hoods must be installed according to the
instructions listed in the relevant operating manual.
Levelling
If it is necessary to level the
appliance, screw the adjustable
feet into the places provided on
each corner of the base of the
cooker (see gure).
The legs* fit into the slots on the
underside of the base of the
cooker.
Electrical connection
Fitting the power supply cable
The cable should be suited to the type of electrical
connection used, according to the following connection
diagram:
1 2
3
4
5
12345
1
2
3
4
5
R
S
T
N
R
S
N
R
N
400 3N
H05RR-F 5x2.5 CEI-UNEL 35363
H05VV-F 5x2.5 CEI-UNEL 35746
400V 2N
H05RR-F 4x4 CEI-UNEL 35363
H05VV-F 4x4 CEI-UNEL 35746
230V
H05RR-F 3x4 CEI-UNEL 35363
H05VV-F 3X4 CEI-UNEL 35746
To install the power supply cable correctly:
1. Loosen the screw V in the terminal board and pull
the cover to open it (see gure).
2. Position the
connection supports A
(see gure) according
to the connection
diagram shown above.
The terminal board is
designed for single-
phase 230 V connection:
terminals 1, 2 and 3
are connected to each
other; jumper 4-5 is
located in the lower area
of the terminal board.
3. Position the wires
Installation
HOOD
420
Min.
min.
650
mm. with hood
min.
700
mm. without hood
mm.
600
Min. mm.
420
Min. mm.
V
1
2
3
N
A
B

GB
13
N and as shown in the diagram (see gure) and
proceed with the connection process, tightening the
terminal screws as far as possible.
4. Position the remaining wires on terminals 1-2-3 and
tighten the screws.
5. Fix the power supply cable in place by fastening the
cable clamp screw.
6. Close the terminal board cover by tightening the
screws V.
Connecting the supply cable to the mains
Install a standardised plug corresponding to the load
indicated on the appliance data plate (see Technical
data table).
The appliance must be directly connected to the mains
using an omnipolar circuit-breaker with a minimum contact
opening of 3 mm installed between the appliance and the
mains. The circuit-breaker must be suitable for the charge
indicated and must comply with NFC 15-100 regulations
(the earthing wire must not be interrupted by the circuit-
breaker). The supply cable must be positioned so that it
does not come into contact with temperatures higher than
50°C at any point.
Before connecting the appliance to the power supply,
make sure that:
• The appliance is earthed and the plug is compliant with
the law.
• The socket can withstand the maximum power of the
appliance, which is indicated by the data plate.
• The voltage is in the range between the values
indicated on the data plate.
• The socket is compatible with the plug of the
appliance. If the socket is incompatible with the
plug, ask an authorised technician to replace it. Do
not use extension cords or multiple sockets.
! Once the appliance has been installed, the power
supply cable and the electrical socket must be easily
accessible.
! The cable must not be bent or compressed.
! The cable must be checked regularly and replaced
by authorised technicians only.
! The manufacturer declines any liability should
these safety measures not be observed.
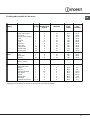
TABLE OF CHARACTERISTSICS
Dimensions
Oven HxDxW
34x39x44
Volume
58 l
Useful
measurements
relating to the oven
compartment
width 42 cm
depth 44 cm
height 18 cm
Voltage and
frequency
see data plate
Electric Hob
Rapid Ø 180 mm: 2000 W
Rapid Ø 145 mm: 1500 W
Max. Hob Power Absorption: 7000 W
ENERGY LABEL
Directive 2002/40/EC on the label of
electric ovens.
Standard EN 50304
Energy consumption for Natural
convection – heating mode: Static
mode;
This appliance conforms to the following
European Economic Community
directives: 2006/95/EC dated 12/12/06
(Low Voltage) and subsequent
amendments - 04/108/EC dated
15/12/04 (Electromagnetic
Compatibility) and subsequent
amendments - 93/68/EEC dated
22/07/93 and subsequent amendments.
2002/96/EEC
1275/2008 (Stand-by/ Off mode)

14
GB
Start-up and use
Using the oven
! The first time you use your appliance, heat the empty
oven with its door closed at its maximum temperature
for at least half an hour. Ensure that the room is well
ventilated before switching the oven off and opening
the oven door. The appliance may emit a slightly
unpleasant odour caused by protective substances
used during the manufacturing process burning away.
! Before operating the product, remove all plastic film
from the sides of the appliance.
1. Select the desired cooking mode by turning the
SELECTOR knob.
2. Select the recommended temperature for the
cooking mode or the desired temperature by turning
the THERMOSTAT knob.
A list detailing cooking modes and suggested cooking
temperatures can be found in the relevant table (see
Oven cooking advice table).
During cooking it is always possible to:
• Change the cooking mode by turning the
SELECTOR knob.
• Change the temperature by turning the
THERMOSTAT knob.
• Set the total cooking time and the cooking end time
(see below).
• Stop cooking by turning the SELECTOR knob to the
“0” position.
! Never put objects directly on the bottom of the oven;
this will avoid the enamel coating being damaged.
! Always place cookware on the rack(s) provided.
THERMOSTAT indicator light
When this is illuminated, the oven is generating heat.
It switches off when the inside of the oven reaches
the selected temperature. At this point the light
illuminates and switches off alternately, indicating
that the thermostat is working and is maintaining the
temperature at a constant level.
Oven light
This is switched on by turning the SELECTOR knob to
any position other than “0”. It remains lit as long as the
oven is operating. By selecting
with the knob, the
light is switched on without any of the heating elements
being activated.

GB
15
Cooking modes
! A temperature value can be set for all cooking
modes between 50°C and MAX, except for the GRILL
programme, for which only the MAX power level is
recommended.
STATIC OVEN mode
Both the top and bottom heating elements will come
on. When using this traditional cooking mode, it is best
to use one cooking rack only. if more than one rack is
used, the heat will be distributed unevenly.
OVEN BOTTOM mode
The lower heating element is activated. This position
is recommended for perfecting the cooking of dishes
(in baking trays) which are already cooked on the
surface but require further cooking in the centre, or
for desserts with a covering of fruit or jam, which only
require moderate colouring on the surface. It should
be noted that this function does not allow the maximum
temperature to be reached inside the oven (250°C) and
it is therefore not recommended that foods are cooked
using only this setting, unless you are baking cakes
(which should be baked at a temperature of 180°C or
lower).
OVEN TOP mode
The top heating element is activated. The extremely
high and direct temperature of the grill makes it
possible to brown the surface of meats and roasts while
locking in the juices to keep them tender.
GRILL mode
The top heating element is activated. The grill is also
highly recommended for dishes that require a high
surface temperature: beef steaks, veal, rib steak, fillets,
hamburgers etc...
! The GRILL and DOUBLE GRILL cooking modes must
be performed with the oven door shut.
Timer*
To activate the Timer proceed as follows:
1. Turn the TIMER knob in a clockwise direction for
almost one complete revolution to set the buzzer.
2. Turn the TIMER knob in an anticlockwise direction
to set the desired length of time.
Lower compartment
There is a compartment underneath
the oven that may be used to store
oven accessories or deep dishes. To
open the door pull it downwards (see
gure).
! Do not place flammable materials in the lower oven
compartment.
! The internal surfaces of the compartment (where
present) may become hot.
Practical cooking advice
! In the GRILL cooking mode, place the dripping pan
in position 1 to collect cooking residues (fat and/or
grease).
GRILL
• Insert the rack in position 3 or 4. Place the food in
the centre of the rack.
• We recommend that the power level is set to
maximum. The top heating element is regulated by a
thermostat and may not always operate constantly.
PIZZA
• Use a light aluminium pizza pan. Place it on the rack
provided.
For a crispy crust, do not use the dripping pan as
it prevents the crust from forming by extending the
total cooking time.
• If the pizza has a lot of toppings, we recommend
adding the mozzarella cheese on top of the pizza
halfway through the cooking process.

16
GB
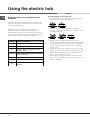
Using the electric hob
Practical advice on using the hob
• Use pans with a thick, flat base to ensure that they
adhere perfectly to the cooking zone.
• Always use pans with a diameter that is large
enough to cover the hotplate fully, in order to use all
the heat produced.
• Always make sure that the base of the pan is
completely clean and dry: this ensures that the pans
adhere perfectly to the cooking zones and that both
the pans and the hob remain effective for a longer
period of time.
• Avoid using the same cookware that is used on gas
burners: the heat concentration on gas burners may
have warped the base of the pan, causing it not to
adhere to the surface correctly.
• Never leave a cooking zone switched on without a
pan on top of it, as doing so may cause the zone to
become damaged.
Practical advice on using the electric
hotplates
To avoid heat loss and damage to the hotplates use
pans with a flat base, whose diameter is no less than
that of the hotplate itself.
! Before using the hotplates for the first time, you
should heat them at maximum temperature for
approximately 4 minutes, without placing any pans on
them. During this initial stage, their protective coating
hardens and reaches its maximum resistance.
Setting Normal or Fast Plate
0
Off
1
Cooking vegetables, fish
2
Cooking potatoes (using steam) soups,
chickpeas, beans.
3
Continuing the cooking of large quantities
of food, minestrone
4
For roasting (average)
5
For roasting (above average)
6
For browning and reaching a boil in a
short time.

GB
17
Cooking advice table for the oven
Selector knob
setting
Food to be cooked Weight
(in kg)
Cooking rack
position from
bottom
Preheating time
(minutes)
Thermostat
knob
setting
Cooking
time
(minutes)
1 Convection
Duck
Roast veal or beef
Pork roast
Biscuits (short pastry)
Tarts
Lasagne
Lamb
Mackerel
Plum-cake
Cream puffs
Sponge-cake
Savoury pies
1
1
1
-
1
1
1
1
1
0.3
0.5
1.5
3
3
3
3
3
3
2
2
2
3
3
3
15
15
15
15
15
10
10
10
10
10
10
15
200
200
200
180
180
190
180
180
170
180
170
200
65-75
70-75
70-80
15-20
30-35
35-40
50-60
30-35
40-50
30-35
20-25
30-35
2 Pastry
Mode
Raised Cakes
Tarts
Fruit cakes
Brioches
0,5
1
1
0,5
3
3
3
3
15
15
15
15
160
180
180
160
30-40
35-40
50-60
25-30
3 Top Oven
Browning food to
perfect cooking
- 3/4 15 220 -
4 Grill
Soles and cuttlefish
Squid and prawn
kebabs
Cod filet
Grilled vegetables
Veal steak
Cutlets
Hamburgers
Mackerels
Toasted sandwiches
1
1
1
1
1
1
1
1
n.° 4
4
4
4
3/4
4
4
4
4
4
5
5
5
5
5
5
5
5
5
Max
Max
Max
Max
Max
Max
Max
Max
Max
8-10
6-8
10
10-15
15-20
15-20
7-10
15-20
2-3
NB: cooking times are approximate and may vary according to personal taste. When cooking using the grill, the
dripping pan must always be placed on the 1st oven rack from the bottom.

18
GB
Precautions and tips
! The appliance was designed and manufactured in
compliance with international safety standards.
The following warnings are provided for safety reasons and
must be read carefully.
General safety
• These instructions are only valid for the countries whose
symbols appear in the manual and on the serial number
plate.
• The appliance was designed for domestic use inside the
home and is not intended for commercial or industrial use.
• The appliance must not be installed outdoors, even in
covered areas. It is extremely dangerous to leave the
appliance exposed to rain and storms.
• Do not touch the appliance with bare feet or with wet or
damp hands and feet.
• The appliance must be used by adults only for
the preparation of food, in accordance with the
instructions outlined in this booklet. Any other
use of the appliance (e.g. for heating the room)
constitutes improper use and is dangerous.
The manufacturer may not be held liable for any
damage resulting from improper, incorrect and
unreasonable use of the appliance.
• The instruction booklet accompanies a class 1 (insulated)
or class 2 - subclass 1 (recessed between 2 cupboards)
appliance.
• Keep children away from the oven.
• Make sure that the power supply cables of other electrical
appliances do not come into contact with the hot parts of
the oven.
• The openings used for the ventilation and dispersion of
heat must never be covered.
• Do not close the glass hob cover (selected models only)
when the burners are alight or when they are still hot.
• Always use oven gloves when placing cookware in the
oven or when removing it.
• Do not use flammable liquids (alcohol, petrol, etc...) near
the appliance while it is in use.
• Do not place flammable material in the lower storage
compartment or in the oven itself. If the appliance is
switched on accidentally, it could catch fire.
• Always make sure the knobs are in the • position and that
the gas tap is closed when the appliance is not in use.
• When unplugging the appliance, always pull the plug from
the mains socket; do not pull on the cable.
• Never perform any cleaning or maintenance work without
having disconnected the appliance from the electricity
mains.
• If the appliance breaks down, under no circumstances
should you attempt to repair the appliance yourself.
Repairs carried out by inexperienced persons may cause
injury or further malfunctioning of the appliance. Contact
Assistance.
• Do not rest heavy objects on the open oven door.
• If the cooker is placed on a pedestal, take the necessary
precautions to prevent the same from sliding off the
pedestal itself.
• Do not place flammable materials in the lower oven
compartment.
• The internal surfaces of the compartment (where present)
may become hot.
• The appliance should not be operated by people
(including children) with reduced physical, sensory
or mental capacities, by inexperienced individuals or
by anyone who is not familiar with the product. These
individuals should, at the very least, be supervised by
someone who assumes responsibility for their safety or
receive preliminary instructions relating to the operation of
the appliance.
• Do not let children play with the appliance.
Disposal
• When disposing of packaging material: observe local
legislation so that the packaging may be reused.
• The European Directive 2002/96/EC relating to Waste
Electrical and Electronic Equipment (WEEE) states that
household appliances should not be disposed of using
the normal solid urban waste cycle. Exhausted appliances
should be collected separately in order to optimise
the cost of re-using and recycling the materials inside
the machine, while preventing potential damage to the
atmosphere and to public health. The crossed-out dustbin
is marked on all products to remind the owner of their
obligations regarding separated waste collection.
Exhausted appliances may be collected by the public
waste collection service, taken to suitable collection areas
in the area or, if permitted by current national legislation,
they may be returned to the dealers as part of an
exchange deal for a new equivalent product.
All major manufacturers of household appliances
participate in the creation and organisation of systems for
the collection and disposal of old and disused appliances.
Respecting and conserving the environment
• You can help to reduce the peak load of the electricity
supply network companies by using the oven in the hours
between late afternoon and the early hours of the morning.
• Always keep the oven door closed when using the GRILL
and OVEN TOP modes. This will achieve better results
while saving energy (approximately 10%).
• Check the door seals regularly and wipe them clean to
ensure they are free of debris so that they adhere properly
to the door, thus avoiding heat dispersion.

GB
19
Care and maintenance
Switching the appliance off
Disconnect your appliance from the electricity supply
before carrying out any work on it.
Cleaning the appliance
! Do not use abrasive or corrosive detergents such as
stain removers, anti-rust products, powder detergents
or sponges with abrasive surfaces: these may scratch
the surface beyond repair.
! Never use steam cleaners or pressure cleaners on
the appliance.
• It is usually sufficient simply to wash the hob using a
damp sponge and dry it with absorbent kitchen roll.
• The stainless steel or enamel-coated external parts
and the rubber seals may be cleaned using a
sponge that has been soaked in lukewarm water
and neutral soap. Use specialised products for the
removal of stubborn stains. After cleaning, rinse well
and dry thoroughly. Do not use abrasive powders or
corrosive substances.
• The hob grids, burner caps, flame spreader rings
and burners may be removed to make cleaning
easier; wash them in hot water and non-abrasive
detergent, making sure all burnt-on residue is
removed before drying them thoroughly.
• For hobs with electronic ignition, the terminal part of
the electronic lighting devices should be cleaned
frequently and the gas outlet holes should be
checked for blockages.
• The inside of the oven should ideally be cleaned
after each use, while it is still lukewarm. Use hot
water and detergent, then rinse well and dry with a
soft cloth. Do not use abrasive products.
•
Clean the glass part of the oven door using a
sponge and a non-abrasive cleaning product, then
dry thoroughly with a soft cloth. Do not use rough
abrasive material or sharp metal scrapers as these
could scratch the surface and cause the glass to
crack.
• The accessories can be washed like everyday
crockery, and are even dishwasher safe.
• Stainless steel can be marked by hard water that
has been left on the surface for a long time, or by
aggressive detergents containing phosphorus.
After cleaning, rinse well and dry thoroughly. Any
remaining drops of water should also be dried.
! Do not close the cover when the burners are alight or
when they are still hot.
Gas tap maintenance
Over time, the taps may become jammed or difficult to
turn. If this occurs, the tap must be replaced.
!This procedure must be performed by a qualified
technician authorised by the manufacturer.
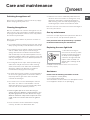
Replacing the oven light bulb
1. After disconnecting the
oven from the electricity mains,
remove the glass lid covering
the lamp socket (see gure).
2. Remove the light bulb and
replace it with a similar one:
voltage 230 V, wattage 25 W,
cap E 14.
3. Replace the lid and reconnect the oven to the
electricity supply.
Assistance
Please have the following information to hand:
• The appliance model (Mod.).
• The serial number (S/N).
This information can be found on the data plate located
on the appliance and/or on the packaging.

20
PT
! É importante guardar este folheto para poder
consultá-lo a qualquer momento. No caso de venda,
cessão ou mudança, assegure-se que o mesmo
permaneça com o aparelho.
! Leia com atenção as instruções: nas quais há
informações importantes sobre a instalação, a
utilização e a segurança.
! A instalação do aparelho deve ser realizada segundo
estas instruções e por pessoal profi ssional qualifi cado.
! Qualquer intervenção de regulação ou manutenção,
deve ser efectuada com o aparelho desligado da rede
eléctrica.
Posicionamento e nivelamento
! É possível instalar o aparelho ao lado de móveis que
não superem a altura do plano de trabalho.
! Assegurar-se de que a parede em contacto com a
parte traseira do aparelho seja de um material não
infl amável e resistente ao calor (T 90°C).
Para uma instalação correcta:
• colocar o aparelho na cozinha, na sala de jantar ou
numa sala única (não na casa de banho);
• se o plano da cozinha for mais alto que o dos
móveis, estes deverão ser colocados a e pelo menos
200 mm do aparelho;
• se o fogão for instalado embaixo de uma prateleira,
esta deverá estar pelo
menos a 420 mm. do
plano de trabalho.
Tal distância deve ser de
700 mm se as prateleiras
forem de material
infl amável (ver fi gura);
• não colocar cortinas
atrás do fogão ou a
menos de 200 mm dos
seus lados;
• se houver exaustor, o mesmo deverá ser instalado
seguindo as indicações contidas no relativo livrete
de instruções.
Nivelamento
Se for necessário nivelar o aparelho, parafusar os pés*
de regulação nos específi cos
lugares colocados nos cantos
na base do fogão (ver fi gura).
As pernas* fornecidas devem
ser encaixadas na base do
fogão.
Ligação eléctrica
Montagem do cabo de fornecimento
As medidas do cabo deverão ser em função do tipo de
ligação eléctrica utilizada, conforme este esquema de
ligação:
Para instalar o cabo de alimentação:
1. Desatarraxe o
parafuso V da caixa de
bornes e puxe a tampa
para abri-la (veja a
fi gura).
2. Posicione o grampo
de ligação A (veja a
fi gura) conforme o
esquema de ligação
indicado acima. A
caixa de bornes já
está predisposta para
a ligação monofásica
230V: os bornes 1, 2 e
3 estão ligados um ao
outro; a ponte 4-5 encontra-se na parte inferior da caixa
de bornes.
3. posicione os fi os N e
conforme o desenho (veja
a fi gura) e efectue a ligação apertando a fundo os
parafusos dos bornes.
4. Posicione os fi os que sobrarem nos bornes 1-2-3 e
aperte os parafusos.
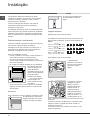
Instalação
HOOD
420
Min.
min.
650
mm. with hood
min.
700
mm. without hood
mm.
600
Min. mm.
420
Min. mm.
V
1
2
3
N
A
B
1 2
3
4
5
12345
1
2
3
4
5
R
S
T
N
R
S
N
R
N
400 3N
H05RR-F 5x2.5 CEI-UNEL 35363
H05VV-F 5x2.5 CEI-UNEL 35746
400V 2N
H05RR-F 4x4 CEI-UNEL 35363
H05VV-F 4x4 CEI-UNEL 35746
230V
H05RR-F 3x4 CEI-UNEL 35363
H05VV-F 3X4 CEI-UNEL 35746
Seite wird geladen ...
Seite wird geladen ...
Seite wird geladen ...
Seite wird geladen ...
Seite wird geladen ...
Seite wird geladen ...
Seite wird geladen ...
Seite wird geladen ...
Seite wird geladen ...
Seite wird geladen ...
Seite wird geladen ...
Seite wird geladen ...
Seite wird geladen ...
Seite wird geladen ...
Seite wird geladen ...
Seite wird geladen ...
Seite wird geladen ...
Seite wird geladen ...
Seite wird geladen ...
Seite wird geladen ...
Seite wird geladen ...
Seite wird geladen ...
Seite wird geladen ...
Seite wird geladen ...
Seite wird geladen ...
Seite wird geladen ...
Seite wird geladen ...
Seite wird geladen ...
Seite wird geladen ...
Seite wird geladen ...
Seite wird geladen ...
Seite wird geladen ...
-
 1
1
-
 2
2
-
 3
3
-
 4
4
-
 5
5
-
 6
6
-
 7
7
-
 8
8
-
 9
9
-
 10
10
-
 11
11
-
 12
12
-
 13
13
-
 14
14
-
 15
15
-
 16
16
-
 17
17
-
 18
18
-
 19
19
-
 20
20
-
 21
21
-
 22
22
-
 23
23
-
 24
24
-
 25
25
-
 26
26
-
 27
27
-
 28
28
-
 29
29
-
 30
30
-
 31
31
-
 32
32
-
 33
33
-
 34
34
-
 35
35
-
 36
36
-
 37
37
-
 38
38
-
 39
39
-
 40
40
-
 41
41
-
 42
42
-
 43
43
-
 44
44
-
 45
45
-
 46
46
-
 47
47
-
 48
48
-
 49
49
-
 50
50
-
 51
51
-
 52
52


Whirlpool KN3E11(W)/I Benutzerhandbuch
- Kategorie
- Kochfelder
- Typ
- Benutzerhandbuch
Verwandte Artikel
-
Whirlpool CI 66V W S Benutzerhandbuch
-
Whirlpool CI 66V A Benutzerhandbuch
-
-
-
-
-
-