Sony HVLF1000 Benutzerhandbuch
- Kategorie
- Kamera blinkt
- Typ
- Benutzerhandbuch

Troubleshooting
Symptom
The flash does not work
Specifications
Guide number Equivalent to 28
Recommended distance 1 to 8 m
Dimensions About 68 × 95 × 92 mm (About 2
2
/3 × 3
3
/4 × 3
2
/3 inches)
(w/h/d)
(Projections are not included in the dimensions)
Mass About 190g (6
2
/3 oz.)
Supplied accessory Shoe adapter (1)
Pouch (1)
Design and specifications are subject to change without notice.
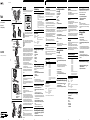
Identifying the parts (See Figure A)
1 Wide panel
2 Flashing section
3 Light exposure meter
4 Cable
5 Battery cover
6 READY lamp
7 Knob
8 POWER switch
Installing the batteries (See Figure B)
Use four AAA alkali batteries. Flash may not operate correctly if other
batteries are used.
1 Open the battery cover.
2 Insert the four batteries in the directions marked inside the
battery case.
3 Close the battery cover.
Notes
• Be sure to use four batteries of the same type.
• Be sure to confirm the 3 # poles of the batteries. Inserting the batteries
with the poles in the wrong direction may cause leakage or ruptures.
Mounting the flash (See Figure C)
1 Turn the knob in the direction of the arrow.
2 Slide into the accessory shoe towards the front, and mount
firmly.
Make sure that the flashing section faces the front.
3 Turn the knob in the direction of the arrow to tighten.
If you have a digital still camera without an accessory show, use the
shoe adapter (provided). Mount the shoe adapter in the screw hole for
the tripod on the digital still camera.
1 Turn the knob in the direction of the arrow to tighten.
2 Slide into the accessory shoe towards the front, and mount
firmly.
Make sure that the flashing section faces the front.
3 Turn the knob in the direction of the arrow to tighten.
Connecting the cable (See Figure D)
1 Connect the cable from the flash to the (flash) terminal on
the digital still camera.
2 Insert the cable between the claws to fasten in place.
WARNING
To prevent fire or shock hazard, do not expose the unit to rain or moisture.
To avoid electrical shock, do not open the cabinet. Refer servicing to
qualified personnel only.
This symbol is intended to alert the user to the presence of
uninsulated “dangerous voltage” within the product’s
enclosure that may be of sufficient magnitude to consitute a
risk of electric shock to persons.
This symbol is intended to alert the user to the presence of
important operating and maintenance (servicing) instructions
in the literature accompanying the appliance.
NOTE
This equipment has been tested and found to comply with the limits for a
Class B digital device, pursuant to Part 15 of the FCC Rules. These limits are
designed to provide reasonable protection against harmful interference in a
residential installation. This equipment generates, uses, and can radiate
radio frequency energy and, if not installed and used in accordance with
the instructions, may cause harmful interference to radio communications.
However, these is no guarantee that interference will not occur in a
particular installation. If this equipment does cause harmful interference to
radio or television reception, which can be determined by turning the
equipment off and on, the user is encouraged to try to correct the
interference by one or more of the following measures:
— Reorient or relocate the receiving antenna.
— Increase the separation between the equipment and receiver.
— Connect the equipment into an outlet on a circuit different from that to
which the receiver is connected.
— Consult the dealer or an experienced radio/TV technician for help.
You are cautioned that any changes or modifications not expressly
approved in this manual could void your authority to operate this
equipment.
Features
This appliance is exclusively for use on digital still cameras with the
(flash) terminal made by SONY.
It allows you to take photos with digital still cameras in dark or backlit
conditions. As it is provided with an automatic metering system, white
dropout does not occur.
Caution
• The flash cannot be used on camcorders.
• Misfiring sometimes occurs when the POWER switch is turned on and
off continuously.
• When the flash is used in low-temperature conditions, battery
performance is reduced. For example, the number of flashes becomes
lower than that in room temperature (about 20°C), and the charging time
becomes longer. We recommend preparing new batteries. Note, however,
that even batteries whose performance has dropped due to low
temperatures are restored by returning them to room temperature.
• Do not leave or store the flash in temperatures that exceed 40°C. Doing so
might adversely affect the internal structure of video flash. (In particular,
take care not to leave the flash in automobiles during summer.)
Cleaning
Remove the flash from the digital still camera. Clean the flash with a dry
soft cloth.
In case of stubborn stains, use a cloth lightly dampened with a mild
detergent solution, then wipe the unit clean with a dry soft cloth.
Never use strong solvents, such as thinner or benzine, as these damage the
surface finish.
English Français
Operating Instructions
Mode d’emploi
Bedienungsanleitung
3-868-194-11(1)
HVL-F1000
© 2000 Sony Corporation Printed in Japan
Flash
A
B
C
Flashing section
Fenêtre du flash
Blitzkopf
1Knob
Bague
Befestigungsrad
2Accessory shoe
Griffe porte-
accessoires
Zubehörschuh
3Knob
Bague
Befestigungsrad
1Knob
Bague
Montageschraube
2Accessory shoe
Griffe porte-accessoires
Zubehörschuh
3Knob
Bague
Befestigungsrad
Remedy
• Make sure that the cable coming from the flash is
properly connected to the
(flash) terminal on the
digital still camera.
• Make sure that the POWER switch on the flash is ON.
• Make sure that a floppy disk and “Memory Stick” are in
each slot.
• If the READY lamp is not lit (orange), check the READY
lamp again in this instruction manual.
• The flash does not fire if the subject is bright with the
digital still camera in the auto mode (no display) red-eye
reduction mode. To forcibly fire the flash when the
subject is bright, press the flash button on the digital still
camera.
• You need to go to a Sony dealer (Sony service facility) to
replace the bulb. Do not replace the bulb yourself.
1
2
3
4
6
5
7
8
+
–
–
+
–
+
+
–
1
2
3
D
1Cable
Câble
Kabel
2Cable
Câble
Kabel
Deutsch
Identification des éléments
(Voir figure A)
1 Panneau grand-angle
2 Fenêtre du flash
3 Posemètre
4 Câble
5 Xxxxxxx
6 Témoin READY
7 Bague
8 Commutateur d’alimentation
Mise en place des piles (Voir Figure B)
Utilisez quatre piles alcalines AAA. Le flash vidéo peut ne pas fonctionner
correctement si vous utilisez d’autres piles.
1 Ouvrez le couvercle des piles.
2 Insérez quatre piles dans le sens indiqué dans le boîtier de
piles.
3 Fermez le couvercle des piles.
Remarques
• Veillez à insérer quatre piles de même type.
• Vérifiez la position des pôles 3 et # des piles. Des piles insérées dans le
mauvais sens peuvent fuir ou éclater.
Fixation du flash vidéo
(Voir Figure C)
1 Xxxxxxxxxxxxxxxxxxxxxxxx.
2 Xxxxxxxxxxxxxxxxxxxxxxxx.
La fenêtre de flash doit être dirigée vers l’avant.
3 Tournez la bague dans le sens de la flèche pour bloquer le
flash.
Si vous possédez un appareil photo sans griffe porte-accessoires,
utilisez l’adaptateur (fourni). Fixez l’adaptateur de flash par la douille
de pied photographique de l’appareil photo numérique.
1 Xxxxxxxxxxxxxxxxxxxxxxx.
2 Xxxxxxxxxxxxxxxxxxxxxxx.
La fenêtre de flash doit être dirigée vers l’avant.
3 Tournez la bague dans le sens de la flèche pour bloquer le
flash.
Branchement du câble ((Voir Figure D)
1 Branchez le câble du flash vidéo sur la borne (flash) de
l’appareil photo numérique.
2 Insérez le câble dans les griffes pour le maintenir en place.
Caractéristiques
Cet appareil est conçu exclusivement pour les appareils photos numériques
Sony dotés d’une borne (flash).
Il permet de prendre des photos avec un appareil photo numérique à
contre-jour ou dans des lieux sombres. Il est pourvu d’un posemètre
automatique qui élimine les risques de sous-exposition.
Attention
• Ce flash vidéo ne peut pas être utilisé avec les camescopes.
• La flash risque de ne pas se déclencher correctement si l’appareil photo
est mis continuellement sous et hors tension par le commutateur
POWER.
• Lorsque le flash vidéo est utilisé à basse température, la performance des
piles est réduite. Par exemple, le nombre de déclenchements du flash ne
sera pas aussi élevé que lorsque l’appareil est utilisé à la température
d’une pièce (36°F environ) et l’intervalle entre deux déclenchements du
flash sera plus long. Il est conseillé d’avoir des piles de réserve. Les piles
dont la performance est réduite à basse température retrouveront leur
performance normale à la température d’une pièce.
• Ne pas exposer ni ranger le flash vidéo à une température supérieure à
104°F.
Les pièces internes du flash risquent d’être endommagées. (En
particulier, ne jamais laisser le flash vidéo dans une voiture en été.)
Nettoyage
Retirez le flash de l’appareil photo numérique et nettoyez-le avec un chiffon
doux et sec.
Pour nettoyer les taches rebelles, utilisez un chiffon légèrement
imprégné d’une solution détergente neutre, puis essuyez-le avec un chiffon
doux et sec.
N’utilisez jamais de solvants puissants, tels qu’un diluant ou de la benzine,
car ils peuvent endommager la surface du coffret.
En cas de panne
Symptôme
Le flash vidéo ne
fonctionne pas
correctement.
Spécifications
Numéro de guide??? Equivalent à 28
Distance recommandée 1 à 8 m
Dimensions Approx. 68 × 95 × 92 mm (Approx. 2
2
/3 × 3
3
/4 × 3
2
/3 pouces)
(l/h/p)
(Projections non comprises)
Poids Approx. 190 g (6
2
/3 po.)
Accessoires fournis Adaptateur de flash (1)
Pochette (1)
La conception et les spécifications peuvent être modifiées sans préavis.
Solution
• Xxxxxxxxxxxxx.
Xxxxxxxxxxxxx
Xxxxxxxxxxxxx.
• Xxxxxxxxxxxxx.
Xxxxxxxxxxxxx
Xxxxxxxxxxxxx
• Xxxxxxxxxxxxx.
Xxxxxxxxxxxxx
Xxxxxxxxxxxxx
• Xxxxxxxxxxxxx.
Xxxxxxxxxxxxx
Xxxxxxxxxxxxx
• Vous devez faire remplacer l’ampoule par un revendeur
Sony (service après-vente Sony). Ne remplacez pas vous-
même l’ampoule.
Einlegen der Batterien (Siehe Abb. B)
Verwenden Sie vier Alkalibatterien (Größe AAA). Mit anderen
Batterientypen arbeitet der Blitz nicht einwandfrei.
1 Öffnen Sie den Batteriefachdeckel.
2 Legen Sie die vier Batterien entsprechend der
Polaritätsmarkierung im Batteriefach ein.
3 Schließen Sie den Deckel.
Hinweise
• Verwenden Sie vier Batterien desselben Typs.
• Beachten Sie den 3 # Pol der Batterien. Wenn die Batterien mit falscher
Polarität eingelegt werden, können sie auslaufen und Beschädigungen
verursachen.
Anbringen des Blitzes
(Siehe Abb. C)
1 Xxxxxxxxxxxxxxxxxxxxxxxx.
2 Xxxxxxxxxxxxxxxxxxxxxxxx.
Achten Sie darauf, dass das Blitzfenster nach vorne zeigt.
3 Drehen Sie das Befestigungsrad in Pfeilrichtung, um den Blitz
zu fixieren.
Wenn Ihre digitale Standbildkamera keinen Zubehörschuh besitzt,
verwenden Sie den (mitgelieferten) Schuhadapter. Montieren Sie diesen
Adapter an der Stativgewindebohrung der digitalen Standbildkamera.
1 Xxxxxxxxxxxxxxxxxxxxxxx.
2 Xxxxxxxxxxxxxxxxxxxxxxx.
Achten Sie darauf, dass das Blitzfenster nach vorne zeigt.
3 Drehen Sie das Befestigungsrad in Pfeilrichtung, um den Blitz
zu fixieren.
Anschluss des Kabels (Siehe Abb. D)
1 Schließen Sie das Kabel des Blitzes an der -Buchse der
digitalen Standbildkamera an.
2 Befestigen Sie das Kabel an der Klaue.
Merkmale
Dieser Blitz ist ausschließlich für digitale Sony Standbildkameras mit
Blitzanschluss ( ) bestimmt.
Der Blitz ermöglicht Aufnahmen bei Dunkelheit und bei Gegenlicht. Ein
eingebauter Sensor reguliert die Blitzstärke.
Vorsicht
• Dieser Blitz eignet sich nicht für Camcorder.
• Wenn der POWER-Schalter wiederholt ein- und ausgeschaltet wird, wird
der Blitz möglicherweise ausgelöst.
• Bei niedriger Umgebungstemperatur (unter etwa 20°C) nimmt die
Batteriekapazität ab. Die maximale Blitzanzahl ist dann geringer und das
Intervall zwischen den Blitzen länger. Wenn der Blitz wieder
Normaltemperatur ausgesetzt ist, besitzen die Batterien die
ursprüngliche Leistungsfähigkeit. Wir empfehlen, stets neue Batterien
bereitzuhalten.
• Halten Sie den Blitz von Temperaturen über 40°C fern, da sonst Teile im
Inneren beschädigt werden können. (Im Sommer sollte der Blitz aus
diesem Grund auch nicht in einem Auto zurückgelassen werden.)
Reinigung
Nehmen Sie den Blitz von der Standbildkamera ab, und reinigen Sie ihn mit
einem trocknen, weichen Tuch.
Hartnäckige Verschmutzung lässt sich mit einem leicht mit mildem
Haushaltsreiniger angefeuchteten Tuch entfernen. Trocknen Sie den Blitz
anschließend mit einem trocknen, weichen Tuch ab. Alle Arten von
Lösungsmittel wie Verdünner oder Benzin dürfen nicht verwendet werden,
da diese Materialien das Gehäuse angreifen.
Störungsüberprüfungen
Symptom
Der Blitz arbeitet nicht.
Technische Daten
Leitzahl Entsprechend 28
Empfohlener 1 bis 8 m
Abstandsbereich
Abmessungen ca. 68 × 95 × 92 mm (B/H/T), ausschl. vorspringender Teile
Gewicht ca. 190 g
Mitgeliefertes Zubehör Schuhadapter (1)
Etüi (1)
Änderungen, die dem technischen Fortschritt dienen, bleiben vorbehalten.
Bezeichnung der Teile (Siehe Abb. A)
1 Weitwinkelvorsatz
2 Blitzfenster
3 Sensor für Belichtungeinstellung
4 Kabel
5 Xxxxxxxxx
6 READY-Lampe
7 Befestigungsrad
8 POWER-Schalter
Abhilfe
• Xxxxxxxxxxxxx.
Xxxxxxxxxxxxx
Xxxxxxxxxxxxx.
• Xxxxxxxxxxxxx.
Xxxxxxxxxxxxx
Xxxxxxxxxxxxx
• Xxxxxxxxxxxxx.
Xxxxxxxxxxxxx
Xxxxxxxxxxxxx
• Xxxxxxxxxxxxx.
Xxxxxxxxxxxxx
Xxxxxxxxxxxxx
• Die Birne ist defekt. Lassen Sie sie von einem Sony
Händler (oder Sony Service-Center) auswechseln.
Versuchen Sie nicht, sie selbst auszuwechseln.

EnglishEnglish Français
E
1
2
3
4
5, 6
F
Light exposure meter
Posemètre
Belichtungsmesser
G
Bounce flash on
Flash indirect
Reflexionsblitz
H
Bounce flash off
Flash direct
Direktblitz
1, 2
Angle of incidence
Angle d’incidence
Einfallswinkel
Angle of reflection
Angle de réflexion
Ausfallswinkel
1
2
Wide panel
Panneau grand-
angle
Weitwinkelvorsatz
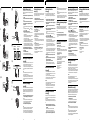
Using the flash (See Figure E)
The digital still camera with an accessory shoe is used here for illustration
purposes. Refer to the Operation Manual of the digital still camera for each
detailed operation.
1 Slide the POWER switch on the digital still camera to the right
to turn ON.
2 Set the PLAY/STILL/MOVIE switch on the digital still camera to
STILL.
(Flash does not function in the PLAY or MOVIE modes.)
3 Press the flash button on the digital still camera to light the
flash indication.
Each press of the flash button changes the indication in the following
order.
AUTO (no display) t Red-eye reduction t Forced firing t
Firing prohibited
4 Set the POWER switch on the flash to ON.
• The flash and the flash built into the digital still camera cannot be
used at the same time.
• The flash starts to be charged, and the READY lamp and FLASH
button on the digital still camera start to flash (orange).
It takes ten seconds or more to charge.
• When the flash is ready to fire, the READY lamp and FLASH button
on the digital still camera stop flashing and light (orange).
• When the batteries are run down, it takes longer to charge the flash.
If the video flash does not become ready for firing by about 40
seconds after charging starts, the READY lamp and FLASH button on
the digital still camera start to flash (red). Replace with new batteries.
5 Point the digital still camera at the subject and focus.
6 Gently press the shutter button on the digital still camera to
check the image.
Press the shutter button firmly.
Firing of the flash is interlocked with the shutter button.
When you release the shutter button, the flash starts to be recharged.
Rotating angle of flashing section
(See Figure F)
• The flashing section rotates from 5° in the down direction up to 90° in the
up direction. Use the flashing section at the fixed positions, 5° in the
down direction and 45°, 60°, 75° and 90° in the up direction.
• 5° in the down direction is used when the shooting distance is 2 meters or
less, and the flash light can spread sufficiently around the bottom of the
subject.
Notes
• The recommended distance for the flash is about one to eight meters.
(step-less automatic metering system)
• During photography, do not cover the metering sensor on the flash with
your fingers, for example. Doing so will prevent the flash from sensing
the distance up to the subject, and prevent the light intensity from being
controlled.
Bounce flash photography
(See Figure G)
If there is a wall or similar object behind the subject, fire the flashing section
pointed at a white ceiling or wall to light the subject using reflected light.
As the reflected light spreads in and around the subject over a wide area to
light the subject, you can create softer images with fewer shadows on the
subject and wall.
1 Decide on the angle of the flashing section so that the angle of
incidence and reflecting angle on the reflecting surface are
equal.
The shooting distance is the total distance obtained by adding the
distance from the flashing section to the reflecting surface to the
distance from the reflecting surface to the subject.
2 Press the shutter button on the digital still camera.
Notes
• A small bounce flash angle causes the light to directly strike the subject
together with the reflected light, resulting in uneven illumination.
• Choose a reflecting surface that is near white having high reflectance.
Correct colouring cannot be obtained with reflecting surfaces other than
white. Also, small reflectance shortens the effective shooting distance.
Mounting the wide panel
(See Figure H)
Use the wide panel when the wide conversion lens is used. The wide panel
widens the illumination angle of the flash. (The maximum light intensity
drops when the wide panel is mounted.)
1 Gently draw out the wide panel.
2 Pull the wide panel down towards the flashing section side.
Follow the above procedure to return the wide panel to its original
position.
Meaning of READY lamp states
• When it flashes (orange)
Flash is charging. Firing is not possible.
• When it light (orange)
Flash is ready for firing. (Flash does not fire if the subject is bright with
the digital still camera in the firing prohibited mode, red-eye reduction
mode or auto mode.)
• When it flashes fast (red)
The batteries are run down.
– Replace with new batteries. (Charging takes longer if the video flash
has not been used for a long time. In this case, turn the power switch
ON again.)
• When it flashes slow (red)
A communications error with the digital still camera has occurred.
– Disconnect and connect the cable.
• When the READY does not light (POWER switch ON)
The cable is not correctly connected to the (flash) terminal.
– Connect correctly.
The PLAY/STILL/MOVIE switch is not in the STILL mode.
– Set to the STILL mode.
POWER
PLAY
MOVIE
STILL
90˚
75˚
60˚
45˚
0˚
5˚
FLASH lamp
Témoin FLASH
FLASH-Lampe
Deutsch
Utilisation du flash vidéo
(Voir Figure E)
Le Mavica (MVC-FD95) est représenté ici sur les illustrations. Reportez-
vous au mode d’emploi de l’appareil photo numérique pour des
informations plus détaillées sur l’appareil photo numérique proprement
dit.
1 Faites glisser le commutateur POWER de l’appareil photo
numérique vers la droite pour le mettre sous tension.
2 Réglez le commutateur PLAY/STILL/MOVIE de l’appareil photo
numérique sur STILL.
(Le flash vidéo ne fonctionne pas dans les modes PLAY ou
MOVIE.)
3 Appuyez sur la touche de flash de l’appareil photo numérique
pour allumer l’indicateur de flash.
A chaque pression de la touche de flash, l’indicateur change de la façon
suivante.
Automatique (pas d’indicateur) t Réduction yeux rouges t
Toujours flash t Sans flash
4 Réglez le commutateur POWER du flash sur ON.
• Le flash vidéo et le flash intégré de l’appareil photo numérique ne
peuvent pas être utilisés en même temps.
• Le flash vidéo se charge et le témoin READY et la touche FLASH de
l’appareil photo numérique se mettent à clignoter en orange.
Il faut au moins 10 secondes au flash pour se charger.
• Lorsque le flash est prêt, le témoin READY et la touche FLASH de
l’appareil photo numérique cessent de clignoter et s’allument en
orange.
• Si les piles sont faibles, il faudra plus de temps au flash vidéo pour se
charger. S’il ne se charge pas en l’espace de 40 secondes, le témoin
READY et la touche FLASH de l’appareil photo numérique se
mettront à clignoter en rouge. Dans ce cas, remplacez les piles par
des neuves.
5 Dirigez l’appareil photo numérique vers le sujet et faites la
mise au point.
6 Appuyez doucement sur le déclencheur de l’appareil photo
numérique pour vérifier l’image.
Appuyez une nouvelle fois sur le déclencheur.
Le déclenchement du flash se synchronise sur le déclencheur.
Lorsque vous relâchez le déclencheur, le flash vidéo se recharge.
Rotation de la fenêtre de flash
(Voir Figure F)
• La fenêtre de flash peut être inclinée de 5° vers le bas et de 90° vers le
haut. Le flash vidéo doit être utilisé aux positions fixes, 5° vers le bas, et
45°, 60°, 75° et 90° vers le haut.
• La position 5° vers le bas doit être utilisée pour la photographie à 2
mètres de distance au maximum. La lumière du flash peut alors éclairer
suffisamment la surface environnante au bas du sujet.
Remarques
• La distance conseillée d’emploi du flash vidéo est de un à huit mètres
(posemètre automatique sans gradation).
• Pendant la photographie, ne couvrez pas le posemètre du flash vidéo
avec les doigts, par exemple. Le flash vidéo ne pourra pas détecter la
distance jusqu’au sujet et régler l’intensité de la lumière.
Photographie au flash indirect
(Voir Figure G)
Si le sujet se trouve devant un mur ou un objet similaire, dirigez la fenêtre
du flash vers le plafond ou un mur blanc pour que le sujet soit éclairé par la
lumière réfléchie.
Comme la lumière réfléchie éclaire le sujet et tout ce qui est autour, il est
possible d’obtenir des images douces avec moins d’ombres sur le sujet et le
mur.
1 Réglez l’angle de la fenêtre de flash de sorte que l’angle
d’incidence et l’angle de réflexion sur la surface réfléchissante
soit identique.
La distance de prise de vues est la distance totale obtenue en
additionnant la distance entre la fenêtre de flash et la surface
réfléchissante à la distance entre la surface réfléchissante et le sujet.
2 Appuyez sur le déclencheur de l’appareil photo numérique.
Remarques
• Si l’angle de flash indirect est trop petit, la lumière directe et la lumière
réfléchie atteindront ensemble le sujet ce qui produira un éclairage
irrégulier.
• Choisissez une surface réfléchissante proche du blanc, qui a le meilleur
facteur de réflexion.
Il n’est pas possible d’obtenir des couleurs naturelles avec les surfaces
réfléchissantes qui ne sont pas blanches. Avec une surface ayant un petit
facteur de réflexion la distance de prise de vues est réduite.
Utilisation du panneau grand-angle
(Voir Figure H)
Utilisez le panneau grand-angle lorsqu’un convertisseur grand-angle est
utilisé. Le panneau grand-angle accroît l’angle d’éclairement du flash.
(L’intensité maximale de la lumière décroît lorsque le panneau grand-angle
est tiré.
1 Tirez doucement le panneau grand-angle.
2 Rabattez le panneau grand-angle contre la fenêtre de flash.
Procédez en sens inverse pour remettre le panneau dans sa position
d’origine.
Signification des différents états du
témoin READY
• Clignotement en orange
Le flash vidéo se charge. Déclenchement du flash impossible.
• Eclairage en orange
Le flash vidéo est prêt à se déclencher. (Le flash vidéo ne se déclenche pas
si le sujet est lumineux et l’appareil photo numérique réglé sur la position
sans flash ou flash automatique.)
• Clignotement rapide en rouge
Les piles sont vides.
– Remplacez-les par des neuves. (La recharge durera plus longtemps si le
flash n’a pas été utilisé depuis longtemps. Dans ce cas, remettez le
commutateur d’alimentation sur ON.)
• Clignotement lent en rouge
Erreur de communication avec l’appareil photo numérique.
– Débranchez et rebranchez le câble.
• Xxxxxxxxxxxxxxxxxxxxxxx
Xxxxxxxxxxxxxxxxxxxxxxxxxxx.
– Xxxxxxxxxxxxxx.
Xxxxxxxxxxxxxxxxxxxxxxxxxxx.
– Xxxxxxxxxxxxxx.
Verwendung des Blitzes (Siehe Abb. E)
Die Abbildung in dieser Anleitung zeigt die Mavica MVC-FD95.
Einzelheiten zur Bedienung der Standbildkamera entnehmen Sie bitte der
Anleitung der Standbildkamera.
1 Schieben Sie den POWER-Schalter der Standbildkamera nach
rechts, um sie einzuschalten.
2 Stellen Sie den PLAY/STILL/MOVIE-Schalter der
Standbildkamera auf STILL.
(In der Position PLAY oder MOVIE arbeitet der Blitz nicht.)
3 Drücken Sie die Blitztaste an der Standbildkamera, so dass die
Blitzanzeige erscheint.
Bei jedem Drücken der Taste ändert sich die Anzeige in der folgenden
Reihenfolge.
Keine Anzeige (Automatik) t („Rotaugen“-Reduktion) t
(Zwangsblitz) t (Blitz ausgeschaltet)
4 Stellen Sie den POWER-Schalter am Blitz auf ON.
• Dieser Blitz und der in der Standbildkamera integrierte Blitz können
nicht gleichzeitig verwendet werden.
• Während der Blitz nun aufgeladen wird, blinken die READY-Lampe
und die FLASH-Taste an der Standbildkamera orangefarben.
Das Laden dauert mindestens 10 Sekunden.
• Wenn der Blitz bereit ist, gehen die READY-Lampe und die FLASH-
Taste von Blinken zu Dauerleuchten (ebenfalls orangefarben) über.
• Bei schwachen Batterien dauert das Laden länger. Wenn der Blitz
nach etwa 40 Sekunden immer noch nicht bereit ist, blinken die
READY-Lampe und die FLASH-Taste rot. Wechseln Sie dann die
Batterien aus.
5 Richten Sie die Standbildkamera auf das Motiv, und
fokussieren Sie.
6 Drücken Sie leicht auf den Auslöser der Standbildkamera, um
das Bild zu überprüfen.
Drücken Sie den Auslöser fester???.
Der Blitz wird synchron zur Bildaufnahme ausgelöst.
Nach Loslassen des Auslösers wird der Blitz erneut geladen.
Ausrichten des Blitzkopfes
(Siehe Abb F)
• Der Blitzkopf kann bis zu 5 Grad nach unten und bis zu 90 Grad nach
oben gerichtet werden. Verwenden Sie eine der Rastpositionen. Der
Blitzkopf rastet nach unten in der Position 5 Grad und nach oben in den
Positionen 45 Grad, 60 Grad, 75 Grad und 90 Grad ein.
• Die Rastposition 5 Grad nach unten dient zum Aufnehmen von Motiven,
die weniger als 2 m entfernt sind. In dieser Position wird sichergestellt,
dass auch der untere Teil des Motivs vom Blitz ausgeleuchtet wird.
Hinweise
• Der Blitz ist für einen Entfernungsbereich von etwa 1 m bis 8 m
ausgelegt. (Er besitzt eine stufenlose Automatik.)
• Achten Sie beim Fotografieren darauf, dass Sie den Belichtungssensor des
Blitzes nicht mit Ihren Fingern usw. verdecken. Ansonsten kann der Blitz
den Abstand zum Motiv nicht richtig ermitteln und stellt die
Lichtintensität falsch ein.
Reflexionsblitz (Siehe Abb. G)
Wenn sich das Motiv vor einer Wand o.ä. befindet, sollten Sie den Blitzkopf
gegen eine weiße Decke oder Wand richten, damit das Motiv durch das
reflektierte Licht aufgehellt wird. Das reflektierte Licht leuchtet das Motiv
gleichmäßig aus, so dass weniger harte Schatten (auf dem Motiv oder an
der Wand) entstehen und das Bild insgesamt ausgewogener wird.
1 Richten Sie den Blitzkopf so aus, dass Einfalls- und
Ausfallswinkel gleich sind.
Der Gesamtabstand ist die Summe aus „Abstand Blitzkopf zur
Reflexionsfläche“ und „Abstand Reflexionsfläche zu Motiv“.
2 Drücken Sie den Auslöser an der Standbildkamera.
Hinweise
• Ein kleiner Winkel führt dazu, dass das Motiv ungleich ausgeleuchtet
wird, da außer dem reflektierten Licht auch direktes Licht auf das Motiv
fällt.
• Wählen Sie eine Reflexionsfläche, die möglichst neutral weiß und
hochreflektierend ist. Farbige Reflexionsflächen führen zu
Farbverfälschungen. Bei kleinen, schlecht reflektierenden Flächen besitzt
der Blitz eine verringerte Reichweite.
Anbringen des Weitwinkelvorsatzes
(Siehe Abb H)
Wenn Sie mit der Standbildkamera einen Weitwinkelbereich aufnehmen,
bringen Sie den Weitwinkelvorsatz am Blitz an. Dieser vergrößert die
ausgeleuchtete Fläche (die maximale Lichtintensität verringert sich jedoch).
1 Ziehen Sie den Weitwinkelvorsatz vorsichtig heraus.
2 Klappen Sie den Weitwinkelvorsatz herunter.
Wenn Sie den Weitwinkelvorsatz nicht mehr benötigen, klappen Sie ihn
wieder zurück.
Leuchtzustände der READY-Lampe
• Blinken (orangefarben)
Der Blitz wird geladen; er kann momentan nicht ausgelöst werden.
• Leuchten (orangefarben)
Der Blitz ist bereit. (Bei hellem Motiv im Automatikmodus sowie im
Modus „Blitz ausgeschaltet“ wird der Blitz nicht ausgelöst.)
• Schnelles Blinken (rot)
Die Batterien sind erschöpft.
– Wechseln Sie sie gegen neue aus. (Wenn der Blitz längere Zeit nicht
verwendet wurde, dauert das Laden länger. Stellen Sie gegebenenfalls
der POWER-Schalter einmal auf OFF und wieder auf ON.)
• Langsames Blinken (rot)
Bei der Kommunikation mit der Standbildkamera ist ein Fehler
aufgetreten.
– Trennen Sie das Kabel einmal ab, und schließen Sie es wieder an.
• Xxxxxxxxxxxxxxxxxxxxxxx
Xxxxxxxxxxxxxxxxxxxxxxxxxxx.
– Xxxxxxxxxxxxxx.
Xxxxxxxxxxxxxxxxxxxxxxxxxxx.
– Xxxxxxxxxxxxxx.
-
 1
1
-
 2
2


Sony HVLF1000 Benutzerhandbuch
- Kategorie
- Kamera blinkt
- Typ
- Benutzerhandbuch
in anderen Sprachen
- English: Sony HVLF1000 User manual
- français: Sony HVLF1000 Manuel utilisateur