Magnat SBW 250 Bedienungsanleitung
- Kategorie
- Soundbar-Lautsprecher
- Typ
- Bedienungsanleitung

SBW 250
Wichtige Hinweise zur Installation / Garantieurkunde
Important notes for installation / warranty card
Mode d’emploi / certicat de garantie
Avvertenze importanti per l’installazione / certifcato di garanzia
Notas importantes sobre la instalación / certicado de garantía
Важная информация по инсталляции / гарантия

Bitte führen Sie das Gerät am Ende seiner Lebensdauer den zur Verfügung stehenden Rückgabe- und
Sammelsystemen zu.
At the end of the product’s useful life, please dispose of it at appropriate collection points provided in your
country.
Une fois le produit en n de vie, veuillez le déposer dans un point de recyclage approprié.
®
The terms HDMI and HDMI High-Denition Multimedia Interface, and the HDMI Logo are trademarks or registered
trademarks of HDMI Licensing LLC in the United States and other countries.
Manufactured under license from Dolby Laboratories. Dolby and the double-D symbol are trademarks of
DolbyLaboratories.
Konformitätserklärung
Hiermit erklärt die Firma Magnat Audio-Produkte GmbH, dass sich das Gerät SBW 250 in Übereinstimmung mit
den grundlegenden Anforderungen und anderen relevanten Vorschriften der Richtlinie 2014/53/EU bendet. Die
Konformitätserklärung nden Sie unter www.magnat.de im Downloadbereich des Gerätes.
Declaration of Conformity
Hereby, Magnat Audio-Produkte GmbH declares that the SBW 250 is in compliance with the essential
requirements and other relevant provisions of directive 2014/53/EU. The Declaration of Conformity can be
found at http://www.magnat.de in the download area of the device.
Déclaration de conformité
Magnat Audio-Produkte GmbH déclarons que le produit SBW 250 est conforme aux exigences essentielles et
aux autres dispositions pertinentes de la Directive 2014/53/EU. Une copie de la Déclaration de conformité est
disponible à l‘adresse http://www.magnat.de (espace de téléchargement du produit).
Qualcomm aptX is a product of Qualcomm Technologies International, Ltd.Qualcomm is a trademark of
Qualcomm Incorporated, registered in the United States and other countries, used with permission. aptX is a
trademark of Qualcomm Technologies International, Ltd., registered in the United States and other countries,
used with permission.
The
Bluetooth
® word mark and logos are registered trademarks owned by Bluetooth SIG, Inc. and any use
of such marks by Magnat is under license. Other trademarks and trade names are those of their respective
owners.
This symbol means that the product contains batteries covered by European Directive 2013/56/EU which
cannot be disposed of with normal household waste. Inform yourself about the local separate collection system
for electrical and electronic products and batteries. Follow local rules and never dispose of the product and
batteries with normal household waste. Correct disposal of old products and batteries helps prevent negative
consequences for the environment and human health.
Your product is designed and manufactured with high quality materials and components, which can be recycled
and reused.

40
Abbildungen/Illustrations
4
10
16
22
28
34

4
Sehr geehrter MAGNAT-Kunde,
vielen Dank dafür, dass Sie sich für ein Magnat-Produkt entschieden haben. Wir möchten Ihnen hierzu von unserer Seite recht
herzlich gratulieren. Durch Ihre kluge Wahl sind Sie Besitzer eines Qualitätsproduktes geworden, das weltweite Anerkennung
ndet.
WICHTIGE SICHERHEITSHINWEISE:
Bitte lesen Sie die Bedienungsanleitung vor der Inbetriebnahme aufmerksam durch. Die Bedienungsanleitung enthält wichtige
Hinweise zum Betrieb und zur Sicherheit. Befolgen Sie unbedingt alle Hinweise. Bewahren Sie die Bedienungsanleitung gut auf.
• WARNHINWEISE: Alle Warnzeichen auf dem Gerät, dem Zubehör und in der Bedienungsanleitung müssen beachtet werden.
• WÄRMEEINWIRKUNG: Betreiben Sie das Gerät mit Zubehör nur im Temperaturbereich von 10°C bis 45°C.
Das Gerät sollen nicht in der Nähe von Wärmequellen aufgestellt werden (Heizkörper, Öfen, Heizstrahler, offene Flammen). Beim
Aufstellen in Nähe von Verstärken sollte ein Mindestabstand von 10cm nicht unterschritten werden.
Stellen Sie keine offenen Flammen, wie z. B. Kerzen, auf das Gerät.
Achten Sie auf eine ausreichende Belüftung des Gerätes. Das Gerät darf nicht abgedeckt sein, z.B. durch Vorhänge, Gardinen.
Halten Sie ausreichend (ca. 20 cm) Abstand zu Wänden.
• EINFLUSS VON FEUCHTIGKEIT: Das Gerät darf nicht Tropf- oder Spritzwasser ausgesetzt werden. Ebenfalls darf es nicht zum
Abstellen von Vasen oder anderen mit Feuchtigkeit gefüllten Behältern benutzt werden. Setzen Sie das Gerät weder Wasser noch
hoher Luftfeuchtigkeit aus. Es besteht die Gefahr eines Stromschlags. Bei Kontakt mit Feuchtigkeit oder Flüssigkeiten sofort den
Netzstecker ziehen.
• FREMDKÖRPER: Achten Sie darauf, dass keine Fremdkörper durch die Öffnungen des Gerätes ins Innere gelangen. Sie könnten
Kurzschlüsse auslösen und auch einen Stromschlag und Brand.
• REINIGUNG: Bitte verwenden Sie ein trockenes und weiches Tuch und keine Reinigungsmittel, Sprays oder chemische
Lösungsmittel, da sonst die Oberäche beschädigt werden könnte.
• STROMANSCHLUSS: Bitte beachten Sie die Spannungswerte auf den Hinweisschildern. Das Netzteil des Gerätes darf nur mit den
auf den Schildern angegebenen Spannungswerten und Frequenzwerten betrieben werden.
• BLITZSCHUTZ/VORSICHTSMASSNAHMEN: Wird das Gerät längere Zeit (z. B. im Urlaub) nicht benutzt, sollte es durch Ziehen
der Netzstecker vom Netz getrennt werden. Das Gerät sollte auch bei Gewitter vom Netz getrennt werden. Somit wird eine
Beschädigung durch Blitzschlag und Überspannung verhindert.
• NETZKABEL: Das Netzkabel muss immer betriebsbereit sein und sollte nur so verlegt sein, dass niemand auf das Netzkabel treten
kann. Auch darf es nicht durch Gegenstände eingeklemmt sein, die das Kabel beschädigen können. Bei Verwendung von Steckern
und Mehrfachsteckdosen ist darauf zu achten, dass das Kabel an der Stelle, wo es aus der Steckdose kommt, nicht geknickt wird.
Das Netzkabel nicht mit feuchten Händen anschließen oder entfernen.
Der Netzstecker dient als Abschalteinrichtung und muss immer frei zugänglich sein.
• ÜBERLASTUNG: Steckdosen, Mehrfachsteckdosen und Verlängerungskabel sollten nicht überlastet werden. Bei Überlastung
besteht Stromschlag- und Brandgefahr.
• AUFSTELLUNG: Bitte beachten Sie die Montageanweisung.
Das Gerät sollte nur auf festem Untergrund und nicht auf bewegliche Untergestelle gestellt oder montiert werden, da sonst
Verletzungsgefahr besteht.
• Benutzen Sie nur das beigepackte oder vom Hersteller speziziertes Originalzubehör.
• Das Gerät darf nur mit dem mitgelieferten Netzteil („Dongguan Dongsong Electronic Co., Ltd., DYS602-210309W“) betrieben
werden.
• Batterien und Akkus dürfen nicht großer Hitze ausgesetzt werden, wie z. B. Sonnenschein, Feuer o. ä.
• GEFAHR DES VERSCHLUCKENS VON BATTERIEN!
• Das Gerät/die Fernbedienung können eine münzförmige/Knopf-Batterie enthalten, die verschluckt werden kann. Halten Sie die
Batterie zu jeder Zeit außerhalb der Reichweite von Kindern. Wird die Batterie verschluckt, kann dies zu schweren Verletzungen
oder zum Tod führen. Schwere innere Verbrennungen können innerhalb von 2 Stunden nach dem Verschlucken auftreten.
• Suchen Sie umgehend einen Arzt auf, wenn der Verdacht besteht, dass eine Batterie verschluckt oder in einen Teil des Körpers
eingeführt wurde.
• Wenn die Batterien gewechselt werden, halten Sie alle neuen und gebrauchten Batterien außerhalb der Reichweite von Kindern.
Vergewissern Sie sich, dass das Batteriefach nach einem Batteriewechsel wieder vollständig geschlossen ist.
• Kann das Batteriefach nicht vollständig geschlossen werden, verwenden Sie das Produkt nicht weiter. Halten Sie das Produkt
außerhalb der Reichweite von Kindern und kontaktieren Sie den Hersteller.
SCHÄDEN, DIE VOM FACHMANN BEHOBEN WERDEN MÜSSEN:
Bei den folgenden Schäden sollte das Gerät sofort vom Netz getrennt werden und ein Fachmann mit der Reparatur beauftragt werden:
· Bei sichtbaren Beschädigungen des Netzkabels darf das Gerät nicht mehr betrieben werden. Ein beschädigtes Kabel darf nicht
repariert, sondern muss ausgetauscht werden.
· Beschädigungen der Netzbuchse am Gerät.
· Wenn Feuchtigkeit oder Wasser in das Gerät gelangt ist oder Gegenstände in das Gerät gefallen sind.
· Wenn das Gerät heruntergefallen ist und das Gehäuse beschädigt ist
· Wenn das Gerät nicht richtig funktioniert, obwohl man alle Hinweise in der Bedienungsanleitung beachtet hat.
Es dürfen nur nachträgliche Änderungen vorgenommen werden, die vom Hersteller genehmigt sind.
Es dürfen zur Reparatur nur Originalersatzteile verwendet werden.
Nach einer Reparatur sollte das Gerät auf Sicherheit überprüft werden, um eine ordnungsgemäße und sichere Funktion
sicherzustellen.
Reparaturen müssen immer qualizierten Fachkräften überlassen werden, da man sich sonst gefährlichen Hochspannungen oder
anderen Gefahren aussetzt.

5
Das Dreieck mit Blitzsymbol warnt den Benutzer, dass innerhalb des Gerätes hohe Spannungen verwendet werden, die
gefährliche Stromschläge verursachen können.
Das Dreieck mit Ausrufezeichen macht den Benutzer darauf aufmerksam, dass in der beigefügten Bedienungsanleitung
wichtige Betriebs- und Wartungsanweisungen (Reparatur) enthalten sind, die unbedingt beachtet werden müssen.
Nicht öffnen! Gefahr des elektrischen Schlages!
ACHTUNG: Weder das Gehäuse/Netzteile öffnen noch Abdeckungen entfernen, um Stromschläge
zu vermeiden. Keine Reparatur durch den Benutzer. Reparatur nur durch qualizierte Techniker!
Keine Steckdosen oder Verlängerungskabel benutzen, die den Stecker des Gerätes nicht vollständig
aufnehmen.
Verwenden Sie nur das in der Bedienungsanleitung angegebene Netzteil.
Wechselspannung.
Gerät der Schutzklasse II mit doppelter Isolation. Kein Schutzerdungsanschluss vorhanden.
ENTSORGUNGSHINWEISE
Gemäß der europäischen Richtlinie 2012/19/EU müssen alle elektrischen und elektronischen Geräte über lokale Sammelstellen
getrennt entsorgt werden. Bitte beachten Sie die lokalen Vorschriften, und entsorgen Sie Ihre Altgeräte nicht mit dem normalen
Hausmüll.
BATTERIE-ENTSORGUNG:
Alt-Batterien sind Sondermüll und müssen gemäß den aktuellen Vorschriften entsorgt werden.
INHALT:
(A) 1 St. Soundbar
(B) 1 St. Subwoofer
(C) 1 St. Netzteil für die Soundbar inkl. Netzkabel
(D) 1 St. Netzkabel für den Subwoofer
(E) 1 St. Fernbedienung einschließlich Batterie (Knopfzelle CR 2025)
(F) 1 St. Stereo-Audiokabel, beidseitig 3,5 mm Klinkenstecker, 1 m
(G) 1 St. Optisches Digitalkabel, 1,5 m
(H) 1 St. Wandhalterung mit Befestigungsmaterial
(I) 1 St. Bedienungsanleitung
AUSPACKEN DES SETS
Bitte die Lautsprecher und das Zubehör vorsichtig auspacken und den Inhalt des Originalkartons anhand der Liste oben überprüfen.
Im Falle eines Transportschadens wenden Sie sich bitte an Ihren Lieferanten. Bewahren Sie das Verpackungsmaterial gut auf. Die
Originalverpackung ermöglicht bei einem späteren Umzug oder im Servicefall einen problemlosen Transport.

6
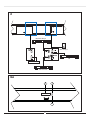
AUFSTELLEN DER SYSTEMKOMPONENTEN
Soundbar (A): Die Soundbar sollte direkt unter dem Fernseher mittig platziert werden. Steht der Fernseher auf einem Regal oder
Sideboard, kann die Soundbar direkt vor dem Gerät aufgestellt werden. Ist das Fernsehgerät an der Wand montiert, sollte auch der
Soundbar mit der mitgelieferten Wandhalterung direkt unterhalb des Bildschirms angebracht werden.
Subwoofer (B): Der Subwoofer sollte auf dem Boden in der Nähe des Soundbars aufgestellt werden, üblicherweise rechts oder
links vom Fernsehgerät. Der Abstand zum Bildschirm sollte bei Röhrenfernsehern 100 cm und bei Flachbildschirmen 50 cm nicht
unterschreiten.
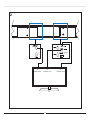
Die Verwendung der mitgelieferten Wandhalterungen für den Soundbar verdeutlicht Abb. 1.
a. Montieren Sie den Wandhalterungsbügel wie gezeigt unterhalb des TV-Gerätes. Bitte verwenden Sie für das Wandmaterial
geeignete Befestigungsschrauben und Dübel (nicht im Lieferumfang enthalten).
b. Hängen Sie nun die Soundbar mit den vormontierten Befestigungsbolzen in die passenden Aussparungen des
Wandhalterungsbügels.
Wichtiger Hinweis / Sicherheitshinweis: Für die Verwendung anderer Wandhalterungen / Befestigungen ist allein der Kunde
verantwortlich. Ebenso ist der Kunde alleinverantwortlich für die sichere Befestigung der Halterung an der Wand und die Auswahl des
passenden Montagematerials (z. B. Schrauben, Dübel) unter Berücksichtigung des Gewichtes und der Konstruktion des Soundbars
und der Beschaffenheit der Wand.
SYSTEMINSTALLATION
Anschluss eines Fernsehgerätes (Abb. 2):
Das System SBW 250 ist zum direkten Anschluss an ein TV-Gerät konzipiert.
Hierzu stehen drei Möglichkeiten zur Auswahl:
a) Anschließen des Fernsehgerätes an den HDMI®-Anschluss HDMI / ARC (Abb. 5, Pos. 14):
Schließen Sie Ihr Fernsehgerät an diesen Anschluss an, wenn er über einen HDMI®-Anschluss mit ARC-Funktion verfügt (Audio
Return Channel, HDMI®-1.4-Standard).
Wenn der HDMI®-Anschluss Ihres Fernsehgeräts zusätzlich die CEC-Funktion beherrscht (Consumer Electronics Control), können
grundlegende Funktionen der Soundbar wie Ein- und Ausschalten, Lautstärke und Stummschalten über die Fernbedienung Ihres
Fernsehgeräts gesteuert werden. Welche CEC-Funktionen zur Verfügung stehen ist von Fernseher zu Fernseher unterschiedlich
und im Einzelfall zu prüfen. Lesen Sie hierzu bitte die Bedienungsanleitung Ihres Fernsehgeräts. Die meisten Hersteller nutzen
einen eigenen Namen für die CEC-Funktion, er endet meist auf den Begriff „Link“. Achtung: die CEC-Funktion steht aus technischen
Gründen nur beim Anschluss über HDMI® zur Verfügung.
Eventuell müssen diese Funktionen im Menü des Fernsehgerätes aktiviert werden. Durch die eingebauten Dolby®-Dekoder können
auch Dolby®-Digital-codierte Signale wiedergegeben werden. Das notwendige Anschlusskabel ist nicht im Lieferumfang enthalten.
b) Anschließen des Fernsehgerätes an den optischen Digitaleingang DIGITAL IN (Abb. 5, Pos. 9):
Verwenden Sie das mitgelieferte optische Kabel und verbinden Sie den digitalen Audioausgang Ihres Fernsehgerätes mit dem
Audioeingang DIGITAL IN (Abb. 5, Pos. 10) der Soundbar. Durch die eingebauten Dolby®--Dekoder können auch Dolby®-Digital
codierte Signale wiedergegeben werden.
c) Anschließen des Fernsehgerätes an den Audioeingang AUX IN (Abb. 5, Pos. 10):
Verwenden Sie das mitgelieferte Audiokabel und verbinden Sie den Audioausgang Ihres Fernsehgerätes mit dem Audioeingang AUX
IN (Abb. 5, Pos. 10). Sollte Ihr Fernsehgerät über einen Audioausgang mit Festpegel verfügen, ist dieser dem Audioausgang mit
variablem Pegel vorzuziehen.
Anschluss weiterer Geräte an die Soundbar (Abb. 3):
Verbinden des Geräts mit einer Bluetooth-Audioquelle:
Schalten Sie die Soundbar mittels Fernbedienung auf den Bluetooth-Modus. Wenn vorher bereits eine Kopplung mit einem
Bluetooth-Quellgerät bestand, wird selbsttätig versucht, die Verbindung mit diesem Gerät wiederherzustellen. Dabei kann
es vorkommen, dass Sie die Wiederaufnahme der Verbindung am Quellgerät manuell bestätigen müssen. Von einem zuvor
gekoppelten Quellgerät aus kann die Verbindung jederzeit wieder aufgenommen werden, da Bluetooth unabhängig vom an der
Soundbar gewählten Eingang stets im Hintergrund aktiv ist und erst beim Wechsel in Standby komplett ausgeschaltet wird.
Wenn keine vorherige Kopplung bestand oder die Verbindung nicht wiederhergestellt werden kann, aktiviert die Soundbar
automatisch den Kopplungs-Modus, auch Pairing-Modus genannt. Um die Soundbar manuell in den Pairing-Modus zu schalten,
drücken und Sie die Taste BT PAIR (Abb. 7, Pos. 22) auf der Fernbedienung. Solange der Pairing-Modus aktiv ist, blinkt die
Displayanzeige BT.
Schalten Sie nun den Bluetooth-Modus Ihres Quellgeräts ein. Das Soundbar wird in der Liste mit Bluetooth-Geräten als „SBW250“
angezeigt. Falls es nicht in der Liste angezeigt wird, aktivieren Sie am Quellgerät manuell die Suche nach Bluetooth-Geräten und
stellen Sie sicher, dass sich die Soundbar im Pairing-Modus bendet.

7
Je nach Quellgerät kann es vorkommen, dass während des Kopplungsvorgangs gefragt wird, ob das Passwort angenommen werden
soll. Das können Sie einfach mit „Annehmen“ bestätigen. Wenn weiterhin nach einem Passwort gefragt wird, benutzen Sie die
Standard-Passwörter „0000“ oder „1234“. Falls nach erfolgter Kopplung gefragt wird, ob Sie eine Verbindung herstellen möchten,
beantworten Sie dies ebenso mit „Ja“. Nach erfolgreicher Kopplung und Verbindung wird im Display der Eingang BT dauerhauft
angezeigt.
Die Soundbar unterstützt den besonders hochwertigen Audio-Übertragungsstandard „Qualcomm® aptX™“. Wenn Ihr Quellgerät
diese Technik ebenfalls unterstützt, wird beim Herstellen einer Bluetooth-Verbindung automatisch „Qualcomm® aptX™“ als
Übertragungsmodus gewählt.
Anschließen einer analogen oder digitalen Audioquelle an die Soundbar:
An den analogen Eingang AUX IN (Abb. 5, Pos. 10) und an den digitalen Eingängen DIGITAL IN (Abb. 5, Pos. 9) der Soundbar können
auch weitere Audioquellen angeschlossen werden, wie z. B. CD-Player, MP3-Player, Sat-Receiver. Verfahren Sie hierzu wie in den
obigen Abschnitten b) und c) beschrieben.
Anschließen von HDMI-Quellen (Audio/Video) an die Soundbar:
An die HDMI-Eingänge HDMI1, HDMI2 und HDMI3 (Abb. 5, Pos. 11, 12, 13) können bis zu drei weitere HDMI-Quellen
angeschlossen werden (z.B. BD/DVD-Player, SAT-Receiver, Spielekonsole). Das Audiosignal der jeweiligen HDMI-Quelle wird
über das SBW-250-System wiedergegeben, das Videosignal wird an den HDMI-Ausgang (HDMI OUT (ARC), Abb. 5, Pos. 14)
weitergeleitet.
In dieser Konguration muss am Fernsehgerät der HDMI-Eingang ausgewählt werden, der mit dem HDMI-Ausgang der Soundbar
(Abb. 5, Pos. 14) verbunden ist.
Wichtig: Der USB-Anschluss (Abb. 5, Pos. 8) ist ausschließlich für System-Updates vorgesehen und hat darüber hinaus keine
Funktion.
Anschließen der Stromversorgung der Soundbar:
Zum Lieferumfang gehört ein universelles, externes Netzteil (C), das mit 110 – 240 V/AC 50/60 Hz arbeitet. Das in Ihrem Land
verwendete Netzkabel könnte jedoch anders sein. Falls das Netzkabel nicht zu Ihren Steckdosen passen sollte oder Sie sich nicht
sicher sind, wenden Sie sich bitte an Ihren Magnat-Fachhändler.
1. Verbinden Sie das Ausgangskabel (Klinkenkupplung) des externen Netzteils mit der Stromversorgungsbuchse der Soundbar
(Abb. 5, Pos. 7).
2. Stecken Sie das Netzkabel in die Buchse am Netzteil.
3. Stecken Sie das Netzkabel in die Steckdose. Achten Sie darauf, dass Sie den zur Steckdose passenden Netzstecker verwenden
(siehe Hinweis oben).
Anschließen der Stromversorgung des Subwoofers:
Zum Lieferumfang gehört das am weitesten verbreitete Netzkabel. Das in Ihrem Land verwendete Netzkabel könnte jedoch anders
sein. Falls das Netzkabel nicht zu Ihren Steckdosen passen sollte oder Sie sich nicht sicher sind, wenden Sie sich bitte an Ihren
Magnat-Fachhändler.
1. Stecken Sie das 2polige Netzkabel in die Netzbuchse am Verstärker des Subwoofers (Abb. 6b, Pos. 16).
2. Stecken Sie das Netzkabel in die Steckdose. Achten Sie darauf, dass Sie den zur Steckdose passenden Netzstecker verwenden
(siehe Hinweis oben).
ERSTE INBETRIEBNAHME, DRAHTLOSE KOPPLUNG DER SOUNDBAR MIT DEM SUBWOOFER:
Nachdem alle Signalkabel und die Stromversorgungen für Soundbar und Subwoofer angeschlossen sind, schalten Sie bitte die
Soundbar mit der Fernbedienung (Abb. 7, Pos. 18) oder am seitlichen Bedienfeld (Abb. 4b, Pos. 4) ein.
Bei jedem Einschalten verbindet sich die Soundbar automatisch mit dem Subwoofer:
Die LED-Zustandsanzeige an der Soundbar (Abb. 4a, Pos. 1) erlischt. Die LED-Zustandsanzeige des Subwoofers (Abb. 6a, Pos. 15)
wechselt von rot auf grün.
Schaltet sich der Subwoofer nicht automatisch ein, oder blinkt die LED-Zustandsanzeige am Subwoofer orange, ist die Verbindung
fehlgeschlagen. In diesem Fall muss die Verbindung manuell hergestellt werden. Gehen Sie wie folgt vor:
- Wählen Sie mit der Fernbedienung den Eingang AUX (Abb. 7, Pos. 24)
- Drücken Sie auf der Fernbedienung die Taste NIGHT (Abb. 7, Pos. 27) für 5 sec. Im Display erscheint WPAIR.
- Drücken Sie nun die Taste CONNECT auf der Rückseite des Subwoofers (Abb. 6b, Pos. 17). Die LED-Zustandsanzeige am Subwoofer
blinkt während des Verbindungsaufbaus grün.
- Bei erfolgreicher Kopplung erscheint SUCCE im Display und die LED-Zustandsanzeige am Subwoofer leuchet dauerhaft grün.
- Erscheint im Display FAIL, muss der Vorgang wiederholt werden.

8
BEDIENUNG
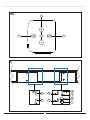
Bedienelemente der Soundbar (Frontseite) (Abb. 4a):
(1) LED-Zustandsanzeige: Diese LED leuchtet rot, wenn sich das Gerät im Standby-Modus bendet.
(2) LED Display: Im Display werden diverse Informationen angezeigt:
- Gewählter Audio Eingang
- Sound- und Menu-Einstellungen
- Tonformat: Wird ein Dolby Digital Signal dekodiert, erscheint im Display kurz DOLBY. Bei inkompatiblen Tonformaten wird im
Display N/A angezeigt, es erfolgt keine Wiedergabe.
- Bei Wiedergabe von USB Speicherinhalten: Titelnummer, gespielte Zeit, Wiederholmodus, Zufallswiedergabeeinstellung, ggf.
weitere Wiedergabeinformation.
Das Display schaltet sich ca. 10 Sec. nach der letzten Bedienung aus.
(3) Sensor für Fernbedienung: Um die Fernbedienung zu benutzen, zielen Sie bitte auf diese Stelle
Bedienelemente der Soundbar (Seite) (Abb. 4b):
(4) ON/STBY: Schaltet das Gerät ein, wenn es sich im Standby-Modus bendet. Umgekehrt kann das Gerät vom Betriebsmodus auf
Standby geschaltet werden.
(5) VOLUME: Erhöht (+) oder verringert (-) die Lautstärke.
(6) SOURCE: Wählt den Eingang.
Bedienelemente des Subwoofers (Frontseite, Abb. 6a):
(15) LED-Zustandsanzeige: Diese LED leuchtet rot, wenn sich das Gerät im Standby-Modus bendet. Die LED leuchtet grün, wenn sich
der Subwoofer im Betriebsmodus bendet. Siehe auch Abschnitt „Erste Inbetriebnahme“.
Bedienelemente des Subwoofers (Rückseite, Abb. 6b):
(17) CONNECT: Startet den manuellen Kopplungsmodus des Subwoofers. Siehe auch Abschnitt „Erste Inbetriebnahme“.
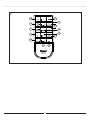
Bedienung mit der System-Fernbedienung (Abb.7):
(18) ON/STBY: Schaltet das Gerät ein, wenn es sich im Standby-Modus bendet. Umgekehrt kann das Gerät vom Betriebsmodus auf
Standby geschaltet werden.
(19) HDMI/ARC: Wählt den Audio-Eingang HDMI/ARC.
(20) HDMI 1/2/3: Wählt die zusätzlichen Audio/Video-Eingänge HDMI 1, 2, 3.
(21) BT: Wählt den Audio-Eingang BLUETOOTH.
(22) BT PAIR: Schaltet das Gerät bei Bluetooth-Betrieb in den Pairing-Modus, um Kopplung zu einem Bluetooth-Quellgerät
herzustellen.
(23) DIGITAL: Wählt den Audio-Eingang DIGITAL IN.
(24) AUX: Wählt den Audio-Eingang AUX IN.
(25) MUTE: Schaltet den Ton stumm und wieder ein.
(26) VOLUME: Erhöht (+) oder verringert (-) die Lautstärke.
(27) NIGHT: Schaltet einen Wiedergabemodus mit reduzierter Dynamik und angepasstem Frequenzgang für lautstärkeempndliche
Situationen (z.B. später Abend o.ä.) ein bzw. aus.
(28) SURR: Schaltet die 3D-Surroundsound-Funktion ein bzw. aus.
(29) SOUND: Wählt unterschiedliche Soundeinstellungen:
LINEAR: Lineare Frequenzgang-Einstellung
MUSIC: Optimiert den Frequenzgang des Gerätes für die Musikwiedergabe.
MOVIE: Optimiert den Frequenzgang des Gerätes für die Filmtonwiedergabe.
VOCAL: Hebt den Stimmenbereich für besonders gute Sprachverständlichkeit hervor.
(30) MENU: Öffnet das Einstellungsmenu der Soundbar
Folgende Einstellungen können gewählt und mit den VOL+/- Tasten (26) geändert werden. Ein erneuter Druck auf Menu bestätigt
die Einstellung.
SUB: Erhöht (+) oder verringert (-) die Lautstärke des Subwoofers.
EQ: Klanganpassung an unterschiedliche Platzierungen der Soundbar
WALL: Diese Einstellung optimiert den Klang, wenn die Soundbar an der Wand montiert ist.
DESK: Diese Einstellung optimiert den Klang, wenn die Soundbar auf einem Regal vor oder unter dem Fernseher platziert ist.
ASTBY: Um Strom zu sparen schaltet sich das Gerät nach ca. 20 Min. ohne Eingangssignal automatisch ab. Diese Funktion kann
ausgeschaltet werden, bei Auslieferung ist sie eingeschaltet.
RESET: Setzt alle Einstellungen auf Werkseinstellung zurück.
EXIT: Beendet das Einstellungsmenu.

9
SERVICE UND TECHNISCHE PROBLEME
Sollten technische Probleme auftreten, wenden Sie sich bitte an Ihren Fachhändler oder an Magnat Audio-Produkte GmbH, Tel.:
+49(0)2234807-0.
TECHNISCHE DATEN
Konfiguration: 2 x 2-Wege, aktiv
Aktiver Bassreflex-Subwoofer
Ausgangsleistung RMS/Max.: 2 x 20 /40 Watt (L+R-Kanal)
100/200 Watt (Subwoofer)
Frequenzbereich: 25 – 28 000 Hz
Trennfrequenzen: 180 / 3100 Hz
Abtastraten der digitalen Eingänge: bis zu 96kHz / 24Bit
Betriebsfrequenz: BT: 2402 – 2480 MHz
Wireless: 5740 - 5840 MHz
Maximale ausgestrahlte Leistung gemäß EN 62479: xxx dBm
Leistungsaufnahme:
Funkverbindung aus (Standby-Modus): <0,5 W
Funkverbindung ein (Betriebsmodus, kein Audio Signal): <6,5 W
Maße Soundbar (BxHxT): 1000 x 79 x 60 mm
Maße Subwoofer (BxHxT): 196 x 334 x 370 mm
Gewicht Soundbar: 2,5 kg
Gewicht Subwoofer: 6,7 kg
Netzteil: Dongguan Dongsong Electronic Co., Ltd., DYS602-210309W0
TECHNISCHE ÄNDERUNGEN VORBEHALTEN

10
Dear MAGNAT Customer,
Congratulations on your ne new loudspeakers and thank you very much for choosing MAGNAT! You have made an excellent choice. The
high-quality speakers produced by MAGNAT are renowned all over the world.
Please study the instructions and information below carefully before using your new loudspeakers.
IMPORTANT SAFETY NOTICE
Please read through the instruction manual carefully before starting to use the device. This manual contains important information
concerning operation and safety aspects. It is imperative you observe all of the information. Keep the manual in a safe location.
• WARNING NOTICES: All of the warning symbols on the device, accessories and in the instruction manual itself must be adhered to.
• EXPOSURE TO HEAT: Only operate the device and accessories in a temperature range from 10°C to 40°C.
• The device should not be positioned near heat sources (heaters, ovens, radiant heaters, naked ames, etc.). When setting up close
to an amplier a minimum distance of 10 cm must be maintained.
• No naked ame sources, such as lighted candles, should be placed on the device.
• Pay attention to a sufcient ventilation of the device. The device may not be covered, e.g. by drapes, curtains. Maintain a distance
of 20 cm to walls.
• EFFECT OF MOISTURE: The device should not be exposed to dripping or splash water. Neither should it be used to support vases or
other containers lled with liquid. Do not expose the device to water or high levels of humidity. There is a danger of electric shock. In
the event of contact with moisture or liquids remove the mains adapter immediately.
• FOREIGN MATERIAL: Ensure that no foreign material enters through the device openings and into the interior. This could trigger short
circuits and even result in electric shock and re.
• CLEANING: Please use a soft, dry cloth with no cleaning agents, sprays or chemical solvents, as these could damage the surfaces.
• ELECTRICAL CONNECTION: Please note the voltage levels on the information signs. The mains adapter for the device should only be
operated with the voltage and frequency values specied on the signs.
• LIGHTNING PROTECTION/PREVENTIVE MEASURES: If the device is not going to be used for a prolonged period (e.g. when on
holiday), it should be disconnected from the mains by removing the plug. The device should also be disconnected from the mains in
the event of a thunderstorm. Doing this will prevent damage caused by lightning and overvoltage.
• MAINS CABLE: The mains cable must always be suitable for operation and it should only ever be laid out in a manner that prevents it
from being trodden on. It should not be pinched by objects either, as this can damage the cable. When using plugs and power strips
it must be ensured that the cable is not kinked at the point where it emerges from the socket. Do not connect or remove the mains
cable with damp hands.
• The mains plug is used as the disconnecting device. Disconnecting devices shall remain readily operable.
• OVERLOAD: Sockets, power strips and extension cables should not be overloaded. If an overload occurs, there is a risk of electric
shock and re.
• SETTING UP: Please read the installation instructions.
• The device should only be positioned or mounted on a solid surface and not on moving base frames, otherwise there is a risk of injury.
• Only use attachments/accessories specied by the manufacturer.
• Use only the following power supply adapter: „Dongguan Dongsong Electronic Co., Ltd., DYS602-210309W0“
• Batteries (battery pack or batteries installed) shall not be exposed to excessive heat, such as sunshine, re and the like.
• RISK OF SWALLOWING BATTERIES!
· The product/remote control may contain a coin/button type battery, which can be swallowed. Keep the battery out of reach of
children at all times! If swallowed, the battery can cause serious injury or death. Severe internal burns can occur within two hours
of ingestion.
• If you suspect that a battery has been swallowed or placed inside any part of the body, seek immediate medical attention.
• When you change the batteries, always keep all new and used batteries out of reach of children. Ensure that the battery compart-
ment is completely secure after you replace the battery.
• If the battery compartment cannot be completely secured, discontinue use of the product. Keep out of reach of children and
contact the manufacturer.
DAMAGE THAT MUST BE RECTIFIED BY A SPECIALIST:
If any of the following damage occurs, disconnect the device from the mains immediately and contact a specialist to conduct the repair
work:
• The device should not continue to be operated if there is visible damage to the mains cable. A damaged cable should not be repaired,
but must be replaced.
• Damage to the mains socket at the device.
• If moisture or water has entered the device or foreign objects have fallen into the device.
• If the device has fallen and the housing is damaged.
• If the device does not work properly, even though all of the information in the instruction manual has been observed.
Only those subsequent alterations approved by the manufacturer may be conducted.
Only original spare parts should be used for repair.
After conducting any repairs the safety of device should be checked to ensure it is functioning correctly and safely.
Repairs must always be conducted by qualied specialists, as you might otherwise be exposed to dangerous high voltage levels or other
hazards.

11
The triangle with a lightning symbol warns the user that high voltage is used within the device which can result in electric
shock.
The triangle with an exclamation mark informs the user that important operating and maintenance instructions (repair) are
contained in the accompanying instruction manual, which must be observed.
Do not open! Risk of electric shock!
CAUTION: In order to avoid electric shock do not open the speaker housing/mains adapters or remove
the covers. The user is not to conduct any repairs him/herself. Repairs should only be conducted by
qualied technicians! Do not use any sockets or extension cables that do not fully accommodate the
plug of the device.
Use only the power supplies listed in the user manual.
AC Voltage.
This is Class II apparatus with double insulation, and no protective earth provided.
INSTRUCTIONS FOR DISPOSAL
In accordance with European Directive 2012/19/EU all electrical and electronic appliances must be disposed of separately via local
collection points. Please observe the local regulations and do not dispose of your old appliances with normal household waste.
BATTERY DISPOSAL
Old batteries are hazardous waste and must be disposed of in accordance with current regulations.
CONTENTS
(A) 1 pc. Soundbar
(B) 1 pc. Subwoofer
(C) 1 pc. Mains adapter for the soundbar incl. mains cable
(D) 1 pc. Mains cable for the subwoofer
(E) 1 pc. Remote control including battery (button cell CR2025)
(F) 1 pc. Stereo audio cable, 3.5 mm stereo jacks on both sides, 1m
(G) 1 pc. Optical digital cable, 1.5m
(H) 1 pc. Wall bracket with securing material
(I) 1 pc. Instruction manual
UNPACKING THE SET
Please unpack the speakers and accessories carefully and check the contents of the box using the list above. In the event of any
transport damage, please contact your supplier. Keep the packing material in a safe location. The original packaging enables trouble-free
transportation for any subsequent relocation or servicing requirements.

12
SETTING UP THE SYSTEM COMPONENTS
Soundbar (A): The soundbar should be positioned directly underneath the centre of the TV. If the TV is located on a shelf or sideboard,
the soundbar can be positioned directly in front of the device. If the TV is mounted on the wall, the soundbar should be mounted directly
below the screen by using the supplied wall bracket.
Subwoofer (B): The subwoofer should be positioned on the floor near the Soundbar, usually to the left or right-hand side of the TV. The
distance to the screen should not be less than 100 cm for CRT TVs and 50 cm for flat screen TVs.
Use of the supplied wall bracket for the soundbar is illustrated in Fig.1.
a. Fit the wall bracket under the TV as shown. Please use securing screws and wall plugs (not supplied) suitable for the wall material.
b. Now hang the soundbar in the matching recesses of the wall bracket using the pre-assembled securing bolts.
Important information / safety instructions: The customer is solely responsible for the use of other wall brackets / attachments. The
customer is also solely responsible for the secure attachment of the Soundbar bracket to the wall and the selection of suitable mounting
material (e.g. screws, wall plugs, etc.), while taking account of the weight and construction of the Soundbar and the condition of the wall.
SYSTEM INSTALLATION
Connecting a television (g. 2):
The SBW 250 is designed to be connected directly to a TV. It can be connected in three different ways:
a) Connecting the TV to the HDMI® port HDMI/ARC (g. 5, pos. 14):
Connect your TV to this port if it has an HDMI® socket with ARC functionality (Audio Return Channel, HDMI® 1.4 standard).
If the HDMI® port on your TV also supports CEC functionality (Consumer Electronics Control), then basic functions of the soundbar
such as switching on/off, volume and mute can be controlled via your TV‘s remote control. The CEC functions that are available vary
from TV to TV and should be checked in each individual case. Please refer to the operating instructions supplied with your TV for
further information. Most manufacturers have their own name for the CEC function, however, most end in the term „Link“. Note: for
reasons of a technical nature the CEC function is only available via HDMI® ports.
These functions may need to be activated in the TV‘s settings. Dolby® Digital encoded signals can also be reproduced via the built-
in Dolby®. The necessary connecting cable is not included in delivery.
b) Connecting the TV to the optical digital input DIGITAL IN (g. 5, pos. 10):
Use the supplied optical cable (G) and connect the digital audio output of your TV to the audio input DIGITAL IN (g. 5, pos. 9) of
the soundbar. Dolby® Digital encoded signals can also be reproduced via the built-in Dolby® decoders. The necessary connecting
cable is not included in delivery.
c) Connecting the TV to audio input AUX IN (g. 5, pos. 10):
Use the supplied audio cable and connect the audio output on your TV to audio input AUX IN (g. 5, pos. 10). If your TV has an audio
output with xed level, this is preferable to the audio output with variable level.
Connecting additional devices to the soundbar (g. 3)
Connecting the device to a Bluetooth audio source:
Use the remote control to switch the sound deck to the Bluetooth mode. If you have previously connected a Bluetooth device,
the sound deck will automatically attempt to re-establish a connection with this device. If this is the case, you may be required to
manually reconrm the connection on the source device. The connection can be resumed from a previously paired source device
at any time, as the Bluetooth function continues to operate in the background regardless of the input selected on the sound deck,
and it is only switched off completely when the standby mode is selected.
If a connection has not already been made or the connection cannot be re-established, the sound deck will automatically activate
the ‚pairing mode‘. To switch the sound deck to the pairing mode manually, press the BT PAIR button (g. 7, pos. 22) on the remote
control. The Display will ash, when the pairing mode is active.
Now activate the Bluetooth mode on your source device. The sound deck will appear in the list of Bluetooth devices as „SBW250“.
If it is not displayed in the list, set your source device to search for Bluetooth devices manually and make sure that the sound deck
has been switched to the pairing mode.
Depending on the source device, you may be asked whether the password is to be accepted during the pairing procedure. You can
conrm this by simply pressing „Accept“. If you are still asked for a password, use the default passwords „0000“ or „1234“. If you
are asked if you want to establish a connection after pairing, please select „Yes“. When the device has been paired and connected
successfully, BT is displayed continuously.
The sound deck supports the „Qualcomm® aptX™“ high quality audio transmission standard. If your source device also supports
this standard, „Qualcomm® aptX™“ will be selected automatically as the transfer mode when establishing a Bluetooth connection.

13
Connecting an analogue or digital audio source to the soundbar:
Additional audio sources such as CD players, MP3 players and satellite receivers can also be connected to the analog input AUX IN
(g. 5, pos. 10) and to the digital inputs DIGITAL IN (Fig. 4, Pos. 6 and 7) on the soundbar. When doing this proceed as described
in the previous sections b) and c).
Connecting HDMI sources (audio/video) to the soundbar:
Up to 3 other HDMI sources (e.g. BD/DVD player, SAT receiver, games console) can be connected to the HDMI inputs HDMI1,
HDMI2 and HDMI3 (Fig. 5, items 11, 12, 13). The audio signal of the respective HDMI source is reproduced via the SBW 250
system, with the video signal forwarded to the HDMI output (HDMI OUT (ARC), Fig. 5, item 14).
In this conguration, the HDMI input connected to the HDMI output of the soundbar (Fig. 5, item 14) has to be selected on the TV.
Important: The USB port (Fig. 5, item 8) is provided exclusively for system updates and does not have any other function.
Connecting the power supply of the soundbar:
Included in delivery is a universal, external mains adapter (C) (110 - 240 V / AC 50/60 Hz). The mains cable used in your country,
however, may be different. If the mains cable is not compatible with your power sockets or if you are in any doubt, please contact your
Magnat dealer.
1. Connect the output cable (jack connector) of the external mains adapter to the power supply jack of the soundbar (g. 5, pos. 7).
2. Insert the mains cable into the jack on the mains adapter.
3. Insert the mains cable into the socket. Make sure that you are using the mains plug that is compatible with the socket (refer to the
information above).
Connecting the power supply to the subwoofer:
Included in delivery is the most commonly used mains cable. The mains cable used in your country, however, may be different. If the
mains cable is not compatible with your power sockets or if you are in any doubt, please contact your Magnat dealer.
1. Plug the 2-pole mains cable into the mains socket on the subwoofer amplier (g. 6b, pos. 16).
2. Insert the mains cable into the socket. Make sure that you are using the mains plug that is compatible with the socket (refer to the
information above).
INITIAL START-UP, WIRELESS PAIRING OF THE SOUNDBAR WITH THE SUBWOOFER
After all the signal cables and power supplies for the soundbar and subwoofer have been connected, switch the soundbar on using the
remote control (Fig. 7, item 18) or via the control panel on the side (Fig. 4b, item 4).
The soundbar will connect to the subwoofer automatically every time it is switched on.
The LED status display on the soundbar (Fig. 4a, item 1) goes off. The LED status display of the subwoofer (Fig. 6a, item 15) changes
from red to green.
If the subwoofer does not switch on automatically or the LED status display on the subwoofer ashes orange, the connection has failed.
In this case, the connection has to be established manually. Proceed as follows:
- Select the AUX input (Fig. 7, item 24) using the remote control.
- Press the NIGHT button (Fig. 7, item 27) on the remote control for 5 seconds. WPAIR then appears in the display.
- Now press the CONNECT button at the rear of the subwoofer (Fig. 6b, item 17). The LED status display on the subwoofer ashes green
while the connection is being established.
- When pairing is successful, SUCCE appears in the display and the LED status indicator on the subwoofer lights up green.
- If FAIL appears in the display, the process has to be repeated.
OPERATION
Operating elements of the Soundbar (front) (Fig. 4a)
(1) LED-status indication: This LED illuminates red when the device is in standby mode.
(2) LED Display: Various information is shown on the Display:
- Selected audio source
- Sound and menu settings
- Audio format: if a Dolby digital signal is decoded, DOLBY appears on the display briey.
In the event of incompatible audio formats, N/A appears on the display; there is no playback.
- When playing back content stored on a USB: title number, play time, repeat mode, random play setting, other playback
information where applicable.
When not used, the display turns itself off after 10 seconds.
(3) Sensor for remote control: Please aim at this sensor when using the remote control.

14
Operating elements of the Soundbar (side) (Fig. 4b)
(4) ON/STBY: Switches the device on when it is in the standby mode. Conversely the device can be switched from power operation to
the standby mode.
(5) VOLUME: Increases (+) or decreases (-) the volume.
(6) SOURCE: Selects the input.
Operating elements of the Subwoofer (front) (Fig. 6a)
(15) LED-status indication: This LED illuminates red when the device is in standby mode. The LED lights up green when the subwoofer
is in operating mode. See the „Initial start-up“ section..
Operating elements of the Subwoofer (rear) (Fig. 6b)
(17) CONNECT: Starts the manual pairing mode on the subwoofer. See the „Initial start-up“ section.
Operation with the system remote control (fig. 7):
(18) ON/STBY: Switches the device on when it is in the standby mode. Conversely the device can be switched from power operation to
the standby mode.
(19) HDMI/ARC: Selects the audio input HDMI/ARC:
(20) HDMI 1/2/3: Selects the additional audio / video inputs HDMI 1, 2, 3
(21) BT: Selects the audio input BLUETOOTH:
(22) BT PAIR: Switches the device to the pairing mode when in Bluetooth operation to establish a connection to a Bluetooth source
device.
(23) DIGITAL: Selects the audio input DIGITAL IN:
(24) AUX: Selects the audio input AUX IN:
(25) MUTE: Switches the sound on and off.
(26) VOLUME: Increases (+) or decreases (-) the volume.
(27) NIGHT: Activates or deactivates a playback mode with reduced dynamics and a frequency response that is adapted for sound-
sensitive situations (e.g. late at night).
(28) SURR: Switches the 3D surround sound function on or off.
(29) SOUND: Selects various sound settings:
LINEAR: Linear sound setting
MUSIC: Optimises the frequency response of the unit for music playback.
MOVIE: Optimises the frequency response of the unit for lm sound reproduction.
VOCAL: Emphasises the vocal range for particularly good speech intelligibility.
(30) MENU: Opens the settings of the Soundbar
The following settings can be selected and changed with the VOL +/- buttons. (26). Pressing the menu button again will set these
changes:
SUB: Increases (+) / decreases (-) the volume of the subwoofer.
EQ: Sound adjustment for different positioning of the soundbar
WALL: This setting optimises the sound when the soundbar is tted to the wall.
DESK: This setting optimises the sound when the soundbar is positioned on a shelf in front of or under the TV.
ASTBY: This device switches off automatically after approx. 20 minutes to save energy. This function can be manually disabled. The
factory setting is enabled.
RESET: Sets all settings back to default settings.
EXIT: Exits the setting menu.
SERVICE AND TECHNICAL PROBLEMS
If you should encounter any technical problems, please contact your specialist dealer or Magnat Audio-Produkte GmbH,
Tel.: + 49 (0) 2234807-0.

15
SPECIFICATIONS
Conguration: 2 x 2-ways, active
Powered bassreflex subwoofer
Output power RMS/Max.: 2 x 20 /40 watts (L+R-channel)
100/200 watts (subwoofer)
Frequency range:
25 – 28 000 Hz
Cross-over frequency:
180 / 3100 Hz
Sampling rates of the digital inputs: up to 96kHz / 24Bit
Operating frequency: BT: 2402 – 2480 MHz
Wireless: 5740 - 5840 MHz
Maximum emitted power according to EN 62479: xxx dBm
Power consumption:
wireless network disabled (standby mode): <0.5 W
wireless network enabled (operation mode, no audio signal): <6.5 W
Dimensions Subwoofer (wxhxd): 1000 x 79 x 60 mm
Dimensions Subwoofer (wxhxd): 196 x 334 x 370 mm
Weight Soundbar: 2,5 kg
Weight Subwoofer: 6,7 kg
Power supply adapter: Dongguan Dongsong Electronic Co., Ltd., DYS602-210309W0
SUBJECT TO TECHNICAL CHANGE.

16
Très cher client,
Félicitations: vous venez d’acquérir de nouvelles enceintes d’excellente qualité et nous vous remercions d’avoir choisi MAGNAT! Votre
choix est excellent: les enceintes produites par MAGNAT ont en effet d’une réputation mondiale.
AVIS IMPORTANT DE SÉCURITÉ
Veuillez lire attentivement la notice d’utilisation avant la mise en marche de l’appareil. La notice d’utilisation comporte des consignes
de fonctionnement et de sécurité importantes. Respectez impérativement toutes les consignes. Conservez soigneusement la notice
d’utilisation.
• AVERTISSEMENTS : Impérativement respecter tous les symboles d’avertissement sur l’appareil, les accessoires et dans la
notice d’utilisation.
• EFFET DE LA CHALEUR : Utilisez uniquement l’appareil à une température comprise entre 10 et 40 °C.
Ne pas installer l’appareil à proximité de sources de chaleur (radiateurs, poêles, radiateurs infrarouges, ammes nues). En cas
d’installation à proximité d’amplicateurs, observez une distance minimale de 10 cm
• Tenez l‘appareil éloigné des ammes nues, des bougies par exemple.
• Veillez à une aération sufsante de l’appareil. Il est interdit de recouvrir l’appareil, par ex. avec des rideaux ou stores. Observez une
distance sufsante (env. 20 cm) par rapport aux murs.
• INFLUENCE DE L’HUMIDITÉ : L’appareil ne doit pas être exposé à des gouttes ou projections d’eau. De même, il ne doit pas être utilisé
comme support pour des vases ou des récipients contenant un liquide. N’exposez l’appareil ni à l’eau ni à une humidité importante
de l’air. Cela risquerait d’entraîner une décharge électrique. En cas de contact avec des objets humides ou des liquides, débranchez
immédiatement la che d’alimentation.
• CORPS ÉTRANGERS : Veillez à ce qu’aucun corps étranger ne pénètre à l’intérieur de l’appareil à travers les orices. Leur présence
risquerait de provoquer des courts-circuits mais également une décharge électrique ou un incendie.
• NETTOYAGE : Veuillez employer un chiffon sec et doux et évitez d’appliquer tout produit de nettoyage, spray ou solvant chimique an
de ne pas endommager la surface de l’appareil.
• RACCORDEMENT ÉLECTRIQUE : Veuillez respecter les valeurs de tension indiquées sur les étiquettes. Le bloc d’alimentation de
l’appareil doit uniquement fonctionner avec les tensions et fréquences indiquées sur les étiquettes.
• PROTECTION CONTRE LA FOUDRE / MESURES DE PRÉCAUTION : Si l’appareil n’est pas utilisé pendant une période prolongée (par
ex. en vacances), mettez-le sous tension en débranchant le cordon d’alimentation. En cas d’orage, l’appareil doit également être mis
sous tension an d’éviter tout risque d’endommagement dû à un coup de foudre ou à une surtension.
• CORDON D’ALIMENTATION : Le cordon d’alimentation doit toujours être en état de fonctionner et posé de manière à ce que personne
ne puisse marcher dessus. Pour éviter tout risque d’endommagement du cordon, veiller à ce qu’il ne soit coincé par aucun objet. En
cas d’utilisation de ches et de prises multiples, veillez à ce que le cordon ne soit pas plié à l’endroit où il sort de la prise. Ne pas
toucher le câble d‘alimentation avec des mains mouillées.
• La prise secteur permet d‘arrêter l‘appareil et doit donc toujours être facilement accessible.
• SURCHARGE : Les prises, prises multiples et rallonges ne devraient pas être surchargées. En cas de surcharge, il y a danger
d’électrocution et d’incendie.
• MONTAGE : Veuillez observer les instructions de montage.
• L’appareil devrait uniquement être posé ou monté sur un support xe et non pas sur des châssis mobiles an d’éviter tout risque de
blessure.
• Utilisez uniquement les accessoires d’origine fournis ou agréés par le fabricant.
• L’appareil doit uniquement être utilisé avec le bloc d’alimentation fourni « Dongguan Dongsong Electronic Co., Ltd., DYS602-
210309W0 ».
• Les batteries et les piles ne doivent pas être exposées à des chaleurs importantes, comme celle générées par le soleil ou le feu.
• RISQUE D‘INGESTION DES PILES !
• L‘appareil/la télécommande peuvent contenir une pile en forme de pièce/pile bouton qui présente un risque élevé d‘ingestion.
Veuillez tenir les piles hors de la portée des enfants à tout moment. Si la pile est ingérée, elle peut causer des blessures graves
ou la mort. De graves brûlures internes peuvent survenir 2 heures après l‘ingestion.
• Veuillez contacter un médecin si vous pensez qu‘une pile a été ingérée ou qu‘elle a pénétré une partie du corps.
• Si les piles doivent être changées, veuillez tenir les nouvelles piles et les piles usagées hors de la portée des enfants. N‘oubliez
pas que le compartiment à piles doit être soigneusement refermé après chaque changement de pile.
• S‘il est impossible de refermer complètement le compartiment à piles, veuillez ne plus utiliser le produit. Veuillez tenir le produit
hors de la portée des enfants et contacter le fabricant.
DOMMAGES DEVANT ÊTRE RÉPARÉS PAR UN SPÉCIALISTE :
En présence d’un ou plusieurs des dommages mentionnés ci-dessous, mettez immédiatement l‘appareil sous tension et conez la
réparation à un spécialiste :
• En cas d’endommagement visible du cordon d’alimentation, l’appareil ne doit plus être utilisé. Tout cordon d’alimentation endommagé
ne doit pas être réparé mais remplacé.
• Détériorations de la prise secteur sur l’appareil.
• Présence d’humidité ou d’eau dans l’appareil ou chute d’objets dans l’appareil.
• Chute de l‘appareil et endommagement du boîtier.
• Dysfonctionnement de l’appareil bien que toutes les consignes gurant dans la notice d‘utilisation aient été respectées.
N’effectuez des interventions ultérieures sur l’appareil que si celles-ci sont autorisées par le fabricant.
Ne procédez à des réparations qu’avec des pièces d’origine.
Suite à une réparation, vériez que l‘appareil est conforme aux normes de sécurité an de garantir un fonctionnement correct et sûr.
Conez systématiquement toute réparation à un personnel qualié sous peine de vous exposer à des risques de haute tension ou à
d’autres dangers.

17
Le triangle comportant le symbole d‘un éclair avertit l’utilisateur que l’appareil est traversé par des tensions élevées pouvant
entraîner des décharges électriques dangereuses.
Le triangle comportant le point d‘exclamation indique à l’utilisateur de l’appareil que la notice d’utilisation jointe avec
l’appareil contient des consignes d’utilisation et d’entretien importantes devant impérativement être respectées.
Attention! Ne pas ouvrir, risque d‘électrocution!
ATTENTION : Veillez à ne pas ouvrir le boîtier/les blocs d’alimentation du haut-parleur ni à retirer les
caches de protection an d‘éviter tout risque de décharge électrique. Aucune réparation ne doit être
effectuée par l’utilisateur de l’appareil. Toute réparation doit être conée exclusivement à un personnel
qualié ! N‘utilisez ni prises ni rallonges dans lesquelles il n’est pas possible d‘enfoncer complètement
le connecteur.
Utilisez exclusivement le bloc d‘alimentation indiqué dans le mode d‘emploi.
Wechselspannung.
Appareil de classe de protection II avec double isolation. Aucune connexion de protection à la terre.
INSTRUCTIONS POUR LA MISE EN REBUT
Conformément à la directive européenne 2012/19/EU, tous les appareils électriques et électroniques usagés doivent être triés et
déposés dans des points de collecte locaux. Veuillez respecter les réglementations locales et ne pas jeter vos appareils usagés avec
les déchets ménagers.
MISE AU REBUT DE LA PILE
Les piles usagées sont des déchets dangereux et doivent être mises au rebut conformément aux réglementations en vigueur.
CONTENU:
(A) 1 pc. Barre de son
(B) 1 pc. Subwoofer
(C) 1 pc. Bloc d‘alimentation de la barre de son et cordon d’alimentation
(D) 1 pc. Câble secteur pour le subwoofer
(E) 1 pc. Télécommande, pile incluse (pile ronde CR2025)
(F) 1 m Câble audio stéréo, fiche Jack 3,5 mm des deux côtés
(G) 1,5 m Câble optique numérique
(H) 1 pc. Support mural avec matériel de fixation
(I) 1 pc. Notice d’utilisation
DÉBALLAGE DU KIT DE HAUT-PARLEURS
Déballez les haut-parleurs et les accessoires avec précaution et vériez le contenu du carton d’origine à l’aide de la liste ci-dessus.
Veuillez signaler tout dommage de transport à votre fournisseur. Conservez soigneusement le matériel d‘emballage. L’emballage
d’origine vous permet de transporter l’appareil en toute sécurité en cas de déménagement ou lorsque une intervention après-vente est
nécessaire.

18
MONTAGE DES ÉLÉMENTS DU SYSTÈME
Barre de son (A): Le système Soundbar doit être placé au centre, directement sous le téléviseur. Si le téléviseur se trouve sur une
étagère ou un buffet, le système Soundbar peut être placé directement devant l‘appareil. Si le téléviseur est fixé au mur, le système
Soundbar doit également être monté directement sous l‘écran à l‘aide du support mural fourni.
Subwoofer (B): Le subwoofer doit être placé au sol, proche de la barre de son, généralement à droite ou à gauche du téléviseur. L‘écart
minimal entre le subwoofer et un téléviseur à tube est de 100 cm. Il n‘est que de 50 cm entre le subwoofer et un téléviseur à écran plat.
L‘utilisation du support mural fourni avec le système Soundbar est illustrée à la Fig. 1.
a. Montez l‘étrier de support mural comme indiqué, sous le téléviseur. Veuillez utiliser des vis de fixation et des chevilles adaptées au
mur (non fournies).
b. Accrochez la barre de son avec les boulons de fixation prémontés dans les orifices de l‘étrier de support mural.
Consigne importante / consigne de sécurite: Le client assume seul la responsabilité quant à l‘utilisation d‘autres supports muraux
/ fixations. De même, le client porte seul la responsabilité quant à la bonne fixation du support de la barre de son au mur ainsi qu’au
choix du matériel de montage adéquat (par ex. vis, chevilles) en prenant en considération le poids et la composition de la barre de son
ainsi que la structure du mur.
INSTALLATION DU SYSTÈME
Connexion d‘un téléviseur (g. 2) :
Le système SBW 250 a été conçu pour être connecté directement à un téléviseur. Trois possibilités s‘offrent à vous:
a) Connexion du téléviseur à la prise HDMI® HDMI/ARC (g. 5, pos. 14) :
Connectez votre téléviseur à cette prise s‘il est doté d‘une prise HDMI® avec fonction ARC (Audio Return Channel, HDMI®-1.4-
Standard).
Lorsque la prise HDMI® de votre téléviseur prend également en charge la fonction CEC (Consumer Electronics Control), vous
pouvez contrôler les fonctions fondamentales de la barre de son, comme les fonctions Marche et Arrêt, les fonctions du volume et
la fonction Muet, à partir de la télécommande de votre téléviseur. Les fonctions CEC disponibles varient d’un téléviseur à l’autre et
doivent être testées au cas par cas. Lisez, à ce propos, le mode d’emploi de votre téléviseur. La plupart des fabricants emploient
leur propre dénomination pour la fonction CEC. Celle-ci se termine généralement par le terme «Link». Attention: pour des raisons
d’ordre technique, la fonction CEC est uniquement disponible en cas de raccordement via la prise HDMI®.
Il se peut que vous deviez activer cettes fonctions de la menu du téléviseur. Grâce au décodeur Dolby® intégré, des signaux
numérique Dolby® codés peuvent également être restitués. Le câble de raccordement requis n‘est pas fourni.
b) Raccordement du téléviseur à l‘entrée numérique optique DIGITAL IN (g. 5, pos. 9) :
Veuillez utiliser le câble optique fourni et relier la sortie audio numérique de votre téléviseur avec l‘entrée audio DIGITAL IN (g.
5, pos. 9) de la barre de son. Grâce au décodeur Dolby® intégré, des signaux numérique Dolby® codés peuvent également être
restitués.
c) Connexion du téléviseur à l‘entrée audio AUX IN (g.5, pos. 10) :
Utilisez le câble audio fourni (E) et raccordez la sortie audio de votre téléviseur à la sortie audio AUX IN (g. 5, pos. 10). Si votre
téléviseur est équipé d‘une sortie audio sans fading, la privilégier par rapport à la sortie audio à niveau variable.
Connexion d‘autres appareils à la barre de son (g. 3):
Connexion de l‘appareil avec une source audio Bluetooth :
Placez la barre de son sur le mode Bluetooth à l‘aide de la télécommande. Si un couplage a déjà été réalisé précédemment avec
un appareil source Bluetooth, alors le système essayera de rétablir automatiquement cette connexion. Il peut arriver lors de ce
processus que vous deviez conrmer manuellement la reconnexion au niveau de l‘appareil source. Comme la fonction Bluetooth
est toujours activée en arrière-plan, indépendamment de l’entrée sélectionnée sur la barre de son, et qu’elle n’est complètement
désactivée qu’en cas de basculement en mode veille, la connexion peut être réactivée à tout moment à partir d’un appareil source
préalablement couplé.
S‘il n‘existe aucun couplage ou que la connexion n‘a pas pu être rétablie, la barre de son active automatiquement le mode
«couplage», également appelé mode « Pairing ». Pour passer la barre de son en mode « Pairing » manuel, appuyez brièvement sur
la touche BT PAIR (g. 7, pos. 22) de la télécommande. Quand le mode « Pairing » est actif, le témoin BT clignote.
Activez à présent le mode Bluetooth de votre appareil source. La la barre de son s‘afche sur la liste des appareils Bluetooth sous
«SBW 250». S‘il n‘apparaît pas dans la liste, activez manuellement la recherche des appareils Bluetooth sur votre appareil source
et assurez-vous que le Sounddeck se trouve bien en mode « Pairing ».
En fonction de l‘appareil source, il peut arriver que l‘on vous demande si le mot de passe doit être accepté pendant le processus
de couplage. Conrmez simplement en appuyant sur « Accepter ». Si un mot de passe vous et demandé ultérieurement, utilisez des
mots de passe standard tels que « 0000 » ou « 1234 ». Si, une fois le couplage effectué, il vous est demandé si vous souhaitez
procéder à la connexion, répondez « Oui ». Une fois le couplage et la connexion réalisés, l‘entrée BT reste afchée sur l‘écran.
La barre de son prend en charge la norme de transmission haut de gamme « Qualcomm® aptX™ ». Si votre appareil source
prend également cette technique en charge, le mode de transmission « Qualcomm® aptX™ » est sélectionné par défaut lors de
l‘établissement de la connexion Bluetooth.

19
Connexion d‘une source audio analogique ou numérique à la barre de son :
Sur l‘entrée analogique AUX IN (g. 5, pos. 10) et sur les entrées numériques DIGITAL IN (g. 5, pos. 9) de la barre de son, d‘autres
sources audio peuvent être branchées, comme un lecteur CD, un lecteur MP3 ou un récepteur satellite. Pour ce faire, procédez
comme décrit dans le point ci-avant.
Raccordez la source HDMI (audio/vidéo) à la barre de son :
Sur les entrées HDMI1, HDMI2 et HDMI3 (g. 5, pos. 11, 12, 13), il est possible de brancher jusqu‘à trois autres sources HDMI
(lecteur BD/DVD, récepteur satellite, console de jeu). Le signal audio de la source HDMI raccordée est transmis via le système SBW
250 ; le signal vidéo est transmis à la sortie HDMI (HDMI OUT (ARC), g. 5, pos. 14).
Pour cette conguration, il faut sélectionner l‘entrée HDMI du téléviseur qui est raccordée à la sortie HDMI de la barre de son (g.
5, pos. 14).
Important : le raccord USB (g. 5, pos. 8) est prévu exclusivement pour les mises à jour du système et n‘a aucune autre fonction.
Branchement de l’alimentation électrique de la barre de son
Un bloc d’alimentation externe universels de 110 – 240 V/AC 50/60 Hz (C) est fourni avec l’appareil. Il se peut toutefois que ce cordon
d‘alimentation soit différent de ceux utilisés dans votre pays. Si le cordon d’alimentation n’est pas compatible avec vos prises ou si vous
avez des doutes, veuillez vous adresser à votre revendeur spécialisé de Magnat.
1. Branchez le câble de sortie (coupleur jack) du bloc d’alimentation externe sur la prise d’alimentation de la barre de son
(g. 5, pos. 7) .
2. Branchez le câble d’alimentation dans la prise du bloc d’alimentation.
3. Branchez le câble d’alimentation sur la prise électrique. Veillez à utiliser un cordon d’alimentation qui soit compatible avec la prise
électrique (voir consigne ci-dessus).
Branchement de l‘alimentation électrique du subwoofer :
Un cordon d’alimentation de modèle courant est fourni avec l’appareil. Il se peut toutefois que ce cordon d‘alimentation soit différent
de ceux utilisés dans votre pays. Si le cordon d’alimentation n’est pas compatible avec vos prises ou si vous avez des doutes, veuillez
vous adresser à votre revendeur spécialisé de Magnat.
1. Branchez le câble d‘alimentation à 2 pôles sur la prise d‘alimentation de l‘amplicateur du subwoofer (g. 6b, pos. 16).
2. Branchez le câble d’alimentation sur la prise électrique. Veillez à utiliser un cordon d’alimentation qui soit compatible avec la prise
électrique (voir consigne ci-dessus).
PREMIÈRE MISE EN SERVICE, COUPLAGE SANS FIL DE LA BARRE DE SON AVEC LE SUBWOOFER :
Une fois le câble de signaux et l‘alimentation électrique de la barre de son et du subwoofer raccordés, veuillez allumer la barre de son
avec la télécommande (g. 7, pos. 18) ou à l‘aide du panneau de commande latéral (g. 4b, pos. 4).
À chaque mise en service, la barre de son se connecte automatiquement avec le subwoofer :
le témoin d‘état LED de la barre de son (g. 4a, pos. 1) s‘éteint. Le témoin d‘état LED du subwoofer (g. 6a, pos. 15) passe du rouge
au vert.
Si le subwoofer ne s‘allume pas automatiquement, ou si le témoin d‘état LED du subwoofer clignote en orange, c‘est que le raccordement
est incorrect. Dans ce cas, il faut raccorder les appareils manuellement. Veuillez suivre les étapes suivantes :
- Avec la télécommande, veuillez sélectionner l‘entrée AUX (g. 7, pos. 24)
- Appuyez sur la touche NIGHT de la télécommande (g. 7, pos. 27) pendant 5 secondes. WPAIR s‘afche sur l‘écran.
- Appuyez ensuite sur la touche CONNECT située à l‘arrière du subwoofer (g. 6b, pos. 17). Le témoin d‘état LED du subwoofer clignote
pendant la connexion.
- Si le couplage est effectué correctement, la mention SUCCE s‘afche sur l‘écran et le témoin d‘état LED du subwoofer s‘allume en
vert.
- Si la mention FAIL s‘afche sur l‘écran, il faut recommencer la procédure.
UTILISATION
Commandes de la barre de son (façade) (g. 4a) :
(1) Témoin d‘état DEL: ce témoin DEL s‘allume en rouge quand l‘appareil est en mode veille.
(2) Afchage DEL: Sur l‘écran, diverses informations sont afchées :
- Entrée audio sélectionnée
- Réglages audio et menu
- Format audio : lors du décodage d’un signal Dolby numérique, DO LBY s’afche rapidement sur l’écran. En cas de format audio non
compatible, N/A sera afché sur l’écran et aucune lecture ne sera effectuée.
- Lors de la lecture de contenus enregistrés sur un support USB : le numéro de la piste, la durée, le mode répétition, le réglage de la
lecture aléatoire ainsi que d’autres informations relatives à la lecture.
L‘écran s‘éteint environ 10 secondes après la dernière utilisation.

20
(3) Capteur de télécommande: Pour pouvoir utiliser la télécommande, orientez-la vers ce point.
Commandes de la barre de son (page) (g. 4b) :
(4) ON/STBY: Permet d‘allumer l‘appareil lorsque celui-ci se trouve en mode de veille. À l‘inverse, ce bouton permet de mettre en veille
l‘appareil lorsque celui-ci est en marche.
(5) VOLUME: Augmente (+) / baisse (-) le volume sonore
(6) SOURCE: sélectionne l‘entrée.
Commandes du subwoofer (façade) (g. 6a) :
(15) Témoin d‘état DEL: ce témoin DEL s‘allume en rouge quand l‘appareil est en mode veille. La LED s‘allume en vert quand le
subwoofer est en fonctionnement. Voir également section « Première mise en service ».
Commandes du subwoofer (dos de l‘appareil) (g. 6b):
(17) CONNECT: lance le mode de couplage manuel du subwoofer. Voir également section « Première mise en service ».
Commande à l‘aide de la télécommande (fig. 7):
(18) ON/STBY: Permet d‘allumer l‘appareil lorsque celui-ci se trouve en mode de veille. À l‘inverse, ce bouton permet de mettre en veille
l‘appareil lorsque celui-ci est en marche.
(19) HDMI/ARC: sélectionne l‘entrée audio HDMI/ARC.
(20) HDMI 1/2/3: sélectionne les entrées HDMI audio/vidéo supplémentaires 1, 2, 3.
(21) BT: sélectionne l‘entrée audio BLUETOOTH.
(22) BT PAIR: Permet de commuter l‘appareil en mode Bluetooth vers le mode « Pairing » an d‘établir un couplage avec un appareil
source Bluetooth.
(23) DIGITAL: sélectionne l‘entrée audio DIGITAL IN.
(24) AUX: sélectionne l‘entrée audio AUX IN.
(25) MUTE: Permet de mettre en sourdine l‘appareil ou de désactiver la sourdine.
(26) VOLUME: Augmente (+) / baisse (-) le volume sonore
(27) NIGHT: Active ou désactive un mode de lecture à dynamique réduite et une fréquence en réponse adaptée pour les situations
nécessitant un volume adapté (parex. en n de soirée, etc.).
(28) SURR: Active ou désactive la fonction son 3D Surround.
(29) SOUND: Sélectionne différentes réglages audio :
LINEAR:
réglage réponse en fréquence linéaire
MUSIC: Optimise la réponse en fréquence de l’appareil pour la lecture de musique.
MOVIE: Optimise la réponse en fréquence de l’appareil pour la lecture de la bande sonore d’un lm.
VOCAL: accentue les fréquences vocales an d’améliorer la netteté de la parole.
(30) MENU: ouvre le menu de réglage de la barre de son.
Les réglages suivants peuvent être sélectionnés et modiés avec les touches VOL+/- (26). Appuyer une nouvelle fois sur le menu
permet de valider les réglages.
SUB: Augmente (+) / baisse (-) le volume sonore du subwoofer.
EQ: Klanganpassung an unterschiedliche Platzierungen der Soundbar
WALL: Diese Einstellung optimiert den Klang, wenn die Soundbar an der Wand montiert ist.
DESK: Diese Einstellung optimiert den Klang, wenn die Soundbar auf einem Regal vor oder unter dem Fernseher platziert ist.
ASTBY: an d‘économiser de l‘énergie, l‘appareil s‘éteint automatiquement après environ 20 minutes sans signal d‘entrée. Cette
fonction peut être désactivée. Elle est activée par défaut à la livraison.
RESET: réinitialise tous les réglages pour revenir aux paramètres d‘usine.
EXIT: ferme le menu de réglage.
SERVICE ET PROBLEMES TECHNIQUES
Si des problèmes techniques font leur apparition, adressez-vous à votre revendeur spécialisé ou à Magnat Audio-Produkte GmbH, tél.:
+49 (0) 2234807-0.
Seite wird geladen ...
Seite wird geladen ...
Seite wird geladen ...
Seite wird geladen ...
Seite wird geladen ...
Seite wird geladen ...
Seite wird geladen ...
Seite wird geladen ...
Seite wird geladen ...
Seite wird geladen ...
Seite wird geladen ...
Seite wird geladen ...
Seite wird geladen ...
Seite wird geladen ...
Seite wird geladen ...
Seite wird geladen ...
Seite wird geladen ...
Seite wird geladen ...
Seite wird geladen ...
Seite wird geladen ...
Seite wird geladen ...
Seite wird geladen ...
Seite wird geladen ...
Seite wird geladen ...
Seite wird geladen ...
Seite wird geladen ...
Seite wird geladen ...
Seite wird geladen ...
-
 1
1
-
 2
2
-
 3
3
-
 4
4
-
 5
5
-
 6
6
-
 7
7
-
 8
8
-
 9
9
-
 10
10
-
 11
11
-
 12
12
-
 13
13
-
 14
14
-
 15
15
-
 16
16
-
 17
17
-
 18
18
-
 19
19
-
 20
20
-
 21
21
-
 22
22
-
 23
23
-
 24
24
-
 25
25
-
 26
26
-
 27
27
-
 28
28
-
 29
29
-
 30
30
-
 31
31
-
 32
32
-
 33
33
-
 34
34
-
 35
35
-
 36
36
-
 37
37
-
 38
38
-
 39
39
-
 40
40
-
 41
41
-
 42
42
-
 43
43
-
 44
44
-
 45
45
-
 46
46
-
 47
47
-
 48
48


Magnat SBW 250 Bedienungsanleitung
- Kategorie
- Soundbar-Lautsprecher
- Typ
- Bedienungsanleitung
in anderen Sprachen
- English: Magnat SBW 250 Owner's manual
- français: Magnat SBW 250 Le manuel du propriétaire
- español: Magnat SBW 250 El manual del propietario
- italiano: Magnat SBW 250 Manuale del proprietario
- русский: Magnat SBW 250 Инструкция по применению
Verwandte Artikel
-
Magnat Sb 180 Bedienungsanleitung
-
Magnat Prime One Bedienungsanleitung
-
Magnat Prime Classic Bedienungsanleitung
-
Magnat Monitor Active 2000 Bedienungsanleitung
-
Magnat Sounddeck 100 Benutzerhandbuch
-
-
Magnat MA 900 Bedienungsanleitung
-
-
Magnat Sounddeck 160 Bedienungsanleitung
-
Magnat WSB 50 PRO Benutzerhandbuch
Andere Dokumente
-
 Magnat Audio CSB 1000 Bedienungsanleitung
-
 Magnat Audio MULTIMEDIA 2100 DIGITAL Bedienungsanleitung
-
 Magnat Audio INTERIOR IC 61 Bedienungsanleitung
-
Lenco SBW-800BK Bedienungsanleitung
-
Philips B95/10 Benutzerhandbuch
-
 Magnat Audio Sounddeck 150 Bedienungsanleitung
-
 Magnat Audio Sounddeck 150 Installation Notes
-
Silvercrest SBW 60 A1 Operation and Safety Notes
-
Q Acoustics M3 Soundbar Quick Start
-
 Magnat Audio Sounddeck 150 Bedienungsanleitung


