Parkside 110037 Original Instructions Manual
- Kategorie
- Power Sanders
- Typ
- Original Instructions Manual
Dieses Handbuch eignet sich auch für

4-IN-1 CORDLESS COMBINATION TOOL
PKGA 14.4 A1
4-IN-1-AKKU-KOMBIGERÄ T
Originalbetriebsanleitung
4-IN-1 CORDLESS
COMBINA TION TOOL
Translation of the original instructions
AKUMULATOROWE URZĄDZENIE
WIELOFUNKCYJNE 4 W 1
Tłumaczenie oryginalnej instrukcji obsługi
AKU KOMBINOVANÉ NÁŘADÍ 4 V 1
Překlad originálního provozního návodu
KUMULÁTOROVÉ KOMBINOVANÉ
NÁRADIE 4 V 1
Preklad originá lneho návodu na obsluhu
4-V-1 AKUMULATORSKA
KOMBINIRANA NAPRAVA
Prevod originalnega navodila za uporabo
4 AZ 1-BEN AKKUS
KOMBINÁLT KÉSZÜLÉK
Az originál használati utasítás fordítása
IAN 110037
110037_par_4in1_Akku-Kombigeraet_cover_PL_HU_SI_CZ_SK.indd 2 06.05.15 08:13

GB Translation of the original instructions Page 4
PL Tłumaczenie oryginalnej instrukcji obsługi Strona 25
HU Az originál használati utasítás fordítása Oldal 47
SI Prevod originalnega navodila za uporabo Stran 68
CZ Překlad originálního provozního návodu Strana 89
SK Preklad originálneho návodu na obsluhu Strana 109
DE / AT / CH Originalbetriebsanleitung Seite 129
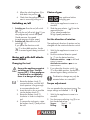
Before reading, unfold the page containing the illustrations and familiarise yourself with all functions of the
device.
Przed przeczytaniem proszę rozłożyć stronę z ilustracjami, a następnie proszę zapoznać się z wszystkimi
funk cjami urządzenia.
Olvasás előtt kattintson az ábrát tartalmazó oldalra és végezetül ismerje meg a készülék mindegyik
funk cióját.
Pred branjem odprite stran s slikami in se nato seznanite z vsemi funkcijami naprave.
Před čtením si otevřete stranu s obrázky a potom se seznamte se všemi funkcemi přístroje.
Pred čítaním si odklopte stranu s obrázkami a potom sa oboznámte so všetkými funkciami prístroja.
Klappen Sie vor dem Lesen die Seite mit den Abbildungen aus und machen Sie sich anschließend mit allen
Funktionen des Gerätes vertraut.
110037_par_4in1_Akku-Kombigeraet_cover_PL_HU_SI_CZ_SK.indd 3 06.05.15 08:13

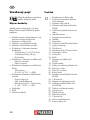
1 2 3 5 6
7
8
9
10
11
12 13
14
15
17 20
18
19
21 24 25
26 27 30 31 32 3328 29
2322
16
4

GB
4
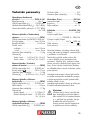
Content
Introduction .................................... 4
Intended Use ................................... 4
General Description ......................... 5
Scope of delivery .................................. 5
Overview .............................................5
Technical Data ................................. 6
Notes on Safety .............................. 7
Symbols ............................................... 7
General safety instructions for power
tools ....................................................8
Correct handling of the battery charger ..10
Additional safety instructions ................11
Charging the battery ..................... 13
Remove/insert rechargeable battery ......13
Recharging the battery ........................13
Used batteries ....................................14
Checking the charge status of the
rechargeable battery ...........................14
Operation ..................................... 14
Replacing the appliance attachment ......14
Switching on/off ................................. 15
Motor unit with drill attachment PKGA1 ..15
Motor unit with multi-sander attachment
PKGA2 ..............................................16
Motor unit with sabre saw attachment
PKGA3 ..............................................16
Motor unit with multifunction tool
PKGA4 ..............................................17
Practical tips ................................. 18
Sawing .............................................. 18
Sanding .............................................18
Scraping ............................................ 18
Cleaning/Maintenance .................. 18
Cleaning............................................19
Maintenance ......................................19
Storage ......................................... 19
Waste Disposal/
Environmental Protection .............. 19
Guarantee .................................... 20
Repair Service ............................... 21
Service-Center ............................... 21
Importer ....................................... 21
Spare Parts/Accessories ................ 22
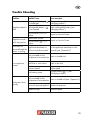
Trouble Shooting ........................... 23
Translation of the original EC
declaration of conformity ............ 151
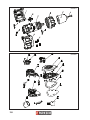
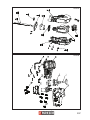
Exploded Diagrams ..................... 155
Introduction
Congratulations on the purchase of your
new device. With it, you have chosen a
high quality product. During production,
this equipment has been checked for qual-
ity and subjected to a nal inspection. The
functionality of your equipment is therefore
guaranteed.
The operating instructions constitute
part of this product. They contain
important information on safety, use
and disposal.
Before using the product, familiarise
yourself with all of the operating
and safety instructions. Use the
product only as described and for
the applications specied. Keep this
manual safely and in the event that
the product is passed on, hand over
all documents to the third party.
Intended Use
The appliance is intended for screwing
screws in and out and for drilling holes in
wood, metal or plastic.
The add-on tools are intended for grinding,
sawing and scraping.
The device is not suitable for commercial
use.
Any other use that is not explicitly ap-
proved in these instructions may result in
damage to the equipment and represent a
serious danger to the user.
The equipment is designed for use by
adults. Adolescents over the age of 16
may use the device only under supervision.
The manufacturer is not liable for damages
caused by unspecied use or incorrect op-
eration.

GB
5
General Description
The illustration of the principal
functioning parts can be found
on the front and back foldout
pages.
Scope of delivery
Carefully unpack the trimmer and check
that it is complete. Dispose of the packag-
ing material correctly.
• Motor unit with rechargeable battery
and drill attachment
• Sabre saw attachment
• Multi-sander attachment
• Multifunction tool
• Accessories for drill attachment
- 6 drill bits (1,5/2/3/4/5/6)
- 6 screwdriver bits, 50 mm
- Bit holder
• Accessories for sabre saw attachment
- Wood sawblade
- Metal sawblade
• Accessories for multi-sander attachment
- 5 sanding sheets
(2 x 60, 2 x 120, 1 x 240)
• Accessories for multifunction tool
- Plunge sawblade
- Scraper blade
- Delta sanding plate with 3 sanding
sheets
(1 x 60, 1 x 80, 1 x 120)
• Charger
• Storage case
• Instruction Manual
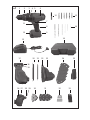
Overview
1 Keyless chuck
2 Torque adjustment ring
3 Gear selection switch
4 Drill attachment PKGA1
5 Unlocking lever for appliance at-
tachment
6 Motor unit
7 Direction switch
8 Handle
9 Rechargeable battery
10 Unlock button - rechargeable
battery
11 On/off switch
12 Bit holder
13 Screwdriver bits, 50 mm, 6 no.
14 Drill bits 6 no.
15 Charger
16 Storage case
17 Sabre saw attachment PKGA3
18 Footplate
19 Lever for unlocking sawblade
20 Metal sawblade
21 Wood sawblade
22 Sanding plate
23 Multi-sander attachment PKGA2
24 5 sanding sheets
25 Dust extraction adaptor
26 Multifunction tool PKGA4
27 Lever for unlocking tool
28 Arbor
29 Tool holder
30 Delta sanding plate
31 3 sanding sheets
32 Scraper blade
33 Plunge sawblade

GB
6
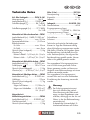
Technical Data
4in1 Cordless combination tool ... PKGA 14.4 A1
Motor voltage ........................... 14,4 V
Idling speed (n
0
) ....................21000 min
-1
Sound pressure level (L
PA
) ........ 86,7 dB(A),
K= 3 dB
Sound power level (L
wA
) ........... 97,7 dB(A)
K= 3 dB
Motor unit with
drill attachment .............. PKGA1
Idling speed (n
0
) ........ 0-400/0-1350 min
-1
Torque .................................max. 25 Nm
Spread drill chuck ................... 1.0-10 mm
Drill diameter
for wood .......................... max. 25 mm
for steel ............................. max. 8 mm
Weight (without charger) ................1,5 kg
Vibration (a
h
)
drilling in metal ....1,615 m/s
2
, K= 1,5 m/s
2
drilling in wood ...1,475 m/s
2
, K= 1,5 m/s
2
Motor unit with
multisander attachment ..PKGA2
Oscillation rate (n
0
) ..............0-9000 min
-1
Sanding sheet size .......138 x 97 mm
Weight (without charger) ................1,3 kg
Vibration (a
h
) ......4,383 m/s
2
, K= 1,5 m/s
2
Motor unit with
sabre saw attachment ....PKGA3
Stroke rate (n
0
) ..................... 0-3200 min
-1
Stroke length ............................... 22 mm
Weight (without charger) ................1,7 kg
Vibration (a
h
)
Sawing boards ................. 11,926 m/s
2
Sawing wood beams ........ 12,392 m/s
2
K= 1,5 m/s
2
Motor unit with
multifunction tool ...........PKGA4
Oscillation rate (n
0
) ............0-20000 min
-1
Oscillation angle ..............................3,0°
Weight (without charger) ................1,3 kg
Battery (Li-Ion) .............................. PAP14.4
Nominal voltage ....................... 14,4 V
Capacity ...................................... 1,5 Ah
Charging time ...................... approx. 1 h
Recharger .......................... JLH-H150-14.4
Nominal consumption .....................40 W
Voltage input .........100-240 V~, 50-60 Hz
Voltage output ............ 14,4 V
1500 mA
Protection class .................................
II
Protection category .......................... IPX0
Noise and vibration values have been de-
termined according to the standards and
regulations mentioned in the declaration of
conformity.
Technical and optical changes may be
undertaken in the course of further develop-
ment without notice. All dimensions, referenc-
es and information in this instruction manual
are therefore not guaranteed. Legal claims
made on the basis of the instruction manual
can therefore not be considered as valid.
The stated vibration emission value was
measured in accordance with a standard
testing procedure and may be used to com-
pare one power tool to another.
The stated vibration emission value may
also be used for a preliminary exposure as-
sessment.
Warning: The vibration emission
value may differ during actual use of
the power tool from the stated value
depending on the manner in which
the power tool is used.
Safety precautions aimed at protect-
ing the user should be based on esti-
mated exposure under actual usage
conditions (all parts of the operating
cycle are to be considered, includ-
ing, for example, times during which
the power tool is turned off and
times when the tool is turned on but
is running idle).

GB
7
Notes on Safety
This section details the basic safety instruc-
tions for working with the appliance.
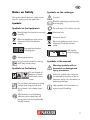
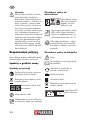
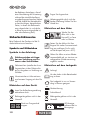
Symbols
Symbols on the Equipment
Read through the instruction manual
carefully.
Electrical appliances must not be
disposed of with the domestic
waste.
Stop appliance before
changing gear.
Wear eye protection.
Injury hazard caused by rotating
tool! Keep hands away.
Symbols on the battery
Do not dispose of
batteries in house-
hold waste, re or
water.
Do not subject the battery to strong
sunlight over long periods and
do not leave it on a heater (max.
45°C).
Take batteries to an old battery
collection point where they will
be recycled in an environmentally
friendly manner.
Symbols on the recharger
Caution!
Read the operating instructions be-
fore charging.
The recharger is for indoor use only.
T2A
Miniature fuse
Protection class II
Electrical appliances must not be
disposed of with the domestic
waste.
LED display
while charging.
Symbols in the manual
Warning symbols with in-
formation on damage and
injury prevention.
Instruction symbols (the instruction
is explained at the place of the ex-
clamation mark) with information on
preventing damage.
Help symbols with information on
improving tool handling.

GB
8
General safety instructions
for power tools
WARNING! Read all safety
directions and instructions.
Omissions in the compliance with
safety directions and instructions
can cause electrical shock, re
and/or severe injuries.
Retain all safety directions and in-
structions for future use.
The term „power tool“ in the warnings re-
fers to your mains-operated (corded) power
tool or battery-operated (cordless) power
tool.
1) WORK AREA SAFETY
• Keep work area clean and well
lit. Cluttered or dark areas invite ac-
cidents.
• Do not operate power tools in
explosive atmospheres, such as
in the presence of ammable
Iiquids, gases or dust. Power tools
create sparks which may ignite the dust
or fumes.
• Keep children and bystanders
away while operating a power
tool. Distractions can cause you to
lose control.
2) ELECTRICAL SAFETY
• Power tool plugs must match
the outlet. Never modify the
plug in any way. Do not use
any adapter plugs with earthed
(grounded) power tools. Unmodi-
ed plugs and matching outlets will
reduce risk of electric shock.
• Avoid body contact with earthed
or grounded surfaces, such as
pipes, radiators, ranges and re-
frigerators. There is an increased risk
of electric shock if your body is earthed
or grounded.
• Do not expose power tools to
rain or wet conditions. Water
entering a power tool will increase the
risk of electric shock.
• Do not abuse the cord. Never
use the cord for carrying, pull-
ing or unplugging the power
tool. Keep cord away from
heat, oil, sharp edges or moving
parts. Damaged or entangled cords
increase the risk of electric shock.
• When operating a power tool
outdoors, use an extension cord
suitable for outdoor use. Use of a
cord suitable for outdoor use reduces
the risk of electric shock.
• If operating a power tool in a
damp location is unavoidable,
use a residual current device
(RCD) protected supply. Use of an
RCD reduces the risk of electric shock.
3) PERSONAL SAFETY
• Stay alert, watch what you are
doing and use common sense
when operating a power tool.
Do not use a power tool while
you are tired or under the inu-
ence of drugs, alcohol or medi-
cation. A moment of inattention white
operating power tools may result in
serious personal injury.
• Use personal protective equip-
ment. Always wear eye protec-
tion. Protective equipment such as dust
mask, non-skid safety shoes, hard hat,
or hearing protection used for appro-
priate conditions will reduce personal
injuries.

GB
9
• Prevent unintentional starting.
Ensure the switch is in the off-
position before connecting to
power source and/or battery
pack, picking up or carrying the
tool. Carrying power tools with your
nger on the switch or energising pow-
er tools that have the switch on invites
accidents.
• Remove any adjusting key or
wrench before turning the pow-
er tool on. A wrench or a key left
attached to a rotating part of the power
tool may result in personal injury.
• Do not overreach. Keep proper
footing and balance at all times.
This enables better control of the power
tool in unexpected situations.
• Dress properly. Do not wear
loose clothing or jewellery. Keep
your hair, clothing and gloves away
from moving parts. Loose clothes, jew-
ellery or long hair can be caught in
moving parts.
• If devices are provided for the
connection of dust extraction
and collection facilities, ensure
these are connected and prop-
erly used. Use of dust collection can
reduce dust-related hazards.
4) POWER TOOL USE AND CARE
• Do not force the power tool. Use
the correct power tool for your
application. The correct power tool
will do the job better and safer at the
rate for which it was designed.
• Do not use the power tool if the
switch does not turn it on and
off. Any power tool that cannot be
controlled with the switch is dangerous
and must be repaired.
• Disconnect the plug from the
power source and/or the bat-
tery pack from the power tool
before making any adjust
-ments, changing accessories, or
storing power tools. Such preven-
tive safety measures reduce the risk of
starting the power tool accidentaIly.
• Store idle power tools out of the
reach of children and do not al-
low persons unfamiliar with the
power tool or these instructions
to operate the power tool. Power
tools are dangerous in the hands of
untrained users.
• Maintain power tools. Check
for misalignment or binding of
moving parts, breakage of parts
and any other condition that
may affect the power tool’s op-
eration. If damaged, have the power
tool repaired before use. Many acci-
dents are caused by poorly maintained
power tools.
• Keep cutting tools sharp and
clean. Properly maintained cutting
tools with sharp cutting edges are less
Iikely to bind and are easier to control.
• Use the power tool, accessories
and tool bits etc. in accordance
with these instructions, tak-
ing into account the working
conditions and the work to be
performed. Use of the power tool for
operations different from those intended
could result in a hazardous situation.
• Hold the device by the insu-
lated gripping surfaces when
performing work in which the
cutting tool may come into con-
tact with hidden wiring or its
own cord. Contact with a live wire
can also cause a charge in metal parts
of the device and result in an electric
shock.

GB
10
5) CAREFUL HANDLING AND USE
OF BATTERY DEVICES
• Charge the batteries only in
chargers that are recommended
by the manufacturer. Risk of re if a
charger that is suitable for a specic type
of battery is used with other batteries.
• In the power tools, use only the
batteries designed for the pur-
pose. The use of other batteries may
result in injuries and risk of re.
• Keep the unused battery away
from paper clips, coins, keys,
nails, screws and other small
metal objects, which could cause
bridging of the contacts. A short
circuit between the battery contacts
may cause burns or re.
• If used incorrectly, liquid may
leak from the battery. Avoid
contact with this. In the event of
accidental contact, rinse off with
water. If the liquid gets into eyes, seek
medical assistance. Leaking battery u-
id may cause skin irritations or burns.
6) SERVICE
• Have your power tool serviced
by a qualied repair person us-
ing only identical replacement
parts. This will ensure that the safety
of the power tool is maintained.
7) SPECIAL SAFETY DIRECTIONS FOR
BATTERY-OPERATED TOOLS
• Ensure that the device is
switched off before inserting
the battery. Inserting a battery into
a power tool that is switched on may
result in accidents.
• Recharge the batteries indoors
only because the battery charg-
er is designed for indoor use
only. Risk of electric shock.
• To reduce the electric shock haz-
ard, unplug the battery charger
from the mains before cleaning
the charger.
• Do not subject the battery to
strong sunlight over long pe-
riods and do not leave it on a
heater. Heat damages the battery
and there is a risk of explosion.
• Allow a hot battery to cool be-
fore charging.
• Do not open up the battery and
avoid mechanical damage to the
battery. Risk of short circuit and
fumes may be emitted that ir-
ritate the respiratory tract. Ensure
fresh air and seek medical assistance in
the event of discomfort.
• Do not use non-rechargeable
batteries. This could damage the ap-
pliance.
Correct handling of the bat-
tery charger
• This appliance can be used by
persons with reduced physical,
sensory or mental capabili-
ties or lack of experience and
knowledge if they have been
given supervision or instruction
concerning use of the appliance
in a safe way and understand
the hazards involved. Children
shall not play with the appli-
ance.
• To charge the battery, use only
the charger supplied. Risk of re
and explosion. This ensures that the
safety of the device is maintained.
• Before each use, check the

GB
11
charger, cable and plug and
have them repaired by quali-
ed professionals and only with
original parts. Do not use a de-
fective charger and do not open
it up yourself. This ensures that the
safety of the device is maintained.
• Connect the charger only to a
socket with an earth. Ensure
that the mains voltage matches
the specications on the charger
rating plate. Risk of electric shock.
• Disconnect the charger from the
mains before closing or open-
ing connection to the battery /
power tool / device. This ensures
that the battery and charger are not
damaged.
• Keep the charger clean and
away from wet and rain. Do not
use the charger outdoors. Dirt
and the entry of water increase the risk
of electric shock.
• Operate the charger only with
the appropriate original bat-
teries. Charging other batteries may
result in injuries and risk of re.
• Avoid mechanical damage to
the charger. This can result in inter-
nal short circuits.
• Do not operate the charger on a
combustible surface (e.g. paper,
textiles). Risk of re due to heating
during charging.
• If the power cable for this
equipment is damaged, it must
be replaced by the manufac-
turer, a customer service agent
of the same or a similarly quali-
ed person in order to prevent
hazards.
• Do not charge non-rechargeable
batteries in the charger. This could
damage the appliance.
Additional safety instructions
Warning! Sawing or sanding
can result in the formation of
hazardous dusts (e.g. arising
from materials with paints
containing lead, materials
containing asbestos, metals
or some wood types) which
can present a hazard to the
operator or persons in the
vicinity. Make sure that the
workplace is well ventilated.
Always wear safety goggles,
safety gloves and respiratory
protection. Attach a dust ex-
traction system.
1) SPECIAL SAFETY INFORMATION
FOR THE CORDLESS COMBINA-
TION TOOL
• Hold the electric tool by the in-
sulated gripping surfaces when
performing work in which the
cutting tool may come into con-
tact with hidden wiring. Contact
with a live wire can also cause a
charge in metal parts of the appliance
and result in an electric shock.
• Use suitable detectors in order
to nd hidden supply lines or
ask the local utility company.
Contact with electrical cables can lead
to electric shock and re, contact with
a gas pipe can result in an explosion.
Damage to a water pipe can lead to
property damaged and electric shock.
• Secure the workpiece. A work-
piece that is retained with clamping
appliances or a vice is held more se-
curely than with your hand.
• Be very careful when handling
tools such as saws, scraper

GB
12
blades and drills. These are sharp
and present an injury hazard.
• Wear safety gloves when
changing attachments. This ena-
bles you to avoid injuries if the appli-
ance attachment has heated up after
use.
2) SPECIFIC SAFETY INSTRUCTIONS
WHEN SAWING
• Keep hands away from the
sawing area. Do not reach
underneath the workpiece. Al-
ways stand to the side of the
saw when working. Upon contact
with the blade there is a risk of injury.
• Only when the electric tool is
turned on should the sawing
blade be moved against the
workpiece. There is a risk of kick-
back if the tool insert jams in the work-
piece.
• Make sure that the footplate
is securely placed against the
workpiece during sawing. The
sawblade can tilt and lead to loss of
control over the power tool.
• After you have nished work,
turn the power tool off and do
not pull the sawblade out of the
cut until it has come to a stand-
still. In this way you will avoid any
kickback and can safely put down the
power tool.
• Use only undamaged saw-
blades in perfect condition. Bent
or blunt blades can break, adversely
affect the cut or cause kickback.
• Do not brake the sawblade af-
ter switching the appliance off
by applying side pressure. The
sawblade may be damaged, break or
cause a kickback.
• Tighten the material rmly. Do
not support the workpiece by
hand or foot. Do not touch any
objects or the ground with the saw run-
ning. There is a risk of kickback.
• Hold the power tool tightly with
both hands while working and
ensure a secure footing. The
power tool is guided more securely
with both hands.
• Wait until the power tool has
stopped before placing it down.
The tool insert can tilt and lead to loss
of control over the power tool.
• Switch the appliance off im-
mediately if the sawing blade
jams. Spread the saw cut out and pull
the blade out carefully. This can lead
to loss of control over the power tool.
3) SPECIAL SAFETY INFORMATION
DURING SANDING AND SCRAP-
ING
• Only use the power tool for dry
sanding. Do not scrape moist
materials. Penetration of water into
the power tool increases the risk of
electric shock.
• Avoid overheating the sanded
object and the sander itself. Pos-
sible re hazard.
• The workpiece gets hot dur-
ing grinding. Do not touch the
machined area, allow it to cool
down. There is a risk of burning. Do
not use coolants or the like.
• Always empty the dust con-
tainer before work breaks.
Sanding dust in the dust sack, micro
lter, paper sack (or in the lter sack or
extraction system lter) can self-ignite
under unfavourable conditions such
as ying sparks caused by grinding

GB
13
metals. Particular hazards are caused
if the sanding dust is mixed with paint,
polyurethane residues or other chemi-
cal substances, or if the sanded object
is hot after long working periods.
4) RESIDUAL RISKS
Even if properly operating and handling
this electric tool, some residual risks will
remain. Due to its construction and build,
this electric tool may present the following
hazards:
a) Lung damage, if suitable respiratory
protection is not worn;
b) Cuts
c) Ear damage if working without ear pro-
tection.
d) Eye damage if suitable eye protection
is not worn.
e) Damage to your health caused by
swinging your hands and arms when
operating the appliance for longer pe-
riods of time or if the unit is not held or
maintained properly.
Charging the battery
Do not expose the battery to
extreme conditions such as
heat or impact. Risk of injury
from escaping electrolytic so-
lution! After eye/skin contact,
rinse the affected areas with
water or a neutraliser and
consult a doctor.
Charge the battery in a dry
room only. Prior to attach-
ing the charger, check that
the battery’s outer surface is
clean and dry. There is a risk
of injury due to electric shock.
Only use the charger from the pack-
age to charge the battery. Mind not
to charge the appliance for more
than 1 hour at a time. If you do,
the battery and the appliance may
be damaged and longer charging
times would be a waste of energy.
Excessive charging will void the
warranty.
• Charge the battery before the rst time
of use. Do not briey charge the bat-
tery several time in a row.
• If a fully recharged battery lasts for
considerably shorter operating times,
the battery is used up and needs to
be replaced. Only use an OEM spare
battery available from our Customer
Service.
• Always take heed of the applicable
safety instructions as well as the envi-
ronmental protection regulations and
information.
• The warranty excludes all defects
caused by improper handling.
Remove/insert rechargeable
battery
1. To remove the battery (9) from the
appliance, press the release but-
ton (10) on the battery and pull
the battery out.
2. To insert the battery (9) push the
battery along the guide rail into
the appliance. It locks into place
audibly.
Recharging the battery
1. Remove the battery (9) from the
appliance.
2. Slide the rechargeable battery (9)

GB
14
onto the charger (15). It locks into
place audibly.
3. Plug the charger (15) into an elec-
trical outlet.
4. After the charging process, dis-
connect the charger (15) from the
mains supply.
5. Pull the rechargeable battery (9)
out of the charger (15).
Overview of the LED indicators
(15a) on the charger (15):
green LED ashes:
Charger is connected to the
mains without a battery.
red LED lights up:
Battery charging.
green LED lights up:
Battery is charged.
Used batteries
• If a fully recharged battery lasts for
considerably shorter operating times,
the battery is used up and needs to be
replaced. Only use an OEM battery
pack replacement available from our
Customer Service.
• Always take heed of the applicable
safety instructions as well as the envi-
ronmental protection regulations and
information (see “Waste Disposal and
Environmental Protection”).
Checking the charge status
of the rechargeable battery
The battery charge status indicator (9a)
signalises the state of charge of the battery
(9).
Press the button (9b) on the battery
(9). The state of charge of the bat-
tery is displayed by illuminating the
3-colour LED lights of the state of
charge display (9a).
All LEDs are on: Battery is fully
charged.
Red and yellow LEDs are on: Battery
has a residual charge (< 90 %).
Red LED lights up: Battery is empty,
please charge.
Operation
Replacing the appliance at-
tachment
Secure the appliance against
switching on (see “Switch-
ing on/off”) or remove the
rechargeable battery from
the appliance. There is an
injury hazard if the device is
switched on accidentally.
Wear safety gloves. The appliance
attachment might have heated up
after use.
Removing appliance attachment
1. Push the unlocking lever (5) into
position
as far as the stop
and then hold it in this position.
2. Pull the unlocked appliance at-
tachment off (4/17/23/26).
3. Allow the unlocking lever (5) to
slide back into position
.
Fitting appliance attachment
4. Push the appliance attachment
(4/17/23/26) along the guide
rail into the motor unit (6). It locks
into place audibly.

GB
15
5. Allow the unlocking lever (5) to
slide back into position
.
6. Check that the appliance attach-
ment is secure by pulling on it.
Switching on/off
1. Switching on: Press the on/off switch
(
11).
By using the on/off switch (
11) you
can progressively control the speed.
Gentle pressure: low speed
Increase pressure: higher speed.
2. Switching off: Release the on/off
switch (
11).
If you place the direction switch
(
7) in the middle position, the de-
vice is secured against being switched
on.
Motor unit with drill attach-
ment PKGA1
Changing the tool
Secure the appliance against
switching on (see “Switch-
ing on/off”). If the appliance
is switched on accidentally,
there is a danger of injury.
1. Rotate the keyless chuck (1)
counter-clockwise, until the drill
chuck aperture is large enough
to accommodate the tool.
2. Insert the tool as far as possible
into the keyless chuck (1).
3. Rotate the keyless chuck (1)
clockwise in order to clamp the
tool.
4. To remove the tool again, rotate
the keyless chuck (1) and pull out
the tool.
Choice of gear
Stop appliance before
changing gear.
1. Wait for the appliance to come to a
standstill.
2 Slide the gear selector (
3) into the
required position:
1: low speed preselection.
2: high speed preselection.
Set the direction of rotation
The appliance’s direction of rotation can be
changed with the rotational direction switch.
1. Wait for the appliance to come to a
standstill.
2. Push the rotational direction speed
(
7) into the desired position:
Clockwise rotation:
to drill and
screw in screws.
Anticlockwise rotation:
to un-
screw screws.
3. If you place the direction switch (
7) in the middle position, the device is
secured against being switched on.
The direction change may only be
actuated when at a standstill!
Torque adjustment
You can preselect the maximum torque. The
torque settings are labelled 1 - 19 +
1. Wait for the appliance to come to a
standstill.
2. Turn the torque adjusting ring (2) to se-
lect the desired torque:
Screws: Steps 1 - 19
Drilling: Step

GB
16
3. Start with a lower torque step and in-
crease as required.
The direction change may only be
actuated when the appliance is at a
standstill!
The necessary torque is dependent
on:
- the type and hardness of the ma-
terial to be treated;
- the type and length of the screws
used.
Motor unit with multi-sander
attachment PKGA2
Secure the appliance against
switching on (see “Switch-
ing on/off”). If the appliance
is switched on accidentally,
there is a danger of injury.
Attaching/removing sanding
sheet
The sanding plate ( 22) is tted with
Velcro for rapid attachment of the sanding
sheet.
Attaching sanding sheet
1. Press the sanding sheet (24)
evenly onto the sanding plate
(22). Ensure that the holes in the
sanding sheet are placed above
the openings in the sanding
plate.
Removing sanding sheet
2. Simply pull the sanding sheet
(24) off the sanding plate (22).
Connecting dust extraction
You can reduce dust production during
sanding by attaching a dust extraction
system.
1. Push the adaptor (25) into the
opening on the multi-sander at-
tachment (23) as far as the stop.
2. Connect a dust extractor suction
hose to the adaptor (25).
Motor unit with sabre saw
attachment PKGA3
Installing/changing the blade
Secure the appliance against
switching on (see “Switch-
ing on/off”). If the appliance
is switched on accidentally,
there is a danger of injury.
Wear gloves when handling the
sawblade. In this way, you avoid
injury from cuts.
Caution, risk of Injury!
- Do not use any blunt or bent
blades or blades which are
damaged in any other way.
- Always insert a suitable saw-
blade.
An overview of appropriate blades
can be found in “Spare Parts/Ac-
cessories”.
Installing the blade:
1. Push the lever (19) for sawblade
unlocking upwards as far as
the stop. Push the sawblade
shaft (20/21) into the sawblade
mounting slot.

GB
17
2. To unlock, release the lever (19),
it will return to the initial position.
3. Check that the sawblade is se-
cure by pulling on it.
Removing the sawblade:
4. Press the lever (19) for sawblade
unlocking upwards as far as the
stop and then pull the sawblade
out of the sawblade mounting.
For certain work, the sawblade
can also be inserted after turning
through 180°.
Operating the sabre saw
1. Before switching the appliance on,
ensure it is not in contact with the work-
piece.
2. Turn the appliance on.
By using the on/off switch (
11) you
can progressively control the stroke
rate.
Gentle pressure: low stroke rate.
Greater pressure: higher stroke rate.
The on/off switch cannot be locked.
3. Place the footplate (
18) on the work-
piece.
4. Cut with a uniform forward motion.
5. After completion of the work, rst re-
move the blade from the saw cut and
then switch the appliance off.
Motor unit with multifunction
tool PKGA4
Changing the tool
Secure the appliance against
switching on (see “Switch-
ing on/off”). If the appliance
is switched on accidentally,
there is a danger of injury.
1. Push the lever (27) for tool un-
locking upwards as far as the
stop.
2. Pull the unlocked tool holder (29)
off forwards.
3. Place the required tool
(30/32/33) on the arbor (28).
12 different positions are pos-
sible.
4. Press the tool holder (29) back
into the central mounting.
5. Push the lever (27) for tool un-
locking forwards again. The tool
holder is xed to the tool.
Attaching/removing sanding
sheet
The delta sanding plate (30) is tted with
Velcro for rapid attachment of the sanding
sheet.
Attaching sanding sheet
1. Press the sanding sheet (31)
evenly onto the delta sanding
plate (30). Ensure that the holes
in the sanding sheet are placed
above the openings in the sand-
ing plate.
Removing sanding sheet
2. Simply pull the sanding sheet
(31) off the delta sanding plate
(30).

GB
18
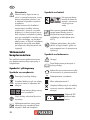
Practical tips
When working with the ap-
pliance, always wear suitable
clothing and appropriate pro-
tective equipment.
Prior to each use it must be
ensured that the appliance is
working correctly.
Personal protective equipment
and a fully functional appli-
ance reduce the risk of inju-
ries and accidents.
Sawing
Wear eye protection.
• Use only undamaged sawblades in
perfect condition. Only use metal saw-
blades for metalworking.
• Ensure your stance is stable and hold
the appliance tightly with both hands
and away from your body.
• Before sawing the workpiece, check for
hidden foreign objects such as nails,
screws. These must be removed.
• Plunge cuts may only be made in soft
material such as wood or plasterboard.
Selection of sawblade
Wood sawblade
for wood, plastic, plaster-
board
Metal sawblade
for metal sheets, proles
and tubes
Plunge sawblade
for soft materials like
wood or plasterboard
Sanding
• Use a dust extraction system when
sanding with the multi-sander attach-
ment.
• Move the appliance against the work-
piece once it is switched on.
• Clean the sanding plate before you at-
tach a sanding sheet.
• Only work with sanding sheets in per-
fect condition to achieve good sanding
results.
• Work using low and even pressure.
This protects the appliance and the
sanding sheet.
• Do not use the same sanding sheet to
sand different materials (e.g. metal
and then wood).
Selection of sanding sheet
Grain size Application
60
for pre-sanding rough wood
surfaces
80 / 120 for plain sanding
240
for ne sanding of primed and
painted surfaces
Scraping
• Use a high oscillation rate when scrap-
ing.
• Work using low pressure and at a low
angle in order not to damage the sub-
strate material.
Cleaning/Maintenance
Repair and servicing work not
described in this manual should
always be carried by our Service
Centre. Use only original parts.

GB
19
Switch off the device and remove
the battery from the device before
working with or transporting it.
The following cleaning and servicing
should be done regularly. This will ensure a
long and reliable service life.
Cleaning
Do not spray the appliance
with water and do not im-
merse it in water. Electric
shock hazard!
• Keep clean the ventilation slots, motor
housing and handles of the appliance.
Use a damp cloth or a brush.
Do not use cleaning agents or solvents.
You may otherwise irreparably damage
the appliance.
Maintenance
• The equipment is maintenance free.
Storage
• Store the device in a dry place well out
of reach of children.
• Remove the battery before storing the
unit for longer periods of time (e.g. hi-
bernation).
• Store the battery only in a partially
charged state. The state of charge
should be 40 – 60 % over a longer stor-
age period (two LED lights of the char-
ge status indicator (
9a) light up).
• During a longer storage period, check
the state of charge of the battery and
recharge if necessary roughly every
3months.
• In order to keep the battery well
charged, avoid exposing the appliance
to extreme heat or cold in storage.
• Store the equipment between 10° C
and 25° C. During storage, avoid ex-
treme cold or heat so the battery does
not lose power.
Waste Disposal/
Environmental Protection
Remove the battery from the device and
take the device, battery, accessories and
packaging for environmentally friendly re-
cycling.
Electric units do not belong with do-
mestic waste.
Do not dispose of batteries in house-
hold waste, re (risk of explosion) or
water. Damaged batteries may dam-
age the environment and your health
if toxic fumes or liquids leak out.
• Return the unit and the recharger to a
recycling centre. The plastic and metal
parts employed can be separated out
and thus recycled use can be imple-
mented. Ask our Service-Center for
details.
• Dispose of batteries in discharged
condition. We recommend covering
the pole with adhesive tape to prevent
a short circuit. Do not open up the bat-
tery.
• Dispose of batteries in accordance with
the local regulations. Take batteries to
an old battery collection point where
they will be recycled in an environmen-
tally friendly manner. For information
about this, ask your local waste man-
agement company or our service centre.
• Defective units returned to us will be dis-
posed of for free.

GB
20
Guarantee
Dear Customer,
This equipment is provided with a 3-year
guarantee from the date of purchase.
In case of defects, you have statutory rights
against the seller of the product. These
statutory rights are not restricted by our
guarantee presented below.
Terms of Guarantee
The term of the guarantee begins on the
date of purchase. Please retain the original
receipt. This document is required as proof
of purchase.
If a material or manufacturing defect occurs
within three years of the date of purchase
of this product, we will repair or replace –
at our choice – the product for you free of
charge. This guarantee requires the defec-
tive equipment and proof of purchase to be
presented within the three-year period with
a brief written description of what consti-
tutes the defect and when it occurred.
If the defect is covered by our guarantee,
you will receive either the repaired product
or a new product. No new guarantee pe-
riod begins on repair or replacement of the
product.
Guarantee Period and Statutory
Claims for Defects
The guarantee period is not extended by
the guarantee service. This also applies for
replaced or repaired parts. Any damages
and defects already present at the time of
purchase must be reported immediately af-
ter unpacking. Repairs arising after expiry
of the guarantee period are chargeable.
Guarantee Cover
The equipment has been carefully produced
in accordance with strict quality guidelines
and conscientiously checked prior to delivery.
The guarantee applies for all material and
manufacturing defects. This guarantee does
not extend to cover product parts that are
subject to normal wear and may therefore
be considered as wearing parts (e.g. saw
blade, battery) or to cover damage to
breakable parts (e.g. switches).
This guarantee shall be invalid if the prod-
uct has been damaged, used incorrectly or
not maintained. Precise adherence to all of
the instructions specied in the operating
manual is required for proper use of the
product. Intended uses and actions against
which the operating manual advises or
warns must be categorically avoided.
The product is designed only for private
and not commercial use. The guarantee
will be invalidated in case of misuse or
improper handling, use of force, or inter-
ventions not undertaken by our authorised
service branch.
Processing in Case of Guarantee
To ensure quick handling of you issue,
please follow the following directions:
• Please have the receipt and identica-
tion number (IAN 110037) ready as
proof of purchase for all enquiries.
• Please nd the item number on the rat-
ing plate.
• Should functional errors or other de-
fects occur, please initially contact the
service department specied below by
telephone or by e-mail. You will then
receive further information on the pro-
cessing of your complaint.
• After consultation with our customer ser-
vice, a product recorded as defective
Seite wird geladen ...
Seite wird geladen ...
Seite wird geladen ...
Seite wird geladen ...
Seite wird geladen ...
Seite wird geladen ...
Seite wird geladen ...
Seite wird geladen ...
Seite wird geladen ...
Seite wird geladen ...
Seite wird geladen ...
Seite wird geladen ...
Seite wird geladen ...
Seite wird geladen ...
Seite wird geladen ...
Seite wird geladen ...
Seite wird geladen ...
Seite wird geladen ...
Seite wird geladen ...
Seite wird geladen ...
Seite wird geladen ...
Seite wird geladen ...
Seite wird geladen ...
Seite wird geladen ...
Seite wird geladen ...
Seite wird geladen ...
Seite wird geladen ...
Seite wird geladen ...
Seite wird geladen ...
Seite wird geladen ...
Seite wird geladen ...
Seite wird geladen ...
Seite wird geladen ...
Seite wird geladen ...
Seite wird geladen ...
Seite wird geladen ...
Seite wird geladen ...
Seite wird geladen ...
Seite wird geladen ...
Seite wird geladen ...
Seite wird geladen ...
Seite wird geladen ...
Seite wird geladen ...
Seite wird geladen ...
Seite wird geladen ...
Seite wird geladen ...
Seite wird geladen ...
Seite wird geladen ...
Seite wird geladen ...
Seite wird geladen ...
Seite wird geladen ...
Seite wird geladen ...
Seite wird geladen ...
Seite wird geladen ...
Seite wird geladen ...
Seite wird geladen ...
Seite wird geladen ...
Seite wird geladen ...
Seite wird geladen ...
Seite wird geladen ...
Seite wird geladen ...
Seite wird geladen ...
Seite wird geladen ...
Seite wird geladen ...
Seite wird geladen ...
Seite wird geladen ...
Seite wird geladen ...
Seite wird geladen ...
Seite wird geladen ...
Seite wird geladen ...
Seite wird geladen ...
Seite wird geladen ...
Seite wird geladen ...
Seite wird geladen ...
Seite wird geladen ...
Seite wird geladen ...
Seite wird geladen ...
Seite wird geladen ...
Seite wird geladen ...
Seite wird geladen ...
Seite wird geladen ...
Seite wird geladen ...
Seite wird geladen ...
Seite wird geladen ...
Seite wird geladen ...
Seite wird geladen ...
Seite wird geladen ...
Seite wird geladen ...
Seite wird geladen ...
Seite wird geladen ...
Seite wird geladen ...
Seite wird geladen ...
Seite wird geladen ...
Seite wird geladen ...
Seite wird geladen ...
Seite wird geladen ...
Seite wird geladen ...
Seite wird geladen ...
Seite wird geladen ...
Seite wird geladen ...
Seite wird geladen ...
Seite wird geladen ...
Seite wird geladen ...
Seite wird geladen ...
Seite wird geladen ...
Seite wird geladen ...
Seite wird geladen ...
Seite wird geladen ...
Seite wird geladen ...
Seite wird geladen ...
Seite wird geladen ...
Seite wird geladen ...
Seite wird geladen ...
Seite wird geladen ...
Seite wird geladen ...
Seite wird geladen ...
Seite wird geladen ...
Seite wird geladen ...
Seite wird geladen ...
Seite wird geladen ...
Seite wird geladen ...
Seite wird geladen ...
Seite wird geladen ...
Seite wird geladen ...
Seite wird geladen ...
Seite wird geladen ...
Seite wird geladen ...
Seite wird geladen ...
Seite wird geladen ...
Seite wird geladen ...
Seite wird geladen ...
Seite wird geladen ...
Seite wird geladen ...
Seite wird geladen ...
Seite wird geladen ...
Seite wird geladen ...
Seite wird geladen ...
Seite wird geladen ...
Seite wird geladen ...
Seite wird geladen ...
-
 1
1
-
 2
2
-
 3
3
-
 4
4
-
 5
5
-
 6
6
-
 7
7
-
 8
8
-
 9
9
-
 10
10
-
 11
11
-
 12
12
-
 13
13
-
 14
14
-
 15
15
-
 16
16
-
 17
17
-
 18
18
-
 19
19
-
 20
20
-
 21
21
-
 22
22
-
 23
23
-
 24
24
-
 25
25
-
 26
26
-
 27
27
-
 28
28
-
 29
29
-
 30
30
-
 31
31
-
 32
32
-
 33
33
-
 34
34
-
 35
35
-
 36
36
-
 37
37
-
 38
38
-
 39
39
-
 40
40
-
 41
41
-
 42
42
-
 43
43
-
 44
44
-
 45
45
-
 46
46
-
 47
47
-
 48
48
-
 49
49
-
 50
50
-
 51
51
-
 52
52
-
 53
53
-
 54
54
-
 55
55
-
 56
56
-
 57
57
-
 58
58
-
 59
59
-
 60
60
-
 61
61
-
 62
62
-
 63
63
-
 64
64
-
 65
65
-
 66
66
-
 67
67
-
 68
68
-
 69
69
-
 70
70
-
 71
71
-
 72
72
-
 73
73
-
 74
74
-
 75
75
-
 76
76
-
 77
77
-
 78
78
-
 79
79
-
 80
80
-
 81
81
-
 82
82
-
 83
83
-
 84
84
-
 85
85
-
 86
86
-
 87
87
-
 88
88
-
 89
89
-
 90
90
-
 91
91
-
 92
92
-
 93
93
-
 94
94
-
 95
95
-
 96
96
-
 97
97
-
 98
98
-
 99
99
-
 100
100
-
 101
101
-
 102
102
-
 103
103
-
 104
104
-
 105
105
-
 106
106
-
 107
107
-
 108
108
-
 109
109
-
 110
110
-
 111
111
-
 112
112
-
 113
113
-
 114
114
-
 115
115
-
 116
116
-
 117
117
-
 118
118
-
 119
119
-
 120
120
-
 121
121
-
 122
122
-
 123
123
-
 124
124
-
 125
125
-
 126
126
-
 127
127
-
 128
128
-
 129
129
-
 130
130
-
 131
131
-
 132
132
-
 133
133
-
 134
134
-
 135
135
-
 136
136
-
 137
137
-
 138
138
-
 139
139
-
 140
140
-
 141
141
-
 142
142
-
 143
143
-
 144
144
-
 145
145
-
 146
146
-
 147
147
-
 148
148
-
 149
149
-
 150
150
-
 151
151
-
 152
152
-
 153
153
-
 154
154
-
 155
155
-
 156
156
-
 157
157
-
 158
158
-
 159
159
-
 160
160


Parkside 110037 Original Instructions Manual
- Kategorie
- Power Sanders
- Typ
- Original Instructions Manual
- Dieses Handbuch eignet sich auch für
in anderen Sprachen
- slovenčina: Parkside 110037
- polski: Parkside 110037
Verwandte Artikel
-
Parkside PKGA 14.4 A1 Original Instructions Manual
-
Parkside PKGA 20-Li B1 - IAN 315586 Bedienungsanleitung
-
-
-
-
Parkside KH 3125 CORDLESS MULTI-GRINDER Benutzerhandbuch
-
Parkside PKGA 20-Li C2 Benutzerhandbuch
-
-
-
Parkside PWSA 20-Li A1 Bedienungsanleitung