Moulinex POWERSTYLE Bedienungsanleitung
- Kategorie
- Staubsauger
- Typ
- Bedienungsanleitung


10
Nous vous remercions d'avoir choisi un appareil de la gamme
Moulinex. Dans le monde entier, Moulinex cherche à vous
faire bénéficier de son savoir-faire en étant à l'écoute des
besoins des consommateurs.
Description
Familiarisez-vous avec votre aspirateur. Les lettres corres-
pondent aux différents éléments de votre appareil qui sont
illustrés sur les premières pages de cette notice.
A Bloc moteur
A1 Pédale marche/arrêt du moteur
A2 Pédale d’enrouleur du cordon électrique
B Tableau de bord (selon modèle)
B1 Version mécanique
B2 Variateur électronique de la puissance d’aspiration
C Capot
C1 Poignée de transport
C2 Verrou d’accès au sac à poussière et aux filtres.
C3 Avertisseur de remplissage
D Compartiment des accessoires
D1 Petit suceur
D2 Suceur plat
E Compartiment sac à poussière
E1 Porte sac
E2 Sac à poussière papier ou tissu
E3 Bouton d'éjection du sac
F Compartiment filtres
F1 Filtre de protection moteur
F2 Filtre de sortie d'air : filtre mousse
F3 Filtre de sortie d'air : filtre électrostatique
F4 Plaque de fermeture filtre
G Flexible
G1 Tourelle pivotante
G2 Flexible
G3 Poignée avec régulateur manuel d'aspiration
H Tubes (selon modèle)
H1/H2 2 tubes en plastique (H1) ou métal (H2)
H3 1 tube télescopique à crans
I Suceur (selon modèle)
I1 Suceur automatique à roulettes
I2 Suceur combiné
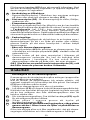
Conseils de sécurité
- Lisez attentivement le mode d’emploi avant la première
utilisation de votre appareil : une utilisation non conforme au
mode d’emploi dégagerait Moulinex de toute responsabilité.

11
- Ne laissez pas les enfants se servir de l’appareil sans
surveillance.
- Vérifiez que la tension d’alimentation de votre appareil cor-
respond à celle de votre installation électrique.
Toute erreur de branchement annule la garantie.
- Votre appareil est destiné à un usage domestique exclusive-
ment.
- N’utilisez pas l’appareil si le cordon électrique est défectueux.
- Si le câble d’alimentation est endommagé, il doit être rem-
placé par le fabricant, son service après-vente ou une
personne de qualification similaire afin d’éviter un danger.
- Ne mettez pas l’appareil, le cordon d’alimentation ou la fiche
dans l’eau ni sous l’eau courante.
- Toute intervention autre que le nettoyage et l’entretien usuel
par le client doit être effectuée par un centre service agréé
Moulinex.
- Arrêtez et débranchez l’appareil pour :
. changer le sac à poussière
. changer ou nettoyer les filtres
. le nettoyer et après chaque utilisation
- N’aspirez pas de substances inflammables ou explosives
(liquide, gaz).
- N’aspirez pas de résidus incandescents (cendres chaudes,
braises, etc...).
- N’aspirez jamais de l’eau ou tout autre liquide, de matières
humides (ex. : mousse nettoyante pour moquette pas encore
totalement sèche) ou d’éléments tranchants.
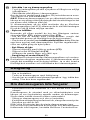
Mise en service
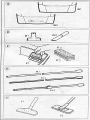
Dépliez le volet de couverture de cette notice, les dessins
numérotés illustrent les montages et fonctions décrits dans les
pages suivantes.
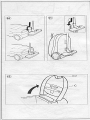
. Montage / réglage des tubes
- Assemblez les deux tubes (H1/H2) .
. Si votre appareil est équipé d’un tube télescopique à crans
(H3) :
- Poussez le curseur et faites coulisser le tube jusqu'à la
longueur souhaitée.
- Relâchez le curseur : le tube se bloque automatiquement.
- Pour débloquer le tube, poussez le curseur : les 2 parties
coulissent à nouveau.
. Branchement du flexible sur l’appareil
- Enfoncez l’extrémité de la tourelle pivotante (G1) du flexible
dans l’ouverture d’aspiration.
Pour retirer le flexible de l’appareil : appuyez sur les 2 touches
situées sur la tourelle pivotante, puis tirez.
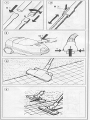
. Montage et réglage du grand suceur
- Emboîtez le grand suceur à l’extrémité du tube.
a. Votre appareil est équipé du suceur automatique (I1).
Ce nouveau suceur s'adapte automatiquement aux différents
types de revêtement. Il permet un grand confort d'utilisation
grâce à son système de roulettes.
1
2
3
4

12
b. Votre aspirateur est équipé d’un suceur combiné (I2).
- Votre suceur combiné (I2) est muni d’une pédale basculante
qui vous permet de l’adapter au type de sol à nettoyer.
. Position sols lisses (carrelages, parquets...) : la brosse
située dans le suceur doit être placée en position basse. Pour
la faire descendre, appuyez sur la pédale.
. Position sols tapis ou moquettes.
La brosse doit être placée en position haute pour ne pas frotter
sur le sol. Pour remonter la brosse, faites basculer la pédale.
Seule la surface plane du suceur est alors en contact avec le
sol.
. Branchement du cordon et mise en marche.
- Sortez le cordon de l’appareil à la longueur désirée et branchez.
- Appuyez sur la pédale (A1) pour mettre en marche l’appareil.
Pour l’arrêter, appuyez à nouveau sur la pédale.
. Réglage de la puissance d’aspiration
Si votre appareil est équipé d’un variateur électronique de
puissance (B2), vous pouvez choisir la puissance la plus
adaptée aux travaux à effectuer.
N’oubliez pas que la poignée (G3) du flexible est équipée d’un
régulateur manuel du débit d’air qui vous permet d’agir momen-
tanément sur la puissance d’aspiration : plus le régulateur est en
position ouverte, plus l’aspiration est faible.
. Utilisation des accessoires
- Ouvrez la porte du compartiment des accessoires. Ceux-ci
peuvent être indifféremment montés sur les tubes ou direc-
tement à l’extrémité de la poignée (G3).
. Le petit suceur (D1) pour vos tentures, meubles capitonnés,
escaliers,...
. Le suceur plat (D2) pour radiateurs, plinthes,...
Moulinex a conçu des accessoires complémentaires que
vous pouvez vous procurer auprès de votre revendeur habi-
tuel ou d’un centre Moulinex :
. Turbo brosse (Réf. CQ4) : il se monte directement sur le
tube sans aucun branchement. Sélectionnez la puissance
maximum sur le tableau de bord de votre appareil. Cet
accessoire vous permet de détacher en douceur la poussière
incrustée et de redresser les poils de vos tapis et moquettes leur
offrant ainsi une nouvelle jeunesse.
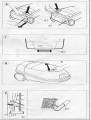
. Interruption momentanée du nettoyage
Si vous souhaitez interrompre momentanément le nettoyage,
par exemple pour déplacer un meuble ou un tapis, utilisez la
fonction spéciale «parking» de votre aspirateur. Accrochez le
tube et le suceur dans l’encoche spéciale à l’arrière de l’aspi-
rateur.
. Transport et rangement
- Après avoir arrêté (A1), puis débranché votre appareil,
rangez le cordon électrique en appuyant sur la pédale (A2).
Le câble s'enroule automatiquement.
- Vous pouvez déplacer ou ranger l'aspirateur en position
verticale avec ses accessoires montés en fixant la patte
d'accrochage du suceur à l'arrière de votre appareil. Il reste
ainsi prêt à l'emploi et occupe un minimum d’espace.
5
6
7
8
9
10
11

13
Nota : Pour le suceur (I2), tournez préalablement la tête du
suceur avant de l'accrocher.
Entretien
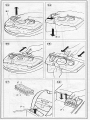
. Changement du sac à poussière
Votre appareil est équipé d'un sac à poussière papier ou d'un
sac tissu (selon modèle).
Si vous constatez une diminution de l’efficacité de votre
appareil, vérifiez l’avertisseur de remplissage du sac (C3) en
réglant la puissance maximum et en maintenant le suceur levé
du sol. S'il est rouge, changez le sac.
- Arrêtez l’appareil et débranchez- le.
- Ouvrez la porte d’accès au compartiment du sac en soule-
vant le verrou (C2) et en basculant le couvercle.
Moulinex a conçu pour vous un système particulièrement
hygiénique qui vous permet de jeter le sac papier plein sans le
toucher :
- Sans toucher le sac, saisissez la poignée du porte-sac (E1)
et tirez.
- Laissez tomber le sac dans la poubelle en appuyant sur le
bouton (E3).
- Si votre appareil est muni d'un sac hygiène, fermez le sac
en tirant sur la languette avant de retirer le porte-sac.
N’oubliez pas de changer régulièrement le sac à poussière et
les filtres. L’efficacité du nettoyage et la longévité du moteur de
votre appareil en dépendent.
. Mise en place du sac
- Emboîtez le support cartonné du nouveau sac sur le porte-
sac jusqu’à la butée.
- Remettez le porte-sac et le sac en position.
Si votre appareil est équipé d’un sac tissu, procédez de la
même façon. Videz-le et remettez-le en place.
Nota : l’appareil étant muni d’un dispositif de sécurité «pré-
sence du sac», vous ne pouvez pas fermer le capot si le sac
et le porte-sac ne sont pas correctement installés. Les sacs
papier Moulinex d’origine étant conçus pour assurer et main-
tenir l’efficacité de votre aspirateur, il est conseillé de n’utiliser
que les sacs Moulinex (Réf. AP8)
. Changement de filtre de sortie d’air
Selon le modèle, votre appareil est équipé de différents filtres
de sortie d'air : filtre mousse (F2), filtre électrostatique (F3).
. Si votre appareil ne possède qu'un filtre mousse, nettoyez-
le régulièrement en le tapotant.
. Si votre appareil est équipé également d'un filtre électros-
tatique de sortie d'air, celui-ci retient les microparticules et
limite la diffusion des poussières fines, facteurs d'allergie.
Nous vous conseillons de le changer régulièrement (tous les
6 remplacements de sac papier).
. Pour changer ces filtres :
- Ouvrez le capot (C)
- Ôtez la plaque de fermeture filtre (F4).
12
13
14
15
16
17

14
- Retirez les filtres usagé et remplacez les par des filtres
propres.
. Nettoyage du filtre moteur.
Le filtre moteur (F1) situé entre le sac à poussière et le moteur
s’encrasse progressivement.
Chaque fois que vous changerez le filtre de sortie d’air, nous
vous conseillons de retirer le filtre moteur (F1), de le nettoyer
en le tapotant et de le remettre en place.
Nettoyage
- Débranchez l'appareil
- Essuyez la carosserie avec un chiffon humide éventuelle-
ment imbibé d'alcool.
- Si votre appareil est équipé d'un sac à poussière en tissu,
surtout ne le lavez pas. Videz régulièrement son contenu.
Si votre appareil ne fonctionne pas,
que faire ?
- Vérifiez que le cordon soit bien branché et que la prise de
courant fonctionne.
Votre appareil est équipé d'une sécurité thermique qui détecte
tout échauffement anormal pendant le nettoyage et arrête
automatiquement le moteur :
- Débranchez alors l'appareil,
- Vérifiez que les tubes, flexible et suceur ne sont pas bouchés,
- Changez le sac s'il est plein.
Après 30 min environ, vous pouvez à nouveau utiliser votre
appareil.
Vous avez suivi toutes les instructions et votre appareil ne
fonctionne toujours pas ? Adressez-vous à un Centre agréé
Moulinex (voir livret Moulinex Service).
18

15
Thank you for choosing this Moulinex vacuum cleaner. It is
just one of a complete range of well designed, practical
products which will help to make your life easier.
Description
Familiarize yourself with your vacuum cleaner. The letters
correspond to the different parts of your vacuum cleaner which
are illustrated at the beginning of this leaflet
A Motor Unit
A1 On/ Off pedal
A2 Automatic cord rewind
B Control Panel (according to model chosen)
B1 Mechanical model
B2 Electronic variable power selector
C Cover
C1 Carrying handle
C2 Catch for opening the cover and for access to dust bag
compartment and filters
C3 Bag full indicator
D Accessory storage compartment
D1 Small cleaning tool
D2 Crevice nozzle
E Dust bag compartment
E1 Dust bag holder with carry handle
E2 Paper dust bag or fabric dust bag
E3 Dust bag release mechanism
F Filter compartment
F1 Motor protection filter
F2 Air exit filter : foam filter
F3 Air exit filter : electrostatic filter (depending on model
chosen)
F4 Cover for filter compartment
G Flexible tube assembly
G1 Pivoting head
G2 Flexible tube
G3 Handle with manual suction regulator
H Tubes (depending on model chosen)
H1/H2 2 plastic (H1) or metal (H2) tubes
H3 1 set of telescopic tubes with ratchet system
I Large cleaning tool (depending on model chosen)
I1 Automatically adjusting cleaning tool with wheels
I2 Cleaning tool with 2 cleaning positions
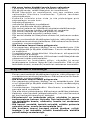
Safety Recommendations
- Read the instruction manual carefully before using the
appliance for the first time: Moulinex is not responsible for any
use not specified in the instruction booklet.

16
- Do not let children use the appliance without supervi-
sion
- Always check that the voltage of your appliance matches that
of your electrical installation
Wiring instructions for U.K and Ireland only :
APPLIANCES WITH FITTED PLUG
Important : For your convenience this appliance is supplied
complete with a plug incorporating a 13 amp fuse.
In the event of replacing a fuse in the plug supplied, a 13 amp
fuse approved by ASTA to BS1362 must be used.
If the socket outlets are not of the 13A BS 1363 type, and
therefore do not accept the plug connected to this appliance,
cut off the plug.
When cut off, this plug is a shock hazard if inserted into a socket
outlet and must therefore be disposed of safely.
If the fuse cover is detachable, never use the plug with the
cover omitted. Replacement covers can be obtained from your
service agent.
Fit the appropriate plug according to the instructions in
paragraph "Fitting a plug". With alternative plugs a 15 amp fuse
must be fitted either in the plug or adaptor or at the main fuse
box.
APPLIANCES WITHOUT FITTED PLUG
FITTING A PLUG - IMPORTANT
The wires in the mains lead are coloured in accordance with
the following code:
BLUE : NEUTRAL
BROWN : LIVE
If the colours do not correspond with the coloured markings
identifying the terminals in your plug, proceed as follows:
The wire which is coloured BLUE must be connected to the
terminal which is marked with the letter ‘N’ or coloured black.
The wire which is coloured BROWN must be connected to the
terminal which is marked with the letter ‘L’ or coloured red.
This appliance is manufactured to conform to the Low Voltage
Electrical Equipment (Safety) Regulations 1989 and is designed
to comply with BS 3456. It complies with the requirements of
the EEC Directive (89/336/EEC).
Any error in connecting the appliance invalidates the
guarantee
- Your appliance is for domestic use only.
- Do not use the appliance if the mains lead is damaged.
- If the mains lead is damaged, it must be replaced by the
manufacturer, the after-sales service , or a qualified technician,
to avoid any danger.
- Do not place the appliance or the mains lead in water or under
running water
- Any operation other than cleaning and usual general mainte-
nance must be carried out by a Moulinex approved service
centre.
- Switch off and unplug the appliance before:
. changing the dust bag
. changing or cleaning the filters
. cleaning it before and after each use
- Do not use appliance to suck up inflammable or explosive
substances (liquid or gas)

17
- Do not use the appliance to suck up hot residues (cinders,
ashes etc.)
- Never suck up water or any other liquid or damp substances
(e.g. still damp carpet cleaning foam ) or sharp objects.
How to Use
Fold out the cover page of this leaflet. The numbers corres-
pond to the descriptions of the various parts and functions
described on the following pages.
. Assembling the tubes
- Fit the two tubes together (H1) or (H2).
. If your appliance is equipped with a telescopic tube with
ratchet system (H3) :
- Push the slide switch and adjust the tube to the required
length.
- Release the slide switch : the tube will be locked in place.
- To unlock the tube push the slide switch again : the 2 sections
will slide apart.
. Attaching the flexible hose to the vacuum cleaner
- Push the end of the pivoting head on the flexible hose (G1)
into the attachment point on the vacuum cleaner.
To remove the flexible hose from the vacuum cleaner : press
on the two buttons situated on either side of the pivoting head,
then pull upwards to remove it from the attachment point.
. Fitting the large cleaning tool
- Fit the large cleaning tool onto the end of the tubes.
a. If your appliance is equipped with an automatic cleaning
tool (I1).
This new cleaning tool automatically adapts to the type of
floor to be cleaned.It is very easy to use due to its system of
large roller wheels.
b. If your vacuum cleaner is equipped with a 2 position
cleaning tool (I2)
- Your 2 position tool (I2) has a rocker switch which allows you
to alter the position of the brush according to the type of floor
to be cleaned
. Hard floor position ( tiles, parquet floors...) : The cleaning
tool’s brush must be in the lower position. Press on the rocker
switch to lower it.
. Carpet or rug position
The cleaning tool’s brush should be raised. Press the rocker
switch to lift the brush up. Only the flat part of the tool is in
contact with the floor.
. How to plug in and use
- Pull the mains lead out to the desired length and plug in the
appliance.
- Press pedal (A1) to start the vacuum cleaner.
To stop it press the pedal again.
. Adjusting the power level
. If your appliance is equipped with an electronic variable
power control (B2) you can choose the power appropriate for
the task.
1
2
3
4
5
6
7

18
Do not forget that the flexible hose handle (G3) has a manual
air flow regulator which allows you to briefly alter the suction
level : the further open the regulator is, the weaker the suction
power.
. Using the accessories
- Open the accessory storage compartment. These accessories
can either be fitted onto the tubes or directly onto the end of
the flexible hose handle (G3).
. The small cleaning tool (D1) for upholstered furniture, stairs
etc.
. The crevice nozzle (D2) for radiators skirting boards etc.
Moulinex has designed additional accessories which may be
supplied with your appliance (depending on model chosen) or
can be obtained from your usual dealer or from a Moulinex
Service Agent :
. Turbobrush (Ref CQ4) : this can be fitted directly onto the
vacuum cleaner tubes without any additional electrical
connection. Select the highest power level on the control panel
of your appliance. This air driven carpet beating accessory
gently detaches embedded dirt and helps to restore your
carpet pile.
. Pausing briefly during vacuuming
If you wish to pause briefly during vacuuming ie : to move a
small piece of furniture or a rug, use the special parking
position on your vacuum cleaner. Slide the hook attached to the
large cleaning tool into the slot on the rear of the appliance.
. Carrying and storage
- When you have finished vacuuming press pedal (A1) to stop
the appliance then unplug it at the mains and press your foot
on the pedal (A2) to automatically rewind the cord.
- You can move or store your appliance in a vertical position by
sliding the hook on the large cleaning tool into the clip on the
underside of the appliance
This practical system allows you to carry the vacuum around
in one hand and to store it in the minimum of space.
Note : If your appliance is equipped with large cleaning
tool (I2) turn it through 180° before attaching to the cleaner.
Maintenance
. Changing the dust bag
Your appliance is equipped with either a paper dust bag or a
fabric dust bag (depending on model chosen).
If you notice that the vacuum cleaner seems to be less efficient
than usual, check the bag full indicator (C3) by selecting the
maximum power and lifting the cleaning tool off the floor. If it
turns red, change the bag.
- Turn off the appliance and unplug it.
- Lift up the catch (C2) to gain access to the dust bag
compartment and raise the cover.
Moulinex has designed an extremely hygienic system to
enable you to remove, carry and dispose of the full dust bag
without touching it.
8
9
10
11
12

19
- Without touching the dust bag pull the handle (E1) up to
remove the bag holder.
- Release the bag into the waste bin by pushing the bag
release lever (E3).
- If your appliance is fitted with a hygienic dust bag, close
the bag by pulling on the flap before removing the bag
holder from the vacuum cleaner
Do not forget to regularly change the dust bag and the filters.
The efficiency of your cleaner and the life of the motor depend
on it.
. Fitting a new dust bag
- Push the cardboard support of the new dust bag into the bag
holder until it will go no further.
- Reposition the bag holder with the dust bag fitted in the
cleaner.
If your appliance is fitted with a fabric dust bag follow the same
instructions as above. Empty it and replace it.
Note : as the appliance is fitted with a safety device which
checks that the “bag is in place” you cannot close the lid if the
bag and bag holder are not fitted correctly.
We recommend that you use only genuine Moulinex dust bags
(Ref AP8) since they are specially designed to ensure optimum
performance from your vacuum cleaner.
. Changing the air outlet filter
Depending on the model you have chosen your appliance is
equipped with different types of filters : foam filter (F2) or
electrostatic filter (F3).
. If your appliance is simply fitted with a foam filter, clean it
regularly by tapping it to remove the dirt.
. If your appliance is also equipped with an electrostatic filter
this retains even smaller particles and limits the redispersement
of fine particles of dust.
It is recommended that you change this type of filter regularly
(approximately every 6 bag changes).
. To change the filters
- Open the large cover (C).
- Remove the filter cover (F4).
- Remove the used filters and replace them by new ones.
. Cleaning the motor filter
The motor filter (F1) situated between the dust bag and the
motor will gradually become dirty.
Each time you change the air outlet filter we advise you to
remove the motor filter (F1) and to clean it by tapping to remove
the dirt and then replacing it in the vacuum cleaner.
Cleaning
- Unplug the appliance
- Clean the vacuum cleaner body with a damp cloth.
- If your appliance has a fabric dust bag, never wash it, simply
empty it regularly.
13
14
15
16
17
18

20
What to do if your appliance does
not work
- First check that the appliance is correctly plugged in and that
the electrical socket is working.
Your vacuum is equipped with a safety thermal cut out which
detects whether the appliance is overheating whilst in use and
automatically stops the motor. If this happens :
- Stop the appliance and unplug it.
- Check that the tubes, flexible hose and cleaning tool are not
blocked.
- Change the bag if it is full.
After about 30 minutes you can use the vacuum cleaner again.
If you have carefully followed the above instructions and your
appliance still does not work :
- contact a Moulinex Service Agent (see list in the "Moulinex
Service" leaflet).

21
Sie haben sich für ein Moulinex-Gerät entschieden. Dafür
vielen Dank. Moulinex bietet - als ein seit Jahrzehnten
bedeutender Hersteller von Elektro-Haushaltsgeräten -
ausgereifte Technik, die stets auf die Bedürfnisse der
Verbraucher ausgerichtet ist.
Beschreibung
A Motorblock
A1 Fußschalter Ein/Aus
A2 Fußschalter für automatische Kabelaufwicklung
B Schalttafel (je nach Modell)
B1 Mechanisches Modell
B2 elektronische Saugkraft-Regulierung
C Gehäuse
C1 Tragegriff
C2 Verriegelung des Gerätes; Zugriff zum Staubbeutel
und zu den Filtern
C3 Staubbeutel-Füllanzeige
D Zubehörfach
D1 Polsterdüse
D2 Fugendüse
E Staubbeutelklappe
E1 Staubbeutelhalterung mit Beutelauswurftaste
E2 Doppelwandiger Papierstaubbeutel
E3 Staubbeutel-Auswurftaste
F Filterfach
F1 Motorschutzfilter
F2 Luftaustrittsfilter
F3 Micro-Feinfilter
F4 Filter-Abdeckklappe
G Saugschlauch
G1 Saugschlauchgelenk
G2 Saugschlauch
G3 Handgriff mit Nebenluftsteller (mechanische
Regulierung der Saugkraft)
H Saugrohre
H1/2 Saugrohre aus Metall (H2) oder Kunststoff (H1), je
nach Modell
H3 Raster-Teleskoprohr (je nach Modell)
I Saugdüsen
I1 Automatik-Saugdüse mit Leichtlaufrollen
I2 kombinierte Gelenk-Saugdüse (unterschiedliche
Ausführung je nach Modell)
Sicherheitshinweise
- Dieser Staubsauger darf nur im Haushalt für trockenes
Sauggut eingesetzt werden. Menschen und Tiere dürfen mit

22
dem Gerät nicht abgesaugt werden. Andere
Verwendungsarten geschehen auf eigene
- Gefahr und sind möglicherweise gefährlich. Vergleichen Sie
vor der ersten Benutzung des Staubsaugers die
Anschlußdaten auf dem Typenschild (Netzspannung und
Netzfrequenz) mit denen Ihres Elektronetzes. Diese Daten
müssen unbedingt übereinstimmen, damit keine Schäden
am Gerät auftreten. Die Netzsteckdose muß über eine 10
Ampere Sicherung abgesichert sein.
- Ziehen Sie das Kabel am Netzstecker aus dem Gerät, bis es
die erforderliche Länge hat. Das Anschlußkabel nicht zum
Tragen benutzen, nicht über scharfe Kanten ziehen, nicht
unter Türen quetschen oder anderweitig einklemmen.
Vermeiden Sie häufiges Überfahren des Anschlußkabels mit
dem Gerät. Das Kabel könnte auf die Dauer beschädigt
werden. Ziehen Sie das Kabel immer am Stecker – niemals
am Kabel – aus der Steckdose.
- Benutzen Sie das Gerät nicht, wenn es Schäden aufweist;
besonders wenn das Anschlußkabel beschädigt ist. Ein
beschädigtes Gerät kann Ihre Sicherheit gefährden.
Reparaturen dürfen nur von Fachkräften ausgeführt werden.
Durch unsachgemäße Reparaturen können erhebliche
Gefahren für den Benutzer entstehen.
- Mit dem Staubsauger keine Flüssigkeiten bzw. feuchten
Schmutz aufsaugen. Das kann zu erheblichen
Funktionsstörungen führen. Außerdem kann dadurch der
Schutz gegen einen elektrischen Schlag beeinträchtigt
werden. Lassen Sie deshalb auch feucht gereinigte oder
shampoonierte Teppichböden vor dem Absaugen erst
vollständig trocknen. Kein Wasser, groben Schmutz, scharfe
Gegenstände (z. B. Glassplitter, Nägel, Schrauben, Steine),
keinen Schutt, Zement oder Gips aufsaugen.
- Keine glühende Asche oder Kohle aufsaugen, dadurch kann
der Staubsauger in Brand geraten. Keine leicht entflammbaren
oder explosiven Stoffe bzw. Gase aufsaugen.
- Kinder von elektrischen Geräten fernhalten. Düsen und
Rohre dürfen bei eingeschaltetem Gerät nicht in Kopfnähe
kommen. Es besteht Verletzungsgefahr für Augen und Ohren.
- Ohne Staubbeutel, Motor- und Abluftfilter darf das Gerät
nicht benutzt werden, es könnte sonst Schaden nehmen!
Wenn kein Staubbeutel eingesetzt ist, kann der
Staubbeuteldeckel nicht geschlossen werden. Bitte keine
Gewalt anwenden. Staubbeutel sind Einwegartikel. Sie dürfen
nicht mehrfach verwendet werden.
- Ein Temperaturbegrenzer schaltet den Staubsauger aus,
wenn er zu warm wird. Bei einzelnen Modellen wird das von
einer Thermo-Anzeigelampe angezeigt. Die Störung kann
auftreten, wenn z. B. sperriges Sauggut die Saugwege
verstopft oder der Staubbeutel voll ist. Auch kann ein stark
verschmutzter Abluft- oder Motorfilter die Ursache dafür
sein. Schalten Sie den Staubsauger dann bitte aus! Nach
Beseitigung der Ursache und einer Wartezeit von ca. 20-30
Minuten hat sich das Gerät soweit abgekühlt, daß es wieder
eingeschaltet werden kann.
- Vor jeder Säuberung oder Wartung das Gerät ausschalten
und den Netzstecker ziehen. Das Gerät niemals in Wasser
Seite wird geladen ...
Seite wird geladen ...
Seite wird geladen ...
Seite wird geladen ...
Seite wird geladen ...
Seite wird geladen ...
Seite wird geladen ...
Seite wird geladen ...
Seite wird geladen ...
Seite wird geladen ...
Seite wird geladen ...
Seite wird geladen ...
Seite wird geladen ...
Seite wird geladen ...
Seite wird geladen ...
Seite wird geladen ...
Seite wird geladen ...
Seite wird geladen ...
Seite wird geladen ...
Seite wird geladen ...
Seite wird geladen ...
Seite wird geladen ...
Seite wird geladen ...
Seite wird geladen ...
Seite wird geladen ...
Seite wird geladen ...
Seite wird geladen ...
Seite wird geladen ...
Seite wird geladen ...
Seite wird geladen ...
Seite wird geladen ...
Seite wird geladen ...
Seite wird geladen ...
Seite wird geladen ...
Seite wird geladen ...
Seite wird geladen ...
Seite wird geladen ...
Seite wird geladen ...
Seite wird geladen ...
Seite wird geladen ...
Seite wird geladen ...
Seite wird geladen ...
Seite wird geladen ...
Seite wird geladen ...
-
 1
1
-
 2
2
-
 3
3
-
 4
4
-
 5
5
-
 6
6
-
 7
7
-
 8
8
-
 9
9
-
 10
10
-
 11
11
-
 12
12
-
 13
13
-
 14
14
-
 15
15
-
 16
16
-
 17
17
-
 18
18
-
 19
19
-
 20
20
-
 21
21
-
 22
22
-
 23
23
-
 24
24
-
 25
25
-
 26
26
-
 27
27
-
 28
28
-
 29
29
-
 30
30
-
 31
31
-
 32
32
-
 33
33
-
 34
34
-
 35
35
-
 36
36
-
 37
37
-
 38
38
-
 39
39
-
 40
40
-
 41
41
-
 42
42
-
 43
43
-
 44
44
-
 45
45
-
 46
46
-
 47
47
-
 48
48
-
 49
49
-
 50
50
-
 51
51
-
 52
52
-
 53
53
-
 54
54
-
 55
55
-
 56
56
-
 57
57
-
 58
58
-
 59
59
-
 60
60
-
 61
61
-
 62
62
-
 63
63
-
 64
64


Moulinex POWERSTYLE Bedienungsanleitung
- Kategorie
- Staubsauger
- Typ
- Bedienungsanleitung
in anderen Sprachen
- English: Moulinex POWERSTYLE Owner's manual
- français: Moulinex POWERSTYLE Le manuel du propriétaire
- español: Moulinex POWERSTYLE El manual del propietario
- italiano: Moulinex POWERSTYLE Manuale del proprietario
- Nederlands: Moulinex POWERSTYLE de handleiding
- português: Moulinex POWERSTYLE Manual do proprietário
- dansk: Moulinex POWERSTYLE Brugervejledning
- svenska: Moulinex POWERSTYLE Bruksanvisning
- suomi: Moulinex POWERSTYLE Omistajan opas
Verwandte Artikel
-
Moulinex MO5233PA Bedienungsanleitung
-
Moulinex MO2441 Bedienungsanleitung
-
-
-
-
-
-
Moulinex MO5325 Bedienungsanleitung
-