Haier AC282AFEAA Operation and Installation Manual
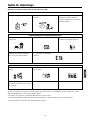
- Kategorie
- Split-System-Klimaanlagen
- Typ
- Operation and Installation Manual
Dieses Handbuch ist auch geeignet für

No. 0150502673 B
Please read this manual carefully before using this air conditioner
Please keep this manual safely for future use
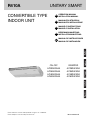
CONVERTIBLE TYPE
INDOOR UNIT
ON-OFF
AC282AFEAA
AC362AFEAA
AC482AFEAA
AC602AFEAA
INVERTER
AC282AFERA
AC362AFERA
AC482AFERA
AC602AFERA
OPERATION MANUAL
INSTALLATION MANUAL
EN
MANUALE DI ISTRUZIONI
MANUALE DI INSTALLAZIONE
IT
MANUEL D’INSTRUCTIONS
MANUEL D’INSTALLATION
FR
BEDIENUNGSANLEITUNG
INSTALLATIONSANLEITUNG
DE
MANUAL DE INSTRUCCIONES
MANUAL DE INSTALACIÓN
ES
R410A UNITARY SMART


AC282AFEAA AC362AFEAA AC482AFEAA AC602AFEAA
AC282AFERA AC362AFERA AC482AFERA AC602AFERA
CE
Tutti i prodotti sono conformi alle seguenti normative europee:
- Direttiva 73/23/EEC Basso Voltaggio
- Direttiva 2006/95/EC Basso Voltaggio
- Direttiva 89/336/EEC Compatibilità elettromagnetica
ROHS
Il prodotto è conforme alla normativa 2002/95/EEC sulla restrizione d’uso di
sostanze inquinanti negli apparecchi elettrici ed elettronici.
WEEE
Informativa al consumatore come previsto dalla normativa europea
2002/96/CE riguardante i rifiuti di apparecchiature elettriche ed elettroniche.
SPECIFICHE DI SMALTIMENTO:
Il climatizzatore è contrassegnato con questo simbolo,
ciò significa che i prodotti elettrici ed elettronici non
possono essere smaltiti insieme ai rifiuti domestici non
differenziati. Non cercare di demolire il sistema da soli:
la demolizioni dei sistemi di condizionamento, nonché il
recupero del refrigerante, dell’olio e di qualsiasi altra
parte devono essere eseguiti da un installatore qualifi-
cato in conformità alla legislazione locale e nazionale
vigente in materia.I climatizzatori devo essere trattati presso una struttura spe-
cializzata nel riutilizzo, riciclaggio e recupero dei materiali. Il corretto smaltimen-
to del prodotto eviterà le possibili conseguenze negative all’ambiente e alla
salute dell’uomo. Per maggiori informazioni contattare l’installatore o le autori-
tà locali. Le batterie devono essere tolte dal telecomando e smaltite separata-
mente conformemente alla legislazione locale e nazionale vigente in materia.
CONFORMITÀ ALLE DIRETTIVE EUROPEE PER I MODELLI:
Haier Industrial Park, No.1 Haier Road, Qingdao, P.R.China
IT
AC282AFEAA AC362AFEAA AC482AFEAA AC602AFEAA
AC282AFERA AC362AFERA AC482AFERA AC602AFERA
CE
All the products are in conformity with the following European provision:
- Low Voltage Directive 73/23/EEC
- Low Voltage Directive 2006/95/EC
- Electromagnetic CompatibilitY 89/336/EEC
ROHS
The products are fulfilled with the requirements in the directive 2002/95/EEC of the
European parliament and of the council on the Restriction of the use of Certain Haz-
ardous Substances in Electrical and Electronic Equipment (EU RoHS Directive)
.
WEEE
In accordance with the directive 2002/96/CE of the European parliament,
herewith we inform the consumer about the disposal requirements of the
electrical and electronic products.
DISPOSAL REQUIREMENTS:
Your air conditioning product is marked with this sym-
bol. This means that electrical and electronic products
shall not be mixed with unsorted household waste.
Do not try to dismantle the system yourself: the dis-
mantling of the air conditioning system, treatment of
the refrigerant, of oil and of other part must be done
by a qualified installer in accordance with relevant
local and national legislation.
Air conditioners must be treated at a specialized treatment facility for re-use,
recycling and recovery. By ensuring this product is disposed of correctly, you
will help to prevent potential negative consequences for the environment and
human health. Please contact the installer or local authority for more infor-
mation. Battery must be removed from the remote controller and disposed of
separately in accordance with relevant local and national legislation.
EUROPEAN REGULATIONS CONFORMITY FOR THE MODELS:
EN
AC282AFEAA AC362AFEAA AC482AFEAA AC602AFEAA
AC282AFERA AC362AFERA AC482AFERA AC602AFERA
CE
Tous les produits sont conformes aux directives européennes suivantes:
- Directive 73/23/CEE Basse tension
- Directive 2006/95/CE Basse tension
- Directive 89/336/CEE Compatibilité électromagnétique
ROHS
L'appareil est conforme à la directive 2002/95/CEE relative à la limitation de
l'utilisation de certains substances dangereuses dans les équipements élec-
triques et électroniques.
DEEE (WEEE)
Information au consommateur comme le prévoit la directive européenne
2002/96/CE relative aux déchets d'équipements électriques et électro-
niques.
SPECIFICATIONS POUR L'ELIMINATION:
Ce pictogramme, apposé sur le climatiseur, signifie
que les équipements électriques et électroniques ne
peuvent pas être éliminés avec les déchets ménagers
non triés. Ne pas essayer de démanteler l'équipement
soi-même: le démantèlement des systèmes de clima-
tisation, ainsi que la récupération du frigorigène, de
l'huile et de toute autre partie doivent être effectués
par un installateur qualifié conformément à la législa-
tion locale et nationale en vigueur en la matière. Les climatiseurs doivent être
traités dans un centre spécialisé dans la réutilisation, le recyclage et la valo-
risation des matériaux. L'élimination correcte de ces appareils permet d'évi-
ter les effets nocifs sur l'environnement et la santé humaine. Pour plus de
renseignements contacter l'installateur ou les autorités locales. Les piles doi-
vent être retirées de la télécommande et éliminées séparément, conformé-
ment à la législation locale et nationale en vigueur en la matière.
CONFORMITÉ AUX DIRECTIVES EUROPÉENNES POUR LES MODÈLES:
FR

Haier Industrial Park, No.1 Haier Road, Qingdao, P.R.China
AC282AFEAA AC362AFEAA AC482AFEAA AC602AFEAA
AC282AFERA AC362AFERA AC482AFERA AC602AFERA
CE
Alle Produkte erfüllen die folgenden europäischen Richtlinien:
- Niederspannungsrichtlinie 73/23/EWG
- Niederspannungsrichtlinie 2006/95/EG
- EMV-Richtlinie 89/336/EWG
ROHS
Das Produkt erfüllt die Richtlinie 2002/95/EWG zur Beschränkung der Ver-
wendung bestimmter gefährlicher Stoffe in Elektro- und Elektronikgeräten.
WEEE
Verbraucherinformation laut europäischer Richtlinie 2002/96/EG zu Elektro-
und Elektronik-Altgeräten.
HINWEISE ZUR ENTSORGUNG:
Das Klimagerät ist mit diesem Symbol gekennzeich-
net, das darauf hinweist, dass Elektro- und Elektronik-
geräte getrennt vom Hausmüll entsorgt werden müs-
sen. Verschrotten Sie die Anlage nicht selbst: die Ver-
schrottung von Klimaanlagen, sowie die Rückgewin-
nung des Kältemittels, des Öls und aller sonstigen Tei-
le müssen durch einen qualifizierten Installateur in
Übereinstimmung mit den einschlägigen geltenden
örtlichen und nationalen Vorschriften erfolgen. Die Klimageräte müssen bei
einem Unternehmen entsorgt werden, das auf die Verwertung, das Recycling
und die Rückgewinnung der Materialien spezialisiert ist. Die richtige Entsor-
gung des Produkts hilft negative Auswirkungen auf Umwelt und Gesundheit
zu vermeiden. Für weitere Informationen wenden Sie sich bitte an den Instal-
lateur oder die örtlichen Behörden. Die Batterien müssen aus der Fernbedie-
nung entfernt und in Übereinstimmung mit den einschlägigen geltenden ört-
lichen und nationalen Vorschriften getrennt entsorgt werden.
ÜBEREINSTIMMUNG MIT DEN EUROPÄISCHEN RICHTLINIEN FÜR DIE MODELLE:
DE
AC282AFEAA AC362AFEAA AC482AFEAA AC602AFEAA
AC282AFERA AC362AFERA AC482AFERA AC602AFERA
CE
Todos los productos están en conformidad con las siguientes Normativas
Europeas:
- Bajo Voltaje directiva 73/23/EEC
- Bajo Voltaje directiva 2006/95/EC
- Compatibilidad electromagnética 89/336/EEC
ROHS
Los productos cumplen los requisitos de la directiva 2002/95/EEC del parla-
mento Europeo y el consejo regulador Del uso de materiales peligrosos en
equipamientos eléctricos Y electrónicos. (EU RoHS Directiva).
WEEE
De acuerdo con la directiva 2002/96/CE del parlamento Europeo, Informa-
mos al consumidor acerca del reciclage de los productos Electrónicos y
eléctricos.
REQUISITOS PARA LA ELIMINACIÓN:
Su acondicionador de aire está marcado con este
símbolo. Esto significa que los productos eléctricos y
electrónicos no deben mezclarse con el resto de resi-
duos domésticos no clasificados.
No intente desmontar el sistema usted mismo: El des-
mantelamiento del acondicionador de aire, así como
el tratamiento del refrigerante, aceite y otros compo-
nentes, debe ser efectuado por un instalador compe-
tente de acuerdo con las normas locales y nacionales aplicables. Los acon-
dicionadores de aire deben ser tratados en instalaciones especializadas para
su reutilización, reciclaje y recuperación. Al asegurarse de desechar este pro-
ducto de la forma correcta, està contribuyendo a evitar posibles consecuen-
cias negativas para el entorno y para la salud de las personas. Contacte, por
favor, con el instalador o con las autoridades locales para obtener más infor-
mación. Las pilas del control remoto deben extraerse y eliminarse por sepa-
rado y de acuerdo con la normativa local y nacional aplicable.
CONFORMIDAD EUROPEA DE LAS REGULACIONES PARA LOS MODELOS:
ES

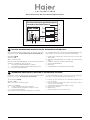
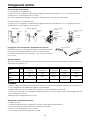
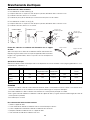
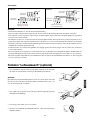
Questo prodotto contiene gas fluorurati ad effetto serra inclusi nel Protocollo
di Kyoto. Non liberare tali gas nell’atmosfera.
Tipo di refrigerante: R410A
Valore GWP*: 1975
*
GWP = potenziale di riscaldamento globale
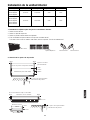
Compilare con inchiostro indelebile,
• 1 la carica di refrigerante di fabbrica del prodotto
• 2 la quantità di refrigerante aggiuntiva nel campo e
• 1+2 la carica di refrigerante totale
sull’etichetta di carica del refrigerante fornita con il prodotto
L’etichetta compilata deve essere collocata in prossimità della portata di cari-
ca del prodotto (ad esempio, nell’interno del coperchio della valvola d’inter-
cettazione).
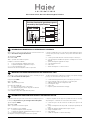
A contiene gas fluorurati ad effetto serra inclusi nel protocollo di Kyoto
B carica di refrigerante di fabbrica del prodotto: vedi targhetta con il nome
dell’unità
C quantità di refrigerante aggiuntiva nel campo
D carica di refrigerante totale
E unità esterna
F cilindro del refrigerante e collettore di carica
INFORMAZIONI IMPORTANTI SUL REFRIGERANTE UTILIZZATO
Haier Industrial Park, No.1 Haier Road, Qingdao, P.R.China
1
1+2=
kg
R410A
2
kg
2=
1=
B
C
D
FE
kg
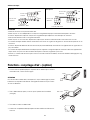
Contains fluorinated greenhouse gases
covered by the Kyoto Protocol
A
This product contains fluorinated greenhouse gases covered by the Kyoto
Protocol. Do not vent into the atmosphere.
Refrigerant type: R410A
GWP* value: 1975
*
GWP = global warming potential
Please fill in with indelible ink,
• 1 the factory refrigerant charge of the product
• 2 the additional refrigerant amount charged in the field and
• 1+2 the total refrigerant charge
on the refrigerant charge label supplied with the product.
The filled out label must be adhered in the proximity of the product charging
port (e.g. onto the inside of the stop valve cover).
A contains fluorinated greenhouse gases covered by the Kyoto Protocol
B factory refrigerant charge of the product: see unit name plate
C additional refrigerant amount charged in the field
D total refrigerant charge
E outdoor unit
F refrigerant cylinder and manifold for charging
IT
IMPORTANT INFORMATION REGARDING THE REFRIGERANT USED
EN
Ce produit contient des gaz à effet de serre fluorés encadrés par le protoco-
le de Kyoto. Ne pas laisser les gaz s’échapper dans l’atmosphère.
Type de réfrigérant: R410A
Valeur GWP*: 1975
*
GWP = potentiel de réchauffement global
Prière de compléter à l’encre indélébile,
• 1 la charge de réfrigérant d’usine du produit
• 2 la quantité de réfrigérant supplémentaire chargée sur place et
• 1+2 la charge de réfrigérant totale
sur l’étiquette de charge de réfrigérant fournie avec le produit.
L’étiquette complétée doit être apposée à proximité de l’orifice de recharge
du produit (par ex. à l’intérieur du couvercle de la vanne d’arrêt).
A contient des gaz à effet de serre fluorés encadrés par le protocole de
Kyoto
B charge de réfrigérant d’usine du produit: voir plaquette signalétique de
l’unité
C quantité de réfrigérant supplémentaire chargée sur place
D charge de réfrigérant totale
E unité extérieure
F cylindre de réfrigérant et collecteur de recharge
INFORMATION IMPORTANTE RELATIVE AU RÉFRIGÉRANT UTILISÉ
FR

Haier Industrial Park, No.1 Haier Road, Qingdao, P.R.China
1
1+2=
kg
R410A
2
kg
2=
1=
B
C
D
FE
kg
Contains fluorinated greenhouse gases
covered by the Kyoto Protocol
A
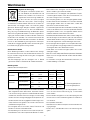
Dieses Produkt enthält fluorierte Treibhausgase, die durch das Kyoto-Proto-
koll abgedeckt werden. Lassen Sie Gase nicht in die Atmosphäre ab.
Kältemitteltyp: R410A
GWP* Wert: 1975
*
GWP = Treibhauspotential
Bitte füllen Sie am Kältemittelbefülletikett, das im Lieferumfang des Gerätes
enthalten ist, mit abriebfester Tinte wie folgt aus:
• 1 die werkseitige Kältemittelbefüllung des Produktes
• 2 die am Montageort befüllte zusätzliche Kältemittelmenge und
• 1+2 die gesamte Kältemittelbefüllung
Das ausgefüllte Etikett muss in der Nähe der Kältemittel-Einfüllöffnung ange-
hängt werden (z. B. auf der Innenseite der Absperrventilabdeckung).
A Enthält fluorierte Treibhausgase, die durch das Kyoto-ProtoKoll abge-
deckt werden
B werkseitige Kältemittelbefüllung des Produktes: siehe Typenschild der
Einheit
C zusätzliche am Montageort befüllen Kältemittelmenge
D gesamte Kältemittelbefüllung
E Außeneinheit
F Kältemittelzylinder und Sammelleitung für die Befüllung
WICHTIGE INFORMATIONEN HINSICHTLICH DES VERWENDETEN KÄLTEMITTELS
DE
Este producto contiene los gases fluorados de efecto invernadora regulados
por el Protocolo de Kioto. No vierta gases a la atmósfera.
Tipo de refrigerante: R410A
Valor GWP*: 1975
*
GWP = Potencial de calentamiento global
Rellene con tinta indeleble,
• 1 la carga de refrigerante de fábrica del producto
• 2 la cantidad adicional de refrigerante cargado en campo y
• 1+2 la carga total de refrigerante
En la etiqueta de carga de refrigerante suministrada con el producto.
La etiqueta rellenada debe pegarse cerca de la conexión de carga del pro-
ducto (p.ej. en el interior de la cubierta de la válvula de tope).
A Contiene los gases fluorados de efecto invernadora regulados por el
Protocolo de Kioto
B Carga de refrigerante de fábrica del producto: véase placa de especifi-
caciones técnicas de la unidad
C Cantidad adicional de refrigerante cargado en campo
D Carga total de refrigerante
E Unidad exterior
F Cilindro del refrigerante y dosificador de carga
INFORMACIÓN IMPORTANTE EN RELACIÓN AL REFRIGERANTE UTILIZADO
ES

AC282AFEAA
AC362AFEAA
AC482AFEAA
AC602AFEAA
AC282AFERA
AC362AFERA
AC482AFERA
AC602AFERA
Please read this operation manual before using the air conditioner.
Please keep this manual carefully and safely.
CONVERTIBLE TYPE AIR CONDITIONER
OPERATION MANUAL
INSTALLATION MANUAL
On-Off Inverter

2
Contents
Cautions
Safety Precautions
Features and Functions
Parts and Functions
Operation
Maintenance
Operation Tips
Troubleshooting
Installation Procedure
Test Run
3
5
6
8
12
19
19
20
24
31

3
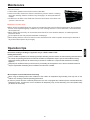
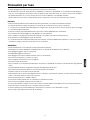
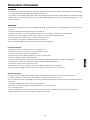
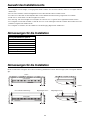
Cautions
Disposal of the old air conditioner
Before disposing an old air conditioner that goes out of use, please make sure it's inoperative and safe. Unplug the air
conditioner in order to avoid the risk of child entrapment.
It must be noticed that air conditioner system contains refrigerants, which require specialized waste disposal. The valuable
materials contained in a air conditioner can be recycled. Contact your local waste disposal center for proper disposal of an old
air conditioner and contact your local authority or your dealer if you have any question. Please ensure that the pipework of
your air conditioner does not get damaged prior to being picked up by the relevant waste disposal center, and contribute to
environmental awareness by insisting on an appropriate, anti-pollution method of disposal.
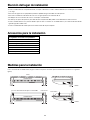
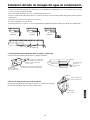
Disposal of the packaging of your new air conditioner
All the packaging materials employed in the package of your new air conditioner may be disposed without any danger to the
environment.
The cardboard box may be broken or cut into smaller pieces and given to a waste paper disposal service. The wrapping bag
made of polyethylene and the polyethylene foam pads contain no fluorochloric hydrocarbon.
All these valuable materials may be taken to a waste collecting center and used again after adequate recycling.
Consult your local authorities for the name and address of the waste materials collecting centers and waste paper disposal
services nearest to your house.
Safety Instructions and Warnings
Before starting the air conditioner, read the information given in the User's Guide carefully. The User's Guide contains very
important observations relating to the assembly, operation and maintenance of the air conditioner.
The manufacturer does not accept responsibility for any damages that may arise due to non-observation of the following
instruction.
Damaged air conditioners are not to be put into operation. In case of doubt, consult your supplier.
Use of the air conditioner is to be carried out in strict compliance with the relative instructions set forth in the User's Guide.
Installation shall be done by professional people. Don't install unit by yourself.
For the purpose of safety, the air conditioner must be properly grounded in accordance with specifications.
Always remember to unplug the air conditioner before opening inlet grill. Always grip plug firmly and pull straight out from the
outlet.
All electrical repairs must be carried out by qualified electricians. Inadequate repairs may result in a major source of danger for
the user of the air conditoiner.
Do not damage any parts of the air conditioner that carry refrigerant by piercing or perforating the air conditioner's tubes
with sharp or pointed items, crushing or twisting any tubes, or scraping the coatings off the surfaces. If the refrigerant spurts
out and gets into eyes, it may result in serious eye injuries.
Do not obstruct or cover the ventilation grille of the air conditioner. Do not put fingers or any other things into the inlet/outlet and
swing louver.
Do not allow children to play with the air conditioner. In no case should children be allowed to sit on the outdoor unit.
When the indoor unit is turned on, the PCB will test if swing motor is O.K., and then fan motor will start up.So there is a few
seconds to wait.
In cooling mode,the flaps will swing automatically to a fixed position for anti-condensating.

If the air conditioner is used under higher temperature condition than those listed, the built-in protection circuit may operate
to prevent internal circuit damage. Also, during Cooling and Dry modes, if the unit is used under conditions of lower
temperature than those listed above, the heat-exchanger may freeze, leading to water leakage and other damage.
Do not use this unit for purposes other than cooling, heating, dehumidifying and ventilation of rooms in ordinary dwellings.
The wiring method should be in line with the local wiring standand.
The waste battery should be disposed properly.
If the fuse on PC board is broken, please change it with the type T 3.15A/250VAC.
4
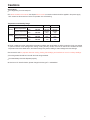
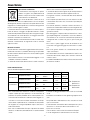
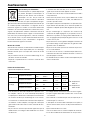
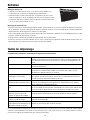
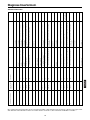
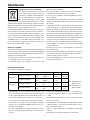
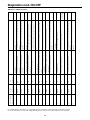
Cautions
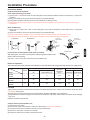
Cooling
Heating
Indoor temperature
Outdoor temperature
Indoor temperature
Outdoor temperature
max. DB/WB
min. DB/WB
max. DB/WB
min. DB/WB
max. DB/WB
min. DB/WB
max. DB/WB
min. DB/WB
ON-OFF Inverter
32/23 C
18/14 C
43/26 C
10 C
27 C
15 C
24/18 C
-7 C
32/23 C
18/14 C
43/26 C
-5 C
27 C
15 C
24/18 C
-
15
C
Temperature and Humidity Range
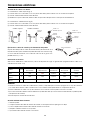
Specifications
The refrigerating circuit is leak-proof.
For all the models in this manual, the all-pole discon-nexion connection method should be applied in the power supply.
Such means for disconnection must be incorporation in the fixed wiring.

WARNING
DANGER
5
Safety Precautions
The breaker of the air conditioner should be all-pole switch, and the distance between its two contacts should be no less
3 mm. Such means for disconnection must be incorporation in the fixed wiring.
Use copper wire only. All the cables shall have got the European authentication certificate.
The power supply connects from the outdoor side. The connecting cable and the power cable are self-provided.
The parameter of connecting cable: H05RN-F 4G 0.75mm
2
.
WARNING
Do not attempt to install this air conditioner by yourself.
This unit contains no user-serviceable parts. Always consult authorized service personnel for repairs.
When moving, consult authorized service personnel for disconnection and installation of the unit.
Do not become excessively chilled by staying for lengthy periods in the direct cooling airflow.
Do not insert fingers or objects into the outlet port or intake grills.
Do not start and stop air conditioner operation by connecting and disconnecting the power supply cord and so on.
Take care not to damage the power supply cord. If the supply cord is damaged, it must be replaced by the manufacturer
or authoried service agent in order to avoid a hazard.
In the event of a malfunction (burning smell, etc.), stop operation immediately, turn off the circuit breaker, and consult
authorized service personnel.
Provide occasional ventilation during use.
Do not direct air flow at fire places or heating apparatuses.
Do not place objects on the air conditioner or climb onto it .
Do not hang objects from the indoor unit.
Do not set flower vases or water containers on top of the air conditioner.
Do not expose the air conditioner directly to water.
Do not operate the air conditioner with wet hands.
Do not pull power supply cord.
Turn off power source when not using the unit for extended periods.
Check the condition of the installation stand for damage.
Do not place animals or plants in the direct path of the air flow.
Do not drink the water drained from the air conditioner.
Do not use in applications involving the storage of foods, plants or animals, precision equipment or art works.
Do not apply any heavy pressure to radiator fins.
Operate only with air filters installed.
Do not block or cover the intake grill and outlet port.
Ensure that any electronic equipment is at least one metre away from either the indoor or outdoor unit.
Avoid installing the air conditioner near a fireplace or other heating apparatuses.
When installing the indoor and outdoor unit, take precautions to prevent access to infants.
Do not use inflammable gases near the air conditioner.

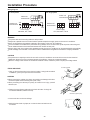
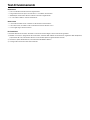
AUTOMATIC OPERATION
SLEEP
COOLING TYPE
When the SLEEP button is pressed during Cooling or Dry mode, the thermostat setting gradually rises during the period
of operation. When the set time is reached, the unit automatically turns off.
HEAT & COOL TYPE
When the SLEEP button is pressed during Heating mode, the air conditioner's thermostat setting gradually lowers during
the period of operation; When the set time is reached, the unit automatically turns off.
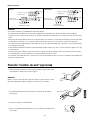
WIRELESS REMOTE CONTROL UNIT
The WIRELESS REMOTE CONTROL UNIT allows convenient control of air conditioner operation.For this type unit, the
wireless remote controllor type is YR-H50.
MILDEW-RESISTANT FILTER
The AIR FILTER has been treated to resist mildew growth, thus allowing cleaner use and easier care.
COOLING TYPE
Merely press the ON/OFF button, and the unit will begin automatic operation in the Cooling or dry modes as appropriate,
in accordance with the thermostat setting and the actual temperature of the room.
HEAT & COOL TYPE
Merely press the ON/OFF button, and the unit will begin automatic operation in any of the Heating, Cooling and Blow
modes as appropriate, in accordance with the thermostat setting and the actual temperature of the room.
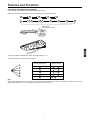
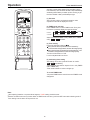
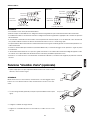
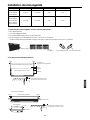
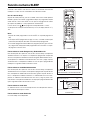
VERTICAL AIR DIRECTION ADJUSTMENT
Use the air direction adjustment within the ranges shown above.
The vertical airflow direction is set automatically as shown, in accordance with the type of operation selected.
Each time the button is pressed, the air direction range will change as follows:
Press the AIR FLOW DIRECTION VERTICAL SET button.
1 2 345
5 4 321
Cool/Dehumidification/Fan:
Heat:
1
2
3
4
5
6
Features and Functions

Each time the button is pressed, the air direction range will change as follows:
air direction louvers
RIGHT/LEFT
1
2 3
4
5
3
2
1
24
1
5
4 5
1
2
3
4
5
Air flow direction set Range of swing
1
2
3
4
5
1
1
2
3
1
to
3
to
3
to
4
to
5
to
5
(all range)
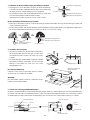
Note :
When being switched on firstly, the up-down flap will be at the position of max. angle. In cooling, the up-down louver is not
good to stay at position 4, 5 for a long time, otherwise, the dew will occur.
HORIZONTAL AIR DIRECTION ADJUSTMENT
Press the AIR FLOW DIRECTION HORIZONTAL SET button.
1
2
3
4
5
Use the air direction adjustments within the ranges shown above.
The swing range of up-down flap is as follow :
7
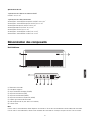
Features and Functions

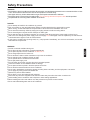
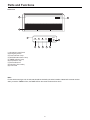
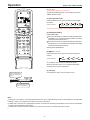
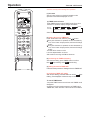
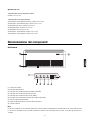
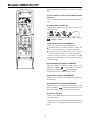
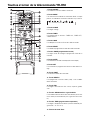
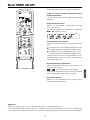
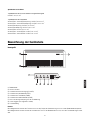
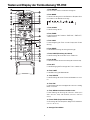
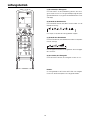
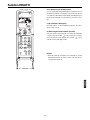
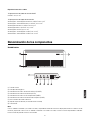
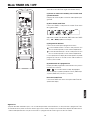
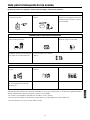
(1) Operating Control Panel
(2) Emergency Switch
(3) Power Indicator Lamp
(4) OPERATION Indicator Lamp
(5) TIMER Indicator Lamp
(6) Compressor Lamp
(7) Remote Receiver
(8) Inlet Grill ( Filter inside )
(9) Front Panel
8
9
1
Note :
For the wired control type unit, the unit state should be checked by the wired controller, instead of the remote receiver.
And if you set the TIMER function, the TIMER LED on the remote receiver will not be on.
8
Parts and Functions
Indoor unit
POWER OPER TIMER
EMER
COMP
1
3
4 5 6
7
2

9
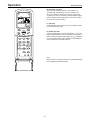
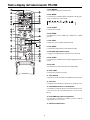
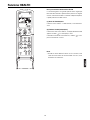
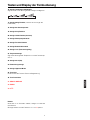
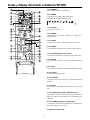
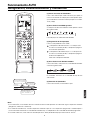
Parts and Functions
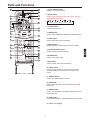
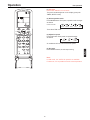
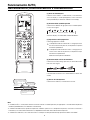
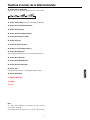
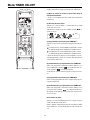
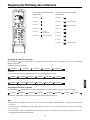
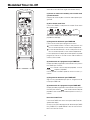
14. TEMP button
Used to set temperature. The temperature range:16 C~30 C
10. LIGHT button
Control the light up and go out of the control panel's
background light source and control the switch of the
buzzer.
8. SLEEP button
Used to select sleep mode
7. HOUR adjustment button
Used to set clock and timer setting.
6. RESET button
Used to reset the controller back to normal condition.
5. LOCK button
Used to lock buttons and LCD display.
9. SET button
Used to confirm Timer and Clock setting.
11. HEALTH button
Used to set Health operation function.
12. FAN button
Used to select fan speed: AUTO, LOW FAN, MID FAN,
HIGH FAN.
13. SWING button
Used to set UP/DOWN air sending and RIGHT/LEFT air
sending direction.
15. Timer mode display
4. TIMER button
Used to select TIMER ON, TIMER OFF, TIMER ON-OFF.
3. CLOCK button
Used to set correct time.
1. Power ON/OFF button
Used for unit to start and stop.
2. MODE button
Used to select operation modes. Each press, operation
modes change as follows.
AUTO COOL DRY FAN HEAT
ON
OFF
TEMP
HEALTH
FAN
MODE
SLEEP
SWING
CLOCK
TIMER
SET
LOCKLIGHT
RESET
HEAT
20
B
A
POWER/SOFT
19
18
17
24
23
16
15
11
1
2
8
3
4
7
6
21
22
27
28
25
26
14
12
13
9
30
29
5
10
HEALTH AIRFLOW
FRESH
10
o
C
31
32
33

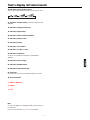
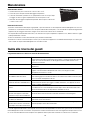
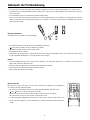
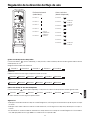
Parts and Functions
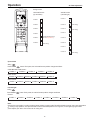
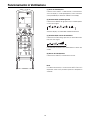
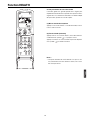
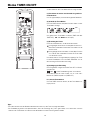
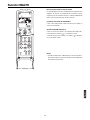
20. Health display
Display when set Health operation function.
23. Battery Capacity display
Display when the electric power of the battery is insufficient.
17. Swing direction display
18. Room temperature display
28. Power/Soft operation display
27. Humidifying display
26. Clock display
25. Temperature display
Used to display the set temperature and room temperature.
24. Lock state display
19. Sleep state display
21. Electric Heating display
29. HEAT button
Used to select auxiliary electric heater function.
22. Fresh Air state display
30. POWER/SOFT button
Used to select power/soft function.
16. Fan speed display
LOW MID HIGH AUTO
Note:
Single cooling air conditioner does not have the displays and functions related to heating.
For some units , the functions are optional.
31. HEALTH AIRFLOW
32. FRESH
31. 10
o
C
10
11 29
30 31 32 33
10

11
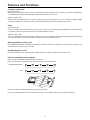
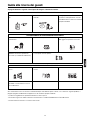
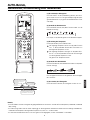
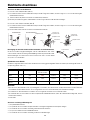
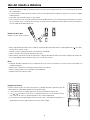
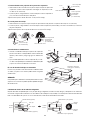
Parts and Functionss
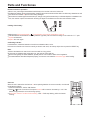
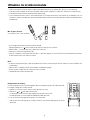
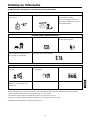
Note:
Remote controller's operation
When in use, put the signal transmission head directly to the receiver hole on the indoor unit.
The distance between the signal transmission head and the receiver hole should be within 7m without any obstacles as well.
Don't throw the controller to prevent it from being damaged.
When electronic-started type fluorescent lamp or change-over type fluorescent lamp or wireless telephone is installed in the
room, the receiver is apt to be interfered in receiving the signal so the distance to the indoor unit should be nearer.
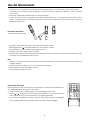
2R-03 dry batteries
M
IN
U
TES
Confirming indicator
In disorderation, reload the batteries or load the new batteries after 5 mins.
If the remote controller can't function normally or doesn't work at all, use a sharp object item to press the RESET key.
Remove the batteries in case the unit won't be used for a long period.
If there are any displays after being taken out, just need to press reset key.
When throwing away the waste batteries, please perform in accordance with the local regulation.
The waste batteries should be disposed properly, and use two new batteries of the same type when loading.
Loading of the battery
Slightly press the part marked with "
" in the direction of the arrow and slide the cover off.
Load the batteries as illustrated: 2 R-03 dry batteries (cylinder). Be sure that the loading is in line with the "+"/"-" pole
request as illustrated.
Replace the cover again.
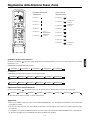
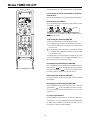
Clock set
When the unit is started for the first time or after replacing batteries in remote controller, clock should
be adjusted as follows:
1. Press CLOCK button, "AM"or "PM" flashes.
2. Press or to set correct time. Each press the time will increase or decrease by 1 min. If the
button is kept pressed, the time will change quickly.
3. P
ress "SET" button to confirm the time setting
. "AM" or "PM" stop flashing, while clock starts
working.
MODE
SLEEP
SWING
CLOCK
TIMER
SET
LOCKLIGHT
RESET
HEAT
1
2
POWER/SOFT
3
HEALTH AIRFLOW
FRESH
10
o
C

12
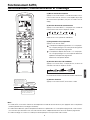
Operation
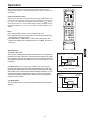
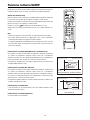
AUTO, COOL, HEAT and DRY
During Auto run operation, the setting temperature which can be adjusted will be shown in LCD display, the unit will select
heating, cooling or fan operation according to the room temperature.
In DRY mode, when the room temperature becomes 2 C lower than the setting temperature, the unit will run intermittently
at LOW speed regardless of FAN setting.
In Heat mode, warm air will blow out after a short period of time due to cold-draft prevention function.
(1) Unit start
Press button ON/OFF, the unit starts.
The previous status appears on the display (except for
TIMER, SLEEP mode).
(5) Unit stop
Press ON/OFF button, the unit stops running.
(2) Select operation mode
Press Mode button. Each press, operation mode changes
as follows:
Remote controller
AUTO COOL DRY FAN HEAT
Then select AUTO, COOL, DRY or HEAT as needed.
Note:
Ultra-low air flow
Temperature
setting+2 C
Temperature
setting
On reaching 2 C lower than
temperature setting, the unit
will run in mild DRY mode.
COOL operation starts
when room temperature is
higher than temperature
setting.
Set the proper temperature.
(3) Temperature setting
Press TEMP button.
Every time the button is pressed, the setting temperature
increases by 1 C; if the button is kept pressed, the setting
temperature will increase quickly.
Every time the button is pressed, the setting temperature
decreases by 1 C; if the button is kept pressed, the setting
temperature will decrease quickly.
(4) Adjust fan speed
Press FAN button. Each press, fan speed changes as
follows:
Air conditioner will run at the selected fan speed.
When fan speed is AUTO, it is changed automatically
according to the indoor temperature.
Remote controller
AUTO LOW MID HIGH
A
U
T
O
ON
OFF
TEMP
HEALTH
FAN
MODE
SLEEP
SWING
CLOCK
TIMER
SET
LOCKLIGHT
RESET
1
2
3
HEAT
POWER/SOFT
5
3
4
HEALTH AIRFLOW
FRESH
10
o
C

13
Operation
(1) Unit start
Press button ON/OFF, the unit starts.
The previous status appears on the display (except for
TIMER, SLEEP mode).
Fan Operation
Note:
In FAN mode, the "AUTO" fan speed is not available.
Furthermore, it is not possible to set the room temperature.
(2) Select operation mode
Press MODE button. Each press, operation mode changes
as follows:
Remote controller
AUTO COOL DRY FAN HEAT
Then select FAN mode.
Air conditioner will run at the selected fan speed.
LOW MID HIGH
(3) Adjust fan speed
Press FAN button. Each press, fan speed changes
as follows:
(4) Unit stop
Press ON/OFF button, the unit stops running.
ON
OFF
TEMP
HEALTH
FAN
MODE
SLEEP
SWING
CLOCK
TIMER
SET
LOCK
LIGHT
RESET
1
2
HEAT
POWER/SOFT
3
4
HEALTH AIRFLOW
FRESH
10
o
C

14
Operation
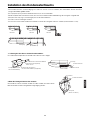
Air Flow Adjustment
Swing louvers
Vertical louvers
(Left and right)
Note:
Horizontal louvers
(Up and down)
Up and down
Swing
Press SWING button. Each press, the horizontal louvers position changes as follows:
COOLING/ DRY/ FAN remote :
Left and right
Swing
Press SWING button. Each press, the vertical louvers position changes as follows:
Remote :
Put louvers at up position in cooling mode and down position in heating mode.This will be helpful to keep an even room temperature
.
In cooling or dry operation, don't put horizontal louvers at downward position for a long time, or outlet grill might get frosted.
Don't expose your skin to cool or warm air for a long time.
HEAT remote :
AUTO remote :
Position 1 Position 2 Position 3 Position 4 Position 5 Position 6 Position 7 Position 8
Position 1 Position 2 Position 3 Position 4 Position 5 Position 6
(Cool/Dry/Fan/Auto(Cool)
have not the position 5)
(Auto swing)
Position 1
Position 2
Position 3
Position 4
Position 5
Position 6
Position 1 Position 2 Position 3 Position 4 Position 6
ON
OFF
TEMP
HEALTH
FAN
MODE
SLEEP
SWING
CLOCK
TIMER
SET
LOCKLIGHT
RESET
HEAT
2
POWER/SOFT
1
Position 1
Position 2
Position 3
Position 4
Position 5
Position 6
Position 7
Position 8
(Auto swing)
(Auto swing)
(Auto swing)
Position 5 Position 4 Position 3 Position 2 Position 1 Position 6
HEALTH AIRFLOW
FRESH
10
o
C
Seite laden ...
Seite laden ...
Seite laden ...
Seite laden ...
Seite laden ...
Seite laden ...
Seite laden ...
Seite laden ...
Seite laden ...
Seite laden ...
Seite laden ...
Seite laden ...
Seite laden ...
Seite laden ...
Seite laden ...
Seite laden ...
Seite laden ...
Seite laden ...
Seite laden ...
Seite laden ...
Seite laden ...
Seite laden ...
Seite laden ...
Seite laden ...
Seite laden ...
Seite laden ...
Seite laden ...
Seite laden ...
Seite laden ...
Seite laden ...
Seite laden ...
Seite laden ...
Seite laden ...
Seite laden ...
Seite laden ...
Seite laden ...
Seite laden ...
Seite laden ...
Seite laden ...
Seite laden ...
Seite laden ...
Seite laden ...
Seite laden ...
Seite laden ...
Seite laden ...
Seite laden ...
Seite laden ...
Seite laden ...
Seite laden ...
Seite laden ...
Seite laden ...
Seite laden ...
Seite laden ...
Seite laden ...
Seite laden ...
Seite laden ...
Seite laden ...
Seite laden ...
Seite laden ...
Seite laden ...
Seite laden ...
Seite laden ...
Seite laden ...
Seite laden ...
Seite laden ...
Seite laden ...
Seite laden ...
Seite laden ...
Seite laden ...
Seite laden ...
Seite laden ...
Seite laden ...
Seite laden ...
Seite laden ...
Seite laden ...
Seite laden ...
Seite laden ...
Seite laden ...
Seite laden ...
Seite laden ...
Seite laden ...
Seite laden ...
Seite laden ...
Seite laden ...
Seite laden ...
Seite laden ...
Seite laden ...
Seite laden ...
Seite laden ...
Seite laden ...
Seite laden ...
Seite laden ...
Seite laden ...
Seite laden ...
Seite laden ...
Seite laden ...
Seite laden ...
Seite laden ...
Seite laden ...
Seite laden ...
Seite laden ...
Seite laden ...
Seite laden ...
Seite laden ...
Seite laden ...
Seite laden ...
Seite laden ...
Seite laden ...
Seite laden ...
Seite laden ...
Seite laden ...
Seite laden ...
Seite laden ...
Seite laden ...
Seite laden ...
Seite laden ...
Seite laden ...
Seite laden ...
Seite laden ...
Seite laden ...
Seite laden ...
Seite laden ...
Seite laden ...
Seite laden ...
Seite laden ...
Seite laden ...
Seite laden ...
Seite laden ...
Seite laden ...
Seite laden ...
Seite laden ...
Seite laden ...
Seite laden ...
Seite laden ...
Seite laden ...
Seite laden ...
Seite laden ...
Seite laden ...
-
 1
1
-
 2
2
-
 3
3
-
 4
4
-
 5
5
-
 6
6
-
 7
7
-
 8
8
-
 9
9
-
 10
10
-
 11
11
-
 12
12
-
 13
13
-
 14
14
-
 15
15
-
 16
16
-
 17
17
-
 18
18
-
 19
19
-
 20
20
-
 21
21
-
 22
22
-
 23
23
-
 24
24
-
 25
25
-
 26
26
-
 27
27
-
 28
28
-
 29
29
-
 30
30
-
 31
31
-
 32
32
-
 33
33
-
 34
34
-
 35
35
-
 36
36
-
 37
37
-
 38
38
-
 39
39
-
 40
40
-
 41
41
-
 42
42
-
 43
43
-
 44
44
-
 45
45
-
 46
46
-
 47
47
-
 48
48
-
 49
49
-
 50
50
-
 51
51
-
 52
52
-
 53
53
-
 54
54
-
 55
55
-
 56
56
-
 57
57
-
 58
58
-
 59
59
-
 60
60
-
 61
61
-
 62
62
-
 63
63
-
 64
64
-
 65
65
-
 66
66
-
 67
67
-
 68
68
-
 69
69
-
 70
70
-
 71
71
-
 72
72
-
 73
73
-
 74
74
-
 75
75
-
 76
76
-
 77
77
-
 78
78
-
 79
79
-
 80
80
-
 81
81
-
 82
82
-
 83
83
-
 84
84
-
 85
85
-
 86
86
-
 87
87
-
 88
88
-
 89
89
-
 90
90
-
 91
91
-
 92
92
-
 93
93
-
 94
94
-
 95
95
-
 96
96
-
 97
97
-
 98
98
-
 99
99
-
 100
100
-
 101
101
-
 102
102
-
 103
103
-
 104
104
-
 105
105
-
 106
106
-
 107
107
-
 108
108
-
 109
109
-
 110
110
-
 111
111
-
 112
112
-
 113
113
-
 114
114
-
 115
115
-
 116
116
-
 117
117
-
 118
118
-
 119
119
-
 120
120
-
 121
121
-
 122
122
-
 123
123
-
 124
124
-
 125
125
-
 126
126
-
 127
127
-
 128
128
-
 129
129
-
 130
130
-
 131
131
-
 132
132
-
 133
133
-
 134
134
-
 135
135
-
 136
136
-
 137
137
-
 138
138
-
 139
139
-
 140
140
-
 141
141
-
 142
142
-
 143
143
-
 144
144
-
 145
145
-
 146
146
-
 147
147
-
 148
148
-
 149
149
-
 150
150
-
 151
151
-
 152
152
-
 153
153
-
 154
154
-
 155
155
-
 156
156
-
 157
157
-
 158
158


Haier AC282AFEAA Operation and Installation Manual
- Kategorie
- Split-System-Klimaanlagen
- Typ
- Operation and Installation Manual
- Dieses Handbuch ist auch geeignet für
in anderen Sprachen
- français: Haier AC282AFEAA
- español: Haier AC282AFEAA
- italiano: Haier AC282AFEAA
Verwandte Papiere
-
Haier AS07GS1ERA Bedienungsanleitung
-
Haier 2HUM14HA03 Bedienungsanleitung
-
-
-
-
-
-
Haier AC24CS1ERA Benutzerhandbuch
-
-
Haier AP48KS1ERA Operation Manual And Installation Manual
Sonstige Unterlagen
-
Hitachi HSU-12RD03/R2(SDB) Benutzerhandbuch
-
Mitsubishi Heavy Industries SRK25ZJP-S Benutzerhandbuch
-
Mitsubishi Electric City Multi PEFY-WP20VMS1-E Bedienungsanleitung
-
-
LG P09EN.UA3 Bedienungsanleitung
-
LG W12AC Benutzerhandbuch
-
-
Fujitsu ARXB12LALH J-II Bedienungsanleitung
-
-
LG ARTCOOL (AM09BP) Bedienungsanleitung