Toro Emotion 43cm Lawn Mower Benutzerhandbuch
- Kategorie
- Rasenmäher
- Typ
- Benutzerhandbuch

FormNo.3362-329RevB
Emotion43LawnMower
ModelNo.21025—SerialNo.290000001andUp
ModelNo.21026—SerialNo.290000001andUp
ModelNo.21027—SerialNo.290000001andUp
Operator'sManual
Introduction
Readthisinformationcarefullytolearnhowtooperate
andmaintainyourproductproperlyandtoavoidinjury
andproductdamage.Youareresponsibleforoperating
theproductproperlyandsafely.
YoumaycontactTorodirectlyatwww.Toro.comfor
productandaccessoryinformation,helpndinga
dealer,ortoregisteryourproduct.
Wheneveryouneedservice,genuineToroparts,or
additionalinformation,contactanAuthorizedService
DealerorToroCustomerServiceandhavethemodel
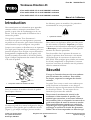
andserialnumbersofyourproductready.Figure1
identiesthelocationofthemodelandserialnumbers
ontheproduct.
Figure1
1.Modelandserialnumberplate
Writetheproductmodelandserialnumbersinthespace
below:
ModelNo.
SerialNo.
Thismanualidentiespotentialhazardsandhas
safetymessagesidentiedbythesafetyalertsymbol
(Figure2),whichsignalsahazardthatmaycauseserious
injuryordeathifyoudonotfollowtherecommended
precautions.
Figure2
1.Safetyalertsymbol
Thismanualuses2wordstohighlightinformation.
Importantcallsattentiontospecialmechanical
informationandNoteemphasizesgeneralinformation
worthyofspecialattention.
Formodelswithstatedenginehorsepower,thegross
horsepoweroftheenginewaslaboratoryratedbythe
enginemanufacturerinaccordancewithSAEJ1940.
Asconguredtomeetsafety,emission,andoperating
requirements,theactualenginehorsepoweronthisclass
oflawnmowerwillbesignicantlylower.
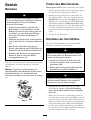
Safety
Improperlyusingormaintainingthismowercan
resultininjury.Toreducethepotentialforinjury,
complywiththesesafetyinstructions.
Torodesignedandtestedthismowerforreasonablysafe
service;however,failuretocomplywiththefollowing
instructionsmayresultinpersonalinjury.
Toensuremaximumsafety,bestperformance,and
togainknowledgeoftheproduct,itisessential
thatyouandanyotheroperatorofthemowerread
andunderstandthecontentsofthismanualbefore
theengineiseverstarted.Payparticularattention
tothesafetyalertsymbol(Figure2)whichmeans
Caution,Warning,orDanger—“personalsafety
instruction.”Readandunderstandtheinstruction
becauseithastodowithsafety.Failuretocomply
withtheinstructionmayresultinpersonalinjury.
©2009—TheToro®Company
8111LyndaleAvenueSouth
Bloomington,MN55420
Registeratwww.Toro.com.
OriginalInstructions(EN)
PrintedinPoland
AllRightsReserved

GeneralLawnMowerSafety
ThefollowinginstructionshavebeenadaptedfromEN
836.
Thiscuttingmachineiscapableofamputatinghands
andfeetandthrowingobjects.Failuretoobservethe
followingsafetyinstructionscouldresultinserious
injuryordeath.
Training
•Readtheinstructionscarefully.Befamiliarwiththe
controlsandtheproperuseoftheequipment.
•Neverallowchildrenorpeopleunfamiliarwiththese
instructionstousethemower.Localregulationscan
restricttheageoftheoperator.
•Keepinmindthattheoperatororuserisresponsible
foraccidentsorhazardsoccurringtootherpeopleor
theirproperty.
•Understandexplanationsforallpictogramsusedon
themowerorintheinstructions.
Gasoline
WARNING-Gasolineishighlyammable.Takethe
followingprecautions.
•Storefuelincontainersspecicallydesignedforthis
purpose.
•Refueloutdoorsonlyanddonotsmokewhile
refueling.
•Addfuelbeforestartingtheengine.Neverremove
thecapofthefueltankoraddgasolinewhilethe
engineisrunningorwhentheengineishot.
•Ifgasolineisspilled,donotattempttostartthe
enginebutmovethemowerawayfromtheareaof
spillageandavoidcreatinganysourceofignition
untilgasolinevaporshavedissipated.
•Replaceallfueltankandcontainercapssecurely.
Preparation
•Whilemowing,alwayswearsubstantialfootwearand
longtrousers.Donotoperatetheequipmentwhen
barefootorwearingopensandals.
•Thoroughlyinspecttheareawheretheequipmentis
tobeusedandremoveallstones,sticks,wires,bones
andotherforeignobjects.
•Beforeusing,alwaysvisuallyinspecttoseethat
guards,andsafetydevices,suchasdeectorsand/or
grasscatchers,areinplaceandworkingcorrectly.
•Beforeusing,alwaysvisuallyinspecttoseethatthe
blades,bladeboltsandcutterassemblyarenotworn
ordamaged.Replacewornordamagedbladesand
boltsinsetstopreservebalance.
Starting
•Disengageallbladeanddriveclutchesandshiftinto
neutralbeforestartingtheengine.
•Donottiltmowerwhenstartingtheengineor
switchingonthemotor,unlessthemowerhastobe
tiltedforstarting.Inthiscase,donottiltitmorethan
absolutelynecessaryandliftonlythepart,whichis
awayfromtheoperator.
•Starttheengineorswitchonthemotorcarefully
accordingtoinstructionsandwithfeetwellaway
fromtheblade(s)andnotinfrontofthedischarge
chute.
Operation
•Nevermowwhilepeople,especiallychildren,orpets
arenearby.
•Mowonlyindaylightoringoodarticiallight.
•Stayalertforholesintheterrainandotherhidden
hazards.
•Donotputhandsorfeetnearorunderrotatingparts.
Keepclearofthedischargeopeningatalltimes.
•Neverpickuporcarryalawnmowerwhilethe
engineisrunning.
•Useextremecautionwhenreversingorpullinga
pedestriancontrolledlawnmowertowardsyou.
•Walk,neverrun.
•Slopes:
–Donotmowexcessivelysteepslopes.
–Exerciseextremecautionwhenonslopes.
–Mowacrossthefaceofslopes,neverupand
downandexerciseextremecautionwhen
changingdirectiononslopes.
–Alwaysbesureofyourfootingonslopes.
•Stopthebladeifthelawnmowerhastobetiltedfor
transportationwhencrossingsurfacesotherthan
grassandwhentransportingthelawnmowertoand
fromtheareatobemowed.
•Donotoperatetheengineinaconnedspacewhere
dangerouscarbonmonoxidefumescancollect.
•Stoptheengine
–wheneveryouleavethelawnmower.
–beforerefueling.
–beforeremovingthegrasscatcher.
2

–beforemakingheightadjustmentunless
adjustmentcanbemadefromtheoperator’s
position.
•Stoptheengineanddisconnectthespark-plugwire.
–beforeclearingblockagesoruncloggingchute.
–beforechecking,cleaningorworkingonthelawn
mower.
–afterstrikingaforeignobject,inspectthelawn
mowerfordamageandmakerepairsbefore
restartingandoperatingthelawnmower.
–iflawnmowerstartstovibrateabnormally(check
immediately).
•Watchoutfortrafcwhencrossingornearroadways.
MaintenanceandStorage
•Keepallnuts,boltsandscrewstighttobesurethe
equipmentisinsafeworkingcondition.
•Donotusepressurecleaningequipmentonmachine.
•Neverstoretheequipmentwithgasolineinthetank
andinsideabuildingwherefumescanreachanopen
ameorspark.
•Allowtheenginetocoolbeforestoringinany
enclosure.
•Toreducetherehazard,keeptheengine,silencer,
batterycompartmentandgasolinestorageareafree
ofgrass,leaves,orexcessivegrease.
•Checkgrasscatchercomponentsandthedischarge
guardfrequentlyandreplacewithmanufacturer’s
recommendedparts,whennecessary.
•Replacewornordamagedpartsforsafety.
•Replacefaultysilencers.
•Ifthefueltankhastobedrained,dothisoutdoors.
•Donotchangetheenginegovernorsettingsor
overspeedtheengine.Operatinganengineat
excessivespeedcanincreasethehazardofpersonal
injury.
•Onmultibladedlawnmowers,takecareasrotating
oneblademaycauseotherstorotate.
•Becarefulduringadjustmentofthelawnmowerto
prevententrapmentofthengersbetweenmoving
bladesandxedpartsofthelawnmower.
•Toensurethebestperformanceandsafety,
purchaseonlygenuineTororeplacementparts
andaccessories.Donotuse
will t
partsand
accessories;theymaycauseasafetyhazard.
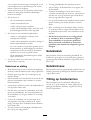
SoundPressure
Thisunithasamaximumsoundpressurelevelatthe
operator’searof81dBA,basedonmeasurementsof
identicalmachinesperEN836andISO11201.
SoundPower
Thisunithasaguaranteedsoundpowerlevelof96dBA,
basedonmeasurementsofidenticalmachinesperISO
11094.
Vibration,Hand/arm
Thisunitdoesnotexceedahand/armvibrationlevelof
6.8m/s
2
,basedonmeasurementsofidenticalmachines
perEN836andEN1033.
3

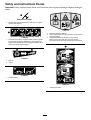
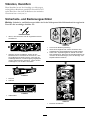
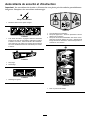
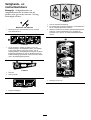
SafetyandInstructionalDecals
Important:Safetyandinstructiondecalsarelocatednearareasofpotentialdanger.Replacedamaged
decals.
Manufacturer’sMark
1.Indicatesthebladeisidentiedasapartfromtheoriginal
machinemanufacturer.
110-9329
1.Tooperatethemachine,engagethebail,inserttheignition
keyandstarttheengine,operatingthebailengagesthe
clutchandthehandleassemblyengagesthetractiondrive,
releasethebailtostoptheengine.
110-9333
1.Recycle
2.Collect
112-8554
1.Handlerelease
115-3114
1.ReadtheOperator’sManual.
2.Thrownobjecthazard—keepbystandersasafedistance
fromthemachine.
3.Cutting/dismembermentofhandorfoot,mower
blade—removethesparkplugwireandreadthe
instructionsbeforeservicingorperformingmaintenance.
1.
2.
115-3116
3.
115-3116
1.Installingthebattery.
4

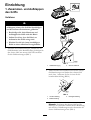
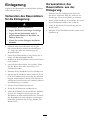
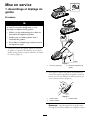
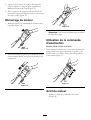
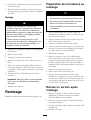
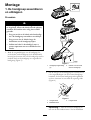
Setup
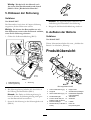
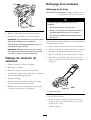
1.AssemblingandUnfolding
theHandle
Procedure
Assemblingandunfoldingthehandle
improperlycandamagethecables,causingan
unsafeoperatingcondition.
•Donotdamagethecableswhenassembling
andunfoldingthehandle.
•Ensurethatthecablesareroutedtothe
outsideofthehandle.
•Ifacableisdamaged,contactanAuthorized
ServiceDealer.
1.Unlockthehandlelocks,movethehandlesections
intotheoperatingposition,attachtheupperhandle
tothelowerhandle,andlockthehandlelocks
(Figure3).
Figure3
1.Handlelock(4)
2.Upperhandleend
2.Toadjustthehandleheight,unlocktheupperhandle
locksandrotatetheupperhandleupwardandlockit
intoapositionthatiscomfortableforyou(Figure4).
Figure4
1.Highestposition3.Lowestposition
2.Middleposition
Note:Youcansettheupperhandleto1of3handle
positions.Lineupthemarktooneofthe3markson
theinnersideoftheupperhandlelocks(Figure4).
5

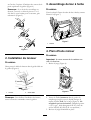
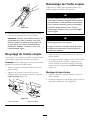
Note:Ifahandleleverisloose,openthelever,
rotateitclockwise1or2turnstotightenit,then
closethelever(Figure5).
Figure5
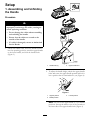
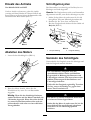
2.InstallingtheStarterRope
Procedure
Pullthestarterropethroughtheropeguideonthe
handle(Figure6).
Figure6
1.Starterrope
2.Ropeguide
Note:Tomaketheropeeasiertoinstall,squeezethe
controlbaronthehandle.
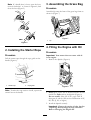
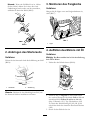
3.AssemblingtheGrassBag
Procedure
Attachthelipontothefrontofthegrassbagframeas
shownin(Figure7).
Figure7
1.Lip
4.FillingtheEnginewithOil
Procedure
Important:Yourmowerdoesnotcomewithoil
intheengine.
1.Removethedipstick(Figure8).
Figure8
2.Slowlypouroilintotheoillltubeuntiltheoillevel
reachestheFullmarkonthedipstick(Figure8).
Donotoverll.(Max.ll:0.59l,type:SAE30
detergentoilwithanAPIserviceclassicationofSF,
SG,SH,SJ,SL,orhigher.)
3.Installthedipsticksecurely.
Important:
Change the engine oil after the r st
5 operating hour s
;changeityearlythereafter.
RefertoChangingtheEngineOil.
6

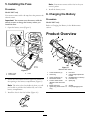
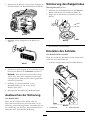
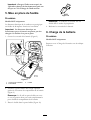
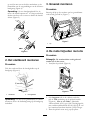
5.InstallingtheFuse
Procedure
Model21027only
Yourmowercomeswitha40-ampfusethatprotectsthe
electricstarter.
Important:Youcannotstartthemowerwiththe
electricstarterorchargethebatteryunlessyou
installthefuse.
1.Openthebatterycover(Figure9).
Figure9
1.Batterycover3.Fuse
2.Fuseholder
2.Locatethefuseholderfromtheupperleftcornerof
theopeningtothebatterycompartment(Figure9).
Note:Thewiretothefuseholderisshort;youwill
notbeabletopullthefuseholderfullyoutofthe
batterycompartment.
3.Installthefuseinthefuseholder(Figure10).
Figure10
Note:Yourmowercomeswithafuseintheyour
owner’spacket.
4.Installthebatterycover.
6.ChargingtheBattery
Procedure
Model21027only
RefertoChargingtheBatteryintheMaintenance
section.
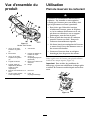
ProductOverview
Figure11
Model21027shown
1.Lowerhandlelock(2)
8.Reardoor
2.Grassbag9.Cuttingheightadjustment
handle
3.Upperhandlelock(2)10.Oilll/Dipstick(notshown)
4.Recoilstarthandle11.Fueltankcap
5.Tractionassisthandle
(Models21026and21027
only)
12.Sparkplug
6.Bladecontrolbar
13.Airlter
7.Ignitionkey(model21027
only)
14.Recycling/bagginglever
7

Operation
FillingtheFuelTank
Gasolineisextremelyammableandexplosive.
Areorexplosionfromgasolinecanburnyou
andothers.
•Topreventastaticchargefromignitingthe
gasoline,placethecontainerand/ormower
directlyonthegroundbeforelling,notina
vehicleoronanobject.
•Fillthetankoutdoorswhentheengineis
cold.Wipeupspills.
•Donothandlegasolinewhensmokingor
aroundanopenameorsparks.
•Storegasolineinanapprovedfuelcontainer,
outofthereachofchildren.
Fillthefueltankwithfreshunleadedregulargasoline
fromamajorname-brandservicestation(Figure12).
Important:Toreducestartingproblems,add
fuelstabilizertothefuelallseason,mixingitwith
gasolinelessthan30daysold.
Figure12
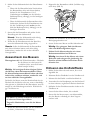
CheckingtheEngineOilLevel
ServiceInterval:Beforeeachuseordaily
1.Removethedipstick,wipeitclean,andfullyinstall
thedipstick(Figure8).
2.Removethedipstickandchecktheoillevel
(Figure8).IftheoillevelisbelowtheAddmarkon
thedipstick,slowlypouroilintotheoillltubeto
raisetheoilleveltotheFullmarkonthedipstick.
Donotoverll.(Max.ll:0.59l,type:SAE30
detergentoilwithanAPIserviceclassicationofSF,
SG,SH,SJ,SL,orhigher.)
3.Installthedipstick.
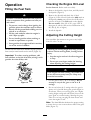
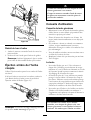
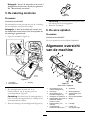
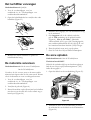
AdjustingtheCuttingHeight
Youcanadjustthemowertocutgrassatanyheight
from2.2cmto7.6cm.
Adjustingthecuttingheightmaybringyouinto
contactwiththemovingblade,causingserious
injury.
•Stoptheengineandwaitforallmovingparts
tostop.
•Donotputyourngersunderthehousing
whenadjustingthecuttingheight.
Iftheenginehasbeenrunning,themuferwill
behotandcanseverelyburnyou.Keepaway
fromthehotmufer.
•CutthegrassattheC,D,orEsettings.Donot
attempttorecyclethegrassattheAorB
settings.
•DonotcutbelowtheCsettingunlessthegrassis
sparseoritislatefallwhengrassgrowthbeginsto
slowdown.Whenyoucutlonggrass,useahigher
cuttingheightsettingandwalkslower;thencutthe
grassagainatanormalsetting.Mowingthegrass
whenitistoolongcanplugthelawnmowerand
causetheenginetostall.
Note:TheSmartWheel
®
calculatesthepropersetting
toensurethatyoucutnomorethanathirdofthegrass
blade(Figure13).
8

Figure13
1.Cuttingheightadjustment
handle
4.Raiseorlowerthemower
2.Cuttingheightadjustment
button
5.SmartWheel
3.Cuttingheightscale
1.Stoptheengineandwaitforallmovingpartstostop.
2.Movethemowerintothegrass;stopmovingthe
mowerwhentheSmartWheeldesignisupright
(Figure13).
3.UsetheSmartWheeldesigntocomparethetipsof
thegrassbladestothelettersonthewheel.The
letterontheSmartWheelthatmatchesthetipsofthe
grassbladesisthepropercuttingheight.
4.Pressdownonthecuttingheightadjustmentbutton
andholdthecuttingheightadjustmenthandleto
movethecuttingheightupordown(Figure13).
5.Liftuporpressdownonthehandle,andusethe
cuttingheightscaletosetthelawnmowertothe
desiredcuttingheight(Figure13).
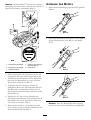
StartingtheEngine
1.Holdthebladecontrolbaragainstthehandle
(Figure14).
Figure14
2.Pulltherecoilstarter(Figure15)orturntheignition
keyasshowninFigure16(model21027only).
Figure15
Figure16
Note:Ifthemowerdoesnotstart,contactan
AuthorizedServiceDealer.
9

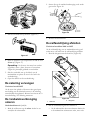
UsingtheSelf-propelDrive
Models21026and21027only
Tooperatetheself-propeldrive,simplywalkwithyour
handsontheupperhandleandyourelbowsatyour
sides,andthemowerwillautomaticallykeeppacewith
you(Figure17).
Figure17
StoppingtheEngine
1.Releasethebladecontrolbar(Figure18).
Figure18
2.Whentheenginestops,removetheignitionkey
whenyouleavethemower.
Important:Whenyoureleasethebladecontrol
bar,boththeengineandbladeshouldstop
within3seconds.Iftheydonotstopproperly,
stopusingyourmowerimmediatelyandcontact
anAuthorizedServiceDealer.
RecyclingtheClippings
Yourmowercomesfromthefactoryreadytorecyclethe
grassandleafclippingsbackintothelawn.
Note:Thegrassbagmayremainonthemowerwhile
youarerecyclingtheclippings.
1.Stoptheengineandwaitforallmovingpartstostop.
2.PressthebuttonontopoftheRecycling/bagging
leverandmovethelevertotherecyclingmode
(Figure19).
Figure19
1.Recyclingmode2.Baggingmode
BaggingtheClippings
Usethegrassbagwhenyouwanttocollectgrassand
leafclippingsfromthelawn.
Aworngrassbagcouldallowsmallstones
andothersimilardebristobethrowninthe
operator’sorbystander’sdirectionandresultin
seriouspersonalinjuryordeathtotheoperator
orbystanders.
Checkthegrassbagfrequently.Ifitis
damaged,installanewTororeplacementbag.
Thebladeissharp;contactingthebladecan
resultinseriouspersonalinjury.
Stoptheengineandwaitforallmovingpartsto
stopbeforeleavingtheoperatingposition.
1.Stoptheengineandwaitforallmovingpartstostop.
2.Tobagthegrassclippings,installthegrassbag(refer
toInstallingtheGrassBag).Pressthebuttonontop
10

oftheRecycling/baggingleverandmovethelever
tothebaggingmode(Figure19).
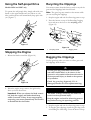
InstallingtheGrassBag
1.Stoptheengineandwaitforallmovingpartstostop.
2.Raiseandholdupthereardoor,installthebagon
thehandle,andlowerthereardoor(Figure20).
Figure20
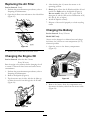
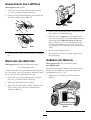
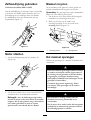
RemovingtheGrassBag
1.Stoptheengineandwaitforallmovingpartstostop.
2.Liftupthegrassbagupandawayfromthehandle.
Note:Tiltthegrassbagslightlybackwardtoprevent
thecollectedgrassclippingsfromfallingout.
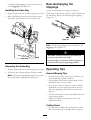
Rear-dischargingthe
Clippings
Usethereardischargeforcuttingverytallgrass.
Ifthebagisonthemower,removeit(refertoRemoving
theGrassBag)beforerear-dischargingtheclippings
(Figure21).
Figure21
Note:TheRecycling/bagginglevershouldbeinthe
baggingmode(Figure19).
Thebladeissharp;contactingthebladecan
resultinseriouspersonalinjury.
Stoptheengineandwaitforallmovingpartsto
stopbeforeleavingtheoperatingposition.
OperatingTips
GeneralMowingTips
•Cleartheareaofsticks,stones,wire,branches,and
otherdebristhatthebladecouldhit.
•Avoidstrikingsolidobjectswiththeblade.Never
deliberatelymowoveranyobject.
•Ifthemowerstrikesanobjectorstartstovibrate,
immediatelystoptheengine,disconnectthewire
fromthesparkplug,andexaminethemowerfor
damage.
•Forbestperformance,installanewbladebeforethe
cuttingseasonbegins.
•ReplacethebladewhennecessarywithaToro
replacementblade.
CuttingGrass
•Cutonlyaboutathirdofthegrassbladeatatime.
DonotcutbelowtheCsettingunlessthegrassis
11

sparseoritislatefallwhengrassgrowthbeginsto
slowdown.RefertoAdjustingtheCuttingHeight.
•Whencuttinggrassover15cmtall,mowatthe
highestcuttingheightsettingandwalkslower;then
mowagainatalowersettingforthebestlawn
appearance.Ifthegrassistoolong,themowermay
plugandcausetheenginetostall.
•Mowonlydrygrassorleaves.Wetgrassandleaves
tendtoclumpontheyardandcancausethemower
toplugortheenginetostall.
Wetgrassorleavescancauseseriousinjuryif
youslipandcontacttheblade.Mowonlyindry
conditions.
•Alternatethemowingdirection.Thishelpsdisperse
theclippingsoverthelawnforevenfertilization.
•Ifthenishedlawnappearanceisunsatisfactory,try
oneormoreofthefollowing:
–Replacethebladeorhaveitsharpened.
–Walkataslowerpacewhilemowing.
–Raisethecuttingheightonyourmower.
–Cutthegrassmorefrequently.
–Overlapcuttingswathsinsteadofcuttingafull
swathwitheachpass.
–Setthecuttingheightonthefrontwheelsone
notchlowerthantherearwheels.Forexample,
setthefrontwheelsattheCsettingandtherear
wheelsattheDsetting.
CuttingLeaves
•Aftercuttingthelawn,ensurethathalfofthelawn
showsthroughthecutleafcover.Youmayneedto
makemorethanonepassovertheleaves.
•Iftherearemorethan13cmofleavesonthelawn,
setthefrontcuttingheightoneortwonotches
higherthantherearcuttingheight.
•Slowdownyourmowingspeedifthemowerdoes
notcuttheleavesnelyenough.
12

Maintenance
Note:Determinetheleftandrightsidesofthemachinefromthenormaloperatingposition.
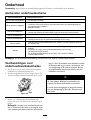
RecommendedMaintenanceSchedule(s)
MaintenanceService
Interval
MaintenanceProcedure
Aftertherst5hours
•Changetheengineoil.
Beforeeachuseordaily
•Checktheengineoillevel.
•Ensurethattheenginestopswithin3secondsafterreleasingthebladecontrolbar.
•Cleanthemower.
Every25hours
•Chargethebatteryfor24hours(model21027only).
•Replacethebladeorhaveitsharpened(morefrequentlyiftheedgedullsquickly).
Every50hours
•Changetheengineoil.
Every100hours
•Cleanthecoolingsystem(refertoyourengineowner’smanual).
•Replacethesparkplug(refertoyourengineowner’smanual).
Beforestorage
•Emptythefueltankbeforerepairsasdirectedandbeforeannualstorage.
Yearly
•Replacetheairlter(morefrequentlyindustyoperatingconditions).
•Checkthesparkplug(refertoyourengineowner’smanual).
•Lubricatethewheelgears.
•RefertoyourEngineOperator’sManualforanyadditionalyearlymaintenance
procedures.
Important:Refertoyour
Engine Operator’ s Man ual
foradditionalmaintenanceprocedures.
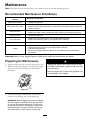
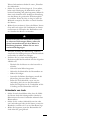
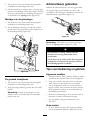
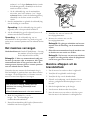
PreparingforMaintenance
1.Stoptheengineandwaitforallmovingpartstostop.
2.Disconnectthesparkplugwirefromthesparkplug
(Figure22)beforeperforminganymaintenance
procedure.
Figure22
3.Afterperformingthemaintenanceprocedure(s),
connectthesparkplugwiretothesparkplug.
Important:Beforetippingthemowertochange
theoilorreplacetheblade,allowthefueltank
torundrythroughnormalusage.Ifyoumust
tipthemowerpriortorunningoutoffuel,usea
handfuelpumptoremovethefuel.Alwaystip
themowerontoitssidewiththeairlterup.
Tippingthemowermaycausethefueltoleak.
Gasolineisammable,explosiveandcancause
personalinjury.
Runtheenginedryorremovethegasolinewith
ahandpump;neversiphon.
13

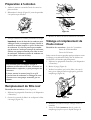
ReplacingtheAirFilter
ServiceInterval:Yearly
1.Performthepre-maintenanceprocedures;referto
PreparingforMaintenance.
2.Opentheairltercoverandremovetheoldairlter
(Figure23).
Figure23
3.Installanewairlterandtheairltercover.
ChangingtheEngineOil
ServiceInterval:Aftertherst5hours
Every50hours
Runtheengineafewminutesbeforechangingtheoil
towarmit.Warmoilowsbetterandcarriesmore
contaminants.
1.Performthepre-maintenanceprocedures;referto
PreparingforMaintenance.
2.Removethedipstick(Figure8).
3.Tipthemowerontoitsside,withtheairlterup,
todraintheusedoiloutthroughtheoillltube
(Figure24).
Figure24
4.Afterdrainingtheoil,returnthemowertoits
operatingposition.
5.Slowlypouroilintotheoillltubeuntiltheoillevel
reachestheFullmarkonthedipstick(Figure8).
Donotoverll.(Max.ll:0.59l,type:SAE30
detergentoilwithanAPIserviceclassicationofSF,
SG,SH,SJ,SL,orhigher.)
6.Installthedipsticksecurely.
7.Disposeoftheusedoilproperlyatalocalrecycling
center.
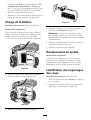
ChargingtheBattery
ServiceInterval:Every25hours
Model21027only
Alwaysusethechargerinashelteredareaandcharge
thebatteryfor24hoursatroomtemperature(22°C)
wheneverpossible.
1.Openthecovertothebatterycompartment
(Figure25).
Figure25
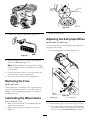
2.Removethebatteryfromthecompartmentand
disconnectthebatterycablefromthemowercable
(Figure26).
14

Figure26
3.Connectthechargertothebattery(Figure27).
Figure27
4.Plugthechargerintoawalloutletandchargethe
batteryfor24hours(Figure27).
Note:Whenthebatterynolongerholdsacharge,
recycleordisposeofthelead-acidbatteryaccording
tolocalcodes.
5.Connectthebatterycabletothemowercableand
installthebatteryinthecompartment.
6.Securethecovertothebatterycompartment.
ReplacingtheFuse
Model21027only
Ifthebatterydoesnotchargeortheenginedoesnot
turnwiththeelectricstarter,thefusemaybeblown.
Replaceitwitha40-ampplug-intypefuse.Referto
InstallingtheFuse.
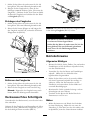
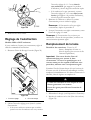
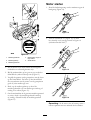
LubricatingtheWheelGears
ServiceInterval:Yearly
1.Removethewheelboltsontherearwheelsand
removetherearwheels.
2.Applyalubricatingoiltothegearasshownin
Figure28.
Figure28
3.Installtherearwheels.
AdjustingtheSelf-propelDrive
Models21026and21027only
Ifyourmowerdoesnotself-propelproperly,adjustthe
self-propeldrivecable.
1.Loosenthelockingnutbyhand(Figure29).
Figure29
1.Adjustingnut2.Lockingnut
2.Usetheadjustingnuttoadjusttheselfpropeldrive.
•Iftherearwheelsdonotrotatebackwardwhen
youpullthemowerbackward,turntheadjusting
nut1to3turnscounterclockwise(fromthe
15

operatingposition),dependingontheamount
ofcorrectionneeded.
•Ifthemowerdoesnotself-propel,turnthe
adjustingnut1to3turnsclockwise(fromthe
operatingposition),dependingontheamount
ofcorrectionneeded.
3.Startthemowerandusetheself-propeldriveto
checktheadjustment.
Note:Iftheself-propeldriveisnotproperly
adjusted,repeatstep2.
4.Whentheself-propeldriveisproperlyadjusted,
tightentheadjustingnutbyhand.
Note:Ifyourmowerstilldoesnotproperlyself-propel
afterperformingthisprocedure,contactanAuthorized
ServiceDealer.
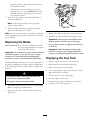
ReplacingtheBlade
ServiceInterval:Every25hours—Replacetheblade
orhaveitsharpened(morefrequently
iftheedgedullsquickly).
Important:
Y ou will need a torque wr ench to install
the blade pr oper l y
.Ifyoudonothaveatorque
wrenchorareuncomfortableperformingthis
procedure,contactanAuthorizedServiceDealer.
Examinethebladewheneveryourunoutofgasoline.If
thebladeisdamagedorcracked,replaceitimmediately.
Ifthebladeedgeisdullornicked,haveitsharpenedor
replaceit.
Thebladeissharp;contactingthebladecan
resultinseriouspersonalinjury.
Weargloveswhenservicingtheblade.
1.Disconnectthesparkplugwirefromthesparkplug.
RefertoPreparingforMaintenance.
2.Tipthemowerontoitssidewiththeairlterup
(Figure30).
Figure30
3.Removetheblade,savingallmountinghardware.
4.Installthenewbladeandallmountinghardware.
Important:Positionthecurvedendsofthe
bladetopointtowardthemowerhousing.
5.Useatorquewrenchtotightenthebladebolt
to50N-m.
Important:Whileholdingthebladewitha
blockofwood,putyourweightbehindthe
ratchetorwrenchandtightentheboltsecurely.
EmptyingtheFuelTank
1.Stoptheengineandwaitforittocooldown
2.Disconnectthewirefromthesparkplug.
3.Removethecapfromthefueltank.
4.Useahandpumptosyphonthefuelintoaclean
approvedgasolinecontainer.
5.Connectthewiretothesparkplug.
6.Runtheengineuntilitstops.
7.Starttheengineagaintomakesurethatallthe
gasolineisoutofthecarburetor.
16

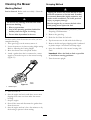
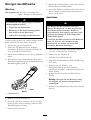
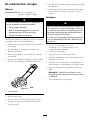
CleaningtheMower
WashingMethod
ServiceInterval:Beforeeachuseordaily—Cleanthe
mower.
Themowermaydislodgematerialfromunder
themowerhousing.
•Weareyeprotection.
•Stayintheoperatingposition(behindthe
handle)whentheengineisrunning.
•Donotallowbystandersinthearea.
Forbestresults,cleanthemowersoonafteryouhave
completedmowing.
1.Ifthegrassbagisonthemower,removeit.
2.Lowerthemowertoitslowestcuttingheightsetting.
RefertoAdjustingtheCuttingHeight.
3.Movethemowerontoaatpavedsurface.
4.Attachagardenhosethatisconnectedtoawater
supplytothewashoutportonthemowerhousing
(Figure31).
Figure31
1.Washoutport
5.Turnthewateron.
6.Starttheengineandrunituntiltherearenomore
clippingsthatcomeoutfromunderthemower
housing.
7.Stoptheengine.
8.Shutoffthewateranddisconnectthegardenhose
fromthemower.
9.Starttheengineandrunitforafewminutestodry
thehousingtopreventitfromrusting.
ScrapingMethod
Tippingthemowermaycausethefueltoleak
fromthecarburetororthefueltank.Gasoline
isextremelyammable,highlyexplosive,and,
undercertainconditions,cancausepersonal
injuryorpropertydamage.
Runtheenginedryorremovethefuelwitha
handpump;neversiphonthefuel.
1.Performthepre-maintenanceprocedures;referto
PreparingforMaintenance.
2.Removethegrassbag.
3.Drainthefuelfromthefueltank.
4.Tipthemowerontoitssidewiththeairlterup.
5.Removethedirtandgrassclippingswithahardwood
orplasticscraper.Avoidburrsandsharpedges.
6.Spraytheundersideofthemowerhousingwith
water.
Important:Movethebladeaslittleaspossible
toavoidfuturestartingproblems.
7.Turnthemowerupright.
17

Storage
Storethemowerinacool,clean,dryplace.
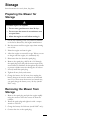
PreparingtheMowerfor
Storage
Gasolinevaporscanexplode.
•Donotstoregasolinemorethan30days.
•Donotstorethemowerinanenclosurenear
anopename.
•Allowtheenginetocoolbeforestoringit.
1.Onthelastrefuelingoftheyear,addfuelstabilizer
tothefuelasdirectedbytheenginemanufacturer.
2.Runthemoweruntiltheenginestopsfromrunning
outoffuel.
3.Primetheengineandstartitagain.
4.Allowtheenginetorununtilitstops.Whenyoucan
nolongerstarttheengine,itissufcientlydry.
5.Disconnectthewirefromthesparkplug.
6.Removethesparkplug,add30mlofoilthrough
thesparkplughole,andpullthestarterropeslowly
severaltimestodistributeoilthroughoutthecylinder
topreventcylindercorrosionduringtheoff-season.
7.Looselyinstallthesparkplug.
8.Tightenallnuts,bolts,andscrews.
9.Chargethebatteryfor24hours,thenunplugthe
batterychargeranstorethemowerinanunheated
area.Ifyoumuststorethemowerinaheatedarea,
youmustchargethebatteryevery90days(model
21027only).
RemovingtheMowerfrom
Storage
1.Removethesparkplugandspintheenginerapidly
usingthestartertoblowtheexcessoilfromthe
cylinder.
2.Installthesparkplugandtightenitwithatorque
wrenchto20N-m.
3.Chargethebatteryfor24hours(model21027only).
4.Connectthewiretothesparkplug.
18

374-0102 Rev D
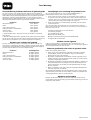
International Distributor List
Distributor: Country: Phone Number:
Atlantis Su ve Sulama Sisstemleri Lt Turkey 90 216 344 86 74
Balama Prima Engineering Equip Hong Kong 852 2155 2163
B-Ray Corporation Korea 82 32 551 2076
Casco Sales Company Puerto Rico 787 788 8383
Ceres S.A Costa Rica 506 239 1138
CSSC Turf Equipment (pvt) Ltd Sri Lanka 94 11 2746100
Cyril Johnston & Co Northern Ireland 44 2890 813 121
Equiver Mexico 52 55 539 95444
Femco S.A. Guatemala 502 442 3277
G.Y.K. Company ltd. Japan 81 726 325 861
Geomechaniki of Athens Greece 30 10 935 0054
Guandong Golden Star China 86 20 876 51338
Hako Ground and Garden Sweden 46 35 10 0000
Hako Ground and Garden Norway 47 22 90 7760
Hayter Limited (U.K.) United Kingdom 44 1279 723 444
Hydroturf Int. Co Dubai United Arab Emirates 97 14 347 9479
Hydroturf Egypt LLC Egypt 202 519 4308
Ibea S.p.A. Italy 39 0331 853611
Irriamc Portugal 351 21 238 8260
Irrigation Products Int'l Pvt Ltd India 86 22 83960789
Jean Heybroek b.v. Netherlands 31 30 639 4611
Lely (U.K.) Limited United Kingdom 44 1480 226 800
Maquiver S.A. Colombia 57 1 236 4079
Maruyama Mfg. Co. Inc. Japan 81 3 3252 2285
Metra Kft Hungary 36 1 326 3880
Mountfield a.s. Czech Republic 420 255 704 220
Munditol S.A. Argentina 54 11 4 821 9999
Oslinger Turf Equipment SA Ecuador 593 4 239 6970
Oy Hako Ground and Garden Ab Finland 358 987 00733
Parkland Products Ltd New Zealand 64 3 34 93760
Prochaska & Cie Austria 43 1 278 5100
RT Cohen 2004 Ltd Israel 972 986 17979
Riversa Spain 34 9 52 83 7500
Roth Motorgerate GmBh & Co Germany 49 7144 2050
Sc Svend Carlsen A/S Denmark 45 66 109 200
Solvert S.A.S France 33 1 30 81 77 00
Spypros Stavrinides Limited Cyprus 357 22 434131
Surge Systems India Limited India 91 1 292299901
T-Markt Logistics Ltd Hungary 36 26 525 500
Toro Australia Australia 61 3 9580 7355
Toro Europe BVBA Belgium 32 14 562 960

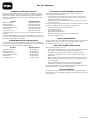
The Toro Warranty
Conditions and Products Covered
The Toro® Company and its afliate, Toro Warranty Company, pursuant to
an agreement between them, jointly promises to the original purchaser* to
repair any Toro Product used for normal residential purposes* if defective in
materials or workmanship. The following time periods apply from the date
of original purchase:
Products
Warranty Period
Walk Power Mowers
2-year limited warranty
Rear Engine Riders 2-year limited warranty
Lawn & Garden Tractors
2-year limited warranty
Electric Hand Held Products
2-year limited warranty
Snowthrowers
2-year limited warranty
Consumer Zero Turn
2-year limited warranty
* “Original purchaser” means use the person who originally purchased Toro
products.
* “Normal residential purposes” means use of the product on the same lot as
your home. Use at more than one location is considered commercial use, and
the commercial use warranty would apply.
Limited Warranty for Commercial Use
Toro Consumer Products and attachments used for commercial, institutional,
or rental use are warranted against defects in materials or workmanship for the
following time periods from the date of original purchase:
Products
Warranty Period
Walk Power Mowers
90 day warranty
Rear Engine Riders 90 day warranty
Lawn & Garden Tractors
90 day warranty
Electric Hand Held Products
90 day warranty
Snowthrowers
90 day warranty
Consumer Zero Turn
45 day warranty
Instructions for Obtaining Warranty Service
If you think that your Toro Product contains a defect in materials or
workmanship, follow this procedure:
1. Contact your seller to arrange service of the product. If for any reason
it is impossible for you to contact your seller, you may contact any Toro
Authorized Distributor to arrange service.
2. Bring the product and your proof of purchase (sales receipt) to your seller
or the Service Dealer.
If for any reason you are dissatised with the Service Dealer’s analysis or with the
assistance provided, contact the Toro importer or contact us at:
Customer Care Department, Consumer Division
Toro Warranty Company
8111 Lyndale Avenue South
Bloomington, MN 55420-1196
Manager: Technical Product Support: 001-952-887-8248
See attached Distributor List
Owner Responsibilities
You must maintain your Toro Product by following the maintenance procedures
described in the operator’s manual. Such routine maintenance, whether
performed by a dealer or by you, is at your expense.
Items and Conditions Not Covered
This express warranty does not cover:
• Cost of regular maintenance service or parts, such as lters, fuel, lubricants,
tune-up parts, blade sharpening, brake and clutch adjustments.
• Any product or part which has been altered or misused or required
replacement or repair due to normal wear, accidents, or lack of proper
maintenance.
• Repairs necessary due to improper fuel, contaminants in the fuel system, or
failure to properly prepare the fuel system prior to any period of non-use
over three months.
• Engine and transmission. These are covered by the appropriate
manufacturer’s guarantees with separate terms and conditions.
All repairs covered by this warranty must be performed by an Authorized Toro
Service Dealer using Toro approved replacement parts.
General Conditions
The purchaser is covered by the national laws of each country. The rights to
which the purchaser is entitled with the support of these laws are not restricted
by this warranty.
374-0101 Rev A
Seite wird geladen ...
Seite wird geladen ...
Seite wird geladen ...
Seite wird geladen ...
Seite wird geladen ...
Seite wird geladen ...
Seite wird geladen ...
Seite wird geladen ...
Seite wird geladen ...
Seite wird geladen ...
Seite wird geladen ...
Seite wird geladen ...
Seite wird geladen ...
Seite wird geladen ...
Seite wird geladen ...
Seite wird geladen ...
Seite wird geladen ...
Seite wird geladen ...
Seite wird geladen ...
Seite wird geladen ...
Seite wird geladen ...
Seite wird geladen ...
Seite wird geladen ...
Seite wird geladen ...
Seite wird geladen ...
Seite wird geladen ...
Seite wird geladen ...
Seite wird geladen ...
Seite wird geladen ...
Seite wird geladen ...
Seite wird geladen ...
Seite wird geladen ...
Seite wird geladen ...
Seite wird geladen ...
Seite wird geladen ...
Seite wird geladen ...
Seite wird geladen ...
Seite wird geladen ...
Seite wird geladen ...
Seite wird geladen ...
Seite wird geladen ...
Seite wird geladen ...
Seite wird geladen ...
Seite wird geladen ...
Seite wird geladen ...
Seite wird geladen ...
Seite wird geladen ...
Seite wird geladen ...
Seite wird geladen ...
Seite wird geladen ...
Seite wird geladen ...
Seite wird geladen ...
Seite wird geladen ...
Seite wird geladen ...
Seite wird geladen ...
Seite wird geladen ...
Seite wird geladen ...
Seite wird geladen ...
Seite wird geladen ...
Seite wird geladen ...
-
 1
1
-
 2
2
-
 3
3
-
 4
4
-
 5
5
-
 6
6
-
 7
7
-
 8
8
-
 9
9
-
 10
10
-
 11
11
-
 12
12
-
 13
13
-
 14
14
-
 15
15
-
 16
16
-
 17
17
-
 18
18
-
 19
19
-
 20
20
-
 21
21
-
 22
22
-
 23
23
-
 24
24
-
 25
25
-
 26
26
-
 27
27
-
 28
28
-
 29
29
-
 30
30
-
 31
31
-
 32
32
-
 33
33
-
 34
34
-
 35
35
-
 36
36
-
 37
37
-
 38
38
-
 39
39
-
 40
40
-
 41
41
-
 42
42
-
 43
43
-
 44
44
-
 45
45
-
 46
46
-
 47
47
-
 48
48
-
 49
49
-
 50
50
-
 51
51
-
 52
52
-
 53
53
-
 54
54
-
 55
55
-
 56
56
-
 57
57
-
 58
58
-
 59
59
-
 60
60
-
 61
61
-
 62
62
-
 63
63
-
 64
64
-
 65
65
-
 66
66
-
 67
67
-
 68
68
-
 69
69
-
 70
70
-
 71
71
-
 72
72
-
 73
73
-
 74
74
-
 75
75
-
 76
76
-
 77
77
-
 78
78
-
 79
79
-
 80
80


Toro Emotion 43cm Lawn Mower Benutzerhandbuch
- Kategorie
- Rasenmäher
- Typ
- Benutzerhandbuch
in anderen Sprachen
- English: Toro Emotion 43cm Lawn Mower User manual
- français: Toro Emotion 43cm Lawn Mower Manuel utilisateur
- Nederlands: Toro Emotion 43cm Lawn Mower Handleiding
Verwandte Artikel
-
Toro Emotion 43cm Lawn Mower Benutzerhandbuch
-
Toro 21081 Benutzerhandbuch
-
-
Toro 48cm Rear Bagging Lawnmower Benutzerhandbuch
-
-
-
-
-
-
Andere Dokumente
-
Simplicity WALK-BEHIND OPERATOR'S MANUAL Benutzerhandbuch
-
Murray 881021 Benutzerhandbuch
-
-
BLACK+DECKER LM2000 Benutzerhandbuch
-
Black and Decker CLMA4820L2 Bedienungsanleitung
-
BLACK+DECKER CLMA4825L2 Benutzerhandbuch
-
-
Briggs & Stratton MXUA21675EX Benutzerhandbuch