Hama 00057251 Bedienungsanleitung
- Kategorie
- Mäuse
- Typ
- Bedienungsanleitung

00057271/00057251-04.06
www.hama.de
Hama GmbH & Co KG
Postfach 80
86651 Monheim/Germany
Tel. +49 (0) 9091/502-0
Fax +49 (0)9091 /502-274
www.hama.de
00057251bda 26.04.2006 11:54 Uhr Seite 2

00057251
00057271
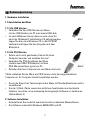
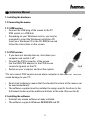
M410 Optical Mouse
M1012 Laser Mouse
00057251bda 26.04.2006 11:54 Uhr Seite 1

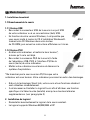
1. Hardware Installation
1.1 Anschließen der Maus
1.1.1 Als USB Version
•Verbinden Sie den USB-Stecker der Maus
mit der USB-Buchse am PC oder einem USB-Hub.
•Je nach Windows-Version kann es sein, dass Sie
nach der Windows® Installations-CD gefragt werden.
Legen Sie dazu ihre Windows-CD in das CD-ROM
Laufwerk und folgen Sie den Vorgaben auf dem
Bildschirm.
1.1.2 Als PS/2 Version
•Sofern noch nicht geschehen, fahren Sie Ihren
Computer herunter und schalten Ihn aus*.
•Verbinden Sie PS/2-Anschluss der Maus
(mittels dem USB-PS/2 Adapter) mit dem
PS/2-Mausanschluss (grün) am PC .
•Schalten Sie Ihren Computer ein und fahren ihn hoch.
*Bitte schließen Sie die Maus als PS/2 Version nicht bei eingeschaltetem
Computer an. Ihr Computer könnte beschädigt werden.
•Durch die Smart-Link Technologie ist die Maus mit Standardfunktionen sofort
einsatzbereit.
•Um der 3. (Rad-) Taste sowie den seitlichen Zusatztasten eine bestimmte
Funktion zuordnen, ist es notwendig die beigelegte Software zu installieren.
(Siehe Absatz 2)
2. Software Installation
• Deinstallieren Sie zunächst eventuell bereits vorhandene Maussoftware.
• Die Software unterstützt Windows 98/ME/2000 und XP.
l
l
Bedienungsanleitung
2
Abb.1
Abb.2
00057251bda 26.04.2006 11:54 Uhr Seite 2

a) Legen Sie die beigelegte CD in Ihr CD-ROM oder DVD-ROM Laufwerk. Warten
Sie einen Moment, und die Installation wird automatisch gestartet.
Sollte dies nicht geschehen, klicken Sie auf Start =>Ausführen, geben
"X:\Setup" ein (wobei "X" für den Laufwerksbuchstaben Ihres CD-ROM
Laufwerks steht) und bestätigen mit Enter.
b) Wählen Sie die gewünschte Sprache aus und klicken auf „Weiter“.
c) Starten Sie zum Abschluss der Installation Ihren PC neu.
Hinweis:
Während der Installation unter Windows XP kann eine Meldung bezüglich eines
nicht signierten Treibers erscheinen. Die Funktion der Maus oder Software wird
dadurch nicht beeinträchtigt. Fahren Sie mit der Installation fort.
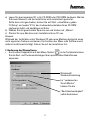
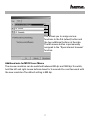
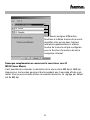
3. Bedienung der Maussoftware
• Durch einen Doppelklick auf das Maus-Symbol in der Taskleiste können
Sie die Rad- und Tasteneinstellungen Ihren persönlichen Bedürfnissen
anpassen:
3
Windows®
Standardeinstellung
Im “verbesserten
Scroll-Modus”
können Sie die
“Rad-Geschwindigkeit”
selbst bestimmen.
00057251bda 26.04.2006 11:54 Uhr Seite 3

Ergänzender Hinweis für M1012 Laser Mouse
Es besteht die Möglichkeit die Auflösung der Maus zwischen 800dpi und 1600dpi
zu wechseln. Zum Umschalten halten Sie für 5 Sekunden die linke und rechte
Maustaste gedrückt. Danach können Sie mit der neuen Auflösung arbeiten.
Standardmäßig sind 800dpi voreingestellt.
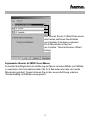
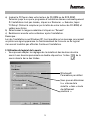
4
Hier können Sie der 3. (Rad-)Taste sowie
den beiden seitlichen Zusatztasten
verschiedene Funktionen zuweisen.
Die 6. Maustaste ist fest mit
der Funktion “Internet Browser öffnen”
belegt.
00057251bda 26.04.2006 11:54 Uhr Seite 4

1. Installing the hardware
1.1 Connecting the mouse
1.1.1 USB version
•Connect the USB plug of the mouse to the PC
USB socket or a USB hub.
•Depending on your Windows version, you may be
prompted to insert the Windows Installation CD.
Insert your Windows CD in the CD-ROM drive and
follow the instructions on the screen.
1.1.2 PS/2 version
•If you have not already done so, shut down your
computer and switch it off*.
•Connect the PS/2 connector of the mouse
(via the USB-PS/2 adapter) to the PS/2 mouse
connector (green) on the PC.
•Switch on your computer and boot the system.
*Do not connect PS/2 version mouse when computer is switched on. This can
cause damage to your PC.
•Smart-Link technology means that the standard functions of the mouse can
be used immediately.
•The software supplied must be installed to assign specific functions to the
3rd (wheel) button and the additional buttons at the side. (See section 2)
2. Installing the software
• Uninstall any mouse software already installed.
• The software supports Windows 98/2000/ME and XP.
L
L
Insturction Manual
5
Fig.1
Fig.2
00057251bda 26.04.2006 11:54 Uhr Seite 5

a) Place the enclosed CD in your CD-ROM or DVD-ROM drive. Wait a moment,
installation is started automatically.
If it does not start automatically, click Start => Run, enter “X:\Setup”
(where "X” is the drive letter of your CD-ROM drive) and press Enter to
confirm.
b) Select the required language and click “Next”.
c) Restart your PC to complete installation.
Note:
During installation under Windows XP, a message may appear regarding an
unsigned driver. This does not affect mouse or software operation. Simply ignore
and continue with the installation process.
3. Using the mouse software
• Double-click the mouse symbol in the task bar to adapt the wheel
and button settings to your personal requirements:
6
Windows®
Standard settings
You can set the wheel
speed yourself in the
improved scroll mode.
00057251bda 26.04.2006 11:54 Uhr Seite 6

Additional note for M1012 Laser Mouse
The mouse resolution can be switched between 800 dpi and 1600 dpi.To switch,
hold the left and right mouse buttons down for 5 seconds.You can then work with
the new resolution.The default setting is 800 dpi.
7
This allows you to assign various
functions to the 3rd (wheel) button and
the two additional buttons at the side.
The 6th mouse button is permanently
assigned to the “Open internet browser"
function.
00057251bda 26.04.2006 11:54 Uhr Seite 7

1. Installation du matériel
1.1 Branchement de la souris
1.1.1 Version USB
•Raccordez le connecteur USB de la souris à un port USB
de votre ordinateur ou à un concentrateur (hub) USB.
•En fonction de votre version Windows, il est possible que
vous soyez invité à insérer le CD d'installation Windows®.
Insérez votre CD Windows dans votre lecteur
de CD-ROM, puis suivez les instructions affichées sur l'écran.
1.1.2 Version PS/2
•Arrêtez votre ordinateur et mettez-le hors tension*,
à moins qu’il ne le soit déjà.
•Raccordez la connexion PS/2 de la souris (à l’aide
de l’adaptateur USB-PS/2) à l’interface PS/2 de la
souris (verte) de votre ordinateur.
•Mettez votre ordinateur sous tension et démarrez le
système d’exploitation.
*Ne branchez pas la souris version PS/2 lorsque votre
ordinateur est sous tension. Votre ordinateur pourraient en subir des dommages.
•Grâce à la technologie Smart Link, votre souris et ses fonctions standard
sont utilisables immédiatement.
•Il est nécessaire d'installer le logiciel fourni afin d’attribuer une fonction
spécifique à la 3ème touche (molette) ainsi qu’aux touches latérales
supplémentaires. (voir paragraphe 2)
2. Installation du logiciel
• Désinstallez éventuellement le logiciel de la souris existant.
• Le logiciel supporte Windows 98/ME/2000 et XP
¬
¬
Mode d’emploi
8
Abb.1
Abb.2
00057251bda 26.04.2006 11:54 Uhr Seite 8

a) Insérez le CD fourni dans votre lecteur de CD-ROM ou de DVD-ROM.
Patientez jusqu’à ce que le programme d’installation démarre automatiquement.
Si l'installation n’est pas lancée, cliquez sur Démarrer => Exécuter, tapez
"X:\Setup" (X étant à remplacer par la lettre de votre lecteur de CD-ROM) et
validez avec Enter.
b) Sélectionnez la langue souhaitée et cliquez sur "Suivant".
c) Redémarrez ensuite votre ordinateur après l'installation.
Remarque :
Lors de l’installation sous Windows XP, il est possible qu’un message concernant
un pilote non signé apparaisse. Le fonctionnement de la souris ou du logiciel
n’en seront toutefois pas affectés. Continuez l’installation.
3. Utilisation du logiciel de la souris
• Vous pouvez adapter les réglages de la molette et des boutons de votre
souris à vos besoins personnels en double-cliquant sur l'icône de la
souris dans la barre des tâches.
9
Windows®
Paramètres par défaut
Vous pouvez déterminer
la «vitesse de la
molette » dans « mode
de défilement
amélioré ».
00057251bda 26.04.2006 11:54 Uhr Seite 9

Remarque complémentaires concernant la souris laser sans fil
M1012 (Laser Mouse)
Il est possible de commuter la résolution de la souris entre 800 dpi et 1600 dpi.
Appuyez sur les touches gauche et droite pendant env. 5 seconde afin de com-
muter. Vous pourrez ensuite utiliser la nouvelle résolution. Le réglage par défaut
est de 800 dpi.
10
Vous pouvez assigner différentes
fonctions à la 3ème touche de la souris
(molette) ainsi qu’aux deux touches
latérales supplémentaires. La 6ème
touche de la souris est pré-configurée
pour la fonction d’ouverture de votre
navigateur internet.
00057251bda 26.04.2006 11:54 Uhr Seite 10
-
 1
1
-
 2
2
-
 3
3
-
 4
4
-
 5
5
-
 6
6
-
 7
7
-
 8
8
-
 9
9
-
 10
10
-
 11
11


Hama 00057251 Bedienungsanleitung
- Kategorie
- Mäuse
- Typ
- Bedienungsanleitung
in anderen Sprachen
- English: Hama 00057251 Owner's manual
- français: Hama 00057251 Le manuel du propriétaire
Verwandte Papiere
-
Hama 00057269 Bedienungsanleitung
-
Hama 00057272 Bedienungsanleitung
-
-
-
-
-
-
-
Hama 00052393 Bedienungsanleitung
-