Aeg-Electrolux SZ71990-4I Benutzerhandbuch
- Kategorie
- Kühlschränke
- Typ
- Benutzerhandbuch

SANTO Z 7 19 90-4 i
Integrierbares Kühl-Gefriergerät
Integrating Fridge-Freezer
Gebrauchs- und Einbauanweisung
Operating and Installation instruction
AEG Hausgeräte GmbH
Postfach 1036
D-90327 Nürnberg
http://www.aeg.hausgeraete.de
Änderungen vorbehalten
© Copyright by AEG Subject to change without notice
2223 188-62 06/05

2
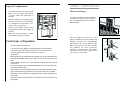
Sehr geehrte Kundin, sehr geehrter Kunde,
bevor Sie Ihr neues Kältegerät in Betrieb nehmen, lesen Sie bitte diese
Gebrauchsanweisung aufmerksam durch. Sie enthält wichtige Informatio-
nen zum sicheren Gebrauch, zum Aufstellen und zur Pflege des Gerätes.
Bewahren Sie bitte die Gebrauchsanweisung zum späteren Nachschlagen
auf. Geben Sie sie an eventuelle Nachbesitzer des Gerätes weiter.
Hinweis: Diese Gebrauchsanweisung ist für mehrere technisch vergleichba-
re Modelle mit unterschiedlicher Ausstattung bestimmt. Beachten Sie bitte
nur die Hinweise, die Ihre Geräteausführung betreffen.
Mit dem Warndreieck und/oder durch Signalwörter (Warnung!, Vorsicht!,
Achtung!) sind Hinweise hervorgehoben, die für Ihre Sicherheit oder für die
Funktionsfähigkeit des Gerätes wichtig sind. Bitte unbedingt beachten.
Nach diesem Zeichen erhalten Sie ergänzende Informationen zur Bedie-
nung und praktischen Anwendung des Gerätes.
Mit der Blume sind Tips und Hinweise zum wirtschaftlichen und umwelt-
schonenden Einsatz des Gerätes gekennzeichnet.
Für evtl. auftretende Störungen enthält die Gebrauchsanweisung Hinweise
zur selbständigen Behebung, siehe Abschnitt "Was tun, wenn ...". Sollten
diese Hinweise nicht ausreichen, haben Sie jederzeit zwei Anlaufstellen, bei
denen Ihnen weitergeholfen wird:
Wir sind für Sie da:
montags bis freitags
8.00 bis 20.00 Uhr
samstags
10.00 bis 14.00 Uhr.
Hier erhalten Sie Antwort auf jede Frage, die die Ausstattung und den Ein-
satz Ihres Gerätes betrifft. Natürlich nehmen wir auch gerne Wünsche,
Anregungen und Kritik entgegen. Unser Ziel ist es, zum Nutzen unserer Kun-
den unsere Produkte und Dienstleistungen weiter zu verbessern.
Bei technischen Problemen steht Ihnen unser WERKSKUNDENDIENST in
Ihrer Nähe jederzeit zur Verfügung (Adressen und Telefonnummern finden
Sie im Verzeichnis Garantiebedingungen / Kundendienststellen).
Beachten Sie dazu den Abschnitt „Kundendienst“
*(Telekom 0,12 Euro/min.)
INFO SERVICES 0180 - 555 4 555*
Gedruckt auf umweltschonend hergestelltem Papier
– wer ökologisch denkt, handelt auch so ...

3
Inhalt
Sicherheit . . . . . . . . . . . . . . . . . . . . . . . . . . . . . . . . . . . . . . . . . . . . . . . . . . .4
Einbau des Gerätes . . . . . . . . . . . . . . . . . . . . . . . . . . . . . . . . . . . . . . . . . .6
Entsorgung . . . . . . . . . . . . . . . . . . . . . . . . . . . . . . . . . . . . . . . . . . . . . . . . .7
Information zur Geräteverpackung . . . . . . . . . . . . . . . . . . . . . . . . . . . . . .7
Entsorgung von Altgeräten . . . . . . . . . . . . . . . . . . . . . . . . . . . . . . . . . . . .7
Transportschutz entfernen . . . . . . . . . . . . . . . . . . . . . . . . . . . . . . . . . . . .7
Aufstellen . . . . . . . . . . . . . . . . . . . . . . . . . . . . . . . . . . . . . . . . . . . . . . . . . .8
Aufstellort . . . . . . . . . . . . . . . . . . . . . . . . . . . . . . . . . . . . . . . . . . . . . . . . . .8
Einbau-Anweisungen . . . . . . . . . . . . . . . . . . . . . . . . . . . . . . . . . . . . . . . . .9
Elektrischer Anschluß . . . . . . . . . . . . . . . . . . . . . . . . . . . . . . . . . . . .16
Vor Inbetriebnahme . . . . . . . . . . . . . . . . . . . . . . . . . . . . . . . . . . . . . . . . .16
Bedienungs- und Kontrolleinrichtung Gefrierraum . . . . . . . . . . . . . .17
Inbetriebnahme und Temperatureinstellung Gefrierraum . . . . . . . .18
Einfrieren und Tiefkühllagern . . . . . . . . . . . . . . . . . . . . . . . . . . . . . . . .20
Eiswürfel bereiten . . . . . . . . . . . . . . . . . . . . . . . . . . . . . . . . . . . . . . . . . .21
Gefrierfach . . . . . . . . . . . . . . . . . . . . . . . . . . . . . . . . . . . . . . . . . . . . . . . .21
edienungs- und Kontrolleinrichtung Kühlraum . . . . . . . . . . . . . . . . .22
Inbetriebnahme und Temperaturregelung Kühlraum . . . . . . . . . . . .23
Kühlschrank . . . . . . . . . . . . . . . . . . . . . . . . . . . . . . . . . . . . . . . . . . . . . . . .25
0 °C Fach . . . . . . . . . . . . . . . . . . . . . . . . . . . . . . . . . . . . . . . . . . . . . . . . . .26
Richtig lagern . . . . . . . . . . . . . . . . . . . . . . . . . . . . . . . . . . . . . . . . . . . . .27
Abtauen . . . . . . . . . . . . . . . . . . . . . . . . . . . . . . . . . . . . . . . . . . . . . . . . . .28
Gerät abschalten . . . . . . . . . . . . . . . . . . . . . . . . . . . . . . . . . . . . . . . . . . .28
Reinigung und Pflege . . . . . . . . . . . . . . . . . . . . . . . . . . . . . . . . . . . . . . .29
Tips zur Energie-Einsparung . . . . . . . . . . . . . . . . . . . . . . . . . . . . . . . . .30
Was tun, wenn . . . . . . . . . . . . . . . . . . . . . . . . . . . . . . . . . . . . . . . . . . . . .30
Abhilfe bei Störungen . . . . . . . . . . . . . . . . . . . . . . . . . . . . . . . . . . . . . . .30
Lampe wechseln . . . . . . . . . . . . . . . . . . . . . . . . . . . . . . . . . . . . . . . . . . . .32
Bestimmungen, Normen, Richtlinien . . . . . . . . . . . . . . . . . . . . . . . . . .32

4
Sicherheit
Die Sicherheit unserer Kältegeräte entspricht den anerkannten Regeln der
Technik und dem Gerätesicherheitsgesetz. Dennoch sehen wir uns veran-
laßt, Sie mit folgenden Sicherheitshinweisen vertraut zu machen:
Bestimmungsgemäße Verwendung
• Das Kältegerät ist für die Verwendung im Haushalt bestimmt. Es eignet
sich zum Kühlen, Einfrieren und Tiefkühllagern von Lebensmitteln sowie
zur Eisbereitung. Wird das Gerät zweckentfremdet oder falsch bedient,
kann vom Hersteller keine Haftung für eventuelle Schäden übernommen
werden.
• Umbauten oder Veränderungen am Kältegerät sind aus Sicherheitsgrün-
den nicht zulässig.
• Sollten Sie das Kältegerät gewerblich oder für andere Zwecke als zum
Kühlen, Tiefkühllagern und Einfrieren von Lebensmitteln benutzen, be-
achten Sie bitte die für Ihren Bereich gültigen gesetzlichen Bestimm-
ungen.
Vor der ersten Inbetriebnahme
• Überprüfen Sie das Kältegerät auf Transportschäden. Ein beschädigtes
Gerät auf keinen Fall anschließen! Wenden Sie sich im Schadensfall bitte
an den Lieferanten.
Kältemittel
Das Gerät enthält im Kältemittelkreislauf das Kältemittel Isobutan (R600a),
ein Naturgas mit hoher Umweltverträglichkeit, das jedoch brennbar ist.
• Achten Sie beim Transportieren und Aufstellen des Gerätes darauf, daß
keine Teile des Kältemittelkreislaufs beschädigt werden.
• Bei Beschädigung des Kältemittelkreislaufs:
– offenes Feuer und Zündquellen unbedingt vermeiden;
– den Raum, in dem das Gerät steht, gut durchlüften.
Sicherheit von Kindern
• Verpackungsteile (z. B. Folien, Styropor) können für Kinder gefährlich
sein. Erstickungsgefahr! Verpackungsmaterial von Kindern fernhalten!
• Ausgediente Altgeräte bitte vor der Entsorgung unbrauchbar machen.
Netzstecker ziehen, Netzkabel durchtrennen, eventuell vorhandene
Schnapp- oder Riegelschlösser entfernen oder zerstören. Dadurch
verhindern Sie, daß sich spielende Kinder im Gerät einsperren
(Erstickungsgefahr!) oder in andere lebensgefährliche Situationen geraten.
61
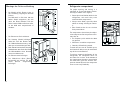
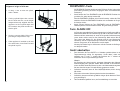
Changing the light bulb
Warning! There is a risk of electric shocks! Before changing the light bulb,
switch off the appliance and unplug it, or pull the fuse or the circuit breaker.
Light bulb data: Replace the lamp with one of the same power (the
maximum power is shown on the light diffuser).
1. To switch off the appliance, press
the ON/OFF buttons (B-K).
2. Unplug the mains plug.
3. Remove the cover. Use bulbs of 15 W
max.
4. Change the defective light bulb.
5. Refit the light bulb cover.
6. Put the refrigerator back into opera-
tion.
D051
Regulations, Standards, Guidelines
This appliance was designed for household use and was manufactured in
accordance with the appropriate standards. The necessary measures in
accordance with appliance safety legislation regulations (GSG), accident
prevention regulations for refrigeration appliances (VBG 20) and the regu-
lations of the German Society of Electrical Engineers (VDE) were observed in
the manufacture of this appliance.
The refrigerant circuit has been checked for leaks.
This appliance is in accordance with the following EU guidelines:
– 73/23/EWG dated 19 February 1973 - low voltage guidelines.
– 89/336/EWG dated 3 May 1989
(including guideline change notice 92/31/EWG) - EMV guideline

5
• Kinder können Gefahren, die im Umgang mit Haushaltsgeräten liegen,
oft nicht erkennen. Sorgen Sie deshalb für die notwendige Aufsicht und
lassen Sie Kinder nicht mit dem Gerät spielen!
Im Alltagsbetrieb
• Behälter mit brennbaren Gasen oder Flüssigkeiten können durch Käl-
teeinwirkung undicht werden. Explosionsgefahr! Lagern Sie keine Behäl-
ter mit brennbaren Stoffen, wie z.B. Spraydosen, Feuerzeug-Nachfüllkar-
tuschen etc. im Kältegerät.
• Flaschen und Dosen dürfen nicht in den Gefrierraum. Sie können sprin-
gen, wenn der Inhalt gefriert - bei kohlensäurehaltigem Inhalt sogar
explodieren! Legen Sie nie Limonaden, Säfte, Bier, Wein, Sekt usw. in den
Gefrierraum. Ausnahme: Hochprozentige Spirituosen können im Gefrier-
raum gelagert werden.
• Speiseeis und Eiswürfel nicht unmittelbar aus dem Gefrierraum in den
Mund nehmen. Sehr kaltes Eis kann an Lippen oder Zunge festfrieren und
Verletzungen verursachen.
• Tiefkühlgut nicht mit nassen Händen berühren. Die Hände könnten daran
festfrieren.
• Keine Elektrogeräte (z. B. elektrische Eismaschinen, Rührgeräte etc.) im
Kältegerät betreiben.
• Vor Reinigungsarbeiten das Gerät grundsätzlich abschalten und den
Netzstecker ziehen oder Sicherung in der Wohnung abschalten bzw.
herausdrehen.
• Netzstecker immer am Stecker aus der Steckdose ziehen, nie am Kabel.
Im Störungsfall
• Sollte einmal eine Störung am Gerät auftreten, sehen Sie bitte zuerst in
dieser Gebrauchsanweisung unter "Was tun, wenn ..." nach. Falls die dort
aufgeführten Hinweise nicht weiterhelfen, führen Sie bitte keine
weiteren Arbeiten selbst aus.
• Kältegeräte dürfen nur von Fachkräften repariert werden. Durch unsach-
gemäße Reparaturen können erhebliche Gefahren entstehen. Wenden
Sie sich im Reparaturfall bitte an Ihren Fachhändler oder an unseren
Kundendienst.
60
The freezer temperature is not
sufficient, red light lights up,
temperature signal sounds
The appliance is near a heat
source.
Temperature is not properly
adjusted.
Please look in the "Initial Start
Up" section.
Press the fast freeze switch
Door was open for an exten-
ded period.
Please look in the "Installation
location" section.
Disturbance on the appliance
Switch on the fast freeze
switch, keep the freezer clo-
sed, inform your customer
service
A large quantity of warm
food was placed in the
appliance within the last 24
hours.
Open the door only as long as
necessary.. Press the fast free-
ze switch
Malfunction Possible Cause
Remedy
Heavy build up of frost, possi-
bly also on the door seal.
Door seal is not air tight (pos-
sibly after changing over the
hinges).
Carefully warm the leaking
sections of the door seal with
a hair dryer (not hotter than
approx. 50 °C). At the same
time shape the warmed door
seal by hand such that it sits
correctly.
Unusual noises.
The appliance is touching the
wall or other objects.
Appliance is not level.
A component, e.g. a pipe, on
the rear of the appliance is
touching another part of the
appliance or the wall.
The compressor starts after a
period of time.
This is normal, no error has
occurred.
The compressor does not start
immediately after changing
the temperature setting.
If necessary, carefully bend
the component out of the
way.
Move the appliance slightly.
Readjust the feet.

1
2
6
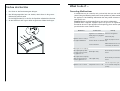
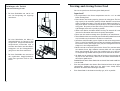
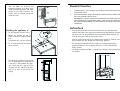
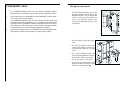
Einbau des Gerätes
• Das Gerät an den Bestimmungsort bringen.
• Den Befestigungswinkel um 180° drehen, damit dieser in die genaue
Position (2) gebracht wird.
Die Anfangsposition (1) ist die für die Spedition erforderliche Position.
• An der Wand mit dem eigens dafür vorgesehenen Winkel befestigen.
59
Green light does not light up,
yellow light lights up when
fast freeze fuction is activa-
ted, appliance is on.
Green light faulty.
Please inform your customer
service
Appliance cools too much. Temperature is set too cold.
Turn the temperature regula-
tor to a warmer setting tem-
porarily..
Yellow light does not light up,
when fast freeze fuction is
activated, appliance is on.
Yellow light faulty.
Please inform your customer
service
Appliance does not work, no
pilot light is illuminated.
Appliance is not switched on Switch on the appliance.
Mains plug is not plugged in
or is loose.
Insert mains plug.
Fuse has blown or is defective.
Check fuse, replace if neces-
sary.
Socket is defective.
Mains malfunctions are to be
corrected by an electrician.
What to do if ...
Correcting Malfunctions
A malfunction may be caused by only a minor fault that you can rectify
yourself using the following instructions. Do not perform any other work on
the appliance if the following information does not provide assistance in
your specific case.
Warning! Repairs to refrigerators/freezers may only be performed by
qualified service engineers. Improper repairs can give rise to significant
hazards for the user. If your appliance needs repairing, please contact your
specialist dealer or our Customer Service.
Malfunction Possible Cause
Remedy

7
Entsorgung
Information zur Geräteverpackung
Alle verwendeten Werkstoffe sind umweltverträglich! Sie können gefahrlos
deponiert oder in der Müllverbrennungsanlage verbrannt werden!
Zu den Werkstoffen: Die Kunststoffe können auch wiederverwertet werden
und sind folgendermaßen gekennzeichnet:
>PE< für Polyäthylen, z. B. bei der äußeren Hülle und den Beuteln im Innern.
>PS< für geschäumtes Polystyrol, z. B. bei den Polsterteilen, grundsätzlich
FCKW-frei.
Die Kartonteile werden aus Altpapier hergestellt und sollten auch wieder zur
Altpapiersammlung gegeben werden.
Entsorgung von Altgeräten
Aus Umweltschutzgründen müssen Kältegeräte fachgerecht entsorgt wer-
den. Dies gilt für Ihr bisheriges Gerät und - nachdem es eines Tages ausge-
dient hat - auch für Ihr neues Gerät.
Warnung! Ausgediente Altgeräte bitte vor der Entsorgung unbrauchbar
machen. Netzstecker ziehen, Netzkabel durchtrennen, eventuell vorhande-
ne Schnapp- oder Riegelschlösser entfernen oder zerstören. Dadurch
verhindern Sie, daß sich spielende Kinder im Gerät einsperren (Erstickungs-
gefahr!) oder in andere lebensgefährliche Situationen geraten.
Entsorgungshinweise:
• Das Gerät darf nicht mit dem Haus- oder Sperrmüll entsorgt werden.
• Der Kältemittelkreislauf, insbesondere der Wärmetauscher an der Gerä-
terückseite, darf nicht beschädigt werden.
• Das Symbol auf dem Produkt oder seiner Verpackung weist darauf
hin, dass dieses Produkt nicht als normaler Haushaltsabfall zu behandeln
ist, sondern an einem Sammelpunkt für das Recycling von elektrischen
und elektronischen Geräten abgegeben werden muss. Durch Ihren Bei-
trag zum korrekten Entsorgen dieses Produkts schützen Sie die Umwelt
und die Gesundheit Ihrer Mitmenschen. Umwelt und Gesundheit werden
durch falsches Entsorgen gefährdet. Weitere Informationen über das
Recycling dieses Produkts erhalten Sie von Ihrem Rathaus, Ihrer Müllab-
fuhr oder dem Geschäft, in dem Sie das Produkt gekauft haben.
Transportschutz entfernen
Das Gerät sowie Teile der Innenausstattung sind für den Transport
geschützt.
• Klebebänder links und rechts an den Türaußenseiten abziehen.
• Alle Klebebänder sowie Polsterteile aus dem Geräteinnenraum entfernen.
58
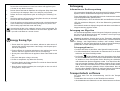
Energy Saving Tips
• Do not install the appliance near cookers, radiators or other sources of
warmth. High ambient temperatures cause longer, more frequent opera-
tion of the compressor.
• Ensure sufficient air circulation and exhaust at the appliance base and at
the back wall of the appliance. Never cover air vent openings.
• Do not place warm foods into the appliance. Allow warm foods to cool
first.
• Only leave door open as long as necessary.
• Do not set temperature any colder than necessary.
• Put frozen food in the fridge to defrost. The cold in the frozen food will
then be used to cool the fridge.
• Keep the heat emitting condenser, the metall grille on the rear wall of
your appliance, always clean.
Do not allow such substances to come into contact with appliance parts.
• Do not use any abrasive cleansers.
1. Remove frozen food and the food from the refrigerator. Wrap frozen food
in several layers of newspaper. Store it in a cool place, well covered.
2. Defrost the freezer compartment prior to cleaning (see "Defrosting" sec-
tion).
3. Switch the appliance off and remove the plug from the mains, or switch off
or turn out the circuit breaker or fuse.
4. Clean the appliance and the interior accessories with a cloth and lukewarm
water. Commercially available dish washing detergents may also be used.
5. After cleaning wipe with fresh water and rub dry.
Accumulation of dust at the condenser increases energy consumption. For
this reason carefully clean the condenser at the back of the appliance once
a year with a soft brush or a vacuum cleaner.

8
Aufstellen
Aufstellort
Das Gerät soll in einem gut belüfteten und trockenen Raum stehen.
Die Umgebungstemperatur wirkt sich auf den Stromverbrauch und die
einwandfreie Funktion des Gerätes aus. Daher sollte das Gerät
– nicht direkter Sonneneinstrahlung ausgesetzt sein;
– nicht an Heizkörpern, neben einem Herd oder sonstigen Wärmequellen
stehen;
– nur an einem Ort stehen, dessen Umgebungstemperatur der Klimaklasse
entspricht, für die das Gerät ausgelegt ist.
Die Klimaklasse finden Sie auf dem Typschild, das sich links im Innenraum
des Kühlraumes befindet.
Nachstehende Tabelle zeigt, welche Umgebungstemperatur welcher Kli-
maklasse zugeordnet ist:
Klimaklasse für Umgebungstemperatur von
SN +10 bis +32 °C
N +16 bis +32 °C
ST +18 bis +38 °C
T +18 bis +43 °C
Ist die Aufstellung neben einer Wärmequelle unvermeidbar, sind folgende
seitliche Mindestabstände einzuhalten:
– zu Elektroherden 3 cm;
– zu Öl- und Kohleherden 30 cm.
Können diese Abstände nicht eingehalten werden, ist eine Wärmeschutz-
platte zwischen Herd und Kältegerät erforderlich.
Steht das Kältegerät neben einem anderen Kühl- oder Gefriergerät, ist ein
seitlicher Abstand von 5 cm erforderlich, damit sich an den Geräte-Außen-
seiten kein Schwitzwasser bildet.
57
Cleaning and Care
For hygienic reasons the appliance interior, including interior accessories,
should be cleaned regularly.
Warning!
• The appliance may not be connected to the mains during cleaning. Dan-
ger of electrical shock! Before cleaning switch the appliance offand rem
ve the plug from the mains, or switch off or turn out the circuit breaker
or fuse.
• Never clean the appliance with a steam cleaner. Moisture could accumu-
late in electrical components, danger of electrical shock! Hot vapours can
lead to the damage of plastic parts.
• The appliance must be dry before it is placed back into service.
Attention!
• Ethereal oils and organic solvents can attack plastic parts, e.g.
– lemon juice or the juice from orange peals;
– butyric acid;
– cleansers which contain acetic acid.
Defrosting
Refrigerator
Frost is automatically eliminated from
the evaporator of the refrigerator
compartment every time the motor
compressor stops, during normal use.
The defrost water drains out through a
trough into a special container at the
back of the appliance, over the motor
compressor, where it evaporates.
Warning!
Never use metal tools to scrape off the frost
Do not use a mechanical device or any artificial means to speed up the
thawing process other than those recommended by the manufacturer.
A temperature rise of the frozen food packs, during defrosting , may shor-
ten their safe storage life.
D037

9
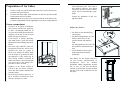
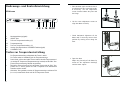
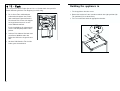
EINBAU - ANWEISUNGEN
Höheneinstellung
Das Gerät ermöglicht durch die Höhen-
verstellbarkeit auf 820 mmm oder 870
mm eine Angleichung an die anderen
Küchenmöbel.
Vor dem Einbau des Gerätes in den
Raum, die Höhe der hinteren Räder und
Füßchen einsteilen. Die Ausgangshöhe
beträgt 820 mm. Um das Gerät auf die
Höhe von 870 mm zu bringen, sind die
vier FüBchen mit dem geeigneten
Schlüssel loszuschrauben, die Räder
abzunehmen und in einer tieferen Posi-
tion wieder zu befestigen.
820
870
820
870
56
Fresh food refrigeration
To obtain the best performance:
• do not store warm food or evaporating liquide in the refrigeator
• do cover or wrap the food, particularly if it has a strong flavour.
• Position food so that air can circuiate freely round it.
Useful hints:
Meat (all types): wrap in polythene bags and place on the glass shelf above the
vegetable drawer(s)For safety, store in this way only one or two days at the
most.
Cooked foods, cold dishes, etc: these should be covered and may be placed
on any shelf.
Fruit and vegetables: these should be thoroughly cleaned and placed in the
special drawer(s) provided.
Butter and cheese: these should be placed in special airtight containers or wap-
ped in aluminium foil or polythene bags to exclude as much air as possible.
Milk bootles: these should have a cap and should be stored in the bottle rack
on the door.
Bananas, potatoes, onions and garlic, if not packed, must not be kept in the
refrigerator.
Superchill compartment
• The temperature in this compartment
(from 0°C to +3°C) is kept constant by
a special sensor. No adjustment is
needed.
• Products stored in this compartment
will keep fresh and in peak condition.
It is advisable to wrap foods in alu-
minium foil or plastic film.
• Drinks can be cooled quickly in this
compartment without any danger of
freezing
• Make sure that the drawers are fully
closed before shutting the door.

10
Montage der Seitenverkleidung
• Die Winkel auf die Platten in der in
der Zeichnung angezeigten Position
fixieren.
Das Maß 260* ist für einen 100 mm
hohen Sockel vorgesehen, der sich
unter der Platte befindet. Falls der
Sockel andere Maße aufweisen sollte,
ist das Maß 260* entsprechend zu
erhöhen.
• Die Platten am Gerät anlehnen.
• Die hinteren Winkel befestigen,
wobei die Tiefe der Platten und
die Möbelaußenabmessung von
900 mm zu berücksichtigen sind.
• Beim Einbau bitte beachten, dass die
Gehäusekante vom Gerät zum Rand
des Küchenmöbels einen Abstand
von 45 mm haben muss.
• Die Platten vorne befestigen.
• Die Winkeleisen (dem Beutel
beigepackt) am unteren Teil der
Türen (bereits vorgesehen)
befestigen.
15
820
15
280
541
37,5
520,8
260*
997
82,2
REICHTE
SEITENPLATTE
VORDERER
RAND
INNENSEITE
HINTERE
RANDE
27,5
45
55
Refrigerator compartment
For proper opening and closing, it is
advisable to act on both doors simulta-
neously (as shown in the figure).
• Do not place hot food or drinks in the
refrigerator; wait until they trave
cooled to room temperature.
• Always cover foods, especially those
which are strong-smelling or aromat-
ic.
• Place foods so that air can circuiate
freely round them.
The temperature selected may be adjust-
ed to compensate for temperature varia-
tions due to:
• The frequency with which the doors
are opened.
• Difference in ambient temperature.
• Quantity of food being stored.
To make the best use of available space,
the front half-shelves may be stacked on
top of the rear halfshelves.
To achieve automatic defrosting of the
refrigerator, the compressor must cut
out from time to time. If the bottom of
the compartment becomes covered with
too much frost, push the warmer tem-
perature button (L) until the compressor
starts to cut out periodically.

11
Montage der Türen
• Die Türen wie auf der Zeichnung
bohren und die 2, im Beutel bei-
gepackten Türschrauben (darauf
achten, dass sie nicht durchge-
dreht werden) eindrehen.
• Vor der Montage der Türen, das
Gerät sorgfältig nivellieren.
• Eine der unteren Türen öffnen und
die zuvor positionierten Schrauben
im Langloch des Scharniers und der
Einstellscheibe einsetzen, die Tür ver-
setzen, bis sie korrekt anschlägt.
• Die Vorgänge bei den übrigen Türen
wiederholen.
OBERE
LINKE
FRONTPLATTE
1062
24
85
22
12
80
24
85
22
12
80
3 MIN
5
305 305
444 MIN.
447 MAX.
300
300
1051
OBERE
RECHTE
FRONTPLATTE
UNTERE
LINKE
FRONTPLATTE
UNTERE
RECHTE
FRONTPLATTE
1051
1062
A
A
54
• During normal operation, the temperature currently present in the fridge
(ACTUAL temperature) is displayed.
• When the temperature is being adjusted a flashing display indicates the
fridge temperature currently set (DESIRED temperature).
Starting Up - Setting the Temperature
1. Plug the mains plug into the mains socket.
2. Press ON/OFF button. The green mains pilot indicator illuminates. The
appliances start.
3. Press either the „L“ (+) or „N“ (-) button. The temperature display switches
over and the DESIRED temperature currently set flashes on the temperatu-
re display.
4. Set the required temperature by pressing the „L“ (+) or „N“ (-) buttons (see
section "Temperature setting buttons"). The temperature display will imme-
diately show the changed setting. Each time the button is pressed the tem-
perature is adjusted by 1 °C.
From a food safety point of view +5 °C should be considered sufficiently
cold for storing food in the fridge.
5. Once the required temperature has been set, after a short period (approx. 5
sec.) the temperature display will change and again indicate the current
ACTUAL temperature inside the fridge. The display will change from flashing
to continuous illumination.
Information! When the setting is changed, the compressor does not start
immediately if automatic defrosting is currently taking place. As the stora-
ge temperature within the fridge is reached quickly you can store food
immediately after switching on.
COOLMATIC
The COOLMATIC function is suited for quick cooling of large quantities of
goods in the refrigerator.
1. The COOLMATIC function is switched on by pressing the COOLMATIC but-
ton. The yellow light illuminates.
The COOLMATIC function now provides for intensive cooling. A DESIRED
temperature of +2 °C is automatically selected. The COOLMATIC function is
ended automatically after a period of 6 hours.
2. The COOLMATIC function can be ended manually at any time by pressing
the COOLMATIC button again. The yellow light goes out.

12
• Die Tür wieder schliessen und prüfen,
ob sie sich in der gewünschten Höhe
befindet, eventuell auf die Einstell-
schrauben auf der Scheibe und dem
Scharnier einwirken.
• Dieselben Einstellschrauben werden
für die vertikale Ausrichtung der
Türen verwendet.
• Die horizontale Ausrichtung der
Türen prüfen und eventuell ihre Stel-
lung an den Langlöchern korrigieren.
Die Tür öffnen.
Das Anliegen der Türen durch Ein-
wirken auf die Registerbuchsen und
das untere Winkeleisen einstellen.
53
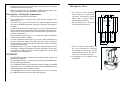
J. Mains pilot indicator (green)
K. Fridge button ON/OFF
L. Temperature setting button (for warmer temperatures)
M. Temperature display
N. Temperature setting button (for colder temperatures)
O. COOLMATIC function "on" indicator (yellow)
P. COOLTMATIC button
Temperature setting buttons
The temperature is adjusted using the „L“ (+) and „N“ (-) buttons. These but-
tons are connected to the temperature display.
• The temperature display is switched over from the display of the ACTUAL
temperature (Temperature display is illuminated) to the display of the DESI-
RED temperature (Temperature display flashes) by pressing one of the two
buttons, „L“ (+) or „N“ (-).
• Each time one of the two buttons is pressed again the DESIRED temperatu-
re is adjusted by 1 °C. The DESIRED temperature must be reached within 24
hours.
If neither button is pressed, the temperature display automatically switches
back after a short period (approx. 5 sec.) to the display of the ACTUAL tem-
perature.
DESIRED temperature means:
The temperature that has been selected for inside the fridge. The DESIRED
temperature is indicated by flashing numbers.
ACTUAL temperature means:
The temperature display indicates the current temperature inside the fridge.
The ACTUAL temperature is indicated with illuminated numbers.
Temperature display
The temperature display can indicate several pieces of information.
N
L
M
O
J
K
P
Operating and indicator panel Fridge

13
Nach Ausrichtung der Türen wird in
den Buchsen (unteres und oberes
Scharnier) und der unteren Grund-
platte eine Feststellschraube einge-
dreht.
Drehen die Schrauben in den Lan-
glöchern durch.
Einbau des Gerätes
• Das Gerät an den Bestimmung-
sort bringen.
• Den Befestigungswinkel um 180°
drehen, damit dieser in die
genaue Position (2) gebracht
wird.
Die Anfangsposition (1) ist die für
die Spedition erforderliche Posi-
tion.
• An der Wand mit dem eigens
dafür vorgesehenen Winkel
befestigen.
Den oberen Teil des Gerätes freilassen,
um eine bessere Luftzirkulation zu
ermöglichen. Falls ein darüber
hängendes Möbel angebracht werden
soll, ist dies 50 mm von der Mauer
entfernt zu befestigen und der Abstand
von der Decke muß mindestens 50 mm
betragen.
1
2
25
50
50
52
Preparation of Ice Cubes
1. Fill the ice cube tray 3/4 full with cold water, place it in the freezer com-
partment and leave to freeze.
2. To loosen the frozen cubes, either bend the ice cube tray or hold it under
running water for a few seconds.
Important! Never try to free an ice tray that is frozen to the freezer com-
partment using pointed or sharp edged objects. Use the ice scraper supplied.
Freezer compartment
• If food is to be frozen immediately
after having installed the appliance
or after a prolonged period out of
use, push the button (I) and allow the
appliance to run for at least 4 hours
before placing the food in it.
If the freezer is already operating,
with food inside it, push the button
(I) 24 hours before loading food to be
frozen.
• The alarm light indicates when the
temperature inside the freezer com-
partment has risen to a point at
which safe storage of frozen foods
can no longer be guaranteed. When
the appliance is first started up, or
after having loaded a quantity of
food to be frozen, this warning light
will stay or until a safe storage tem-
perature has been reached.
• Products to be frozen should be
placed in the fast freeze compart-
ment and, once frozen, moved to the
storage baskets.
• The maximum freezing capacity is 13
kg in 24 hours. Do not freeze more
than one quantity at a time.

14
Anbringen des Sockels
Höhenausnichtung H=820
• Bei einer Sockelhöhe von 140 bis 170
mm eine Aussparung wie angezeigt
vornehmen.
Bei einer Sockelhöhe, die höher als
100 und niedriger als 140 mm ist, das
mitgelieferte Ausgleichsabdeckstück
entsprechend zaschneiden und es
zwischen dem Sockel und dem Belüf-
tungsgitter mit der Schnappbefesti-
gung unter dem Gitter montieren.
• Bei einer Sockelhöhe von 100 mm ist
das regulierbare Ausgleichsabdeck-
stück in der gesamten Tiefe zu mon-
tieren.
870
820
140
190
30
100
900
170
220
140
190
51
Freezing and storing frozen food
You can use your freezer for freezing fresh food yourself.
Important!
• The temperature in the freezer compartment must be –18 °C or colder
before freezing food.
• Please observe the freezing capacity given on the rating plate. The free-
zing capacity is the maximum quantity of fresh food that can be frozen
within a period of 24 hours. If you wish to freeze food several days in a
row, please observe a maximum capacity of only 2/3 to 3/4 of that on the
rating plate. The quality of the food is best preserved when it is frozen
right through to the core as quickly as possible.
• Allow warm food to cool down before freezing. The warmth will cause
increased ice formation and increase the power consumption.
• Please note the maximum storage times specified by the manufacturer.
• Thawed foods which have not been processed further (cooked into meals)
may not under any circumstances be frozen a second time.
• Containers with flammable gases or liquids can leak at low temperatures.
There is a risk of an explosion! Do not store any containers with flamma-
ble materials such as, for example, spray cans, fire extinguisher refill car-
tridges etc in the refrigerator/freezer.
• Bottles and cans must not be placed in the freezer. They can burst when
the contents freeze, high carbonate content drinks can even explode!
Never store lemonade, juices, beer, wine, sparkling wine etc. in the free-
zer. Exception: high alcohol content spirits can be stored in the freezer.
• All foods must be packed air tight prior to freezing, so that they do not
dry out or lose their flavour, and so that no flavour contamination of
other frozen goods occurs.
Caution! Do not touch frozen food with wet hands. Your hands could free-
ze to the food.
1. Place the packed food in the drawers. Place food to be frozen in the upper
compartment. Unfrozen food must not touch items already frozen,
otherwise the frozen food could begin to defrost.
2. Place frozen foods in the drawers sorted by type, as far as possible.

15
Höhenausrichtung H=870
• Bei einer Sockelhöhe von 190 bis 220
mm eine Ausnehmung wie angezeigt
vornehmen.
• Bei einer Sockelhöhe, die höher als
150 und niedriger als 190 mm ist, das
mitgelieferte Ausgleichsabdeckstück
entsprechend zuschneiden und es
zwischen dem Sockel und dem Belüf-
tungsgitter montieren.
• Bei einer Sockelhöhe von 150 mm ist
das regulierbare Ausgleichsabdeck-
stück in der gesamten Tiefe zu mon-
tieren.
• Wenn das Gerät in eine Einbauküche
eingefügt werden soli, den Fuß E zur
Befestigung des Sokkels einsetzen.
100
150
30
100
E
50
If the FROSTMATIC function is not ended manually, the appliance switch off
the FROSTMATIC function after 48 hours. The yellow light goes out.
2. The FROSTMATIC function can be ended manually at any time by pressing
the FROSTMATIC button again. The yellow light goes out.
Alarm reset button
In the event of an abnormal temperature rise inside the freezer (e.g. power
cut) warning light (F) will start to flash and a buzzer will sound.
After the temperature has returned to normal, the warning light (F) will
continue to flash, although the buzzer has stopped.
When the alarm button is pressed, the warmest temperature reached in the
compartment flashes on the indicator.
Switching the Appliance off
To switch off, hold down the ON/OFF button for approx. 5 seconds. This will
result in a countdown from "3" to "1" taking place in the temperature
display. On reaching "1" the fridge will switch off. The temperature display
will go off.
Note:
The appliance cannot be switched on or off if unplugged, or if there is no
power being supplied to it. Following connection to the mains power sup-
ply, the appliance returns to the same operating state as before the inter-
ruption of main power.
If the appliance is not going to be used for an extended period:
1. Switch off the appliance, holding down the ON/OFF button until the display
goes off (see above).
2. Remove the mains plug or switch off or turn out the circuit breaker or fuse.
3. Defrost the freezer compartment and clean the appliance thoroughly (see
section: “Cleaning and Maintenance”).
4. Finally, leave the doors open so as to avoid a build up of odours.

16
Vor Inbetriebnahme
• Das Geräteinnere und alle Ausstattungsteile bitte vor Erstinbetriebnahme
reinigen (siehe Abschnitt "Reinigung und Pflege").
Elektrischer Anschluß
Für den elektrischen Anschluß ist eine vorschriftsmäßig installierte
Schutzkontakt-Steckdose erforderlich. Sie sollte so gesetzt sein, daß ein
Ziehen des Netzsteckers möglich ist.
Die elektrische Absicherung muß mindestens 10/16 Ampere betragen.
Ist die Steckdose bei eingebautem Gerät nicht mehr zugänglich, muß eine
geeignete Maßnahme in der Elektroinstallation sicherstellen, daß das Gerät
vom Netz getrennt werden kann (z. B. Sicherung, LS-Schalter, Fehlerstrom-
Schutzschalter oder dergleichen mit einer Kontaktöffnungsweite von min-
destens 3 mm).
• Vor Inbetriebnahme am Typschild des Gerätes überprüfen, ob Anschluß-
spannung und Stromart mit den Werten des Stromnetzes am Aufstellort
übereinstimmen.
Z. B.: AC 220 ... 240 V 50 Hz oder
220 ... 240 V <~ 50 Hz
(d. h. 220 bis 240 Volt Wechselstrom, 50 Hertz)
Das Typschild befindet sich links im Innenraum des Gerätes.
49
ACTUAL temperature means:
The temperature display indicates the current temperature inside the freezer.
The ACTUAL temperature is indicated with illuminated numbers.
Temperature display
The temperature display can indicate several pieces of information.
• During normal operation, the temperature currently present in the freezer
(ACTUAL temperature) is displayed.
• When the temperature is being adjusted a flashing display indicates the
freezer temperature currently set (DESIRED temperature).
Starting Up - Setting the Temperature
1. Plug the mains plug into the mains socket.
2. Press ON/OFF button. The green mains pilot indicator illuminates. The alarm
light flashes since the temperature is reached. The buzzer sounds.
3. Pressing button “G” the buzzer stops.
4. Press either the „C“ or „E” button. The temperature display switches over and
the DESIRED temperature currently set flashes on the temperature display.
5. Set the required temperature by pressing the „C“ or „E“ buttons (see section
"Temperature setting buttons"). The temperature display will immediately
show the changed setting. Each time the button is pressed the temperatu-
re is adjusted by 1 °C.
From a food safety point of view -18 °C should be considered sufficiently
cold for storing food in the freezer.
6. The alarm light,when the set temperature is reached. Press the alarm but-
ton to turn off the buzzer.
Ice pack
The appliance can an or more ice packs have.
In the event of a power failure or malfunction, the ice pack will lengthen
the amount of time it takes for the frozen food to become too warm by
several hours. The ice pack can only fulfil this task optimally if it is placed in
the uppermost drawer, at the front, above the frozen food. You can use the
ice pack for cooling cold bags.
FROSTMATIC
The FROSTMATIC function accelerates the freezing of fresh food and, at the
same time, protects foodstuffs already stored from undesirable warming.
1. The FROSTMATIC function is switched on by pressing the FROSTMATIC but-
ton. The yellow light illuminates.

17
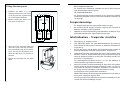
Bedienungs- und Kontrolleinrichtung
Gefrierraum
E
C
D
F
A
B
GH
I
A. Netzkontrollanzeige (grün)
B. ON/OFF Taste
C. Taste zur Temperatureinstellung (+)
D. Temperaturanzeige
E. Taste zur Temperatureinstellung (-)
F. Warnanzeige (rot)
G Taste ALARM OFF
H. Anzeige für eingeschaltete FROSTMATIC Funktion (gelb)
I. FROSTMATIC Taste
Tasten zur Temperatureinstellung
Die Temperatureinstellung erfolgt durch die Tasten C und E.
Die Tasten stehen in Verbindung mit der Temperaturanzeige.
• Durch Druck auf eine der beiden Tasten C oder E wird die Temperaturanzei-
ge von der IST-Temperatur (Temperaturanzeige leuchtet) auf die SOLL-Tem-
peratur (Temperaturanzeige blinkt) umgeschaltet.
• Mit jedem weiteren Druck auf eine der beiden Tasten wird die SOLL- Tem-
peratur um 1°C weiter gestellt. Die SOLL- Temperatur muss innerhalb 24
Stunden erreicht werden.
• Wird keine Taste gedrückt, schaltet die Temperaturanzeige nach kurzer Zeit
(ca. 5 sec.) automatisch wieder auf die IST-Temperatur zurück.
SOLL-Temperatur bedeutet:
Die Temperatur, die im Gefrierraum vorhanden sein soll. Die SOLL-Tempera-
tur wird durch blinkende Zahlen angezeigt.
48
Operating and indicator panel Freezer
E
C
D
F
A
B
GH
I
A. Mains pilot indicator (green)
B. Freezer button ON/OFF
C. Temperature setting button (for warmer temperatures)
D. Temperature display
E. Temperature setting button (for colder temperatures)
F. Alarm reset light
G. Alarm reset button
H. FROSTMATIC function "on" indicator (yellow)
I. FROSTMATIC button
Temperature setting buttons
The temperature is adjusted using the „C“ and „E“ buttons. These buttons
are connected to the temperature display.
• The temperature display is switched over from the display of the ACTUAL
temperature (Temperature display is illuminated) to the display of the DESI-
RED temperature (Temperature display flashes) by pressing one of the two
buttons, „C” or „E“.
• Each time one of the two buttons is pressed again the DESIRED temperatu-
re is adjusted by 1 °C. The DESIRED temperature must be reached within 24
hours.
If neither button is pressed, the temperature display automatically switches
back after a short period (approx. 5 sec.) to the display of the ACTUAL tem-
perature.
DESIRED temperature means:
The temperature that has been selected for inside the freezer. The DESIRED
temperature is indicated by flashing numbers.

18
IST-Temperatur bedeutet:
Die Temperaturanzeige zeigt die Temperatur an, die momentan tatsächlich
im Gefrierraum vorhanden ist. Die IST-Temperatur wird durch leuchtende
Zahlen angezeigt.
Temperaturanzeige
Die Temperaturanzeige kann mehrere Informationen anzeigen.
• Bei normalem Betrieb wird die Temperatur angezeigt, die momentan im
Gefrierraum vorhanden ist (IST-Temperatur).
• Während der Temperatureinstellung wird blinkend die im Moment einge-
stellte Gefrierraumtemperatur angezeigt (SOLL-Temperatur).
Inbetriebnahme - Temperatur einstellen
1. Netzstecker in die Steckdose stecken.
2. Taste ON/OFF (B) drücken. Die grüne Netzkontrollanzeige (A) leuchtet. Die
Temperaturanzeige (D) zeigt die momentan im Gefrierraum vorhandene IST-
Temperatur an. Die rote Warnanzeige (F) signalisiert blinkend, daß die erfor-
derliche Lagertemperatur noch nicht erreicht ist. Ein Warnton ist zu hören.
3. Auf eine der Tasten J oder L drücken. Die Temperatur-anzeige schaltet um
und zeigt blinkend die momentan eingestellte SOLL-Temperatur an.
4. Gewünschte Temperatur durch Drücken der Tasten C und E einstellen (siehe
Abschnitt "Tasten zur Temperatureinstellung"). Die Temperaturanzeige zeigt
sofort die geänderte Einstellung an. Mit jedem Tastendruck wird die Tem-
peratur um 1°C weitergestellt.
Aus ernährungswissenschaftlicher Sicht ist -18°C für den Gefrierraum als
ausreichend kalte Lagertemperatur anzusehen.
5. Der Warnton schaltet sich ab, wenn die vorgegebene Temperatur im
Gefrierraum erreicht wird. Die rote Warnanzeige blinkt weiter. Taste ALARM
STOP drücken, um die rote Warnanzeige abzuschalten.
Kälteakku
Das Gerät kann mit einem oder mehrere Kälteakkus ausgestattet sein.
Bei Stromausfall oder einer Störung am Gerät verlängert die Kälteakkus die
Zeit bis zur unzulässigen Erwärmung des Gefrierguts um mehrere Stunden.
Diese Aufgabe erfüllen die Kälteakkus nur dann optimal, wenn sie in der
obersten Schublade vorne oben auf dem Gefriergut eingelegt werden.
Die Kälteakkus können Sie vorübergehend auch als Kühlelement für Kühl-
taschen verwenden.
47
Prior to Initial Start–Up
• Please clean the appliance interior and all accessories prior to initial start-
up (see section: “Cleaning and Care”).
Electrical connection
Before initial start-up, refer to the appliance rating plate to ascertain if sup-
ply voltage and current values correspond with those of the mains at the
installation location.
e.g.: AC 220 ... 240 V 50 Hz or
220 ... 240 V~ 50 Hz
(i.e. 220 to 240 volts alternating current, 50 Hertz)
The rating plate is inside the appliance on the left.
A correctly installed, earthed socket is required for the electrical supply. The
supply must have a fuse rating of at least 10 Amps.
If the socket is not accessible once the appliance is built in, the electrical
installation must include suitable means of isolating the appliance from the
mains (e.g. fuse, cut-out, current trip or similar with a minimum contact
separation of 3 mm).
Attention: The mains connection cable may only be replaced by a skilled
electrician. Please contact your dealer or our customer service department
for repairs.

19
FROSTMATIC-Taste
Die FROSTMATIC-Funktion beschleunigt das Einfrieren frischer Lebensmittel
und schützt gleichzeitig die bereits eingelagerte Ware vor unerwünschter
Erwärmung.
1. Durch Drücken der Taste FROSTMATIC wird die FROSTMATIC-Funktion ein-
geschaltet. Die gelbe Anzeige leuchtet (H).
Wird die FROSTMATIC-Funktion nicht manuell beendet, schaltet die Elek-
tronik des Gerätes die FROSTMATIC-Funktion nach 24 Stunden ab. Die gel-
be Anzeige erlischt.
2. Durch erneutes Drücken der Taste FROSTMATIC kann die FROSTMATIC-
Funktion jederzeit manuell beendet werden. Die gelbe Anzeige erlischt.
Taste ALARM OFF
Im Falle eines ungewöhnlichen Temperaturanstieges im Gefrierraum (z.B. bei
Stromausfall) blinkt die rote Warnanzeige (F) und ein Warnton ertönt. Der
Warnton schaltet automatisch ab, wenn die eingestellte Gefrierraumtemp-
eratur wieder erreicht wird. Die rote Warnanzeige blinkt weiter. Mit der
Taste alarm stop können Sie den Warnton und die rote Warnanzeige
abschalten. Auf der Temperaturanzeige erscheint für einige Sekunden die
wärmste Temperatur, die im Gefrierraum erreicht wurde.
Achtung: Bei Erwärmung im Gefrierraum muß der Zustand des Gefriergu-
tes überprüft werden.
Gerät abschalten
1. Zum Abschalten die Taste ON/OFF ca. 5 Sekunden gedrückt halten. In der
Temperaturanzeige erfolgt ein sogenannter “Count down”, dabei wird
rückwärts von “3” nach “1” gezählt. Mit Erreichen der “1” schaltet der
Gefrieraum ab. Die Temperaturanzeige erlischt.
Hinweis:
Die Einstellung des Geräts kann bei gezogenem Netzstecker oder fehlender
Stromversorgung nicht geändert werden. Nach Anschluß an das Stromnetz
nimmt das Gerät wieder den Zustand an, den es bei Netzunterbrechung hatte.
Soll das Gerät für längere Zeit außer Betrieb genommen werden:
1. Gefrierfach abschalten, dazu die Taste ON/OFF (B) drücken, bis die Anzeige
(A) erlischt .
2. Netzstecker ziehen oder Sicherung abschalten bzw. herausdrehen.
3. Gefrierfach abtauen und Gerät gründlich reinigen (siehe Abschnitt "Reini-
gung und Pflege").
4. Türe anschließend geöffnet lassen, um Geruchsbildung zu vermeiden.
46
Alignment height of 870 mm
• If using a 190 to 220 mm plinth,
make a shown.
• If using a plinth higher than 150 mm
but less than 190 mm, cut the height
compensation strip supplied with the
appliance to the required depth and
fit it between the plinth and the ven-
tilation grille.
• If using a 150 mm plinth, fit the com-
plete height compensation strip.
• If the appliance is installed at the end
of a row of units, insert foot E to hold
the plinth in place.
100
150
30
100
E

20
Einfrieren und Tiefkühllagern
Im Gefrierraum können Sie Tiefkühlkost lagern und frische Lebensmittel
einfrieren.
Achtung!
•Vor dem Einfrieren von Lebensmitteln muß die Temperatur im Gefrierraum
-18 °C oder kälter sein.
• Bitte das auf dem Typschild angegebene Gefriervermögen beachten. Das
Gefriervermögen ist die maximale Menge an frischer Ware, die innerhalb
von 24 Stunden eingefroren werden kann. Wenn Sie an mehreren Tagen
hintereinander einfrieren, nehmen Sie bitte nur 2/3 bis 3/4 der auf dem
Typschild angegebenen Menge. Sie erreichen eine bessere Qualität, wenn
die Lebensmittel schnell bis zum Kern durchgefroren werden.
• Warme Lebensmittel vor dem Einfrieren abkühlen lassen. Die Wärme führt
zu verstärkter Eisbildung und erhöht den Energieverbrauch.
• Auf die Lagerzeit bzw. auf das Haltbarkeitsdatum von gekauften Tiefkühl-
produkten achten
• Einmal aufgetaute Lebensmittel ohne weitere Verarbeitung (garen zu Fer-
tiggerichten) auf keinen Fall ein zweites Mal einfrieren.
• Behälter mit brennbaren Gasen oder Flüssigkeiten können durch Käl-
teeinwirkung undicht werden. Explosionsgefahr! Lagern Sie keine Behäl-
ter mit brennbaren Stoffen, wie z.B. Spraydosen, Feuerzeug-Nachfüllkar-
tuschen etc. im Kältegerät.
• Flaschen und Dosen dürfen nicht in den Gefrierraum. Sie können sprin-
gen, wenn der Inhalt gefriert - bei kohlensäurehaltigem Inhalt sogar
explodieren! Legen Sie nie Limonaden, Säfte, Bier, Wein, Sekt usw. in den
Gefrierraum. Ausnahme: Hochprozentige Spirituosen können im Gefrier-
raum gelagert werden.
• Alle Lebensmittel vor dem Einfrieren luftdicht verpacken, damit sie nicht
austrocknen, nicht den Geschmack verlieren und keine Geschmacksüber-
tragung auf anderes Tiefkühlgut erfolgen kann.
Vorsicht! Tiefkühlgut nicht mit nassen Händen berühren. Die Hände könn-
ten daran festfrieren.
1. Die verpackten Lebensmittel in die obere Schubladen legen. Nicht gefro-
rene Ware darf bereits gefrorene Ware nicht berühren, die gefrorene
Ware kann sonst antauen.
2. Tiefkühlgut möglichst nach Art getrennt in die Schubladen legen.
45
Fitting the plinth
Alignment height of 820 mm
• If using a 140 to 170 mm plinth,
make a cut-out as shown.
• If using a plinth higher than 100 mm
but less than 140 mm, cut the height
compensation strip supplied with the
appliance to the required depth and
fit it between the plinth and the ven-
tilation griile, pressing it into position
below this grille.
• If using a 100 mm plinth, fit the com-
plete height compensation strip.
870
820
140
190
30
100
900
170
220
140
190
Seite wird geladen ...
Seite wird geladen ...
Seite wird geladen ...
Seite wird geladen ...
Seite wird geladen ...
Seite wird geladen ...
Seite wird geladen ...
Seite wird geladen ...
Seite wird geladen ...
Seite wird geladen ...
Seite wird geladen ...
Seite wird geladen ...
-
 1
1
-
 2
2
-
 3
3
-
 4
4
-
 5
5
-
 6
6
-
 7
7
-
 8
8
-
 9
9
-
 10
10
-
 11
11
-
 12
12
-
 13
13
-
 14
14
-
 15
15
-
 16
16
-
 17
17
-
 18
18
-
 19
19
-
 20
20
-
 21
21
-
 22
22
-
 23
23
-
 24
24
-
 25
25
-
 26
26
-
 27
27
-
 28
28
-
 29
29
-
 30
30
-
 31
31
-
 32
32


Aeg-Electrolux SZ71990-4I Benutzerhandbuch
- Kategorie
- Kühlschränke
- Typ
- Benutzerhandbuch