Zanussi ZTA250 Benutzerhandbuch
- Kategorie
- Waschmaschinen
- Typ
- Benutzerhandbuch


SAFETY INFORMATION
Before the installation and use of the appliance, carefully read the
supplied instructions. The manufacturer is not responsible if an
incorrect installation and use causes injuries and damages.
Always keep the instructions with the appliance for future
reference.
CHILDREN AND VULNERABLE PEOPLE SAFETY
WARNING!
Risk of suffocation, injury or permanent disability.
• This appliance can be used by children aged from 8 years and
above and persons with reduced physical, sensory or mental
capabilities or lack of experience and knowledge if they have
been given supervision or instruction concerning use of the
appliance in a safe way and understand the hazards involved.
• Do not let children play with the appliance.
• Children of less than 3 years should be kept away unless
continuously supervised.
• Keep all packaging away from children.
• Keep all detergents away from children.
• Keep children and pets away from the appliance door when it is
open.
• If the appliance has a child safety device, we recommend you
activate it.
• Cleaning and user maintenance shall not be made by children
without supervision.
GENERAL SAFETY
• Do not change the specification of this appliance.
• If the tumble dryer is put on top of a washing machine, use the
stacking kit. The stacking kit, available from your authorized
vendor, can be used only with the appliance specified in the
instructions, supplied with the accessory. Read it carefully
before installation (Refer to the Installation leaflet).
2

• The appliance can be installed as freestanding or below the
kitchen counter with correct space (Refer to the Installation
leaflet).
• Do not install the appliance behind a lockable door, a sliding
door or a door with a hinge on the opposite side, where the
appliance door can not be fully opened.
• The ventilation openings in the base (if applicable) must not be
obstructed by a carpet.
• Connect the mains plug to the mains socket only at the end of
the installation. Make sure that there is access to the mains
plug after the installation.
• Ensure you have good ventilation in the installation room to
avoid the back flow of gases into the room from appliances
burning other fuels, including open fires.
• Exhaust air must not be discharged into a flue which is used for
exhausting fumes from appliances burning gas or other fuels. (if
applicable)
• If the supply cord is damaged, it must be replaced by the
manufacturer, its Authorised Service Centre or similarly
qualified persons in order to avoid a hazard.
• Obey the maximum load volume of 7kg (refer to the
“Programme chart” chapter).
• Do not use the appliance if industrial chemicals have been used
for cleaning.
• Wipe away lint that has accumulated around the appliance.
• Do not run the appliance without a filter. Clean the lint filter
before or after each use.
• Do not dry unwashed items in the tumble dryer.
• Items that have been soiled with substances such as cooking
oil, acetone, alcohol, petrol, kerosene, spot removers,
turpentine, waxes and wax removers should be washed in hot
water with an extra amount of detergent before being dried in
the tumble dryer.
• Items such as foam rubber (latex foam), shower caps,
waterproof textiles, rubber backed articles and clothes or
pillows fitted with foam rubber pads should not be dried in the
tumble dryer.
3

• Fabric softeners, or similar products, should be used as
specified by the fabric softener instructions.
• Remove all objects from pockets such as lighters and matches.
• Never stop a tumble dryer before the end of the drying cycle
unless all items are quickly removed and spread out so that the
heat is dissipated.
• The final part of a tumble dryer cycle occurs without heat (cool
down cycle) to ensure that the items are left at a temperature
that ensures that the items will not be damaged.
• Before maintenance, deactivate the appliance and disconnect
the mains plug from the mains socket.
SAFETY INSTRUCTIONS
INSTALLATION
• Remove all the packaging.
• Do not install or use a damaged appliance.
• Obey the installation instruction supplied with
the appliance.
• Always be careful when you move the appliance
because it is heavy. Always wear safety gloves.
• Do not install or use the appliance where the
temperature is less than 5°C or higher than
35°C.
• Make sure that the floor where you install the
appliance is flat, stable, heat resistant and clean.
• Make sure that there is air circulation between
the appliance and the floor.
• Always move the appliance vertically.
• The rear surface of the appliance must be put
against the wall.
• When the appliance is put in its permanent
position, check if it is fully level with the aid of a
spirit level. If it is not, adjust the feet until it is.
ELECTRICAL CONNECTION
WARNING! Risk of fire and electrical
shock.
• The appliance must be earthed.
• Make sure that the electrical information on the
rating plate agrees with the power supply. If not,
contact an electrician.
• Always use a correctly installed shockproof
socket.
• Do not use multi-plug adapters and extension
cables.
• Do not pull the mains cable to disconnect the
appliance. Always pull the mains plug.
• Do not touch the mains cable or the mains plug
with wet hands.
• Only for UK and Ireland. The appliance has a 13
amp mains plug. If it is necessary to change the
fuse in the mains plug, use a 13 amp ASTA (BS
1362) fuse.
• This appliance complies with the E.E.C.
Directives.
USE
WARNING! Risk of injury, electrical
shock, fire, burns or damage to the
appliance.
• Use this appliance in a household only.
• Do not dry the damaged items which contain
padding or fillings.
• Only dry fabrics which are applicable to dry in
the tumble dryer. Follow the instructions on the
fabric label.
• If you have washed your laundry with a stain
remover start an extra rinse cycle before you
start the dryer.
• Do not drink or prepare food with the
condensed water/distilled water. It can cause
health problems to people and pets.
• Do not sit or stand on the open door.
• Do not dry dripping wet clothes in the tumble
dryer.
CARE AND CLEANING
WARNING! Risk of injury or damage
to the appliance.
4

• Do not use water spray and steam to clean the
appliance.
• Clean the appliance with a moist soft cloth. Only
use neutral detergents. Do not use abrasive
products, abrasive cleaning pads, solvents or
metal objects.
DISPOSAL
WARNING! Risk of injury or
suffocation.
• Disconnect the appliance from the mains
supply.
• Cut off the mains cable and discard it.
• Remove the door catch to prevent children and
pets to get closed in the appliance.
INSTALLATION
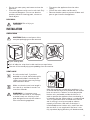
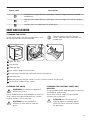
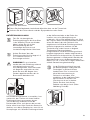
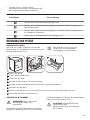
UNPACKING
CAUTION! Before use all parts of the
transport packaging must be removed.
1 2 3
Open loading door.1
Pull off adhesive strips from inside machine on top of drum.2
Remove foil hose and polystyrene padding from the machine.3
VENT HOSE
As to the outlet itself, if you have
decided on a install wall/window grille,
a good local builder’s merchant can
supply you with the necessary fittings
and installation advice.
Make sure that the vent hose length is
less than 2 m, and that it contains no
more than 2 bends.
WARNING! It is important not to
connect the vent hose to, for example,
a cooker hood, or a chimney or flue
pipe designed to transmit the exhaust
from a fuel burning appliance.
Note that to prevent condensation problems, it is
essential that the dryer be installed with the flexible
hose to transmit its “exhaust” at least beyond the
kitchen units; preferable outside the kitchen. In
order to prevent the appliance from overheating, it
is important that the steam exhaust is unobstructed.
Thus, if a permanent hose installed to an external
wall or ceiling, it must be ensured an exhaust
capacity of minimum 150 m3/h. If the dryer is
installed adjacent to kitchen units, make sure that
the vent hose is not squashed. If the hose is not
fully squashed, drying efficiency will be decreased ,
5

resulting in longer drying times and higher energy
consumption. If the hose is fully squashed, the
automatic cut-outs with which the appliance is
fitted can operate. When operating the tumble
dryer, the room temperature must not be lower than
+5°C and higher than +35°C, as it can affect the
performance of the appliance.
If the hose is long and the room
temperature low, the moisture might
condense to water inside the hose.
This is an usual occurrence. To
prevent this water from the hose, it is
recommend to drill a small hole (via. 3
mm) in the lowest point of the hose
and to put a small container below it.
(See picture, point B).
B
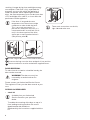
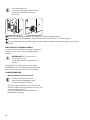
There are 3 vent outlets: on the left,
right side and at the rear.
A
1
A
2
Pull the ring nut A from the vent outlet at the rear.1
Screw on the ring nut to the hose and push it into position.2
The not used vents must be sealed with supplied covers.3
DOOR REVERSAL
To make it easier to load or unload the laundry, the
door can be reversed.
WARNING! The door must only be
reversed by an authorised service
engineer.
Please contact your Authorised Service Centre.
The engineer will carry out the door reversal at your
cost.
SPECIAL ACCESSORIES
• stack kit
Available from your Authorised
Service Centre or your specialist
dealer
To enable the mounting of the dyer on top of a
front loading washing machine with cover’s
depth between 48 and 60 cm.
Read carefully the instructions supplied with the
kit.
6

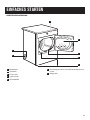
EASY START
PRODUCT DESCRIPTION
1
3
4
2
7
6
5
1
Control panel
2
Appliance door
3
Fluff filter
4
Rating plate
5
Adjustable feet
6
Sideways vent outlets / back vent outlet
7
Ring nut
7

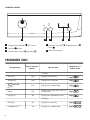
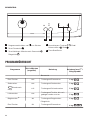
CONTROL PANEL
1 2 3 54
1
Programme knob and OFF switch
2
Delicate button
3
Textile button: Cotton , Synthetic
4
Indicators: Drying , End/Anticrease ,
Filter
5
Start/Pause button
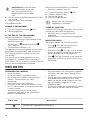
PROGRAMME TABLE
Programmes
Time in minutes
(about)
Type of load
Load (max.)
1)
/
Fabric mark
Cotton
Extra Dry 140 Drying level: extra dry.
7kg/
Strong Dry 130 Drying level: strong dry.
7kg/
Cupboard
Dry
2)3)
115 Drying level: cupboard dry.
7kg/
Damp 100
Drying level: textiles which are still
to be ironed.
7kg/
Iron Dry
3)
90 Drying level: applicable for iron.
7kg/
Synthetic
Extra Dry 50 Drying level: extra dry.
3kg/
Cupboard Dry
3)
45 Drying level: cupboard dry.
3kg/
8

Programmes
Time in minutes
(about)
Type of load
Load (max.)
1)
/
Fabric mark
Iron Dry 30 Drying level: applicable for iron.
3kg/
Jeans 140
Leisure clothing such as jeans,
sweat-shirts of different material
thicknesses (e.g. at the neck,
cuffs and seams).
7kg/
1) The maximum weight refers to dry items.
2) The Cotton Cupboard Dry programme is the “Standard cotton programme” and it is suitable to
dry normal wet cotton laundry and it is the most efficient programme in terms of energy consumption for
drying wet cotton laundry.
3) For test institutes only: Standard programmes for tests are specified in the EN 61121 document.
OPTIONS
DELICATE
With this option you can set a delicate drying
programme that has a low temperature. Use this
option with a fabrics that have the symbol on
the fabric label (e.g. acrylic, viscose).
TEXTILE
type of laundry: Cotton , Synthetic
Selection for time controlled programmes
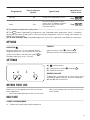
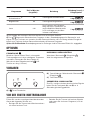
SETTINGS
A B C
A) Delicate button
B) Textile button: Cotton , Synthetic
C) Start/Pause button
BUZZER ON/OFF
To deactivate or activate the acoustic signals, press
and hold for approximately 2 seconds touchpads
(A) and (B) at the same time.
BEFORE FIRST USE
Before you use the appliance for the first time do
these operations:
• Clean the tumble dryer drum with a moist cloth.
• Start a short programme (e.g. 30 minutes) with
moist laundry.
DAILY USE
START A PROGRAMME
1. Prepare the laundry and load the appliance.
9

CAUTION! Make sure that when
you close the door, the laundry
does not catch between the
appliance door and the rubber
seal.
2. Set the correct programme and options for the
type of load.
3. Press the Start/Pause touchpad.
The programme starts.
CHANGE A PROGRAMME
1. Turn the Programme knob to OFF
2. Set the programme.
AT THE END OF THE PROGRAMME
When the programme is completed:
• An intermittent acoustic signal operates (If the
Buzzer function is on).
• The indicators End/Anticrease and
Filter comes on.
• The Start/Pause indicator is on.
The appliance continues to operate with the crease
guard phase for approximately other 30 minutes.
The crease guard phase removes creases from
your laundry.
You can remove the laundry before the crease
guard phase is completed. We recommend, for
better results, that you remove the laundry when the
phase is almost completed or completed.
When the crease guard phase is completed:
• Start/Pause indicator goes off.
1. Turn the Programme knob to OFF
2. Open the appliance door.
3. Remove the laundry.
4. Close the appliance door.
Always clean the filter when a
programme is completed.
STAND-BY FUNCTION
To decrease the energy consumption, this function
automatically deactivates the appliance:
• After 5 minutes if you do not start the
programme.
• After 5 minutes from the end of the programme.
INDICATOR LIGHTS
These lights indicate the following functions:
• Drying : This light indicates that the
appliance is in the drying phase.
• End/Anticrease : This light is on at the end
of the cooling phase, during the anticreasing
phase and at the end of the programme.
• Filter
: This light illuminates at the end of the
programme to remind you that the filters must
be cleaned.
HINTS AND TIPS
PREPARING THE LAUNDRY
• Close the zippers.
• Close the fasteners of the duvet covers.
• Do not keep ties or ribbons loose (e.g. apron
ribbons). Tie them before you start a
programme.
• Remove all items from the pockets.
• If an item has the internal layer made of cotton,
turn it inside out. Make sure that the cotton layer
is always external
• We recommend that you set the correct
programme applicable for the type of fabrics
that are in the appliance.
• Do not put fabrics with strong colours together
with fabrics with light colours. Strong colours
can bleed.
• Use an applicable programme for cotton jersey
and knitwear to prevent the items to shrink.
• Make sure that the laundry weight is not more
than the maximum weight that is in the
programme table.
• Dry only the laundry that is applicable for tumble
dryer. Refer to the fabric label on the items.
Fabric label Description
Laundry that is applicable for tumble dryer.
10

Fabric label Description
Laundry that is applicable for tumble dryer. Set the programme with standard
temperature.
Laundry that is applicable for tumble dryer. Set the programme with low tempera-
ture.
Laundry that is not applicable for tumble dryer.
CARE AND CLEANING
CLEANING THE FILTER
At the end of each cycle the filter indicator is on to
tell you that the filter must be cleaned.
The filter collects the fluff. The fluff
occurs while the cloths are dried in the
tumble dryer.
1 2 3
Open the door.1
Pull the filter.2
Open the filter3
Use a moist hand to clean the filter.4
If necessary clean the filter with warm water using a brush.5
Close the filter.6
Remove fluff from the filter socket. For this a vacuum cleaner can be used.7
Put the filter inside the filter socket.8
CLEANING THE DRUM
WARNING! Disconnect the appliance
before you clean it.
Use a standard neutral soap detergent to clean the
inner surface of the drum and drum ribs. Dry the
cleaned surfaces with a soft cloth.
CAUTION! Do not use abrasive
materials or steel wool to clean the
drum.
CLEANING THE CONTROL PANEL AND
HOUSING
Use a standard neutral soap detergent to clean the
control panel and housing.
Use a moist cloth to clean. Dry the cleaned
surfaces with a soft cloth.
CAUTION! Do not use furniture
cleaning agents or cleaning agents
which can cause corrosion to clean
the appliance.
11

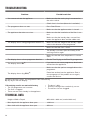
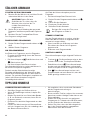
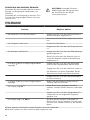
TROUBLESHOOTING
Problem Possible solution
You cannot activate the appliance. Make sure that the mains plug is connected to
the mains socket.
Check fuse in fuse box (domestic installation).
The programme does not start. Press Start/Pause.
Make sure that the appliance door is closed.
The appliance door does not close. Make sure that the installation of the filter is cor-
rect.
Make sure that the laundry does not catch be-
tween the appliance door and the rubber seal.
The display shows a long programme duration.
1) Make sure that the weight of the laundry is appli-
cable to the duration of the programme.
Make sure that the filter is clean.
The laundry is too wet. Spin the laundry in the
washing machine again.
Make sure that the room temperature is not too
warm.
The display shows a short programme duration. Set the Time Drying or the Extra Dry programme.
The display shows Err
2)
.
If you want to set a new programme, deactivate
and activate the appliance.
Make sure that the options are applicable to the
programme.
The display shows (e.g. E51)
2)
.
Deactivate and activate the appliance. Start a
new programme. If the problem occurs again,
contact the Service.
1) After maximum 5 hours, the programme ends automatically
2) only dryers with the display.
If the drying results are not satisfactory
• The set programme was incorrect.
• The filter is clogged.
• There was too much laundry in the appliance.
• The drum is dirty.
• Incorrect setting of the conductivity sensor.
• The airflow slots are clogged.
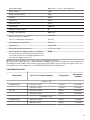
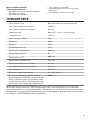
TECHNICAL DATA
Height x Width x Depth 850 x 600 x 600 mm (maximal 630 mm)
Max. depth with the appliance door open 1090 mm
Max. width with the appliance door open 950 mm
12

Adjustable height 850 mm (+ 15 mm - feet regulation)
Drum volume 108 l
Maximum load volume 7 kg
Voltage 230 V
Frequency 50 Hz
Necessary fuse 16 A
Total power 2600 W
Energy efficiency class C
Energy consumption
1) 4,25 kWh
Annual energy consumption
2) 512 kWh
Left—on mode power absorption 0,70 W
Off mode power absorption 0,70 W
Type of use Household
Permitted ambient temperature + 5°C to + 35°C
Level of protection against ingress of solid parti-
cles and moisture ensured by the protective cov-
er, except where the low voltage equipment has
no protection against moisture
IPX4
1) With reference to EN 61121. 7kg of cotton centrifuged at 1000 rpm.
2) Energy consumption per year in kWh, based on 160 drying cycles of the standard cotton programme at
full and partial load, and the consumption of the low-power modes. Actual energy consumption per cycle
will depend on how the appliance is used (REGULATION (EU) No 392/2012).
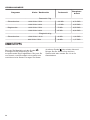
CONSUMPTION DATA
Programme Spun at / residual humidity Drying time
Energy con-
sumption
Cotton 7 kg
Cupboard Dry 1400 rpm / 50% 100 min. 3,70 kWh
1000 rpm / 60% 115 min. 4,25 kWh
Iron Dry 1400 rpm / 50% 75 min. 2,55 kWh
1000 rpm / 60% 87 min. 3,20 kWh
Synthetic 3 kg
Cupboard Dry 1200 rpm / 40% 40 min. 1,20 kWh
800 rpm / 50% 46 min. 1,47 kWh
13

ENVIRONMENT CONCERNS
Recycle the materials with the symbol . Put the
packaging in applicable containers to recycle it.
Help protect the environment and human health
and to recycle waste of electrical and electronic
appliances. Do not dispose appliances marked with
the symbol with the household waste. Return the
product to your local recycling facility or contact
your municipal office.
14

SICHERHEITSHINWEISE
Lesen Sie vor der Montage und dem Gebrauch des Geräts zuerst
die Gebrauchsanleitung. Der Hersteller übernimmt keine
Verantwortung für Verletzungen und Beschädigungen durch
unsachgemäße Montage. Bewahren Sie die Gebrauchsanleitung
griffbereit auf.
SICHERHEIT VON KINDERN UND
SCHUTZBEDÜRFTIGEN PERSONEN
WARNUNG!
Erstickungs- und Verletzungsgefahr sowie Gefahr einer
dauerhaften Behinderung.
• Das Gerät kann von Kindern ab 8 Jahren und Personen mit
eingeschränkten physischen, sensorischen oder geistigen
Fähigkeiten oder mit mangelnder Erfahrung und/oder
mangelndem Wissen nur dann verwendet werden, wenn sie
durch eine für ihre Sicherheit zuständige Person beaufsichtigt
werden oder in die sichere Verwendung des Geräts
eingewiesen wurden und die mit dem Gerät verbundenen
Gefahren verstanden haben.
• Kinder dürfen nicht mit dem Gerät spielen.
• Halten Sie Kinder unter 3 Jahren vom Gerät fern, wenn sie nicht
ständig beaufsichtigt werden.
• Alle Verpackungsmaterialien von Kindern fernhalten.
• Alle Reinigungsmittel von Kindern fernhalten.
• Halten Sie Kinder und Haustiere vom geöffneten Gerät fern.
• Falls Ihr Gerät mit einer Kindersicherung ausgestattet ist,
empfehlen wir, diese einzuschalten.
• Wartung oder Reinigung des Geräts dürfen nicht von Kindern
ohne Aufsicht erfolgen.
ALLGEMEINE SICHERHEIT
• Nehmen Sie keine technischen Änderungen am Gerät vor.
• Wenn der Wäschetrockner auf einer Waschmaschine
aufgestellt wird, muss die Befestigung mithilfe des Bausatzes
Wasch-Trocken-Säule erfolgen. Der Bausatz Wasch-Trocken
15

Säule, der bei Ihrem autorisierten Lieferanten erhältlich ist, kann
nur für die in der mitgelieferten Anleitung aufgeführten Geräte
verwendet werden. Lesen Sie die Anleitung aufmerksam vor der
Montage (siehe Montageanleitung).
• Das Gerät kann freistehend oder unter einer
Küchenarbeitsplatte in einer Nische mit den entsprechenden
Abmessungen montiert werden (siehe Montageanleitung).
• Das Gerät darf nicht hinter einer verschließbaren Tür, einer
Schiebetür oder einer Tür mit einem Scharnier, das dem des
Gerätes gegenüber liegt und eine vollständige Öffnung der
Gerätetür verhindert, aufgestellt werden.
• Die Lüftungsöffnungen im Gerätesockel (falls vorhanden)
dürfen nicht von einem Teppichboden blockiert werden.
• Stecken Sie den Netzstecker erst nach Abschluss der Montage
in die Steckdose. Stellen Sie sicher, dass der Netzstecker nach
der Montage noch zugänglich ist.
• Der Raum, in dem das Gerät aufgestellt wird, muss gut belüftet
sein, damit keine Gase in den Raum zurückströmen, die von
offenem Feuer oder von anderen Geräten stammen, die mit
Brennstoffen arbeiten.
• Die Abluft darf nicht über denselben Abzug abgeleitet werden,
durch den der Dunstabzug von mit Gas oder sonstigen
Brennstoffen betriebenen Geräten gewährleistet wird. (falls
zutreffend)
• Wenn das Netzkabel beschädigt ist, muss es vom Hersteller,
seinem autorisierten Kundenservice oder einer gleichermaßen
qualifizierten Person ausgetauscht werden, um
Gefahrenquellen zu vermeiden.
• Beachten Sie die maximale Beladungsmenge von 7 kg (siehe
Kapitel „Programmtabelle“).
• Verwenden Sie das Gerät nicht, wenn es mit
Industriechemikalien gereinigt wurde.
• Wischen Sie die um das Gerät ggf. angesammelten Flusen
weg.
• Benutzen Sie das Gerät niemals ohne Filter. Reinigen Sie den
Flusenfilter vor oder nach jedem Gebrauch.
16

• Trocknen Sie keine ungewaschenen Wäschestücke im
Trockner.
• Wäschestücke, die mit Speiseöl verschmutzt sind oder die mit
Aceton, Alkohol, Kerosin, Fleckentfernern, Terpentin und
Wachsentfernern behandelt worden sind, müssen vor dem
Trocknen in dem Wäschetrockner in heißem Wasser und
zusätzlichem Waschmittel gewaschen werden.
• Artikel wie Schaumgummi (Latexschaumgummi), Duschhauben,
imprägnierte Textilien, gummibeschichtete Wäschestücke und
Kleider oder Kissen mit Schaumgummipolster dürfen in dem
Gerät nicht getrocknet werden.
• Weichspüler oder ähnliche Produkte dürfen nur entsprechend
den Herstelleranweisungen benutzt werden.
• Entfernen Sie alle Gegenstände, wie Feuerzeuge und
Streichhölzer, aus den Taschen.
• Wenn Sie die Trockentrommel vor dem Ende des
Trockengangs anhalten müssen, entnehmen Sie bitte sofort die
gesamte Wäsche und breiten Sie diese zur Wärmeableitung
aus.
• Der letzte Teil eines Trockenprogramms findet ohne Hitze statt
(Abkühlzyklus), um sicherzustellen, dass die Wäsche auf einer
Temperatur bleibt, bei der sie nicht beschädigt wird.
• Schalten Sie das Gerät immer aus und ziehen Sie den
Netzstecker aus der Steckdose, bevor Reinigungsarbeiten
durchgeführt werden.
SICHERHEITSANWEISUNGEN
MONTAGE
• Entfernen Sie das Verpackungsmaterial.
• Stellen Sie ein beschädigtes Gerät nicht auf
und benutzen Sie es nicht.
• Halten Sie sich an die mitgelieferte
Montageanleitung.
• Seien Sie beim Umsetzen des Geräts vorsichtig,
denn es ist schwer. Tragen Sie stets
Sicherheitshandschuhe.
• Das Gerät darf nicht an einem Ort aufgestellt
oder verwendet werden, an dem die Temperatur
unter 5 °C absinken oder auf über 35°C steigen
kann.
• Stellen Sie sicher, dass der Boden, auf dem das
Gerät aufgestellt wird, eben, hitzebeständig und
sauber ist.
• Stellen Sie sicher, dass die Luft zwischen Gerät
und Boden zirkulieren kann.
• Das Gerät darf ausschließlich stehend
transportiert oder umgesetzt werden.
• Die Geräterückseite muss gegen die Wand
zeigen.
• Überprüfen Sie den waagrechten Stand des
Geräts mit einer Wasserwaage, wenn es an
seinen endgültigen Platz gestellt wird. Richten
Sie es gegebenenfalls mit den Schraubfüßen
waagerecht aus.
17

ELEKTRISCHER ANSCHLUSS
WARNUNG! Brand- und
Stromschlaggefahr.
• Das Gerät muss geerdet sein.
• Stellen Sie sicher, dass die elektrischen Daten
auf dem Typenschild den Daten Ihrer
Stromversorgung entsprechen. Wenden Sie
sich andernfalls an eine Elektrofachkraft.
• Schließen Sie das Gerät nur an eine
ordnungsgemäß installierte
Schutzkontaktsteckdose an.
• Verwenden Sie keine Mehrfachsteckdosen oder
Verlängerungskabel.
• Ziehen Sie nicht am Netzkabel, wenn Sie das
Gerät von der Stromversorgung trennen
möchten. Ziehen Sie stets am Netzstecker.
• Fassen Sie das Netzkabel oder den Netzstecker
nicht mit nassen Händen an.
• Nur für GB und Irland. Das Gerät besitzt einen
Netzstecker mit einer 13 A Sicherung. Muss die
Sicherung im Netzstecker ausgetauscht
werden, setzen Sie eine 13 A Sicherung des
Typs ASTA (BS 1362) ein.
• Das Gerät entspricht den EWG-Richtlinien.
GEBRAUCH
WARNUNG! Verletzungs-,
Stromschlag-, Brand-,
Verbrennungsgefahr sowie Risiko von
Schäden am Gerät.
• Das Gerät ist ausschließlich für die Verwendung
im Haushalt vorgesehen.
• Beschädigte Wäschestücke mit Wattierungen
oder Füllungen dürfen nicht im Gerät getrocknet
werden.
• Nur Textilien trocknen, die für Wäschetrockner
geeignet sind. Beachten Sie die Pflegehinweise
auf dem Textiletikett.
• Für Wäsche, die mit einem Fleckenentferner
behandelt wurde, muss vor dem Trocknen ein
zusätzlicher Spülgang durchgeführt werden.
• Das Kondenswasser/destillierte Wasser darf
nicht getrunken oder für das Zubereiten von
Speisen verwendet werden. Dies kann bei
Mensch und Tier gesundheitliche Schäden
hervorrufen.
• Setzen oder stellen Sie sich niemals auf die
geöffnete Gerätetür.
• Trocknen Sie keine tropfnassen Wäschestücke
im Trockner.
REINIGUNG UND PFLEGE
WARNUNG! Verletzungsgefahr sowie
Risiko von Schäden am Gerät.
• Reinigen Sie das Gerät nicht mit einem
Wasser- oder Dampfstrahl.
• Reinigen Sie das Gerät mit einem weichen,
feuchten Tuch. Verwenden Sie ausschließlich
Neutralreiniger Benutzen Sie keine
Scheuermittel, scheuernde
Reinigungsschwämmchen, Lösungsmittel oder
Metallgegenstände.
ENTSORGUNG
WARNUNG! Verletzungs- und
Erstickungsgefahr.
• Trennen Sie das Gerät von der
Stromversorgung.
• Schneiden Sie das Netzkabel ab, und entsorgen
Sie es.
• Entfernen Sie das Türschloss, um zu verhindern,
dass sich Kinder oder Haustiere in dem Gerät
einschliessen.
MONTAGE
AUSPACKEN
ACHTUNG! Entfernen Sie vor dem
Gebrauch das gesamte
Verpackungsmaterial.
18

1 2 3
Öffnen Sie die Einfülltür.1
Ziehen Sie die Klebebänder innerhalb der Maschine oben von der Trommel ab.2
Entfernen Sie den Folienschlauch und den Styroporblock aus dem Gerät.3
ENTLÜFTUNGSSCHLAUCH
Falls Sie sich bezüglich der
Entlüftungsöffnung für das feste Gitter
in der Wand/im Fenster entschieden
haben, sollten Sie sich in Ihrer
Baustoffhandlung über die
notwendigen Anschlüsse und
Installationsmöglichkeiten informieren.
Achten Sie darauf, dass der
Entlüftungsschlauch nicht länger als 2
m ist und nicht mehr als 2
Krümmungen aufweist.
WARNUNG! Es muss beachtet
werden, dass der Entlüftungsschlauch
nicht beispielsweise an eine
Dunstabzugshaube, einen Kamin oder
ein Abgasrohr angeschlossen wird,
durch den auch die Abgase eines
Gerätes abgeleitet werden, das mit
Brennstoffen betrieben wird.
Um Kondensationsprobleme zu vermeiden, ist es
unerlässlich, den Trockner mit einem flexiblen
Entlüftungsschlauch auszustatten, dessen
„Auslassöffnung“ mindestens hinter die
Küchenmöbel reicht, noch besser aber aus der
Küche selbst hinaus führt. Damit das Gerät nicht
überhitzt, muss dieser Dampfauslass stets frei von
Verstopfungen sein. Wird der Entlüftungsschlauch
an der Außenwand oder an der Decke fest
installiert, muss eine Absaugleistung von
mindestens 150 m³/Std. gewährleistet sein. Wird
der Trockner neben einem Küchenmöbel installiert,
achten Sie darauf, dass der Schlauch nicht
eingeklemmt wird. Wird der Entlüftungsschlauch
teilweise eingequetscht, reduziert sich die
Trockenleistung, und es kommt zu längeren
Trockenzeiten und einem höheren
Energieverbrauch. Wird der Entlüftungsschlauch
komplett eingequetscht, werden möglicherweise
die Sicherheitsausschalter aktiviert, mit denen das
Gerät ausgestattet ist. Während des Betriebs des
Wäschetrockners muss die Raumtemperatur im
Bereich von +5 °C und +35 °C liegen, anderenfalls
wird die Geräteleistung beeinträchtigt.
Ist der Entlüftungsschlauch lang und
die Raumtemperatur niedrig, kann die
Feuchtigkeit im Schlauchinneren
kondensieren. Dies ist normal. Um
diese Wasseransammlung im
Schlauch zu verhindern, wird
empfohlen, an der niedrigsten Stelle
des Schlauchs ein kleines Loch
(Durchmesser 3 mm) zu bohren.
Stellen Sie dann einen kleinen
Behälter unter dieses Loch. (Siehe
Abbildung, Punkt B.)
B
19

Das Gerät besitzt 3
Luftaustrittsöffnungen: auf der linken
und rechten Seite sowie auf der
Rückseite.
A
1
A
2
Ziehen Sie die Ringmutter A aus der hinteren Luftaustrittsöffnung heraus.1
Schrauben Sie die Ringmutter auf den Schlauch und setzen Sie ihn in die Öffnung ein.2
Die nicht benutzten Austrittsöffnungen müssen mit den mitgelieferten Abdeckungen verschlossen
werden.
3
WECHSEL DES TÜRANSCHLAGS
Um das Einfüllen und Entnehmen der Wäsche zu
erleichtern, kann der Türanschlag gewechselt
werden.
WARNUNG! Die Tür darf nur von
einem autorisierten
Kundendiensttechniker gewechselt
werden.
Wenden Sie sich bitte an Ihren autorisierten
Kundendienst. Der Techniker wird den Wechsel
des Türanschlags auf Ihre Kosten vornehmen.
SONDERZUBEHÖR
• Bausatz Wasch-Trocken-Säule
Den Bausatz können Sie vom
autorisierten Kundendienst oder
Ihrem Fachhändler beziehen.
Ermöglicht die Installation des Trockners auf
einer Frontlader-Waschmaschine mit einer Tiefe
zwischen 48 und 60 cm.
Lesen Sie aufmerksam die dem Bausatz
beiliegende Anleitung.
20
Seite wird geladen ...
Seite wird geladen ...
Seite wird geladen ...
Seite wird geladen ...
Seite wird geladen ...
Seite wird geladen ...
Seite wird geladen ...
Seite wird geladen ...
Seite wird geladen ...
Seite wird geladen ...
Seite wird geladen ...
Seite wird geladen ...
-
 1
1
-
 2
2
-
 3
3
-
 4
4
-
 5
5
-
 6
6
-
 7
7
-
 8
8
-
 9
9
-
 10
10
-
 11
11
-
 12
12
-
 13
13
-
 14
14
-
 15
15
-
 16
16
-
 17
17
-
 18
18
-
 19
19
-
 20
20
-
 21
21
-
 22
22
-
 23
23
-
 24
24
-
 25
25
-
 26
26
-
 27
27
-
 28
28
-
 29
29
-
 30
30
-
 31
31
-
 32
32


Zanussi ZTA250 Benutzerhandbuch
- Kategorie
- Waschmaschinen
- Typ
- Benutzerhandbuch
in anderen Sprachen
- English: Zanussi ZTA250 User manual