Electrolux GA55LSI220 Benutzerhandbuch
- Kategorie
- Geschirrspüler
- Typ
- Benutzerhandbuch

Bedienungsanleitung für Ihren Geschirrspüler
Mode d’emploi pour votre machine à laver la vaisselle
Istruzioni per il vostro lavastoviglie
Instructions for the use for your dishwasher
Servicenummer 0848 88 7000

Geschirrspüler
laver la vaisselle
lavastoviglie
dishwasher
Geschirrspüler
lavastoviglie
dishwasher

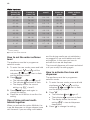
CONTENTS
Safety information 3
Safety instructions 4
Product description 6
Control panel 7
Programmes 8
Settings 9
Options 11
Before first use 11
Daily use 12
Hints and tips 14
Care and cleaning 15
Troubleshooting 17
Technical information 18
Subject to change without notice.
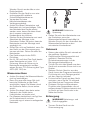
SAFETY INFORMATION
Before the installation and use of the appliance, carefully read
the supplied instructions. The manufacturer is not responsible
if an incorrect installation and use causes injuries and
damages. Always keep the instructions with the appliance for
future reference.
General Safety
• This appliance is intended to be used in household and
similar applications such as:
– farm houses; staff kitchen areas in shops, offices and
other working environments;
– by clients in hotels, motels, bed & breakfast and other
residential type environments.
• Do not change the specification of this appliance.
• The operating water pressure (minimum and maximum)
must be between 0.5 (0.05) / 8 (0.8) bar (Mpa)
•
Obey the maximum number of 12 place settings.
•
If the supply cord is damaged, it must be replaced by the
manufacturer, its Authorised Service Centre or similarly
qualified persons in order to avoid a hazard.
•
Put knives and cutlery with sharp points in the cutlery basket
with the points down or in a horizontal position.
•
Do not keep the appliance door open without supervision to
prevent to fall on it.
•
Before maintenance, deactivate the appliance and
disconnect the mains plug from the mains socket.
3

• Do not use water spray and steam to clean the appliance.
• The appliance is to be connected to the water mains using
the new supplied hose-sets. Old hose sets must not be
reused.
Children and vulnerable people safety
• This appliance can be used by children aged from 8 years
and above and persons with reduced physical, sensory or
mental capabilities or lack of experience and knowledge if
they have been given supervision or instruction concerning
use of the appliance in a safe way and understand the
hazards involved.
• Do not let children play with the appliance.
• Keep all detergents away from children.
• Keep children and pets away from the appliance door when
it is open.
• Cleaning and user maintenance shall not be made by
children without supervision.
SAFETY INSTRUCTIONS
Installation
• Remove all the packaging.
• Do not install or use a damaged
appliance.
• Do not install or use the appliance where
the temperature is less than 0 °C.
• Obey the installation instruction supplied
with the appliance.
• Make sure that the appliance is installed
below and adjacent to safe structures.
Electrical connection
WARNING! Risk of fire and
electrical shock.
• The appliance must be earthed.
• Make sure that the electrical information
on the rating plate agrees with the
power supply. If not, contact an
electrician.
• Always use a correctly installed
shockproof socket.
• Do not use multi-plug adapters and
extension cables.
• Make sure not to cause damage to the
mains plug and to the mains cable.
Should the mains cable need to be
replaced, this must be carried out by our
Authorised Service Centre.
• Connect the mains plug to the mains
socket only at the end of the installation.
Make sure that there is access to the
mains plug after the installation.
• Do not pull the mains cable to
disconnect the appliance. Always pull
the mains plug.
• This appliance complies with the E.E.C.
Directives.
• Only for UK and Ireland. The appliance
has a 13 amp mains plug. If it is
necessary to change the fuse in the
mains plug, use a 13 amp ASTA (BS
1362) fuse.
4

Water connection
• Make sure not to cause damage to the
water hoses.
• Before you connect the appliance to
new pipes or pipes not used for a long
time, let the water flow until it is clean.
• The first time you use the appliance,
make sure that there is no leakage.
• The water inlet hose has a safety valve
and a sheath with an inner mains cable.
WARNING! Dangerous
voltage.
• If the water inlet hose is damaged,
immediately disconnect the mains plug
from the mains socket. Contact the
Authorised Service Centre to replace the
water inlet hose.
Use
• Do not sit or stand on the open door.
• Dishwasher detergents are dangerous.
Obey the safety instructions on the
detergent packaging.
• Do not drink and play with the water in
the appliance.
• Do not remove the dishes from the
appliance until the programme is
completed. There can be detergent on
the dishes.
• The appliance can release hot steam if
you open the door while a programme
operates.
• Do not put flammable products or items
that are wet with flammable products in,
near or on the appliance.
Disposal
WARNING! Risk of injury or
suffocation.
• Disconnect the appliance from the mains
supply.
• Cut off the mains cable and discard it.
• Remove the door catch to prevent
children and pets to get closed in the
appliance.
5

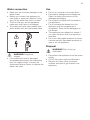
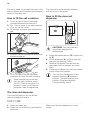
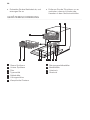
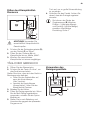
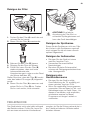
PRODUCT DESCRIPTION
4
3
7
9
8
10
56
11
1
2
1
Upper spray arm
2
Lower spray arm
3
Filters
4
Rating plate
5
Salt container
6
Air vent
7
Rinse aid dispenser
8
Detergent dispenser
9
Cutlery basket
10
Lower basket
11
Upper basket
6

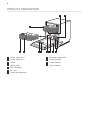
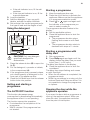
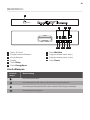
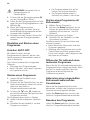
CONTROL PANEL
3
1
5678910
42
1
On/off button
2
Programme indicators
3
Indicators
4
Display
5
Delay button
6
EnergySaver button
7
Multitab button
8
Programme button (up)
9
Programme button (down)
10
Reset button
Indicators
Indicator Description
Multitab indicator.
Salt indicator. It is always off while the programme operates.
Rinse aid indicator. It is always off while the programme operates.
EnergySaver indicator.
7

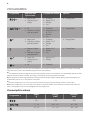
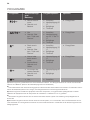
PROGRAMMES
Programme Degree of soil
Type of load
Programme phases Options
1)
• Normal soil
• Crockery and
cutlery
• Prewash
• Wash 50 °C
• Rinses
• Dry
• EnergySaver
2)
• All
• Crockery, cutlery,
pots and pans
• Prewash
• Wash from 45 °C
to 70 °C
• Rinses
• Dry
• EnergySaver
3)
• Heavy soil
• Crockery, cutlery,
pots and pans
• Prewash
• Wash 70 °C
• Rinses
• Dry
• EnergySaver
• Normal or light
soil
• Delicate crockery
and glassware
• Wash 45 °C
• Rinses
• Dry
• EnergySaver
4)
• Fresh soil
• Crockery and
cutlery
• Wash 60 °C
• Rinses
5)
• All • Prewash
1)
With this programme you have the most efficient use of water and energy consumption for crockery and cutlery
with normal soil. (This is the standard programme for test institutes).
2)
The appliance senses the degree of soil and the quantity of items in the baskets . It automatically adjusts the tem-
perature and the quantity of water, the energy consumption and the programme duration.
3)
This programme has a high temperature rinsing phase for better hygiene results. During the rinsing phase, the
temperature stays at 70 °C for at least 10 minutes.
4)
With this programme you can wash a load with fresh soil. It gives good washing results in a short time.
5)
With this programme you can quickly rinse dishes to prevent remains of food to bond on dishes and odours to
form in the appliance. Do not use detergent with this programme.
Consumption values
Programme
1)
Water
(l)
Energy
(kWh)
Duration
(min)
9.5 1.03 195
7 - 14 0.6 - 1.5 40 - 150
13 - 14 1.4 - 1.6 150 - 160
8

Programme
1)
Water
(l)
Energy
(kWh)
Duration
(min)
11 - 12 0.8 - 0.9 70 - 80
9 0.9 30
4 0.1 14
1)
The pressure and the temperature of the water, the variations of the mains supply, the options and the quantity of
dishes can change the values.
Information for test institutes
For all the necessary information for test
performance, send an email to:
Write down the product number (PNC) that
is on the rating plate.
SETTINGS
Programme selection mode and
user mode
When the appliance is in programme
selection mode it is possible to set a
programme and to enter the user mode.
In user mode, the following settings
can be changed:
• The level of the water softener according
to the water hardness.
• The activation of the rinse aid dispenser
when you want to use the Multitab
option and the rinse aid together.
These settings will be saved until you
change them again.
How to set the programme
selection mode
The appliance is in programme selection
mode when all the programme indicators
are on and the display shows 2 horizontal
status bars.
When you activate the appliance, usually it
is in programme selection mode. However,
if this does not happen, you can set the
programme selection mode in the following
way:
Press and hold Reset until the appliance is
in programme selection mode.
The water softener
The water softener removes minerals from
the water supply, which would have a
detrimental effect on the washing results
and on the appliance.
The higher the content of these minerals,
the harder your water is. Water hardness is
measured in equivalent scales.
The water softener should be adjusted
according to the hardness of the water in
your area. Your local water authority can
advise you on the hardness of the water in
your area. It is important to set the right
level of the water softener to assure good
washing results.
9

Water hardness
German de-
grees (°dH)
French de-
grees (°fH)
mmol/l Clarke de-
grees
Water softener
level
47 - 50 84 - 90 8.4 - 9.0 58 - 63 10
43 - 46 76 - 83 7.6 - 8.3 53 - 57 9
37 - 42 65 - 75 6.5 - 7.5 46 - 52 8
29 - 36 51 - 64 5.1 - 6.4 36 - 45 7
23 - 28 40 - 50 4.0 - 5.0 28 - 35 6
19 - 22 33 - 39 3.3 - 3.9 23 - 27
5
1)
15 - 18 26 - 32 2.6 - 3.2 18 - 22 4
11 - 14 19 - 25 1.9 - 2.5 13 - 17 3
4 - 10 7 - 18 0.7 - 1.8 5 - 12 2
<4 <7 <0.7 < 5
1
2)
1)
Factory setting.
2)
Do not use salt at this level.
How to set the water softener
level
The appliance must be in programme
selection mode.
1. To enter the user mode, press and hold
simultaneously
and until the
indicators , and start to flash
and the display is blank.
2. Press .
• The indicators
and go off.
•
The indicator continues to flash.
• The display shows the current
setting: e.g. = level 5.
3. Press again and again to
change the setting.
4.
Press the on/off button to confirm the
setting.
Use of rinse aid and multi-
tablets together
When you activate the option Multitab, the
rinse aid dispenser no longer releases rinse
aid. However if you are using multi-tablets
and the drying results are not satisfactory,
we suggest to use multi-tablets and rinse
aid together. In this case you have to
activate the rinse aid dispenser.
The rinse aid dispenser will remain activated
until you modify the setting again
How to activate the rinse aid
dispenser
The appliance must be in programme
selection mode.
1.
To enter the user mode, press and hold
simultaneously and until the
indicators
, and start to flash
and the display is blank.
2. Press .
• The indicators
and go off.
• The indicator continues to flash.
• The display shows the current
setting: = rinse aid dispenser
deactivated.
3. Press
to change the setting.
10

= rinse aid dispenser activated.
4. Press the on/off button to confirm the
setting.
5. Adjust the dosage of rinse aid.
6. Fill the rinse aid dispenser.
OPTIONS
Desired options must be
activated every time before you
start a programme (except for
Multitab). It is not possible to
activate or deactivate options
while a programme is running.
Multitab
Activate this option when you use multi-
tablets that integrate the salt, rinse aid and
detergent functions. They can also contain
other cleaning or rinsing agents.
This option deactivates the release of salt
and rinse aid from the respective
containers. The salt and rinse aid indicators
do not come on.
With the use of this option the programme
duration is prolonged to increase the
cleaning and drying results with the use of
multi-tablets.
You do not need to activate the Multitab
option every time you start a programme.
Once you have activated the option it will
remain active.
How to activate Multitab
Press Multitab.
The related indicator comes on.
EnergySaver
This option decreases the temperature of
the last rinsing phase and consequently
also the energy consumption
(approximately -25%).
Dishes can still be wet once the programme
is completed.
The duration of the programme will be
shorter.
How to activate EnergySaver
Press EnergySaver, the related indicator
comes on.
If the option is not applicable to the
programme, the related indicator does not
come on or it flashes quickly for a few
seconds and then goes off.
The display shows the updated programme
duration.
BEFORE FIRST USE
1. Make sure that the current level of
the water softener agrees with the
hardness of the water supply. If not,
adjust the level of the water
softener.
2. Fill the salt container.
3. Fill the rinse aid dispenser.
4. Open the water tap.
5. Start a programme to remove any
processing residuals that can still be
inside the appliance. Do not use
detergent and do not load the baskets.
When you start a programme, the
appliance can take up to 5 minutes to
recharge the resin in the water softener. It
seems that the appliance is not working.
The washing phase starts only after this
procedure is completed. The procedure will
be repeated periodically.
The salt container
CAUTION! Only use salt
specifically designed for
dishwashers.
11

The salt is used to recharge the resin in the
water softener and to assure good washing
results in the daily use.
How to fill the salt container
1. Turn the cap of the salt container
counterclockwise and remove it.
2. Put 1 litre of water in the salt container
(Only for the first time).
3. Fill the salt container with dishwasher
salt.
4.
Remove the salt around the opening of
the salt container.
5. Turn the cap of the salt container
clockwise to close the salt container.
Water and salt can come out
from the salt container when
you fill it. Risk of corrosion. To
prevent it, after you fill the salt
container, start a programme.
The rinse aid dispenser
The rinse aid helps to dry the dishes
without streaks and stains.
The rinse aid is automatically released
during the hot rinse phase.
How to fill the rinse aid
dispenser
M
A
X
1
2
3
4
+
-
A B
D
C
CAUTION! Only use rinse aid
specifically designed for
dishwashers.
1.
Press the release button (D) to open the
lid (C).
2.
Fill the dispenser (A) until the rinse aid
reaches the marking ''MAX''.
3. Remove the spilled rinse aid with an
absorbent cloth to prevent too much
foam.
4. Close the lid. Make sure that the release
button locks into position.
You can turn the selector of the
released quantity (B) between
position 1 (lowest quantity) and
position 4 (highest quantity).
Factory setting: level 4.
DAILY USE
1. Open the water tap.
2. Press the on/off button to activate the
appliance.
Make sure that the appliance is in user
mode.
12

• If the salt indicator is on, fill the salt
container.
• If the rinse aid indicator is on, fill the
rinse aid dispenser.
3. Load the baskets.
4. Add the detergent. If you use multi-
tablets, activate the option Multitab.
5. Set and start the correct programme for
the type of load and the degree of soil.
Using the detergent
20
30
A
B
C
CAUTION! Only use detergent
specifically designed for
dishwashers.
1. Press the release button (B) to open the
lid (C).
2. Put the detergent, in powder or tablets,
in the compartment (A).
3. If the programme has a prewash phase,
put a small quantity of detergent on the
inner part of the appliance door.
4. Close the lid. Make sure that the release
button locks into position.
Setting and starting a
programme
The AUTO OFF function
This function decreases energy
consumption by deactivating automatically
the appliance when it is not operating.
The function comes into operation:
• 5 minutes after the completion of the
programme.
• After 5 minutes if the programme has
not started.
Starting a programme
1. Keep the appliance door ajar.
2. Press the on/off button to activate the
appliance. Make sure that the appliance
is in programme selection mode.
3. Press or again and again until
the indicator of the programme you
want to select comes on.
The programme duration flashes in the
display.
4. Set the applicable options.
5. Close the appliance door to start the
programme.
• The programme duration stops
flashing and comes on with fixed
light.
• The programme duration starts to
decrease with steps of 1 minute.
Starting a programme with
delay start
1.
Set a programme.
2.
Press Delay again and again until the
display shows the delay time you want
to set (from 1 to 24 hours).
The delay time flashes in the display.
3. Close the appliance door to start the
countdown.
The delay time stops flashing and comes
on with fixed light.
• When the countdown is completed, the
programme starts.
• While the countdown is running only the
buttons Reset and Delay are active. It is
not possible to change the programme
or options.
Opening the door while the
appliance operates
If you open the door while a programme is
running, the appliance stops. When you
close the door, the appliance continues
from the point of interruption.
13

Cancelling the delay start while
the countdown operates
When you cancel the delay start you have
to set the programme and options again.
Press and hold Reset until the appliance is
in programme selection mode.
Cancelling the programme
Press and hold Reset until the appliance is
in programme selection mode.
Make sure that there is detergent in the
detergent dispenser before you start a new
programme.
End of the programme
When the programme is completed the
display shows 0:00.
1. Open the appliance door and press the
on/off button or wait for the AUTO OFF
function to automatically deactivate the
appliance.
2. Close the water tap.
HINTS AND TIPS
General
The following hints will ensure optimal
cleaning and drying results in daily use and
also help to protect the environment.
• Remove larger residues of food from the
dishes into the waste bin.
• Do not pre-rinse dishes by hand. When
needed, use the prewash programme (if
available) or select a programme with a
prewash phase.
• Always use the whole space of the
baskets.
• When loading the appliance, make sure
that the dishes can be completely
reached and washed by the water
released from the spray arm nozzles.
Make sure that items do not touch or
cover each other.
• You can use dishwasher detergent, rinse
aid and salt separately or you can use
the multi-tablets (e.g. ''3in1'', ''4in1'',
''All in 1''). Follow the instructions written
on the packaging.
• Select the programme according to the
type of load and degree of soil. With the
ECO programme you have the most
efficient use of water and energy
consumption for crockery and cutlery
with normal soil.
Using salt, rinse aid and
detergent
• Only use salt, rinse aid and detergent for
dishwasher. Other products can cause
damage to the appliance.
• Multi-tablets are usually suitable in areas
with a water hardness up to 21 °dH. In
areas exceeding this limit, rinse aid and
salt must be used in addition to the
multi-tablets. However, in areas with
hard and very hard water we
recommend to use solo-detergent
(powder, gel, tablets without additional
functions), rinse aid and salt separately
for optimal cleaning and drying results.
• If you use multi-tablets you can select
the Multitab option (if available). This
option increases the cleaning and drying
results with the use of multi-tablets.
• Detergent tablets do not fully dissolve
with short programmes. To prevent
detergent residues on the tableware, we
recommend that you use the tablets with
long programmes.
• Do not use more than the correct
quantity of detergent. Refer to the
instructions on the detergent packaging.
14

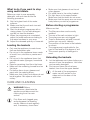
What to do if you want to stop
using multi-tablets
Before you start to use separately
detergent, salt and rinse aid do the
following procedure.
1. Set the highest level of the water
softener.
2. Make sure that the salt and rinse aid
containers are full.
3. Start the shortest programme with a
rinsing phase. Do not add detergent
and do not load the baskets.
4.
When the programme is completed,
adjust the water softener according to
the water hardness in your area.
5.
Adjust the released quantity of rinse aid.
Loading the baskets
• Only use the appliance to wash items
that are dishwasher-safe.
• Do not put in the appliance items made
of wood, horn, aluminium, pewter and
copper.
• Do not put in the appliance items that
can absorb water (sponges, household
cloths).
• Remove remaining food from the items.
• Make soft the remaining burned food on
the items.
• Put hollow items (cups, glasses and
pans) with the opening down.
• Make sure that cutlery and dishes do not
bond together. Mix spoons with other
cutlery.
• Make sure that glasses do not touch
other glasses.
• Put small items in the cutlery basket.
• Put light items in the upper basket.
Make sure that the items do not move.
• Make sure that the spray arm can move
freely before you start a programme.
Before starting a programme
Make sure that:
• The filters are clean and correctly
installed.
• The cap of the salt container is tight.
• The spray arms are not clogged.
• There is dishwasher salt and rinse aid
(unless you use multi- tablets).
• The position of the items in the baskets
is correct.
• The programme is applicable for the
type of load and for the degree of soil.
• The correct quantity of detergent is
used.
Unloading the baskets
1. Let the tableware cool down before you
remove it from the appliance. Hot items
can be easily damaged.
2. First remove items from the lower
basket, then from the upper basket.
At the end of the programme
water can still remain on the
sides and on the door of the
appliance.
CARE AND CLEANING
WARNING! Before
maintenance, deactivate the
appliance and disconnect the
mains plug from the main
socket.
Dirty filters and clogged spay
arms decrease the washing
results. Make a check regularly
and, if necessary, clean them.
15

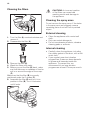
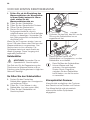
Cleaning the filters
A B C
C
1. Turn the filter (A) counterclockwise and
remove it.
2. Disassemble the filter (A).
3. Remove the filter (B).
4. Wash the filters with water.
5. Before you put the filter (B) back, make
sue that there are no residues of food or
soil in or around the edge of the sump.
(C).
Make sure that the filter (B) is correctly
positioned under the 2 guides (C).
6. Assemble the filter (A) and put it into
position in filter (B). Turn it clockwise
until it locks.
CAUTION! An incorrect position
of the filters can cause bad
washing results and damage to
the appliance.
Cleaning the spray arms
Do not remove the spray arms. If the holes
in the spray arms are clogged, remove
remaining parts of soil with a thin pointed
object.
External cleaning
• Clean the appliance with a moist soft
cloth.
• Only use neutral detergents.
• Do not use abrasive products, abrasive
cleaning pads or solvents.
Internal cleaning
• Carefully clean the appliance, including
the rubber gasket of the door, with a soft
moist cloth.
• If you regularly use short duration
programmes, these can leave deposits
of grease and limescale inside the
appliance. To prevent this, we
recommend to run long duration
programmes at least 2 times per month.
16

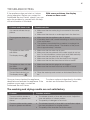
TROUBLESHOOTING
If the appliance does not start or it stops
during operation. Before you contact an
Authorised Service Centre, check if you can
solve the problem by yourself with the help
of the information in the table.
With some problems, the display
shows an alarm code.
Problem and alarm code Possible solution
You cannot activate the ap-
pliance.
• Make sure that the mains plug is connected to the mains
socket.
• Make sure that there is no a damage fuse in the fuse box.
The programme does not
start.
• Make sure that the appliance door is closed.
• If the delay start is set, cancel the setting or wait for the end
of the countdown.
• The appliance has started the procedure to recharge the
resin inside the water softener. The duration of the proce-
dure is approximately 5 minutes.
The appliance does not fill
with water.
The display shows .
• Make sure that the water tap is open.
• Make sure that the pressure of the water supply is not too
low. For this information, contact your local water authority.
• Make sure that the water tap is not clogged.
• Make sure that the filter in the inlet hose is not clogged.
• Make sure that the inlet hose has no kinks or bends.
The appliance does not drain
the water.
The display shows .
• Make sure that the sink spigot is not clogged.
• Make sure that the drain hose has no kinks or bends.
The anti-flood device is on.
The display shows .
• Close the water tap and contact an Authorised Service Cen-
tre.
Once you have checked the appliance,
deactivate and activate the appliance. If the
problem occurs again, contact an
Authorised Service Centre.
For alarm codes not described in the table,
contact an Authorised Service Centre.
The washing and drying results are not satisfactory
Problem Possible solution
There are whitish streaks or
bluish layers on glasses and
dishes.
• The release quantity of rinse aid is too much. Adjust the
rinse aid selector to a lower position.
• The quantity of detergent is too much.
There are stains and dry water
drops on glasses and dishes.
• The released quantity of rinse aid is not sufficient. Adjust
the rinse aid selector to a higher position.
• The quality of the rinse aid can be the cause.
17

Problem Possible solution
The dishes are wet. • The programme does not have a drying phase or has a
drying phase with low temperature.
• The rinse aid dispenser is empty.
• The quality of the rinse aid can be the cause.
• The quality of the multi-tablets can be the cause. Try a dif-
ferent brand or activate the rinse aid dispenser and use
rinse aid and multi-tablets together.
Refer to "Hints and tips" for
other possible causes.
TECHNICAL INFORMATION
Dimensions Width / height / depth (mm) 546 / 759 / 570
Electrical connection
1)
Voltage (V) 220 - 240
Frequency (Hz) 50
Water supply pressure Min. / max. bar (MPa) 0.5 (0.05) / 8 (0.8)
Water supply
Cold water or hot water
2)
max 60 °C
Capacity Place settings 12
Power consumption Left-on mode (W) 0.99
Power consumption Off-mode (W) 0.10
1)
Refer to the rating plate for other values.
2)
f the hot water comes from alternative source of energy, (e.g. solar panels, aeolian energy), use the hot water
supply to decrease energy consumption.
ENVIRONMENTAL CONCERNS
Recycle the materials with the symbol .
Put the packaging in applicable containers
to recycle it. Help protect the environment
and human health and to recycle waste of
electrical and electronic appliances. Do not
dispose appliances marked with the symbol
with the household waste. Return the
product to your local recycling facility or
contact your municipal office.
18

INHALTSVERZEICHNIS
Sicherheitsinformationen 19
Sicherheitsanweisungen 20
Gerätebeschreibung 22
Bedienfeld 23
Programme 24
Einstellungen 25
Optionen 27
Vor der ersten Inbetriebnahme 28
Täglicher Gebrauch 29
Tipps und Hinweise 31
Reinigung und Pflege 32
Fehlersuche 33
Technische Daten 35
Änderungen vorbehalten.
SICHERHEITSINFORMATIONEN
Lesen Sie vor der Montage und dem Gebrauch des Geräts
zuerst die Gebrauchsanleitung. Der Hersteller übernimmt keine
Verantwortung für Verletzungen und Beschädigungen durch
unsachgemäße Montage. Bewahren Sie die
Gebrauchsanleitung griffbereit auf.
Allgemeine Sicherheit
• Dieses Gerät ist für die Verwendung im Haushalt und
ähnliche Zwecke vorgesehen, wie z. B.:
– Bauernhöfe, Personalküchenbereiche in Geschäften,
Büros und anderen Arbeitsumfeldern
– Für Gäste in Hotels, Motels, Pensionen und anderen
wohnungsähnlichen Räumlichkeiten.
• Nehmen Sie keine technischen Änderungen am Gerät vor.
• Der Betriebswasserdruck (Mindest- und Höchstdruck) muss
zwischen 0.5 (0.05) / 8 (0.8) bar (Mpa) liegen.
•
Beachten Sie, dass die Höchstzahl an Maßgedecken 12
beträgt.
•
Wenn das Netzkabel beschädigt ist, muss es vom Hersteller,
seinem autorisierten Kundenservice oder einer
gleichermaßen qualifizierten Person ausgetauscht werden,
um Gefahrenquellen zu vermeiden.
•
Stellen Sie Messer und Besteck mit scharfen Spitzen mit der
Spitze nach unten in den Besteckkorb oder legen Sie sie
waagerecht in das Gerät.
19

• Lassen Sie die Gerätetür nicht ohne Beaufsichtigung offen
stehen, damit von der Tür keine Stolpergefahr ausgeht.
• Schalten Sie das Gerät immer aus und ziehen Sie den
Netzstecker aus der Steckdose, bevor Reinigungsarbeiten
durchgeführt werden.
• Reinigen Sie das Gerät nicht mit einem Wasser- oder
Dampfstrahl.
• Das Gerät muss mit den mitgelieferten neuen Schläuchen an
die Wasserversorgung angeschlossen werden. Alte
Schläuche dürfen nicht wieder verwendet werden.
Sicherheit von Kindern und schutzbedürftigen
Personen
• Das Gerät kann von Kindern ab 8 Jahren und Personen mit
eingeschränkten physischen, sensorischen oder geistigen
Fähigkeiten oder mit mangelnder Erfahrung und/oder
mangelndem Wissen nur dann verwendet werden, wenn sie
durch eine für ihre Sicherheit zuständige Person
beaufsichtigt werden oder in die sichere Verwendung des
Geräts eingewiesen wurden und die mit dem Gerät
verbundenen Gefahren verstanden haben.
•
Kinder dürfen nicht mit dem Gerät spielen.
•
Alle Reinigungsmittel von Kindern fernhalten.
•
Halten Sie Kinder und Haustiere vom geöffneten Gerät fern.
•
Wartung oder Reinigung des Geräts dürfen nicht von
Kindern ohne Aufsicht erfolgen.
SICHERHEITSANWEISUNGEN
Montage
• Entfernen Sie das Verpackungsmaterial.
• Stellen Sie ein beschädigtes Gerät nicht
auf und benutzen Sie es nicht.
• Stellen Sie das Gerät nicht an einem Ort
auf, an dem die Temperatur unter 0 °C
absinken kann, und benutzen Sie das
Gerät nicht, wenn die Temperatur unter
0 °C absinkt.
• Halten Sie sich an die mitgelieferte
Montageanleitung.
• Stellen Sie sicher, dass das Gerät unter
und an angrenzenden sicheren
Konstruktionen montiert ist.
Elektrischer Anschluss
WARNUNG! Brand- und
Stromschlaggefahr.
• Das Gerät muss geerdet sein.
• Stellen Sie sicher, dass die elektrischen
Daten auf dem Typenschild den Daten
Ihrer Stromversorgung entsprechen.
20
Seite wird geladen ...
Seite wird geladen ...
Seite wird geladen ...
Seite wird geladen ...
Seite wird geladen ...
Seite wird geladen ...
Seite wird geladen ...
Seite wird geladen ...
Seite wird geladen ...
Seite wird geladen ...
Seite wird geladen ...
Seite wird geladen ...
Seite wird geladen ...
Seite wird geladen ...
Seite wird geladen ...
Seite wird geladen ...
Seite wird geladen ...
Seite wird geladen ...
Seite wird geladen ...
Seite wird geladen ...
-
 1
1
-
 2
2
-
 3
3
-
 4
4
-
 5
5
-
 6
6
-
 7
7
-
 8
8
-
 9
9
-
 10
10
-
 11
11
-
 12
12
-
 13
13
-
 14
14
-
 15
15
-
 16
16
-
 17
17
-
 18
18
-
 19
19
-
 20
20
-
 21
21
-
 22
22
-
 23
23
-
 24
24
-
 25
25
-
 26
26
-
 27
27
-
 28
28
-
 29
29
-
 30
30
-
 31
31
-
 32
32
-
 33
33
-
 34
34
-
 35
35
-
 36
36
-
 37
37
-
 38
38
-
 39
39
-
 40
40


Electrolux GA55LSI220 Benutzerhandbuch
- Kategorie
- Geschirrspüler
- Typ
- Benutzerhandbuch
in anderen Sprachen
- English: Electrolux GA55LSI220 User manual
Verwandte Artikel
-
Electrolux GA555IF Benutzerhandbuch
-
-
Electrolux ESF4510ROW Benutzerhandbuch
-
Electrolux ESL7310RO Benutzerhandbuch
-
-
-
-