
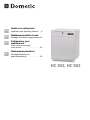
Health care refrigerator
Installation and Operating Manual. . . 8
Medikamentenkühlschrank
Montage- und Bedienungsanleitung 24
Réfrigérateur pour
médicaments
Instructions de montage
et de service . . . . . . . . . . . . . . . . . . 42
Medicamentenkoelkast
Montagehandleiding en
gebruiksaanwijzing . . . . . . . . . . . . . 58
EN
DE
FR
NL
HC302, HC502

HC302, HC502
2
2
1
5
7
8
6
HC302FS
HC502FS
HC302BIU
HC502BIU
3
3
4
1
3
4
21
2

HC302, HC502
3
1
2
1
1
1
2
2
2
ADCB
3
!
m
i
n
.
1
0
0
°
4
EN: chapter 6.3
DE: Kapitel 6.3
FR: chapitre 6.3
NL: hoofdstuk 6.3

HC302, HC502
4
!
5
EN: chapter 6.3
DE: Kapitel 6.3
FR: chapitre 6.3
NL: hoofdstuk 6.3
!
6
EN: chapter 6.3
DE: Kapitel 6.3
FR: chapitre 6.3
NL: hoofdstuk 6.3

HC302, HC502
5
1.
2.
3.
7
4.
1.
1.
3.
2.
8

HC302, HC502
6
A
C
B
1
2 2 3
4
9
CD
AB
0

HC302, HC502
7
820
422 FS: 450; BIU: 440
540
580
HC302
!
a
EN: chapter 6.3
DE: Kapitel 6.3
FR: chapitre 6.3
NL: hoofdstuk 6.3
HC502
948
486 FS: 494; BIU: 484
552
592
!
b
EN: chapter 6.3
DE: Kapitel 6.3
FR: chapitre 6.3
NL: hoofdstuk 6.3

EN
HC302, HC502
8
Please read this instruction manual carefully before installation and
first use, and store it in a safe place. If you pass on the product to
another person, hand over this instruction manual along with it.
Table of contents
1 Explanation of symbols . . . . . . . . . . . . . . . . . . . . . . . . . . . . . . . . . . . 9
2 Safety instructions . . . . . . . . . . . . . . . . . . . . . . . . . . . . . . . . . . . . . . . 9
3 Scope of delivery . . . . . . . . . . . . . . . . . . . . . . . . . . . . . . . . . . . . . . . 12
4 Intended use . . . . . . . . . . . . . . . . . . . . . . . . . . . . . . . . . . . . . . . . . . 12
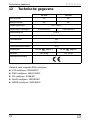
5 Technical description . . . . . . . . . . . . . . . . . . . . . . . . . . . . . . . . . . . . 13
6 Installing and connecting the refrigerator. . . . . . . . . . . . . . . . . . . . . 14
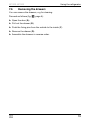
7 Using the refrigerator . . . . . . . . . . . . . . . . . . . . . . . . . . . . . . . . . . . . 16
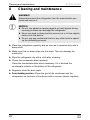
8 Cleaning and maintenance . . . . . . . . . . . . . . . . . . . . . . . . . . . . . . . 20
9 Troubleshooting . . . . . . . . . . . . . . . . . . . . . . . . . . . . . . . . . . . . . . . . 21
10 Warranty . . . . . . . . . . . . . . . . . . . . . . . . . . . . . . . . . . . . . . . . . . . . . 22
11 Disposal . . . . . . . . . . . . . . . . . . . . . . . . . . . . . . . . . . . . . . . . . . . . . . 22
12 Technical data . . . . . . . . . . . . . . . . . . . . . . . . . . . . . . . . . . . . . . . . . 23

EN
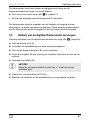
HC302, HC502 Explanation of symbols
9
1 Explanation of symbols
D
!
!
A
I
➤ Action: This symbol indicates that action is required on your part. The
required action is described step-by-step.
✓ This symbol describes the result of an action.
Fig. 1 5, page 3: This refers to an element in an illustration. In this case,
item 5 in figure 1 on page 3.
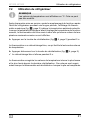
2 Safety instructions
The manufacturer accepts no liability for damage in the following cases:
Faulty assembly or connection
Damage to the product resulting from mechanical influences and excess
voltage
Alterations to the product without express permission from the manu-
facturer
Use for purposes other than those described in the operating manual
DANGER!
Safety instruction: Failure to observe this instruction will cause
fatal or serious injury.
WARNING!
Safety instruction: Failure to observe this instruction can cause
fatal or serious injury.
CAUTION!
Safety instruction: Failure to observe this instruction can lead to
injury.
NOTICE!
Failure to observe this instruction can cause material damage and
impair the function of the product.
NOTE
Supplementary information for operating the product.

EN
Safety instructions HC302, HC502
10
2.1 General safety
!
WARNING!
Do not operate the device if it is visibly damaged.
If this device's power cable is damaged, it must be replaced by
customer service or a similarly qualified person in order to
prevent safety hazards.
This device should be repaired by qualified person only.
Inadequate repairs may cause serious hazards.
This device can be used by children aged 8 years or over, as
well as by persons with diminished physical, sensory or mental
capacities or a lack of experience and knowledge, providing
they are supervised, or have been taught how to use the device
safely and are aware of the resulting risks.
Cleaning and user maintenance must not be carried out by
children without supervision.
Children must be supervised to ensure that they do not play with
the device.
Always keep and use the device out of the reach of children
under 8 years of age.
Do not store any explosive substances, such as spray cans with
propellants, in the device.
A
NOTICE!
Check that the voltage specification on the type plate is the
same as that of the power supply.
Never pull the plug out of the socket by the connection cable.
The refrigerator is not suitable for storing substances which are
caustic or contain solvents.
Keep the drainage outlet clean at all times.
Do not open the refrigerant circuit under any circumstances.
Never transport the device in a horizontal position, so that no oil
can leak out of the compressor.
Make sure that the refrigerator circuit is not damaged during
transportation.
Set up the device in a dry location where it is protected against
splashing water.

EN
HC302, HC502 Safety instructions
11
2.2 Operating the device safely
D
DANGER!
Do not touch exposed cables.
!
CAUTION!
Before starting the device, ensure that the power supply line
and the plug are dry.
A
NOTICE!
Do not use electrical devices inside the cooling device unless
they are recommended by the manufacturer for that purpose.
Do not place it near naked flames or other heat sources
(heaters, direct sunlight, gas ovens etc.)
Danger of overheating!
Always ensure sufficient ventilation so that the heat generated
during operation can dissipate. Make sure that the device is
sufficiently far away from walls and other objects so that the air
can circulate (fig. 3, page 3).
Ensure that the ventilation vents are not covered.
The device shall not be exposed to rain.
Never immerse the appliance in water.
Protect the appliance and power cable against heat and mois-
ture.
Make sure that the stored substances do not touch the walls of
the cooling area.

EN
Scope of delivery HC302, HC502
12
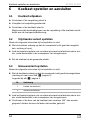
3 Scope of delivery
These instructions are also available in PDF format (e.g. on the
manufacturer‘s website).
4 Intended use
The refrigerator is designed to store medicaments and medical products
which may be stored at temperatures +2 °C and +8 °C.
!
Quantity Description
1 Refrigerator
1 Handle
1 Battery (CR1632)
1 Installation and operating manual
CAUTION!
The refrigerator is not suitable for the storage of blood.

EN
HC302, HC502 Technical description
13
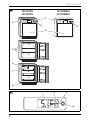
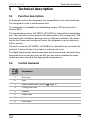
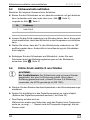
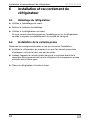
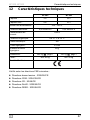
5 Technical description
5.1 Function description
All materials used in the refrigerator are compatible for use with medicines.
The refrigerant circuit is maintenance-free.
The refrigerator is available as freestanding version (FS) and as built-in
version (BIU).
The freestanding version (HC302FS, HC502FS) is intended for freestanding
use. The cooling unit cover protects the warm parts of the cooling units. The
foot frame with ventilation openings ensure sufficient ventilation. By remov-
ing the foot frame and cooling unit cover the refrigerator can be used as a
built-in version.
The built-in version (HC302BIU, HC502BIU) is intended to be mounted into
furniture. It doesn‘t have a foot frame or cooling unit cover.
The digital thermometer shows and stores the minimum and maximum inner
temperatures from the last reset so that you can check whether the medi-
cines have been stored at the appropriate temperatures.
5.2 Control elements
No. in
fig. 1,
page 2
Explanation
1 Door lock
2 Door
3 Digital thermometer (see fig. 2, page 2)
4 Cooling unit cover
5Drawers
6 Interior light
7Fan
8 Foot frame

EN
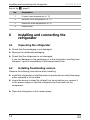
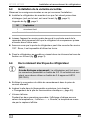
Installing and connecting the refrigerator HC302, HC502
14
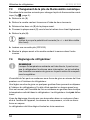
Key to fig. 2, page 2
6 Installing and connecting the
refrigerator
6.1 Unpacking the refrigerator
➤ Check that the packaging in not damaged.
➤ Remove the cardboard packaging.
➤ Check that the refrigerator is not damaged.
If you find damage on the packaging or at the refrigerator resulting from
transport, report it immediately to the transportation firm.
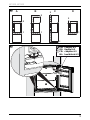
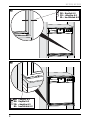
6.2 Installing freestanding version
Observe the following instructions when installing:
Install the refrigerator so that the warm air produced can easily flow away,
either upwards or to the sides.
Leave the device to stand for at least four hours before you connect it
to the power supply so that the refrigerant can flow back into the
compressor.
➤ Place the refrigerator at the chosen place.
No. Explanation
1 Current inner temperature (in °C)
2 Minimum inner temperature (in °C)
3 Maximum inner temperature (in °C)
4 Reset button

EN
HC302, HC502 Installing and connecting the refrigerator
15
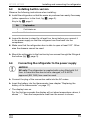
6.3 Installing built-in version
Observe the following instructions when installing:
Install the refrigerator so that the warm air produced can easily flow away
(either upwards or to the front, fig. 3, page 3).
Key to fig. 3, page 3
Leave the device to stand for at least four hours before you connect it
to the power supply so that the refrigerant can flow back into the
compressor.
Make sure that the refrigerator door is able to open at least 100°. Other-
wise the drawers cannot be used.
➤ Mount the refrigerator to the furniture by two screws through the fittings at
the bottom (fig. 4, page 3).
6.4 Connecting the refrigerator to the power supply
A
➤ Connect the plug of the connection cable into the AC mains.
➤ Insert the battery into the thermometer (see chapter “Replacing the
battery of the thermometer” on page 17).
✓ The display turns on.
For the first two seconds the display will not show temperature values; it
shows “--.-”. Then the temperature read from the sensor is shown.
No. Explanation
1 Cold intake air
2 Hot waste air
NOTICE!
UK only: The refrigerator is supplied with a plug fitted with 3 A
fuse. In case this fuse has to be to changed, a 3 A ASTA
approved (BS 1362) fuse must be used.

EN
Using the refrigerator HC302, HC502
16
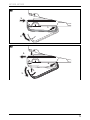
6.5 Mounting and removing the door handle
➤ Mount the handle as shown (fig. 7, page 5).
➤ Remove the handle as shown (fig. 8, page 5).
7 Using the refrigerator
I
7.1 Energy saving tips
Choose a well ventilated location which is protected from direct sunlight.
Do not open the refrigerator more often than necessary.
Do not leave the doors open for longer than necessary.
Defrost your refrigerator as soon as a layer of ice forms.
7.2 Using the refrigerator
I
After the first start, after replacing the battery or after switching off the
refrigerator for a longer time the display of the digital thermometer (fig. 2,
page 2) shows the current ambient temperature. When the inner temperature
reaches the operating range the thermometer should be reset to avoid show-
ing wrong maximum temperature value.
➤ Press the reset button (fig. 2 4, page 2) for 5 s.
NOTE
Before starting your new refrigerator for the first time, you
should clean it inside and outside with a damp cloth for
hygienic reasons (please also refer to the chapter “Cleaning
and maintenance” on page 20).
Always leave some space between the medicaments in the
cabinet to ensure efficient and even cooling. If the drawers are
packed too tightly there may be unacceptable temperature
values.
NOTE
The temperature values are shown in °C. This cannot be
changed.

EN
HC302, HC502 Using the refrigerator
17
The thermometer has a blue backlight which makes the temperature values
easier to read.
➤ Press the reset button (fig. 2 4, page 2) briefly.
✓ The blue backlight lights for 2 s.
The thermometer stores the values of the minimum and maximum inner
temperature since the last reset. These values are deleted when the thermo-
meter is reset or the battery is changed.
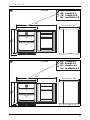
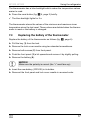
7.3 Replacing the battery of the thermometer
Replace the battery of the thermometer as follows (fig. 9, page 6):
➤ Pull the key (1) from the lock.
➤ Remove the lock cover rosette using two standard screwdrivers.
➤ Remove both screws (2) from front panel.
➤ Push the front panel (3) a bit upwards and remove it by slightly pulling.
➤ Remove the battery (4).
A
➤ Insert the new battery (CR1632) in its holder.
➤ Remount the front panel and lock cover rosette in reversed order.
NOTICE!
Make sure the polarity is correct (the “+” must face up).

EN
Using the refrigerator HC302, HC502
18
7.4 Defrosting the refrigerator
I
Humidity can cause frost to form in the interior of the refrigerator or on the
vaporiser.
A slight layer of frost or water droplets could form in the interior of the
refrigerator if it has been cooling for longer periods. This is normal because
the moisture in the air condenses to water when the temperature in the refrig-
erator drops. The refrigerator is not defective.
The condensate flows out through a water drain duct into a water container
at the back of the unit at top of the compressor, where it evaporates.
It is recommended to defrost the refrigerator every three weeks.
Proceed as follows:
➤ Disconnect the refrigerator from the AC mains.
➤ Remove the drawers (see chapter “Removing the drawers” on page 19).
➤ Leave the door open.
➤ After defrosting wiped out the cabinet interior with a clean, damp cloth.
➤ Assemble the drawers.
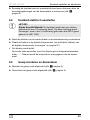
7.5 Switching off and storing the refrigerator
If you do not intend to use the refrigerator for a long time, proceed as follows:
➤ Disconnect the plug.
➤ Clean the refrigerator (see chapter “Cleaning and maintenance” on
page 20).
➤ Leave the door slightly open.
This prevents smells from building up.
NOTE
In high ambient temperatures, the refrigerator may operate
continuously, which can lead to excessive formation of frost on
the rear wall of the refrigerator compartment.

EN
HC302, HC502 Using the refrigerator
19
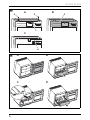
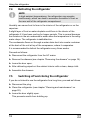
7.6 Removing the drawers
You can remove the drawers, e.g for cleaning.
Proceed as follows (fig. 0, page 6):
➤ Open the door (A).
➤ Pull out the drawer (B).
➤ Push the fixing pins from the outside to the inside (C)
➤ Remove the drawer (D)
➤ Assemble the drawers in reverse order.

EN
Cleaning and maintenance HC302, HC502
20
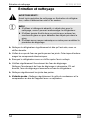
8 Cleaning and maintenance
!
A
➤ Clean the refrigerator regularly and as soon as it becomes dirty with a
damp cloth.
➤ Make sure that no water drips into the seals. This can damage the
electronics.
➤ Wipe the refrigerator dry with a cloth after cleaning.
➤ Check the condensate drain regularly.
Clean the condensate drain when necessary. If it is blocked the
condensate collects on the bottom of the refrigerator.
➤ Regularly clean the door seals.
➤ Freestanding version: Clean the grid of the condenser and the
compressor on the back of the device with a vacuum cleaner regularly.
WARNING!
Always disconnect the refrigerator from the mains before you
clean and service it.
NOTICE!
Do not use abrasive cleaning agents or hard objects during
cleaning as these can damage the refrigerator.
Never use hard or sharp tools to remove ice or to free objects
frozen onto the device.
Do not use any mechanical tools or any other tools to speed
up the defrosting process.
Seite wird geladen ...
Seite wird geladen ...
Seite wird geladen ...
Seite wird geladen ...
Seite wird geladen ...
Seite wird geladen ...
Seite wird geladen ...
Seite wird geladen ...
Seite wird geladen ...
Seite wird geladen ...
Seite wird geladen ...
Seite wird geladen ...
Seite wird geladen ...
Seite wird geladen ...
Seite wird geladen ...
Seite wird geladen ...
Seite wird geladen ...
Seite wird geladen ...
Seite wird geladen ...
Seite wird geladen ...
Seite wird geladen ...
Seite wird geladen ...
Seite wird geladen ...
Seite wird geladen ...
Seite wird geladen ...
Seite wird geladen ...
Seite wird geladen ...
Seite wird geladen ...
Seite wird geladen ...
Seite wird geladen ...
Seite wird geladen ...
Seite wird geladen ...
Seite wird geladen ...
Seite wird geladen ...
Seite wird geladen ...
Seite wird geladen ...
Seite wird geladen ...
Seite wird geladen ...
Seite wird geladen ...
Seite wird geladen ...
Seite wird geladen ...
Seite wird geladen ...
Seite wird geladen ...
Seite wird geladen ...
Seite wird geladen ...
Seite wird geladen ...
Seite wird geladen ...
Seite wird geladen ...
Seite wird geladen ...
Seite wird geladen ...
Seite wird geladen ...
Seite wird geladen ...
Seite wird geladen ...
Seite wird geladen ...
Seite wird geladen ...
Seite wird geladen ...
-
 1
1
-
 2
2
-
 3
3
-
 4
4
-
 5
5
-
 6
6
-
 7
7
-
 8
8
-
 9
9
-
 10
10
-
 11
11
-
 12
12
-
 13
13
-
 14
14
-
 15
15
-
 16
16
-
 17
17
-
 18
18
-
 19
19
-
 20
20
-
 21
21
-
 22
22
-
 23
23
-
 24
24
-
 25
25
-
 26
26
-
 27
27
-
 28
28
-
 29
29
-
 30
30
-
 31
31
-
 32
32
-
 33
33
-
 34
34
-
 35
35
-
 36
36
-
 37
37
-
 38
38
-
 39
39
-
 40
40
-
 41
41
-
 42
42
-
 43
43
-
 44
44
-
 45
45
-
 46
46
-
 47
47
-
 48
48
-
 49
49
-
 50
50
-
 51
51
-
 52
52
-
 53
53
-
 54
54
-
 55
55
-
 56
56
-
 57
57
-
 58
58
-
 59
59
-
 60
60
-
 61
61
-
 62
62
-
 63
63
-
 64
64
-
 65
65
-
 66
66
-
 67
67
-
 68
68
-
 69
69
-
 70
70
-
 71
71
-
 72
72
-
 73
73
-
 74
74
-
 75
75
-
 76
76


Dometic HC302BIU Installationsanleitung
- Typ
- Installationsanleitung
- Dieses Handbuch eignet sich auch für
in anderen Sprachen
- English: Dometic HC302BIU Installation guide
- français: Dometic HC302BIU Guide d'installation
- Nederlands: Dometic HC302BIU Installatie gids
Verwandte Artikel
-
Dometic HC302, HC502 (R134a) Bedienungsanleitung
-
-
Dometic HC302D, HC502D Bedienungsanleitung
-
Dometic HC302D, HC502D Bedienungsanleitung
-
-
-
-