Nordcap SCU 1425 Bottle Cooler Benutzerhandbuch
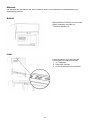
- Typ
- Benutzerhandbuch

Bedienungsanweisung
Flaschenkühlschrank SCU 1425
[Art. 4358001425]
2021-07

Important Instructions:
The appliances mentioned in this document are only intended for preservation and cooling of
beverages in bottles and cans.
Read the manual In order to obtain full benefit of the appliance.
It is the user’s responsibility to utilize the appliance according to the instructions.
Contact the dealer immediately in case of any defects.
The appliance is only for indoor use.
The appliance should be placed in a dry sufficiently ventilated room.
The appliance should not be placed near a source of heat or direct sunlight.
The appliance should not be placed near a ventilation or air condition system.
Note that all electrical appliances can cause danger.
Do not store explosives such as gas, petrol, ether or similar substances in the appliance.
Asbestos nor CFC have been used in the production of the appliance.
The oil in the compressor does not contain PCB.
- THIS APPLIANCE MUST ALWAYS HAVE AN EARTHED PLUG!
- AT REPAIR ALWAYS UNPLUG THE APPLIANCE!
at
- ONLY FOR APPLIANCES WITH REFRIGERANT R290/R600a!
This appliance contains a flammable refrigerant, so make sure of good ventilation around the
appliance.
Do not use mechanical devices when defrosting, this can cause leakage of the cooling system.
Do not use electrical appliances inside the refrigerated storage compartment.
Any repair of the appliance should be carried out by a skilled technician (EN 60335-2-89: 2010).
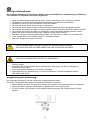
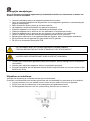
Unpacking and Installation:
Remove the packing and check that the cabinet has no transport damage.
Any transport damages should be reported to the transport company and noted on the delivery note.
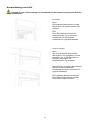
When building-in ensure a distance of at least 50 mm behind the appliance and above the
appliance.
Make sure that the air intake at the bottom panel is not blocked.
Place the appliance in a level position for correct functioning. This can be achieved by adjusting the
adjustable feet:
2

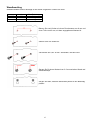
Electrical Connections
The appliance is intended for 220-240 V/50 Hz. The connection should be effected to an accessible
socket.
This appliance should have extra protection according to the power regulations. This is also the case
when replacing an existing appliance which does not have the extra protection.
Always use a 3 pin plug. The lead with green/yellow insulation should be earthed (marked ).
In all other cases an authorized electrician can tell you how to get the extra protection of the
appliance. In case there is no extra protection in the building, the Board of Electricity recommends
that an electrician installs a PFI or HPFI switch (contact breaker).
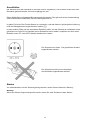
The appliance should be connected to an 13A
protected socket.
The appliance should not be connected to a
multipoled distribution socket.
Start-up the Appliance
Before taking the appliance into use it is recommended to clean it – see section regarding
maintenance.
Important!
In case the cabinet has been lying down during transport leave it standing up for 2 hours before
switching it on.
3

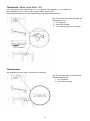
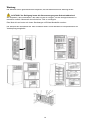
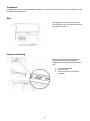
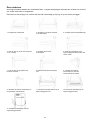
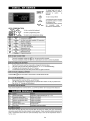
Thermostat (Also see page 137)
The thermostat setting has a scale 1-7, corresponding to approx. 2-12 ºC.
In most cases a setting of 3-4 will be optimum.
The cooling system can be switches off at 0.
Depending on model the thermostat can
be placed as follows:
1. In top panel
2. Under the canopy
3. On the cover of the internal fan
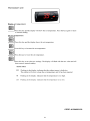
Thermometer
All appliances are fitted with a thermometer.
Depending on model the thermometer
can be placed as follows:
1. In top panel
2. Under the canopy
4

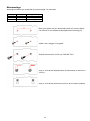
Defrosting
The appliance has automatic defrost. Discharge water is led to evaporation in a drip tray placed in the
compressor compartment.
Lock
The appliance with hinged door has a
lock. The lock is placed at the top of the
door.
Internal Light
Appliance with internal light has a light
switch. Depending on model this is
placed as follows:
1. In the top panel
2. Under the canopy
3. On the cover of the internal fan
5

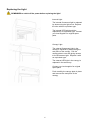
Replacing the Light
REMEMBER to switch off the power before replacing the light!
Internal Light:
The internal fluorescent light is replaced
by demounting the light cover. Replace
the tube with an equivalent type.
The internal LED light should be
replaced by an equivalent type. Contact
your local supplier for original spare
parts.
Canopy Light:
The external fluorescent light in the
canopy is replaced by dismounting the
end piece of the canopy. Pull the
canopy plate to one side giving access
to the fluorescent light. Replace it with
an equivalent type.
The external LED light in the canopy is
replaced in the same way.
Contact your local supplier for original
spare parts.
Push carefully the canopy plate in place
and remount the end piece of the
canopy.
6

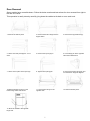
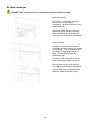
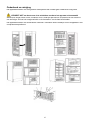
Door Reversal
Some models have reversible doors. Follow the below mentioned instructions for door reversal from right to
left and vice versa.
This operation is easily done by carefully lying down the cabinet at its back or on a sack truck.
1. Remove the bottom panel
2. Remove the bottom hinge and the
support fitting.
3. Remove the top panel/canopy.
4. Lift the door and pull it approx. 10 cm
down.
5. Remove the top hinge pin.
6. Fit the hinge pin at the opposite
side without tightening it.
7. Lift the door in place in the top hinge.
8. Tighten the top hinge pin.
9. Remove the bottom hinge pin and
turn the bottom hinge 90 degrees.
10.Refit the bottom hinge pin to the
bottom hinge which was turned.
11. Fit the bottom hinge on the
opposite side.
12. Refit the bottom panel.
13. Move the handle to the opposite
hinge side.
7

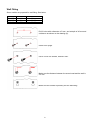
Wall Fitting
Some models are prepared for wall fitting. See below.
A
Max. Load:
FS60CP
345
20 kgs.
FS80CP
360
30 kgs.
FSC100
527
30 kgs.
Drill 2 holes with a diameter of 8 mm and a depth of 40 mm and
a distance as shown on the drawing (A).
Insert 8 mm plugs.
Use 4.8 x 38 mm screws, DIN NO.7981.
Make sure the distance between the screw head and the wall is
2-3 mm.
Make sure the screws fit perfectly into the wall fitting.
8

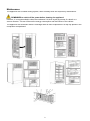
Maintenance
The appliance has a closed cooling system, which normally does not require any maintenance.
REMEMBER to switch off the power before cleaning the appliance!
However, it is recommended to clean the condenser 2-4 times a year by means of a brush or a
vacuum cleaner. This can influence the energy consumption and the lifetime of the cabinet.
The appliance has automatic defrost. Discharge water is led to evaporation in a drip tray placed in the
compressor compartment.
9

Service
In case of no cooling check failure in the power supply.
In case you are unable to find any failure, please contact your dealer.
You need to inform your dealer of the model number and serial number stated on the rating label
normally placed inside on the right side of the cabinet.
Always use authorized technicians and original spare parts.
This device complies with the following EU Directives:
Low Voltage Directive (LVD) 2014/35/EU,
Electromagnetic Compatibility Directive (EMC) 2014/30/EU,
Restriction of Hazardous Substances (RoHS) Directive 2011/65/EC
Disposal
The disposal of old appliances should be done correctly in order to protect the environment.
Please observe the national regulations for disposal of old appliances.
10

Wichtige Informationen:
Die in diesem Dokument beschriebenen Kühler sind ausschließlich zur Aufbewahrung und Kühlung
von Getränken in Flaschen oder Dosen vorgesehen.
Lesen Sie diese Bedienungsanleitung durch, um den vollen Nutzen vom Schrank zu erzielen.
Der Braucher ist für die vorschriftsgemäße Anwendung vom Schrank verantwortlich.
Kontaktieren Sie bei Fehlern am Schrank sofort den Händler.
Der Schrank ist nur für die Verwendung in Innenräumen.
Der Schrank soll in einem trockenen und ausreichend ventillierten Raum angebracht werden.
Der Schrank soll nicht in der Nähe von Wärmequellen oder in direktem Sonnenlicht platziert werden.
Der Schrank soll nicht in der Nähe von Ventilations- oder Aircondition-Anlagen platziert werden.
Achten Sie darauf, dass alle elektrischen Geräte zu Gefahr führen können.
Bewahren Sie keine explosionsgefährlichen Stoffe, z.B. Gas, Benzin, Äther u.ä. im Schrank auf.
In der Konstruktion ist kein Asbest oder CFC verwendet worden.
Das Öl im Kompressor enthält kein PCB.
- DEN SCHRANK IMMER EINEM STECKER MIT ERDUNG ANSCHLIEßEN!
- BEI WARTUNG DEN STECKER IMMER AUS DER STECKDOSE NEHMEN!
- NUR FÜR SCHRÄNKE MIT KÜHLMITTEL R290/R600a !
Dieser Schrank enthält ein brennbares Kühlmittel, deshalb immer für gute Ventilation um den
Schrank sorgen.
Verwenden Sie für das Abtauen keine mechanischen Werkzeuge, da dies zu Leckagen im
Kühlsystem führen kann.
Keine elektrischen Werkzeuge im Schrank verwenden.
Jede Reparation am Schrank muss von einem qualifizierten Techniker ausgeführt werden.
(EN 60335-2-89: 2010)
Auspackung und Aufstellung:
Die Verpackung entfernen und das Gerät nach Transportschaden prüfen.
Eventuelle Transportschaden sind unverzüglich dem Spediteur mitzuteilen.
Beim Einbauen ist hinter und über dem Schrank ein Abstand von mindestens 50 mm zu beachten.
Sorgen Sie dafür, dass die Lufteinnahme im Bodenpaneel nicht blockiert wird.
Für die Funktion vom Schrank ist eine gerade Platzierung wichtig. Die Füße können so justiert
werden:
11

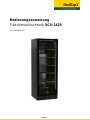
Anschließen
Der Schrank ist für den Anschluß an 220-240 V/50 Hz vorgesehen. Der Anschluß muss durch eine
Steckdose gemacht werden, die leicht zugängig sein soll.
Dieser Kühlmöbel muß gesetsmäßig extra geschützt werden. Dies gilt auch bei der Auswechslung
eines existierenden Kühlmöbels, der nicht extra geschützt ist.
In jedem Fall ist ein Drei-Punkte-Stecker zu verwenden, und das Kabel mit grüner/gelber Isolierung
muß der Erdungsklemme angeschlossen werden ( ).
In allen anderen Fällen soll ein autorisierter Elektriker prüfen, wie der Schrank am einfachsten extra
geschützt wird. Falls Sie im Gebäude keinen Extraschutz schon haben, empfehlen wir durch einen
Elektriker einen PFI- oder HPFI-Schalter installieren zu lassen.
Der Schrank muss einem 13 A geschützten Auslauf
angeschlossen werden.
Der Schrank soll nicht einer mehrpoligen
Anschlußdose angeschlossen werden.
Starten
Vor Inbetriebnahme soll der Schrank gereinigt werden, sehen Sie den Abschnitt „Wartung“.
Wichtig !
Wenn der Schrank liegend transportiert wurde, warten Sie zwei Stunden mit dem Starten.
12

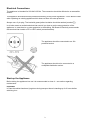
Thermostat (Siehe auch Seite 137)
Der Thermostat ist auf einer Skala von 1-7 einstellbar, was ungefähr 2-12 ºC entspricht.
Eine Einstellung von 3-4 wird in den meisten Fällen optimal sein.
Das Kühlsystem kann durch die Einstellung auf null abgeschaltet werden.
Der Thermostat kann je nach Modell wie
folgt platziert sein:
1. Im Toppaneel
2. Unter dem Canopy
3. In der Abdeckung vom Innenlüfter
Thermometer
Alle Schränke sind mit einem Thermometer versehen.
Das Thermometer kann je nach Modell
wie folgt platziert sein:
1. Im Toppaneel
2. Unter dem Canopy
13

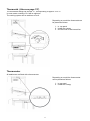
Abtauen
Der Schrank taut automatisch ab. Das Tauwasser wird in einen Behälter im Kompressorraum zur
Verdampfung geleitet.
Schloß
Die Schränke mit Drehtür sind mit einem
Schloß versehen, das oben im
Türrahmen platziert ist.
Licht
In den Schränken mit Licht kann der
Lichtschalter wie folgt platziert sein:
1. Im Toppaneel
2. Unter dem Canopy
3. In der Abdeckung vom Innenlüfter
14

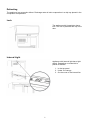
Auswechslung vom Licht
Achtung! Vor der Auswechslung von Lichtquellen ist die Stromversorgung zum Schrank
immer abzubrechen
Innenlicht:
Neon:
Die Abdeckung abmontieren und die
Röhre durch ein entsprechendes Typ
ersetzen.
LED:
Das LED-Innenlicht ist durch ein
entsprechendes Typ zu ersetzten.
Kontaktieren Sie Ihren lokalen
Lieferanten für originale Ersatzteile.
Licht im Canopy:
Neon:
Das eine der beiden Seitenstücke
abmontieren. Die Lichtplatte zur Seite
ausziehen, um an die Neonröhre zu
kommen. Diese durch ein
entsprechendes Typ ersetzten.
Das LED-Licht im Canopy lässt sich auf
dieselbe Weise auswechseln.
Kontaktieren Sie Ihren Lieferanten für
originale Ersatzteile.
Die Lichtplatte danach vorsichtig auf
ihren Platz zurückschieben und das
Seitenstück wieder montieren.
15

Wechsel vom Türanschlag
Gewisse Modelle haben wechselbare Türanschläge. Folgen Sie den untigen Anweisungen, um den
Türanschlag von rechts auf links zu wechseln und umgekehrt.
1. Das Bodenpaneel abmontieren.
2. Bodenscharnier und Stützbeschlag
abmontieren.
3. Toppaneel abmontieren.
4. Die Tür heben und etwa 10 cm nach
unten ziehen.
5. Scharnierstift oben abmontieren.
6. Den Scharnierstift in der anderen
Seite montieren, aber nicht
zuspannen.
7. Die Tür heben und im oberen
Scharnier einsetzen.
8. Den Stift vom oberen Scharnier
spannen.
9. Den Stift vom unteren Scharnier
abmontieren und das untere
Scharnier 90 Grad drehen.
10. Den Stift vom unteren Scharnier
wieder auf dem gedrehten Scharnier
montieren.
11. Das untere Scharnier und den
Stützbeschlag in der neuen Seite
montieren.
12. Das Bodenpaneel wieder
montieren.
13. Den Griff auf die andere Seite
montieren.
16

Wandbeschlag
Gewisse Modelle sind für Montage an der Wand vorgesehen. Sehen Sie unten.
A
Max. Belastung:
FS60CP
345
20 kg.
FS80CP
360
30 kg.
FSC100
527
30 kg.
Bohren Sie zwei Löcher mit einem Durchmesser von 8 mm und
einer Tiefe von 40 mm, mit dem angegebenen Abstand A.
Setzen Sie 8 mm Dübel ein.
Verwenden Sie 4,8 x 38 mm. Schrauben, DIN NO:7981.
Sorgen Sie für einen Abstand von 2-3 mm zwischen Wand und
Schraubenkopf.
Sorgen Sie dafür, dass die Schrauben perfekt in den Beschlag
passen.
17

Wartung
Der Schrank hat ein geschlossenes Kühlsystem, das normalerweise keine Wartung fordert.
ACHTUNG! Vor Reinigung immer die Stromversorgung zum Schrank abbrechen!
Wir empfehlen, den Kondensator 2 bis 4 Mal im Jahr zu reinigen, um den Energieverbrauch zu
reduzieren und die Lebenszeit der technischen Teile zu verlängern.
Dies lässt sich am besten mit einem Staubsauger mit Bürste-Mundstück machen.
Der Schrank taut automatisch ab. Das Tauwasser wird in einen Behälter im Kompressorraum zur
Verdampfung ausgeleitet.
18

Service
Bei Versagen im Kühlsystem, prüfen Sie zunächst, ob es an der Stromversorgung liegt.
Wenn der Grund nicht gefunden werden kann, müssen Sie Ihren Lieferanten kontaktieren.
Dabei immer Typnamen und Seriennummer vom Schrank mitteilen.
Diese Informationen befinden sich auf dem Typenschild, das sich im Schrank oben rechts befindet.
Verwenden Sie immer autorisierten Kundendienst und originale Ersatzteile.
Dieses Gerät erfüllt die folgenden EU-Direktive:
Low Voltage Directive (LVD) 2014/35/EU,
Electromagnetic Compatibility Directive (EMC) 2014/30/EU,
Restriction of Hazardous Substances (RoHS) Directive 2011/65/EC
Entsorgung
Wenn der abgenutzte Schrank entsorgt werden muss, ist dies auf eine umweltmäßig rücksichtsvolle
Weise vorzunehmen. Achten Sie auf besondere nationale Regeln der Entsorgung.
19

Belangrijke aanwijzingen:
De in dit document genoemde apparaten zijn uitsluitend bedoeld voor het bewaren en koelen van
dranken in flessen en blikken.
Lees de handleiding zodat u het apparaat optimaal kunt benutten.
Het is de verantwoordelijkheid van de gebruiker om het apparaat te gebruiken overeenkomstig de
gegeven aanwijzingen.
Neem bij defecten direct contact op met de leverancier.
Het apparaat is uitsluitend bedoeld voor gebruik binnenshuis.
Plaats het apparaat in een droge en voldoende geventileerde ruimte.
Plaats het apparaat niet in de buurt van een warmtebron of rechtstreeks zonlicht.
Plaats het apparaat niet in de buurt van een systeem voor ventilatie of air conditioning.
Houd er rekening mee dat alle elektrische apparaten gevaar kunnen opleveren.
Bewaar geen explosieven in het apparaat zoals gas, benzine, ether of soortgelijke substanties.
Bij de productie van dit apparaat zijn geen asbest of CFC gebruikt.
De olie in de compressor bevat geen PCB.
- DIT APPARAAT MOET ALTIJD EEN GEAARDE STEKKER HEBBEN.
- TREK BIJ REPARATIES ALTIJD DE STEKKER UIT HET STOPCONTACT.
at
- ALLEEN VOOR APPARATEN MET KOELVLOEISTOF R290/R600a.
Dit apparaat bevat een brandbaar koelmiddel, dus zorg voor voldoende ventilatie rond het apparaat.
Gebruik geen mechanische apparaten tijdens het ontdooien, dat kan lekkage van het koelsysteem
veroorzaken.
Gebruik geen elektrische apparaten binnen het gekoelde opslagvak.
Eventuele reparaties aan het apparaat moeten worden uitgevoerd door een ervaren technicus (EN
60335-2-89: 2010).
Uitpakken en installeren:
Verwijder de verpakking en controleer de kast op vervoersschade.
Eventuele vervoersschade moet worden gemeld aan het vervoersbedrijf en genoteerd op de vrachtbrief.
Zorg bij inbouwen voor een afstand van ten minste 50 mm achter en boven het apparaat.
Zorg er voor dat de luchtopening in het onderpaneel niet geblokkeerd wordt.
Zet het apparaat vlak neer voor een juiste werking. Stel hiervoor de voeten in.:
20
Seite wird geladen ...
Seite wird geladen ...
Seite wird geladen ...
Seite wird geladen ...
Seite wird geladen ...
Seite wird geladen ...
Seite wird geladen ...
Seite wird geladen ...
Seite wird geladen ...
Seite wird geladen ...
Seite wird geladen ...
Seite wird geladen ...
Seite wird geladen ...
-
 1
1
-
 2
2
-
 3
3
-
 4
4
-
 5
5
-
 6
6
-
 7
7
-
 8
8
-
 9
9
-
 10
10
-
 11
11
-
 12
12
-
 13
13
-
 14
14
-
 15
15
-
 16
16
-
 17
17
-
 18
18
-
 19
19
-
 20
20
-
 21
21
-
 22
22
-
 23
23
-
 24
24
-
 25
25
-
 26
26
-
 27
27
-
 28
28
-
 29
29
-
 30
30
-
 31
31
-
 32
32
-
 33
33


Nordcap SCU 1425 Bottle Cooler Benutzerhandbuch
- Typ
- Benutzerhandbuch
in anderen Sprachen
- English: Nordcap SCU 1425 Bottle Cooler User manual
- Nederlands: Nordcap SCU 1425 Bottle Cooler Handleiding
Andere Dokumente
-
Tefcold FS1202S Benutzerhandbuch
-
ARTEVINO OXG2T206NPDOXG2T206NVD Bedienungsanleitung
-
ARTEVINO OXG1T230NPG Bedienungsanleitung
-
Vestfrost FKG 311 Instructions For Use Manual
-
Tefcold SCU1280CP Benutzerhandbuch
-
Electrolux EU6932C Benutzerhandbuch
-
-
Climadiff PCLP205 Bedienungsanleitung
-
Climadiff PCLP205 Bedienungsanleitung
-