
PDF 5998 / 01.07.2019
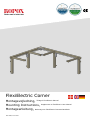
FlexiElectric Corner
Montagevejledning, Tillæg til FlexiElectric Manual
Mounting Instructions, Supplement to FlexiElectric User Manual
Montageanleitung, Nachtrag zum FlexiElectric Benutzerhandbuch

2
1. Introduktion
Enhver projektering, montering og normal brug, må kun udføres såfremt FlexiElectric manualen
benyttes sammen med denne manual
Alle øvrige informationer herunder anvendelse, overensstemmelse med EU-direktiv samt tekniske
data findes i FlexiElectric manualen
Producent: Ropox A/S, DK-4700 Næstved, Tlf.: +45 55 75 05 00
E-mail: info@ropox.dk, www.ropox.dk
1. Introduction
Planning, installation and normal use must only be carried out if the FlexiElectric Manual is used in
combination with these Mounting Instructions.
All other information, including use, conformity with EU-directives and technical data will be found in
the FlexiElectric Manual.
Producer: Ropox A/S, DK-4700 Næstved, Tel.: +45 55 75 05 00
E-mail: info@ropox.dk, www.ropox.dk
1. Einleitung
Planung, Montage und normaler Gebrauch dürfen nur dann erfolgen, wenn das FlexiElectric
Benutzerhandbuch in Kombination mit dieser Montageanleitung benutzt wird.
Alle sonstigen Informationen, einschl. Anwendung, Übereinstimmung mit EU-Richtlinien sowie
technischer Daten, finden Sie im FlexiElectric Benutzerhandbuch.
Hersteller: Ropox A/S, DK-4700 Naestved, Tel.: +45 55 75 05 00
E-mail: info@ropox.dk, www.ropox.com

3
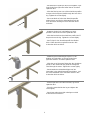
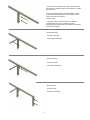
- Det første ben skydes på den ene alu-bjælke, og 6-
kant akslen føres igennem hullet i benet. Skruerne
spændes løst.
- Slide the first leg onto one of the aluminium profiles
and pass the hexagonal shaft through the hole of the
leg. Tighten the screws lightly.
- Das erste Bein auf eines der Aluminiumprofile
gleiten lassen und die Sechskantwelle durch das
Loch des Beins anbringen. Die Schrauben leicht
anziehen
- Knægten skydes ind i alu-bjælken og SKAL
placeres over benet. Skruerne spændes løst.
- Slide the bracket into the aluminium profile. MUST
be placed over the leg. Tighten the screws lightly.
- Den Träger in das Aluminiumprofil einschieben.
MUSS über dem Bein angebracht werden. Die
Schrauben leicht anziehen.
- Møtrikken på motorbeslaget skydes ind i alu-
bjælken på undersiden og 6 kant akslen føres
igennem motoren. Skruerne spændes løst.
- Slide the nut of the motor fixture into the aluminium
profile on the underside and guide the hexagonal
shaft through the motor. Tighten the screws lightly.
- Den Nutstein des Motorbeschlages auf der
Unterseite in das Aluminiumprofil einschieben, und
die Sechskantwelle durch den Motor stecken. Die
Schrauben leicht anziehen.
- Motoren placeres ved siden af benet, og skruen
spændes løst.
- Place the motor beside the leg and tighten the
screw lightly.
- Den Motor neben dem Bein anbringen und die
Schraube leicht anziehen.

4
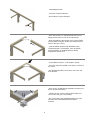
- Det næste ben skydes ind i alu-bjælken. Skruerne
spændes løst.
- Slide the next leg into the aluminium profile. Tighten
the screws lightly.
- Das nächste Bein in das Aluminiumprofil
einschieben. Die Schrauben leicht anziehen.
- Endnu en knægt placeres over det nye ben. Hvis
der skal anvendes ekstra knægte mellem de to viste,
skal disse skydes ind forinden. Skruerne spændes
løst.
- Place the next bracket over the second leg. If extra
brackets are required between the two brackets
shown here, they must be mounted first. Tighten the
screws lightly.
- Die nächste Auflagekkonsole über dem neuen Bein
anbringen. Werden zwischen den beiden gezeigten
Trägern zusätzliche Träger benötigt, diese zuerst
montieren. Die Schrauben leicht anziehen.
- Vinkelbeslagets to møtrikker skydes ind i alu-
bjælken. !! Skruerne spændes løst.!!
- Slide the two nuts of the angular fitting into the
aluminium profile.!! Tighten the screws lightly.!!
- Die beiden Nutsteine des Winkelbeschlages in das
Aluminiumprofil einschieben.!! Die Schrauben leicht
anziehen.!!
- Vinkel-gearhusets møtrik skydes ind i alu-bjælken.
Vigtigt!! Vær opmærksom på, at gearet vender som
på billederne!! 6-kant akslen føres ind i gearhuset.
Skruerne spændes løst.
- Slide the nut of the angular gear casing into the
aluminium profile. Important!! See that the gear is
placed as illustrated!! Place the hexagonal shaft in
the gear casing. Tighten the screws lightly.
- Den Nutstein des Winkelgetriebegehäuses in das
Aluminiumprofil einschieben. Wichtig!! Das Getriebe
muss wie gezeigt angebracht werden!! Die Sechs-
kantwelle ins Getriebegehäuse stecken. Die
Schrauben leicht anziehen.

5
- Nu samles den anden side ud fra samme princip.
Vent med at spænde noget, til hele stellet er samlet.
Ben placeres.
- Now assemble the other side following the same
procedure. Don't tighten the screws till the whole
frame has been assembled.
Place the leg.
- Jetzt die andere Seite wie oben beschrieben
zusammenbauen. Die Scrauben erst nach
beendigtem Zusammenbau des Rahmens anziehen.
Das Bein anbringen.
- Knægt placeres.
- Place the bracket.
- Den Träger anbringen.
- Motor placeres.
- Place the motor.
- Den Motor anbringen.
- Ben placeres.
- Place the leg.
- Das Bein anbringen.

6
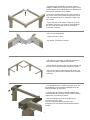
- Yderknægt placeres.
- Place the outermost bracket.
- Den äußeren Träger anbringen.
- De to stel samles nu i vinkelbeslaget. Sørg for at
begge 6-kant aksler er helt i bund i gearhuset.
- Now assemble the two frames in the angular fitting.
See that both hexagonal shafts have been pressed
home in the gear casing.
- Jetzt die beiden Rahmen mit Winkelbeschlag
zusammenbauen. Sicherstellen, dass die beiden
Sechskantwellen im Getriebegehäuse richtig
eingedrückt worden sind.
- Alu-profilerne placeres, så de flugter i hjørnet
- Place the aluminium profiles so that they are flush in
the corner.
- Die Aluminiumprofile so anordnen, dass sie in der
Ecke fluchten.
- De 4 skruer i vinkelbeslaget spændes samt den ene
skrue i gearhusets beslag.
- Tighten the four screws of the angular fitting and
one screw of the gear casing fitting.
- Die 4 Schrauben des Winkelbeschlages und eine
Schraube des Getriebegehäusebeschlages
anziehen.

7
- Samlebeslaget til knægtene monteres på de to
knægte i stellets hjørne. Flyt benene fra side til side
indtil knægtene passer til beslaget som billedet viser.
De to skruer spændes ind i knægten.
- Mount the assembly fitting on the two brackets in
the corner of the frame. Move the legs from side to
side until the brackets fit as illustrated. Tighten the
two screws.
- Den Eckwinkel an die beiden Träger in der Ecke
montieren. Die Beine von Seite zu Seite bewegen,
bis die Träger wie gezeigt passen. Die beiden
Schrauben anziehen.
- De 2 skruer fastspændes.
- Tighten the two screws.
- Die beiden Schrauben anziehen
- Når alle ben og knægte er rettet ind og placeret i
den ønsket position, spændes alle skruer!
- When all legs and brackets have been aligned and
placed in the required position, tighten all screws!
- Nach Ausrichten und Anbringung aller Beine und
Träger in der gewünschten Position alle Schrauben
anziehen!
- Hvis knægten ikke er i vatter men peger opad, kan
det afhjælpes med at montere medfølgende vinkel
imellem knægte og aluprofilet!
- If support arm isn’t level but points upwards, this
can be rectified by mounting included angle between
support arm and aluminum profile!
- Falls die Auflagekonsole nich waagerecht ist,
sondern nacho ben zeigt,
kann der beigefügte Winkel zwischen der
Auflagekonsole und dem Aluminiumprofil montiert
werden!

8
Inden ibrugtagning følges anvisningerne i FlexiElectric manualen!
Before use follow the instructions of the FlexiElectric User Manual!
Vor Ingebrauchnahme die Anweisungen des FlexiElectric Benutzerhandbuches befolgen!
ROPOX A/S
Ringstedgade 221
DK – 4700 Næstved
Tel.: +45 55 75 05 00 Fax.: +45 55 75 05 50
E-mail: info@ropox.dk
www.ropox.dk
ROPOX A/S
Ringstedgade 221
DK – 4700 Naestved
Tel.: +45 55 75 05 00 Fax.: +45 55 75 05 50
E-mail: info@ropox.dk
www.ropox.com
ROPOX A/S
Ringstedgade 221
DK – 4700 Naestved
Tel.: +45 55 75 05 00 Fax.: +45 55 75 05 50
E-mail: info@ropox.dk
www.ropox.de
-
 1
1
-
 2
2
-
 3
3
-
 4
4
-
 5
5
-
 6
6
-
 7
7
-
 8
8


in anderen Sprachen
- English: Ropox ACK8541 User manual
- dansk: Ropox ACK8541 Brugermanual
Andere Dokumente
-
P. Lindberg 43cc Bedienungsanleitung
-
Truma TRUMATIC S 3002 P Bedienungsanleitung
-
Trumatic S 3002 Installation Instructions Manual
-
Crivit 292789 Instructions For Use Manual
-
Waeco PerfectView CRT 100 Bedienungsanleitung
-
Makita LS1017 Bedienungsanleitung
-
-
Milwaukee HDE 13RQ Benutzerhandbuch
-