LumenRadio CRMX Benutzerhandbuch
- Kategorie
- Stroboskope
- Typ
- Benutzerhandbuch

CRMX Stardust
User Manual
LumenRadio AB
2022-10-18

CRMX Stardust 2022-10-18
Contents
Safety information 4
English .............................................. 5
Deutsch.............................................. 6
Introduction 7
WirelessDMXinanutshell .................................... 7
Cognitivecoexistence ...................................... 9
Introducing CRMX2........................................ 9
Compatibility........................................... 9
Linkingkey ............................................ 10
WhatisLinkingKey..................................... 10
Cloningtransmitters .................................... 11
LinkinganRXbyLinkingKey................................ 11
Your Stardust device 12
Overview ............................................. 12
Poweroptions .......................................... 12
ACinlet ........................................... 13
DCinlet ........................................... 13
Power-over-Ethernet.................................... 13
Mounting ............................................. 13
M10and3/8”holes..................................... 13
Safetywire ......................................... 13
Rackmounting ....................................... 14
Wallmounting ....................................... 14
Settings and operation 15
Firmwareupgrades........................................ 15
Howtoupdate ....................................... 15
FrontpanelUI........................................... 15
Mainmenu ......................................... 15
OutputStatus........................................ 15
Statusicons......................................... 16
WebUI............................................... 16
Linking .............................................. 17
Linking ........................................... 17
Unlinking .......................................... 17
LumenRadio AB 2

CRMX Stardust 2022-10-18
Universemapping ........................................ 17
StreamingACN ....................................... 18
ArtNet............................................ 18
Datamerging........................................ 18
Ethernet.............................................. 18
StaticIP........................................... 19
DHCP ............................................ 19
WiFi ................................................ 19
AccessPoint(APmode) .................................. 19
Clientmode......................................... 19
Batterybackup .......................................... 20
Turningthedeviceo ................................... 20
ChargingtheBattery.................................... 20
Compliance information 21
CE ................................................. 21
UKCA ............................................... 21
FCC ................................................ 21
FCCInformationtoUser .................................. 21
FCC Guidelines for Human Exposure . . . . . . . . . . . . . . . . . . . . . . . . . . . . 21
FCC Declaration of Conformity . . . . . . . . . . . . . . . . . . . . . . . . . . . . . . . 21
FCC Radio Frequency Interference Warnings & Instructions . . . . . . . . . . . . . . . 22
IndustryCanada ......................................... 22
Accessories 23
LumenRadio AB 3

CRMX Stardust 2022-10-18
Safety information
WARNING / WARNUNG / ATTENTION / ADVERTENCIA /
VARNING / ADVARSEL / VAROITUS / ADVARSEL
This product must be earthed.
Das Gerät muss an eine geerdete Steckdose angeschlossen werden.
Cet appareil doit être branché à une prise de terre.
Este aparato se debe conectar a una toma de tierra.
Apparaten skall anslutas till jordat uttag.
Apparatet må tilkoples jordet stikkontakt.
Laite on liitettävä suojakoskettimilla varustettuun pistorasiaan.
Apparatets stikprop skal tilsluttes en stikkontakt med jord.
LumenRadio AB 4

CRMX Stardust 2022-10-18
English
1. Please read these instructions and safety instructions carefully before using this product.
2. Keep these instructions for future reference.
3.
Never plug the product into the mains supply while it is still in its packaging. Never cover during
use.
4. Only use indoors and in dry spaces, except where otherwise explicitly stated.
5. Verify that the product has not been damaged in transport before you make use of it.
6. Keep the product out of the reach of animals, children and persons who require supervision.
7. This product is intended for professional use only.
8. Always place the product on a stable, solid and flat base or safely secure it.
9. Do not use the product near hot surfaces or objects.
10.
The mains cable must be regularly and carefully checked for damage to the cable, the plug and
other parts. In the event of damage, the product must not be used until the mains cable has been
replaced. If the product needs to be cleaned, the adapter or mains cable must be disconnected
from the mains supply.
11. Repairs must only be carried out by a qualified person.
12. Note that the connected voltage and current corresponding to the sticker on the product.
13.
Never submerge the product or the mains cable in water or any other liquid, in order to prevent
electric shocks, fire, injury and other hazards.
14. Never carry the product by the cables and do not put the cord around sharp edges.
LumenRadio AB 5

CRMX Stardust 2022-10-18
Deutsch
1.
Bitte lesen Sie diese Hinweise und Sicherheitshinweise sorgfältig durch, bevor Sie dieses Produkt
verwenden.
2. Bewahren Sie diese Anleitung zum späteren Nachschlagen auf.
3.
Das Produkt nie anschließen, wenn es sich in der Verpackung befindet- Außerdem darf das
Produkt beim betrieb nicht abgedeckt werden.
4. Nur in trockenen Innenräumen verwenden sofern nicht ausdrücklich anders angegeben!
5.
Versichern Sie sich vor der Verwendung, das dieses Produkt beim Transport nicht beschädigt
wurde.
6.
Produkt außerhalb der Reichweite von Kindern, Tieren und zu beaufsichtigenden Personen
aufbewahren.
7. Dieses Produkt ist nur für den professionellen Gebrauch bestimmt.
8. Stellen Sie das Produkt immer auf eine stabile, feste und flache Fläche auf.
9. Verwenden Sie das Produkt nicht in der Nähe von warmen Oberflächen oder Objekten.
10.
Das Netzkabel muss regelmäßig und sorgfältig auf Schäden am Kabel, Stecker und anderen
Teilen kontrolliert werden. Bei einem Schaden darf das Produkt erst wiederverwendet werden,
wenn das Netzkabel repariert/ersetzt ist. Wenn das Produkt gereinigt werden soll, muss das
Netzkabel vom Stromnetz getrennt werden.
11. Eventuell anfallende Reparaturen müssen von einer qualifizierten Person ausgeführt werden.
12.
Beachten Sie, dass die angeschlossene Spannung und Strom dem entsprechen, was auf dem
Typenschild angegeben ist.
13.
Tauchen Sie das Produkt oder das Anschlusskabel niemals in Wasser oder in andere Flüssigkeiten
ein, um einen Stromschlag, Brand, Verletzungen oder andere Gefahren zu vermeiden.
14. Das Produkt nicht am Netzkabel tragen und das Netzkabel nicht um scharfe Kanten legen.
LumenRadio AB 6

CRMX Stardust 2022-10-18
Introduction
This user manual refers to version 1.0.20 or later.
Welcome to the large family of users of LumenRadio’s world-leading wireless DMX system. We hope
that you will enjoy your brand new devices. We, at LumenRadio, have tailored this wireless DMX system
to deliver reliability at its best. No matter if you’re using them at a night-club, a community theatre or
on the set of a feature film, you should be able to trust its cable-like reliability, but without the hassle
of cables.
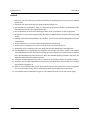
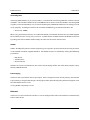
Wireless DMX in a nutshell
Wireless DMX can be used in many dierent setups, may it be one single universe being transmitted
from one point over a distance to one receiver. This is what is called point-to-point, and is a common
scenario when shooting wireless DMX over a distance where cable is not possible. The cable is simply
replaced with a wireless cable with a fixed latency of 5 ms.
Figure 1: One DMX universe in a point-to-point setup
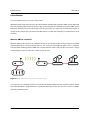
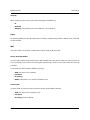
It is simple to just add more receivers to a universe of wireless DMX to create a wireless splitter, where
the same DMX data is outputted with a synchronisation of less than 0.1 ms. This is what is called a
point-to-multipoint setup.
LumenRadio AB 7

CRMX Stardust 2022-10-18
Figure 2: One universe in a point-to-multipoint setup
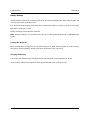
It is possible to have multiple universes being transmitted simultaneously in what’s called a multipoint-
to-multipoint setup. Simply link each receiver to the transmitted universe you want it to output. The
system will automatically exchange encryption keys and other security parameters. The system will
coordinate the frequency usage to avoid collisions so that multiple universes can be transmitted
simultaneously.
Figure 3: Multipoint-to-mutlipoint setup
LumenRadio AB 8

CRMX Stardust 2022-10-18
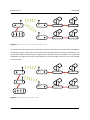
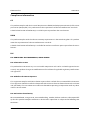
Cognitive coexistence
Cognitive Coexistence is LumenRadio’s patented technology for real-time adaptive frequency hopping.
It’s the foundation of our CRMX
®
technology and the main reason why we are perceived as the most
reliable and resilient wireless DMX system on the market.
CRMX systems automatically scan and adapt to the RF environment 1500 times per second. If distur-
bances are detected, the system will move to frequencies that are currently not disturbed. This is how
the cable-like reliability can be achieved, trusted by users in the most demanding sets.
Figure 4: Cognitive coexistence
Introducing CRMX2
Stardust introduces the usage of CRMX
2
that allows for transport of more universes in the same amount
of frequency space.
It packs more data into the same radio link, hence your receivers needs to be updated to support this.
In the next section you can see details on what receivers that can be updated and which that can not
be updated to support CRMX2.
Compatibility
There has been two major wireless DMX systems on the market for a while - CRMX
®
and W-DMX
TM
. They
have historically not been fully compatible due to dierent technologies being used. But CRMX receivers
have been able to receive the W-DMX G3 protocol. However, your new CRMX Stardust multi-universe
transmitter can be operated in dierent modes;
1. CRMX2- transmit 8 universes of CRMX data
2. CRMX Classic - transmit 4 universes of CRMX data in compatibility mode.
LumenRadio AB 9

CRMX Stardust 2022-10-18
3. W-DMX G3 - transmit 4 universes of W-DMX G3 protocol.
4. W-DMX G4S - transmit 4 universes of W-DMX G4S protocol.
Stardust can transmit up to 8 universes of wireless DMX data to CRMX receivers. This requires receivers
to run the latest firmware that has support for CRMX
2
. Most receivers that are built-in in fixtures
manufactured later than circa 2015 can be updated
1
. For receivers that are not upgraded, CRMX Classic
mode needs to be used. It is possible to run Stardust in mixed modes of CRMX Classic and CRMX
2
. In
that case you will be able to transmit in total either 5, 6 or 7 universes depending on what mix you
configure.
For W-DMX receivers, please use the W-DMX G3 mode for maximum compatibility. Note: This mode can
also be used with CRMX receivers, but security and DMX fidelity is not as good as when running CRMX
mode.
Mode CRMX receivers Older CRMX receivers W-DMX receivers
CRMX2Yes No No
CRMX Classic Yes Yes No
W-DMX G3 Yes Yes Yes
W-DMX G4S Yes No Yes
Linking key
What is Linking Key
The Linking Key is a user-defined 8 digit key code. It can be used as a password to to the link credentials
of a CRMX link. It can be used to tell two (or more) dierent transmitters to set up identical links. This
is what we call cloned transmitters.
It can also be used to link a receiver to a transmitter that has an active link using the same linking key.
This allows for easy addition of a receiver to a network where the transmitter might be inaccessible for
instance, without the need to initiate a linking process from the transmitter.
1
Fixtures using CRMXchip, TiMo RX, TiMo FX or TimoTwo FX can all be upgraded. Contact your fixture’s manufacturer for
further information. CRMX Nova, CRMX Outdoor and CRMX Slim can not be upgraded.
LumenRadio AB 10

CRMX Stardust 2022-10-18
Cloning transmitters
By cloning transmitters, by entering the same Linking Key into both transmitters, you can place them
at separate physical locations and move receives between the locations without the need to relink.
Note: It is important that the transmitters are separated, otherwise receivers may end up creating a
link with any of the transmitters, which may lead to undefined behaviour.
Linking key for transmitters can be used in any mode, not limited to CRMX2.
Linking an RX by Linking Key
In receivers that supports it, it is possible to enter the linking key of the transmitter to join that network
without the need for performing a linking procedure from the transmitter.
Enter the same Linking Key into the receiver as you have entered into the transmitter and the receiver
will automatically link to the transmitter when it is within range.
Linking receivers by Linking key can be used both in CRMX Classic and CRMX
2
, but it requires the
manufacturer of the device to have enabled this in their fixture. Current LumenRadio products that
supports this is; Aurora (through app or UI), Luna (through app) and Moonlite (through app).
LumenRadio AB 11

CRMX Stardust 2022-10-18
Your Stardust device
Overview
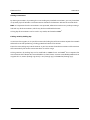
Figure 5: Stardust back and front
1. Antenna for Output A and Output B
2. Antenna for Output C and Output D
3. Antenna for Output E and Output F
4. Antenna for Output G and Output H
5. IPS TFT display for menu system
6. Control knob
7. Ethernet port (EtherCON) with PoE+ (802.3at Type 2) (Soware locked to 100Mbps)
8. Ethernet Link/Data LEDs
9. DC inlet (10-18V DC) (5.5x2.5 mm)
10. USB port for firmware upgrades
11. WiFi antenna
12. AC inlet (90-240 VAC) (PowerCON TRUE1)
13. Decorative lights
Power options
Stardust has three dierent power options. It is possible to connect multiple power sources at the same
time without damaging the device, this can for instance be used to have redundant power sources.
LumenRadio AB 12

CRMX Stardust 2022-10-18
AC inlet
Stardust can operate from 90-240VAC (10%) through the PowerCON TRUE1 inlet.
DC inlet
The DC inlet is a 5.5x2.5 mm lockable jack. Suitable male connectors are thread lockable 5.5x2.5x7.5mm
plugs. Acceptable voltages are 10-18VDC (10%).
Power-over-Ethernet
Stardust can be operated from a PoE+ (30W) power source. While it might be possible to power the
unit from lower power classes, it is not recommended as it may be unreliable.
Mounting
Your Stardust is designed to be able to be mounted in a number of dierent ways;
1. Truss mounted - using a clamp with either M10 or 3/8” thread.
2. Rack mounted - using the rack mounting kit accessory.
3. Tripod mounted - using a M10 or 3/8” spigot or the yoke accessory.
4. Wall mounted - using the wall mount kit accessory.
M10 and 3/8” holes
On either side of your Stardust unit you’ll find holes for M10 (1.5 mm pitch) and 3/8” (UNC). These can
be used with any standard truss mounting clamps or spigots, for instance a standard TV spigot. Do not
use screws that can go deeper than 27 mm.
Safety wire
There are holes on the device where a safety wire shall be fasted if mounted more than 2 meters (6
feet) above ground.
LumenRadio AB 13

CRMX Stardust 2022-10-18
Rack mounting
You can use the rack mounting kit (sold separately) to mount a Stardust in a standard 19 inch rack.
The rack mounting kit comes with convenient antenna patch cables to bring the rear antennas to the
front of the rack.
To mount the rack brackets, loosen four (4) of the M4 screws on each side of the unit, place the rack
bracket, and fasten it in place using the M4 screws. Tighten firmly.
Wall mounting
Stardust can be mounted to a wall using the wall mounting kit (sold separately). Loosen the lower two
M4 screws on each side of the unit, place the brackets and fasten them using the M4 screws. Tighten
firmly.
LumenRadio AB 14

CRMX Stardust 2022-10-18
Settings and operation
Firmware upgrades
You can expect firmware updates to be released on a regular basis for your new Stardust unit. Even
though we take pride in quality, we probably have overlooked something. Also, there will be many
more features added to the firmware in the new weeks and months.
How to update
1. Go to https://lumenradio.com/products/stardust/ to download the latest firmware release.
2. Unzip the release and copy the .swu file to the root directory of a FAT formatted USB stick.
3. Plug the USB stick into the USB port in the back of the Stardust unit.
4. Choose Update in the menu on the front panel. (You’ll find it under the Settings menu.)
5. Stardust will inform you about the process and reboot automatically when done.
Note: In the future, upgrades will be possible in less manual fashions.
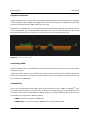
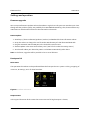
Front panel UI
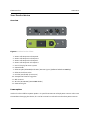
Main menu
The operation of Stardust can be performed from the front panel menu system. Linking, mapping of
universes, IP settings, etc is all done from here.
Figure 6: Stardust main menu
Output Status
In the upper le corner of the screen the current status of all eight outputs is shown;
LumenRadio AB 15

CRMX Stardust 2022-10-18
•Dash (-) shows that the output is not configured.
•Small letter (a-h) indicates that the output is configured, but not receiving data from Ethernet.
•Capital letter (A-H) indicates that the output receives data from Ethernet.
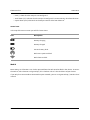
Status icons
In the top of the menu screen you will find status icons.
Icon Description
Battery charging
Battery charged
Current battery level
WiFi access point enabled
WiFi client enabled
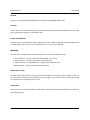
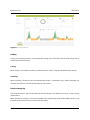
Web UI
Most settings and functions can also be operated from the web UI embedded in the device. To access
the web UI, take a browser and go to http://a.b.c.d where a.b.c.d is the IP address of your device.
If you only have one Stardust connected to your network, you can navigate to http://stardust.local
instead.
LumenRadio AB 16

CRMX Stardust 2022-10-18
Figure 7: Stardust Web UI
Linking
Linking and unlinking receivers is done from the Linking menu or from the web UI. Each output can be
linked/unlinked individually.
Linking
When linking, all available (currently unlinked) receivers within range will be linked to the output.
Unlinking
When unlinking, all receivers that are linked to this output - and within range - will be unlinked. The
receivers will then be available to link to other transmitters.
Universe mapping
In the Universe menu, you can connect each Stardust output to an Ethernet universe, or alternatively
disconnect it.
When Stardust is running in a 4 universe mode, every second output will be disabled, hence it’s not
possible to connect them to any universe at that point.
LumenRadio AB 17

CRMX Stardust 2022-10-18
Streaming ACN
Streaming ACN (ANSI E1.31), or simply sACN, is a standard for transferring DMX-512 universes over IP
networks. The standard allows for up to 64,000 universes on the same IP network. Streaming ACN
supports, and most commonly uses, multicast allowing the protocol to work even if IP settings are not
set up properly. To configure Stardust to use sACN, the following parameter needs to be set:
•Universe (1-64000)
When using sACN with multicast, it is recommended to use network switches that has IGMP support
for scalability reasons if using many universes. It allows for the network switches to oload the devices
by taking care of the network traic to only send the data that each device wants.
ArtNet
ArtNet, developed by Artistic Licence Engineering Ltd, supports up to 32,768 universes being sent over
an IP network. Stardust supports ArtNet 4. The ArtNet universe is selected by setting the following
parameters:
•Net (0-127)
•SubNet (0-15)
•Universe (0-15)
ArtNet uses unicast and broadcast, this means that IP settings of the unit needs to be properly set up
for the protocol to work.
Data merging
Stardust tracks up to 4 data sources per output. Data is merged based on source priority, sourced with
equal priority is merged according to a HTP (highest takes precedence) policy where the highest value
for each DMX channel is used.
If using ArtNet, no priority is used.
Ethernet
Stardust has a built-in Ethernet interface. It can be configured for static IP, or to obtain IP automatically
from a DHCP server.
LumenRadio AB 18

CRMX Stardust 2022-10-18
Static IP
When configuring for static IP, you need to configure the following:
•IP
•Netmask
•Gateway (if no gateway exist, leave blank or set it to 0.0.0.0)
DHCP
By enabling DHCP your Stardust will obtain IP settings automatically if there is DHCP server available
on the network.
WiFi
The built-in WiFi can operate in either Access Point mode, or Client mode.
Access Point (AP mode)
In access point mode Stardust will create a WiFi network that your phone, tablet, etc could connect to.
This is handy for instance for iPad based lighting control apps, that can send data to Stardust directly
over WiFi.
In AP mode you need to do the following settings:
•SSID (the name of the network)
•Password
•IP settings
•DHCP (if the DHCP server shall be enabled or not)
Client mode
In client mode, the Stardust tries to connect to the specified WiFi network.
•SSID (the name of the network to join)
•Password
•IP settings (static or DHCP)
LumenRadio AB 19

CRMX Stardust 2022-10-18
Battery backup
Stardust comes with a built-in battery backup for uninterrupted operation. When fully charged, the
unit can operate for up to 20 minutes.
The device will automatically shut down when it detects the battery is reaching a level where normal
operaton is no longer assured.
Battery backup can be enabled or disabled.
Note: Battery backup is not available when the unit is configured for operation at 280mW output
power.
Turning the device o
When external power is plugged in, the unit will always be on. When operating from the built-in battery,
the unit can be turned o by selecting the Power o option in the main menu.
Charging the Battery
The battery will automatically charge whenever external power is connected to the device.
If the battery is completely depleted it takes approx two hours for it to fully charge.
LumenRadio AB 20
Seite wird geladen ...
Seite wird geladen ...
Seite wird geladen ...
-
 1
1
-
 2
2
-
 3
3
-
 4
4
-
 5
5
-
 6
6
-
 7
7
-
 8
8
-
 9
9
-
 10
10
-
 11
11
-
 12
12
-
 13
13
-
 14
14
-
 15
15
-
 16
16
-
 17
17
-
 18
18
-
 19
19
-
 20
20
-
 21
21
-
 22
22
-
 23
23


LumenRadio CRMX Benutzerhandbuch
- Kategorie
- Stroboskope
- Typ
- Benutzerhandbuch
in anderen Sprachen
- English: LumenRadio CRMX User manual
Verwandte Artikel
Andere Dokumente
-
ARRI SKYLINK Short Instruction
-
Chauvet Professional ONAIRPANEL1IP Benutzerhandbuch
-
EuroLite DMF-5 LED Hybrid Flower Effect Benutzerhandbuch
-
Litecraft BX.7 Benutzerhandbuch
-
-
Chauvet MAVERICK Referenzhandbuch
-
-
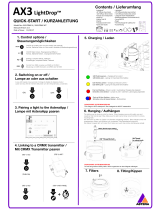 Astera LightDrop AX3 Series Quick Start
-
Astera Led Technology AX2 Benutzerhandbuch
-
Cameo OTOS® SP6 Benutzerhandbuch
