
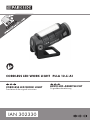
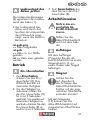
CORDLESS LED WORK LIGHT PLLA 12-Li A1
AKKU-LED-ARBEITSLICHT
Originalbetriebsanleitung
CORDLESS LED WORK LIGHT
Translation of the original instructions
IAN 302330

Before reading, unfold the page containing the illustrations and familiarise yourself with all
functions of the device.
Klappen Sie vor dem Lesen die Seite mit den Abbildungen aus und machen Sie sich
anschließend mit allen Funktionen des Gerätes vertraut.
GB / IE / NI Translation of the original instructions Page 4
DE / AT / CH Originalbetriebsanleitung Seite 18

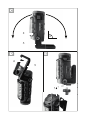
9
1
2 1110
12
3
4
5
5
6
6
14
7
13
78

4
GB IE NI
Introduction
Congratulations on the pur-
chase of your new device.
With it, you have chosen
a high quality product. Du-
ring production, this equip-
ment has been checked for
quality and subjected to a
nal inspection. The functio-
nality of your equipment is
therefore guaranteed.
The operating
instructions constitute
Content
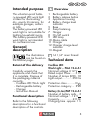
Introduction ..................4
Intended purpose ..........5
General description .......5
Extent of the delivery ......... 5
Functional description ........ 5
Overview......................... 5
Technical data ............... 5
Safety instructions .........6
Symbols and icons ............ 6
Safety notices for
battery-powered lamps ........ 7
Use and treatment of this
battery-powered tool ......... 7
Charging the battery ...10
Inserting/removing
the battery ..................... 11
Recharging the battery .... 11
Used batteries ................ 12
Checking the battery
charge level ................... 12 Translation of the original
EC declaration of confor-
mity ............................ 35
Operation ...................12
Switching ON and OFF ... 12
Working instructions ...12
Hanger .......................... 12
Magnet ......................... 13
Swivelling the battery-
powered LED work light ... 13
Snap fastening ............... 13
Tripod mount .................. 13
Maintenance ...............13
Cleaning .....................13
Storage .......................14
Disposal and protection
of the environment......14
Accessories .................14
Guarantee ..................15
Repair Service ............. 17
Service-Center ............. 17
Importer .....................17
part of this product. They
contain important informa-
tion on safety, use and
disposal. Before using the
product, familiarise yourself
with all of the operating
and safety instructions.
Use the product only as
described and for the
applications specied. Keep
this manual safely and in the
event that the product is
passed on, hand over all
documents to the third party.

5
GB IE NI
Intended purpose
This vibration-proof batte-
ry-powered LED work light
is ideal for illuminating
dry, poorly lit interiors, for
example garages, cellars
or lofts.
The battery-powered LED
work light is not suitable for
lighting household rooms.
This battery-powered LED
work light is not intended
for commercial use.
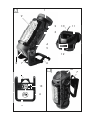
General
description
The illustrations
can be found on
the fold-out page..
Extent of the delivery
Carefully unpack the
appliance and check that
it is complete. Dispose of
the packaging material
correctly.
- Cordless LED Work Light
- Rechargeable battery
- Charger
- Instruction Manual
Functional description
Refer to the following
descriptions for a functional
description of the controls.
Overview
1 Rechargeable battery
2 Battery release button
3 Appliance housing
4 Battery charge level
indicator
5 Base
6 Snap fastening
7 Hanger
8 On/off switch
9 LED lamp
10 Mains cable
11 Charger
12 Charger charge level
indicator
13 Magnet
14 1/4” inner thread
Technical data
Cordless LED
Work Light ... PLLA 12-Li A1
Nominal voltage U 12 V
Rated output Pmax .....5 W
Number of lamps (LED) . 10
Light output............ 350 lm
Protection class ..........III
III
Protection category ... IP20
Battery (Li-Ion) PAP 12-Li A1
Number of battery cells... 3
Nominal voltage ....12 V
Capacity ................2,0 Ah
Charging time .approx. 1 h

6
GB IE NI
Recharger ......PLG 12-Li A1
Nominal
consumption ............ 40 W
Uptake voltage/
Input ... 220-240 V~, 50 Hz
Voltage output/
Output .........12 V 2,4 A
Protection class .......... II
Protection category ... IPX0
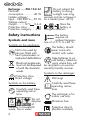
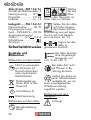
Safety instructions
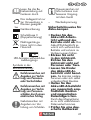
Symbols and icons
Symbols on the appliance:
Not to be used by
persons tted with
heart pacemakers or
implanted debrillators
Electrical appliances
must not be disposed
of with the domestic
waste.
III
Protection class
Direct voltage
Symbols on the battery:
Carefully read these
operating instruc-
tions.
Do not
dispose
of
batteries in household
waste, re or water.
Do not subject the
battery to strong
sunlight over long
periods and do not leave it
on a heater (max. 45°C).
Store the
battery in
charged condition
The battery
requires an
ambient tempera-
ture of +10°C to +40°C.
The battery should
never come into
contact with water.
Take batteries to an
old battery collection
point where they will
be recycled in an environ-
mentally friendly manner.
Symbols on the recharger:
Warning!
Carefully read these
operating instruc-
tions.
The recharger is for
indoor use only.
130°C
Miniature fuse
Protection class II
(double insulated)
T2A

7
GB IE NI
Electrical appliances
must not be disposed
of with the domestic
waste.
LED display while charging.
Symbols in the manual
Warning symbols
with information on
damage and injury
prevention.
Hazard symbol with
information on the
prevention of perso-
nal injury caused by
electric shock.
Instruction symbols
with information on
preventing damage
Help symbols with
information on impro-
ving tool handling.
~ Alternating voltage
Safety notices for
battery-powered lamps
• Do not cover the
battery-powered
LED work light when
in use. The battery-po-
wered LED work light
becomes hot during use
and can cause re.
• Do not look into the
light beam. Do not aim
the light beam at people
or animals.
• Do not allow chil-
dren to use the
battery-powered LED
work light. They could
inadvertently blind other
people or themselves.
• Keep the battery-po-
wered LED work light
away from magnet-
ically sensitive devices
and magnetic data
storage media. Due to
the magnet, there could be
irreversible data loss.
• Check that the batte-
ry powered LED work
light’s mounting is
solid. There is a risk of in-
jury if the battery-powered
LED work light falls down.
• The light source in this
lamp is not replacea-
ble; if the light source has
reached the end of its life,
then the whole lamp must
be replaced.
Use and treatment
of this battery-
powered tool
• Only recharge the
battery using char-
gers recommended

8
GB IE NI
by the manufacturer.
If a charger that has
been designed for
a particular type of
battery is used to
charge other batte-
ries, there is a risk
of re.
• Only use the battery
that is intended in
an electric tool. The
use of other batteries
may create a re
hazard and lead to
injury.
• When not in use,
keep batteries away
from paper clips,
coins, keys, nails,
screws or other
small metal objects
that could cause the
contacts to be brid-
ged. A short circuit
between battery
contacts can result in
burns or a re.
• When misused, uid
may leak from the
battery. Avoid any
contact with it. On
accidental contact,
wash in running
water. If the uid
comes into contact
with the eyes, seek
medical assistance
also. Leaking battery
uid can cause skin
irritation or burns.
Service
• Have your power
tool serviced by
a qualied repair
person using only
identical replace-
ment parts. This will
ensure that the safety
of the power tool is
maintained.
Special safety di-
rections for batte-
ry-operated tools
• Ensure that the de-
vice is switched off
before inserting the
battery. Inserting a
battery into a power tool
that is switched on may
result in accidents.
• bRecharge the bat-
teries indoors only
because the battery
charger is designed
for indoor use only.
• To reduce the elec-
tric shock hazard,
unplug the battery
charger from the
mains before clean-
ing the charger.
• Do not subject the
battery to strong
sunlight over long
periods and do not
leave it on a heater.
Heat damages the bat-

9
GB IE NI
tery and there is a risk of
explosion.
• Allow a hot battery to
cool before charging.
• Do not open up the
battery and avoid
mechanical damage
to the battery. Risk of
short circuit and fumes
may be emitted that irri-
tate the respiratory tract.
Ensure fresh air and seek
medical assistance in the
event of discomfort.
• Do not use non-re-
chargeable batteries!
Correct handling
of the battery
charger
• This appliance can
be used by children
aged from 8 years
and above and per-
sons with reduced
physical, sensory or
mental capabilities
or lack of experien-
ce and knowledge
if they have been
given supervision
or instruction con-
cerning use of the
appliance in a safe
way and understand
the hazards invol-
ved. Children shall
not play with the
appliance. Cleaning
and user maintenan-
ce shall not be made
by children without
supervision.
• Children should be
supervised to ensure
that they do not play
with the device.
• To charge the
battery, use only
the charger sup-
plied. Risk of re
and explosion. This
ensures that the safe-
ty of the device is
maintained.
• Before each use,
check the charg-
er, cable and plug
and have them
repaired by qual-
ied profession-
als and only with
original parts. Do
not use a defective
charger and do not
open it up yourself.
This ensures that the
safety of the device
is maintained.
• Connect the
charger only to
a socket with an
earth. Ensure that
the mains volt-
age matches the
specications on
the charger rat-
ing plate. Risk of
electric shock.

10
GB IE NI
• Keep the charger
clean and away
from wet and
rain. Do not use
the charger out-
doors. Dirt and
the entry of water
increase the risk of
electric shock.
• Operate the
charger only with
the appropriate
original batteries.
Charging other batter-
ies may result in inju-
ries and risk of re.
• Avoid mechan-
ical damage to
the charger. This
can result in internal
short circuits.
• Do not operate
the charger on a
combustible sur-
face (e.g. paper,
textiles). Risk of
re due to heating
during charging.
• If the power cable
for this equipment is
damaged, it must be
replaced by the man-
ufacturer, a customer
service agent of the
same or a similarly
qualied person in
order to prevent haz-
ards.
• The battery of the
appliance is not fully
charged at the time of
delivery. It therefore
needs to be fully re-
charged before you
use it for the rst time.
Slot the battery into
the base and plug the
battery charger into a
mains outlet.
• Remove the mains
plug when the battery
is fully charged and
disconnect the battery
from the charger.
• Do not use the
charger to charge
non-rechargeable
batteries.
Charging the
battery
Do not expose the
battery to extreme
conditions such
as heat or impact.
Risk of injury from
escaping electrolytic
solution! After eye/
skin contact, rinse the
affected areas with
water or a neutraliser
and consult a doctor.
Charge the battery in
a dry room only.
Prior to attaching the
charger, check that the
battery‘s outer surface
is clean and dry.

11
GB IE NI
There is a risk of
injury due to electric
shock.
Only use the original
charger from the
package to charge
the battery.
Make sure that the
mains supply voltage
matches the voltage
rating indicated on
the device‘s type plate
• Charge the battery befo-
re the rst time of use.
• If a fully recharged batte-
ry lasts for considerably
shorter operating times,
the battery is used up and
needs to be replaced.
Only use an OEM spare
battery available from our
Customer Service.
Inserting/
removing the
battery
1. To insert the battery (1),
place it on the guide
track and push it back
into the appliance. It will
audibly snap in.
2. To remove the battery
(1) from the appliance,
press the release buttons
(2) on the battery and
pull out the battery.
Recharging the
battery
Charging time is
approximately one
hour
1. Remove the battery (1)
from the appliance i
necessary.
2. Insert the battery (1) in
the charging compart-
ment of the battery
charger (11).
3. Plug the battery charger
(11) into a mains outlet.
4. When the battery is
fully recharged unplug
the battery charger (11)
from the mains.
5. Pull the battery (1) out of
the battery charger (11).
Overview of the LED indica-
tors on the charger (12):
Green LED lights up without
battery inserted:
Charger ready.
Green LED lights up:
Battery such alleged char-
ged.
Red LED lights up:
Battery charging.

12
GB IE NI
Used batteries
• If a fully recharged batte-
ry lasts for considerably
shorter operating times,
the battery is used up
and needs to be repla-
ced. Only use an OEM
battery pack replacement
available from our Custo-
mer Service.
• Always take heed of
the applicable safety
instructions as well as the
environmental protection
regulations and informa-
tion (see “Cleaning and
Maintenance”).
Checking the
battery charge
level
The battery’s (1) charge level is
indicated by the charge state
indicator (4).
• The LEDs indicate the
battery’s charge level,
when the device is in
operation.
red-yellow-green =>
Battery fully charged
red and yellow =>
Battery half charged
red =>
Battery needs to be charged
Operation
Switching ON
and OFF
1. To start, press the on/off
switch (8). The LED lamp
illuminates with maxi-
mum brightness.
2. To reduce the brightness,
hold down the on/off
switch (8) for about 3
seconds. To return to
maximum brightness,
press the on/off switch
(8) again for about 3
seconds.
3. To switch off, briey press
the on/off switch (8).
Working
instructions
Do not stare into the
battery-powered LED
work light when it is
switched on
Do not place the
battery-powered LED
work light on top of
the battery!
Hanger
Using the hanger (7), you
can attach the battery-po-
wered LED work light to an
object (e.g. onto a hook or
a nail).

13
GB IE NI
Magnet
Take care, because
sliding the batte-
ry-powered LED work
light can cause the
magnetic surface to
become scratched!
Using the magnets (13),
you can x the battery-po-
wered LED work lamp to
magnetic surfaces
The appliance housing
(3) with LED lamp can be
installed on the base (5) in
8 positions
Swivelling the
battery-powered
LED work light
The appliance housing
(3) with LED lamp can be
installed on the base (5) in
8 positions.
If you put the battery-po-
wered LED work light on a
non-magnetic surface, make
sure that it is in a stable
position. The 90º angle
shown in illustration
must not be exceeded.
Snap fastening
You can secure the batte-
ry-powered LED work light
using the snap fastening
(6) on the base (5). For
example, onto a belt loop,
a rope or similar
Tripod mount
Using the 1/4" inner thread
(14) you can screw the
battery-powered LED work
lamp onto a tripod (not
included in this package).
Maintenance
The battery-powered LED
work lamp is maintenance-
free
Cleaning
Before cleaning, dis-
connect the charger
from the mains
and switch off the
battery-powered LED
lamp.
• Clean the battery-powe-
red LED work lamp with
a soft, dry cloth to avoid
scratching the cover of
the LED lamp.
• Clean the charger and
the battery with a dry
cloth or with a paint

14
GB IE NI
brush. Do not use water
or metal objects.
• Do not use any abrasi-
ve cleaning agents or
solvents. These could
damage the device irre-
parably.
• Do not use water or me-
tallic aids. There is a risk
of a short circuit.
Storage
Avoid extreme cold or heat
during storage, so that the
battery does not lose per-
formance.
Before prolonged storage,
remove the battery from the
device and charge it fully.
Disposal and
protection of the
environment
Remove the battery from the
device and take the device,
battery, accessories and
packaging for environmen-
tally friendly recycling.
Machines do not
belong with domestic
waste.
Do not dispose of
batteries in hou-
sehold waste, re
(risk of explosion) or
water. Damaged bat-
teries may damage
the environment and
your health if toxic
fumes or liquids leak
out.
• Return the unit to a recy-
cling centre. The plastics
and metals in the unit can
be sorted and appropria-
tely recycled. Ask our
Service Centre for details.
• Dispose of batteries in
discharged condition.
We recommend covering
the pole with adhesive
tape to prevent a short
circuit. Do not open up
the battery.
• Dispose of batteries in
accordance with the local
regulations. Take batteries
to an old battery collec-
tion point where they will
be recycled in an environ-
mentally friendly manner.
For information about
this, ask your local waste
management company or
our service centre.
• Defective units returned to
us will be disposed of for
free.
Accessories
Accessories can be
obtained at
www.grizzly-service.eu

15
GB IE NI
If you do not have internet
access, please contact the
Service Centre via telepho-
ne (see “Service-Center”
Page 17).
Guarantee
Dear Customer,
This equipment is provided
with a 3-year guarantee
from the date of purchase.
The guarantee on the batte-
ry is 6 months from date of
purchase.
In case of defects, you have
statutory rights against the
seller of the product. These
statutory rights are not re-
stricted by our guarantee
presented below.
Terms of Guarantee
The term of the guarantee
begins on the date of pur-
chase. Please retain the
original receipt. This docu-
ment is required as proof of
purchase.
If a material or manufac-
turing defect occurs within
three years of the date of
purchase of this product,
we will repair or replace –
at our choice – the product
for you free of charge.
This guarantee requires the
defective equipment and
proof of purchase to be pre-
sented within the three-year
period with a brief written
description of what consti-
tutes the defect and when it
occurred.
If the defect is covered by
our guarantee, you will
receive either the repaired
product or a new product.
No new guarantee period
begins on repair or replace-
ment of the product.
Guarantee Period and
Statutory Claims for
Defects
The guarantee period is not
extended by the guarantee
service. This also applies
for replaced or repaired
parts. Any damages and
defects already present at
the time of purchase must
be reported immediately
after unpacking. Repairs
arising after expiry of
the guarantee period are
chargeable.
Guarantee Cover
The equipment has been
carefully produced in ac-
cordance with strict quality
guidelines and conscien-
tiously checked prior to
delivery.
The guarantee applies for
all material and manufac-
turing defects. This guar-
antee does not extend to

16
GB IE NI
cover product parts that are
subject to normal wear and
may therefore be consid-
ered as wearing parts or to
cover damage to breakable
parts.
This guarantee shall be
invalid if the product has
been damaged, used incor-
rectly or not maintained.
Precise adherence to all of
the instructions specied in
the operating manual is re-
quired for proper use of the
product. Intended uses and
actions against which the
operating manual advises
or warns must be categori-
cally avoided.
The product is designed
only for private and not
commercial use. The guar-
antee will be invalidated in
case of misuse or improper
handling, use of force, or
interventions not undertak-
en by our authorised ser-
vice branch.
Processing in Case of
Guarantee
To ensure efcient handling
of your query, please fol-
low the directions below:
• Please have the re-
ceipt and item number
(IAN302330) ready as
proof of purchase for all
enquiries.
• Please nd the item num-
ber on the rating plate.
• Should functional errors
or other defects occur,
please initially contact the
service department spec-
ied below by telephone
or by e-mail. You will
then receive further infor-
mation on the processing
of your complaint.
• After consultation with
our customer service, a
product recorded as de-
fective can be sent post-
age paid to the service
address communicated
to you, with the proof of
purchase (receipt) and
specication of what
constitutes the defect and
when it occurred. In or-
der to avoid acceptance
problems and additional
costs, please be sure
to use only the address
communicated to you.
Ensure that the consign-
ment is not sent carriage
forward or by bulky
goods, express or other
special freight. Please
send the equipment inc.
all accessories supplied
at the time of purchase
and ensure adequate,
safe transport packaging.

17
GB IE NI
Repair Service
For a charge, repairs
not covered by the
guarantee can be carried
out by our service branch,
which will be happy to is-
sue a cost estimate for you.
We can handle only equip-
ment that has been sent
with adequate packaging
and postage.
Attention: Please send your
equipment to our service
branch in clean condition
and with an indication of
the defect.
Equipment sent carriage
forward or by bulky goods,
express or other special
freight will not be accepted.
We will dispose of your
defective devices free of
charge when you send
them to us.
Service-Center
GB
Service
Great Britain
Tel.: 0800 404 7657
E-Mail:
IAN 302330
IE
NI
Service Ireland
Service
Northern Ireland
Tel.: 1890 930 034
(0,08 EUR/Min.,
(peak))
(0,06 EUR/Min.,
(off peak))
E-Mail: [email protected]
IAN 302330
Importer
Please note that the follow-
ing address is not a service
address. Please initially
contact the service centre
specied above.
Grizzly Tools
GmbH & Co. KG
Stockstädter Straße 20
63762 Großostheim
Germany
www.grizzly-service.eu

18
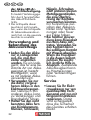
DE AT CH
Einleitung
Herzlichen Glückwunsch
zum Kauf Ihres neuen
Gerätes.
Sie haben sich damit für
ein hochwertiges Gerät
entschieden. Dieses Gerät
wurde während der Produk-
tion auf Qualität geprüft
und einer Endkontrolle
unterzogen. Die Funktions-
fähigkeit Ihres Gerätes ist
somit sichergestellt.
Inhalt
Einleitung ....................18
Bestimmungs ge mäße
Verwendung ................ 19
Allgemeine
Beschreibung ..............19
Lieferumfang .................. 19
Funktionsbeschreibung ..... 19
Übersicht ....................... 19
Technische Daten .........19
Sicherheits hinweise .....20
Symbole und Bildzeichen . 20
Sicherheitshinweise für
Akku-Lampen .................. 21
Verwendung und Behandlung
des Akkuwerkzeugs ........ 22
Ladevorgang ..............25
Akku entnehmen /
einsetzen ....................... 26
Akku auaden ................ 26
Verbrauchte Akkus .......... 26
Ladezustand
des Akkus prüfen ............ 27
Original EG-Konformi-
tätserklärung .............. 37
Betrieb ........................27
Ein-/Ausschalten ............. 27
Arbeitshinweise ..........27
Aufhänger ..................... 27
Magnet ......................... 27
Akku-LED-Arbeitslicht
schwenken ..................... 28
Schnapp verschluss .......... 28
Stativ-Gewinde ............... 28
Wartung .....................28
Reinigung ...................28
Lagerung ....................29
Entsorgung /
Umweltschutz .............29
Zubehör ......................29
Garantie .....................30
Reparatur-Service .......32
Service-Center ............. 32
Importeur ...................32
Die Betriebsanleitung
ist Bestandteil dieses
Gerätes. Sie enthält
wichtige Hinweise für
Sicherheit, Gebrauch und
Entsorgung. Machen Sie
sich vor der Benutzung des
Gerätes mit allen Bedien-
und Sicherheitshinweisen
vertraut. Benutzen Sie das
Gerät nur wie beschrieben
und für die angegebenen
Einsatzbereiche. Bewahren
Sie die Betriebsanleitung
gut auf und händigen Sie

19
CHATDE
alle Unterlagen bei
Weitergabe des Gerätes
an Dritte mit aus.
Bestimmungs ge-
mäße Verwendung
Das rüttelfeste Akku-LED-Ar-
beitslicht eignet sich zum
Ausleuchten trockener,
schlecht beleuchteter Innen-
bereiche, wie zum Beispiel
Garagen, Keller oder Dach-
böden.
Das Akku-LED-Arbeitslicht ist
nicht zur Raumbeleuchtung
im Haushalt geeignet.
Das Akku-LED-Arbeitslicht ist
nicht für den kommerziellen
Gebrauch geeignet.
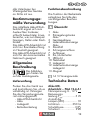
Allgemeine
Beschreibung
Die Abbildun-
gen nden Sie
auf der Ausklappseite.
Lieferumfang
Packen Sie das Gerät aus
und kontrollieren Sie, ob es
vollständig ist. Entsorgen
Sie das Verpackungsmate-
rial ordnungsgemäß.
- Akku-LED-Arbeitslicht
- Akku
- Ladegerät
- Betriebsanleitung
Funktionsbeschreibung
Die Funktion der Bedienteile
entnehmen Sie bitte den
nachfolgenden Beschrei-
bungen.
Übersicht
1 Akku
2 Entriegelungstasten
Akku
3 Gerätegehäuse
4 Ladezustandsanzeige
Akku
5 Standfuß
6 Schnappverschluss
7 Aufhänger
8 Ein-/Ausschalter
9 LED-Licht
10 Netzkabel
11 Ladegerät
12 Ladezustandsanzeige
Ladegerät
13 Magnet
14 1/4"-Innengewinde
Technische Daten
Akku-LED-
Arbeitslicht ... PLLA 12-Li A1
Nennspannung U .. 12 V
Bemessungs-
leistung P
max
...............5 W
Anzahl der
Lampen (LED) ............... 10
Lichtstrom .............. 350 lm
Schutzklasse .............. III
III
Schutzart ................. IP20

20
DE AT CH
Akku (Li-Ion) ...PAP 12-Li A1
Anzahl der Batteriezellen 3
Nennspannung ......12 V
Kapazität ...............2,0 Ah
Ladezeit ................ ca. 1 h
Ladegerät .......PLG 12-Li A1
Nennaufnahme ........40 W
Eingangsspannung/
Input ... 220-240 V~, 50 Hz
Ausgangsspannung/
Output .........12 V 2,4 A
Schutzklasse .............. II
Schutzart.................. IPX0
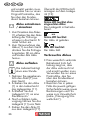
Sicherheits hinweise
Symbole und
Bildzeichen
Bildzeichen auf dem Gerät:
Nicht zu verwenden
von Personen mit
Herzschrittmachern
oder implantierten
Debrillatoren
Elektrogeräte ge-
hören nicht in den
Hausmüll.
III
Schutzklasse III
Gleichspannung
Bildzeichen auf dem Akku:
Betriebsanleitung
lesen!
Werfen
Sie den
Akku
nicht in den Hausmüll, ins
Feuer oder ins Wasser.
Setzen Sie den Akku
nicht über längere
Zeit starker Sonnen-
einstrahlung aus und legen
Sie ihn nicht auf Heizkör-
pern ab (max. 45 °C).
Lagern Sie den
Akku in
gelade nem Zustand
Der Akku benötigt
eine Umgebungs-
temperatur von
+10°C bis +40°C.
Der Akku darf nicht
mit Wasser in Be-
rührung kommen.
Geben Sie Akkus an
einer Altbatteriesam-
melstelle ab, wo sie
einer umweltgerechten
Wiederverwertung
zugeführt werden.
Bildzeichen auf dem
Ladegerät:
Achtung!
Seite wird geladen ...
Seite wird geladen ...
Seite wird geladen ...
Seite wird geladen ...
Seite wird geladen ...
Seite wird geladen ...
Seite wird geladen ...
Seite wird geladen ...
Seite wird geladen ...
Seite wird geladen ...
Seite wird geladen ...
Seite wird geladen ...
Seite wird geladen ...
Seite wird geladen ...
Seite wird geladen ...
Seite wird geladen ...
Seite wird geladen ...
Seite wird geladen ...
Seite wird geladen ...
Seite wird geladen ...
-
 1
1
-
 2
2
-
 3
3
-
 4
4
-
 5
5
-
 6
6
-
 7
7
-
 8
8
-
 9
9
-
 10
10
-
 11
11
-
 12
12
-
 13
13
-
 14
14
-
 15
15
-
 16
16
-
 17
17
-
 18
18
-
 19
19
-
 20
20
-
 21
21
-
 22
22
-
 23
23
-
 24
24
-
 25
25
-
 26
26
-
 27
27
-
 28
28
-
 29
29
-
 30
30
-
 31
31
-
 32
32
-
 33
33
-
 34
34
-
 35
35
-
 36
36
-
 37
37
-
 38
38
-
 39
39
-
 40
40


Parkside PLLA 12-Li A1 Translation Of The Original Instructions
- Typ
- Translation Of The Original Instructions
- Dieses Handbuch eignet sich auch für
in anderen Sprachen
- English: Parkside PLLA 12-Li A1
Verwandte Artikel
-
Parkside PDSSA 18 A1 Translation Of The Original Instructions
-
-
Parkside RAPIDFIRE 2.0 Translation Of The Original Instructions
-
-
-
Parkside PABSW10.8 B3 Original Instructions Manual
-
-
Parkside PAWS 3.6 A1 Bedienungsanleitung
-
-