Parkside PABS 18 A1 Operation and Safety Notes
- Kategorie
- Akku-Kombibohrer
- Typ
- Operation and Safety Notes
Dieses Handbuch ist auch geeignet für

PABS 18 A1
CORDLESS DRILL
Operation and Safety Notes
Translation of original operation manual
AKKU-BOHRSCHRAUBER
Bedienungs- und Sicherheitshinweise
Originalbetriebsanleitung

GB / IE / CY Operation and Safety Notes Page 5
DE / AT / CH Bedienungs- und Sicherheitshinweise Seite 15
Before reading, unfold the page containing the illustrations and familiarise yourself with all functions of the
device.
Klappen Sie vor dem Lesen die Seite mit den Abbildungen aus und machen Sie sich anschließend mit allen
Funktionen des Gerätes vertraut.

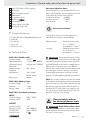
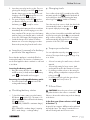
A B C
D
5
7
10
7
1211
6
1
2
3
4
9 8

5 GB/IE/CY
Table of contents
Introduction
Intended purpose ..........................................................................................................Page 6
Equipment Components ................................................................................................Page 6
Scope of delivery ..........................................................................................................Page 7
Technical Data ...............................................................................................................Page 7
General safety advice for electrical power tools .................. Page 7
1.
Workplace safety .....................................................................................................Page 8
2.
Electrical safety .........................................................................................................Page 8
3. Personal safety ..........................................................................................................Page 8
4.
Careful handling and use of electrical power tools ...............................................Page 9
5. Use and handling of the cordless electrical power tool .........................................Page 9
Safety advice relating to cordless drill drivers.............................................................Page 10
Attention - Service lines! ................................................................................................Page 10
Original ancillaries / accessories .................................................................................Page 10
Before first use
Charging the battery pack ...........................................................................................Page 10
Insertion / removal of a battery pack into the appliance ...........................................Page 11
Checking battery status ................................................................................................Page 11
Changing tools ..............................................................................................................Page 11
Torque pre-selection ......................................................................................................Page 11
2 Gear Drive .................................................................................................................Page 11
Preparing the tool for use
Switching ON /OFF ......................................................................................................Page 12
Adjusting the speed ......................................................................................................Page 12
Switching direction of rotation ......................................................................................Page 12
Tips and Tricks ...............................................................................................................Page 12
Cleaning and Maintenance ........................................................................Page 13
Service .........................................................................................................................Page 13
Warranty ................................................................................................................... Page 13
Disposal ......................................................................................................................Page 13
Declaration of Conformity / Manufacturer..................................Page 14

6 GB/IE/CY
Introduction
Cordless drill PABS 18 A1
Introduction
Before you use it for the first time, it is es-
sential that you make yourself fully familiar
with the functions of the appliance and
find out how to correctly handle electrically powered
tools. To do this, read the following operating instruc-
tions carefully. Retain these instructions for future
reference. Additionally, pass them on to whoever
might acquire the appliance at a future date.
Intended purpose
This appliance is designed for drilling and screwing
into wood, plastic and metal. Use the appliance only
as described and only for the purposes indicated.
Any other uses, and modifications to the appliance,
are deemed to be improper usage and may result
in serious physical injury. The manufacturer accepts
no responsibility for damage(s) resulting from
improper usage. The appliance is not intended for
commercial use.
Equipment Components
1
Gear selector switch
2
Button - Battery condition / Battery display LED
3
Direction of rotation switch / lock
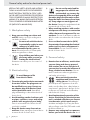
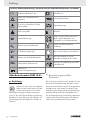
The following pictograms are used in these operating instructions / on the device:
Read instruction manual! Safety class II
Observe caution and safety notes! Drill chuck, Made In Germany
Caution – electric shock!
Danger to life!
Spindle lock
Explosive material! Drill setting (torque preselect)
W
Watts (Effective power)
Wear hearing protection, dust
protection mask, protective glasses
and protective gloves.
n
0
Design no-load speed
Keep children away from electrical
power tools!
V
~
Voltage For indoor use only!
Ah
Amp (Battery capacity)
Check that the device, mains lead
and plug are in good condition!
Nm
Newton metre (torque)
Dispose packaging and appliance in
an environmentally-friendly way!
DC (current and voltage type)

7 GB/IE/CY
Introduction / General safety advice for electrical power tools
4
ON / OFF Switch / R.P.M. regulator
5
Bit storage
6
Button for battery release
7
Battery pack
8
Torque pre-selector
9
Drill chuck
10
Fast charger
11
Green charge-control LED
12
Red charge-control LED
Scope of delivery
1 Cordless drill with rechargeable battery pack
1 Double bit
1 Fast charger
1 Carry case
1 Directions for use
Technical Data
PABS 18 A1 Cordless drill:
Nominal voltage: 18 V DC
Idle-running speed: 1st gear: max. -400min
-1
Idle-running speed: 2nd gear: max. 1300min
-1
Drill chuck
clamping range: max. 10 mm
Maximum
drill diameter: Steel: 10 mm,
Wood: 30 mm
Max. torque: 20 Nm
PABS 18 A1 Battery Pack:
Nominal voltage: 18 V
Capacity: 1.5 Ah
Energy content: 27 Wh
PABS 18 A1 Fast Battery Charger:
INPUT
Nominal voltage: 230 V
~
50 Hz
Nominal output: 70 W
OUTPUT
Nominal voltage: 18 V
Charging current max. 2600 mA
Charging time: approx. 60 min
Protection class: II /
Noise and vibration data:
Measured values for noise are determined in accor-
dance with EN 60745. The A-weighted noise level
of the electrical power tool are typically:
Sound pressure level: 66 dB(A)
Sound power level: 77 dB(A)
Uncertainty K: 3 dB
Wear ear protection!
Total vibration (vector sum of three directions) is
calculated in accordance with EN 60745:
Drilling in metal: Vibration emission value
a
h, D
= 1.944 m / s
2
,
uncertainty K = 1.5 m / s
2
,
Screwing: Vibration emission value
a
h
= 2.101 m / s
2
,
uncertainty K = 1.5 m / s
2
.
WARNING!
The vibration level given in these
instructions has been measured in accordance with
a standardised measurement procedure specified
in EN 60745 and can be used to compare devices.
Different uses of the device give rise to different
vibration levels and in many cases they may exceed
the values given in these instructions. It is easy to
underestimate the vibration load if the electrical
power tool is used regularly in particular circum
stances.
Note: If you wish to make an accurate assessment
of the vibration loads experienced during a particular
period of working, you should also take into account
the intervening periods of time when the device is
switched off or is running but is not actually in use.
This can result in a much lower vibration load over
the whole of the period of working.
General safety advice
for electrical power tools
WARNING!
Read all the safety advice
and instructions! Failure to observe the safety
advice and instructions may result in electric shock,
fire and / or serious injury.

8 GB/IE/CY
General safety advice for electrical power tools
KEEP ALL THE SAFETY ADVICE AND INSTRUC-
TIONS IN A SAFE PLACE FOR FUTURE REFER-
ENCE! THE TERM “ELECTRICAL TOOL” USED
IN THE SAFETY ADVICE REFERS TO ELECTRICAL
TOOLS POWERED BY MAINS ELECTRICITY (BY
MEANS OF A MAINS LEAD) AND ELECTRICAL
TOOLS POWERED BY RECHARGEABLE BATTER-
IES (WITHOUT A MAINS LEAD).
1. Workplace safety
a) Keep your working area clean and
well lit. Untidy or poorly lit working areas
can lead to accidents.
b)
Do not work with the device
in potentially explosive envi-
ronments in which there
are inflammable liquids, gases or
dusts. Electrical power tools create sparks,
which can ignite dusts or fumes.
c)
Keep children and other peo-
ple away while you are op-
erating the electrical tool.
Distractions can cause you to lose control of
the device.
2. Electrical safety
To avoid danger to life
from electric shock:
a)
The mains plug on the device must match
the mains socket. The plug must not
be modified in any way. Do not use
an adapter plug with devices fitted
with a protective earth. Unmodified
plugs and matching sockets reduce the risk of
electric shock.
b) Avoid touching earthed surfaces such
as pipes, radiators, ovens and refrig-
erators with any part of your body.
There is an increased risk of electric shock if
your body is earthed
.
c) Keep the device away from rain or
moisture. Water entering an electrical device
increases the risk of electric shock.
d)
Do not use the mains lead for
any purpose for which it was
not intended, e.g. to carry the
device, to hang up the device or to pull
the mains plug out of the mains socket.
Keep the mains lead away from heat,
oil, sharp edges or moving parts of
the device. Damaged or tangled mains leads
increase the risk of electric shock.
e) When working outdoors with an elec-
trical power tool always use extension
cables that are also approved for use
outdoors. The use of an extension cable suit-
able for outdoor use reduces the risk of electric
shock.
f) Use a residual current device (RCD)
for protection if operating the electrical
power tool in a moist environment is
unavoidable. The use of an RCD reduces
the risk of electric shock.
3. Personal safety
a) Remain alert at all times, watch what
you are doing and always proceed
with caution. Do not use the device if
you are tired or under the influence of
drugs, alcohol or medication. One mo-
ment of carelessness when using the device
can lead to serious injury.
b)
Wear personal protective
equipment and always wear
safety glasses. The wearing of
personal protective equipment such as dust
masks, non-slip safety shoes, safety helmets or
ear protectors, appropriate to the type of elec-
trical power tool used and work undertaken,
reduces the risk of injury.
c) Avoid unintentional operation of the
device. Check that the electrical power
tool is switched off before you connect
it to the mains, pick it up or carry it.
Accidents can happen if you carry the device
with your finger on the ON / OFF switch or with
the device switched on.
d) Remove any setting tools or spanners
before you switch the device on. A tool

9 GB/IE/CY
General safety advice for electrical power tools
or spanner left attached to a rotating part of a
device can lead to injury.
e) Avoid placing your body in an unnat-
ural position. Keep proper footing
and balance at all times. By doing this
you will be in a better position to control the
device in unforeseen circumstances.
f) Wear suitable clothing. Do not wear
loose clothing or jewellery. Keep your
hair, clothing and gloves clear of mov-
ing parts. Loose clothing, jewellery or long
hair can become trapped in moving parts.
g) If vacuum dust extraction and collection
devices are fitted do not forget to
check
that they are properly connected
and
correctly used. The use of these devices re-
duces the hazard presented by dust.
4. Careful handling and use of
electrical power tools
a) Do not overload the device. Always
use an electrical power tool that is
intended for the task you are under-
taking. By using the right electrical power
tool for the job you will work more safely and
achieve a better result.
b)
Do not use an electrical power tool if
its switch is defective. An electrical power
tool that can no longer be switched on and off
is dangerous and must be repaired.
c) Pull the mains plug out of the socket
before you make any adjustments to
the device, change accessories or
when the device is put away. This
precaution is intended to prevent you from un-
intentionally starting the device.
d) When not in use always ensure that
electrical power tools are kept out of
reach of children. Do not let anyone
use the device if he or she is not famil-
iar with it or has not read the instruc-
tions and advice. Electrical power tools are
dangerous when they are used by inexperi-
enced people.
e) Look after the device carefully. Check
that moving parts are working prop-
erly and move freely. Check for any
parts that are broken or damaged
enough to detrimentally affect the
functioning of the device. Have dam-
aged parts repaired before you use
the device. Many accidents have their origins
in poorly maintained electrical power tools.
f) Keep cutting tools clean and sharp.
Carefully maintained cutting tools with sharp
cutting edges are less likely to jam and are
easier to control.
g) Use the electrical power tool, accesso-
ries, inserted tools etc. in accordance
with these instructions and advice,
and the stipulations drawn up for this
particular type of device. In doing
this, take into account the working
conditions and the task in hand. The use
of electrical power tools for purposes other than
those intended can lead to dangerous situations.
5. Use and handling of the cord-
less electrical power tool
a) Charge a rechargeable battery unit
using only the charger recommended
by the manufacturer. Chargers are often
designed for a particular type of rechargeable
battery unit. There is the danger of fire if other
types of rechargeable battery units are used.
b) Only the rechargeable battery units
supplied are to be used with an elec-
trical power tool. The use of other recharge-
able battery units may lead to the danger of
injury or fire.
c) When they are not being used, store
rechargeable battery units away from
paperclips, coins, keys. nails, screws
or other small metal objects that could
cause the contacts to be bridged. Short-
circuiting the contacts of a rechargeable battery
unit may result in heat damage or fire.
d)
WARNING!
Fluids may leak out of
rechargeable battery units if they are
misused. If this happens, avoid contact
with the fluid. If contact occurs, flush
the affected area with water. Seek

10 GB/IE/CY
General safety advice for electrical power tools / Before first use
additional medical help if any of the
fluid gets into your eyes. Escaping battery
fluid may cause skin irritation or burns.
Safety advice relating
to cordless drill drivers
Securely support the workpiece. A workpiece
held in a clamp or vice is kept more securely in
place than one held by your hand.
WARNING!
POISONOUS DUSTS!
Harmful / noxious dusts generated from your
work represent a risk to the health of the person
operating the device and to anyone near the
work area.
Wear safety glasses and a dust
mask!
Do not drill any material containing
asbestos. Asbestos is a known carcinogen.
Hold the electrical power tool firmly.
High reaction torques may occur momentarily
during tightening or loosening of screws.
If the inserted tool jams, switch off the
electrical power tool immediately. Be
prepared for high reaction torques as they may
cause kickback. The inserted tool may jam if
the electrical power tool is overloaded or is
held at an angle to the workpiece.
WARNING!
The inserted tool may
strike concealed electricity cables,
therefore when working you must
hold the electrical power tool by the
insulated handle areas only. Contact
with a live wire means that the metal parts of
the electrical power tools may become live and
this can result in an electric shock.
Before you carry out any tasks on the
device, transport or store it, make
sure that the direction of rotation
switch is in the middle position (lock).
To prevent the device from starting up uninten-
tionally.
Attention - Service lines!
DANGER! Take steps to ensure that
you do not hit upon any service lines
(electricity, gas, water) when work-
ing with electrical appliances. Check, if
need be with a service line detector, before
you start to cut or bore into a surface.
Original ancillaries /
accessories
Use only the ancillaries and accessories
that are detailed in the operating
instructions. The use of ancillaries and ac-
cessories other than those recommended in the
operating instructions could lead to an in-
creased risk of personal injury for you.
Before first use
Charging the battery pack
WARNING!
DANGER OF ELECTRIC
SHOCK! Before cleaning or servicing the
charging station or the battery pack always
ensure that the plug is not in the mains socket.
Note! A new battery pack, or one that has not
been in use for an extended period, must be charged
up before the first / renewed usage.
The battery pack attains its full capacity after ca.
3-5 charging cycles.
CAUTION! Always ensure the plug is removed
from the mains socket before inserting a battery pack
into, or removing one from, the charging station.
Never charge the battery pack if the ambient
temperature is less than 10 °C or greater than
40 °C.
1. Insert the battery pack
7
into the quick-
charger
10
(see Fig. C).

11 GB/IE/CY
Before first use
2. Insert the power plug into the socket. The now
glowing red charging control LED
12
indicates
that the charging process has begun. The red
charging control LED
12
extinguishes as soon
as the battery pack is fully charged.
3. The green charging control LED
11
signals to
you that the charging process is complete and
the battery pack
7
is ready for service.
Never charge the battery pack for a second time
immediately after a fast charging process has
been completed. This can give rise to the battery
pack becoming overcharged and to a reduced
service life of the battery and charging station.
Switch the charger off for at least 15 minutes
between two successive charging procedures.
Remove the power plug from the wall socket.
Insertion / removal of a battery
pack into the appliance
Ensure that the appliance is switched off before
inserting the battery. The insertion of a battery into
an electrical appliance that is switched on can lead
to accidents.
Inserting the battery pack:
Bring the rotation direction switch
3
into the
middle position (Locked) and insert the battery
pack
7
into the handle until it engages.
Removing the rechargeable battery pack:
Press the release button
6
and remove the
rechargeable battery pack
Checking battery status
To check the battery status, press the battery
LED button
2
(see also Fig.). The status or re-
sidual capacity will be indicated in the battery
LED
2
as follows:
GREEN / RED / ORANGE = maximum charge /
capacity
RED / ORANGE = medium charge / capacity
RED = weak charge – recharge battery
Changing tools
Your cordless electric drill / screwdriver has a fully
automatic spindle lock
and is fitted with an
enclosed keyless chuck incorporating the latest
technology from
”Made in Germany”.
Once the motor has come to a halt, the drive shaft
is automatically locked, so that the chuck
9
can
be opened simply by turning it
.
After you have inserted the required bit and fixed it
in place by turning the chuck
, you can immedi-
ately continue working. The spindle lock releases
itself automatically when the motor is started (by
operation of the ON / OFF switch
4
).
Torque pre-selection
You can adjust the torque by using
8
torque pre-
selection. The torque levels regulate a range of up
to ca. 8 Nm.
Select a low setting for small screws, soft work
material.
Select a high setting for large screws, hard
work materials and for the extraction of screws.
For drilling, push the selector to the setting for
drilling, in that you adjust the torque pre-selector
to the position
.
For drilling tasks, also push the gear selector
switch
1
to the front (Position: 2).
2 Gear Drive
CAUTION! Move the gear selector switch
1
only after the device has come to a standstill.
Failure to observe this advice may result in damage
to the device.
In the first gear (Gear selector switch
1
in Position: 1)
A speed of up to approx. 400 rpm can be achieved
and a high torque. This setting is intended for use
with all screwing tasks and for accessories.

12 GB/IE/CY
Before first use / Preparing the tool for use
In the second gear (Gear selector switch
1
in Position: 2)
It achieves a speed of up to approx. 1300 rpm, for
the carrying out of drilling tasks.
Preparing the tool for use
Switching ON /OFF
Switching on:
To start the appliance squeeze on the ON /
OFF switch
4
and then keep it pressed down.
Switching off:
To stop the appliance, release the ON / OFF
switch
4
.
Adjusting the speed
The ON / OFF switch
4
has a variable speed
regulator.
The ON / OFF switch
4
has a variable speed
control device. Slight pressure on the ON / OFF
switch
4
will cause the rotation speed to slow down.
With increased pressure, the rotational speed will
increase.
Note: The integrated engine brake means that the
device will come to a fast standstill.
Switching direction of rotation
To switch the direction of rotation, push the
direction of rotation switch
3
to either the
right or to the left.
Tips and Tricks
Before you use the appliance, check to see
that the screw or drill bit is properly fitted, i.e.
located centrally in the chuck.
Screw bits are designated with their dimensions
and their shape. If you are unsure, always try
the particular screw bit out to see whether it sits
in the screw head without any free play.
Torque:
Smaller screws and bits in particular can be
easily damaged if you adjust the appliance
with too high a torque and/or rotation speed.
Hard screwdriving conditions (into metal):
Particularly high torques can occur, for example
with metal screws tightened by socket tool bits.
Select a lower rotation speed.
Soft screwdriving conditions (e.g. into
soft wood):
You should also select a low speed in order not
to damage the wood workpiece surface through
contact with the metal screw head. Use a coun-
tersinker.
When drilling into wood, metal and other
materials, take note of the following advice:
With small diameter drill bits use a high drill
speed. For large diameter drill bits, use a low
drill speed.
For hard materials, select a low drill speed.
For soft materials, select a high drill speed.
Secure or fix down the workpiece (if possible)
in a clamp or vice.
Mark the intended position of the hole with a
centre punch or a nail and select a low drill speed
for drilling.
Take the rotating drill bit out of the hole frequently
so that swarf or drill dust can be re-moved and
the hole and tool is ventilated.
Drilling in metal:
Use a metal drill bit (HSS). For the best results,
you should cool the bit with oil. Metal drill bits
can also be used to drill into plastic.
Drilling in stone:
Use a circular shafted masonry drill bit with a
hardened metal tip.
Drilling in wood:
Normally you should use a wood drill with a
centring point. For deep holes, use an auger type

13 GB/IE/CY
Preparing the tool … / Cleaning and Maintenance / Service / Warranty / Disposal
bit. For large diameter holes, use a forstner bit.
You can screw small screws into soft wood
without the need for pre-drilling.
Cleaning and Maintenance
CAUTION! Place the direction of rotation
switch
3
into the middle position before carry-
ing out any tasks on the device, e.g. changing
tools or maintenance, or before transporting or
storing the device. Inadvertent operation of the
ON / OFF switch
4
may result in injury.
Pull the mains lead out of the mains socket every
time and remove the battery before you clean or
maintain the device.
The Cordless drill is maintenance-free.
Always keep the device clean, dry and free of
oil or grease.
Clean the device immediately after you have
finished using it.
Do not allow any liquids to enter the device.
Use a cloth to clean the housing. Never use
petrol, solvents or cleaning agents that might
attack plastic.
Service
WARNING!
Have your device
repaired at the service centre or by
qualified specialist personnel using
original manufacturer parts only. This
will ensure that your device remains safe to use.
WARNING!
If the plug or lead needs
to be replaced, always have the
replacement carried out by the manu-
facturer or its service centre. This will
ensure that your device remains safe to use.
Warranty
The warranty for this appliance is for 3
years from the date of purchase. The ap-
pliance has been manufactured with care
and meticulously examined before deliv-
ery. Please retain your receipt as proof
of purchase. In the event of a warranty
claim, please make contact by telephone
with our Service Department. Only in this
way can a post-free despatch for your
goods be assured.
The warranty covers only claims for material and
maufacturing defects, but not for transport damage,
for wearing parts or for damage to fragile compo-
nents, e.g. buttons or batteries. This product is for
private use only and is not intended for commercial
use.
The warranty is void in the case of abusive and im-
proper handling, use of force and internal tamper-
ing not carried out by our authorized service branch.
Your statutory rights are not restricted in any way
by this warranty.
The warranty period will not be extended by repairs
made unter warranty. This applies also to replaced
and repaired parts. Any damage and defects extant
on purchase must be reported immediately after
unpacking the appliance, at the latest, two days after
the purchase date. Repairs made after the expiration
of the warranty period are subject to payment.
GB
DES UK LTD
Tel.: 0871 5000 700 (£ 0.10 / minute)
e-mail: [email protected]
IE
Kompernass Service Ireland
Tel: 1850 930 412 (0,082 EUR/Min.)
Standard call rates apply.
Mobile operators may vary.
e-mail: [email protected]
Disposal
The packaging comprises exclusively en-
vironmentally-friendly material. Dispose
of it in your local recycling containers.

14 GB/IE/CY
Disposal / Declaration of Conformity / Manufacturer
Do not dispose of electrical
appliances with your domestic
waste!
According to the European Directive 2002 / 96 / EC,
concerning used electrical and electronic appliances
and its implementation in national law, superannu-
ated electrical appliances must be collected and
disposed of via an environmentally suitable recy-
cling facility.
Do not dispose of rechargeable
batteries with your household
refuse!
Defective or worn out rechargeable batteries must
be recycled according to Directive 2006 / 66 / EC.
Dispose of batteries and appliances over the existing
collection facilities.
Your local communal or municipal authorities can
provide information on how to dispose of the worn
out appliance.
Declaration of Conformity /
Manufacturer
We, Kompernaß GmbH, the person responsible for
documents: Mr Dennis Dohm, Burgstr. 21,
D-44867 Bochum, Germany, hereby declare that
this product complies with the following standards,
normative documents and EU directives:
Machinery Directive
(2006 / 42 / EC)
EC Low Voltage Directive
(2006 / 95 / EC)
EMC (Electromagentic Compatibility)
(2004 / 108 / EC)
Applicable harmonized standards
EN 55014-1:2006
EN 55014-2:1997+A1
EN 61000-3-2:2006
EN 61000-3-3:1995+A1+A2
Type / Appliance Designation:
Cordless drill PABS 18 A1
Date of manufacture (DOM): 02 - 2010
Serial number: IAN 46462
Bochum, 28.02.2010
Hans Kompernaß
- Managing Director-
We reserve the right to make technical
modifications in the course of further development.

15 DE/AT/CH
Inhaltsverzeichnis
Einleitung
Bestimmungsgemäßer Gebrauch .................................................................................Seite 16
Ausstattung ....................................................................................................................Seite 17
Lieferumfang ..................................................................................................................Seite 17
Technische Daten ..........................................................................................................Seite 17
Allgemeine Sicherheitshinweise für Elektrowerkzeuge
1. Arbeitsplatz-Sicherheit ..............................................................................................Seite 18
2. Elektrische Sicherheit ................................................................................................Seite 18
3. Sicherheit von Personen ...........................................................................................Seite 18
4. Verwendung und Behandlung des Elektrowerkzeugs ............................................Seite 19
5. Verwendung und Behandlung des Akkuwerkzeugs ...............................................Seite 20
Sicherheitshinweise für Akku-Bohrschrauber ...............................................................Seite 20
Achtung Leitungen! .......................................................................................................Seite 20
Originalzubehör / -zusatzgeräte ..................................................................................Seite 20
Vor der Inbetriebnahme
Akku-Pack laden ............................................................................................................Seite 21
Akku-Pack ins Gerät einsetzen / entnehmen ................................................................Seite 21
Akkuzustand prüfen ......................................................................................................Seite 21
Werkzeuge wechseln....................................................................................................Seite 21
Drehmomentvor wahl .....................................................................................................Seite 22
2-Gang Getriebe ..........................................................................................................Seite 22
Inbetriebnahme
Ein- / Ausschalten...........................................................................................................Seite 22
Geschwindigkeit einstellen ...........................................................................................Seite 22
Drehrichtung umschalten ..............................................................................................Seite 22
Tipps und Tricks .............................................................................................................Seite 22
Wartung und Reinigung ...............................................................................Seite 23
Service .........................................................................................................................Seite 23
Garantie .....................................................................................................................Seite 23
Entsorgung ...............................................................................................................Seite 24
Konformitätserklärung / Hersteller ....................................................Seite 25

16 DE/AT/CH
Einleitung
Akku-Bohrschrauber PABS 18 A1
Einleitung
Machen Sie sich vor der ersten Inbetrieb-
nahme mit den Funktionen des Gerätes
vertraut und informieren Sie sich über
den richtigen Umgang mit Elektrowerkzeugen.
Lesen Sie die nachfolgende Bedienungsanleitung.
Bewahren Sie diese Anleitung auf. Händigen Sie
alle Unterlagen bei Weitergabe des Gerätes an
Dritte aus.
Bestimmungsgemäßer
Gebrauch
Dieses Gerät ist zum Bohren und Schrauben in Holz,
Kunststoff und Metall bestimmt. Benutzen Sie das
Gerät nur wie beschrieben und für die angegebenen
Einsatzbereiche. Jede andere Verwendung oder
Veränderung des Gerätes gilt als nicht bestimmungs-
gemäß und birgt erhebliche Unfallgefahren. Für
aus bestimmungswidriger Verwendung entstandene
Schäden übernimmt der Hersteller keine Haftung.
Nicht für den gewerblichen Einsatz bestimmt.
In dieser Bedienungsanleitung / am Gerät werden folgende Piktogramme verwendet:
Bedienungsanleitung lesen! Schutzklasse II
Warn- und Sicherheitshinweise
beachten!
Schnellspannbohrfutter
Vorsicht vor elektrischem Schlag!
Lebensgefahr!
Spindelarretierung
Explosionsgefahr! Bohrstufe
W
Watt (Wirkleistung)
Tragen Sie einen Gehörschutz, eine
Atem- / Staubschutzmaske, eine
Schutzbrille und Schutzhandschuhe.
n
0
Bemessungs-Leerlaufdrehzahl
Kinder vom Elektrowerkzeug
fernhalten!
V
~
Volt (Wechselspannung) Nur zur Verwendung in Innenräumen!
Ah
Ampere-Stunde (Akku-Kapazität)!
Auf Unversehrtheit von Gerät,
Netzkabel und Netzstecker achten!
Nm
Newtonmeter (Drehmoment)
Entsorgen Sie Verpackung und Gerät
umweltgerecht!
Gleichstrom
(Strom- und Spannungsart)

17 DE/AT/CH
Einleitung
Ausstattung
1
Gangwahlschalter
2
Taste Akkuzustand / Akku-Display-LED
3
Drehrichtungsumschalter / Sperre
4
EIN- / AUS-Schalter / Drehzahlregulierung
5
Bitgarage
6
Taste zur Entriegelung des Akkus
7
Akku-Pack
8
Drehmomentvorwahl
9
Schnellspannbohrfutter
10
Schnell-Ladegerät
11
Grüne Ladekontroll-LED
12
Rote Ladekontroll-LED
Lieferumfang
1 Akku-Bohrschrauber mit Akku-Pack
1 Doppelbit
1 Schnell-Ladegerät
1 Tragekoffer
1 Bedienungsanleitung
Technische Daten
PABS 18 A1 Akku-Bohrschrauber:
Nennspannung: 18 V DC
Leerlaufdrehzahl: 1. Gang: max. - 400 min
-1
Leerlaufdrehzahl: 2. Gang: max. 1300 min
-1
Bohrfutterspannbereich: max. 10 mm
Maximaler
Bohrdurchmesser: Stahl: 10 mm,
Holz: 30 mm
Max. Drehmoment: 20 Nm
PABS 18 A1-1 Akku-Pack:
Nennspannung: 18 V
Kapazität: 1,5 Ah
Energiegehalt: 27 Wh
PABS 18 A1-2 Schnell-Ladegerät:
EINGANG / INPUT
Nennspannung: 230 V
~
50 Hz
Nennleistung: 70 W
AUSGANG / OUTPUT
Nennspannung: 18 V
Ladestrom: max. 2600 mA
Ladedauer: ca. 60 min
Schutzklasse: II /
Geräusch- und Vibrationsinformationen:
Messwert für Geräusch ermittelt entsprechend
EN 60745. Der A-bewertete Geräuschpegel des
Elektrowerkzeugs beträgt typischerweise:
Schalldruckpegel: 66 dB(A)
Schallleistungspegel: 77 dB(A)
Unsicherheit K: 3 dB
Gehörschutz tragen!
Schwingungsgesamtwerte (Vektorsumme dreier
Richtungen) ermittelt entsprechend EN 60745:
Bohren in Metall: Schwingungsemissionswert
a
h, D
= 1,944 m / s
2
,
Unsicherheit K= 1,5 m / s
2
,
Schrauben: Schwingungsemissionswert
a
h
= 2,101 m / s
2
,
Unsicherheit K= 1,5 m / s
2
.
WARNUNG!
Der in diesen Anweisungen
angegebene Schwingungspegel ist entsprechend
einem in EN 60745 genormten Messverfahren
gemessen worden und kann für den Gerätevergleich
verwendet werden. Der Schwingungspegel wird
sich entsprechend dem Einsatz des Elektrowerk-
zeugs verändern und kann in manchen Fällen über
dem in diesen Anweisungen angegebenen Wert lie-
gen. Die Schwingungsbelastung könnte unter-
schätzt werden, wenn das Elektrowerkzeug regel-
mäßig in solcher Weise verwendet wird.
Hinweis: Für eine genaue Abschätzung der
Schwingungsbelastung während eines bestimmten
Arbeitszeitraumes sollten auch die Zeiten berück-
sichtigt werden, in denen das Gerät abgeschaltet
ist oder zwar läuft, aber nicht tatsächlich im Einsatz
ist. Dies kann die Schwingungsbelastung über den
gesamten Arbeitszeitraum deutlich reduzieren.

18 DE/AT/CH
Allgemeine Sicherheitshinweise für Elektrowerkzeuge
Allgemeine
Sicherheitshinweise
für Elektrowerkzeuge
WARNUNG!
Lesen Sie alle Sicherheits-
hinweise und Anweisungen. Versäumnisse
bei der Einhaltung der Sicherheitshinweise und
Anweisungen können elektrischen Schlag, Brand
und / oder schwere Verletzungen verursachen.
BEWAHREN SIE ALLE SICHERHEITSHINWEISE
UND ANWEISUNGEN FÜR DIE ZUKUNFT AUF.
DER IN DEN SICHERHEITSHINWEISEN VER-
WENDETE BEGRIFF „ELEKTROWERKZEUG“
BEZIEHT SICH AUF NETZBETRIEBENE ELEKTRO-
WERKZEUGE (MIT NETZKABEL) UND AUF AK-
KUBETRIEBENE ELEKTROWERKZEUGE (OHNE
NETZKABEL).
1. Arbeitsplatz-Sicherheit
a) Halten Sie Ihren Arbeitsbereich sauber
und gut beleuchtet. Unordnung und unbe-
leuchtete Arbeitsbereiche können zu Unfällen
führen.
b)
Arbeiten Sie mit dem Elektro-
werkzeug nicht in explosions-
gefährdeter Umgebung, in
der sich brennbare Flüssigkeiten, Gase
oder Stäube befinden. Elektrowerkzeuge
erzeugen Funken, die den Staub oder die
Dämpfe entzünden können.
c)
Halten Sie Kinder und andere
Personen während der Benut-
zung des Elektrowerkzeugs
fern. Bei Ablenkung können Sie die Kontrolle
über das Gerät verlieren.
2. Elektrische Sicherheit
Vermeiden Sie Lebensgefahr
durch elektrischen Schlag:
a) Der Anschlussstecker des Elektrowerk-
zeuges muss in die Steckdose passen.
Der Stecker darf in keiner Weise verän-
dert werden. Verwenden Sie keine
Adapterstecker gemeinsam mit
schutzgeerdeten Elektrowerkzeugen.
Unveränderte Stecker und passende Steckdosen
verringern das Risiko eines elektrischen Schlages.
b) Vermeiden Sie Körperkontakt mit ge-
erdeten Oberflächen, wie von Rohren,
Heizungen, Herden und Kühlschränken.
Es besteht ein erhöhtes Risiko durch elektrischen
Schlag, wenn Ihr Körper geerdet ist.
c)
Halten Sie Elektrowerkzeuge von Re-
gen oder Nässe fern. Das Eindringen von
Wasser in ein Elektrogerät erhöht das Risiko
eines elektrischen Schlages.
d)
Zweckentfremden Sie das
Kabel nicht, um das Elektro-
werkzeug zu tragen, aufzu-
hängen oder um den Stecker aus der
Steckdose zu ziehen. Halten Sie das
Kabel fern von Hitze, Öl, scharfen
Kanten oder sich bewegenden Gerä-
teteilen. Beschädigte oder verwickelte Kabel
erhöhen das Risiko eines elektrischen Schlages.
e) Wenn Sie mit einem Elektrowerkzeug
im Freien arbeiten, verwenden Sie nur
Verlängerungskabel, die auch für den
Außenbereich zugelassen sind. Die
Anwendung eines für den Außenbereich
geeigneten Verlängerungskabels verringert
das Risiko eines elektrischen Schlages.
f) Wenn der Betrieb des Elektrowerk-
zeuges in feuchter Umgebung nicht
vermeidbar ist, verwenden Sie einen
Fehlerstromschutzschalter. Der Einsatz
eines Fehlerstromschutzschalters vermindert
das Risiko eines elektrischen Schlages.
3. Sicherheit von Personen
a) Seien Sie stets aufmerksam, achten
Sie darauf, was Sie tun und gehen Sie
mit Vernunft an die Arbeit mit einem
Elektrowerkzeug. Benutzen Sie kein
Elektrowerkzeug, wenn Sie müde sind
oder unter dem Einfluss von Drogen,
Alkohol oder Medikamenten stehen.

19 DE/AT/CH
Allgemeine Sicherheitshinweise für Elektrowerkzeuge
Ein Moment der Unachtsamkeit beim Gebrauch
des Elektrowerkzeuges kann zu ernsthaften
Verletzungen führen.
b)
Tragen Sie persönliche Schutz-
ausrüstung und immer eine
Schutzbrille. Das Tragen persön-
licher Schutzausrüstung wie Staubmaske,
rutschfeste Sicherheitsschuhe, Schutzhelm oder
Gehörschutz, je nach Art und Einsatz des
Elektrowerkzeuges, verringert das Risiko von
Verletzungen.
c) Vermeiden Sie eine unbeabsichtigte
Inbetriebnahme. Vergewissern Sie
sich, dass das Elektrowerkzeug aus-
geschaltet ist, bevor Sie es an die
Stromversorgung anschließen, es auf-
nehmen oder tragen. Wenn Sie beim
Tragen des Elektrowerkzeuges den Finger am
Schalter haben oder das Gerät bereits einge-
schaltet an die Stromversorgung anschließen,
kann dies zu Unfällen führen.
d) Entfernen Sie Einstellwerkzeuge oder
Schraubenschlüssel, bevor Sie das
Elektrowerkzeug einschalten. Ein Werk-
zeug oder Schlüssel, der sich in einem drehenden
Geräteteil befindet, kann zu Verletzungen führen.
e) Vermeiden Sie eine abnormale Körper-
haltung. Sorgen Sie für einen sicheren
Stand und halten Sie jederzeit das
Gleichgewicht. Dadurch können Sie das
Elektrowerkzeug in unerwarteten Situationen
besser kontrollieren.
f) Tragen Sie geeignete Kleidung. Tragen
Sie keine weite Kleidung oder Schmuck.
Halten Sie Haare, Kleidung und Hand-
schuhe fern von sich bewegenden
Teilen. Lockere Kleidung, Schmuck oder lange
Haare können von sich bewegenden Teilen
erfasst werden.
g) Wenn Staubabsaug- und -auffangein-
richtungen montiert werden können,
vergewissern Sie sich, dass diese
angeschlossen sind und richtig ver-
wendet werden. Die Verwendung einer
Staubabsaugung kann Gefährdungen durch
Staub verringern.
4. Verwendung und Behandlung
des Elektrowerkzeugs
a) Überlasten Sie das Gerät nicht. Ver-
wenden Sie für Ihre Arbeit das dafür
bestimmte Elektrowerkzeug. Mit dem
passenden Elektrowerkzeug arbeiten Sie besser
und sicherer im angegebenen Leistungsbereich.
b) Benutzen Sie kein Elektrowerkzeug,
dessen Schalter defekt ist. Ein Elektro-
werkzeug, das sich nicht mehr ein- oder
ausschalten lässt, ist gefährlich und muss
repariert werden.
c) Ziehen Sie den Stecker aus der Steck-
dose und / oder entfernen Sie den Akku,
bevor Sie Geräteeinstellungen vor-
nehmen, Zubehörteile wechseln oder
das Gerät weglegen. Diese Vorsichtsmaß-
nahme verhindert den unbeabsichtigten Start
des Elektrowerkzeuges.
d) Bewahren Sie unbenutzte Elektrowerk-
zeuge außerhalb der Reichweite von
Kindern auf. Lassen Sie Personen das
Gerät nicht benutzen, die mit diesem
nicht vertraut sind oder diese Anwei-
sungen nicht gelesen haben. Elektrowerk-
zeuge sind gefährlich, wenn sie von unerfahrenen
Personen benutzt werden.
e) Pflegen Sie Elektrowerkzeuge mit
Sorgfalt. Kontrollieren Sie, ob beweg-
liche Teile einwandfrei funktionieren
und nicht klemmen, ob Teile gebrochen
oder so beschädigt sind, dass die Funk-
tion des Elektrowerkzeuges beeinträch-
tigt ist. Lassen Sie beschädigte Teile vor
dem Einsatz des Gerätes reparieren.
Viele Unfälle haben ihre Ursache in schlecht
gewarteten Elektrowerkzeugen.
f) Halten Sie Schneidwerkzeuge scharf
und sauber. Sorgfältig gepflegte Schneid-
werkzeuge mit scharfen Schneidkanten verklem-
men sich weniger und sind leichter zu führen.
g) Verwenden Sie Elektrowerkzeug,
Zubehör, Einsatzwerkzeuge usw.
entsprechend diesen Anweisungen.
Berücksichtigen Sie dabei die Arbeits-
bedingungen und die auszuführende

20 DE/AT/CH
Allgemeine Sicherheitshinweise für Elektrowerkzeuge
Tätigkeit. Der Gebrauch von Elektrowerkzeu-
gen für andere als die vorgesehenen Anwen-
dungen kann zu gefährlichen Situationen führen.
5. Verwendung und Behandlung
des Akkuwerkzeugs
a) Laden Sie die Akkus nur in Ladegeräten
auf, die vom Hersteller empfohlen
werden. Für ein Ladegerät, das für eine
bestimmte Art von Akkus geeignet ist, besteht
Brandgefahr, wenn es mit anderen Akkus
verwendet wird.
b) Verwenden Sie nur die dafür vorgese-
henen Akkus in den Elektrowerkzeugen.
Der Gebrauch von anderen Akkus kann zu
Verletzungen und Brandgefahr führen.
c) Halten Sie den nicht benutzten Akku
fern von Büroklammern, Münzen,
Schlüsseln, Nägeln, Schrauben oder
anderen kleinen Metallgegenständen,
die eine Überbrückung der Kontakte
verursachen könnten. Ein Kurzschluss zwi-
schen den Akkukontakten kann Verbrennungen
oder Feuer zur Folge haben.
d)
WARNUNG!
Bei falscher Anwen-
dung kann Flüssigkeit aus dem Akku
austreten. Vermeiden Sie den Kontakt
damit. Bei zufälligem Kontakt mit
Wasser abspülen. Wenn die Flüssigkeit
in die Augen kommt, nehmen Sie
zusätzlich ärztliche Hilfe in Anspruch.
Austretende Akkuflüssigkeit kann zu Hautrei-
zungen oder Verbrennungen führen.
Sicherheitshinweise für
Akku-Bohrschrauber
Sichern Sie das Werkstück. Ein mit Spannvor-
richtungen oder Schraubstock festgehaltenes
Werkstück ist sicherer gehalten als mit Ihrer Hand.
WARNUNG!
GIFTIGE
STÄUBE!
Die durch die Bearbeitung entstehenden
schädlichen / giftigen Stäube stellen eine
Gesundheitsgefährdung für die Bedienperson
oder in der Nähe befindliche Personen dar.
Tragen Sie Schutzbrille und
Staubmaske!
Bearbeiten Sie kein asbesthaltiges
Material. Asbest gilt als krebserregend.
Halten Sie das Elektrowerkzeug fest.
Beim Festziehen und Lösen von Schrauben kön
nen
kurzfristig hohe Reaktionsmomente auftreten.
Schalten Sie das Elektrowerkzeug so-
fort aus, wenn das Einsatzwerkzeug
blockiert. Seien Sie auf hohe Reaktionsmo
mente
gefasst, die einen Rückschlag verursachen. Das
Einsatzwerkzeug blockiert, wenn das Elektro-
werkzeug überlastet wird oder es im zu bear-
beitenden Werkstück verkantet.
WARNUNG!
Fassen Sie das Elektro-
werkzeug nur an den isolierten Griffflä-
chen an, wenn Sie Arbeiten ausführen,
bei denen das Einsatzwerkzeug ver-
borgene Stromleitungen treffen kann.
Kontakt mit einer spannungsführenden Leitung
setzt auch Metallteile des Elektrowerkzeuges
unter Spannung und führt zu einem elektrischen
Schlag.
Bei Arbeiten am Gerät, sowie Transport
bzw. Aufbewahrung bringen Sie den
Drehrichtungsumschalter in die Mittel-
position (Sperre). So verhindern Sie unbe-
absichtigtes Anlaufen des Elektrowerkzeuges.
Achtung Leitungen!
GEFAHR! Vergewissern Sie sich, dass
Sie nicht auf Strom-, Gas- oder Wasser-
leitungen stoßen, wenn Sie mit einem
Elektrowerkzeug arbeiten. Prüfen Sie
ggf. mit einem Leitungssucher, bevor Sie in eine
Wand bohren bzw. aufschlitzen.
Originalzubehör / -zusatzgeräte
Benutzen Sie nur Zubehör und Zusatz-
geräte, die in der Gebrauchsanweisung
angegeben sind. Der Gebrauch anderer als
in der Bedienungsanleitung empfohlener Ein-
satzwerkzeuge oder anderen Zubehörs kann
eine Verletzungsgefahr für Sie bedeuten.

21 DE/AT/CH
Vor der Inbetriebnahme
Vor der Inbetriebnahme
Akku-Pack laden
WARNUNG!
STROMSCHLAGGE-
FAHR! Ziehen Sie vor Reinigung und Wartung von
Ladegerät oder Akku-Pack immer den Netzstecker.
Hinweis! Ein neuer oder lange Zeit nicht genutzter
Akku-Pack muss vor der ersten / erneuten Benutzung
aufgeladen werden.
Seine volle Kapazität erreicht der Akku-Pack nach
ca. 3-5 Ladezyklen.
VORSICHT! Ziehen Sie immer den Netzstecker,
bevor Sie den Akku-Pack aus dem Ladegerät
nehmen bzw. einsetzen.
Laden Sie den Akku-Pack nie, wenn die
Umgebungstemperatur unterhalb 10 °C oder
oberhalb 40 °C liegt.
1. Setzen Sie den Akku-Pack
7
in das Schnell-
Ladegerät
10
ein (siehe Abb. C).
2. Stecken Sie den Netzstecker in die Steckdose.
Die nun leuchtende rote Ladekontroll-LED
12
zeigt den Beginn des Ladevorgangs an. Die
rote Ladekontroll-LED
12
erlischt, sobald der
Akku-Pack geladen ist.
3. Die grüne Ladekontroll-LED
11
signalisiert
Ihnen, dass der Ladevorgang abgeschlossen
und der Akku-Pack
7
einsatzbereit ist.
Laden Sie einen Akku-Pack niemals unmittelbar
nach dem Schnell-Ladevorgang ein zweites
Mal auf. Es besteht die Gefahr, dass der Akku-
Pack überladen und dadurch die Lebensdauer
von Akku und Ladegerät verringert wird.
Schalten Sie das Ladegerät zwischen aufeinan-
derfolgenden Ladevorgängen für mindestens
15 Minuten ab. Ziehen Sie dazu den Netzstecker.
Akku-Pack ins Gerät
einsetzen / entnehmen
Stellen Sie sicher, dass das Gerät ausgeschaltet ist,
bevor Sie den Akku einsetzen. Das Einsetzen eines
Akkus in ein Elektrowerkzeug, das eingeschaltet ist,
kann zu Unfällen führen.
Akku-Pack einsetzen:
Bringen Sie den Drehrichtungsumschalter
3
in
Position Sperre und lassen Sie den Akku-Pack
7
in den Griff einrasten.
Akku-Pack entnehmen:
Drücken Sie die Taste zur Entriegelung
6
und
entnehmen Sie den Akku-Pack.
Akkuzustand prüfen
Drücken Sie zum Prüfen des Akkuzustands
die Taste Akku-LED
2
(siehe auch Abb.). Der
Zustand bzw. die Restleistung wird in der Akku-
LED
2
wie folgt angezeigt:
GRÜN / ROT / ORANGE = maximale Ladung /
Leistung
ROT / ORANGE = mittlere Ladung / Leistung
ROT = schwache Ladung – Akku aufladen
Werkzeuge wechseln
Ihr Akku-Bohrschrauber hat eine vollautomatische
Spindelarretierung
und ist mit einem einhül-
sigen Bohrfutter „Made in Germany“ von
ausgestattet.
Beim Stillstand des Motors wird der Antriebsstrang
verriegelt, so dass Sie das Schnellspannbohrfutter
9
durch Drehen
öffnen können.
Nachdem Sie das gewünschte Werkzeug eingesetzt
und durch Drehen des Bohrfutters
festgespannt
haben, können Sie sofort weiter arbeiten. Die Spin-
delarretierung löst sich automatisch mit Starten des
Motors (Betätigung des EIN- / AUS-Schalters
4
).
Seite laden ...
Seite laden ...
Seite laden ...
Seite laden ...
Seite laden ...
-
 1
1
-
 2
2
-
 3
3
-
 4
4
-
 5
5
-
 6
6
-
 7
7
-
 8
8
-
 9
9
-
 10
10
-
 11
11
-
 12
12
-
 13
13
-
 14
14
-
 15
15
-
 16
16
-
 17
17
-
 18
18
-
 19
19
-
 20
20
-
 21
21
-
 22
22
-
 23
23
-
 24
24
-
 25
25


Parkside PABS 18 A1 Operation and Safety Notes
- Kategorie
- Akku-Kombibohrer
- Typ
- Operation and Safety Notes
- Dieses Handbuch ist auch geeignet für
in anderen Sprachen
- English: Parkside PABS 18 A1
Verwandte Papiere
-
Parkside PABS10.8-LI Bedienungsanleitung
-
-
Parkside PABS 18 A1 Operation and Safety Notes
-
Parkside A1 Benutzerhandbuch
-
Parkside PABS 10.8 C2 Operation and Safety Notes
-
-
-
Parkside PABS 16 B3-2 Operation and Safety Notes
-
-

