
MWG 746 H
Bedienungsanleitung/Garantie
Instruction Manual/Guarantee
Gebruiksaanwijzing/Garantie
Mode d’emploi/Garantie
Instrucciones de servicio/Garantía
Manual de instruções/Garantia
Istruzioni per l’uso/Garanzia
Instrukcja obsługi/Gwarancja
Mikrowelle mit Grill und Heißluftfunktion
Combined Microwave Oven with Grill and Hot Air
Magnetron met grill en heteluchtfunctie
Four à micro-ondes avec gril et chaleur traditionnelle
Microonda combinada con grill y aire caliente
Combi-microondas com grelha e ar quente
Microonde con griglia e funzione con aria calda
Uniwersalna kuchenka mikrofalowa z grillem i obiegiem gorącego powietrza
05-MWG 746 H EST 1 13.07.2005, 14:26:52 Uhr

2
DEUTSCH
Inhalt
Übersicht Bedienelemente ............................ Seite 3
Bedienungsanleitung..................................... Seite 4
Übersicht der Bedientasten ........................... Seite 5, 78
Technische Daten.......................................... Seite 11
Garantie......................................................... Seite 11
ENGLISH
Contents
Control element overview .............................. Page 3
Instruction Manual ......................................... Page 13
Controls ......................................................... Page 14, 78
Technical Data............................................... Page 20
Guarantee...................................................... Page 20
NEDERLANDS
Inhoud
Overzicht van de bedieningselementen..........Pagina 3
Gebruiksaanwijzing .....................................Pagina 22
Overzicht van de bedieningstoetsen............Pagina 23, 79
Technische gegevens...................................Pagina 29
Garantie.......................................................Pagina 29
FRANÇAIS
Sommaire
Liste des différents éléments de commande..... Page 3
Mode d’emploi ............................................... Page 31
Aperçu des touches de commande............... Page 32, 79
Données techniques...................................... Page 38
Garantie......................................................... Page 39
ESPAÑOL
Indice
Vista de conjunto Elementos de mando......Página 3
Instrucciones de servicio .............................Página 40
Vista general de las teclas de manejo.........Página 41, 80
Datos técnicos.............................................Página 48
Garantia.......................................................Página 48
PORTUGUÊS
Índice
Vista geral dos elemntos de comando ........Página 3
Manual de instruções ..................................Página 49
Vista geral das teclas de funcionamento.....Página 50, 80
Características técnicas ..............................Página 57
Garantía.......................................................Página 57
ITALIANO
Indice
Elementi di comando....................................Pagina 3
Istruzioni per l’uso........................................Pagina 58
Tabella dei tasti di controllo .........................Pagina 59, 81
Dati tecnici...................................................Pagina 65
Garanzia......................................................Pagina 65
JE˛ ZYK POLSKI
Spis tres´ci
Przegląd elemetów obsługi.......................... Strona 3
Instrukcja obsługi......................................... Strona 67
Przegląd przycisków obsługowych ..............Strona 68, 81
Dane techniczne..........................................Strona 75
Gwarancja ................................................... Strona 75
05-MWG 746 H EST 2 13.07.2005, 14:26:56 Uhr

3
Übersicht der Bedienelemente
Overview of the Components • Overzicht van de bedieningselementen
Liste des différents éléments de commande • Indicación de los elementos de manejo
Descrição dos elementos • Elementi di comando
Przegląd elementów obsługi
*) Achtung: Entfernen Sie keine montierten Teile aus
dem Garraum und von der Innenseite der Tür!
Bitte entfernen Sie in keinem Fall Folien auf der
Innenseite der Tür!
*) Caution: Do not remove any installed parts from in-
side the oven or anything from the inside of the door!
The foils on the inside of the door must not be
removed!
*) Let op: Verwijder géén vast gemonteerde onderde-
len uit de gaarruimte en niets van de binnenzijde van
de deur!
Verwijder in géén geval folie die op de binnenzij-
de van de deur is aangebracht!
*) Attention: Ne démontez jamais aucun pièce de
l’intérieur de l’appareil ni de l’intérieur de la porte!
N’enlevez en aucun cas les feuilles du côté intéri-
eur de la porte!
*) Atención: ¡No retire ningunas piezas montadas del
espacio interior de cocción o de la parte interior de la
puerta!
Se ruega no retirar de ninguna manera la hoja de
plástico que hay en la parte interior de la puerta.
*) Atenção: Não retire objectos montados no sítio para
cozer e na parte interior da porta!
Por favor não retire de qualquer maneira folhas
que se encontrem pegadas ao interior da porta!
*) Attenzione: non togliere pezzi montati nella camera
di cottura e dal lato interno dello sportello!
Non togliere mai pellicole dall’interno dello
sportello!
*) Uwaga: Proszę nie usuwać żadnych zamontowanych
części z komory kuchenki i niczego z wewnętrznej
strony drzwiczek!
W żadnym wypadku proszę nie usuwać folii na
wewnętrznej stronie drzwiczek!
05-MWG 746 H EST 3 13.07.2005, 14:26:57 Uhr

4
DEUTSCH
Allgemeine Sicherheitshinweise
• Lesen Sie vor Inbetriebnahme dieses Gerätes die Be-
dienungsanleitung sehr sorgfältig durch und bewahren
Sie diese inkl. Garantieschein, Kassenbon und nach
Möglichkeit den Karton mit Innenverpackung gut auf.
• Benutzen Sie das Gerät ausschließlich für den privaten
und den dafür vorgesehenen Zweck. Dieses Gerät
ist nicht für den gewerblichen Gebrauch bestimmt.
Benutzen Sie es nicht im Freien (außer es ist für den
bedingten Einsatz im Freien vorgesehen). Halten Sie
es vor Hitze, direkter Sonneneinstrahlung, Feuchtigkeit
(auf keinen Fall in Flüssigkeiten tauchen) und scharfen
Kanten fern. Benutzen Sie das Gerät nicht mit feuchten
Händen. Bei feucht oder nass gewordenem Gerät so-
fort den Netzstecker ziehen. Nicht ins Wasser greifen.
• Schalten Sie das Gerät aus und ziehen Sie immer den
Stecker aus der Steckdose (ziehen Sie am Stecker,
nicht am Kabel) wenn Sie das Gerät nicht benutzen,
Zubehörteile anbringen, zur Reinigung oder bei Stö-
rung.
• Betreiben Sie das Gerät nicht unbeaufsichtigt. Sollten
Sie den Arbeitsplatz verlassen, schalten Sie das Gerät
bitte immer aus, bzw. ziehen Sie den Stecker aus der
Steckdose (ziehen Sie am Stecker, nicht am Kabel).
• Um Kinder vor Gefahren elektrischer Geräte zu
schützen, sorgen Sie bitte dafür, dass das Kabel nicht
herunter hängt und Kinder keinen Zugriff auf das Gerät
haben.
• Prüfen Sie Gerät und Kabel regelmäßig auf Schäden.
Ein beschädigtes Gerät bitte nicht in Betrieb nehmen.
• Reparieren Sie das Gerät nicht selbst, sondern suchen
Sie bitte einen autorisierten Fachmann auf. Um Ge-
fährdungen zu vermeiden, ein defektes Netzkabel bitte
nur vom Hersteller, unserem Kundendienst oder einer
ähnlich qualifi zierten Person durch ein gleichwertiges
Kabel ersetzen lassen.
• Verwenden Sie nur Original-Zubehör.
• Beachten Sie bitte die nachfolgenden „Speziellen
Sicherheitshinweise...“.
Wichtige Sicherheitsanweisungen!
Bitte sorgfältig lesen und für den
weiteren Gebrauch aufbewahren.
• Warnung: Wenn die Tür oder die Türdichtungen
beschädigt sind, darf das Kochgerät nicht betrieben
werden, bevor es von einer dafür ausgebildeten Per-
son repariert worden ist.
• Warnung: Bitte reparieren Sie das Gerät auf keinen
Fall selbst, sondern suchen Sie einen autorisierten
Fachmann auf. Es ist für alle anderen, außer für einen
Fachmann, gefährlich, irgendwelche Wartungs- oder
Reparaturarbeiten auszuführen, die die Entfernung
einer Abdeckung erfordern, die den Schutz gegen
Strahlenbelastung durch Mikrowellenenergie sicher-
stellt.
• Warnung: Erwärmen Sie Flüssigkeiten oder andere
Speisen nicht in geschlossenen Behältern. Explosions-
gefahr!
• Warnung: Wenn das Gerät im Kombibetrieb betrieben
wird, dürfen Kinder wegen der vorkommenden Tempe-
raturen, das Gerät nur unter Aufsicht von Erwachse-
nen benutzen.
• Hinweis: Das Mikrowellengerät ist nicht zum Er-
wärmen/Erhitzen von lebenden Tieren vorgesehen.
• Warnung: Kindern und gebrechlichen Personen
dürfen die Benutzung des Kochgerätes ohne Aufsicht
nur erlaubt werden, wenn eine angemessene Anwei-
sung gegeben wurde, die die Personen in die Lage
versetzt, das Kochgerät in sicherer Weise zu benutzen
und die Gefahren falscher Bedienung zu verstehen.
• Möchten Sie Ihre Mikrowelle in einem Schrank, Regal
o. ä. unterbringen, achten Sie bitte darauf, dass Sie an
allen Seiten des Gerätes mindestens 10 cm Ventilati-
onsabstand zu Schränken, Wänden u.a. einhalten.
• Verwenden Sie nur geeignetes Geschirr wie:
Glas, Porzellan, Keramik, hitzebeständiges Kunststoff-
oder spezielles Mikrowellengeschirr.
• Beim Erwärmen oder Kochen von Speisen in brenn-
baren Materialien, wie Kunststoff- oder Papierbehäl-
ter, muss das Mikrowellenkochgerät häufi g wegen der
Möglichkeit einer Entzündung überwacht werden.
• Bei Rauchentwicklung ist das Gerät abzuschalten
und der Netzstecker zu ziehen. Halten Sie die Tür ge-
schlossen, um evtl. auftretende Flammen zu ersticken.
• Achtung Siedeverzug: Beim Kochen, insbesondere
beim Nacherhitzen von Flüssigkeiten (Wasser) kann es
vorkommen, das die Siedetemperatur zwar erreicht ist,
die typischen Dampfblasen aber noch nicht aufstei-
gen. Die Flüssigkeit siedet nicht gleichmäßig. Dieser
sogenannte Siedeverzug kann beim Entnehmen des
Gefäßes durch leichte Erschütterung zu einer plötzli-
chen Dampfblasenbildung und damit zum Überkochen
führen. Verbrennungsgefahr! Um ein gleichmäßiges
Sieden zu erreichen, stellen Sie bitte einen Glasstab
oder etwas Ähnliches, nichtmetallisches in das Gefäß.
• Der Inhalt von Babyfl äschchen und Gläsern mit Kin-
dernahrung muss umgerührt oder geschüttelt und die
Temperatur vor dem Verbrauch überprüft werden. Es
besteht Verbrennungsgefahr.
• Speisen mit Schale oder Haut, wie Eier, Würste,
geschlossene Glaskonserven usw. dürfen nicht in
Mikrowellenkochgeräten erwärmt werden, da diese
explodieren können, selbst wenn die Erwärmung durch
Mikrowellen beendet ist.
• Türrahmen/Türdichtung und benachbarte Teile müssen
bei Verschmutzung sorgfältig mit einem feuchten Tuch
gereinigt werden.
• Reinigen Sie das Mikrowellenkochgerät regelmäßig
und entfernen Sie Nahrungsmittelreste aus dem Innen-
raum.
• Bei mangelhafter Sauberkeit des Gerätes, kann es zu
einer Zerstörung der Oberfl äche kommen, welches die
Lebensdauer des Gerätes beeinfl usst und möglicher-
weise zu gefährlichen Situationen führt.
Beschreibung der Bedienelemente
1 Türverschluss
2 Sichtfenster*
3 Abdeckung*
4 Antriebsachse
5 Gleitring
6 Drehteller
7 Bedienblende
8 Grillheizung
9 Grillrost
Achtung: Entfernen Sie keine montierten Teile aus dem
Garraum und von der Innenseite der Tür!
Bitte entfernen Sie in keinem Fall Folien auf der
Innenseite der Tür!
05-MWG 746 H EST 4 13.07.2005, 14:26:58 Uhr

5
DEUTSCH
Übersicht der Bedientasten
Ziffern-Tasten
Zum Einstellen von Uhrzeit, Gardauer,
Temperatur und Gewicht
Taste Mikrowelle
Wahl der Leistungsstufen
Taste Grill
Zum Grillen und Überbacken
Taste Heißluft
Reiner Heißluftbetrieb,
Thermostat gesteuert
Taste Mikrowelle/Grill Kombibetrieb
Mikrowelle und Grill arbeiten abwechselnd
Taste Mikrowelle/Heißluft Kombibetrieb
Mikrowelle und Heißluft
arbeiten abwechselnd
Taste Auftauen
Aktiviert die Auftaufunktion
in Verbindung mit einer Zeiteinstellung
Taste Uhr
In Verbindung mit den Ziffern-Tasten
zum Einstellen der Uhrzeit
Programmtaste Kuchen
Taste Timer (Countdown)
Programmtaste Kartoffel
Programmtaste Popkorn
Programmtaste Getränke
Programmtaste Pizza
Programmtaste Fleischspieße
Programmtaste Aufwärmen
Taste Start
Start des Programms
Taste Express
Start des Expressprogramms –
Setzen der Express-Kochzeit
Taste Stopp
• Einmal drücken zum Stoppen des
Garvorgangs oder zum Löschen einer
falschen Eingabe.
• Zweimal drücken zum Löschen des
Programms.
• 3 Sekunden halten zum Sperren/
Entsperren des Gerätes
Hinweise zum Grill- und Kombibetrieb
• Da im Grill- und Kombibetrieb Strahlungshitze benutzt
wird, benutzen Sie bitte nur hitzebeständiges Ge-
schirr.
• Im reinen Grillbetrieb dürfen Sie auch Metall- oder
Alugeschirr benutzen – nicht jedoch bei Kombi- oder
Mikrowellenbetrieb.
• Für die Betriebsarten Grill, Pizza, Backen und Kombi
ist nur der Grillrost geeignet.
• Stellen Sie nichts auf die Oberseite des Gehäuses.
Diese wird heiß. Lassen Sie die Lüftungsschlitze
immer frei.
• Verwenden Sie bitte den Grillrost, um das Gargut
näher an das Heizelement heranzuführen.
Inbetriebnahme
• Entnehmen Sie alles im Garraum befi ndliche Zube-
hör, packen Sie es aus und legen Sie den Gleitring in
die Mitte. Positionieren Sie den Glasteller so auf der
Antriebsachse, das dieser in die Ausbuchtungen der
Antriebswelle einrastet und gerade aufl iegt.
• Kontrollieren Sie das Gerät auf sichtbare Schäden,
besonders im Bereich der Tür. Bei Schäden jeglicher
Art darf das Gerät auf keinen Fall in Betrieb genom-
men werden.
• Um beim Betrieb Störungen anderer Geräte zu
vermeiden, stellen Sie Ihr Gerät nicht in unmittelbarer
Nähe von anderen elektronischen Geräten auf.
• Entfernen Sie evtl. auf dem Gehäuse haftende
Schutzfolien.
• Bitte entfernen Sie in keinem Fall Folien auf der
Innenseite der Tür!
• Stecken Sie den Netzstecker in eine korrekt installier-
te Schutzkontaktsteckdose 230 V, 50 Hz.
• Entfernen Sie keine montierten Teile aus dem Gar-
raum und von der Innenseite der Tür!
Benutzung des Gerätes
Wissenswertes zum Mikrowellenbetrieb
• Ihr Gerät arbeitet mit Mikrowellenstrahlung, welche
Wasserteilchen in Speisen in sehr kurzer Zeit erhitzt.
Hier gibt es keine Wärmestrahlung und somit auch
kaum Bräunung.
• Erwärmen Sie mit diesem Gerät nur Lebensmittel.
• Das Gerät ist nicht zum Backen in schwimmendem
Fett geeignet.
• Erhitzen Sie nur 1-2 Portionen auf einmal. Das Gerät
verliert sonst an Effi zienz.
• Zur Unterbrechung des Garvorgangs drücken Sie die
Stopp-Taste.
• Mikrowellen liefern sofort volle Energie. Ein Vorheizen
ist somit nicht erforderlich.
• Betreiben Sie das Gerät im Mikrowellen- oder Kombi-
betrieb niemals leer.
• Der Mikrowellenherd ersetzt nicht Ihren herkömmli-
chen Herd. Er dient hauptsächlich zum:
• Auftauen von Tiefgekühltem/Gefrorenem
• Schnellen Erhitzen/Aufwärmen von Speisen oder
Getränken
• Garen von Speisen
• Bitte benutzen Sie kein Plastik- bzw. Papier-Geschirr.
05-MWG 746 H EST 5 13.07.2005, 14:26:59 Uhr

6
DEUTSCH
Bestätigungston
Ihre Eingaben am Gerät werden durch einen Signalton
bestätigt.
• Ein Signalton nach dem Drücken einer Taste:
Ihre Eingabe wird angenommen.
• Zwei Signaltöne nach dem Drücken einer Taste:
Die Eingabe wird verweigert.
Bitte nehmen Sie eine Korrektur der Einstellung vor.
Einstellen der Uhrzeit
Hinweis: Beim ersten Einschalten erscheint ein Doppel-
punkt blinkend.
1. Drücken Sie die Uhr-Taste.
Die Anzeige wechselt auf „:“.
2. Mit Hilfe der Ziffern-Tasten tragen Sie die gewünsch-
ten Stunden und die Minuten ein.
3. Drücken Sie erneut die Uhr-Taste. Die neue Uhrzeit
wird aktiviert.
Bedienung Mikrowelle
Geben Sie die zu erhitzende Speise in ein geeignetes
Geschirr. Öffnen Sie die Tür und stellen Sie das Gefäß
mittig auf den Glasteller. Türe bitte schließen. (Das Gerät
arbeitet aus Sicherheitsgründen nur mit fest geschlosse-
ner Tür).
1. Drücken Sie die Stopp-Taste.
2. Wählen Sie durch ein-/mehrmaliges Drücken der
Mikrowelle-Taste die gewünschte Mikrowellenleistung.
Drücken Sie, zum Auswählen der Prozentwerte,
die Mikrowelle-Taste
Drücken Sie: Leistung Beschreibung
1x 100% (P-HI) Volle Leistung
2x 90% (P-90)
3x 80% (P-80)
4x 70% (P-70) Hoch
5x 60% (P-60)
6x 50% (P-50) Mittel
7x 40% (P-40)
8x 30% (P-30) Niedrig
9x 20 % (P-20)
10x 10 % (P-10) Sehr niedrig
11x 0% (P-00)
100% entspricht 900 W
3. Mit Hilfe der Ziffern-Tasten tragen Sie die gewünschte
Gardauer ein.
Zum Beispiel:
10:30Min Gardauer auf 100% Leistung
Schritt Taste Anzeige
1 Stopp
2 Mikrowelle
P- HI
3 1 0 3 0
10:30
4Start
4. Drücken Sie zum Starten die Start-Taste. Die Gar-
dauer richtet sich nach Menge und Beschaffenheit
des Inhaltes. Bei etwas Übung lernen Sie schnell, die
Gardauer einzuschätzen.
Bitte beachten Sie:
Das Garen im Mikrowellenherd geschieht sehr viel
schneller als in einem Backofen. Stellen Sie die Gardau-
er, wenn Sie sich nicht sicher sind, gering ein und garen
Sie ggf. nach. Nach Ablauf der Zeit schaltet sich das
Gerät aus und im Display erscheint „END”. Entnehmen
Sie dann die Speise.
Schnelles Auftauen von Gefriergut
Bitte beachten Sie:
• Als Faustregel gilt, 500g Gefriergut benötigt ca.
5 Minuten zum Auftauen.
• Sollte innerhalb dieser Zeit das Gefriergut nicht
vollständig aufgetaut sein, stellen Sie die Zeit in 1-
Min.-Schritte ein.
Angenommen, Sie möchten gefrorene Lebensmittel
auftauen und die Zeit auf 5 Minuten einstellen:
1. Drücken Sie die Stopp-Taste.
2. Drücken Sie die Auftauen-Taste.
3. Mit Hilfe der Ziffern-Tasten tragen Sie die gewünschte
Gardauer ein.
Schritt Taste Anzeige
1 Stopp
2 Auftauen
:
3 5 0 0
5:00
4Start
4. Drücken Sie zum Starten die Start-Taste.
Falls das Gefriergut in einem Kunststoffbehälter einge-
froren war, empfehlen wir das Gefriergut kurz anzu-
tauen und dann in ein mikrowellengeeignetes Geschirr
umzufüllen.
Sie können zum Auftauen bis zu 99 Minuten plus 99 Se-
kunden einstellen. Nachdem die Zeit abgelaufen ist, ertö-
nen akustische Signale und das Wort „END“ erscheint im
Display. Drücken Sie die Stopp-Taste oder öffnen Sie die
Tür. Das Wort „END“ erlischt.
In der nachfolgenden Tabelle erhalten Sie Informationen
zum manuellen Auftauen.
Tabelle Auftauen
Lebensmittel/Speise Menge
Leistung
Watt
Zeit
ca. Min.
Nachtau-
zeit Min.
Fleisch, Wurstwaren
Fleisch (Rind, Kalb,
Schwein) am Stück
500 g
1000 g
180
180
14 – 18
25 - 30
10 – 15
20 - 25
Schnitzel, Kotelett 200 g 180 4 - 6 5 - 10
Hackfl eisch 250 g 180 6 - 8 5 - 10
Bratwurst, Bockwurst 200 g 180 4 - 6 5 - 10
Aufschnitt 300 g 180 4 - 6 5 - 10
Tipp: Nach halber Zeit Fleisch wenden, empfi ndliche Teile abdecken; Hack-
fl eisch zerteilen, bereits aufgetaute Teile entfernen; Wurstscheiben trennen
Gefl ügel
Hähnchen 1000 g 180 20 - 25 10 - 15
Hähnchenteile 500 g 180 12 - 15 5 - 10
Ente 1700 g 180 25 - 40 20 - 25
Gans-, Putenteile 500 g 180 12 - 18 10 - 15
Tipp: Gefl ügel nach halber Zeit wenden, Flügel und Keulen abdecken.
Achtung: Auftaufl üssigkeit wegschütten und nicht mit anderen Speisen in
Berührung bringen.
05-MWG 746 H EST 6 13.07.2005, 14:27:12 Uhr

7
DEUTSCH
Lebensmittel/Speise Menge
Leistung
Watt
Zeit
ca. Min.
Nachtau-
zeit Min.
Wild
Rehrücken 1000 g 180 20 - 35 20 - 30
Hasenrücken 500 g 180 12 - 13 10 - 20
Tipp: Einmal wenden, Randteile abdecken
Fisch
Krabben, Shrimps 250 g 180 5 - 7 5 - 10
Forelle 340 g 180 4 - 6 5 - 10
Fisch im Ganzen 500 g 180 7 - 10 10 - 15
Fischfi let 250 g 180 5 - 7 5 - 10
Tipp: Mehrmals wenden.
Obst
Himbeeren, Erdbeeren 250 g 180 4 - 6 5 - 10
Kirschen, Pfl aumen 250 g 180 5 - 7 5 - 10
Apfelmus 500 g 180 9 - 12 5 - 10
Tipp: Vorsichtig umrühren, bzw. zerteilen.
Gemüse: Siehe „Tabelle Garen“, „Gemüse auftauen und garen“
Brot und Gebäck
Brötchen 4 Stück 180 ca. 1-3 5
Brot 1000 g 180 13 - 15 8 - 10
Toastbrot 500 g 180 5 - 6 5 - 10
Rührkuchen 500 g 180 6 - 8 5 - 10
Obstkuchen 1 Stück 180 2 - 3 2 - 3
Torte
1 Stück 180 0,5 - 1 3 - 5
1200 g 180 10 - 12 30 - 60
Tipp: Brot und Gebäck auf Küchenkrepppapier legen, das die Feuchtigkeit
aufnimmt; empfi ndliches Gebäck nur antauen.
Milchprodukte
Butter 250 g 180 5 - 7 10 - 15
Quark 250 g 180 6 - 8 5 - 10
Sahne 200 g 180 3 - 5 2 - 3
Tipp: Alufolie entfernen, nach halber Zeit umrühren; Sahne noch halb
gefroren schlagen.
Erwärmen
Das Erwärmen und Erhitzen ist eine besondere Stärke
der Mikrowelle. Kühlschrankkalte Flüssigkeiten und Spei-
sen lassen sich sehr leicht auf Zimmertemperatur oder
Verzehrtemperatur bringen, ohne viele Töpfe benutzen
zu müssen.
Die in der folgenden Tabelle angegebenen Erhitzungs-
zeiten können nur Richtwerte sein, da die Zeit sehr stark
von der Ausgangstemperatur und der Zusammensetzung
der Speise abhängt. Es empfi ehlt sich deshalb, ab und zu
nachzusehen, ob das Gericht schon heiß genug ist.
Tabelle Erwärmen
Lebensmittel/Speise Menge
Leistung
Watt
Zeit
ca. Min.
Abdecken
Flüssigkeiten
Wasser, 1 Tasse 150 g 900 0,5 - 1 nein
Wasser, 0,5 l 500 g 900 3,5 - 5 nein
Wasser, 0,75 l 750 g 900 5 - 7 nein
Kaffee, 1 Tasse 150 g 900 0,5 - 1 nein
Milch, 1 Tasse 150 g 900 0,5 - 1 nein
Achtung: Einen Glasstab o. ä. (nichts metallisches) gegen Siedeverzug in
das Gefäß geben, vor dem Trinken gut umrühren.
Tellergerichte
Schnitzel + Kartoffeln und
Gemüse
450 g 900 2,5 - 3,5 ja
Gulasch mit Nudeln 450 g 900 2 - 2,5 ja
Fleisch + Kloß + Soße 450 g 900 2,5 - 3,5 ja
Tipp: Vorher leicht anfeuchten, zwischendurch umrühren.
Lebensmittel/Speise Menge
Leistung
Watt
Zeit
ca. Min.
Abdecken
Fleisch
Schnitzel, paniert 200 g 900 1 - 2 nein
Frikadellen, 4 Stück 500 g 900 3 - 4 nein
Bratenstück 250 g 900 2 - 3 nein
Tipp: Mit Öl bepinseln, damit die Panade bzw. die Kruste nicht aufweicht.
Gefl ügel
1/2 Hähnchen 450 g 900 3,5 - 5 nein
Hühnerfrikassee 400 g 900 3 - 4,5 ja
Tipp: Mit Öl bepinseln, zwischendurch umrühren.
Beilagen
Nudeln, Reis
1 Port. 150 g 900 1 - 2 ja
2 Port. 300 g 900 2,5 - 3,5 ja
Kartoffeln 500 g 900 3 - 4 ja
Tipp: Vorher leicht anfeuchten.
Suppen / Soßen
Klare Brühe, 1 Teller 250 g 900 1 - 1,5 ja
Suppe mit Einlagen 250 g 900 1,5 - 2 ja
Soße 250 g 900 1 - 2 ja
Babykost
Milch 100 ml 540 0,5 - 1 nein
Brei 200 g 540 1 - 1,5 nein
Tipp: Gut durchschütteln oder umrühren. Temperatur überprüfen!
Garen
Praktische Tipps zum Garen
Halten Sie sich an die Richtwerte in der Gartabelle und
den Rezepten. Beobachten Sie den Kochvorgang, solan-
ge Sie noch nicht soviel Übung haben.
Die Tür des Gerätes können Sie jederzeit öffnen. Das
Gerät schaltet automatisch ab.
Es arbeitet erst wieder, wenn die Tür geschlossen ist.
Lebensmittel aus dem Kühlschrank, benötigen eine etwas
längere Garzeit als solche mit Raumtemperatur.
Je kompakter eine Speise ist, desto länger ist die Garzeit.
So benötigt z.B. ein größeres Stück Fleisch eine längere
Garzeit als geschnetzeltes Fleisch gleicher Menge. Es
empfi ehlt sich, größere Mengen bei maximaler Leistung
anzukochen und für ein gleichmäßiges Garen auf mittle-
rer Leistung fortzukochen.
Flache Speisen und kleinere Mengen garen schneller
als hohe und große Mengen, die Lebensmittel daher
möglichst fl ach verteilen. Dünnere Teile, z.B. Hähn-
chenschenkel oder Fischfi let, nach innen legen oder
überlappen lassen.
Es gilt die Faustregel:
Doppelte Menge = fast doppelte Zeit
Halbe Menge = halbe Zeit
Wenn Sie für ein Gericht keine passende Zeitangabe
fi nden können, gilt die Regel:
pro 100 g ca. 1 Minute Garzeit
Alle Speisen, die Sie am Herd abdecken, sollten Sie auch
im Mikrowellengerät abdecken.
Ein Deckel verhindert, dass die Speisen austrocknen.
Zum Abdecken eignen sich ein umgedrehter Teller,
Pergamentpapier oder Mikrowellenfolie. Speisen, die eine
Kruste erhalten sollen, offen garen.
05-MWG 746 H EST 7 13.07.2005, 14:27:14 Uhr

8
DEUTSCH
Tabelle Garen
Lebensmittel/Speise Menge
Leistung
Watt
Zeit ca.
Min.
Abdecken
Gemüse
Auberginen 500 g 720 7 - 10 ja
Blumenkohl 500 g 720 8 - 11 ja
Brokkoli 500 g 720 6 - 9 ja
Chicoree 500 g 720 6 - 7 ja
Erbsen 500 g 720 6 - 7 ja
Fenchel 500 g 720 8 - 11 ja
Grüne Bohnen 300 g 720 13 - 15 ja
Kartoffeln 500 g 720 9 - 12 ja
Kohlrabi 500 g 720 8 - 10 ja
Lauch 500 g 720 7 - 9 ja
Maiskolben 250 g 720 7 - 9 ja
Möhren 500 g 720 8 - 10 ja
Paprika 500 g 720 6 - 9 ja
Rosenkohl 300 g 720 7 - 10 ja
Spargel 300 g 720 6 - 9 ja
Tomaten 500 g 720 6 - 7 ja
Zucchini 500 g 720 9 - 10 ja
Tipp: Gemüse kleinschneiden und mit 2 - 3 El Flüssigkeit garen, zwischen-
durch umrühren, 3 - 5 Min. nachgaren lassen, erst vor dem Servieren würzen.
Obst
Apfel-, Birnenkompott 500 g 720 5 - 8 ja
Pfl aumenmus 250 g 720 4 - 6 nein
Rhabarberkompott 250 g 720 5 - 8 ja
Bratäpfel, 4 Stück 500 g 720 7 - 9 ja
Tipp: 125 ml Wasser zufügen. Zitronensaft verhindert, dass das Obst sich
verfärbt, 3 - 5 Min. nachgaren lassen.
Fleisch (Bereits vorgefertigte Speisen)
Fleisch mit Soße 400 g 720 10 - 12 ja
Gulasch, Geschnetzeltes 500 g 720 10 - 15 ja
Rindsrouladen 250 g 720 7 - 8 ja
Tipp: Zwischendurch umrühren, 3 - 5 Min. ruhen lassen.
Gefl ügel (Bereits vorgefertigte Speisen)
Hühnerfrikassee 250 g 720 6 - 7 ja
Gefl ügelsuppe 200 g 720 5 - 6 ja
Tipp: Zwischendurch umrühren, 3 - 5 Min. ruhen lassen.
Fisch
Fischfi let
300 g 720 7 - 8 ja
400 g 720 8 - 9 ja
Tipp: Nach der Hälfte der Zeit wenden, 3 - 5 Min. nachgaren lassen.
Gemüse auftauen und garen
Apfelrotkohl 450 g 720 14 -16 ja
Blattspinat 300 g 720 11 - 13 ja
Blumenkohl 200 g 720 7 - 9 ja
Brechbohnen 200 g 720 8 - 10 ja
Brokkoli 300 g 720 8 - 9 ja
Erbsen 300 g 720 7 - 8 ja
Kohlrabi 300 g 720 13 -15 ja
Lauch 200 g 720 10 - 11 ja
Mais 200 g 720 4 - 6 ja
Möhren 200 g 720 5 - 6 ja
Rosenkohl 300 g 720 7 - 8 ja
Spinat
450 g 720 12 - 13 ja
600 g 720 15 - 17 ja
Tipp: Mit 1 -2 El Flüssigkeit garen, zwischendurch umrühren bzw. vorsichtig
zerteilen, 2 - 3 Min. nachgaren lassen, erst vor dem Servieren würzen.
Suppen / Eintöpfe (Bereits vorgefertigte Speisen)
Eintopf 500 g 720 13 - 15 ja
Suppe mit Einlage 300 g 720 7 - 8 ja
Crèmesuppe 500 g 720 13 - 15 ja
Tipp: Zwischendurch umrühren, 3 - 5 Min. nachgaren lassen.
Express Kochen
Zum Starten des Express-Kochens drücken Sie die
Express-Taste wiederholt. Der Garvorgang beginnt sofort,
wobei jedes weitere Drücken der Taste die Garzeit erst
um 30 Sekunden verlängert, ab einer Minute wird die
Gardauer um jeweils eine Minute verlängert.
Die Leistung der Mikrowelle beträgt dabei 100%.
Automatik-Programme
Mit Hilfe der Automatik können Sie bestimmte Mengen
von Speisen automatisch garen. Gardauer und Mikrowel-
lenleistung sind im Programm hinterlegt.
Gehen Sie dazu wie folgt vor:
a) Kartoffeln
1. Drücken Sie die Stopp-Taste.
2. Drücken Sie Taste „Kartoffel“ 1x für die Zubereitung
von 120-170g oder drücken Sie Taste „Kartoffel“
2x für die Zubereitung von 140-200g.
3. Drücken Sie eine Ziffern-Taste von 1-4, um eine
Gardauer auszuwählen.
Taste
“Kartoffel”
Ziffern-Taste Gardauer
1x 1 3min 50sek.
1x 2 7min 10sek
1x 3 11min
1x 4 14min
Taste
“Kartoffel”
Ziffern-Taste Gardauer
2x 1 5min 40sek.
2x 2 9min
2x 3 13min
2x 4 17min
4. Drücken Sie zum Starten die Start-Taste.
Nach Ablauf der Zeit schaltet sich das Gerät aus und
im Display erscheint „END“.
Tipp: Lassen Sie die Speise zum Nachgaren noch
5-10min im Ofen stehen.
b) Popkorn
Bitte nur Mikrowellen-Popcorn im Beutel verwenden!
1. Drücken Sie die Stopp-Taste.
2. Drücken Sie Taste „Popkorn“. Im Display erscheint
„2:30“.
3. Drücken Sie zum Starten die Start-Taste.
Nach Ablauf der Zeit schaltet sich das Gerät aus und
im Display erscheint „END“. Entnehmen Sie dann die
Speise.
Hinweis: Sie können die Gardauer ändern.
• Drücken Sie die Taste „Popkorn“ 2x.
• Tragen Sie mit den Ziffern-Tasten die neue Gardauer
ein.
• Drücken Sie die Start-Taste.
Die neue Gardauer bleibt gespeichert, bis sie erneut
geändert wird.
05-MWG 746 H EST 8 13.07.2005, 14:27:16 Uhr

9
DEUTSCH
c) Pizza
1. Drücken Sie die Stopp-Taste.
2. Drücken Sie Taste „Pizza“ 1x für das Aufwärmen
eines Stücks von 120-140g oder drücken Sie Taste
„Pizza“ 2x für das Aufwärmen eines größeren Stücks.
3. Drücken Sie zum Starten die Start-Taste.
Nach Ablauf der Zeit schaltet sich das Gerät aus und
im Display erscheint „END”. Entnehmen Sie dann die
Speise.
d) Fleischspieß
1. Drücken Sie die Stopp-Taste.
2. Drücken Sie Taste „Fleischspieße“ 1x für die Zuberei-
tung von kleineren Mengen oder drücken Sie Taste
„Fleischspieße“ 2x für die Zubereitung von größeren
Mengen.
3. Drücken Sie eine Ziffern-Taste von 1-4, um ein Garge-
wicht zu wählen.
(Taste „Fleischspieße“ 1x gedrückt)
Ziffern-Taste Gewicht Gardauer
1 120g 10min
2 200g 13min
3 400g 17min
4 600g 23min
(Taste „Fleischspieße“ 2x gedrückt)
Ziffern-Taste Gewicht Gardauer
1 170g 12min
2 310g 15min
3 540g 23min
4 800g 30min
4. Drücken Sie zum Starten die Start-Taste.
Nach Ablauf der Zeit schaltet sich das Gerät aus und
im Display erscheint „END“. Entnehmen Sie dann die
Speise.
e) Getränke
1. Drücken Sie die Stopp-Taste.
2. Drücken Sie Taste „Getränke“ 1x für die Erhitzung von
140-200g. Drücken Sie Taste „Getränke“ 2x für die
Erhitzung von 250-310g.
3. Drücken Sie eine Ziffern-Taste von 1-4, um eine
Aufwärmzeit auszuwählen.
Taste
“Getränke”
Ziffern-Taste Aufwärmzeit
1x 1 1min 20sek
1x 2 2min 30sek
1x 3 3min 40sek
1x 4 4min 50sek
Taste
“Getränke”
Ziffern-Taste Aufwärmzeit
2x 1 2min 20sek.
2x 2 4min
2x 3 5min 40sek
2x 4 7min 20sek
4. Drücken Sie zum Starten die Start-Taste.
Nach Ablauf der Zeit schaltet sich das Gerät aus und im
Display erscheint „END“. Entnehmen Sie dann die Speise.
f) Aufwärmen
1. Drücken Sie die Stopp-Taste.
2. Drücken Sie Taste „Aufwärmen“. Im Display erscheint
„3:40“.
3. Drücken Sie zum Starten die Start-Taste.
Nach Ablauf der Zeit schaltet sich das Gerät aus und im
Display erscheint „END“. Entnehmen Sie dann die Speise.
g) Kuchen
1. Drücken Sie die Stopp-Taste.
2. Drücken Sie Taste „Kuchen“. Im Display erscheint
„40:00“.
3. Drücken Sie zum Starten die Start-Taste.
Nach Ablauf der Zeit schaltet sich das Gerät aus und
im Display erscheint „END“. Entnehmen Sie dann die
Speise.
Hinweis: Sie können die Gardauer ändern.
• Drücken Sie die Taste „Kuchen“ 2x.
• Tragen Sie mit den Ziffern-Tasten die neue Gardauer
(bis 99:99) ein.
• Drücken Sie die Start-Taste.
Die neue Gardauer bleibt gespeichert, bis sie erneut
geändert wird.
Grill
Zum Grillen benutzen Sie bitte den Grillrost, um eine
schnelle und gleichmäßige Bräunung zu erzielen.
Verwenden Sie ein geeignetes hitzebeständiges Geschirr
oder legen Sie das Grillgut direkt auf den Grillrost.
Große, dicke Lebensmittel werden direkt auf dem Dreh-
teller gegrillt!
Zum Grillen und Überbacken gehen Sie wie folgt vor:
1. Drücken Sie die Stopp-Taste.
2. Drücken Sie die Grill-Taste 1x.
3. Mit Hilfe der Ziffern-Tasten tragen Sie die gewünschte
Grilldauer ein.
4. Drücken Sie zum Starten die Start-Taste.
Nach Ablauf der Zeit schaltet sich das Gerät aus und
im Display erscheint „END“. Entnehmen Sie dann die
Speise.
Mikrowelle/Grill-Kombibetrieb
In diesen Einstellungen arbeiten Mikrowelle und Grill
abwechselnd innerhalb der vorgewählten Zeit nach dem
Verhältnis:
Kombination 1
30% der Garzeit
Mikrowelle
70% der Garzeit
Grill
Kombination 2
55% der Garzeit
Mikrowelle
45% der Garzeit
Grill
Wenn Sie Speisen im Kombibetrieb Mikrowelle-Grill zube-
reiten, sollten Sie folgendes beachten:
Für große, dicke Lebensmittel, wie z.B. Schweinebraten,
ist die Mikrowellenzeit entsprechend länger als für kleine,
fl ache Lebensmittel. Beim Grill verhält es sich jedoch um-
gekehrt. Je näher das Lebensmittel an den Grill gelangt,
desto schneller wird es braun. Das heißt, wenn Sie große
Bratenstücke im Kombibetrieb zubereiten, ist die Grillzeit
gegebenenfalls kürzer als für kleinere Bratenstücke.
05-MWG 746 H EST 9 13.07.2005, 14:27:18 Uhr

10
DEUTSCH
Gehen Sie dazu wie folgt vor:
1. Drücken Sie die Stopp-Taste.
2. Drücken Sie Taste „Mikrowelle/Grill“ 1x für den Kombi-
nationsbetrieb 1. Drücken Sie Taste „Mikrowelle/Grill“
2x für den Kombinationsbetrieb 2.
3. Mit Hilfe den Ziffern-Tasten geben Sie die gewünschte
Gardauer ein.
4. Drücken Sie zum Starten die Start-Taste.
Nach Ablauf der Zeit schaltet sich das Gerät aus und
im Display erscheint „END“. Entnehmen Sie dann die
Speise.
Tabelle Mikrowelle/Grill-Kombibetrieb
Lebensmittel/Speise Menge
Zeit ca.
Min.
Ab-
decken
Fleisch, Wurstwaren
Rind-, Schwein oder
Kalbfl eisch im Stück
500 g
750 g
10 - 12
12 - 15
nein
nein
Kasseler 500 g 12 - 14 nein
Hackbraten 500 g 13 - 15 nein
Wiener Würstchen 200 g 2 - 3 nein
Bockwurst 200 g 2 - 3 nein
Tipp: Fleisch nach der Hälfte der Zeit wenden, 5 – 10 Min. nachgaren
lassen; Hackbraten mit Eiklar bestreichen; Würstchen mit einer Gabel
anstechen.
Gefl ügel
Suppenhuhn 1000 g 13 - 15 nein
Hähnchenteile 250 g 4 - 5 nein
Tipp: Ohne Flüssigkeit im eigenen Saft garen lassen, einmal wenden,
4 - 5 Min. nachgaren lassen.
Fisch
Forelle, blau 300 g 5 - 6 nein
Fischfi let 300 g 3 - 4 nein
Tipp: Nach der Hälfte der Zeit wenden, 3 - 5 Min. nachgaren lassen.
Bedienung im reinen Heißluft Betrieb
Während des Kochens mit Heißluft zirkuliert die heiße
Luft im Garraum. Dadurch werden die Speisen schneller
gebräunt und knuspriger. Im Heißluftbetrieb können Sie
bis zu 10 unterschiedliche Temperaturen wählen.
Kochen mit Heißluft
Angenommen, Sie möchten bei 180°C, 40 Minuten
garen, dann gehen Sie wie folgt vor:
1. Drücken Sie die Stopp-Taste.
2. Drücken Sie die Taste „Heißluft“.
3. Mit einer der Ziffern-Tasten (z. B. 8) wählen Sie die
gewünschte Gartemperatur aus.
4. Mit Hilfe der Ziffern-Tasten tragen Sie die gewünschte
Gardauer (z. B. 40min) ein.
Schritt Taste Anzeige
1 Stopp
2 Heißluft
38
1 80
44 0
H:40
5Start
5. Drücken Sie zum Starten die Start-Taste.
Bitte beachten Sie:
• Maximal können 9 Stunden, 99 Minuten programmiert
werden. Nachdem die Zeit abgelaufen ist, ertönen
akustische Signale und das Wort „END“ erscheint im
Display. Drücken Sie die Stopp-Taste oder öffnen Sie
die Tür. Das Wort „END“ erlischt.
• Sie können während des Kochens mit Heißluft die
Temperatur kontrollieren, indem Sie die Heißluft-Taste
drücken.
Vorheizen und Kochen mit Heißluft
Sie können Ihr Mikrowellengerät im Heißluftbetrieb vor-
heizen und dann die Heißluft einsetzen.
Angenommen Sie möchten das Gerät auf 170°C vorhei-
zen und anschließend für 35 Minuten garen:
1. Drücken Sie die Stopp-Taste.
2. Drücken Sie die Heißluft-Taste.
3. Mit einer der Ziffern-Tasten (z. B. 7) wählen Sie die
gewünschte Vorheiztemperatur aus.
4. Drücken Sie die Start-Taste. Im Display blinkt die
Anzeige „PREH“ (Vorheizen). Erreicht der Ofen die
programmierte Temperatur, leuchtet die Anzeige
„PREH“ kontinuierlich.
5. Öffnen Sie bitte die Tür und stellen Sie Ihr Gargut auf
die Mitte des Drehtellers.
6. Mit Hilfe der Ziffern-Tasten tragen Sie die gewünschte
Gardauer (z. B. 35min) ein.
7. Drücken Sie zum Starten die Start-Taste.
Nach Ablauf der Zeit schaltet sich das Gerät aus und
im Display erscheint „END”. Entnehmen Sie dann die
Speise.
Kombiniertes Nutzen
von Heißluft und Mikrowelle
Das Gerät hat hierzu vier vorprogrammierte Einstellun-
gen. Dies vereinfacht es Ihnen, sowohl mit Heißluft als
auch mit der Mikrowellenfunktion zu arbeiten.
Drücken Sie bitte die Mikrowelle/Heißluft-Taste und dann
eine Ziffern-Taste von 1-4, um die Heißlufttemperatur
auszuwählen.
Taste
Ziffern-
Taste
Temperatur (°C)
Mikrowelle/Heißluft 1 150
Mikrowelle/Heißluft 2 180
Mikrowelle/Heißluft 3 200
Mikrowelle/Heißluft 4 230
Möchten Sie, um einen Kuchen auf 200°C zu backen,
eine Zeit von 25 Minuten einstellen:
1. Drücken Sie die Stopp-Taste.
2. Drücken Sie bitte die Mikrowelle/Heißluft-Taste.
3. Mit einer der Ziffern-Tasten (z. B. 3) wählen Sie die
gewünschte Temperatur (200°C) aus.
4. Mit Hilfe der Ziffern-Tasten tragen Sie die gewünschte
Gardauer (z. B. 25min) ein.
5. Drücken Sie zum Starten die Start-Taste.
Bitte beachten Sie:
Maximal können 9 Stunden, 99 Minuten programmiert
werden. Nachdem die Zeit abgelaufen ist, ertönen akus-
tische Signale und das Wort „END“ erscheint im Display.
05-MWG 746 H EST 10 13.07.2005, 14:27:19 Uhr

11
DEUTSCH
Drücken Sie die Stopp-Taste oder öffnen Sie die Tür. Das
Wort „END“ erlischt.
Sie können während des Kochens mit Heißluft die Tem-
peratur kontrollieren, indem Sie die Mikrowelle/Heißluft-
Taste drücken.
Kochen in mehreren Schritten
Sie können die Programme so einstellen, dass Sie die
Möglichkeit haben 3 verschiedene Funktionen zu wählen.
Nehmen wir an Sie wählen das folgende Programm zum
Kochen:
Schnelles Auftauen
쒆
Zubereiten in der Mikrowelle
쒆
Kochen mit Heißluft (ohne Vorheizen)
1. Drücken Sie die Stopp-Taste.
2. Drücken Sie die Auftauen-Taste.
3. Mit Hilfe der Ziffern-Tasten tragen Sie die gewünschte
Auftaudauer ein.
4. Drücken Sie die Mikrowelle-Taste.
5. Mit Hilfe der Ziffern-Tasten tragen Sie die gewünschte
Mikrowellen-Gardauer ein.
6. Drücken Sie die Heißluft-Taste.
7. Mit einer der Ziffern-Tasten wählen Sie die gewünsch-
te Gartemperatur aus.
8. Mit Hilfe den Ziffern-Tasten tragen Sie die gewünschte
Heißluft-Gardauer ein.
9. Drücken Sie zum Starten die Start-Taste.
Nach Ablauf der Zeit schaltet sich das Gerät aus und
im Display erscheint „END“. Entnehmen Sie dann die
Speise.
Sonderfunktionen
Automatische Erinnerung
Nach Beenden eines Garvorgangs werden Sie alle 2
Minuten durch einen Signalton aufgefordert, die Speise
zu entnehmen.
Durch Öffnen der Tür oder Drücken der Stopp-Taste wird
diese Erinnerung ausgeschaltet.
Sperren
Drücken Sie die Stopp-Taste länger als 3 Sek., um
das Gerät zu sperren. Die Sperrung wird im Display
angezeigt. Die Funktion der Bedienelemente ist blockiert.
Drücken Sie die Stopp-Taste erneut länger als 3 Sek., um
die Sperrung aufzuheben.
Timer (Count down)
Das Gerät verfügt über eine Timer-Funktion:
1. Drücken Sie die Stopp-Taste.
2. Drücken Sie die Timer-Taste.
3. Mit Hilfe der Ziffern-Tasten tragen Sie die gewünschte
Zeit ein.
4. Drücken Sie zum Starten die Start-Taste.
Die eingestellte Zeit wird zurückgezählt und das Ende
durch einen Ton signalisiert.
Hinweis: Diese Funktion können Sie auch während des
Betriebes des Gerätes nutzen.
Reinigung
Ziehen Sie vor der Reinigung immer den Netzstecker.
• Reinigen Sie den Garraum nach der Benutzung mit
einem leicht feuchten Tuch.
• Reinigen Sie die Mikrowelle von außen mit einem
leicht feuchten Tuch.
• Reinigen Sie das Zubehör in gewohnter Weise mit
warmem Wasser und Spülmittel.
• Türrahmen/Türdichtung und benachbarte Teile müs-
sen bei Verschmutzung sorgfältig mit einem feuchten
Tuch gereinigt werden.
Technische Daten
Modell: ...........................................................MWG 746 H
Spannungsversorgung: .................................230 V, 50 Hz
Leistungsaufnahme: ..............................................1400 W
Leistungsaufnahme Heißluft:.................................1400 W
Leistungsaufnahme Grill:.......................................1200 W
Bemessungs-Mikrowellenausgangsleistung:...........900 W
Garraumvolumen:.................................................. 25 Liter
Schutzklasse: ................................................................... Ι
Dieses Gerät wurde nach allen zutreffenden, aktuellen
CE-Richtlinien geprüft, wie z.B. elektromagnetische
Verträglichkeit und Niederspannungsdirektive und wurde
nach den neuesten sicherheitstechnischen Vorschriften
gebaut.
Technische Änderungen vorbehalten!
Garantie
Wir übernehmen für das von uns vertriebene Gerät eine
Garantie von 24 Monaten ab Kaufdatum (Kassenbon).
Innerhalb der Garantiezeit beseitigen wir unentgeltlich
die Mängel des Gerätes oder des Zubehörs, die auf
Material- oder Herstellungsfehler beruhen, durch Repa-
ratur oder, nach unserem Ermessen, durch Umtausch.
Garantieleistungen bewirken weder eine Verlängerung
der Garantiefrist, noch beginnt dadurch ein Anspruch auf
eine neue Garantie!
Als Garantienachweis gilt der Kaufbeleg. Ohne diesen
Nachweis kann ein kostenloser Austausch oder eine
kostenlose Reparatur nicht erfolgen.
Im Garantiefall geben Sie bitte das Grundgerät in der
Originalverpackung zusammen mit dem Kassenbon an
Ihren Händler.
Sowohl Defekte an Verbrauchszubehör bzw. Verschleiß-
teilen
, als auch Reinigung, Wartung oder der Austausch
05-MWG 746 H EST 11 13.07.2005, 14:27:20 Uhr
12
von Verschleißteilen, fallen nicht unter die Garantie und
sind deshalb kostenpfl ichtig!
Die Garantie erlischt bei Fremdeingriff.

12
DEUTSCH
Nach der Garantie
Nach Ablauf der Garantiezeit können Reparaturen
kostenpfl ichtig vom entsprechenden Fachhandel oder
Reparaturservice ausgeführt werden.
Bedeutung des Symbols „Mülltonne“
Schonen Sie unsere Umwelt, Elektrogeräte gehören nicht
in den Hausmüll.
Nutzen Sie die für die Entsorgung von Elektrogeräten
vorgesehenen Sammelstellen und geben dort Ihre Elek-
trogeräte ab die Sie nicht mehr benutzen werden.
Sie helfen damit die potenziellen Auswirkungen, durch
falsche Entsorgung, auf die Umwelt und die menschliche
Gesundheit zu vermeiden.
Sie leisten damit Ihren Beitrag zur Wiederverwertung,
zum Recycling und zu anderen Formen der Verwertung
von Elektro- und Elektronik-Altgeräten.
Informationen, wo die Geräte zu entsorgen sind, erhalten
Sie über Ihre Kommunen oder die Gemeindeverwaltun-
gen.
Kostenlose Hotline*
Haben Sie Fragen zu Ihrem Gerät? Unser Serviceteam
steht gerne für Sie bereit. Kleinere Probleme lassen sich
oft schon telefonisch lösen.
Rufen Sie deshalb bitte zunächst unsere Hotline an.
Hotline 02152/2006-888
Mo. - Do. 8.30 - 17.00 Uhr
Fr.
8.30 - 14.00 Uhr
oder per E-Mail:
Service Anschrift
Industriering Ost 40
D-47906 Kempen/Germany
Clatronic International GmbH
(*bei entsprechendem Telekommunikationstarif.)
05-MWG 746 H EST 12 13.07.2005, 14:27:21 Uhr

ENGLISH
13
General Safety Instructions
• Read the operating instructions carefully before
putting the appliance into operation and keep the
instructions including the warranty, the receipt and, if
possible, the box with the internal packing.
• The appliance is designed exclusively for private use
and for the envisaged purpose. This appliance is not
fi t for commercial use. Do not use it outdoors (except
if it is designed to be used outdoors). Keep it away
from sources of heat, direct sunlight, humidity (never
dip it into any liquid) and sharp edges. Do not use the
appliance with wet hands. If the appliance is humid or
wet, unplug it immediately. Do not put it in water.
• When cleaning or putting it away, switch off the ap-
pliance and always pull out the plug from the socket
(pull on the plug, not the cable) if the appliance is not
being used and remove the attached accessories.
• Do not operate the machine without supervision. If
you should leave the workplace, always switch the
machine off or remove the plug from the socket (pull
the plug itself, not the lead).
• To protect children from the dangers posed by
electrical appliances, make sure that the cable is
hanging low and that children do not have access to
the appliance.
• Check the appliance and the cable for damage on a
regular basis. Do not use the appliance if it is dama-
ged.
• Do not try to repair the appliance on your own. Always
contact an authorized technician. To avoid the expos-
ure to danger, always have a faulty cable be replaced
only by the manufacturer, by our customer service or
by a qualifi ed person and with a cable of the same
type.
• Use only original spare parts.
• Pay careful attention to the following “Special Safety
Instructions“.
Important Safety Information!
Please read carefully
and keep for future use.
• Warning: When the door or the door seals are dama-
ged, the microwave oven must not be used until it has
been repaired by a qualifi ed specialist.
• Warning: Please do not repair the device yourself,
but have it repaired by an authorised specialist. Car-
rying out maintenance or repair work which involves
removal of the cover that protects the surroundings
from microwave radiation is dangerous unless carried
out by an expert.
• Warning: Do not heat liquids in closed containers.
Danger of explosion!
• Warning: If the device is operated using combi-
ned mode children may use the device only when
supervised by adults due to the temperatures that are
produced.
• Note: The microwave oven is not suitable for
warming/heating up living animals.
• Warning: Children and frail individuals may only
use the oven without supervision if they have been
instructed in its use in such a way that they are able to
use the device safely and understand the dangers of
incorrect operation.
• If you would like to use your microwave in a cupboard,
on a shelf or similar item, please ensure that you
maintain a space of at least 10 cm to cupboards, walls
etc for ventilation purposes on all sides of the machine.
• Only suitable tableware should be used such as:
glass, porcelain, ceramics, heat-resistant plastic or
special microwave tableware.
• If food is being heated or cooked in combustible
materials, such as plastic or paper containers, the
microwave oven should be checked frequently due to
the risk of fi re.
• If smoke is produced, turn the device off and remove
the plug. Keep the door closed in order to suffocate
any fl ames.
• Delay in boiling: During boiling, particularly during
the reheating of liquids (water), it may happen that the
boiling temperature has been reached but the typical
bubbles have not yet started to rise. The liquid does not
boil evenly. When the vessel is removed this so-called
delay in boiling may result in the sudden formation of
bubbles when the vessel is knocked, causing the water
to boil over. There is a serious danger of burns! In
order to achieve even boiling, please place a glass rod
or similar item, but nothing metallic, in the vessel.
• The contents of babies‘ bottles and jars of baby
food must be stirred or shaken and the temperature
checked before use. There is a danger of burns.
• Food with a shell or skin, such as eggs, sausages,
sealed jars etc. must not be heated up in the micro-
wave as they may explode even when heating by the
microwaves is fi nished.
• Any dirt on the door frame/door seal and neighbou-
ring parts must be carefully cleaned with a damp
cloth.
• Clean the microwave oven regularly and remove any
food residues from the interior.
• If the machine is not clean the surface may be
damaged, affecting its serviceable life and possibly
resulting in hazardous situations.
Description of the Operating Controls
1 Door lock
2 Viewing window*
3 Cover*
4 Drive axle
5 Sliding ring
6 Rotating plate
7 Operating panel
8 Grill heating
9 Grilling grid
Caution: Do not remove any installed parts from inside
the oven or anything from the inside of the door!
The foils on the inside of the door must not be
removed!
05-MWG 746 H EST 13 13.07.2005, 14:27:21 Uhr

ENGLISH
14
Controls
Number Buttons
For setting the clock, cooking time,
temperature and weight
Microwave Button
For selecting the power level
Grill Button
For grilling and browning
Hot Air Button
Hot air operation, thermostat controlled
Microwave/Grill
Combined Operation Button
Microwave and grill alternate
Microwave/Hot Air
Combined Operation Button
Microwave and hot air alternate
Defrost Button
Activates the defrost function in
conjunction with a time setting
Clock Button
For setting the clock in conjunction with the
number buttons
Cake Programme Button
Timer Button (Countdown)
Potato Programme Button
Popcorn Programme Button
Drinks Programme Button
Pizza Programme Button
Meat Spit Programme Button
Warming Programme Button
Start Button
Start of the programme
Express Button
Start of the express programme –
setting the express cooking time
Stop Button
• Press once to stop the cooking process
or cancel an incorrect entry.
• Press twice to delete the programme.
• Hold down for three seconds to block/
unblock the device.
Information on Grilling and
Combined Operation
• As heat radiation is used during grilling and combined
operation, please use only heat-resistant tableware.
• When food is only being grilled, metal or aluminium
tableware may also be used -but not during combined
or microwave operation.
• For grilling, pizza, baking and combined operation
only the grilling grid is suitable.
• Do not place anything on top of the housing as this
becomes hot. Always leave the ventilation slits unco-
vered.
• Please use the grilling grid to move the food to be
cooked nearer to the heating element.
Initial Operation
• After removing all the accessories from inside the
oven, unpack them and place the sliding ring in the
middle. Position the glass plate on the drive axle in
such a way that it locks into the dents of the drive
shafts and is lying fl at.
• Check the device for any visible damage, particularly
in the area of the door. If any damage is found, the
machine must not be used.
• In order to avoid interference to other machines when
the microwave oven is operated, do not place it in the
direct vicinity of other electronic devices.
• Remove any protective foils that may be adhered to
the housing.
• The foils on the inside of the door must not be
removed!
• Insert the mains plug into a properly installed
230 V, 50 Hz power socket.
• Do not remove any installed parts from inside the
oven or from inside the door!
Using the Device
What you should know about microwave operation:
• Your device works with microwave radiation, which
heats up water particles in food in a very short time.
There is no heat radiation and therefore hardly any
browning.
• Only food should be heated up with this device.
• The device is not suitable for baking in fl oating fat.
• Only 1-2 portions should be heated up at the same
time. Otherwise the microwave will become less
effi cient.
• If you want to interrupt the cooking process, press the
Stop button.
• Microwaves provide their full energy levels immediate-
ly. Pre-heating is therefore not necessary.
• Never operate the machine in microwave or combined
mode if it is empty.
• The microwave oven does not replace your traditional
cooker. It is used mainly for:
• defrosting deep-frozen food
• rapid warming/heating of food or drinks
• cooking meals
• Please do not use any plastic or paper tableware.
05-MWG 746 H EST 14 13.07.2005, 14:27:22 Uhr

ENGLISH
15
Confi rmation Signal
The information you put into the device is confi rmed by
an audible signal.
• One beep after a button has been pressed: the infor-
mation entered has been accepted.
• Two beeps after a button has been pressed:
the information has been refused.
Please correct the information you have entered.
Setting the Time
Note: When the device is switched on for the fi rst time a
fl ashing colon appears.
1. Press the clock button. The display changes to „:“.
2. Enter the desired hours and minutes using the num-
ber buttons.
3. Press the clock button again. The new time is activa-
ted.
Operating the Microwave
Place the food to be heated up into suitable tableware.
Open the door and place the vessel in the middle of the
glass plate. Then close the door. (For safety reasons the
device only works when the door is fi rmly closed.)
1. Press the Stop button.
2. Select the desired microwave power by pressing the
microwave button once or several times.
Press the microwave button to select
the percentage values
Press: Power Description
1x 100% (P-HI) Full power
2x 90% (P-90)
3x 80% (P-80)
4x 70% (P-70) High
5x 60% (P-60)
6x 50% (P-50) Medium
7x 40% (P-40)
8x 30% (P-30) Low
9x 20 % (P-20)
10x 10 % (P-10) Very low
11x 0% (P-00)
100% corresponds to 900 W
3. Enter the desired cooking time using the number
buttons.
For example:
10:30min cooking time at 100% power
Step Button Display
1Stop
2 Microwave
P- HI
3 1 0 3 0
10:30
4Start
4. Press the Start button to start the machine. The
length of cooking depends on the quantity and con-
sistency of the contents. With a little practice you will
soon learn to estimate the cooking time.
Please note: cooking in the microwave oven is very
much faster than in a standard cooker. If you are not sure,
set the cooking time to low and continue cooking after-
wards if necessary. After the time has elapsed, the device
switches off and the word „END“ appears in the display.
Then you can remove the food.
Rapid Defrosting of Frozen Food
Please note:
• As a rule of thumb, 500g of frozen food needs approx.
fi ve minutes to defrost.
• If the frozen food has not fully defrosted within this
time, set the time in 1-minute steps.
Assuming you would like to defrost frozen food and set
the time to fi ve minutes:
1. Press the Stop button.
2. Press the Defrosting button.
3. Enter the desired cooking time using the number
buttons.
Step Button Display
1Stop
2 Defrosting
:
3 5 0 0
5:00
4Start
4. Press the Start button to start the machine.
If the food was frozen in a plastic container, we
recommend that it be briefl y defrosted and then
transferred to a vessel that is suitable for placing in the
microwave oven.
A time of up to 99 minutes and 99 seconds can be set for
defrosting. After the time has elapsed beeps are heard
and the word „END“ appears in the display. Press the stop
button or open the door. The word „END“ goes off.
The following table provides information on manual
defrosting.
Defrosting Table
Food/dish Quantity
Power
in watts
Approx.
time in
minutes
Additional
thawing
time in
minutes
Meat, Sausages
Meat (beef, veal, pork)
in pieces
500 g
1000 g
180
180
14 – 18
25 - 30
10 – 15
20 - 25
Schnitzel, cutlet 200 g 180 4 - 6 5 - 10
Minced meat 250 g 180 6 - 8 5 - 10
Frying sausage,
Frankfurter
200 g 180 4 - 6 5 - 10
Slices of cold meat 300 g 180 4 - 6 5 - 10
Tip: turn the meat halfway through and cover sensitive pieces; break up
the minced meat and remove pieces that have already thawed; separate
sausage slices.
Poultry
Chicken 1000 g 180 20 - 25 10 - 15
Chicken pieces 500 g 180 12 - 15 5 - 10
Duck 1700 g 180 25 - 40 20 - 25
Goose and turkey pieces 500 g 180 12 - 18 10 - 15
Tip: turn poultry halfway through, cover wings and legs, throw away thawed
liquid and do not allow to come into contact with other foods.
Game
Saddle of venison 1000 g 180 20 - 35 20 - 30
Saddle of hare 500 g 180 12 - 13 10 - 20
Tip: turn once and cover edges.
Fish
Prawns, shrimps 250 g 180 5 - 7 5 - 10
Trout 340 g 180 4 - 6 5 - 10
Whole fi sh 500 g 180 7 - 10 10 - 15
05-MWG 746 H EST 15 13.07.2005, 14:27:32 Uhr

ENGLISH
16
Food/dish Quantity
Power
in watts
Approx.
time in
minutes
Additional
thawing
time in
minutes
Fish fi llet 250 g 180 5 - 7 5 - 10
Tip: stir several times and turn frequently.
Fruit
Raspberries, strawberries 250 g 180 4 - 6 5 - 10
Cherries, plums 250 g 180 5 - 7 5 - 10
Stewed apple 500 g 180 9 - 12 5 - 10
Tip: stir carefully or break up into pieces.
Vegetables: see „Cooking Table“, „Defrosting and Cooking Vegetables“
Bread and Pastries
Rolls 4 pieces 180 ca. 1-3 5
Bread 1000 g 180 13 - 15 8 - 10
Bread for toasting 500 g 180 5 - 6 5 - 10
Stirred cake 500 g 180 6 - 8 5 - 10
Fruit cake 1 piece 180 2 - 3 2 - 3
Flan
1 piece 180 0,5 - 1 3 - 5
1200 g 180 10 - 12 30 - 60
Tip: place the bread and pastries on kitchen crepe paper to take up the
moisture; only defrost sensitive pastry slightly.
Milk Products
Butter 250 g 180 5 - 7 10 - 15
Curds 250 g 180 6 - 8 5 - 10
Cream 200 g 180 3 - 5 2 - 3
Tip: remove the aluminium foil and stir halfway through; whip the cream
until it is semisolid.
Warming
The warming and heating of food is a particular strength
of the microwave. Liquids and foods that are in the
refrigerator can be easily brought up to room temperature
or the right temperature for consumption without the need
for many pots.
The heating times contained in the following table are
only rough guides as the time depends very much on the
starting temperature and the composition of the food. You
are therefore advised to check from time to time whether
the dish is already hot enough.
Heating Table
Food/dish Quantity
Power
in watts
Approx.
time in
minutes
Cover
Liquids
Water, 1 cup 150 g 900 0,5 - 1 no
Water, 0.5 l 500 g 900 3,5 - 5 no
Water, 0.75 l 750 g 900 5 - 7 no
Coffee, 1 cup 150 g 900 0,5 - 1 no
Milk, 1 cup 150 g 900 0,5 - 1 no
Note: Place a glass rod or similar item (nothing metal) into the vessel in
order to prevent delayed boiling. Stir well before drinking.
One-Course Meals
Schnitzel, potatoes
and vegetables
450 g 900 2,5 - 3,5 yes
Goulash with noodles 450 g 900 2 - 2,5 yes
Meat, dumpling
and sauce
450 g 900 2,5 - 3,5 yes
Tip: moisten slightly beforehand, stir from time to time.
Food/dish Quantity
Power
in watts
Approx.
time in
minutes
Cover
Meat
Schnitzel, coated
with breadcrumbs
200 g 900 1 - 2 no
Meatballs, 4 in total 500 g 900 3 - 4 no
Joint 250 g 900 2 - 3 no
Tip: brush with oil so that the breadcrumbs or crust do not become soft.
Poultry
Half a chicken 450 g 900 3,5 - 5 no
Chicken fricassee 400 g 900 3 - 4,5 yes
Tip: brush with oil, stir from time to time.
Extras
Noodles, rice
1 portion 150 g 900 1 - 2 yes
2 portions 300 g 900 2,5 - 3,5 yes
Potatoes 500 g 900 3 - 4 yes
Tip: moisten slightly beforehand.
Soups/Sauces
Clear soup, 1 plate 250 g 900 1 - 1,5 yes
Soup with garnish 250 g 900 1,5 - 2 yes
Sauce 250 g 900 1 - 2 yes
Baby Food
Milk 100 ml 540 0,5 - 1 no
Mash 200 g 540 1 - 1,5 no
Tip: shake well or stir. Check the temperature!
Cooking
Practical Cooking Tips
Please keep to the recommended values in the cooking
table and the recipes. Keep an eye on the cooking pro-
cess until you have more experience.
The door of the microwave can be opened at any time.
The machine switches off automatically.
It starts again when the door is closed.
Foods taken directly from the refrigerator require a slightly
longer cooking time than those at room temperature.
The more compact a food is, the longer is the cooking
time. For example, a large piece of meat has to be
cooked longer than the same quantity of sliced meat.
It is advisable to start cooking sizeable quantities on
maximum power and then to continue cooking evenly on
medium power.
Flat dishes cook faster than thick ones. Therefore it is ad-
visable to spread the food as thinly as possible. Thinner
pieces, e.g. chicken legs or fi sh fi llets should be placed
towards the inside or allowed to overlap.
The following rule of thumb applies:
Double the quantity = almost double the time
Half the quantity = half the time
If you are not able to fi nd a suitable time for a dish, the
following rule applies:
approx. 1 minute cooking time for each 100 g.
All dishes which are covered up on a normal cooker
should also be covered in the microwave oven.
A lid prevents the food from drying out. Suitable covers
are an inverted plate, parchment paper or microwave
foil. Dishes which are to be given a crust should not be
covered when cooked.
05-MWG 746 H EST 16 13.07.2005, 14:27:34 Uhr

ENGLISH
17
Cooking Table
Food/dish Quantity
Power
in watts
Approx.
time in
minutes
Cover
Vegetables
Aubergines 500 g 720 7 - 10 yes
Caulifl ower 500 g 720 8 - 11 yes
Broccoli 500 g 720 6 - 9 yes
Chicory 500 g 720 6 - 7 yes
Peas 500 g 720 6 - 7 yes
Fennel 500 g 720 8 - 11 yes
Green beans 300 g 720 13 - 15 yes
Potatoes 500 g 720 9 - 12 yes
Turnip cabbage 500 g 720 8 - 10 yes
Leek 500 g 720 7 - 9 yes
Maize cob 250 g 720 7 - 9 yes
Carrots 500 g 720 8 - 10 yes
Paprika 500 g 720 6 - 9 yes
Sprouts 300 g 720 7 - 10 yes
Asparagus 300 g 720 6 - 9 yes
Tomatoes 500 g 720 6 - 7 yes
Courgettes 500 g 720 9 - 10 yes
Tip: Cut the vegetables into small pieces and cook with 2 - 3 tablespoons of
liquid, stir from time to time, continue cooking for 3 - 5 minutes, season just
before serving.
Fruit
Stewed apple, pear 500 g 720 5 - 8 yes
Plum jam 250 g 720 4 - 6 no
Stewed rhubarb 250 g 720 5 - 8 yes
4 baked apples 500 g 720 7 - 9 yes
Tip: add 125 ml water. Lemon juice prevents the fruit from changing colour.
Cook for a further 3 - 5 minutes.
Meat (Ready-made meals)
Meat with sauce 400 g 720 10 - 12 yes
Goulash, stewed strips
of meat
500 g 720 10 - 15 yes
Roulade of beef 250 g 720 7 - 8 yes
Tip: stir from time to time, allow to stand for 3 - 5 minutes.
Poultry (Ready-made meals)
Chicken fricassee 250 g 720 6 - 7 yes
Poultry soup 200 g 720 5 - 6 yes
Tip: stir from time to time, allow to stand for 3 - 5 minutes.
Fish
Fish fi llet
300 g 720 7 - 8 yes
400 g 720 8 - 9 yes
Tip: turn halfway through, continue cooking for 3 - 5 minutes.
Defrosting and Cooking Vegetables
Apple and red cabbage 450 g 720 14 -16 yes
Leaf spinach 300 g 720 11 - 13 yes
Caulifl ower 200 g 720 7 - 9 yes
French beans 200 g 720 8 - 10 yes
Broccoli 300 g 720 8 - 9 yes
Peas 300 g 720 7 - 8 yes
Turnip cabbage 300 g 720 13 -15 yes
Leek 200 g 720 10 - 11 yes
Corn 200 g 720 4 - 6 yes
Carrots 200 g 720 5 - 6 yes
Sprouts 300 g 720 7 - 8 yes
Spinach
450 g 720 12 - 13 yes
600 g 720 15 - 17 yes
Tip: cook in 1 - 2 tablespoons of liquid, stir from time to time or divide
carefully into pieces. Continue cooking for 2 - 3 minutes and season just
before serving.
Food/dish Quantity
Power
in watts
Approx.
time in
minutes
Cover
Soups / Stews (Ready-made meals)
Stew 500 g 720 13 - 15 yes
Soup with garnish 300 g 720 7 - 8 yes
Crème soup 500 g 720 13 - 15 yes
Tip: stir from time to time and continue cooking for 3 - 5 minutes.
Express Cooking
To start express cooking press the express button
repeatedly. The cooking process begins immediately, with
each press of the button increasing the cooking time by 30
seconds. From a time of one minute and up the cooking
time is prolonged by one minute in each case.
The power of the microwave is then 100%.
Automatic-Programmes
With the help of the automatic control it is possible
to cook defi ned quantities of food automatically. The
cooking time and microwave power level are stored in the
programme.
Please proceed as follows:
a) Potatoes
1. Press the Stop button.
2. Press the „Potato“ button once for preparing 120-170g
for press the „Potato“ button twice for the preparation
of 140-200g.
3. Press a number button between 1 and 4 to select a
cooking time.
Button
“Potatoes”
Number Button Cooking Time
1x 1 3min 50sek.
1x 2 7min 10sek
1x 3 11min
1x 4 14min
Button
“Potatoes”
Number Button Cooking Time
2x 1 5min 40sek.
2x 2 9min
2x 3 13min
2x 4 17min
4. Press the Start button to start the machine.
After the time has elapsed, the device switches off
and the word „END“ appears in the display.
Tip: Leave the food in the oven to continue cooking
for 5-10 min.
b) Popcorn
Please only use microwave popcorn in a bag!
1. Press the Stop button.
2. Press the „Popcorn“ button. „2:30“ appears in the
display.
3. Press the Start button to start the machine.
After the time has elapsed, the device switches off and
the word „END“ appears in the display. Then you can
remove the food.
Note: It is possible to change the cooking time.
05-MWG 746 H EST 17 13.07.2005, 14:27:36 Uhr

ENGLISH
18
• Press the „Popcorn“ button twice.
• Enter the new cooking time with the number buttons.
• Press the Start button.
The new cooking time remains stored in the memory until
it is changed.
c) Pizza
1. Press the Stop button.
2. Press the „Pizza“ button once to heat up a piece of
120-140g, or press the „Pizza“ button twice to heat up
a larger piece.
3. Press the Start button to start the machine.
After the time has elapsed, the device switches off and
the word „END“ appears in the display. Then you can
remove the food.
d) Meat Spit
1. Press the Stop button.
2. Press the „Meat Spit“ button once to prepare small
quantities, or press it twice for the preparation of
larger quantities.
3. Press a number button from 1 to 4 to select a cooking
time.
(„Meat Spit“ button pressed once)
Number Button Weight Cooking Time
1 120g 10min
2 200g 13min
3 400g 17min
4 600g 23min
(„Meat Spit“ button pressed twice)
Number Button Weight Cooking Time
1 170g 12min
2 310g 15min
3 540g 23min
4 800g 30min
4. Press the Start button to start the machine.
After the time has elapsed, the device switches off and
the word „END“ appears in the display. Then you can
remove the food.
e) Drinks
1. Press the Stop button.
2. Press the „Drinks“ button once for heating up 140-
200g. Press the „Drinks“ button twice for heating up
250-310g.
3. Press a number button from 1 to 4 to select a war-
ming-up time.
Button
“Drinks”
Number Button
Warming-up
Time
1x 1 1min 20sek
1x 2 2min 30sek
1x 3 3min 40sek
1x 4 4min 50sek
Button
“Drinks”
Number Button
Warming-up
Time
2x 1 2min 20sek.
2x 2 4min
2x 3 5min 40sek
2x 4 7min 20sek
4. Press the Start button to start the machine.
After the time has elapsed, the device switches off and
the word „END“ appears in the display. Then you can
remove the food.
f) Warming up
1. Press the Stop button.
2. Press the „Warming“ button. „3:40“ appears in the
display.
3. Press the Start button to start the machine.
After the time has elapsed, the device switches off and
the word „END“ appears in the display. Then you can
remove the food.
g) Cake
1. Press the Stop button.
2. Press the „Cake“ button. „40:00“ appears in the
display.
3. Press the Start button to start the machine.
After the time has elapsed, the device switches off and
the word „END“ appears in the display. Then you can
remove the food.
Note: The cooking time can be changed.
• Press the „Cake“ button twice.
• Enter the new cooking time (up to 99:99) using the
number buttons.
• Press the start button.
The new cooking time remains in the memory until it is
changed.
Grill
Please use the grilling grid for grilling in order to achieve
rapid and even browning. Please use suitable heat-re-
sistant crockery or place the food to be grilled directly on
the grid.
Large or thick pieces of food are grilled directly on the
rotating plate!
To grill and gratinate food, proceed as follows:
1. Press the Stop button.
2. Press the grill button once.
3. Enter the desired grilling time using the number
buttons.
4. Press the Start button to start the machine.
After the time has elapsed, the device switches off and
the word „END“ appears in the display. Then you can
remove the food.
Combined Microwave/Grill Operation
When these settings are used the microwave and grill
alternate within the preselected time in the ratio:
Combination1
30% of the
cooking time
is with the
microwave
70% of the
cooking time is
with the grill
Combination2
55% of the
cooking time
is with the
microwave
45% of the
cooking time is
with the grill
05-MWG 746 H EST 18 13.07.2005, 14:27:38 Uhr

ENGLISH
19
If you prepare food using the combined microwave-grill
functions you should note the following:
For large, thick foods such as roast pork the microwave
time is correspondingly longer than for small, fl at foods.
However, in the case of the grill it is the other way round.
The closer the food is to the grill, the faster it turns brown.
This means that when large joints are prepared using
combined operation the grilling time may be shorter than
for smaller joints.
Please proceed as follows:
1. Press the Stop button.
2. Press the „Microwave/Grill“ button once for combined
operation 1. Press the „Microwave/Grill“ twice for
combined operation 2.
3. Enter the desired cooking time using the number
buttons.
4. Press the Start button to start the machine.
After the time has elapsed, the device switches off and
the word „END“ appears in the display. Then you can
remove the food.
Microwave/Grill
Combined Operation Table
Food/dish Quantity
Approx.
time in
minutes
Cover
Meat, Sausages
Beef, pork or veal in pieces
500 g
750 g
10 - 12
12 - 15
no
no
Smoked pork loin 500 g 12 - 14 no
Meat loaf 500 g 13 - 15 no
Wienerwurst 200 g 2 - 3 no
Frankfurter 200 g 2 - 3 no
Tip: turn the meat halfway through and continue cooking for 3 - 5 minutes;
coat the meat loaf with egg white; prick the sausages with a fork.
Poultry
Boiling fowl 1000 g 13 - 15 no
Chicken pieces 250 g 4 - 5 no
Tip: allow to cook without liquid in its own juice, turn once and continue
cooking for 4 - 5 minutes.
Fish
Trout, blue 300 g 5 - 6 no
Fish fi llet 300 g 3 - 4 no
Tip: turn halfway through and continue cooking for 3 - 5 minutes.
Hot Air Only Operation
During cooking with hot air the hot air circulates inside
the oven. This makes the food brown and crispy faster.
In hot air operation it is possible to select 10 different
temperatures.
Cooking with Hot Air
Assuming you would like to cook at a temperature of
180°C for 40 minutes, please proceed as follows:
1. Press the Stop button.
2. Press the „Hot Air“ button.
3. Select the desired cooking temperature with one of
the number buttons (e.g. 8).
4. Enter the desired cooking time (e.g. 40 min) using the
number buttons.
Step Button Display
1Stop
2 Hot Air
38
1 80
44 0
H:40
5Start
5. Press the Start button to start the machine.
Please note:
• A maximum of 9 hours and 99 minutes can be
programmed. After the time has elapsed beeps are
heard and the word „END“ appears in the display.
Press the stop button or open the door. The word
„END“ goes off.
• When cooking with hot air it is possible to check the
temperature by pressing the hot air button.
Preheating and Cooking with Hot Air
It is possible to preheat the microwave oven using hot air
operation and then use hot air to cook with.
Assuming you would like to preheat the device to 170°C
and then cook for 35 minutes:
1. Press the Stop button.
2. Press the „Hot Air“ button.
3. Select the desired preheating temperature using one
of the number buttons (e.g. 7).
4. Press the start button. The word „PREH“ (preheat)
fl ashes in the display. Once the oven has reached the
pre-programmed temperature the „PREH“ symbols
stops fl ashing and appears continuously.
5. Please open the door and place the food to be
cooked on the middle of the rotating plate.
6. Enter the desired cooking time (e.g. 35 min.) using
the number buttons.
7. Press the Start button to start the machine.
After the time has elapsed, the device switches off and
the word „END“ appears in the display. Then you can
remove the food.
Combined Use of Hot Air and Microwave
For this the device has four pre-programmed settings,
making it easier for you to work with both the hot air and
the microwave function.
Please press the microwave/hot air button and then one
of the number buttons from 1 to 4 to select the hot air
temperature.
Button
Number
Button
Temperature(°C)
Microwave/Hot Air 1 150
Microwave/Hot Air 2 180
Microwave/Hot Air 3 200
Microwave/Hot Air 4 230
If you would like to set a time of 25 minutes, for example
to bake a cake at 200°C:
1. Press the Stop button.
2. Please press the microwave/hot air button.
3. Select the desired temperature (200°C) with one of
the number buttons (e.g. 3).
4. Enter the desired cooking time (e.g. 25 min) using the
number buttons.
5. Press the Start button to start the machine.
05-MWG 746 H EST 19 13.07.2005, 14:27:39 Uhr

ENGLISH
20
Please note:
A maximum of 9 hours and 99 minutes can be
programmed. After the time has elapsed beeps are heard
and the word “END” appears in the display. Press the
stop button or open the door. The word “END” goes off.
When cooking with hot air it is possible to check the
temperature by pressing the microwave/hot air button.
Cooking in Several Steps
It is possible to set the programmes in such a way that
three different functions can be selected.
Assuming you select the following programme for
cooking:
Rapid Defrosting
쒆
Preparation in the Microwave
쒆
Cooking with Hot Air (without Preheating)
1. Press the Stop button.
2. Press the defrost button.
3. Enter the desired defrost time using the number
buttons.
4. Press the microwave button.
5. Enter the desired microwave cooking time using the
number buttons.
6. Press the hot air button.
7. Select the desired cooking temperature using the
number buttons.
8. Enter the desired hot air cooking time with the number
buttons.
9. Press the Start button to start the machine.
After the time has elapsed, the device switches off and
the word „END“ appears in the display. Then you can
remove the food.
Special Functions
Automatic Reminder:
After cooking has fi nished you are reminded every
2 minutes by a beep to remove the food.
This reminder is switched off by opening the door or
pressing the Stop button.
Disabling:
Press the Stop button for more than 3 seconds to disable
the machine. The fact that the machine is disabled is
then shown in the display. The function of the operating
controls is now blocked. Press the Stop button again for
more than 3 seconds to reactivate the machine.
Timer (Countdown)
The device has a timer function:
1. Press the Stop button.
2. Press the timer button.
3. Enter the desired time using the number buttons.
4. Press the Start button to start the machine.
The set time is counted backwards. When the time has
elapsed a beep is heard.
Note: This function can also be used during operation of
the device.
Cleaning
Always remove the mains plug before cleaning the
machine.
• Clean the inside of the oven after use with a slightly
damp cloth.
• Please clean the microwave from the outside with a
slightly damp cloth.
• Clean the accessories in the usual manner in soapy
water.
• The door frame/door seal and neighbouring parts
must be carefully cleaned when dirty with a damp
cloth.
Technical Data
Model: ............................................................MWG 746 H
Power supply: ................................................230 V, 50 Hz
Power consumption: ..............................................1400 W
Power consumption - hot air:.................................1400 W
Power consumption - grill: .....................................1200 W
Rated microwave power output: ..............................900 W
Cavity volume: ....................................................... 25 Liter
Protection class: ...............................................................Ι
This device has been tested according to all relevant cur-
rent CE guidelines, such as electromagnetic compatibility
and low voltage directives, and has been constructed in
accordance with the latest safety regulations.
Subject to technical changes without prior notice!
Guarantee
The device supplied by our Company is covered by a
24 month guarantee starting on the date of purchase
(receipt).
During the life of the guarantee any fault of the device or
its accessories ascribable to material or manufacturing
defects will be eliminated free of charge by repairing or, at
our discretion, by replacing it. The guarantee services do
not entail an extension of the life of the guarantee nor do
they give rise to any right to a new guarantee!
Proof of the guarantee is provided by the proof of
purchase. Without proof of purchase no free replacement
or repair will be carried out.
If you wish to make a claim under the guarantee please
return the entire machine in the original packaging to your
dealer together with the receipt.
Defects to consumables or parts subject to wearing
as
05-MWG 746 H EST 20 13.07.2005, 14:27:40 Uhr
Seite wird geladen ...
Seite wird geladen ...
Seite wird geladen ...
Seite wird geladen ...
Seite wird geladen ...
Seite wird geladen ...
Seite wird geladen ...
Seite wird geladen ...
Seite wird geladen ...
Seite wird geladen ...
Seite wird geladen ...
Seite wird geladen ...
Seite wird geladen ...
Seite wird geladen ...
Seite wird geladen ...
Seite wird geladen ...
Seite wird geladen ...
Seite wird geladen ...
Seite wird geladen ...
Seite wird geladen ...
Seite wird geladen ...
Seite wird geladen ...
Seite wird geladen ...
Seite wird geladen ...
Seite wird geladen ...
Seite wird geladen ...
Seite wird geladen ...
Seite wird geladen ...
Seite wird geladen ...
Seite wird geladen ...
Seite wird geladen ...
Seite wird geladen ...
Seite wird geladen ...
Seite wird geladen ...
Seite wird geladen ...
Seite wird geladen ...
Seite wird geladen ...
Seite wird geladen ...
Seite wird geladen ...
Seite wird geladen ...
Seite wird geladen ...
Seite wird geladen ...
Seite wird geladen ...
Seite wird geladen ...
Seite wird geladen ...
Seite wird geladen ...
Seite wird geladen ...
Seite wird geladen ...
Seite wird geladen ...
Seite wird geladen ...
Seite wird geladen ...
Seite wird geladen ...
Seite wird geladen ...
Seite wird geladen ...
Seite wird geladen ...
Seite wird geladen ...
Seite wird geladen ...
Seite wird geladen ...
Seite wird geladen ...
Seite wird geladen ...
-
 1
1
-
 2
2
-
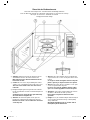 3
3
-
 4
4
-
 5
5
-
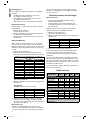 6
6
-
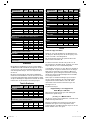 7
7
-
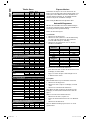 8
8
-
 9
9
-
 10
10
-
 11
11
-
 12
12
-
 13
13
-
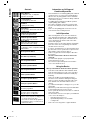 14
14
-
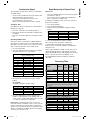 15
15
-
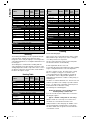 16
16
-
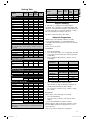 17
17
-
 18
18
-
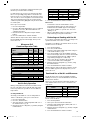 19
19
-
 20
20
-
 21
21
-
 22
22
-
 23
23
-
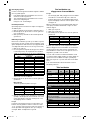 24
24
-
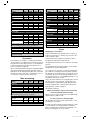 25
25
-
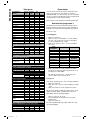 26
26
-
 27
27
-
 28
28
-
 29
29
-
 30
30
-
 31
31
-
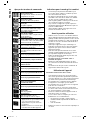 32
32
-
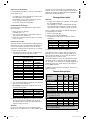 33
33
-
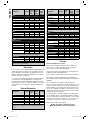 34
34
-
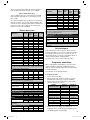 35
35
-
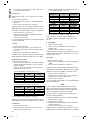 36
36
-
 37
37
-
 38
38
-
 39
39
-
 40
40
-
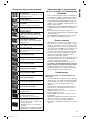 41
41
-
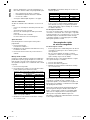 42
42
-
 43
43
-
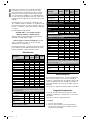 44
44
-
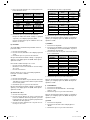 45
45
-
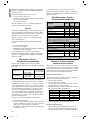 46
46
-
 47
47
-
 48
48
-
 49
49
-
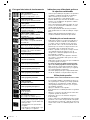 50
50
-
 51
51
-
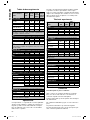 52
52
-
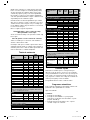 53
53
-
 54
54
-
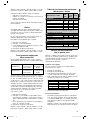 55
55
-
 56
56
-
 57
57
-
 58
58
-
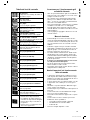 59
59
-
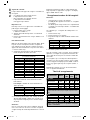 60
60
-
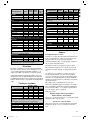 61
61
-
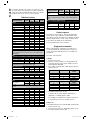 62
62
-
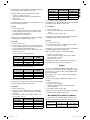 63
63
-
 64
64
-
 65
65
-
 66
66
-
 67
67
-
 68
68
-
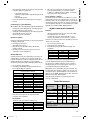 69
69
-
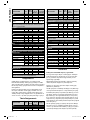 70
70
-
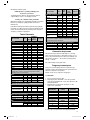 71
71
-
 72
72
-
 73
73
-
 74
74
-
 75
75
-
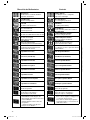 76
76
-
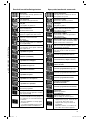 77
77
-
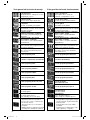 78
78
-
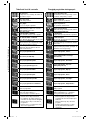 79
79
-
 80
80


in anderen Sprachen
- français: Clatronic mwg 746 h Manuel utilisateur
- español: Clatronic mwg 746 h Manual de usuario
- italiano: Clatronic mwg 746 h Manuale utente
- Nederlands: Clatronic mwg 746 h Handleiding
- português: Clatronic mwg 746 h Manual do usuário
- polski: Clatronic mwg 746 h Instrukcja obsługi
Verwandte Artikel
-
Clatronic mwg 746 h Benutzerhandbuch
-
-
BOMANN MWG 2216 H EB Benutzerhandbuch
-
BOMANN MWG 2215 EB Benutzerhandbuch
-
Clatronic MWG 778 Benutzerhandbuch
-
Clatronic MWG 777 U Benutzerhandbuch
-
Clatronic MWG 738 E Benutzerhandbuch
-
-
Andere Dokumente
-
BOMANN MWG 3001 H EB Benutzerhandbuch
-
-
BOMANN MWG 2211 U CB Bedienungsanleitung
-
BOMANN MWG 2285 H CB Bedienungsanleitung
-
Profi Cook PC-MWG 1118 H Benutzerhandbuch
-
Tefal FW501815 Schnellstartanleitung
-
Juno-Electrolux JMW9161E Benutzerhandbuch
-
 Keytec Mouse MCI Benutzerhandbuch
