Hama 00052465 Bedienungsanleitung
- Kategorie
- Mäuse
- Typ
- Bedienungsanleitung

Muster
3
e
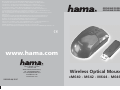
Wireless Optical Mouse
»M640 - M642 - M644 - M646«
00052463/00052464/
00052465/00052466
w ww.hama.com
H ama GmbH & Co KG
Postfach 80
86651 Monheim/Germany
Tel. +49 (0)9091/502-0
Fax +49 (0)9091/502-274
www.hama.com
00052463-66/-05.07
Die Konformitätserklärung nach der R&TTE Richtlinie 99/5/EG fi nden Sie unter www.hama.com
See www.hama.com for declaration of conformity according to R&TTE Directive 99/5/EC guidelines
La déclaration de conformité à la directive R&TTE 99/5/CE se trouve sur www.hama.com
La declaración de conformidad según la directiva R&TTE 99/5/CE la encontrará en www.hama.com
De conformiteitsverklaring conform de R&TTE-richtlijn 99/5/EG vindt u onder www.hama.com
La dichiarazione di conformità secondo la direttiva R&TTE 99/5/CE è disponibile sul sito www.hama.com
Τη δήλωση συμμόρφωσης σύμφωνα με την οδηγία 99/5/EΚ περί R&TTE θα τη βρείτε στη διεύθυνση www.hama.com
Konformitetsförklaring enligt R&TTE riktlinje 99/5/EG fi nner du på www.hama.com
Radio- ja telepäätelaitteita koskevan direktiivin 99/5/EY mukainen vaatimustenmukaisuusvakuutus löytyy osoitteesta
www.hama.com
Deklaracja zgodności według dyrektywy R&TTE 99/5/EG dostępna na stronie internetowej www.hama.com
A megfelelőségi követelmények megegyeznek az R&TTE Irányelvek 99/5/EG ajánlásaival www.hama.com
Prohlášení, o shodě podle směrnice R&TTE 99/5/EG, naleznete na www.hama.com
Prehlásenie o zhode podľa R&TTE smernice 99/5/EG nájdete na www.hama.com
A declaração de conformidade segundo a directiva R&TTE 99/5/CE pode ser consultada em www.hama.com
Заявление о соответствии товара нормам R&TTE 99/5/EG см. на веб-узле www.hama.com
R&TTEDirektifi 99/5/EG’ye göre uygunluk beyanı için www.hama.com adresine bakınız.
Overensstemmelseserklæringen i henhold til R&TTE-retningslinierne fi nder du under HYPERLINK „http://www.hama.com”

2
l
Kurzanleitung
3
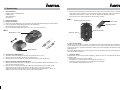
Abb.1
+
Batteriefach-Taste
+
-
-
Abb.2
Batteriedeckel
Verbindungstaste
Status-LED
Verbindungstaste
Befestigungsmechanismus
optischer Sensor
1. Verpackungsinhalt
· Kabellose, optische Notebook-Maus
· USB Empfänger
· Zwei AAA Batterien
· Kurzanleitung
2. Hardware Installation
2.1 Einlegen der Batterien
a) Drücken Sie auf die Batteriefach-Taste und ziehen gleichzeitig den Batteriedeckel nach hinten (Abb.1)
b) Legen Sie die beiden AAA-Batterien polrichtig in das Batteriefach.
Die richtige Polarität ist dort aufgezeichnet.
c)
Bringen Sie die Batterieabdeckung wieder so an, dass sie fest verschlossen ist.
2.2 Anschließen des USB Empfängers
a) Verbinden Sie den USB Empfänger mit einem freien USB Anschluss am PC.
b) Sofern noch nicht geschehen, schalten Sie den Computer ein.
c) Der USB-Stecker wird von Windows erkannt und in das Betriebssystem eingebunden.
3. Maus und Empfänger verbinden/Inbetriebnahme
a) Betätigen Sie die Verbindungstaste am Empfänger, die Status-LED blinkt (Abb.2). Der Empfänger ist zur
Syncronisation mit der Maus bereit.
b) Betätigen Sie anschließend innerhalb von 10 Sekunden die Verbindungstaste mit einem spitzen
Gegenstand (z.B. einem Sift) auf der Unterseite der Maus. Diese Taste ist mit „Connect“
gekennzeichnet. Bitte achten Sie darauf, das sich während dieser Verbindungsphase, Maus und
Empfänger nicht mehr als maximal 30 cm voneinander entfernt befi nden.
c) Die Status-LED am Empfänger leuchtet permanent nachdem der Syncronisationsprozess erfolgreich
abgeschlossen wurde. Die Maus ist nun betriebsbereit. Sollte sich der Mauszeiger nicht bewegen,
wiederholen Sie die Schritte 3a-b. Dies gilt auch falls während des Betriebes Störungen
(Interferenzen) durch andere Funk-Mäuse oder Tastaturen auftreten.
4. Maus Aus/Einschalten
Die Maus lässt sich komplett ausschalten, falls die Maus längere Zeit nicht benötigt wird. Betätigen Sie
dazu die Verbindungstaste für mindestens 3 Sekunden. Das Ausschalten wird durch ein kurzes Aufl euchten
des optischen Sensors signalisiert. Um die Maus wieder einzuschalten, betätigen Sie wiederum kurz die
Verbindungstaste.
Eine weitere Möglichkeit des Ausschaltens besteht, indem Sie den Empfänger vom PC entfernen und an der
Unterseite der Maus festklipsen.
5. Funktionsprobleme
Sollte die Maus nicht erwartungsgemäß funktionieren, stellen Sie sicher, dass Sie folgende Schritte genau
ausgeführt haben:
• Die Batterien sind neu und korrekt eingelegt
• Der Empfänger ist ordnungsgemäß an den Computer angeschlossen
• Empfänger und Geräte befi nden sich innerhalb ihrer Funkreichweite
(je nach örtlichen Gegebenheiten max. 1,5 m)

4
L
Short Instruction
5
Fig.1
Fig.2
Battery comparatment
button
+
+
-
-
Battery cover
Connect Button
Status-LED
Connect Button
Fixing mechanism
optical Sensor
1. Package contents
· Wireless optical notebook mouse
· USB receiver
· Two AAA batteries
· Instructions
2. Installing the hardware
2.1 Inserting Batteries
a) Press the battery compartment button and pull the battery cover back at the same time (Fig. 1)
b) Insert the two AAA batteries into the battery compartment pointed in the correct direction.
The correct poles are indicated there.
c) Put the battery cover back in place so that is securely closed.
2.2 Connecting the USB receiver
a) Connect the USB receiver to a free USB port on the PC.
b) Switch on your computer if you have not already done so.
c) Windows now detects the USB plug and integrates it into the operating system.
d) Set the ON-OFF switch on the base of the mouse to “ON”.
3. Connecting the mouse / getting started
a) Press the connect button on the receiver; the status LED starts to blink (Fig. 2).
The receiver is now ready to synchronise the mouse automatically.
b) Within 10 seconds, press the connect button with a pointed object (for instance a pen) on the base of the
mouse. This button is marked with “Connect”. Please note that the mouse should be no more than
30 cm away from the receiver during this connect phase.
c) The status LED on the receiver lights continuously after the synchronisation process has been completed
successfully. The mouse is now ready for use. If the cursor does not move then repeat steps 3a-b.
This also applies if interference originating from other radio mice or keyboards occurs during
operation.
4. Switching the mouse on/off
The mouse can be switched off completely to save e. g. the batteries if the mouse is not used for a
longer period of time. Press the connecting button for at least 2 seconds.
A short lighting up of the optical sensor indicates that the mouse is now switched off.
Press the connecting button to switch on the mouse again.
You can also switch it off by removing the receiver from the PC and by attaching it to the bottom side
of the mouse.
5. Functionality problems
If the mouse does not function as expected, ensure that you have carried out the following steps:
• The batteries are new and inserted correctly
• The receiver is correctly connected to the computer.
• Receiver and devices are within their communication range (depending on location, max. 1,5 m)

6
¬
Petit mode d‘emploi
7
fi g.1
fi g.2
Poussoir du
compartiment des piles
+
+
-
-
Couvercle
Reliez le bouton
DEL d‘affi chage
Reliez le bouton
Mécanisme de fi xation
Capteur optique
1. Contenu de l‘emballage
- Souris sans fi l optique d’ordinateur portable
· Récepteur USB
· Deux piles LR03/AAA
· Notice d’utilisation
2. Installation du matériel
2.1 Mise en place des piles
a) Appuyez sur le poussoir du compartiment des piles et faites glisser
simultanément le couvercle vers l‘arrière (fi g.1)
b) Insérez les deux piles LR03/AAA dans le compartiment en respectant la polarité.
La bonne polarité est indiquée à l’intérieur du compartiment.
c) Refermez le couvercle du compartiment à batteries.
2.2 Branchement du récepteur USB
a) Raccordez le récepteur USB à une connexion USB libre du PC.
b) Mettez votre ordinateur sous tension.
c) Le connecteur USB est alors reconnu par Windows et intégré dans votre système d’exploitation.
d) Réglez le commutateur ON-OFF de la face inférieure de la souris sur „ON”.
3. Synchronisation / mise en service de la souris
a) Appuyez sur la touche de connexion du récepteur ; la DEL d’affi chage d’état commence à clignoter
(fi g. 2). Le récepteur est alors prêt pour la synchronisation avec la souris.
b) Appuyez dans les 10 secondes sur la touche de connexion de la face inférieure de votre souris à
l’aide d’un objet pointu (un stylo, par exemple). Cette touche est indiquée par „Connect“. La souris devrait
être à une distance d’environ 30 cm du récepteur afi n de garantir une connexion parfaite.
d) La LED du récepteur s’allume en continu une fois que la synchronisation est correctement réalisée.
Votre souris est alors prête à fonctionner. Répétez les étapes 3 a-b dans le cas où le pointeur ne bouge
pas. La souris et le récepteur doivent être également à nouveau synchronisés s‘il se produit des
interférences avec d‘autres souris ou claviers radio en cours de fonctionnement.
4. Eteindre/allumer la souris
Vous pouvez éteindre complètement la souris si vous ne la nécessitez pas pendant un certain temps.
Appuyez pour cela sur la touche de connexion pendant au moins 3 secondes. Le détecteur optique s’allume
brièvement, cela signifi e que la souris a été éteinte. Appuyez de nouveau sur la touche de connexion si vous
souhaitez rallumer la souris.
Vous pouvez aussi l’éteindre en enlevant le récepteur du PC et en le fi xant au dessous de la souris.
5. Problèmes de fonctionnement
Dans le cas où la souris ne fonctionne pas correctement, assurez-vous que vous avez bien effectué les
étapes suivantes :
• Les piles sont neuves et correctement insérées
• Le récepteur est correctement connecté à votre ordinateur
• Le récepteur et les appareils se trouvent à portée radio l’un des autres
(1,5 m au maximum en fonction de la confi guration des lieux)
-
 1
1
-
 2
2
-
 3
3
-
 4
4


Hama 00052465 Bedienungsanleitung
- Kategorie
- Mäuse
- Typ
- Bedienungsanleitung
in anderen Sprachen
- English: Hama 00052465 Owner's manual
- français: Hama 00052465 Le manuel du propriétaire
Verwandte Artikel
-
Hama M650 Bedienungsanleitung
-
-
-
-
-
-
-
-
-