
905302 G21M 1/43
*905.302
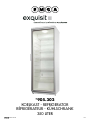
KOELKAST - REFRIGERATOR
RÉFRIGÉRATEUR - KÜHLSCHRANK
350 LITER

905302 G21M 2/43
FLK- 292

905302 G21M 3/43
NOTE. Direction of door is not changeable in refrigerators with lockable
doors.
HINWEIS. Für Kühlschränke mit abschließbaren Türen,
Türöffnungsrichtung nicht geändert.

905302 G21M 4/43
IMPORTANT USE AND SAFETY INSTRUCTIONS
CAREFULLY READ THE INSTRUCTION MANUAL. If instructions are not followed, there is a
risk of injury, damage of the appliance and loss of the right to free warranty service.
The Manufacturer shall not be held liable for damage arising from the failure to observe
the instructions contained in this manual.
We recommend to keep the Instruction manual the whole time you have the appliance.
When you sell the appliance pass the Instruction manual to the new owner of the
appliance.
GENERAL INFORMATION:
The appliance is a vertical display cooler with glass doors and with a fan and is designed
for storage of foodstuffs and for chilling of drinks and for a short-term storage of them.
This appliance is intended for commercial use!
The models CD350-1313, CD350-311. The appliances is a refrigerators with glass doors
and is designed for storage and chilling of wine. The appliances may be used in cafes,
bars and etc.
SAFETY INSTRUCTIONS:
–Do not cover the ventilation holes at the top and on the sides of the appliance.
–Do not use electrical appliances inside the food storage compartments of the
appliance, unless they are of the type recommended by the manufacturer.
–If the supply cord is damaged it must be replaced by the manufacturer,
manufacturer service agent or a similarly qualified person, in order to avoid a
hazard.
–Disposal of the appliance should be according to national rules.
–Do not damage the appliance refrigeration system. It contains the refrigerant
gas R600a. If the refrigeration system is damaged:
•Do not use any open flame.
•Avoid sparks ― do not turn on any electrical appliances or lighting fixtures.
•Immediately ventilate the room: air the room in which the appliance is placed for
a few minutes (the size of the room for a product containing isobuthane / R600a
must be at least 4 m3) to avoid damage to the cooling system.
–Once the appliance is unpacked, make sure that it is complete, that the body
and the electrical cord aren’t damaged. It is forbidden to use a technically
damaged appliance.
CONNECTION TO THE MAINS
–The appliance should only be connected to an earthed socket installed in
accordance with the regulations. Make sure that the supply voltage corresponds
GB

905302 G21M 5/43
with the voltage marked on the rating label. This product complies with all
binding CE labelling directives. The earthed electrical socket by which the
appliance is connected to the mains should be in an accessible place. It is a
legal requirement that the appliance is properly earthed. The manufacturer will
not be held liable for any damage or injury which may result from the failure to
fulfil this requirement.
–To avoid the exposure to danger, always have faulty cable be replaced only by
the manufacturer, by our customer service or by qualified person and with a
cable of the same type.
–DO NOT USE extension cords or connectors (adapters), or hubs.
–The frequency and power of the electricity supply must conform to the general
data parameters of the appliance as it is shown in the product label.
–When positioning the appliance, be careful that the electrical cord isn’t
squeezed in order to avoid its damage. Do not store heavy objects such as
cooling devices, furniture or other devices next the appliance in such a way that
they could squeeze and damage the electrical cord. This can cause a short
circuit and a fire.
–Make sure that the plug of the electrical cord is not squeezed by the back wall
of the appliance or otherwise damaged. A damaged plug can be the cause of a
fire!
–CAUTION! If the installed interior lighting diode (LED) lamp for the cooling
device is not functioning, contact the maintenance and repair representative for
replacements. LAMPS CAN BE REPLACED ONLY BY THE MAINTENANCE
AND REPAIR REPRESENTATIVE.
If the appliance is out of order and it is not possible to repair it by means of
given recommendations, unplug it, open the doors and call the service
expert. Only a service representative can remedy all technical or
construction faults.
•If the appliance is unplugged (for cleaning, moving to another place, etc.), IT MAY
BE REPEATEDLY SWITCHED ON AFTER 15 MIN.
•The appliance should be used only for storing foodstuffs.
•This appliance is not designed for the storage of explosive substances such as
aerosol cans with a flammable propellant.
•It is prohibited to store petrol and other flammable liquids near the appliance.
•The appliance can’t be disposed of by burning.
•Do not place any switched on electrical devices (such as microwave ovens, hair
dryers, irons, electric kettles or other electrical devices) on top of the appliance
because this may cause ignition of plastic parts.
•Do not place any dishes with liquids on top of the appliance and do not keep flowers
in vases or other liquid-filled vessels on the appliance.

905302 G21M 6/43
•Do not climb on or sit on the appliance, do not lean on or hang on the appliance
doors.
The appliance should be transported only in the vertical position. The
manufacturer will not be responsible for any damage of the appliance that
results from non-compliance with the instructions for transportation.
The manufacturer guarantees reliable operation of the refrigerator when the
ambient temperature is +16 to +32 degrees celsius and the relative air
humidity not greater than 60 per cent.
The models CD350-1313, CD350-311: the manufacturer guarantees
reliable operation of the refrigerator when the ambient temperature is +16 to
+32 degrees celsius and the relative air humidity not greater than 70 per cent
POSITIONING
•Place the appliance in a dry, well ventilated room.
WARNING! The appliance should not be operated in an unheated room or
porch. Place the appliance away from heat sources such as kitchen
stove/oven, radiators, or direct sunlight. The appliance must not touch any
pipes for heating, gas or water supply or any other electrical devices.
•Do not cover the ventilation holes at the top of the appliances – it must be a good air circulation
around the appliance. There should be a gap of at least 10 cm between the top of the appliance
body and any furniture that may be above it. If this requirement is not followed, the appliance
consumes more electrical energy and its compressor may overheat.
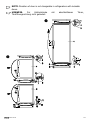
•If the appliance is placed in a corner, a gap of at least 1 cm must be left between the appliance
body and the wall (see fig. 2, page 2).
•The appliance must stand on a level surface and must not touch the wall. If necessary, regulate
the height of the appliance by adjusting the levelling feet: by turning them clockwise – the front of
the appliance rises, by turning them counter clockwise – it comes down. If the appliance is tilted
slightly backward – the doors will close by themselves.
PREPARING THE APPLIANCE FOR OPERATION
It is recommended to prepare the appliance for operation with a helper.
•Remove package. Lift the appliance away from foamed polystyrene base.Therefore take
out adhesive tapes from sides and simply lift the appliance up and take out the
board. Strip adhesive tapes off and open the door. Remove the spacer above the door.
•When positioning the appliance in chosen location, it will move more easily into position
if you lift the front a little and incline it backward allowing it to roll on its casters. When
placing, moving, lifting the appliance, do not hold the door handles, do not
pull the condenser at the rear part of the refrigerator and do not touch the
compressor unit.
•Take two supports from the bag (see fig. 4, page 2) and insert them into the guides at
the top back part of the appliance.
Wait at least 4 hours before connecting the appliance to the power
supply. If this is not done, the appliance compressor may fail.
The appliance should not be connected to the mains until all packing and transport
materials aren’t removed. Suitably dispose the packaging material.

905302 G21M 7/43
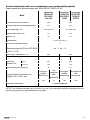
DESCRIPTION OF THE APPLIANCE, BASIC PARTS
See fig. 1, page 1
1
Switch -(ON/OFF)
6
Fan* (CD350-1313 - no)
2
Thermostat knob
7
Shelf
3
Thermostat indicator
8
Cleaner
4
Electricity supply indicator
9
Condenser
5
Interior light block (LED)
10
Compressor
1 ― ON / OFF SWITCH FOR INTERIOR LIGHT. On / off switch for interior light I -(ON) O –(OFF)
2 ― THERMOSTAT KNOB. The thermostat is off when there is a zero (0) in the thermostat indicator
space. Turning the thermostat knob clockwise the temperature in the compartment lowers.
*WARNING! The fan switches on and continuously operates!
TEMPERATURE REGULATION
The temperature in the refrigerator compartment is controlled using the thermostat knob 2 (see fig.
1) by turning it to one side or the other. The temperature indication in digits is shown beside the
thermostat knob. When the door is closed, the temperature setting can be seen on the thermostat
indicator display 3 (fig. 1).
The temperature is regulated on the scale of five digits.
0 = Compressor is switched off. WARNING! Electric current is not switched off.
1 = highest temperature (lowest cooling)
5 = lowest temperature (highest cooling)
IF THE ROOM IS COOL, THE APPLIANCE COOLS LESS. THE TEMPERATURE IN THE
APPLIANCE MAY THEREFORE RISE. Use the thermostat wheel to set a lower temperature.
The models CD350-1313, CD350-311: Temperature in the
storage compartment depends on the ambient temperature,
on the position of the thermostat knob. Thermostat knob
position is set according to the table.
Wine temperature, °C
DEFROSTING, CLEANING AND CARE
THE REFRIGERATOR COMPARTMENT DEFROSTS AUTOMATICALLY. Drops of ice that form on the back wall
of the refrigerator compartment thaw during the time the compressor is not working and the thaw water
runs down the thaw water runoff channel to the tray on top of the compressor, where it evaporates.
REGULARLY CLEAN THE APPLIANCE.
Remember that before cleaning you must disconnect the appliance from the
electrical energy supply socket by pulling the plug out of the electricity outlet.
Zone
designation
Position of the thermostat
(ambient temperature +25 ºC)
1
2
3
4
5
1 zone
12 – 14
12 – 14
12 - 14
10 – 12
8 – 10
2 zone
10 – 12
10 – 12
9 – 11
8 – 10
6 – 8
3 zone
8 – 10
8 – 10
8 – 10
6 – 8
4 – 6
4 zone
8 – 10
8 – 10
6 – 8
4 – 6
4 – 6
5 zone
8 – 10
8 – 10
4 – 6
2 – 4
2 – 4
6 zone
6 – 8
6 – 8
4 – 6
2 – 4
1 – 3

905302 G21M 8/43
•Protect the appliance inner surfaces and plastic parts from fats, acids and sauces.
In case of accidental spills – immediately clean with warm soapy water or
dishwashing detergent. Wipe dry.
•Regularly clean the hermetic gaskets of the doors. Wipe dry.
•REGULARLY CLEAN THE THAW WATER CHANNEL SPACE WITH A SPECIAL
CLEANER 8 FOR THAT PURPOSE (Fig. 1).
•At least once a year clean dust away from the back part of the appliance body
and the compressor. A soft brush, electrostatic cloth or vacuum cleaner may be
used for cleaning.
•DO NOT use detergents containing abrasive particles, acid, alcohol or benzene for cleaning the
appliance inner and outer surfaces. DO NOT use for cleaning cloths or sponges that have coarse
surfaces intended for scrubbing. Outer of the doors – glass – clean with agents intended for glass
cleaning.
•If the appliance is to be left switched off for an extended period, leave its doors open.
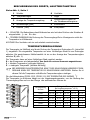
CHANGING THE OPENING DIRECTION OF THE DOORS
It is recommended that changing the opening direction of the doors should be done with a helper.
You will need two spanners No. 8 and No. 10 and a Philips head screwdriver.
When changing the opening direction of the doors YOU CAN NOT lay the refrigerator horizontally!
Do the actions below in the order they are listed:
FOR THE MODELS WITH ONE DOOR (see fig. 3, page 2):
1. Turn off the appliance and pull the plug out of the electricity supply socket
2. Unscrew two screws 7 and remove the bottom bracket 8 together with the set of washers 6 on
the axle and the spacer 5.
3. Unscrew two screws 7 and remove the bracket 11. Remove the door 4.
4. Unscrew the axle 2 together with the nut 1 and washers 3 from the upper bracket and screw all
this set on the reverse side of the door;
5. Before hanging the door, turn the door over by 1800 and insert the upper axle in the door.
6. Unscrew fixing screws 12 from doors, remove handles 13 and fix them screwing in free holes on
the same side. Plate 10 remains in its place.
7. Before screwing the bottom bracket 8 together with the set of washers and spacers on the
reverse side of a cabinet, insert the bracket axle to the door.
8. Screw the bracket 11 on the reverse side of a cabinet.
FOR THE MODELS WITH TWO DOORS (see fig. 3, page 2):
1. Turn off the appliance and pull the plug out of the electricity supply socket.
2. Unscrew two screws 12 and remove the bottom bracket 13 together with the set of washers 11
on the axle and the spacer 10.
3. Unscrew two screws 12 and remove the bracket 15. Remove the bottom door 9.
4. Unscrew fixing screws 7 of the middle bracket. Remove the middle bracket 6 together with
washers on the axle and the spacer 5. Remove the top door 4.
5. Unscrew the axle 2 together with the nut 1 and washers 3 from the upper bracket and screw all
this set on the reverse side of the door.
6. Take out the plugs 18 in the crossbar zone and displace them on the reverse side.
7. Before hanging the upper door, turn the door over by 1800 and insert the upper axle in the door.
Before screwing the middle bracket 6 with the set of washers and spacers on the reverse side of
the cabinet, insert the bracket axle into the upper door;
8. Before hanging the bottom door on the middle bracket axle, turn them over by 1800.
9. Unscrew fixing screws 16 from both of door, remove handles 17 and fix them screwing in free
holes on the same side. Plate 14 remains in its place.
10. Before screwing the bottom bracket 13 together with the set of washers and spacers on the
reverse side of a cabinet, insert the bracket axle to the door.
11. Screw the bracket 15 on the reverse side of a cabinet.

905302 G21M 9/43
Operation problems and their solutions (troubleshooting). What if …
•The appliance is plugged in to the mains but it does not work and the electricity supply
voltage indicator is not illuminated. Check that your house electricity supply installations are in
order. Check that the plug is correctly inserted into the electricity supply socket.
•The noise has become louder. Check that the appliance is standing stable, on a level place. To
make it level, regulate the front feet. Check if the appliance is not touching any furniture, and that
no part of the refrigeration system at the back part of the appliance body is touching the wall. Pull
the appliance away from any furniture or walls. Check that the cause of increased noise isn’t due
to bottles, cans or dishes in the appliance that might be touching each other.
•Water has appeared at the bottom of the refrigerator compartment. Check whether a
thaw water channel space isn’t blocked. Clean the thaw water channel space with a cleaner
intended for that purpose.
•Water has appeared under the appliance. The thaw water collection tray has slipped off the
compressor. Place the tray on top of the compressor.
•When the appliance door is opened, the rubber sealing gasket pulls out. The gasket is
smeared with sticky foodstuffs (fat, syrup). Clean the sealing gasket and the groove for it with
warm water containing soap or dishwashing detergent and wipe dry. Put the rubber sealing gasket
back into the place.
•High temperature in appliance, the compressor operation pauses are short. Ascertain
whether the appliance door/doors are shutting tightly, whether the door wasn’t kept open longer
than necessary when taking out or putting in foodstuffs or whether a large amount of warm food
was placed in the appliance.
•The top of the appliance has condensation on it. The ambient relative air humidity is above
60 %. Ventilate the room where the appliance stands and if possible remove the cause of the
humidity.
Remarks on the appliance operating noise. As the appliance operates and
goes through the freezing cycle, various noises will be emitted. This is normal and is not a
sign of any malfunction.
As the refrigerant circulates around the refrigeration system, it causes sounds like
murmuring, bubbling, or rustling. Louder sounds like popping or clicking may be heard for a
short time as the refrigerator compressor switches on.
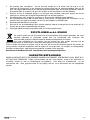
ENVIRONMENTAL PROTECTION INFORMATION
If the appliance is no longer in use, cut the connecting cable off the used equipment before
its scrapping. Also, remove the appliance lock or render it useless so that the appliance
presents no danger to children while being stored for di- sposal. This appliance is marked
with a symbol of the crossed out waste container in conformance with the European Directive
2002/96/EC. Such marking informs that the equipment may not be kept together with other waste
coming from the household after the period of its use. The user is obliged to dispose of the appliance
at the waste collection point. The local waste collection points, shops and communal units form an
appropriate system enabling the disposal of the equipment.
Handling the used electrical and electronic equipment properly contributes to the avoidance of
consequences harmful to the human health and natural environment, resulting from the presence of
hazardous substances and improper storage and processing of such equipment.
WARRANTY SERVICE
IF YOUR APPLIANCE IS NOT WORKING PROPERLY, ASCERTAIN WHETHER YOU CAN REMEDY THE
CAUSE OF THE FAULTY FUNCTIONING OF THE APPLIANCE YOURSELF. If you cannot solve the
problem yourself, contact the nearest refrigerator service representative by telephone or in writing.
When making contact necessarily indicate the refrigerator model and number. You will find this data
on the product label, which is glued to the wall.

905302 G21M 10/43
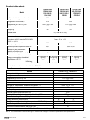
Product data sheet
NOTE. The manufacturer reserves the right to make future changes to technical parameters and specifications.
Model
CD290-1004,
CD290.1004,
FKU 290 G,
FLK- 292
CD350-1003
CD350.1003
KS CD 350.1
CD350
CD350-1004
KS CD 350.2
CD350-2D
CD350-2
Refrigerator total gross volume, L
290
350
Refrigerator net volume, L
275
320
Dimensions (H x W x D), cm
145 x 60 x 60
173 x 60 x 60
Shelf area, dm2
115
115
Weight, kg
55
65
Climate class
3 (+16 to +32)
Product temperature class
S
Products temperature ranges, °C (In
accordance with EU standard ISO 23953-
2:2015, p .4.2.2)
from -2 to +14
Door opening area, m²
0,66
0,80
General product exposure area, m²
0,51
0,62 / 0,58
Loading of the refrigerator
quantity of bottles, pcs.
0,33 l cans
287
322
0,5 l PET
126
154
Maximum loading of one shelf, kg
40
50
Energy consumption at ambient
temperature +25 °C:
kWh/year
At switched on
lighting
At switched
off lighting
At switched on
lighting
At switched off
lighting
748
737
781
756
Electrical Data: see in the product label
A-weighted sound pressure level below 70db(A)
Models
CD350-1313, CD350-311
Refrigerator total gross volume, L
350
Refrigerator net volume, L
330
Dimensions (H x W x D), cm
173 x 60 x 60
Shelf area, dm2
120
climate class
N
Average air temperature inside the refrigerator, °C
from +4 to +14
Weight, kg
67
Door opening area, m²
0,80
General product exposure area, m²
0,62
Loading of the refrigerator (quantity of bottles) 0,75 l
105 pcs.
Maximum loading of one shelf, kg
50
Energy efficiency classification
D
A
Energy consumption at ambient temperature +25 °C, kWh/year
321
161
Nominal imput of luminaire, W
3
Acoustical noise emissions, dB(A) re1 pW
43
Electrical Data: see in the product label

905302 G21M 11/43
Lees de veiligheidsinstructies aandachtig door. Indien de instructies niet zorgvuldig worden
toegepast, kunnen er risico’s onstaan of kan er schade worden aangericht met als gevolg
het vervallen van de volledige garantie.
Producent steelt zich niet verantwoordelijk voor de schade die uit het niet nagaan van de
aanwijzingen van deze gebruiksaanwijzing voortvloeit.
Het is aanbevolen om de veiligheidsinstructies te bewaren gedurende de gehele
levensduur van de koelkast. Indien de koelkast wordt verkocht, dient men tevens de
veiligheidsinistructies aan de nieuwe eigenaar te geven.
Algemene informatie:
De koelkast is een commerciële vitrine koelkast, met een glasdeur en een ventilator, bedoeld
voor het koelen, tonen en bewaren van levensmiddelen en drank. Deze toestellen zijn
bedoeld voor commercieel gebruik!
DE WERKING VAN DE KOELKAST WORDT DOOR DE FABRIKANT GEGARANDEERD BIJ EEN
OMGEVINGSTEMPERATUUR TUSSEN +16°C EN +32°C EN EEN VOCHTIGHEIDSGRAAD DIE
NIET HOGER DAN 60% IS.
VEILIGHEIDSINSTRUCTIES
–Let erop dat de ventilatieopeningen aan de bovenkant en zijkanten niet
afgedekt worden.
–Tijdens het reinigen van het vriesgedeelte geen gebruik maken van
mechanische of elektrische hulpmiddelen om het ontdooingsproces te
versnellen.
–Indien de voedingskabel beschadigd is, dient deze door de fabrikant, zijn
onderhoudspersoneel of door een gespecialiseerd vakman te worden
vervangen om schade te voorkomen.
–Wanneer de koelkast wordt afgedankt, dient dit volgens de landelijke wetgeving
plaats te vinden.
–Zorg dat het koelsysteem van de koelkast niet wordt beschadigd. Indien het
koelsysteem wordt beschadigd:
•Geen vuur gebruiken.
•Vermijd vonken ― gebruik geen elektrische apparaten of verlichtingen.
•Ingeval van storing van het koelsysteem is het aangeraden om de ruimte,
waarin het apparaat geplaatst werd door enkele minuten te ventileren (deze
ruimte dient ten minste 4 m3 hebben; voor het product met isobutaan/ R600a)
–De koelkast dient uitsluitend voor het koelen en levensmiddelen gebruikt te worden.
–Dit apparaat is niet geschikt voor de opslag van explosieve stoffen zoals
aerosols met ontvlambaar drijfgas.
NL

905302 G21M 12/43
–Het is verboden om benzine of andere ontvlambare stoffen op te slaan in de
onmiddellijke omgeving van het apparaat.
ELEKTRISCHE AANSLUITING
–Dit apparaat mag alleen worden aangesloten op een volgens de wet
geïnstalleerd geaard stopcontact. De geaarde stekker waarmee het apparaat
met het voedingsnet wordt verbonden, dient gemakkelijk bereikbaar te zijn.Zorg
ervoor dat de op het typeplaatje aangegeven spanning overeenkomt met de
netspanning. Dit product komt overeen met de richtlijnen aangegeven op het
CE-label.
–Indien de koelkast voorzien is van de speciale voedingskabel, kan deze enkel
vervangen worden door een gelijksoortige kabel die door de fabrikant wordt
geleverd.
–Om gevaar te voorkomenvermijden mogen beschadigde voedingskabels enkel
door de fabriek, een onderhoudstechnicus of iemand met gelijkwaardige
ervaring vervangen worden.
–GEBRUIK GEEN verlengkabels, adapters of hub.
–Bij het plaatsen van de koelkast moet gecontroleerd worden of de voedingskabel niet
gekneld zlt en zodoende beschadigd wordt. Bij het plaatsen van eventuele zware
objecten zoals bijvoorbeeld koelelementen, meubels of andere apparaten naast de
koelkast, dient men ervoor te zorgen dat de voedingskabel niet bekneld raakt. Dit kan
namelijk kortsluiting en brand veroorzaken.
–Controleer of de stekker van de voedingskabel niet achter de koelkast gekneld
zit of dat het op andere wijze beschadigd wordt. Een beschadigde stekker kan
brand veroorzaken!
–Waarschuwing! Verwijder nooit de afdekking van het binnenverlichting LED
lampje. Wanneer er een defect is, neem dan contact op met onze
klantenservice voor assistentie.
Als de koelkast niet werkt en als het niet mogelijk is om deze volgens de
aanbevolen richtlijnen te repareren, dient men de stekker uit het stopcontact
te halen, de deuren te openen en contact op te nemen met de erkende
onderhoudsmonteur. Alleen de erkende onderhoudsmonteur is bevoegd om
technische of productiefouten te herstellen.
•Als de stekker van de koelkast uit het het stopcontact wordt gehaald, (bij schoonmaak,
verplaatsing, enz.), kan het apparaat na 15 minuten weer aangesloten worden.
•Het is verboden om technisch beschadigde apparaten te gebruiken.
•Voordat men de koelkast schoonmaakt, dient deze uitgezet te worden en dient de
stekker uit het stopcontact gehaald te worden.
•De koelkast mag niet door verbranding vernietigd worden.

905302 G21M 13/43
•Plaats geen andere werkende elektrische apparaten (zoals magnetrons,
haardrogers, strijkijzers, elektrische ketels of andere apparaten) boven op de
koelkast want deze kunnen de plastic onderdelen ervan doen verbranden.
•Plaats geen borden met vloeistoffen, vazen met bloemen of andere vloeistofhouders
op de koelkast.
•Klim of zit niet op de koelkast, hang niet aan de deuren en vermijd dat kinderen dit
doen.
De koelkast dient uitsluitend in verticale positie te worden vervoerd. DE
FABRIKANT IS NIET VERANTWOORDELIJK VOOR SCHADE DIE BEROKKEND
WORDT BIJ HET NIET RESPECTEREN VAN DE VERVOERAANWIJZINGEN.
IINSTALLATIE EN WERKOMSTANDIGHEDEN VAN HET
APPARAAT
Plaatsing
•Plaats de koelkast in een droog en goed geventileerde ruimte.
WAARSCHUWING! De koelkast dient niet in een ruimte zonder verwarming
of op een veranda geplaatst te worden. Plaats de koelkast ver van
warmtebronnen zoals keukenovens, verwarmingsradiatoren en vermijd
direct zonlicht. De koelkast dient niet in aanraking te komen met
verwarmings- gas- of waterleidingen of andere elektrische apparaten.
•Let erop dat de ventilatieopeningen aan de bovenkant niet afgedekt worden– er moet een goede
luchtventilatie rondom de koelkast verzekerd worden. Er dient een ruimte te zijn van minstens 10
cm tussen de bovenkant van de koelkast en eventuele andere meubels die boven het apparaat
worden geplaatst. Indien deze aanbeveling niet wordt nageleefd, zal de koelkast meer stroom
gebruiken en kan de compressor oververhit raken.
•Indien de koelkast in een hoek wordt geplaatst, dient er een ruimte van minstens 1 cm (afb. 2).
•De koelkast moet waterpas staan en moet de muur niet aanraken. Indien nodig, kan de hoogte
van de koelkast door middel van de afstelpoot ingesteld worden: de voorkant van de koelkast stijgt
als de afstelpoten met de klok mee gedraaid worden en daalt als deze tegen de klok in gedraaid
worden. De deuren sluiten vanzelf als de koelkast ietwat naar achteren helt.
Vóór de ingebruikname:
De werkzaamheden kunnen het beste door 2 personen worden uitgevoerd.
•Pak de koelkast uit. Til de koelkast uit de schuimbasis. Verwijder het plakband. Verwijder alle
roodgekleurde onderdelen van de rekken Het apparaat is uitgerust met vastgeschroefde
handgrepen. Gebruik de handgrepen niet om het toestel op te tillen of te verplaatsen.
Dit kan leiden tot het afbreken van de handgrepen.
•Bij het verplaatsen van de koelkast in de gewenste positie, is het gemakkelijker deze te verzetten
indien u de voorkant een beetje optilt en naar achteren kantelt zodat de diepvriezer op de wieltjes
kan bewegen.
•Monteer twee van de steunen uit het onderdelentasje op hun plaats aan de achterbovenkant van de
koelkast (zie afb. 4, pagina 1).
Dient u 4 uur te wachten voordat u de diepvriezer kunt aansluiten. Indien deze tijd
niet wordt gerespecteerd, zou de compressor buiten werking kunnen raken.
Alle verpakkings- en vervoermaterialen dienen verwijderd te worden voordat u de koelkast
met het voedingsnet verbindt. Zorg ervoor dat al het verpakkingsmateriaal op de juiste wijze
wordt gerecycled.

905302 G21M 14/43
BESCHRIJVING VAN DE KOELKAST, BASISONDERDELEN
Zie afb., pagina 1
1
Aan- / uitschakelaar voor binnenlicht
6
Ventilator*
2
Thermostaatknop
7
Vak
3
Schaal van de thermostaat
8
Zuiveringsinstallatie
4
Elektriciteit (groen licht)
9
Condensor
5
Verlichting binnenkant (LED)
10
Compressor
1 ― AAN- / UITSCHAKELAAR VOOR BINNENLICHT. De verlichting van de bewaarafdeling word er
aangezet door de druk op de drukknop 1 van de schakelaar.
Simbol | - aangezet. Simbol O – i uitgezet.
2 ― THERMOSTAATKNOP. De temperatuur in bewaar afdeling van de koelkast word door de knop
van de thermostaatregelaar geregeld.
*WAARSCHUWING! Wordt de ventilator automatisch aangezet en werkt ononderbroken.
TEMPERATUUR INSTELLEN
De temperatuur in het koelgedeelte wordt bediend door de thermostaatknop 2 (afb. 1) in de
gewenste stand te draaien. De temperatuur wordt naast de thermostaatknop aangegeven.
De temperatuur wordt op een schaal van 5 cijfers aangegeven.
0 = Compressor is uitgeschakeld. WAARSCHUWING! Elektriciteit is niet uitgeschakeld.
1 = hoogste temperatuur (laagste koeling)
5 = laagste temperatuur (hoogste koeling)
ALS DE OMGEVINGSTEMPERATUUR LAAG IS, ZAL DE KOELKAST MINDER KOELEN. DE
TEMPERATUUR IN DE KOELKAST KAN DAAROM STIJGEN. Gebruik de thermostaatknop om
een lagere temperatuur in te stellen.
SCHOONMAAK EN ONDERHOUD
DE KOELKAST IS VOORZIEN VAN EEN AUTOMATISCH ONTDOOI-SYSTEEM. IJsdruppels die zich op de
achterwand van het koelgedeelte vormen, dooien wanneer de compressor niet in werking is en het
dooiwater loopt weg via het afvoergootje naar het blad op de compressor waar het verdampt.
REINIG DE KOELKAST REGELMATIG.
Vergeet niet om de stekker uit het stopcontact te halen voordat u ontdooit en de
achterkant van de koelkast schoonmaakt.
•Vermijd dat de interne oppervlaktes en de plastic onderdelen in aanraking komen met vetten, zuren en
sauzen. Reinig bij morsen onmiddelijk met warm zeepwater of afwasmiddel. Daarna afdrogen.
•Reinig regelmatig het deurrubber. Daarna afdrogen.
•
REINIG REGELMATIG DE AFVOER VAN HET ONDOOISYSTEEM MET HET
DAARTOE BESTEMDE SCHOONMAAKELEMENT.
•Verwijder stof aan de achterkant van de koelkast en de compressor minstens
één keer per jaar. Gebruik hiervoor een zachte borstel, een elektrostatische
doek of een stofzuiger.
•Gebruik voor de schoonmaak van de koelkast GEEN schoonmaakmiddelen die
schurende of zure elementen of alcohol of benzeen bevatten. GEBRUIK GEEN
doeken of sponsen met een ruwe oppervlakte.
•Laat de deuren open als u de koelkast voor een lange periode uit moet zetten.

905302 G21M 15/43
PROBLEMEN EN OPLOSSINGEN. Wat te doen indien …
•De stekker aangesloten is maar de koelkast niet werkt en het aan/uit licht
uitgeschakeld is. Controleer of er stroom in huis is. Controleer of de stekker op de juiste wijze
in het stopcontact is gestoken.
•Het geluid neemt toe. Controleer of de koelkast rechtop en waterpas staat. Verstel hiertoe de
poten aan de voorkant. Controleer of de koelkast geen andere meubels aanraakt, en of geen enkel
deel van het koelingssysteem op de achterkant van de koelkast tegen de wand steunt. Laat de
koelkast niet dichtbij andere meubels of muren staan. Controleer of de geluidstoename niet
veroorzaakt wordt door flessen, blikjes of borden die in de koelkast elkaar aanraken.
•Er is water op de bodem van de koelafdeling. Controleer of het afvoergootje van het
ondooingswater niet verstopt is. Reinig het afvoergootje met een daarvoor bestemd
schoonmaakelement.
•Er is water onder de koelkast. De dampbak bevindt zich niet op de juiste manier op de
compressor. Zet de bak bovenop de compressor.
•Bij het openen van de koelkast, gaat het deurrubber los. Het deurrubber is in aanraking
gekomen met vette voedselresten (vet, stroop). Reinig het rubber en de behuizing met warm
zeepwater of afwasmiddel en droog het af. Doe het deurrubber terug op zijn plaats.
•De temperatuur in de koelkast is gestegen, de pauses van de compressor zijn kort.
Controleer of de deur van de koelkast goed afsluit, of de deur niet langer dan nodig geopend is
gebleven om levensmiddelen te plaatsen of te verwijderen en of er niet veel warme levensmiddelen
in de koelkast geplaatst zijn.
•Er is condensatie op de bovenkant van de koelkast. De vochtigheidsgraad van de omgeving
is boven 60%. Ventileer de ruimte waar de koelkast zich bevindt en verwijder indien mogelijk de
oorzaak van het vocht.
Opmerkingen over het geluid. Tijdens de werking van de koelkast en bij het invriezen van
de levensmiddelen, kunnen er verschillende soorten geluiden ontstaan. Dit is normaal en dit
betekent niet dat er een storing is.
OPENINGSRICHTING VAN DE DEUREN WIJZIGEN
Deze werkzaamheden kunnen het beste uitgevoerd worden door 2 personen. U heeft van twee
schroefsleutels Nr. 8 en Nr. 10 nodig en een Philips kruiskopschroevendraaier.
Tijdens het wijzigen van de openingsrichting, mag de koelkast NIET in horizontale positie geplaatst
worden. Volg onderstaande aanwijzingen in de volgorde waarin ze beschreven zijn.
VOOR DE MODELS MET EEN DEUR (zie abf. 3, pagina 2):
1. WAARSCHUWING! Zet de koelkast uit en haal de stekker uit het stopcontact.
2. De twee schroeven 7 uitdraaien en de bodembeugel 8 samen met de set sluitringen 6 op de as en de
bus 5 verwijderen.
3. De twee schroeven 7 losschroeven en de beugel 11 verwijderen.De deur 4 verwijderen.
4. Van de bovenste beugel de as 2 samen met de moer 1 en de sluitringen 3 losschroeven en de volledige
set vastschroeven aan de tegenovergestelde zijde van de deur.
5. Alvorens de deur te monteren, de deur 180° draaien en de bovenste as in de deur plaatsen.
6. De bevestigingschroeven 12 uit beide deuren losschroeven, de deurgrepen 13 verwijderen en ze
vastschroeven door gebruik te maken van de vrije schroefgaten op dezelfde zijde.
7. De bodemplaat 10 blijft op zijn plaats.
8. Eerst de as van de bodembeugel 8 in de deur plaatsen, daarna de beugel met de set sluitringen en
bussen aan de tegenovergestelde zijde monteren.
9. De beugel 11 aan de tegenovergestelde zijde van de kast vastschroeven.
VOOR DE MODELLEN MET TWEE DOOREN (abf .5, pagina 2):
WAARSCHUWING! Zet de koelkast uit en haal de stekker uit het stopcontact.
1. De twee schroeven 12 uitdraaien en de bodembeugel 13 samen met de set sluitringen 11 op de as en
de bus 10 verwijderen. De twee schroeven 12 losschroeven en de beugel 15 verwijderen. De onderste
deur 9 verwijderen. De bevestigingsschroeven 7 van de middelste beugel uitdraaien. De middelste
beugel 6 samen met de sluitringen op de as en de bus 5 verwijderen.

905302 G21M 16/43
2. De bovenste deur verwijderen. Van de bovenste beugel de as 2 samen met de moer 1 en de
sluitringen 3 losschroeven en de volledige set vastschroeven aan de tegenovergestelde zijde van de
deur. De pluggen 18 verwijderen en naar de tegenovergestelde zijde van de kast verplaatsen. Alvorens
de bovenste deur te monteren, de deur 180° draaien en de bovenste as in de deur plaatsen.
3. Eerst de as van de middelste beugel in de bovenste deur plaatsen, daarna de beugel met de set
sluitringen en bussen aan de tegenovergestelde zijde van de kast monteren.
4. De onderste deur 180° draaien en vervolgens op de as van de middelste beugel plaatsen.
5. De bevestiginsschroeven 16 uit beide deuren losschroeven, de deurgrepen 17 verwijderen en ze
vastschroeven door gebruik te maken van de vrije schroefgaten op dezelfde zijde.
6. De bodemplaat 14 blijft op zijn plaats.
7. Eerst de as van de bodembeugel 13 in de deur plaatsen, daarna de beugel met de set sluitringen en
bussen aan de tegenovergestelde zijde monteren.
8. De beugel 15 aan de tegenovergestelde zijde van de kast vastschroeven.
RICHTLIJNEN m.b.t. MILIEU
Dit symbool geeft aan dat dit product niet als huishoudafval mag worden behandeld. Het moet
separaat opgehaald en gerecycled worden door het bijvoorbeeld naar containers met
bovenvermeld symbool in daartoe bestemde afvalwerverkingscentra te brengen.
Voor meer informatie over het recyclen van het product, kan men contact opnemen met de
gemeentelijke dienst, de winkel waar u het product heeft gekocht of met de fabrikant.
Indien u beslist het product te recyclen, zorg er dan voor dat dit niet door anderen gebruikt kan worden en
vermijd hierdoor eventuele ongelukken Haal de stekker uit het stopcontact en verwijder de voedingskabel.
Verwijder het deurrubber. Maak de deurvergrendeling ongedaan indien aanwezig.
Demonteer de koelkast niet zelf. Laat dit door een recyclingsbedrijf doen.
GARANTIE BEPALINGEN
INDIEN U KOELKAST NIET OP DE GEWENSTE MANIER FUNCTIONEERT, CONTROLEERT U DAN EERST OF U
DIT ZELF KUNT VERHELPEN. Indien u het probleem niet zelf kunt oplossen, neemt u dan telefonisch of
schriftelijk contact op met de dichtsbijzijnde servicedienst. Geef altijd het koelkastmodel en het
serienummer aan. Deze gegevens staan op het plaatje, dat zich op de linkerwand van het koelgedeelte
bevindt.

905302 G21M 17/43
Product informatie blad voor koelapparaten voor huishoudelijk gebruik
Daten gemäß den Anforderungen der Norm EN ISO 23953-2:2005
LET OP. De fabrikant behoudt zich het recht voor om in de toekomst eventuele wijzigingen aan de
technische gegevens en specificaties aan te brengen.
Model
CD290-1004,
CD290.1004,
FKU 290 G,
FLK- 292
CD350-1003
CD350.1003
KS CD 350.1
CD350
CD350-1004
KS CD 350.2
CD350-2D
CD350-2
Totaal volume van de koelkast, L
290
350
Nuttig volume van de bewaringsafdeling, L
275
320
Grote afmetingen , cm
145 x 60 x 60
173 x 60 x 60
Vlakte van de rekken, dm2
115
115
Gewicht, kg
55
65
Klimaatklasse
3 (
+16°C en +32°C)
Producten temperatuur klasse
S
Producten temperatuurbereik, ° C (In
overeenstemming met EU-norm ISO 23953-
2: 2015, p .4.2.2)
von -2 bis +14
Fläche zum Türaufmachen , m²
0,66
0,80
Allgemeine Produkt-Exposition Bereich, m²
0,51
0,62
0,58
Anzahl der
Flaschen, Stc:
0,33 l
287
322
0,5 l PET
126
154
Max. Belastung pro Ablage kg
40
50
Energieverbruik bij temperatuur van
omgeving +25°C, kWh / year
Bei einges-
chalteter
Beleuchtung
Bei
ausgeschal-
teter
Beleuchtung
Bei einges-
chalteter
Beleuchtung
Bei ausgeschal-
teter
Beleuchtung
748
737
781
756
Elektrische specificaties
Zie waarderingsplaat

905302 G21M 18/43
LESEN SIE BITTE DIE GEBRAUCHSANWEISUNG SORGFÄLTIG DURCH ! Bei Nichtbeachtung
der in der Gebrauchsanweisung genannten Anweisungen besteht die Gefahr der
Beschädigung des Geräts und des damit verbundenen Verlusts des Rechts auf
Garantieleistungen. Wir empfehlen ihnen, die Gebrauchsanweisung bis zum Ende der
Betriebszeit aufzubewahren und sie im Falle eines Verkaufs des Geräts an den neuen
Eigentümer weiterzugeben.
Allgemeine daten:
Der Kühlschrank ist ein Kommerzkühlschrank –Vitrine mit einer Glastür und einem
Ventilator, der für die Abkühlung, Exponierung und Aufbewahrung von Lebensmitteln und
Geträn-ken geeignet ist. Diese Geräte sind für den gewerblichen Gebrauch
bestimmt!
DER HERSTELLER GARANTIERT EINE ZUVERLÄSSIGE FUNKTION DES KÜHLSCHRANKS BEI
EINER UMGEBUNGSTEMPERATUR VON +16 BIS +32 GRAD CELSIUS UND EINER
VERHÄLTNISMÄSSIGEN LUFTFEUCHTIGKEIT VON BIS ZU 60 PROZENT.
Für die Kühlschränke CD350-1313, CD350-113. Der Kühlschrank ist ein
Kühlschrank–Vitrine mit einer Glastür. Geeignet für die Weinabkühlung und
Weinaufbewarung im Bar, Cafe u.s.w.
DER HERSTELLER GARANTIERT EINE ZUVERLÄSSIGE FUNKTION DES KÜHLSCHRANKS BEI
EINER UMGEBUNGSTEMPERATUR VON +16 BIS +32 GRAD CELSIUS UND EINER
VERHÄLTNISMÄSSIGEN LUFTFEUCHTIGKEIT VON BIS ZU 70 PROZENT.
SICHERHEITSHINWEISE
Halten Sie die Lüftungsöffnungen im Gerategehäuse oder in möglichen
Seitenwändenvon umgebenden Einbauwänden frei von Hindemissen.
Benutzen Sie keine mechanichen Gegenstände order andere Mittel, um den
Abtauprozess zu beschleunigen, ausser den vom Hersteller empfohlenen.
Das Kühlsystem des Geräts nicht beschädigen. Verwendetes Kühlmittel R600a.
Falls das Kühlsystem beschädigt ist:
•Kein offenes Feuer verwenden.
•Funkenschlag vermeiden, keine elektrischen sowie Beleuchtungsgeräte
einschalten.
•Den Raum sofort durchlüften.
Das Kühlgerät nur Aufbewahrung von Esswaren verwenden.
In diesem Gerät keine explosionsfähigen Stoffe, wie zum Beispiel
Aerosolbehälter mit brennbarem Treibgas, lagern.
NETZANSCHLUSS
Das Kühlgerät nur an eine vorschriftsmäßig installierte Schutzkontaktsteckdose
anschließen. Die Netzspannung muss der auf dem Typenschild des Gerätes
DE

905302 G21M 19/43
angegebenen Spannung entsprechen. Das Kühlgerät entspricht den Richtlinien,
die für die CE-Kennzeichnung verbindlich sind.
Das Kühlgerät nicht an Wechselgleichrichter oder zusammen mit anderen
Geräten über ein Verlängerungskabel anschließen.
Die Anschlussleitung sollte nicht die Rückseite, wie z.B. den Wärmetauscher
berühren, um eventuelle Vibrationsgeräusche zu vermeiden.
Vor dem aufstellen ein defektes kabel unbedingt durch ein neues vom selben typ
wie das vom hersteller des kühlgeräts verwendete ersetzen, um schaden an
gesundheit und eigentum zu vermeiden.
Um jegliches risiko auszuschliessen, darf ein schadhaftes netzkabel nur vom
hersteller, dessen wartungsmeister oder einer entsprechend ausgebildeten
person ausgewechselt werden.
Beachten Sie bitte beim Aufstellen des Kühlgeräts, dass dieser das Netzkabel
nicht beschädigt. Nichts Schweres wie Kühlgeräte oder andere geräte auf das
Stromkabel stellen, um dieses nicht zu beschädigen. Andernfalls könnte dies zu
einem Kurzschluss und zu einem Brand führen.
Achten Sie darauf, dass die Rückwand des Kühlgeräts den Netzstecker nicht
berührt oder letzterer in irgendeiner Weise beschädigt ist. Ein defekter
Netzstecker kann zu einem Brand führen!
Nach dem ausschalten des geräts (zur reinigung, zum aufstellen an einem
anderen platz usw.) Dieses erst nach mindestens 15 MINUTEN wieder ans netz
anschließen.
Die Benutzung eines technisch nicht einwandfreien Geräts ist zu unterlassen.
Vor der Reinigung Das Kühlgerät ausschalten und den Netzstecker aus der
Steckdose ziehen.
Schützen Sie die Innenwände und alle Kunststoffteile des Kühlgeräts vor Kontakt
mit Fett, Säuren und Soßen.
Bitte keine elektrischen Geräte wie Mikrowellengeräte, Haartrockner, Bügeleisen,
Wasserkocher und ähnliche auf den Kühlschrank stellen: Kunststoffteile könnten
sich entzünden.
Das Kühlgerät kann von Kindern ab 8 Jahrensowie von Personen mit
reduzierterphysischen, sensorischen oder mentalen Fähigkeiten oder Mangel an
Erfahrung und/oder Wissen benutzt werden, wenn sie beaufsichtigt oder
bezüglich des sicheren Gebrauchs des Gerätes unterwiesen wurden und die
daraus resultierenden Gefahren verstanden haben.
NUR DER SERVICE-FACHMANN IST IMSTANDE, TECHNISCHE MÄNGEL
ZU BEHEBEN.

905302 G21M 20/43
Das Kühlgerät nur in vertikaler Lage transportieren. BEI
NICHTBEACHTUNG DER TANSPORTVORSCHRIFTEN KANN DER
HERSTELLER NICHT FÜR ENTSTEHENDE SCHÄDEN HAFTBAR GEMACHT
WERDEN.
INBETRIEBNAHME UND BETRIEBSBEDINGUNGEN DES GERÄTES
Aufstellung:
•Stellen Sie den Kühlschrank in einem trockenen, gut gelüfteten Raum auf.
ACHTUNG! Der Kühlschrank darf nicht in ungeheizten Räumen oder auf dem
Balkon betrieben werden. Das Gerät nicht in unmittelbarer Nähe einer
Heizquelle (Kochherd, Heizkörper, direkte Sonneneinstrahlung) aufstellen.Der
Kühlgerät darf nicht in Kontakt mit Heizungs- Gas- und Abwasserrohre
geraten sowie elektrische Geräte nicht berühren.
•Die Lüftungsöffnung an der Oberseite des Kühlschranks darf nicht abgedeckt werden, eine
ungehinderte Lufzirkulation muss gewährleistet sein. Der Zwischenraum zwischen der
Oberseite des Kühlschranks und einem darüber befindlichen Möbel sollte mindestens 10 cm
betragen. Andernfalls steigt der Stromverbrauch des Kühlschranks an oder der Kompressor
kann sich überhitzen.
•Falls der Kühlschrank in einer Ecke aufgestellt werden soll, belassen Sie einen seitlichen
Abstand von mindestens 1 cm (siehe abb. 2, Seite 1).
•Der Kühlschrank ist unbedingt auf einer ebenen Oberfläche aufzustellen, er darf nicht an die
Wand angelehnt werden. Regulieren Sie, falls nötig, die Höhe durch Drehen der Stützfüße:
durch Drehen im Uhrzeigersinn hebt sich der Vorderteil des Geräts, durch Drehen im
Gegenuhrzeigersinn senkt er sich. Wenn der Kühlschrank ganz leicht nach hinten geneigt
steht, gehen die Türen von selbst zu.
Vorbereitung des Geräts:
Wir empfehlen, für die Vorbereitungsarbeiten eine weitere Person heranzuziehen.
•Die Verpackung entfernen. Den Kühlschrank von der Schaumstoffunterlage nehmen.
Klebebänder entfernen.
•Neigen Sie beim Aufstellen den Vorderteil des Kühlschranks ein wenig nach hinten, dann
können Sie ihn auf den Rädchen leicht an den gewünschten Platz rollen. Zum
Aufstellen und Verschieben des Gerätes dürfen nie die Türgriffe, die
Kondensatorröhrchen oder die Kompressoreinheit benutzt werden.
•Zwei Abstandshalter (1) aus dem Beutel herausnehmen und in die Halterungen (2) auf
der Rückseite des Gerätes einsetzen (siehe abb. 4, Seite 1).
•Das Gerät nicht ans Netz anschließen ohne vorher alle Verpackungs- und
Transportelemente entfernt zu haben. Entsorgen Sie die Verpackungen fachgerecht.
Das Gerät darf es erst nach mindestens vier Stunden ans Netz
angeschlossen werden. Bei Nichtbeachtung dieser Vorschrift droht der
Ausfall des Kompressors.
Seite wird geladen ...
Seite wird geladen ...
Seite wird geladen ...
Seite wird geladen ...
Seite wird geladen ...
Seite wird geladen ...
Seite wird geladen ...
Seite wird geladen ...
Seite wird geladen ...
Seite wird geladen ...
Seite wird geladen ...
Seite wird geladen ...
Seite wird geladen ...
Seite wird geladen ...
Seite wird geladen ...
Seite wird geladen ...
Seite wird geladen ...
Seite wird geladen ...
Seite wird geladen ...
Seite wird geladen ...
Seite wird geladen ...
Seite wird geladen ...
Seite wird geladen ...
-
 1
1
-
 2
2
-
 3
3
-
 4
4
-
 5
5
-
 6
6
-
 7
7
-
 8
8
-
 9
9
-
 10
10
-
 11
11
-
 12
12
-
 13
13
-
 14
14
-
 15
15
-
 16
16
-
 17
17
-
 18
18
-
 19
19
-
 20
20
-
 21
21
-
 22
22
-
 23
23
-
 24
24
-
 25
25
-
 26
26
-
 27
27
-
 28
28
-
 29
29
-
 30
30
-
 31
31
-
 32
32
-
 33
33
-
 34
34
-
 35
35
-
 36
36
-
 37
37
-
 38
38
-
 39
39
-
 40
40
-
 41
41
-
 42
42
-
 43
43


in anderen Sprachen
- English: Exquisit 905302 User manual
- français: Exquisit 905302 Manuel utilisateur
- Nederlands: Exquisit 905302 Handleiding
Andere Dokumente
-
SEVERIN KS 9776 Bedienungsanleitung
-
Whirlpool ADN 221/2 Benutzerhandbuch
-
Whirlpool ADN203 C Benutzerhandbuch
-
Candy CFBF3050 Bedienungsanleitung
-
Ignis INS 921 A+ Bedienungsanleitung
-
SEVERIN KS 9794 Benutzerhandbuch
-
AEG S83600CSW1 Benutzerhandbuch
-
Zanussi ZGL63ITX Benutzerhandbuch
-
SEVERIN DT Series Benutzerhandbuch
-
SEVERIN 910010 Benutzerhandbuch