
Information
Power Parts
www.ktm.com
76535940000
07. 2009 3.211.567
*3211567*

Danke, dass Sie sich für KTM Power Parts entschlossen haben.
Alle unsere Produkte wurden nach den höchsten Standards entwickelt und gefertigt, unter Verwendung der besten verfügbaren
Materialien.
KTM Power Parts sind rennerprobt und gewährleisten ultimative Performance.
KTM KANN NICHT VERANTWORTLICH GEMACHT WERDEN FÜR FALSCHE MONTAGE ODER VERWENDUNG DIESES PRODUKTS. Bitte
befolgen Sie die Montageanleitung. Fachmännische Beratung und korrekte Installation der KTM PowerParts durch einen autorisierten
KTM Händler sind unerlässlich, um das Optimum an Sicherheit und Funktionalität zu gewährleisten.
Danke.
Thank you for choosing KTM Power Parts!
All of our products are designed and built to the highest standards using the finest materials available.
KTM Power Parts are race proven to offer the ultimate in performance.
KTM WILL NOT BE HELD LIABLE FOR IMPROPER INSTALLATION OR USE OF THIS PRODUCT. Please follow all instructions provided.
Professional advice and proper installation of the KTM PowerParts by an authorized KTM dealer are essential to provide maximum
safety and functions.
Thank you.
Grazie per aver deciso di acquistare un prodotto KTM Power Parts.
Tutti i nostri prodotti sono stati sviluppati e realizzati secondo i massimi standard e con l'impiego dei migliori materiali disponibili.
Le KTM Power Parts sono collaudate nelle competizioni ed assicurano altissime prestazioni.
KTM NON PUÒ ESSERE RESA RESPONSABILE PER UN MONTAGGIO O USO IMPROPRIO DI QUESTO PRODOTTO. Per favore osservate le
istruzioni nel manuale d'uso. Al fine di garantire la massima sicurezza e il corretto funzionamento, è indispensabile farsi consigliare
da persone esperte e competenti e far eseguire l'installazione delle KTM PowerPart presso i concessionari KTM autorizzati.
Grazie.
Nous vous remercions d'avoir choisi KTM Power Parts.
Tous nos produits ont été développés et réalisés selon les plus hauts standards et en utilisant les meilleurs matériaux disponibles.
Les Power Parts de KTM ont fait leurs preuves en compétition et garantissent les meilleures performances.
LA RESPONSABILITÉ DE KTM NE SAURAIT ÊTRE ENGAGÉE EN CAS D'ERREUR DANS LE MONTAGE OU L'UTILISATION DE CE PRODUIT.
Il convient de respecter les instructions de montage.
Le conseil spécialisé et l'installation dans les règles de l'art des PowerParts KTM par un concessionnaire KTM agréé sont
indispensables pour assurer un maximum de sécurité et de fonctionnalité.
Merci.
Gracias por haberse decidido por el Power Parts KTM.
Todos nuestros productos han sido desarrollados y producidos según los estándares más altos utilizando los mejores materiales
disponibles.
Las KTM Power Parts están probadas en competencia y garantizan un óptimo rendimiento.
NO SE PUEDE HACER RESPONSABLE A LA KTM POR UN MONTAJE O UN USO INCORRECTO DE ESTE PRODUCTO.
Le rogamos seguir las instrucciones para el montaje.
A fin de garantizar la máxima seguridad y un funcionamiento correcto es imprescindible acudir a un concesionario autorizado de KTM
para obtener el mejor asesoramiento técnico e instalar correctamente las KTM PowerParts.
Gracias.
DEUTSCH
2
ENGLISH
2
ESPANOL
2
ITALIANO
2
FRANCAIS
2

DEUTSCH
3
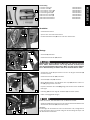
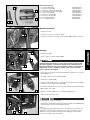
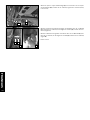
Lieferumfang:
1x Strebe rechts (1) 76535940045
1x Strebe links (2) 76535940035
1x Schutzblech rechts (3) 76535940020
1x Schutzblech links (4) 76535940010
1x Verbindungsrohr (5) 76535940050
2x Buchse 6.2x12x8 (6) 76535940075
2x Buchse 6.2x10x7 (7) 76535940065
4x Bundschraube M6x25 0025060256
4x Bundschraube M6x20 0025060206
Vorarbeiten
- Sitzbank demontieren.
- Spoiler links und rechts demontieren.
- Kunststoff Kühlerschutz (8) rechts und links demontieren.
Montage
- Schraube (9) entfernen.
- Kühlerverschlussdeckel (10) öffnen.
Kühlflüssigkeit wird beim Betrieb des Motorrades sehr heiß und steht unter
Druck. Kühler, Kühlerschläuche und sonstige Bauteile des Kühlsystems
nicht bei betriebswarmem Motor öffnen. Motor und Kühl-system abkühlen
lassen. Bei Verbrühung die Stellen sofort unter lauwarmes Wasser halten.
- Schutzblech rechts (3) positionieren und mit der Original Schraube (9)
montieren (5Nm).
- Kühlerverschlussdeckel (10) schließen.
- Schraube (11) und (12) entfernen.
- Mutter (13) entfernen, das Halteblech der Hupe (14) drehen und wie in
Bild (A) gezeigt wieder montieren.
- Hupe mit Halteblech wie in Bild (B) gezeigt positionieren und mit der Mutter
befestigen.
- Halterung (15) mit der Original Schraube (11) montieren (5Nm).
- Kabel ordnungsgemäß verlegen
Achten Sie darauf, dass das Kabel nicht am Krümmer ansteht.
- Strebe rechts (1) positionieren und mit der zuvor am Kunststoff Kühlerschutz
demontierten Schraube (12) montieren (5Nm).
HINWEIS:
Die Montage des Schutzbleches links und der Strebe links, erfolgt ähnlich
zu der der rechten Seite. Es entfällt lediglich die Demontage der Hupe und
des Kühlerverschlussdeckels.
4
3
1 2
5
8
9
10
3
11
12
13
1
11
12
15
14
AB

DEUTSCH
4
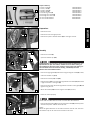
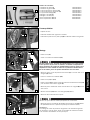
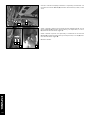
- Original Kunststoff Kühlerschutz mit den Schrauben M6x20 (3)
(Lieferumfang) und den Buchsen 6.2x10x7 (4) (Lieferumfang) wieder
montieren (Bild C).
- Spoiler links und rechts mit den Schrauben M6x20 (3) (Lieferumfang) und
den Buchsen 6.2x12x8 (4) (Lieferumfang) wieder montieren (Bild D).
- Sitzbank montieren.
- Verbindungsrohr (1) positionieren und mit den Bundschrauben M6x25 (2)
(Lieferumfang) links und rechts montieren (5Nm, Loctite 243).
1
2
4
3
CD

ENGLISH
5
4
3
1 2
5
8
9
10
3
11
12
13
1
11
12
15
14
AB
Scope of delivery:
1x brace, right (1) 76535940045
1x brace, left (2) 76535940035
1x guard, right (3) 76535940020
1x guard, left (4) 76535940010
1x connecting tube (5) 76535940050
2x bushings 6.2x12x8 (6) 76535940075
2x bushings 6.2x10x7 (7) 76535940065
4x collar screws M6x25 0025060256
4x collar screws M6x20 0025060206
Preparations
- Remove the seat.
- Remove the left and right spoilers.
- Remove the plastic radiator shields (8) on the right and left.
Assembly
- Remove the screw (9).
- Open the radiator cap (10).
Coolant becomes very hot and is under pressure when the motorcycle is in
operation.Do not open the radiator, radiator hoses and other cooling sys-
tem components when the engine is warm.Let the engine and cooling sys-
tem cool down first.In the event of scalding, immediately flush the
affected areas with lukewarm water.
- Position the right guard (3) and mount using the original screw (9) (5 Nm).
- Close the radiator cap (10).
- Remove the screws (11) and (12).
- Remove the nut (13), turn the retaining bracket of the horn (14) and mount
it again as shown in the figure (A).
- Position the horn with the retaining bracket as shown in the figure (B) and
tighten using the nut.
- Mount the holder (15) with the original screw (11) (5 Nm).
- Route the cables properly
Ensure that the cable does not come in contact with the manifold.
- Position the right brace (1) and mount using the screw (12) previously remo-
ved from the plastic radiator shield (5 Nm).
NOTE:
Mount the guard and brace in the same manner on the left side. The horn
and radiator cap do not need to be removed on this side.

ENGLISH
6
1
2
4
3
CD
- Remount the original plastic radiator shields with the screws M6x20 (3)
(scope of supply) and the bushings 6.2x10x7 (4) (scope of supply, figure
C).
- Remount the spoilers on the left and right using the screws M6x20 (3)
(scope of supply) and the bushings 6.2x12x8 (4) (scope of supply, figure
D).
- Mount the seat.
- Position the connecting tube (1) and mount on the left and right using the
collar screws M6x25 (2) (scope of delivery) (5 Nm, Loctite 243).

ITALIANO
7
4
3
1 2
5
8
9
10
3
11
12
13
1
11
12
15
14
AB
Volume della fornitura:
N. 1 supporto destro (1) 76535940045
N. 1 supporto sinistro (2) 76535940035
N. 1 lamiera di protezione destra (3) 76535940020
N. 1 lamiera di protezione sinistra (4) 76535940010
N. 1 tubo di raccordo (5) 76535940050
N. 2 boccole 6.2x12x8 (6) 76535940075
N. 2 boccole 6.2x10x7 (7) 76535940065
N. 4 viti flangiate M6x25 0025060256
N. 4 viti flangiate M6x20 0025060206
Operazioni preliminari
- Smontare la sella.
- Smontare lo spoiler a sinistra e a destra.
- Smontare la protezione in plastica del radiatore (8) a destra e a sinistra.
Montaggio
- Estrarre la vite (9).
- Aprire il tappo a vite del radiatore (10).
Durante il funzionamento della motocicletta il liquido di raffreddamento
raggiunge temperature elevate e si trova sotto pressione. A motore caldo
non aprire il radiatore, i flessibili del radiatore o altri componenti del sis-
tema di raffreddamento. Far prima raffreddare il motore e il sistema di raf-
freddamento. In caso di scottatura, mettere subito le parti interessate
sotto un getto di acqua tiepida.
- Posizionare la lamiera di protezione destra (3) e montarla con la vite ori-
ginale (9) (5 Nm).
- Chiudere il tappo a vite del radiatore (10).
- Estrarre le viti (11) e (12).
- Estrarre il dado (13), ruotare la piastrina dell'avvisatore acustico (14) e
rimontarla come illustrato nella figura (A).
- Posizionare l'avvisatore acustico con la piastrina come mostrato nella figura
(B) e fissarlo con il dado.
- Montare il supporto (15) con la vite originale (11) (5 Nm).
- Disporre correttamente il cavo.
Il cavo non deve toccare il collettore.
- Posizionare il supporto destro (1) e montarlo utilizzando la vite (12) estratta
dalla protezione in plastica del radiatore (5 Nm).
NOTA:
Il montaggio della lamiera di protezione e del supporto sul lato sinistro va
effettuato in modo analogo a quanto descritto per il lato destro. L'unica
differenza è che viene meno l'operazione di smontaggio dell'avvisatore
acustico e del tappo a vite del radiatore.

ITALIANO
8
1
2
4
3
CD
- Con le viti M6x20 (3) (in dotazione) e le boccole 6.2x10x7 (4) (in dota-
zione) rimontare la protezione in plastica del radiatore (figura C).
- Rimontare lo spoiler a sinistra e a destra utilizzando le viti M6x20 (3) (in
dotazione) e le boccole 6.2x12x8 (4) (in dotazione) (figura D).
- Montare la sella.
- Posizionare il tubo di raccordo (1) e montarlo con le viti flangiate M6x25
(2) (in dotazione) a sinistra e a destra (5 Nm, Loctite 243).

FRANCAIS
9
4
3
1 2
5
8
9
10
3
11
12
13
1
11
12
15
14
AB
Contenu de la livraison :
1x Montant de droite (1) 76535940045
1x Montant de gauche (2) 76535940035
1x Tôle de protection de droite (3) 76535940020
1x Tôle de protection de gauche (4) 76535940010
1x Tuyau d'assemblage (5) 76535940050
2x Bague 6.2x12x8 (6) 76535940075
2x Bague 6.2x10x7 (7) 76535940065
4x Vis à épaulement M6x25 0025060256
4x Vis à épaulement M6x20 0025060206
Travaux préalables
- Déposer la selle.
- Démonter le déflecteur à gauche et à droite.
- Démonter la protection en plastique (8) du radiateur à droite et à gauche.
Montage
- Retirer la vis (9).
- Ouvrir le couvercle du radiateur (10).
Lorsque la moto tourne, le liquide de refroidissement est à la fois brûlante
et sous pression. Ne pas ouvrir le radiateur, les flexibles correspondant et
autres composants du système de refroidissement lorsque le moteur est en
température. Laisser refroidir le moteur et le système de refroidissement.
En cas de brûlure, passer les parties traumatisées sous l'eau tiède.
- Mettre en place la tôle de protection de droite (3) et la fixer avec la vis
d'origine (9) (5Nm).
- Ferme le couvercle du radiateur (10).
- Retirer la vis (11) et (12).
- Retirer l'écrou (13) et tourner la tôle de fixation de l'avertisseur sonore (14)
puis remonter comme décrit figure (A).
- Mettre en place l'avertisseur sonore comme décrit sur la figure (B) et fixer
avec l'écrou.
- Monter la fixation (15) avec la vis d'origine (11) (5Nm).
- Mettre le câble correctement en place.
Veiller à ce que le câble ne vienne pas reposer sur le collecteur.
- Mettre en place le montant de droite (1) et le fixer avec la vis (12) démon-
tée précédemment sur la protection plastique du radiateur (5Nm).
REMARQUE :
Le montage de la tôle de protection de gauche et du montant de gauche
est identique à ceux de droite. Seuls les montages de l'avertisseur sonore
et du couvercle de radiateur ne sont pas requis.

FRANCAIS
10
1
2
4
3
CD
- Monter la protection plastique d'origine du radiateur avec les vis M6x20
(3) (contenu de la livraison) et les bagues 6.2x10x7 (4) (contenu de la liv-
raison) (figure C).
- Monter le déflecteur de gauche et de droite avec les vis M6x20 (3) (con-
tenu de la livraison) et les bagues 6.2x12x8 (4) (contenu de la livraison)
(figure D).
- Poser la selle.
- Mettre en place le tuyau d'assemblage (1) et le fixer avec les vis à épau-
lement M6x25 (2) (contenu de la livraison) à gauche et à droite (5Nm,
Loctite 243).

ESPANOL
11
4
3
1 2
5
8
9
10
3
11
12
13
1
11
12
15
14
AB
Volumen de suministro:
1x puntal a la derecha (1) 76535940045
1x puntal a la izquierda (2) 76535940035
1x chapa de protección a la derecha (3) 76535940020
1x chapa de protección a la izquierda (4) 76535940010
1x tubo de unión (5) 76535940050
2x casquillo 6,2 x 12 x 8 (6) 76535940075
2x casquillo 6,2 x 10 x 7 (7) 76535940065
4x tornillo de collarín M6x25 0025060256
4x tornillo de collarín M6x20 0025060206
Trabajos previos
- Desmontar el asiento.
- Desmontar el spoiler a la izquierda y a la derecha.
- Sacar el plástico de la protección del radiador (8) a la izquierda y a la dere-
cha.
Montaje
- Retirar el tornillo (9).
- Abrir la tapa de cierre del radiador (10).
Durante el funcionamiento del motor, el líquido refrigerante alcanza tem-
peraturas muy elevadas y se encuentra bajo presión. No abrir el radiador,
las mangueras del radiador ni otros componentes del sistema de refrigera-
ción con el motor caliente. Esperar a que se enfríen el motor y el sistema
de refrigeración. En caso de quemadura, sumergir las zonas afectadas en
agua tibia inmediatamente.
- Colocar la chapa de protección a la derecha (3) y fijarla con el tornillo ori-
ginal (9) (5 Nm).
- Cerrar la tapa de cierre del radiador (10).
- Extraer el tornillo (11) y (12).
- Retirar la tuerca (13), girar la chapa de sujeción de la bocina (14) y vol-
verla a montar como se muestra en la figura (A).
- Colocar la bocina con la chapa de sujeción como se muestra en la figura
(B) y fijarla con la tuerca.
- Montar el soporte (15) con el tornillo original (11) (5 Nm).
- Tender el cable correctamente
Hay que asegurarse de que el cable no toque el colector.
- Colocar el puntal a la derecha (1) y fijarlo con el tornillo desmontado pre-
viamente en el plástico de la protección del radiador (12) (5 Nm).
NOTA:
El montaje de la chapa de protección a la izquierda y del puntal a la
izquierda se realizan de la misma forma que a la derecha. Únicamente se
suprime el desmontaje de la bocina y de la tapa de cierre del radiador.

ESPANOL
12
1
2
4
3
CD
- Volver a montar el plástico de la protección del radiador original con los
tornillos M6x20 (3) (volumen de suministro) y los casquillos 6,2 x 10 x 7
(4) (volumen de suministro) (figura C).
- Volver a montar el spoiler a la izquierda y a la derecha con los tornillos
M6x20 (3) (volumen de suministro) y los casquillos 6,2 x 12 x 8 (4) (volu-
men de suministro) (figura D).
- Montar el asiento.
- Colocar el tubo de unión (1) y montarlo a la izquierda y a la derecha con
los tornillo de collarín M6x25 (2) (volumen de suministro) (5 Nm, Loctite
243).
-
 1
1
-
 2
2
-
 3
3
-
 4
4
-
 5
5
-
 6
6
-
 7
7
-
 8
8
-
 9
9
-
 10
10
-
 11
11
-
 12
12


in anderen Sprachen
- français: KTM 76535940000 Le manuel du propriétaire
- español: KTM 76535940000 El manual del propietario
- italiano: KTM 76535940000 Manuale del proprietario
Verwandte Artikel
-
KTM 7503004505049 Bedienungsanleitung
-
-
-
-
-
-
-
-
-