Compass 12/24/230 V Compressor Cooling Box Benutzerhandbuch
- Typ
- Benutzerhandbuch

item 07 090 - 30 L - blue
item 07 094 - 30 L - grey
item 07 092 - 50 L - blue
item 07 096 - 50 L - grey
E Compressor cooling box 12 / 24 / 230 V
D Kühlbox 12 / 24 / 230 V
H Hűtőtáska 12 / 24 / 230 V
C Chladicí box kompresorový 12 / 24 / 230 V
S Chladiaci box kompresorový 12 / 24 / 230 V

2
E
Compressor cooling box 12 / 24 / 230 V
User manual
1. Features:
źHigh efficiency DC inverter compressor and conversion module with high reliability and long life.
źFluoride-free insulation with good heat preservation performance and low energy consumption.
ź12/24VDC and 110~240VAC power supply, allow use in the car or at home.
źCompressor delay protection
źQuick cooling to -20℃(based on 25℃ ambient temperature).
źIntelligent car battery protection system.
źDual door opening direction.
źWide range electronic temperature control.
2. Safety instructions
źWarning: Do not attempt or continue to operate your unit if it is wet. The installation of the DC
power source in the boat should be handled by the qualified personnel.
źMake sure the voltage is within the correct range for socket and cable being used. The technical
data label on the side of the unit shows the voltage ranges.
źNo electrical devices inside the refrigerator as they may be damaged.
źDuring transportation, slope less than 45° and handle carefully.
źYour unit requires good ventilation, allow the following free space for the air circulation: Back:
200mm Side:100mm
źThe unit must be placed in dry and ventilated place which is far from heat source (such as stove,
flue) and avoid direct sun-shine.
źIt is recommended to operate the unit on a flat surface. Maximum operation angle is 30°.
źOne piece inner tank allows water filled, but no allows pouring out water by invert the unit. Keep
the shells of the unit drying after rained. Not allow dump the unit in the water.
źAlthough the units has been cleaned before leaving factory, we strongly recommend to use soft
cloth dampened with warm water and a little neutral detergent to clean it again, after that wipe it
with dry soft cloth.( Warning: Electrical parts can be wiped by dry cloth only)
źWarning: Do not allow children to play games with the refrigerator such as climbing or standing
in the refrigerator. They could damage the refrigerator and seriously injure themselves.

3
E
3. Functions and operation setting.
3.1 Power supply: 12/24V DC or 110~240V AC (enclose adapter).
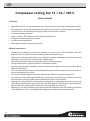
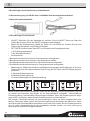
3.2 Power cable connection:
3.3 Operation setting:
źON/OFF: Connect to the power; press the ON/OFF button to start the unit. Press the ON/OFF
button again, the unit is turn off.
źPress the button Δ UP or ▽DOWN button to adjust target temperature. Press the button Δ to
increase or the button ▽to decrease the temperature.
ź“SET” BUTTON: Press the button “SET” to enter the economy running mode:
1. ECO (Energy-saving mode)
2. HH (Quick cooling mode)
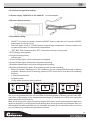
źIndicator light:
1. Power indicator light in red: the compressor is stopped.
2. Power indicator light in Green: the compressor is working.
3. Eco/Max indicator light in red: quick cooling mode is working.
4. Eco/Max indicator light in green: Energy-saving cooling mode is working.
źBattery Protection: Selecting the L, M, H positions, you can choose different levels for battery
protection. When the unit is on working, press the “SET” button for 3S, then the LED will display
as below:
źL: Low power protection.
źM: Middle power
źH: High power protection (factory default)
When the unit is connect to the car, we suggest you setting the battery protection to (H) level. (M)
and (L) are suggested when the unit is connect to the backup battery. Different car may have diffe-
rent power output voltage. If the voltage protection display (F1 display in the LED), then setting the
battery portection from H to M or L.
Most car will stop power supply if engine is stopped. But some car will continue power supply even
engine is stopped. If your refrigerator is still working when the engine of the car is stopped, then you
should adjust the battery protection to (H), otherwise, the power of your car battery may run out and
your car battery may not have enough power to start car.

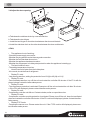
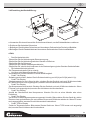
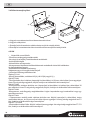
3. 4 Adjust the door opening:
a. Take down the stainless chain by cross screwdriver
b. Take down the two hinges
c. Install the two hinges on the other size between the door and the tank.
d. Install the stainless chain on the other size between the door and the tank.
4. FAQ
źThe appliance is out of working:
-Check the power supply connection
-Whether the plug and the socket have a good connection.
-Whether the fuse has been burned out.
-Whether the appliance has been turned on
-Whether the compressor is in delay start protection when the appliance is starting up.
źThe food inside is frozen:
-The setting temperature is too low.
źHear the sound of water from the inside place.
-It is normal, due to the flow of refrigerant.
źDisplay F1 code
-Low power protection, setting the protection from H3 (H) to H2 (M) or H1 (L)
źDisplay F2 code
-Fan overload protection, turn off the unit and restart the unit after 30 minutes. If the F2 is still dis-
played, please contact the after-sales person.
źDisplay F3 code
-The compressor protection is activated. Please turn off the unit and restart the unit after 30 minute-
s. If the F3 is still displayed, please contact the after-sales person.
źDisplay F4 code
-Compressor controller unit failure. Contact a dealer, seller or a special service.
źDisplay F5 code
-Compressor controller module protection is activated. Please turn off the unit, keep it at ventilated
place and restart the unit after 30 minutes. If the F5 code is still displayed, please contact the after-
sales person.
źDisplay F7/F8 code
-Temperature sensor error. Please restart the unit. If the F7/F8 code is still displayed, please con-
tact the after-sales person.
4
a)
b)
c)
d)
E

5
5. Food storage
źFreezer (below -20℃)
-Meat should be cut and wrapped tightly, and then averagely placed in the freezer.
-After buying frozen food, put it in the freezer as soon as it is still in frozen condition.
-Do not put the fresh food and frozen food together.
-Do not put the fruit and vegetable in the freezer to avoid freeze-drying.
-Do not put the glass container or other container with sealed liquid in freezer. Or there is a possibili-
ty of explosion.
źRefrigerator (0℃ ~10℃)
-Eggs, butter, milk and bottled drink can be put in refrigerator.
-Fruit and vegetable should be put in the crisper for moisture retaining.
-Hot food should be cooled down before it’s placed in, which could help to save power.
-Food must be packed into fresh keeping bags. Leaving space between packaged foods to keep
the circulation of cool air.
6. Defrosting
źAfter the refrigerator working for a period, frost could be seen on surfaces in the freezer,
which reduces refrigerating effect and increases power consumption. In the case, you
need to defrost it.
źUnplug the refrigerator and open the doors, take the food from the refrigerator to cool place.
Use defrosting shovel to remove ice and frost (also can just let the door open, then ice and
frost will be thawed by the raising temperature). Then use dishtowel to wipe off the ice
water. After that, place the food back to the refrigerator and plug it in power supply.
Note: Do not use sharp metal tools to defrost which will damage the refrigerator.
7. Care and cleaning
Unplug the refrigerator before cleaning!
źUse soft cloth dampened with warm water to wipe the inner surfaces and external
appearance of the refrigerator.
źUse neutral detergent to clean the heavy stains, and dry with clean soft cloth.
źFor long vacation or absences, remove food and unplug the refrigerator. Clean the
refrigerator and leave the doors open a little. Then place the refrigerator in ventilated
place.
NOTE: Do not sprinkle water on the refrigerator during cleaning because that would
reduce the insulating property of electrical components and erode the metal parts.
źDo not use cleansers containing corrosive and deliquescent material ( such as
scouring powder, bleach, soap powder, alkaline cleansers, benzene, gasoline, acid,
hot water and etc.) to clean the appearance panels, door gaskets and plastic parts.
E

6
8. Following situations are normal
źThe flow of refrigerant through the evaporator may create a boiling or gurgling sound.
źIn the raining and high humidity weather, moisture may form on the outside of refrigerator or
door gaskets. You can wipe damp surfaces with dry cloth.
źThe temperature on the back panel may be high (particularly in summer) due to heat emission of
the condenser.
źThe temperature on external surface of the compressor may be high when compressor is wor-
king.
źThe compressor may cause a high hum or pulsating sound when it is at starting or stopping
step.
źIt's normal to hear metal hit noise from compressor when refrigerator is bumped.
10. Guidelines for protection of the environment
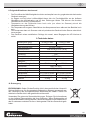
DISPOSAL: Do not dispose this product as unsorted municipal waste. Collection of such
waste separately for special treatment is necessary.
Meaning of crossed-out wheeled dustbin: Do not dispose of electrical
appliances as unsorted municipal waste. Use separate collection
facilities.
Contact your local government for information regarding the collection
systems available.
If electrical appliances are disposed of in landfills or dumps,
hazardous substances can leak into the groundwater and get into the
food chain, damaging your health and well-being.
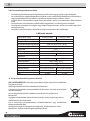
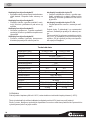
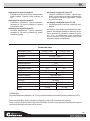
9.Technical specification:
type (blue / grey) 07 090 / 07 094 07 092 / 07 096
inner volume 30 L 50 L
power supply 12 / 24 V =; 230 V ~
power max. 45 W (3,75 A / 1,87 A)
protection class III
fuse 15A
climate class T/ST/N/SN
energy rating A++ A++
category 1
annual energy consumption 67 kWh 75 kWh
cooling range +20°C to -20°C
ambient temperature +10°C to +43°C
noise level 46 dB(A)
external dimensions 57,5 x 36,5 x 36 cm 57,5 x 36,5 x 50 cm
cooling fluid R134a (32g) R134a (36g)
weight 12,9 kg 15,1 kg
E

Kühlbox 12 / 24 / 230 V
BEDIENUNGSANLEITUNG
1. Funktionen:
źHocheffizienter DC Inverter Kompressor und Wandlermodul mit hoher Verlässlichkeit und
Langlebigkeit.
źFluoridfreie Isolierung mit guter Wärmeerhaltung und niedrigem Energieverbrauch.
ź12/24 V DC und 110-240 V AC Stromversorgung ermöglicht die Verwendung im Auto und zu
Hause.
źKompressor Verzögerungsschutz.
źSchnelles Kühlen auf-20°C (bei einer Umgebungstemperatur von 25°C).
źIntelligenter Schutz für die Autobatterie.
źBeidseitige Deckelöffnung.
źWeitreichende elektronische Temperaturkontrolle.
2. Sicherheitshinweise
źWarnung: Setzen Sie die Nutzung des Geräts nicht fort, wenn es nass geworden ist. Die
Installation einer DC Stromversorgung auf einem Boot sollte von Fachpersonal vorgenommen
werden.
źVergewissern Sie sich, dass die Spannung mit dem verwendeten Kabel und dem
Netzanschluss übereinstimmt. Das Typenschild an der Seite des Geräts zeigt die Spannungen
an.
źLegen Sie keine elektrischen Geräte in den Kühlschrank, sie könnten beschädigt werden.
źNeigen Sie den Kühlschrank beim Transport nicht mehr als 45° und behandeln Sieihn vorsichti-
g.
źDas Gerät benötigt eine guten Belüftung, lassen Sie wie folgt Platz für die Luftzirkulation:
Rückseite: 200 mm Seite: 100 mm
źDas Gerät muss an einem trockenen, gut belüfteten Platz aufbewahrt werden, entfernt von
jeder Wärmequelle (wie eln Ofen oder einem Kamin). Vermeiden Sledirekte
Sonneneinstrahlung.
źStellen Sie das Gerät auf einen ebenen Untergrund. Der maximale Neigungswinkel für den
Betrieb beträgt 30°.
źDer einteilige innere Behälter darf mit Wasser befällt werden, das Wasser darf aber nicht durch
Kippen des Geräts ausgegossen werden. Nehmen Sie die Abdeckung des Geräts ab, wenn es
nach dem Regen trocknet. Tauchen Sie das Gerät niemals in Wasser ein.
źDas Gerät wurde vor dem Verlassen der Produktion gereinigt, dennoch empfehlen wir eine
erneute Reinigung mit einem feuchten Tuch und etwas Spülmittel. Wischen Sie es
anschließend mit einem weichen Tuch trocken. (Warnung: Elektrische Teile dürfen nur mit
einem trockenen Tuch abgewischt werden)
źWarnung: Erlauben Sie Kinder nicht, mit dem Kühlschrank zu spielen, etwa sich darauf oder
hinein zu stellen. Sie könnten den Kühlschrank beschädigen und sich verletzen.
7
D

8
D
3. Einstellungen für die Funktionen und den Betrieb
3.1 Stromversorgung: 12/24V DC oder 110-240VAC über das mitgelieferte Netzteil.
3.2 Anschluss des Netzkabels:
3.3 Einstellungen für den Betrieb:
źON/OFF: Schließen Sie das Netzkabel an; drücken Sie die ON/OFF Taste zum Start des
Geräts. Bei erneuten Druck auf ON/OFF schaltet sich das Gerät ab.
źStellen Sie die Zieltemperatur mithilfe der Tasten UP und DOWN ein. Drücken Sie UP zum
Erhöhen der Temperatur und DOWN zum Senken.
źSET TASTE Drücken Sie die Taste SET zurn Einstellen des Energiesparmodus:
ź1.ECO (Energiesparmodus)
ź2.HH (Schnellkühlmodus)
źKontrollleuchte:
1. Betriebskontrolleuchte leuchtet rot: Der Kompressor ist angehalten.
2. Betriebskontrolleuchte leuchtet grün: Der Kompressor arbeitet.
3. Eco/Max Kontrollleuchte leuchtet rot: Schnellkühlmodus ist eingestellt.
4. Eco/Max Kontrolleuchte leuchtet grün: Energiesparmodus ist eingestellt.
źBatterieschutz: Wählen Sie die Ebene des Batterieschutzes über die Einstellungen L, M und H.
Drücken Sie dazu bei eingeschaltetem Gerät 3s lang die SET Taste, das LED Display zeigt fol-
gendes an:
źL: Niedriger Entladungsschutz
źM: Mittlerer Entladungsschutz
źH: Hoher Entladungsschutz (Werkseinstellung)
Wenn Sie das Gerät Im Auto verwenden, sollten Sie den Batterieschutz auf (H)einstellen. (M) und
(L) werden bei Anschluss des Geräts an die Reservebatterie empfohlen. Unterschiedliche
Fahrzeuge können unterschiedliche Spannungen aufweisen. Wenn der Entladungsschutz ange-
zeigt wird (F1 im Display), stellen Sie den Entladungsschutz von H auf M oder L.
Die meisten Fahrzeuge beenden die Stromversorgung, wenn der Motor ausgeschaltet wird.
Manche Fahrzeuge setzen jedoch die Stromversorgung nach Abschalten des Motors fort. Wenn
der Kühlschrank nach Abschalten des Motors immer noch läuft, sollten Sie den Entladungsschutz
auf (H) stellen. Andernfalls könnte die Autobatterie entladen werden und nicht mehr genug
Spannung zum Starten des Wagens behalten.

3. 4 Einstellung der Deckelöffnung:
a. Verwenden Sie einen Kreuzschlitz-Schraubenschlüssels, um die Edelstahlkette zu entfernen
b. Entfernen Sie die beiden Scharniere
c. Befestigen Sie die beiden Scharniere auf der anderen Seite zwischen Deckel und Behälter.
d. Befestigen Sie die Edelstahlkette auf der anderen Seite zwischen Deckel und Behälter.
4. FAQ
źDas Gerät arbeitet nicht:
-Überprüfen Sie die Verbindung der Stromversorgung:
-Überprüfen Sie die Verbindung zwischen Stecker und Buchse.
-Überprüfen Sie die Sicherung.
-Llberprüfen Sie, ob das Gerät eingeschaltet ist.
-Überprüfen Sie, ob sich der Kompressor in der Startverzögerung beim Start des Geräts befindet.
źDie Lebensmittel sind gefroren:
-Die Temperatureinstellung ist zu niedrig.
źVon Innen sind Wassergeräusche zu hören:
-Es handelt sich um den normalen Fluss der Kühlflüssigkeit.
źCode F1 Im Display
-Entladungsschutz aktiv, ändern Sie die Schutzeinstellung von H3 (H) auf H2 (M) oder H1 (L).
źCode F2 im Display
-Überlastungsschutz des Lüfters ist aktiv, schalten Sie das Gerät ab und nach 30 Minuten wieder
ein. Wenn F2 immer noch angezeigt wird, wenden Sie sich bitte an den Kundendienst.
źCode F3 im Display
-Der Kompressorschutz ist aktiv. Schalten Sie das Gerät ab und nach 30 Minuten wieder ein. Wenn
F3 immer noch angezeigt wird, wenden Sie sich bitte an den Kundendienst.
źCode F4 im Display
-Ausfall der Steuereinheit des Kompressors. Wenden Sie sich an einen Händler oder einen
Fachdienst.
źCode F5 im Display
-Der Schutz für das Kompressorsteuerungsmodul ist aktiv. Bitte schalten Sie das Gerät ab, stellen
Sie es an einen gut belüfteten Ort und schalten Sie es nach 30 Minuten wieder ein. Wenn F5 immer
noch angezeigt wird, wenden Sie sich bitte an den Kundendienst.
źCode F7/F8 im Display
-Fehler im Temperatursensor. Bitte starten Sie das Gerät neu. Wenn F7/F8 immer noch angezeigt
wird, wenden Sie sich bitte an den Kundendienst.
a)
b)
c)
d)
D
9

5. Aufbewahrung von Lebensmitteln
źGefriergerät (unter -20°C)
-Fleisch sollte geschnitten und fest verpackt werden, dann wird es gleichmäßig im Gefriergerät
verteilt.
-Legen Sie tiefgekühlt gekaufte Lebensmittel im noch tiefgekühlten Zustand in das Gefriergerät.
-Bewahren Sie frische und tiefgekühlte Lebensmittel nicht gemeinsam auf.
-Legen Sie keine Früchte und kein Gemüse in das Gefriergerät, um Gefrierbrand zu vermeiden.
-Legen Sie keine Glasbehälter oder andere versiegelte, mit Flüssigkeit gefüllte Behälter in das
Gefriergerät. Es besteht Explosionsgefahr.
źKühlschrank (0°C - 10°C)
-Eir, Butter, Milch und gekühlte Getränke können Sie In den Kühlschrank legen.
-Um die Feuchtigkeit von Obst und Gemüse zu erhalten, können Sie den Kühlschrank als
Gemüsefach einstellen.
-Lassen Sie heiße Lebensmittel abkühlen, bevor Sie diese in den Kühlschrank legen.
-Verpacken Sie Lebensmittel in Frischhaltebeutel. Lassen Sie Platz für die Luftzirkulation zwischen
den Lebensmitteln.
6. Abtauen
źNachdem der Kühlschrank längere Zeit in Betrieb war, bildet sich Eis auf den Oberflächen des
Gefriergeräts, Die Kühlleistung wird dadurch reduziert und der Energieverbrauch steigt. Sie
sollten den Kühlschrank nun abtauen.
źTrennen Sie die Stromversorgung und öffnen Sie den Deckel, legen Sie die Lebensmittel aus
dem Kühlschrank an einen kühlen Ort. Verwenden Sie die Abtauschaufel, um Eis und Schnee
zu entfernen (sie können auch einfach den Deckel offen lassen und das Eis taut durch die
Temperaturerhöhung ab). Nehmen Sie das Eiswasser mit einem Küchentuch auf. Legen Sie
anschließend die Lebensmittel wieder in den Kühlschrank und schließen Sie diesen an.
Anmerkung: Das verwenden scharfer Gegenstände beim Abtauen kann den Kühlschrank
beschädigen.
7. Pflege und Reinigung
Ziehen Sie vor der Reinigung den Netzstecker des Kühlschranks!
źVerwenclen Sle ein weiches, mit warmem Wasser angefeuchtetes Tuch zur Reinigung cler
inneren uncl ingeren Oberflächen.
źVerwenrien Sie einen neutralen Reiniger zum Entfernen stärkerer Flecken, trocknen Sie
anschließend mit einem weichen Tuch nach.
źEntfernen Sie bei Magerer Ninst-Benutzung die Lebensmittel und trennen SM die
Stromversorgung, Reinigen sie den Kühlschrank und lassen Sie den Deckel einen
Spaltgeöffnet. Stellen Sie den Kühlschrank dann an einen gut belüfteten Ort. ANMERKUNG:
Spritzen gie beirn Reinigen kein Wasser auf den errelscerenk, es kenn die Isolierung elek-
trischer Zelle reduzieren und rdetel.ileangrellen.
Verwenden: keine Reinlgungsmittel mit korro5iven oder abrasiven en (me Scheuerpulver, Weiche,
Seifenpulver, alkalische Reiniger, Benn,c All. hol, Saure, heißes Wasser etck, um die Oberflächen
Türrheinngen und Plasti.e. eureinigen.
D
10

8. Folgende Situationen sind normal
źDer Durchfluss tler Mühlflüssigkeinlurch den verclampfer kenn ein gurgelndes oder kochendes
Geräusch erzeugen.
źIm Regen und bei hoher Luftfeuchtigkeit kann sich ein Feuchtigkeinfilm an der äußeren
Oberfläche des Kühlschranks und an den Dichtungen bilden. SM können die feuchten
Oberflächen mit einem Tuch abwischen.
źTemperatur an der Rückseite kann hoch sein (vor allem Im Sommer) durch die
Hitzeabsonderung des Kühlers.
źDie Temperatur der augeren Oberflächen des Kompressors kann während des Betriebs hoch
sein.
źDer Kompressor kann ein Summen oder ein pulsierendes Geräusch beim Starren orlerAnhal-
ten erzeugen.
źDas Geräusch eines metallIschen Schlags Ist normal, wenn Biegegen den KD hIschra nk
stoße.
10. Entsorgung
ENTSORGUNG: Geben Sie das Produkt nicht in den gewöhnlichen Hausmüll.
Solcher Abfall muss für die gesonderte Behandlung getrennt gesammelt wer-
den. Bedeutung des durchgestrichenen Mülleimers auf Rädern: Geben Sie
elektrische Gerate nicht in den gewöhnlichen Hausmüll.
Verwenden Sie getrennte Sammeleinrichtungen. Erfragen Sie Informationen
zu den örtlichen Sammelstellen bei Ihren Behörden. Wenn Elektrogeräte auf
normalen Müllhalden entsorgt werden, renbenesnmgejähi rliche Substanzen in
das Grundwasser und damit in die n e kette geraten und Ihre Gesundheit gefa-
hrden.
9.Techniche daten:
Modell (blue / grey) 07 090 / 07 094 07 092 / 07 096
Innenvolumen 30 L 50 L
Energieversorgung 12 / 24 V =; 230 V ~
Stromverbauch max. 45 W (3,75 A / 1,87 A)
Schutzklasse III
Sicherung 15A
Klimaklasse T/ST/N/SN
Energiebewertung A++ A++
Kategorie 1
Jährlicher Energieverbrauch 67 kWh 75 kWh
Kühlbereich +20°C zu -20°C
Umgebungstemperatur +10°C zu +43°C
Geräuschpegel 46 dB(A)
Außenmaße 57,5 x 36,5 x 36 cm 57,5 x 36,5 x 50 cm
Kühlflüssigkeit R134a (32g) R134a (36g)
Gewicht 12,9 kg 15,1 kg
D
11

Kompresszor hűtődoboz 12/24/230 V
Használati utasítás
1. Jellemzők:
źNagy hatékonyságú DC inverter kompresszor és átalakító modul nagy megbízhatósággal és
hosszú élettartammal.
źFluoridmentes szigetelés jó hő megőrzéssel és alacsony energiafelhasználással.
ź12 / 24VDC és 110 ~ 240VAC tápegység, lehetővé teszi a használatot az autóban vagy otthon.
źKompresszor késleltetés elleni védelem
źGyors hűtés -20 ℃ (25 ℃ környezeti hőmérsékleten alapul).
źIntelligens autó-akkumulátor-védelmi rendszer.
źKettős ajtónyitási irány.
źSzéles tartományú elektronikus hőmérsékletszabályozás.
2. Biztonsági utasítások
źFigyelmeztetés: Ne próbálja meg vagy folytassa a készülék üzemeltetését, ha nedves. Az egye-
náramú tápegység felszerelését a hajóban a szakképzett személyzet kezelheti.
źGyőződjön meg róla, hogy a feszültség a megfelelő aljzaton belül van. A készülék oldalán
található műszaki adatok címkéje mutatja a feszültségtartományokat.
źNincs elektromos eszköz a hűtőszekrényben, mert károsodhat.
źA szállítás során a lejtés kevesebb, mint 45 ° és óvatosan kezelje.
źA készülék megfelelő szellőzést igényel, engedje szabadon a következő szabad területet a
levegő keringtetéséhez: Hátul: 200 mm Oldal: 100 mm
źA készüléket száraz és szellőztetett helyiségben kell elhelyezni, amely távol van a hőforrástól
(pl. Tűzhely, füstgáz), és elkerülje a közvetlen napfényt.
źJavasoljuk, hogy a készüléket sima felületen használja. A maximális működési szög 30 °.
źAz egyrészes belső tartály lehetővé teszi a víz feltöltését, de nem teszi lehetővé a víz kiöntését
a készülék invertálásával. A készülék héjait az eső után le kell szárítani. Ne engedje, hogy a
készüléket a vízbe dobja.
źAnnak ellenére, hogy a készülékeket a gyár elhagyása előtt megtisztították, erősen javasoljuk,
hogy puha ruhát használjon meleg vízzel és kevés semleges tisztítószerrel, hogy tisztítsa meg
újra, majd törölje száraz, puha ruhával. (Figyelmeztetés: Az elektromos részeket száraz csak
ruhával)
źFigyelmeztetés: Ne hagyja, hogy a gyerekek a hűtőszekrénnyel játsszanak játékokat, mint pél-
dául a hegymászás vagy a hűtőszekrényben való tartózkodás. Károsíthatják a hűtőszekrényt,
és súlyosan megsérülhetnek.
12
H

13
H
3. Funkciók és működési beállítások.
3.1 Tápellátás: 12 / 24V DC vagy 110 ~ 240V AC (csatolja az adaptert).
3.2 Tápkábel csatlakozás:
3.3 Üzemeltetési beállítás:
źON / OFF: Csatlakoztatás a tápfeszültséghez; nyomja meg az ON / OFF gombot a készülék
indításához. Nyomja meg újra az ON / OFF gombot, a készülék kikapcsol.
źNyomja meg a Δ UP vagy a ▽ DOWN gombot a célhőmérséklet beállításához. Nyomja meg a Δ
gombot a növeléshez, vagy a ▽ gombot a hőmérséklet csökkentéséhez.
ź"SET" GOMB: Nyomja meg a "SET" gombot a gazdaságos üzemmódba való belépéshez:
ź1. ECO (energiatakarékos üzemmód)
ź2. HH (gyors hűtés üzemmód)
źJelző lámpa:
ź1. Tápellátás jelzőfény pirosan: a kompresszor leáll.
ź2. Tápellátás jelzőfény zölden: a kompresszor működik.
ź3. Eco / Max jelzőfény pirosan: a gyors hűtés üzemmód működik.
ź4. Eco / Max jelzőfény zölden: Az energiatakarékos hűtés üzemmód működik.
źAkkumulátorvédelem: A (L), (M), (H) pozíciók kiválasztásával különböző szinteket választhat ki
az akkumulátorvédelemhez. Amikor az egység működik, nyomja meg a "SET" gombot 3S-re,
majd a LED a következőképpen jelenik meg:
źL: Alacsony teljesítményvédelem.
źM: Közép hatalom
źH: Nagy teljesítmény védelem (gyári alapbeállítás)
Ha a készülék csatlakozik az autóhoz, azt javasoljuk, hogy az akkumulátorvédelmet (H) szintre
állítsa be. (M) és (L) akkor javasolt, ha a készülék a tartalék akkumulátorhoz csatlakozik. A külön-
böző autók eltérő teljesítményfeszültséggel rendelkezhetnek. Ha a feszültségvédő kijelző (F1
megjelenik a LED-ben), akkor állítsa be az akkumulátor pozícióját a H-ról a M-re vagy a L-re.
A legtöbb autó leállítja az áramellátást, ha a motor leáll. De néhány autó folytatja a tápellátást, még
a motor is leáll. Ha a hűtőszekrény még mindig működik, amikor az autó motorja le van állítva, akkor
állítsa az akkumulátorvédőt a (H) állásba, ellenkező esetben az autó akkumulátorának teljesítmé-
nye elfogyhat, és az autó akkumulátorának nincs elegendő teljesítménye autó.

3. 4 Állítsa be az ajtónyílást:
a. Vegye le a rozsdamentes láncot keresztcsavarhúzóval
b. Vegye le a két pántot
c. Szerelje fel a két zsanérot a másik méretre az ajtó és a tartály között.
d. Szerelje fel a rozsdamentes láncot a másik méretre az ajtó és a tartály között.
4. GYIK
źA készülék nem működik:
- Ellenőrizze a tápegység csatlakozását
-Ha a dugó és az aljzat jó csatlakozással rendelkezik.
-Az biztosíték kiégett.
-A készülék be van kapcsolva
-A kompresszor késleltetett indításvédelemmel rendelkezik a készülék indításakor.
Az étel belsejében fagyott:
-A beállítási hőmérséklet túl alacsony.
Hallgassa meg a víz hangját a belső helyről.
- Normál a hűtőközeg áramlása miatt.
Display F1 kód
-Könnyű áramellátás, a védelem H3 (H) -tól H2 (M) vagy H1 (L)
Kijelző F2 kód
-Fan túlterhelés elleni védelem, kapcsolja ki a készüléket, és 30 perc után indítsa újra az egységet.
Ha az F2 még mindig megjelenik, kérjük, forduljon az értékesítés utáni személyhez.
Kijelző F3 kód
-A kompresszor védelme aktiválva van. Kapcsolja ki a készüléket, és indítsa újra a készüléket 30
perc elteltével. Ha az F3 még mindig megjelenik, kérjük, forduljon az értékesítés utáni személyhez.
Kijelző F4 kód
-Kompresszor vezérlőegység meghibásodása. Lépjen kapcsolatba egy kereskedővel vagy egy
speciális szervizzel.
Kijelző F5 kód
- A kompresszor vezérlő modul védelme aktiválva van. Kérjük, kapcsolja ki a készüléket, tartsa
szellőztetett helyen, és 30 perc múlva indítsa újra az egységet. Ha még mindig megjelenik az F5
kód, forduljon az értékesítést végző személyhez.
Kijelző F7 / F8 kód
-Hőmérséklet-érzékelő hiba. Kérjük, indítsa újra az egységet. Ha még mindig megjelenik az F7 / F8
kód, forduljon az értékesítés utáni személyhez.
a)
b)
c)
d)
14
H

5. Élelmiszer tárolás
źGefriergerät (unter -20°C)
Fagyasztó (-20 ° C alatt)
- A húst vágni és szorosan be kell húzni, majd átlagban a fagyasztóba kell helyezni.
-A fagyasztott élelmiszer felvásárlása után helyezze be a fagyasztóba, amint még mindig fagyott
állapotban van.
- Ne tegye a friss élelmet és a fagyasztott ételeket.
-A fagyasztva szárítás elkerülése érdekében ne tegye a gyümölcsöt és a zöldséget a fagyasztóba.
- Ne tegye az üvegtartályt vagy más tartályt zárt folyadékkal a fagyasztóba. Vagy lehetőség van
robbanásra.
Hűtőszekrény (0 ℃ ~ 10 ℃)
- A tojásokat, a vajat, a tejet és a palackozott italokat hűtőszekrénybe lehet tenni.
- A gyümölcsöt és a növényeket a legmélyebbre kell helyezni a nedvesség megőrzése érdekében.
- Az ételeket le kell hűteni, mielőtt elhelyezésre kerülne, ami segíthet az energia megtakarításában.
- A terméket friss tartós zsákokba kell csomagolni. A csomagolt élelmiszerek között hagyja a helyet,
hogy megőrizze a hideg levegő áramlását.
6. Felolvasztás
źMiután a hűtőszekrény egy ideig működött, a fagyasztó felületén fagy látható,
źamely csökkenti a hűtőteljesítményt és növeli az energiafogyasztást. Ebben az esetben ön
źmeg kell leolvasztani.
źHúzza ki a hűtőszekrényt, és nyissa ki az ajtókat, húzza le a hűtőszekrényből az ételeket.
źHasználja a leolvasztó lapátot, hogy eltávolítsa a jeget és a fagyot (szintén hagyja nyitva az
ajtót, majd jeget és
źa fagyot a felemelkedési hőmérséklet felolvasztja). Ezután használjon konyharuhát, hogy
törölje le a jeget
źvíz. Ezután helyezze vissza az ételt a hűtőszekrénybe, és dugja be a tápegységbe.
źMegjegyzés: Ne használjon éles fémszerszámokat a leolvasztáshoz, ami károsíthatja a hűtős-
zekrényt.
7. Ápolás és tisztítás
Tisztítás előtt húzza ki a hűtőszekrényt!
A belső felületeket és a külső felületeket törölje le meleg vízzel nedvesített puha ruhával
a hűtőszekrény megjelenése.
Ne használjon semleges mosószert a nehéz foltok tisztításához, és tiszta puha ruhával tisztítsa
meg.
Hosszú nyaralás vagy távollét esetén vegye le az élelmiszereket és húzza ki a hűtőszekrényt.
Tisztítsa meg a hűtőszekrény, és hagyja nyitva az ajtót egy kicsit. Ezután helyezze a hűtőszekrényt
szellőztetett helyre hely.
MEGJEGYZÉS: Ne tisztítsa meg a vizet a hűtőszekrényben tisztítás közben, mert ez lenne
csökkenti az elektromos alkatrészek szigetelési tulajdonságait és a fémrészeket.
Ne használjon maró hatású és elfolyósodó anyagot tartalmazó tisztítószereket (pl
súrolópor, fehérítő, szappanpor, alkáli tisztítók, benzol, benzin, sav,
forró víz stb.) a kültéri lapok, az ajtótömítések és a műanyag alkatrészek tisztításához.
15
H

8. A következő helyzetek normálisak
źA hűtőközeg áramlása az elpárologtatón keresztül forrás vagy gurgling hang keletkezhet.
źAz esőzések és a magas páratartalmú időjárás esetén nedvesség keletkezhet a hűtőszekrény
vagy az ajtótömítések külső oldalán. Nedves felületeket törölhet száraz ruhával.
źA hátsó panel hőmérséklete magas lehet (különösen nyáron) a kondenzátor hőkibocsátása
miatt.
źA kompresszor külső felületén a hőmérséklet magas lehet, ha a kompresszor működik.
źA kompresszor magas zümmögést vagy lüktető hangot okozhat, amikor az indítási vagy leállí-
tási lépésnél van.
źNormális, ha a hűtőszekrény ütközéskor hallja a kompresszor fém ütőhangját.
10. Iránymutatások a környezet védelmére
HULLADÉKKEZELÉS: Ne dobja a terméket selejtlen települési hulladékként.
Gyűjteménye ilyen
Különleges kezelésre külön hulladékot kell használni.
A kerekes szeméttároló kereszteződésének jelentése: Ne dobja el az elektro-
mos berendezést
mint a válogatott települési hulladék. Használjon külön gyűjteményt
felszerelés.
A gyűjtéssel kapcsolatos információkért forduljon a helyi önkormányzathoz
rendelkezésre álló rendszerek.
Ha az elektromos berendezéseket hulladéklerakókban vagy hulladéklera-
kókban ártalmatlanítják,
veszélyes anyagok szivároghatnak a talajvízbe, és bejuthatnak a vízbe
tápláléklánc, ami károsítja az egészségét és a jólétet.
9.Műszaki adatok:
Típus (blue / grey) 07 090 / 07 094 07 092 / 07 096
Belső hangerő 30 L 50 L
Energiaellátás 12 / 24 V =; 230 V ~
Villamosenergia-fogyasztás max. 45 W (3,75 A / 1,87 A)
Védelmi osztály III
Biztosíték 15A
Klímaosztály T/ST/N/SN
Energia Értékelés A++ A++
Kategória 1
Éves energiafogyasztás 67 kWh 75 kWh
Hűtés területén +20°C hogy -20°C
Környezeti hőmérséklet +10°C hogy +43°C
Zaj 46 dB(A)
Külső méretek 57,5 x 36,5 x 36 cm 57,5 x 36,5 x 50 cm
Hűtőfolyadék R134a (32g) R134a (36g)
Súly 12,9 kg 15,1 kg
16
H

Chladicí box kompresorový 12 / 24 / 230 V
Návod k použití
Všeobecná bezpečnost
Chladicí box může být napájen z 12 V nebo 24
V zástrčky automobilů či lodí, nebo z běžné
zásuvky 230 V.
Je vybaven výkonným kompresorem s chladi-
cím médiem a lze jej použít jak jako chladničku
s teplotou 0 – 10°C, tak i jako mrazicí box s
teplovou až -20°C.
Chladicí box nabízí i režim ECO pro úsporu
elektrické energie a Hi mode pro rychlé ochla-
zení obsahu až k -20°C (při okolní teplotě
25°C).
Dále je vybaven inteligentním systémem
ochrany před vybitím připojeného akumuláto-
ru a je osazen displejem s tlačítky pro pohodl-
né ovládání.
Dvířka chladicího boxu jsou variabilní, umož-
ňují jak podélné otvírání, tak i snadnou úpravu
na příčné otevírání. Díky postranním modelům
z odolného plastu je tento box snadno přenos-
ný.
Vnější plášť je proveden z kvalitně lakovaného
hliníku stříbrné barvy, který spolu s perfektní
PU izolací zajišťuje dlouhodobé zachování
stabilní teploty uvnitř boxu a zaručuje velmi
nízkou spotřebu energie.
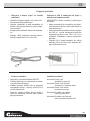
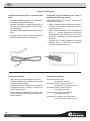
Obsah balení:
źChladicí box
źNapájecí kabel 12/24 V
źAdaptér pro napájení 230 V
źNávod k použití
Přečtěte si důkladně tento návod, než
začnete používat spotřebič. Uschovejte jej
na bezpečném místě pro možné budoucí
použití. Při předání spotřebiče jiné osobě jí
odevzdejte také tento návod k obsluze.
Výrobce nenese žádnou odpovědnost za
poškození vyplývající z nesprávného použití
nebo nesprávné manipulace.
NEBEZPEČÍ!
Na lodích: Pokud je spotřebič napájen ze sítě,
zajistěte, aby mělo napájení správný jistič.
VAROVÁNÍ!
źSpotřebič nepoužívejte, pokud je viditelně
poškozený.
źTento spotřebič smí opravovat pouze kvalifi-
kovaný servisní technik.
źNesprávné opravy mohou vést k nebezpe-
čí.
źOsoby (včetně dětí) s omezenými fyzický-
mi, senzorickými nebo mentálními schop-
nostmi nebo bez dostatečných zkušeností s
obsluhou domácích spotřebičů jej nesmí
ovládat bez dohledu odpovědné osoby.
źElektrická zařízení nejsou hračky.
źDržte a používejte zařízení mimo dosah
dětí.
źNedovolte dětem hrát si se spotřebičem.
źPokud je poškozený přívodní kabel spotře-
biče, musí jej vyměnit výrobce, servisní
středisko nebo podobně kvalifikovaná oso-
ba, aby se zabránilo nebezpečí.
źVe spotřebiči neskladujte žádné hořlavé
předměty jako jsou spreje.
UPOZORNĚNÍ!
źOdpojte spotřebič od elektrické sítě
- před čištěním a údržbou
- po použití
źPotraviny skladujte pouze v originálním
balení nebo vhodných nádobách.
17
C

POZNÁMKA!
źSpotřebič připojujte následovně:
- Pomocí 12/24 V kabelu k zásuvce vozi-
dla (např. k cigaretovému zapalovači)
- Pomocí 230 V adaptéru s kabely do
běžné zásuvky 230 V.
źZkontrolujte, zda parametry napájení na
výrobním štítku odpovídají parametrům v
elektrické síti.
źChladicí zařízení není vhodné pro převoz
žíravých látek obsahujících rozpouštědla.
źPři odpojování od elektrické zásuvky neta-
hejte za kabel.
źPokud je spotřebič připojený k 12/24 V
zásuvce: Odpojte chladničku a jiné elektric-
ké spotřebiče od baterie, než připojíte dobí-
jecí zařízení.
źPokud je spotřebič připojený k 12/24 V
zásuvce: Odpojte spotřebič nebo jej vypně-
te, když vypnete motor.
źV opačném případě může dojít k vybití bate-
rie.
Bezpečná obsluha spotřebiče
NEBEZPEČÍ!
Nedotýkejte se kabelů holýma rukama. To
platí zejména při napájení spotřebiče z 230 V
elektrické sítě.
UPOZORNĚNÍ!
Před zapnutím zařízení se ujistěte, zda je
kabel a zástrčka v pořádku.
POZNÁMKA!
źNepoužívejte elektrická zařízení uvnitř spo-
třebiče, dokud nejsou doporučená výrob-
cem.
źNestavte spotřebič do blízkosti otevřeného
ohně nebo zdrojů tepla (ohřívače, přímé
sluneční záření, plynové trouby apod.). -
Riziko přehřátí!
źZajistěte vždy dostatečné větrání tak, aby
se nehromadilo teplo během provozu.
Ujistěte se, zda je spotřebič v dostatečné
vzdálenosti od zdí a jiných předmětů pro
dostatečnou cirkulaci vzduchu.
źPonechte minimálně volný prostor 10 cm po
stranách a 20 cm na zadní straně.
źNezakrývejte větrací otvory.
źNeplňte vnitřní zásobník ledem ani tekutina-
mi.
źNikdy neponořujte spotřebič do vody.
źChraňte spotřebič a kabel před teplem a
vlhkostí.
źNezapínejte zařízení v případě, že je mok-
ré.
źInstalaci spotřebiče do lodě musí být prove-
dena odborným a kvalifikovaným techni-
kem.
źJe doporučeno používat spotřebič na rov-
ném podkladu a v zapnutém stavu v náklo-
nu menším než 30°.
źPři transportu nenaklápějte více, než pod
úhlem 30°, s výrobkem zacházejte opatrně.
Pokud dojde k většímu naklonění, nechte
vždy spotřebič 24 hodin vypnutý a až pak jej
zapněte.
źSpotřebič je určen výhradně pro vnitřní pou-
žití, nikdy jej nevystavujte vlhkosti.
źPřesto, že bylo zařízení umyto již po montá-
ži, doporučujeme umýt za pomoci utěrky a
horké vody a trochy neutrálního čisticího
prostředku. Po umytí je třeba utřít suchou
utěrkou.
źPozor - elektrické části mohou být myty
pouze suchou utěrkou
18
C

źPřipojení k baterii (např. ve vozidle
nebo lodi)
źSpotřebič můžete napájet z 12 V nebo 24 V.
źPoznámka! Riziko poškození!
źOdpojte chladničku a další spotřebiče od
baterie, než připojíte baterii k rychle dobíje-
címu zařízení.
źPřepětí může poškodit elektroniku spotřebi-
če.
źZapojte 12/24 V kabel zo zásuvky automo-
bilového zapalovače 12 V nebo 24 V.
Připojení k 230 V elektrické síti (např. v
domácnosti nebo kanceláři)
NEBEZPEČÍ! Riziko zasažení elektrickým
proudem!
źNikdy nemanipulujte s konektory ani přepí-
nači mokrýma rukama, nebo když stojíte na
mokrém povrchu.
źPokud používáte spotřebič na lodi s napáje-
ním 230 V~, musíte instalovat přerušovač
zbytkového proudu mezi 230 V AC síť a
spotřebič. Požádejte o pomoc zkušeného
technika.
źPřipojte 230 V kabel adaptéru do běžné
zásuvky 230 V a druhý konec adaptéru při-
pojte k chladicímu boxu.
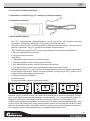
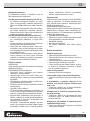
Připojení spotřebiče
źFunkce a ovládání:
źZapínání a vypínání tlačítkem ON/OFF
źTlačítky šipka nahoru a šipka dolu se nasta-
vuje požadovaná teplota.
źKrátkým stiskem tlačítka Set se přepínají
energetické režimy - úsporný režim ECO a
rychlé chlazení HH.
źDlouhým stiskem tlačítka Set po dobu 3
vteřin se nastavuje ochrana před vybitím
připojené baterie.
Indikační osvětlení:
kontrolka Power svítí
spotřebič je zapnutý
kontrolka Power svítí červeně
kompresor v klidovém stavu
kontrolka Power svítí zeleně
kompresor pracuje
kontrolka Eco/Max svítí zeleně
úsporný režim ECo
kontrolka Eco/Max svítí červeně
režim rychlého chlazení HH
19
C

Dvířka chladicího boxu jsou variabilní, umož-
ňují jak podélné otvírání, tak i snadnou úpravu
na příčné otevírání.
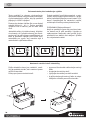
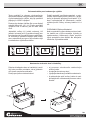
Postup pro úpravu otevírání dveří:
źa) pomocí šroubováku odšroubujte ocelový
řetěz
źb) odpojte oba závěsy dveří
źc) připojte oba závěsy na další umístění
źd) přišroubujte zpět ocelový řetěz do odpo-
vídajícího umístění pomocí šroubováku
Ochrana baterie před nadměrným vybitím
Nastavení otevírání dveří chladničky
a)
b)
c)
d)
20
C
Tento spotřebič je vybaven víceúrovňovým
monitorem baterie, který pomáhá chránit bate-
rii před nadměrným vybitím, když je spotřebič
připojený k 12/24 V napájení.
Postupným stiskem tlačítka Set se na displeji
zobrazí režimy H - M – L. Změnu potvrdíte
vyčkáním cca 10 sekund, pak se vaše volba
uloží.
Jednotlivé režimy L (nízká ochrana), M (střed-
ní ochrana) a H (vysoká ochrana) jsou konci-
povány tak, že pokud klesne napětí baterie ze
které je spotřebič napájen pod určitou mez,
automaticky se vypne, aby nemohlo dojít k
nadměrnému vybití akumulátoru.
Pokud spotřebič používáte zapojený v auto-
mobilu, doporučujeme použít režim H. V přípa-
dě že je spotřebič připojen pouze k baterii 12 V,
kterou nepotřebujete ke startování vozidla,
můžete použít režimy ochrany baterie L a M.
POZNÁMKA! Riziko poškození!
Když se spotřebič vypne díky monitoru bate-
rie, baterie se již plně nenabije. Vyhněte se
opakovanému startování nebo použití jiných
spotřebičů bez delších fází dobíjení. Ujistěte
se, zda je baterie nabitá.
Seite wird geladen ...
Seite wird geladen ...
Seite wird geladen ...
Seite wird geladen ...
Seite wird geladen ...
Seite wird geladen ...
Seite wird geladen ...
Seite wird geladen ...
Seite wird geladen ...
Seite wird geladen ...
Seite wird geladen ...
Seite wird geladen ...
Seite wird geladen ...
Seite wird geladen ...
Seite wird geladen ...
Seite wird geladen ...
-
 1
1
-
 2
2
-
 3
3
-
 4
4
-
 5
5
-
 6
6
-
 7
7
-
 8
8
-
 9
9
-
 10
10
-
 11
11
-
 12
12
-
 13
13
-
 14
14
-
 15
15
-
 16
16
-
 17
17
-
 18
18
-
 19
19
-
 20
20
-
 21
21
-
 22
22
-
 23
23
-
 24
24
-
 25
25
-
 26
26
-
 27
27
-
 28
28
-
 29
29
-
 30
30
-
 31
31
-
 32
32
-
 33
33
-
 34
34
-
 35
35
-
 36
36


Compass 12/24/230 V Compressor Cooling Box Benutzerhandbuch
- Typ
- Benutzerhandbuch
in anderen Sprachen
Verwandte Artikel
Andere Dokumente
-
Electrolux ERF3310AOW Benutzerhandbuch
-
MSW MSW-CRF36A Bedienungsanleitung
-
CHiQ MRF-361W American Fridge Benutzerhandbuch
-
-
-
Hotpoint W84BE 72 X UK 2 Benutzerhandbuch
-
Zanussi ZNB3240 Benutzerhandbuch
-
Whirlpool WB70I 952 X Daily Reference Guide
-
Evolveo a4 Benutzerhandbuch